Nikon AI-S Zoom-NIKKOR ED 200-400mm f-4 – page 2
Manual for Nikon AI-S Zoom-NIKKOR ED 200-400mm f-4
Table of contents
- Notes on Safety Operations
- Observe the following precautions when handling the camera and lens
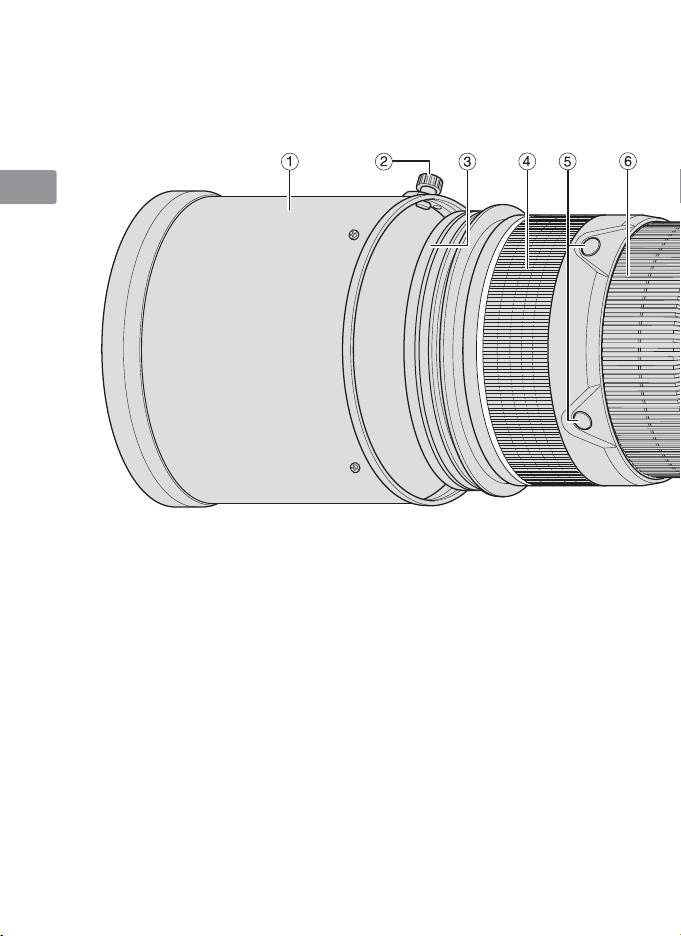
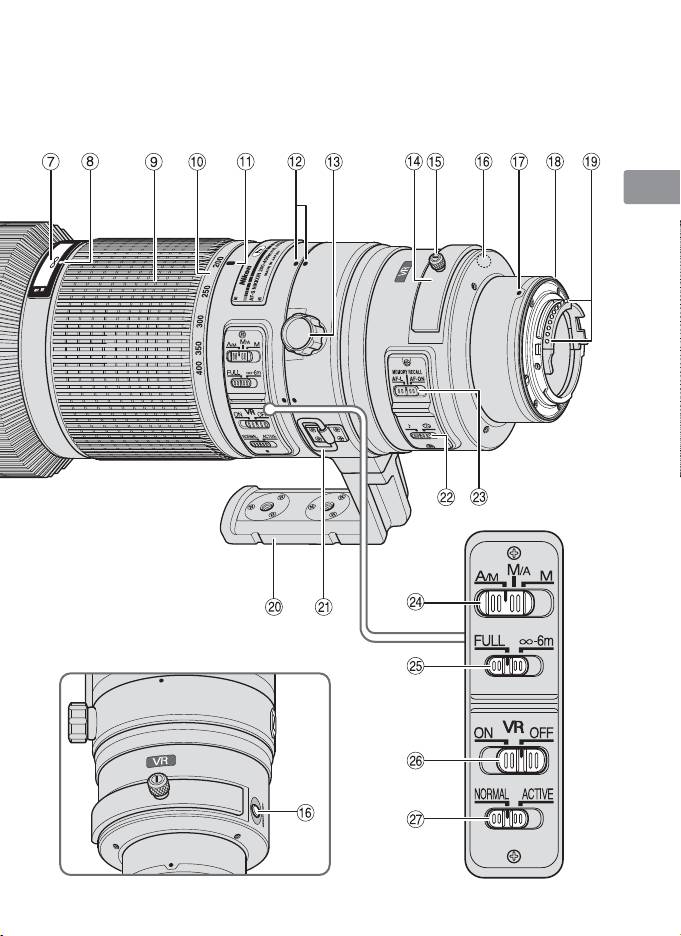
- ■ Nomenclature
- En
- ■ Major features ■ Usable cameras and available functions
- Cameras
- ■ Focusing
- To limit the range of autofocus ■ Focus operation selection switch and focus operation button (See p. 20 for compatible cameras.) Focus lock (AF-L)
- Memory recall (MEMORY RECALL)
- Autofocus (AF) start on the lens (AF-ON) ■ Vibration reduction mode (VR
- Setting the vibration reduction ON/OFF switch Setting the vibration reduction mode switch
- ■ Setting the aperture ■ Focusing, zooming, and depth of field
- ■ Using a built-in rotating tripod collar ■ Using the lens hood ■ Lens protective glass
- ■ The built-in flash and vignetting
- ■ Slip-in filter holder ■ Recommended focusing screens
- ■ Lens care
- ■ Standard accessories ■ Optional accessories ■ Specifications
- Weight: Approx. 3,360 g (7.4 lbs) with lens protective

Exposure
Function
(shooting)
Cameras
mode
Jp
Focus
Memory
AF start on
*1
VR AF
P
SAM
En
lock
recall
the lens
F60-Series/N60*,
F55-Series/N55-Series*,
De
F50-Series/N50*,
—— — — —
✓✓✓✓
F-401x/N5005*,
Fr
F-401s/N4004s*,
F-401/N4004*
Es
F-801s/N8008s*,
F-801/N8008*,
—— — — —
✓✓
——
Se
F-601
M/N6000*
F3AF, F-601/N6006*,
Ru
F-501/N2020**, Nikon
— — — — — ————
MF cameras (except
Nl
F-601
M/N6000*)
It
✓: Possible
—
: Not possible VR: Vibration reduction AF: Autofocus
*Sold exclusively in the USA
Ck
**Sold exclusively in the USA and Canada
*1: P includes AUTO and Vari-Program System (Scene modes).
Ch
*2: Manual (M) is not available.
*3: When the focus operation selection switch is set to AF-ON,
autofocus begins as soon as the focus operation button is pressed
Kr
while the shutter-release button pressed halfway.
*4: Press the memory set button or a focus operation button while
pressing the shutter release button halfway.
*5: Possible, with limited restrictions
21
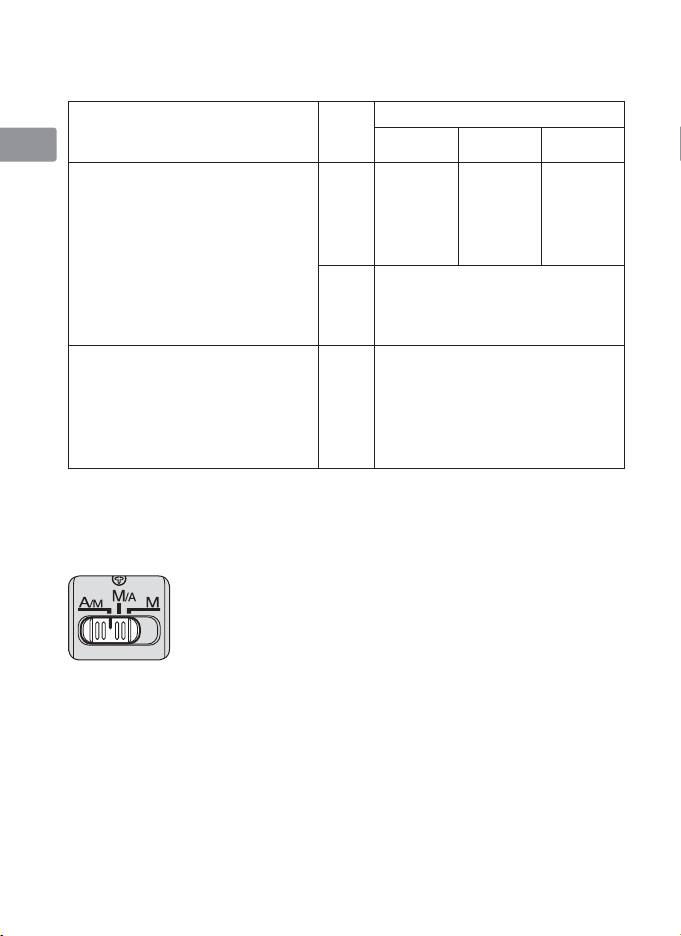
■ Focusing
Set your camera’s focus mode according to the chart below:
Jp
Camera
Lens’ focus mode switch
Cameras
focus
En
A/M M/A M
mode
Nikon digital SLR (Nikon
Autofocus
Autofocus
Manual focus
De
FX/DX format) cameras,
with manual
with manual
(Electronic
F6, F5, F4-Series, F100,
AF
override
override
rangefinder
Fr
F90X/N90s*, F90-Series/N90*,
(AF priority)
(MF priority)
can be used.)
F80-Series/N80-Series*,
F75-Series/N75-Series*,
Es
Manual focus
F70-Series/N70*,
MF
(Electronic rangefinder can be
F65-Series/N65-Series*,
Se
used.)
Pronea 600i/6i*, Pronea S
F60-Series/N60*,
Ru
F55-Series/N55-Series*,
Manual focus
F50-Series/N50*,
AF
(Electronic rangefinder can be
Nl
F-801s/N8008s*, F-801/N8008*,
MF
used, except with the
F-601
M/N6000*, F-401x/N5005*,
F-601
M/N6000*.)
It
F-401s/N4004s*, F-401/N4004*
*Sold exclusively in the USA
Ck
AF: Autofocus MF: Manual focus
Ch
A/M (Autofocus with manual override. AF priority) mode and
M/A (Autofocus with manual override. MF priority) mode
Kr
M/A: Autofocus can be overridden by manually focusing
with the focus ring.
A/M: Autofocus can be overridden by manually focusing
with the focus ring, but focus ring detection
sensitivity is lower than in M/A mode. Use this
mode to avoid canceling the AF setting by
unintentionally moving the focus ring.
a
Set the focus mode switch to A/M or M/A.
b
Autofocus can be manually overridden by rotating the focus ring
while pressing the shutter release button halfway, pressing the
AF-ON button on the camera or pressing a focus operation button
(with focus operation set to AF-ON) on the lens.
22
c
Pressing the shutter release button halfway, pressing the AF-ON
button on the camera again or pressing a focus operation button
on the lens again will cancel manual override and return the lens to
Jp
autofocus mode.
En
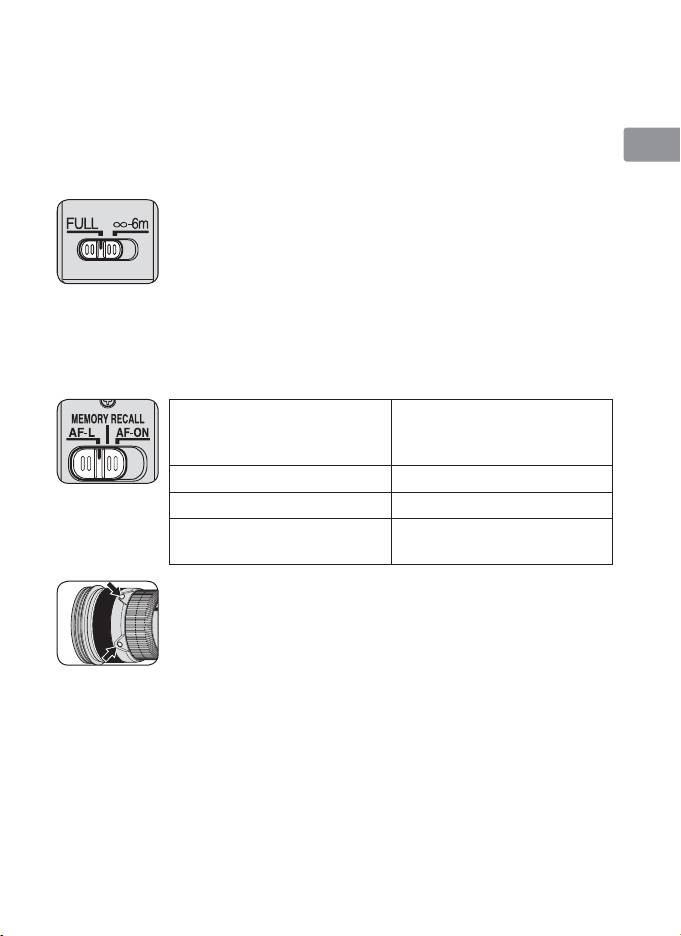
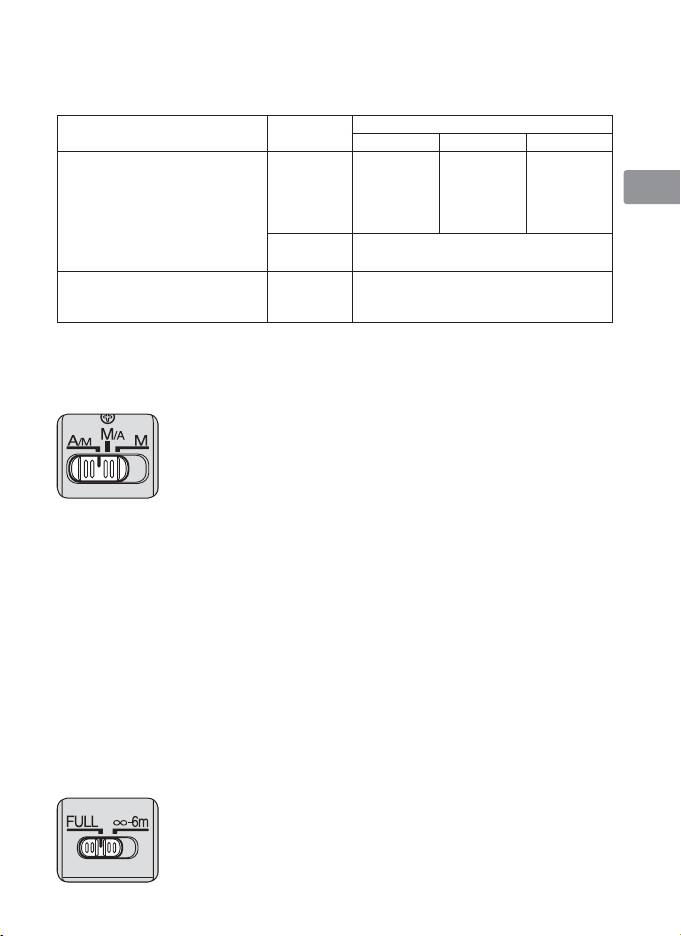
To limit the range of autofocus
This function is only available with autofocus.
De
FULL: If the subject is sometimes closer than 6 m
(19.7 ft), set the switch to FULL.
Fr
∞–6m: If the subject is always 6 m (19.7 ft) or more
away, set the switch to ∞– 6m to reduce
Es
focusing time.
■ Focus operation selection switch and focus operation
Se
button (See p. 20 for compatible cameras.)
Use the focus operation selection switch to choose a function of the
Ru
focus operation buttons.
Nl
Position of focus
Focus operation button
operation selection
function
It
switch
AF-L Focus lock
Ck
MEMORY RECALL Memory recall
AF start (AF-ON) on the
Ch
AF-ON
lens
Kr
• Press one of four focus operation buttons to activate
each function.
• The focus operation button positions can be changed
to suit individual user preferences. For more details
on this, contact your nearest Nikon service center or
representative office.
Focus lock (AF-L)
This function is only compatible with autofocus.
a
Set the focus mode switch to A/M or M/A.
b
Set the focus operation selection switch to AF-L.
c
During autofocus mode, focus can be locked by pressing one of the
focus operation buttons.
• Focus remains locked while a focus operation button is pressed and
held down.
23
• The AF-L function can be engaged either from the camera or from
the lens.
Jp
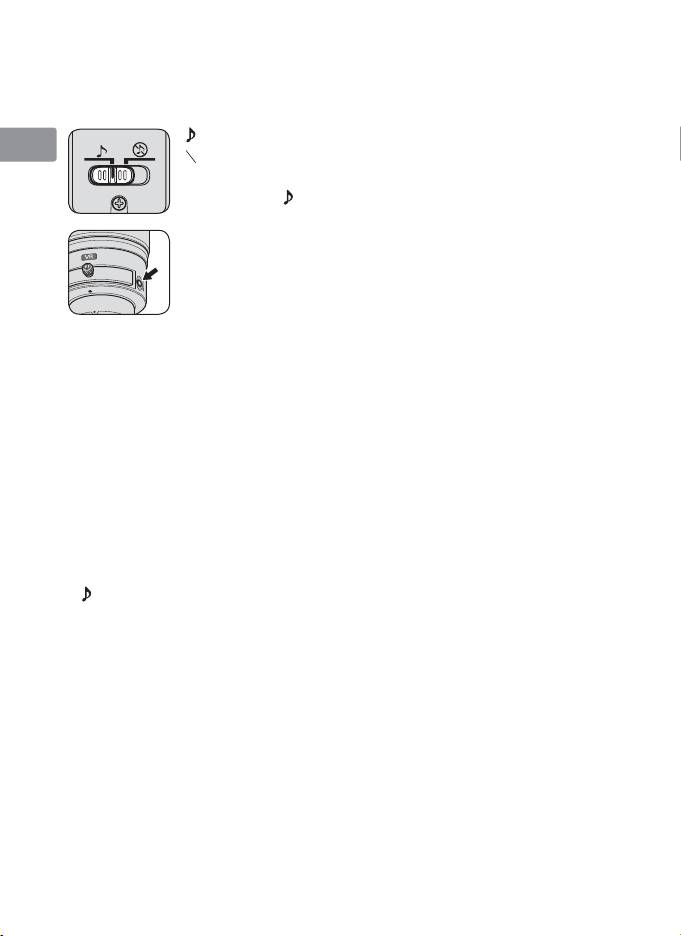
Memory recall (MEMORY RECALL)
: The lens beeps when memory recall is operated.
En
○
♪
: Memory recall operates without the beep sound.
The following operation is with the sound monitor
De
switch set to
.
Fr
a
Focus on a subject and press the memory set button
to save the focus distance.
Es
•
The lens will beep when the focused distance is
correctly saved.
Se
• When the focus distance is not correctly saved, the
distance scale ring will revolve back and forth some
Ru
10 times, while the lens will emit one short and three
long beeps. In this case, repeat procedure to save
Nl
focus distance.
• Memory set is possible regardless of the setting of the focus mode or
It
focus operation selection switch.
• The focus distance is saved even when the camera is turned off or the
Ck
lens is detached from the camera.
• When performing memory recall at a focal length setting different
Ch
from the original setting, the focused distance may be slightly off.
Special care should be taken when performing memory recall at
Kr
longer focal length settings. When the sound monitor switch is set to
, it will beep a warning. It is recommended to perform memory recall
as often as possible at the same focal length to which the memory
has been set.
b
Set the focus operation selection switch to MEMORY RECALL.
c
Press a focus operation button. After the lens beeps twice, fully
press the shutter release button to take the picture.
• The saved focus distance is recalled when a focus operation button is
pressed even when the shutter release button is pressed halfway.
• To take pictures at the saved focus distance, hold the focus operation
button down and fully press the shutter release button.
• The lens reverts from memory recall to autofocus or manual focus
when the focus operation button is released.
24
Autofocus (AF) start on the lens (AF-ON)
a
Set the focus mode switch to A/M or M/A.
Jp
b
Set the focus operation selection switch to
AF-ON.
c
Press a focus operation button to focus on the subject.
En
• Autofocus is activated while a focus operation button is pressed and
held down.
De
• The AF-ON function can be engaged either from the camera or from
the lens.
Fr
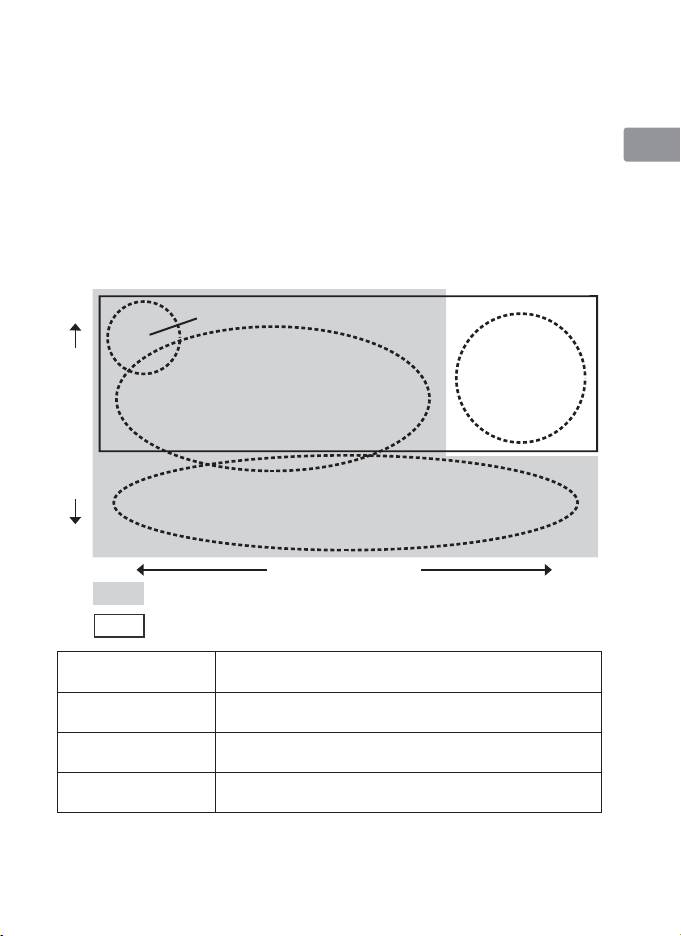
■ Vibration reduction mode (VR
Ⅱ
)
Basic concept of vibration reduction
Es
High
Camera shake when using a tripod
Se
Strong
camera shake when
Ru
taking pictures
Camera shake
from a moving
Nl
vehicle
It
Number of vibrations
Ck
Panning shots
Ch
Low
Weak
Strength of vibrations
Strong
Kr
Set the vibration reduction mode switch to NORMAL.
Set the vibration reduction mode switch to ACTIVE.
Set the vibration reduction mode switch to either
When taking pictures
NORMAL or ACTIVE.
When taking panning
Set the vibration reduction mode switch to NORMAL.
shots
When taking pictures
Set the vibration reduction mode switch to ACTIVE.
from a moving vehicle
When taking pictures
Set the vibration reduction mode switch to either
using a tripod
NORMAL or ACTIVE.
25

Setting the vibration reduction ON/OFF switch
ON: The effects of camera shake are reduced while the
Jp
shutter-release button is pressed halfway and also at
the instant the shutter is released. Because vibration
En
is reduced in the viewfinder, auto/manual focusing
and exact framing of the subject are easier.
De
OFF: The effects of camera shake are not reduced.
Setting the vibration reduction mode switch
Fr
Set the vibration reduction ON/OFF switch to
ON and choose a vibration
reduction mode with the vibration reduction mode switch.
Es
NORMAL: The vibration reduction mechanism primarily
reduces the effects of camera shake. The
Se
effects of camera shake are also reduced
with horizontal and vertical panning.
Ru
ACTIVE: The vibration reduction mechanism reduces
the effects of camera shake, such as that
Nl
which occurs when taking pictures from
a moving vehicle, whether it be normal
It
or more intense camera shake. In this
mode, camera shake is not automatically
Ck
distinguished from panning motion.
Notes on using vibration reduction
Ch
• If this lens is used with cameras that do not have the vibration
reduction function (p. 20), set the vibration reduction ON/OFF switch
Kr
to OFF. With the Pronea 600i/6i camera, in particular, battery power
may become quickly depleted if this switch is left ON.
• After pressing the shutter-release button halfway, wait until the
image in the viewfinder stabilizes before pressing the shutter-release
button the rest of the way down.
• Due to the characteristics of the vibration reduction mechanism, the
image in the viewfinder may be blurred after the shutter is released.
This is not a malfunction.
• When taking panning shots, be sure to set the vibration reduction
mode switch to NORMAL. If the camera is panned in a wide arc,
compensation for camera shake in the panning direction is not
performed. For example, only the effects of vertical camera shake is
reduced with horizontal panning.
26

• Do not turn the camera off or remove the lens from the camera while
vibration reduction is operating. Failure to observe this note could
result in the lens sounding and feeling as if an internal component is
Jp
loose or broken when it is shaken. This is not a malfunction. Turn the
camera on again to correct this.
En
• With cameras featuring a built-in flash, vibration reduction does not
function while the built-in flash is charging.
De
• When using a tripod, set the vibration reduction ON/OFF switch to
ON to reduce the effect of camera shake. Nikon recommends the
Fr
switch be set to ON when using the camera on an unsecured tripod
head or with a monopod. But when camera shake is very slight, the
Es
vibration reduction function may conversely increase the effect of
camera shake by the movement of the system. In such a case, set the
Se
vibration reduction ON/OFF switch to OFF.
Ru
■ Setting the aperture
Use the camera to adjust the aperture setting.
Nl
■ Focusing, zooming, and depth of field
Before focusing, rotate the zoom ring to adjust the focal length until
It
the desired composition is framed. If your camera has a depth-of-field
preview (stop-down) button or lever, depth of field can be previewed
Ck
through the camera viewfinder.
• This lens is equipped with the Internal Focusing (IF) system. As the
Ch
shooting distance decreases, the focal length also decreases.
• The distance scale does not indicate the precise distance between the
Kr
subject and the camera. Values are approximate and should be used
only as a general guide. When shooting distant landscapes, depth of
field may influence operation and the subject may appear in focus at
a position that is closer than infinity.
• For more information, see p. 210.
27
■ Using a built-in rotating tripod collar
When using a tripod, attach it to the lens’ tripod collar instead of the
Jp
camera.
• When holding the camera by its handgrip and rotating the camera
En
with the lens in its tripod collar, your hand may bump into the tripod,
depending on the tripod in use.
De
• It’s possible to detach the tripod collar by removing the tripod collar
lock screw. For details on this procedure, contact your nearest Nikon
Fr
service center or representative office.
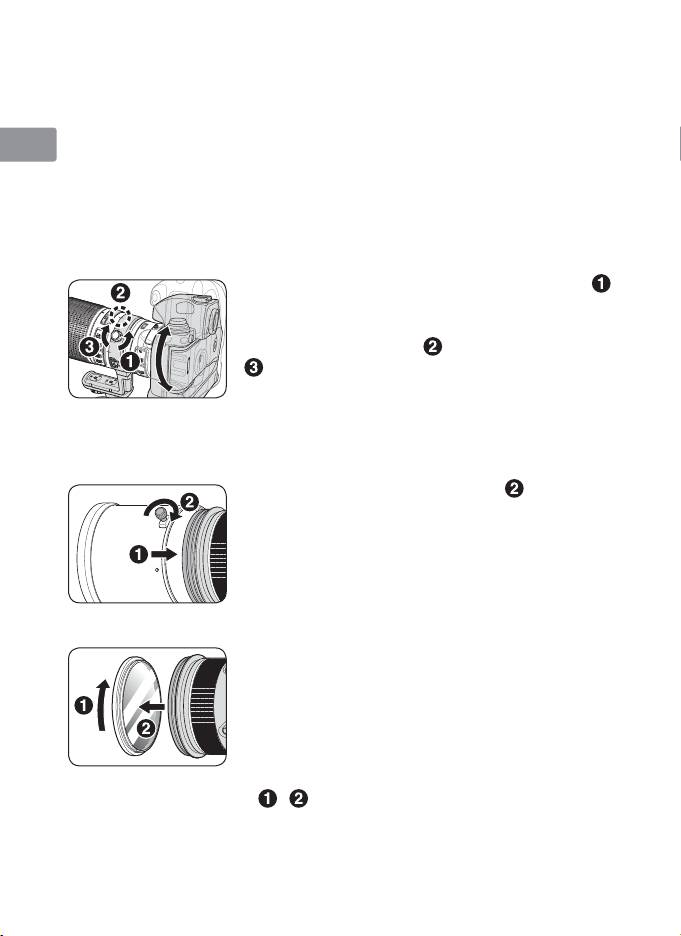
Changing the camera position
Es
Loosen the tripod collar ring fastening screw ( ).
Depending on camera position (vertical or
Se
horizontal), turn the lens to an appropriate lens
rotating position index (
) and tighten the screw
Ru
(
).
Nl
■ Using the lens hood
Lens hoods minimise stray light and protect the lens.
It
Attaching the hood
Ck
• Fully tighten the lens hood screw ( ).
• If the lens hood is not correctly attached,
Ch
vignetting may occur.
• To store the lens hood, attach it in the
Kr
reverse position.
■ Lens protective glass
This lens is available with a lens protective glass
attached. Keeping this glass on the lens is
recommended at all times.
• If the picture you want to take includes a bright
light source, removing this glass may reduce
ghost images. To detach the glass, unscrew by
rotating the rubber ring around the glass
(
, ).
• Store the glass in the dedicated lens protective
glass case provided.
28

■ The built-in flash and vignetting
To prevent vignetting, do not use the lens hood.
Jp
Supported focal length/Shooting
Cameras
distance
En
• 200mm/3 m (9.8 ft) or greater
D90, D80, D50
• 250mm or longer/No restriction
De
• 200mm/4 m (13.1 ft) or greater
D70-Series
• 250mm/2.5 m (8.2 ft) or greater
Fr
• 300mm or longer/No restriction
• 200mm/5 m (16.4 ft) or greater
Es
D5200, D5100, D5000, D3200,
• 250mm/3 m (9.8 ft) or greater
D3100, D3000, D60, D40-Series
• 300mm/2.5 m (8.2 ft) or greater
Se
• 350mm or longer/No restriction
• 200mm/3 m (9.8 ft) or greater
Ru
• 250mm or 300mm/2.5 m (8.2 ft)
F80-Series/N80-Series*
or greater
Nl
• 350mm or longer/No restriction
• 250mm/5 m (16.4 ft) or greater
It
F75-Series/N75-Series*,
• 300mm/4 m (13.1 ft) or greater
F70-Series/N70*
• 350mm/3 m (9.8 ft) or greater
Ck
• 400mm/No restriction
F65-Series/N65-Series*,
Ch
F60-Series/N60*,
F55-Series/N55-Series*,
Vignetting occurs at any shooting
Kr
F50-Series/N50*, F-401/N4004*,
distance.
F-401x/N5005*, F-401s/N4004s*,
Pronea 600i/6i*, Pronea S
*Sold exclusively in the USA
29
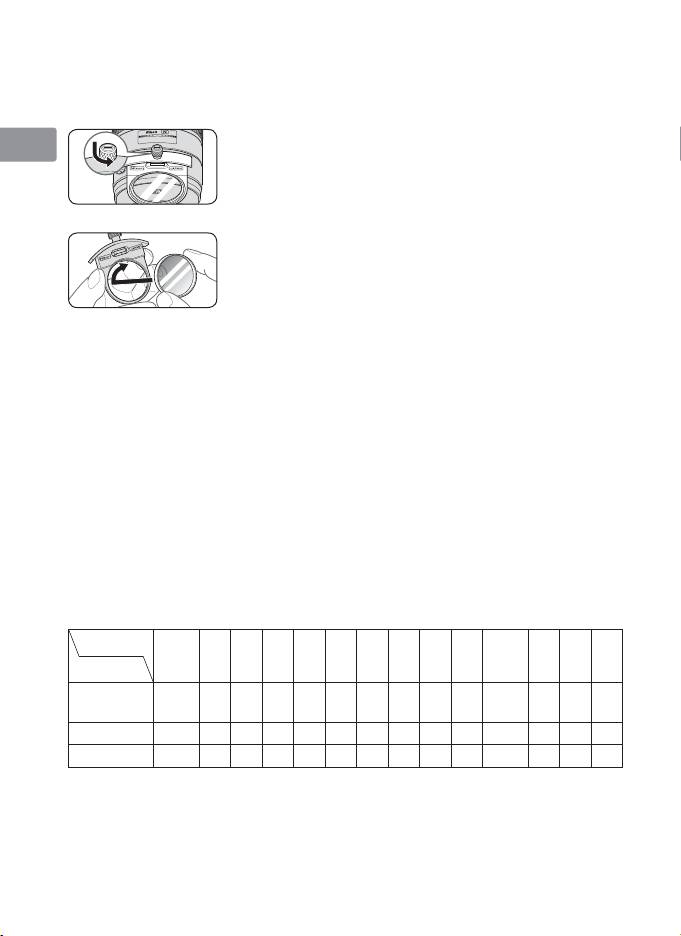
■ Slip-in filter holder
Always use a (52mm screw-on) filter. A 52mm Screw-on NC Filter is
Jp
attached to the filter holder when shipped from the factory.
a Press down on the slip-in filter holder knob, and
En
turn counterclockwise until the white line on the
knob is at a right angle to the axis of the lens.
De
b
Pull the slip-in filter holder from the lens body
c
Detach the attached filter from the filter holder.
Fr
d
Screw a filter onto the side of the filter holder
marked with the words “Nikon” and “JAPAN”.
Es
• The slip-in filter holder can be attached with the
“Nikon” and “JAPAN” facing either the lens or
Se
camera side without any effect on your pictures.
Slip-in Circular Polarizing Filter C-PL1L (optional)
Ru
• Blocks reflections from nonmetallic surfaces such as glass and water.
• When a Slip-in Circular Polarizing Filter C-PL1L is attached, the focus
Nl
distance is different from when a 52mm screw-on filter is attached.
The distance scale is shifted from the correct position. The closest
It
focused distance is extended slightly.
• The memory set position may change slightly when using focus
Ck
preset.
• Attach the C-PL1L filter before using the memory set function.
Ch
■ Recommended focusing screens
Various interchangeable focusing screens are available for certain
Kr
Nikon SLR cameras to suit any picture-taking situation. The ones
recommended for use with this lens are:
Screen
G1
EC-B
ABCE
F
G2
G4 J K L M P U
EC-E
Camera
G3
◎
◎
F6
◎
—
◎
————
◎
—
—
◎
(–0.5)
(–0.5)
F5+DP-30
◎◎○◎◎
—
○◎
—
◎
—
◎
F5+DA-30
◎ ◎○◎◎
—
○◎
—
◎
—
◎
◎
: Excellent focusing
○
: Acceptable focusing
Slight vignetting or moiré patterns appear in the viewfinder, but not on
the film.
—
: Not available
30

( ) : Indicates degree of exposure compensation needed (center-
weighted metering only). For F6 cameras, compensate by selecting
“Other screen“ in Custom Setting “b6: Screen comp.“ and setting
Jp
the EV level to -2.0 to +2.0 in 0.5 EV steps. When using screens
other than type B or E, “Other screen“ must be selected even
En
when the required compensation value is “0“ (no compensation
required). For F5 cameras, compensate using Custom Setting #18 on
De
the camera body. See user’s manual of the camera body for more
details.
Fr
Blank box means not applicable. Since type M screen can be used for
both macro photography at a magnification ratio of 1:1 or above and for
Es
photomicrography, it has different applications than other screens.
Important
Se
• For F5 cameras, only EC-B, EC-E, B, E, J, A, L focusing screens are
usable in Matrix Metering.
Ru
■ Lens care
Nl
•
Be careful not to hold the camera body when the lens is attached, as
this may cause damage to the camera (lens mount). Be sure to hold
It
both the lens and camera when carrying.
• When the lens is mounted on a camera, do not pick up or hold the
Ck
camera and lens by the lens hood.
• Be careful not to allow the CPU contacts to become dirty or
Ch
damaged.
• If the lens mount rubber gasket is damaged, be sure to visit the
Kr
nearest Nikon-authorized service representative for repair.
• Clean lens surfaces with a blower brush. To remove dirt and smudges,
use a soft, clean cotton cloth or lens tissue moistened with ethanol
(alcohol) or lens cleaner. Wipe in a circular motion from the center to
outer edge, taking care not to leave traces or touch other parts of the
lens.
• Never use organic solvent such as thinner or benzene to clean the
lens.
• When storing the lens in its case, attach both the front and rear lens
caps.
• When the lens will not be used for an extended period of time, store
it in a cool, dry place to prevent mold and rust. Be sure to store the
lens away from direct sunlight or chemicals such as camphor or
naphthalene.
31

• Do not get water on the lens or drop it in water as this will cause it to
rust and malfunction.
Jp
• Reinforced plastic is used for certain parts of the lens. To avoid
damage, never leave the lens in an excessively hot place.
En
■ Standard accessories
• Slip-on front lens cap
De
• Rear Lens Cap
• Lens Hood HK-30
Fr
• Semi-soft Case CL-L2 (with dedicated interior cushioning material)
• Dedicated slip-in filter holder
Es
• 52mm Screw-on NC Filter
• Dedicated lens protective glass (attached to the lens)
Se
• Dedicated lens protective glass case
• Strap LN-1
Ru
Important
• The slip-in filter holder, with a 52mm screw-on filter attached, should
Nl
be inserted in the lens at all times.
■ Optional accessories
It
• 52mm screw-on filters (except circular polarizing filterⅡ)
• Slip-in Circular Polarizing Filter C-PL1L
Ck
• AF-S Teleconverters TC-14EⅡ/TC-17EⅡ*/ TC-20EⅢ*
(*Autofocus is available only with cameras that offer f/8 support.)
Ch
■ Specifications
Kr
Type of lens: G-type AF-S Zoom-NIKKOR lens with built-in
CPU and Nikon bayonet mount
Focal length: 200-400mm
Maximum
f/4
aperture:
Lens construction: 24 elements in 17 groups (4 ED and some Nano
Crystal Coat-deposited lens elements), as well as
1 detachable protective glass
Picture angle: 12°20´-6°10´ with 35mm (135) format Nikon
film SLR cameras and Nikon FX format digital
SLR cameras
8°-4° with Nikon DX format digital SLR cameras
9°50´-5° with IX240 system cameras
Focal length scale: 200, 250, 300, 350, 400mm
32

Distance
Output to camera
information:
Jp
Zoom control: Manually via separate zoom ring
Focusing: Nikon Internal Focusing (IF) system, autofocus
En
using a Silent Wave Motor; manually via
separate focus ring
De
Vibration
Lens-shift method using voice coil motors
reduction:
(VCMs)
Fr
Shooting distance
Graduated in meters and feet from 2 m (7 ft) to
scale:
infinity (∞)
Es
Closest focusing
2 m (6.6 ft) with autofocus, from focal plane at
distance:
all zoom positions
Se
1.95 m (6.4ft) with manual focus, from focal
plane at all zoom positions
Ru
No. of diaphragm
9 pcs. (rounded)
blades:
Diaphragm: Fully automatic
Nl
Aperture range: f/4 to f/32
It
Exposure
Via full-aperture method with cameras with
measurement:
CPU interface system
Ck
Focusing limit
Provided; two ranges available: FULL (∞–2 m),
switch:
or ∞–6 m
Ch
Tripod collar: Rotatable through 360°, lens rotating position
index at 90°, only tripod collar detachable
Kr
Dimensions: Approx. 124 mm dia. x 365.5 mm (extension
from the camera’s lens-mount flange with lens
protective glass attached)
Approx. 124 mm dia. x 358.5 mm (extension
from the camera’s lens-mount flange without
lens protective glass)
Weight: Approx. 3,360 g (7.4 lbs) with lens protective
glass
Approx. 3,240 g (7.1 lbs) without lens protective
glass
Specifications and designs are subject to change without any notice or
obligation on the part of the manufacturer.
33

Hinweise für sicheren Betrieb
ACHTUNG
Jp
Keinesfalls zerlegen.
En
Beim Berühren der Innenteile von Kamera oder Objektiv droht
Verletzungsgefahr. Überlassen Sie Reparaturen unbedingt ausschließlich
De
qualifizierten Technikern. Kommt es durch einen heftigen Stoß (z.B. Fall auf den
Boden) zu einem Bruch von Kamera oder Objektiv, so trennen Sie zunächst das
Fr
Produkt vom Stromnetz bzw. entnehmen die Batterie(n) und geben es dann an
eine autorisierte Nikon-Servicestelle zur Überprüfung ab.
Es
Bei einer Störung sofort die Stromversorgung ausschalten.
Se
Bei Entwicklung von Rauch oder ungewöhnlichem Geruch durch Kamera oder
Objektiv entnehmen Sie sofort die Batterie(n); dabei vorsichtig vorgehen,
Ru
denn es besteht Verbrennungsgefahr. Bei einem Weiterbetrieb unter diesen
Umständen droht Verletzungsgefahr.
Nl
Nach dem Abtrennen von der Stromversorgung geben Sie das Gerät an eine
It
autorisierte Nikon-Servicestelle zur Überprüfung ab.
Ck
Kamera oder Objektiv keinesfalls bei Vorhandensein von
brennbarem Gas einsetzen.
Ch
Wird elektronisches Gerät bei brennbarem Gas betrieben, so droht u.U.
Explosions- oder Brandgefahr.
Kr
Keinesfalls durch Objektiv oder Sucher in die Sonne blicken.
Beim Betrachten der Sonne oder anderer starker Lichtquellen durch Objektiv
oder Sucher droht eine permanente Schädigung des Sehvermögens.
Dem Zugriff von Kindern entziehen.
Es ist unbedingt dafür zu sorgen, dass Kleinkinder keine Batterien oder andere
Kleinteile in den Mund nehmen können.
34

Jp
Beim Umgang mit Kamera und Objektiv unbedingt die
folgenden Vorsichtmaßnahmen beachten:
En
• Schützen Sie die Kamera und das Objektiv vor Feuchtigkeit. Andernfalls droht
De
Brand- oder Stromschlaggefahr.
• Handhaben oder berühren Sie die Kamera bzw. das Objektiv keinesfalls mit
Fr
nassen Händen. Andernfalls droht Stromschlaggefahr.
• Bei Gegenlichtaufnahmen nicht das Objektiv gegen die Sonne richten oder
Es
das Sonnenlicht direkt durch das Objektiv eintreten lassen. Dies könnte eine
Überhitzung der Kamera verursachen und ein Brand könnte die Folge sein.
Se
• Vor einem längeren Nichtgebrauch des Objektivs bringen Sie den vorderen
und hinteren Deckel an und bewahren das Objektiv geschützt vor direkter
Ru
Sonnenlichteinwirkung auf. Andernfalls droht Brandgefahr wegen möglicher
Fokussierung von Sonnenlicht durch das Objektiv auf brennbare Gegenstände.
Nl
It
Ck
Ch
Kr
35
Wir danken Ihnen für das Vertrauen, das Sie Nikon mit dem Kauf des
AF-S NIKKOR 200-400mm 1
:
4G ED VR
Ⅱ
entgegenbringen. Machen
Sie sich bitte vor dem Gebrauch dieses Objektivs mit dem Inhalt dieser
Jp
Bedienungsanleitung und dem Benutzerhandbuch Ihrer Kamera vertraut.
En
Nomenklatur
De
Fr
Es
Se
Ru
Nl
It
Ck
1 Gegenlichtblende (S. 43)
% Knopf für einsetzbaren Filterhalter
Ch
2 Halteschraube der Gegenlichtblende
(S. 44)
(S. 43)
^ Speichertaste (S. 40)
Kr
3 Objektiv-Schutzscheibe (am Objektiv
& Montagemarkierung
angebracht) (S. 44)
* Dichtungsmanschette (S. 46)
4 Gummigriff
( CPU-Kontakte (S. 46)
5 Fokus-Betriebstaste (Fokussperre/
) Eingebauter Stativanschluss (S. 43)
Speicheraufruf/AF Start) (S. 40)
q Ösen für den Schulterriemen
6 Entfernungseinstellring (S. 39)
w Ton-Monitorschalter (S. 40)
7 Entfernungsskala (S. 43)
e Fokus-Betriebswahlschalter (AF-L/
8 Entfernungsindexlinie
MEMORY RECALL/AF-ON) (S. 40)
9 Zoomring (S. 43)
r Fokussierschalter (S. 39)
0 Brennweitenskala
t Fokussier-Begrenzungsschalter
! Brennweitenskala-Indexlinie
(S. 34)
@
Positionsindex für Objektivdrehung (S. 43)
y Bildstabilisator-Schalter ON/OFF
# Stativanschlussring-
(S. 42)
Befestigungsschraube (S. 43)
u Bildstabilisatorschalter (VR) (S. 42)
$ Einsetzbarer Filterhalter (S. 44)
( ): Seitennummer
36
Jp
En
De
Fr
Es
Se
Ru
Nl
It
Ck
Ch
Kr
37

Die wichtigsten Merkmale
• Die Nanokristallvergütung einiger Linsen sorgt für klare Bilder in den
unterschiedlichsten Aufnahmesituationen, von Außenaufnahmen bei hellem
Jp
Sonnenschein bis hin zu Innenaufnahmen bei grellem Scheinwerferlicht.
• Dieses Objektiv verfügt über die Funktionen AF-L zur Fokussperre im
En
Autofokusbetrieb, AF-ON zur Aktivierung des Autofokus und MEMORY
RECALL zum Speichern und erneuten Aufrufen ausgewählter Brennweiten.
De
• Bei eingeschaltetem Bildstabilisator (VRⅡ) können längere Belichtungszeiten
(ca. vier Stufen*) verwendet werden. Auf diese Weise kann mit längeren
Belichtungszeiten fotografiert werden, insbesondere bei Freihandaufnahmen
Fr
mit längeren Brennweiten. (*Basierend auf Ergebnissen, die unter Nikon-
Messbedingungen erzielt wurden. Die Wirkung des Bildstabilisators kann je
Es
nach Aufnahmebedingungen und Einsatz variieren.)
Wichtige Hinweise
Se
• Bei Verwendung des Objektivs an einer digitalen Nikon-Spiegelreflexkamera
mit DX-Format, wie der D300-Serie oder der D7000 beträgt der Bildwinkel
8° bis 4° und der Brennweitenbereich entspricht 300-600mm beim
Ru
Kleinbildformat.
Verwendbare Kameras und verfügbare Funktionen
Nl
Möglicherweise gibt es hinsichtlich der verfügbaren Funktionen Einschränkungen.
Informationen hierzu finden Sie im Benutzerhandbuch Ihrer Kamera.
It
Belichtungssteuerung
Funktion
(Aufnahmebereitschaft)
Ck
Kameras
AF-Start
Fokus-
Speicher-
*1
VR AF
am
P
SAM
sperre
aufruf
Objektiv
Ch
Nikon Digital-SLR-Kameras (Nikon
FX/DX-Format), F6, F5, F100,
3 3 3 3 3 3333
Kr
F80-Serie, F75-Serie, F65-Serie
2
Pronea 600i, Pronea S*
—
3 3 3 3 3333
3
4
3
F4-Serie, F90X, F90-Serie, F70-Serie
—
3*
3
3*
3
*
5
33
——
*
F60-Serie, F55-Serie, F50-Serie,
—— — — —
3333
F-401x, F-401s, F-401
F-801s, F-801, F-601
M
—— — — —
33
——
F3AF, F-601, F-501,
— — — — — ————
Nikon MF Kameras (außer F-601
M)
3: Möglich —: Nicht möglich VR: Bildstabilisator AF: Autofokus
*1 : P schließt die Automatik (AUTO) und Motivprogramme mit ein.
*2 : Manuelle Belichtungssteuerung (M) nicht möglich.
*3 : Befindet sich der Fokus-Betriebswahlschalter in Stellung AF-ON, so wird der Autofokus
aktiviert, sobald bei angetipptem Auslöser die Fokus-Betriebstaste gedrückt wird.
*4 : Drücken Sie bei angetipptem Auslöser die Speichertaste oder eine Fokus-Betriebstaste.
*5 : Möglich mit bestimmen Einschränkungen
38
Fokussierung
Stellen Sie den Fokusmodus Ihrer Kamera entsprechend der nachstehenden
Tabelle ein.
Jp
Fokussteuerung
Fokussteuerung (Objektiv)
Kameras
(Kamera)
A/M M/A M
En
Autofokus
Autofokus
mit manueller
Manueller Fokus
mit manueller
Nikon Digital-SLR-Kameras (Nikon
Einstellmöglichkeit
(Elektronische
AF
Einstellmö glichkeit
De
FX/DX-Format), F6, F5, F4-Serie,
bei Priorität
Einstellhilfe
bei Priorität des
F100, F90X, F90-Serie, F80-Serie,
der manuellen
verfügbar.)
Autofokus
Einstellung
F75-Serie, F70-Serie, F65-Serie,
Fr
Pronea 600i, Pronea S
Manueller Fokus
MF
(Elektronische Einstellhilfe verfügbar.)
F60-Serie, F55-Serie, F50-Serie,
Es
Manueller Fokus
AF
F-801s, F-801, F-601
M, F-401x,
(Elektronische Einstellhilfe verfügbar,
MF
F-401s, F-401
außer bei F-601
M.)
Se
AF: Autofokus MF: Manuelle Fokussierung
A/M-Modus (Autofokus mit manueller Einstellmöglichkeit bei
Ru
Priorität des Autofokus) und M/A-Modus (Autofokus mit manueller
Einstellmöglichkeit bei Priorität der manuellen Einstellung)
Nl
M/A: Der Autofokus wird durch manuelles Fokussieren mit
dem Einstellring außer Kraft gesetzt.
It
A/M: Der Autofokus wird durch manuelles Fokussieren
mit dem Entfernungseinstellring außer Kraft gesetzt,
die Empfindlichkeit bei der Einstellringerkennung ist
Ck
jedoch wesentlich geringer als in der Betriebsart M/A.
Verwenden Sie diesen Modus, wenn Sie darauf achten
Ch
müssen, die AF-Einstellung nicht versehentlich durch
Berühren des Entfernungseinstellring zu ändern.
Kr
a
Stellen Sie den Fokussierschalter auf A/M oder M/A ein.
b
Der Autofokus wird durch Drehen des Entfernungseinstellrings
bei angetipptem Auslöser, durch Drücken der AF-ON-Taste an der
Kamera oder die Betätigung einer Fokus-Betriebstaste (bei Fokus-
Betriebswahlschalterstellung AF-ON) am Objektiv außer Kraft gesetzt.
c
Durch erneutes Drücken der AF-ON-Taste an der Kamera bei angetipptem
Auslöser oder erneute Betätigung einer Fokus-Betriebstaste am Objektiv wird
der manuelle Betrieb aufgehoben und der Autofokusmodus des Objektivs
wiederhergestellt.
Begrenzung des Autofokusbereichs
Diese Funktion ist nur bei Kameras mit Autofokus verfügbar.
FULL: Wählen Sie FULL, wenn Ihr Motiv möglicherweise
näher als 6 m sein könnte.
∞–6m: Ist das Motiv immer 6 m oder weiter entfernt, stellen
Sie den Schalter auf ∞–6m, um die Fokussierzeit zu
verkürzen.
39

Fokus-Betriebswahlschalter und Fokus-Betriebstaste
(Eine Liste kompatibler Kameras finden Sie auf S. 38.)
Jp
Wählen Sie mit Hilfe des Fokus-Betriebswahlschalters eine Funktion der Fokus-
Betriebstasten.
Fokus-
Fokus-
En
Betriebswahlschalterposition
Betriebstastenfunktion
AF-L Fokussperre
De
MEMORY RECALL Speicheraufruf
Fr
AF-ON AF-Start (AF-ON) am Objektiv
• Drücken Sie eine der vier Fokus-Betriebstasten, um die
Es
einzelnen Funktionen zu aktivieren.
• Die Fokus-Betriebstastenpositionen können nach den
Se
Vorlieben des Benutzers individuell eingestellt werden.
Weitere Informationen hierzu erhalten Sie bei der Nikon-
Servicestelle oder dem Nikon-Vertreter in Ihrer Nähe.
Ru
Fokussperre (AF-L)
Diese Funktion ist nur bei Kameras mit Autofokus verfügbar.
Nl
a
Stellen Sie den Fokussierschalter auf A/M oder M/A ein.
b
Stellen Sie den Fokus-Betriebswahlschalter auf AF-L ein.
It
c
Im Autofokus-Modus kann die Fokussperre durch Drücken einer der Fokus-
Betriebstasten aktiviert werden.
Ck
• Die Fokussperre bleibt aktiv, solange eine der Fokus-Betriebstasten gedrückt
gehalten wird.
• Die AF-L-Funktion kann entweder über die Kamera oder das Objektiv aktiviert
Ch
werden.
Speicheraufruf (MEMORY RECALL)
Kr
♪: Bei Betätigung des Speicheraufrufs gibt das Objektiv einen
Piepton von sich.
○
♪
: Während des Speicheraufrufs ertönt kein Piepton.
Für das nachfolgende Beispiel muss der Ton-Monitorschalter
auf eingestellt sein.
a
Fokussieren Sie ein Motiv und drücken Sie die Speichertaste,
um die Brennweite zu speichern.
• Bei korrekter Speicherung der Brennweite gibt das Objektiv
einen Piepton von sich.
• Wurde die Brennweite nicht korrekt gespeichert, dreht sich
der Entfernungseinstellring ca. 10-mal hin- und her, während das Objektiv
einen kurzen und drei lange Pieptöne von sich gibt. Wiederholen Sie in diesem
Fall den Vorgang, um die Brennweite zu speichern.
• Die Brennweitenspeicherung ist unabhängig von der Einstellung des Fokus-
Modus oder des Fokus-Betriebswahlschalters möglich.
• Die Brennweite wird auch dann gespeichert, wenn die Kamera ausgeschaltet
oder das Objektiv nicht auf der Kamera angebracht ist.
40
