Fagor 6H-760BN – page 2
Manual for Fagor 6H-760BN
p o r t u g u ê s
19
1 2
Instalação
Utilização
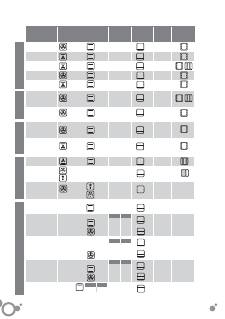
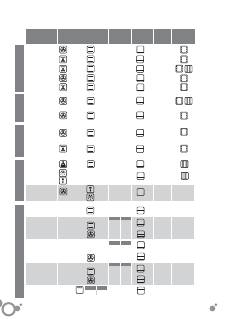
Identifi que o modelo do seu forno
(“
a
”, “
b
”, “
c
”,
“
d
”, “
e
”) comparando o painel de comandos do
aparelho com as ilustrações.
1.1 Desembalagem.
Retire todos os elementos
de protecção.
1.2 Ligação à rede eléctrica.
Tenha sempre em
conta os dados da placa de características
(1.2.1) e as medidas do móvel onde vai
encastrar o forno (1.2.2, 1.2.3).
O aparelho deve ser ligado à rede através
de uma ligação fi xa monofásica, na qual a
ligação neutra (cor azul) com neutro deve
fi car garantida (1.2.4). Introduza o forno e
centre-o no espaço (1.2.5). Tenha o cuidado
de não deixar fi car o cabo que sobra na
parte superior (1.2.6). Fixe-o ao móvel com
os dois parafusos fornecidos (1.2.7). O
material do móvel de encastramento ou o
revestimento do móvel devem ser resistentes
ao calor. Para fi nalizar a instalação no
aparelho é necessário defi nir a hora.
Depois de algum tempo de inactividade,
o aparelho passa para o estado standby,
em que segundo o modelo, é reduzida a
luminosidade ou o visor desliga-se.
0
Identifi cação
2.1 Ajuste da hora.
Ao ligar o forno o visor fi ca
a piscar (2.1.1, 2.1.2). Ajuste a hora rodando
o comando
(2.1.3, 2.1.4). Após 3
segundos ou premindo a tecla
(2.1.5) ou
(2.1.6) a hora fi ca validada.
Nota:
Volte a ajustar a hora depois de um
corte do fornecimento de energia.
2.2 Modifi cação da hora
.
Com o forno
desligado, prima
até chegar à posição
/
(2.2.1) ou prima
durante alguns
segundos (2.2.2). Com a hora a piscar, ajuste
a hora rodando o comando
(2.2.3, 2.2.4).
Após alguns segundos a hora fi ca validada.
2.3 Função alarme .
Prima
ou
até
chegar à posição
(2.3.1, 2.3.2). Ajuste
o tempo rodando o comando
(2.3.3,
2.3.4). Após alguns segundos o tempo fi ca
validado e começa a contagem decrescente.
No fi nal é activado um sinal sonoro. Para
silenciar prima qualquer tecla.
2.4
Antes de utilizar o seu novo forno pela
primeira vez, aqueça-o vazio
(sem
alimentos no forno e na posição
, a
250ºC e durante 30 minutos. Pode produzir
fumo ou mau cheiro (é normal devido ao
aquecimento de restos de gordura, etc).
Quando tiver arrefecido, faça uma limpeza ao
forno passando um pano húmido no interior
do forno.
2.5 Acessórios.
De acordo com os modelos,
existem Tabuleiro Profundo (2.5.1), Tabuleiro
Plano (2.5.2) e Grelha Multifunções (2.5.3) que
funcionam de forma independente. Além disso,
pode combinar qualquer tabuleiro com a Grelha
Multifunções (2.5.4) formando um conjunto.
Todos os acessórios ou conjuntos podem ser
colocados directamente ou estar montados na
Grelha de extracção parcial (2.5.5) ou na Grelha
de extracção total (2.5.6, 2.5.7) (2.5.8). Se
tem o tabuleiro de extracção parcial, este será
usado de forma independente ou juntamente
com os tabuleiros (3 modalidades) (2.5.9). A
Grelha Simples é de utilização independente
(2.5.10). Se tem guias auto amovíveis
”impulsão”, introduza-as primeiro no forno sem
o tabuleiro (2.5.11). As guias ”impulsão” saem
automaticamente com o peso do tabuleiro ao
abrir o forno (2.5.12). É obrigatório utilizar um
tabuleiro como suporte dos alimentos com as
guias ”impulsão” (2.5.13). Tenha em conta a
posição das grelhas ao introduzi-las no interior.
Têm amortecedores laterais anti-viragem
(2.5.14).
2.6 Posição acessório.
Tem 5
posições para colocar os acessórios
.
2.7 Alimento a cozinhar.
Introduza o alimento
no forno. Seleccione o acessório(s) e a sua
posição recomendada ou consulte a tabela
de cozedura. Feche a porta.
PREPARAR UM PRATO
2.8 Selecção função de cozedura
. Rode
o comando selector de funções
e
seleccione a função desejada de acordo
com o modelo.
Calor tradicional ventilado.
Para qualquer
tipo de prato. Podem cozinhar-se vários
pratos de uma vez, sem que se misturem os
sabores ou os odores.
Turbo plus.
O calor é produzido pela
p o r t u g u ê s
20
resistência central. No modelo
“ f “
utiliza-se
esta função para a descongelação, fi xando a
temperatura a 35ºC.
Master Chef.
Sistema de cozinha inteligente.
Grelhador forte ventilado.
Gratina
repartindo o calor de maneira uniforme. Ideal
para assados de grande tamanho.
Grelhador forte.
Gratinados: massas, souffl é
e molho bechamel.
Grelhador suave.
Hambúrgueres, torradas e
alimentos de pequena dimensão.
Calor da placa intenso.
O forte calor
inferior reparte-se uniformemente. Ideal para
paelhas, pizzas.
Calor da placa ventilado.
O ventilador
reparte o calor inferior de maneira uniforme.
Indicado para paelhas.
Calor tradicional.
Pão, tartes, pastéis com
recheio e carnes magras.
Descongelação.
Descongela em tempos
mínimos qualquer produto.
2.9 Selecção de temperatura.
Se ao
seleccionar a função de cozedura o forno
propuser uma temperatura ideal, a cozedura
começa de imediato. Pode modifi car esta
temperatura durante 3 segundos de em que
fi ca a piscar ou da seguinte maneira: prima a
tecla
(2.9.1), a temperatura fi ca a piscar,
mude-a rodando o comando
(2.9.2).
Ou prima a tecla
até chegar à posição
(2.9.3), a temperatura fi ca a piscar,
modifi que-a rodando o comando
(2.9.4).
Se mantiver o botão ºC premido (a,b,e),
visualizar-se-á a temperatura real do interior
do forno.
2.10 Desligar o forno
. Em qualquer caso,
quando a cozedura estiver terminada, rode
o comando selector de funções
para a
posição (2.10.1).
FUNÇÕES DE TEMPO
2.11 Selecção da duração
.
Seleccione
a função de cozedura e a temperatura
desejada. Prima
ou
até que o
fi que a piscar (2.11.1. 2.11.2). Ajuste a
hora de cozedura rodando o comando
(2.11.3, 2.11.4). Após alguns segundos o
tempo fi ca validado e começa a contagem
decrescente. Quando o forno terminar o
programa seleccionado emite um apito, para
silenciá-lo prima qualquer tecla e o forno
desliga-se.
2.12 Selecção hora fi m
:
Seleccione a função
de cozedura, a temperatura e a duração da
cozedura. Prima
ou
até que o
fi que a piscar (2.12.1, 2.12.2). Ajuste a hora
de fi m de cozedura rodando o comando
(2.12.3, 2.12.4). A colocação em
funcionamento fi ca retardada para fi nalizar à
hora indicada. Quando o programa terminar
emite um apito. Para silenciá-lo prima
qualquer tecla e o forno desliga-se.
2.13 Desligação automática.
Se por
esquecimento não tiver desligado o forno,
este desliga-se automaticamente após algum
tempo. Com uma temperatura inferior a
100ºC o forno desliga-se em 10 horas. Com
uma temperatura superior a 100ºC desliga-se
após 3 horas.
2.14 Função Celeris.
Para o pré-aquecimento do
forno. Rode o comando selector de funções
até à posição
e introduza a temperatura
desejada. O forno atinge rapidamente
a temperatura seleccionada. Uma vez
alcançada introduza o alimento e seleccione a
função de cozedura e o tempo necessário.
2.15 Função Bloqueio.
Para evitar manipulações
por crianças. Prima simultaneamente as
teclas
,
até visualizar
(2.15.1).
Para desbloquear, repita a operação.
2.16 Calor residual.
Indica que o forno embora
esteja desligado continua quente. O
termómetro é visualizado no visor enquanto a
temperatura no interior for superior a 60º C.
2.17 Cozedura Master Chef. (“e”).
Sistema de cozinha inteligente. Calcula
automaticamente os ciclos de tempo
e temperatura, através de sensores
electrónicos que medem o nível de humidade
e variações de temperatura. Tem duas fases:
Fase 1:
Recompilação da informação. Determina o
tempo de cozedura ideal. Esta fase dura entre
5 e 40 minutos segundo o prato. Seleccione
(Master Chef)
no comando selector
de funções (2.17.1), escolha o tipo de
prato a cozinhar de entre os seis propostos
pelo forno rodando o comando
e após
alguns segundos o forno começa a cozinhar
(2.17.2). Na tabela seguinte são mostrados
os tipos de alimentos e os níveis correctos
para colocar o tabuleiro para cada tipo de
alimento.

p o r t u g u ê s
21
3
Manutenção e
limpeza
3.1 Limpeza dos acessórios.
Podem ir à
máquina de lavar loiça. Se os lavar à mão,
use detergentes de uso corrente. Coloque-
os de molho para facilitar a limpeza.
Fornos não pirolíticos
3.2 Modelos de paredes lisas.
Função
AquaSliding:
é um sistema que
facilita a limpeza do forno, através da
utilização do vapor da água. A sua duração é
de 35 minutos e é feita da seguinte forma:
• Comece com o forno temperado.
• Retire todos os acessórios e guias laterais
s/modelo.
• Pulverize 200 ml de água nas paredes
do interior do forno.
Uma quantidade
excessiva de água pode provocar
transbordos.
• Segundo o modelo,
a)
AquaSliding
esperar que o forno
indique a fi nalização do ciclo de
limpeza.
b)
tradicional
a 150ºC durante 10
minutos. Passado este tempo, ajuste
a temperatura para o mínimo (35ºC -
75ºC s/modelo) e mantenha-a assim
durante 25 minutos. Se não seguir
estas indicações pode provocar
condensações na parte da frente do
forno.
• Desligue o forno
• Abra com cuidado a porta do forno,
evitando o contacto com o vapor.
• No fi nal do ciclo, retire a água do interior
e com a ajuda de um pano desprenda os
restos de sujidade. Este ciclo de ajuda
à limpeza perde efi cácia se não forem
respeitados os tempos indicados.
* Segundo o modelo pode utilizar a função
Avisador.
3.3 Modelos de paredes rugosas. Auto-
limpeza.
Nestes fornos a placa posterior
e os painéis laterais estão revestidos com
um esmalte de auto-limpeza que elimina a
gordura enquanto o forno está a funcionar.
Os painéis laterais são reversíveis e desta
forma duplicam a duração do revestimento.
Quando os painéis não fi carem
sufi cientemente limpos por si próprios tem
de os substituir. Para isso baste retirar todos
os acessórios e recipientes do interior do
forno. Limpe em profundidade as superfícies
do forno que não são de auto-limpeza.
Seleccione a função
.
Coloque a temperatura a 250º C e o tempo
entre 30 e 60 minutos dependendo do grau
de sujidade.
Quando o programa de limpeza terminar e
o forno arrefecer passe com uma esponja
humedecida nos elementos de auto-limpeza
que voltarão a estar completamente funcionais.
Tipo de alimento
Nível do tabuleiro
Pizza 1
Assado de vaca
2
Frango 2
Peixe 2
Verduras recheadas
2
Tarte doce
2
Nesta fase aparece no visor alternativamente
o tipo de alimento seleccionado e o tempo
restante de cozedura (2.17.2, 2.17.3).
Em Master Chef não é necessário o pré-
aquecimento. O ciclo de cozedura deve
começar obrigatoriamente com o forno frio.
Se o forno estiver quente devido a uma
utilização anterior, deve deixá-lo arrefecer. No
visor irá aparecer o ícone do calor residual
(2.17.4).
Fase
2:
Depois de recompilar a informação e calcular
o tempo restante irá aparecer no visor o
tempo que falta para terminar a cozedura
(2.17.5). Quando o prato estiver pronto o
forno desliga-se e emite um sinal sonoro.
Para silenciar, pressione
.
Importante:
Não abra a porta durante a cozedura
porque irá prejudicar o cálculo e registo
da informação e irá cancelar a cozedura,
aparecendo no visor “door” (2.17.6).
p o r t u g u ê s
22
Fornos pirolíticos
3.4 Limpeza por pirólise.
• A limpeza ocorre por eliminação da
sujidade a altas temperaturas.
• Os fumos e odores são eliminados quando
passam por um catalisador.
• Não é necessário esperar que o forno
tenha muita gordura para fazer a limpeza.
• Depois da pirólise, quando o forno estiver
frio, passe um pano húmido para retirar os
restos de cinza branca.
• Antes de colocar a pirólise a funcionar retire
todos os acessórios do forno, incluindo os
acessórios de cozinha e guias telescópicas.
• Se ocorrerem transbordamentos grandes,
retire-os antes de efectuar a pirólise para
evitar que infl amem ou produzam muito
fumo.
• Durante a pirólise as superfícies fi cam mais
aquecidas do que durante a sua utilização
normal. Mantenha as crianças afastadas.
De acordo com o grau de sujidade do forno,
pode optar entre dois tipos de pirólise.
Pirólise
:
Utilize-a apenas quando o grau
de sujidade for elevado, a limpeza é realizada
em 2 horas. Para activar, rode o comando
selector de funções
para a posição
(3.4.1).
Nota:
Nesta opção é possível a limpeza por
pirólise, o acessório bandeja esmaltada.
Posicione no nível 2 Previamente retire o
excesso de gordura acumulado.
Pirólise ECO
:
Faz a limpeza em 1 hora
e 30 minutos. Para activar, rode o comando
selector de funções
para a posição
(3.4.2).
Nota:
Os parâmetros de tempo e
temperatura são fi xos e não podem ser
modifi cados.
Ao iniciar o processo o forno atinge
temperaturas muito altas, por segurança
a porta fi ca bloqueada, acende-se o piloto
luminoso ao lado do símbolo (3.4.3).
Quando a temperatura descer, o piloto
apaga-se e pode abrir a porta.
3.5 Pirólise diferida.
Pode programar a hora
a que termina o processo de pirólise.
Rode o comando selector de funções
e seleccione
ou
(3.5.1). Prima
(3.5.2) ou
(3.5.3) até que o
fi que
a piscar. Ajuste a hora de fi m da pirólise
rodando o comando selector de tempo
(3.5.4, 3.5.5).
3.6 Limpeza paredes interiores.
Retire as guias
laterais para limpar os restos de gordura
ou cinza que possam ter fi cado após os
processos de limpeza. De acordo com os
modelos as guias laterais têm dois tipos de
fi xação, sem suporte (3.6.1, 3.6.2) ou com
suporte, (3.6.4, 3.6.5). Uma vez retiradas
utilize um pano húmido para limpar as
paredes laterais (3.6.3, 3.6.6). Quando as
paredes do forno estiverem limpas volte a
colocar as guias.
Se o seu forno dispor de grill rebatível, puxe
para cima e pressione para baixá-lo (3.6.7) e
limpe o tecto com um pano húmido (3.6.8).
3.7 Limpeza dos vidros.
Limpeza
exterior:
Utilize um pano suave
embebido com um produto para limpeza de
vidros.
Limpeza interior:
Se o interior dos vidros
estiver sujo, pode desmontá-los para
proceder à sua limpeza.
Quando o forno estiver frio, abra a porta
(3.7.1) e prenda-a com o amortecedor
vermelho fornecido na bolsa dos acessórios
(3.7.2). Introduza o acessório de chapa num
dos lados do vidro para levantar o vidro
fazendo pressão. Fazer o mesmo no outro
lado do vidro. Retire o amortecedor vermelho
e feche a porta (3.7.3). Retire o vidro (3.7.4),
limpe-o e seque-o com um pano (3.7.5). Se
for necessário retire o conjunto de vidros
interiores da porta. Este conjunto pode ser
formado por um ou dois vidros de acordo
com o modelo e com um amortecedor preto
em cada canto. Para retirá-los coloque a
mão na parte inferior da porte e puxe para
cima (3.7.6). Uma vez retirados tire os
amortecedores para limpar os vidros (3.7.7).
Quando os vidros estiverem limpos (3.7.8)
volte a encaixá-los nos batentes de
borracha, com o bico virado para cima
(3.7.9) e coloque os vidros de forma que
“L” esquerda e “R” direita fi quem ao lado
das dobradiças (3.7.10). Para terminar
p o r t u g u ê s
23
5
Meio-ambiente
4
Resolução de
problemas
Existem várias incidências que você mesmo pode
solucionar.
4.1 O forno não aquece.
Verifi que se está
ligado ou se o fusível não está fundido.
Aumente a temperatura seleccionada.
4.2 A luz interior não funciona.
Mude a
lâmpada ou o fusível.
4.3 Sai fumo durante a cozedura.
Reduza a
temperatura e/ou limpe o forno.
4.4 A limpeza por pirólise não se realiza.
Verifi que se a porta está bem fechada. Falha
do sistema de bloqueio ou do sensor de
temperatura. Contacte o Serviço Técnico.
4.5 O forno emite um apito.
Foi alcançada a
temperatura escolhida. O ciclo de cozedura
está fi nalizado.
4.6 Faz ruído depois da cozedura.
É normal,
o ventilador continua a funcionar até reduzir
a temperatura do interior e a temperatura do
exterior.
4.7 Avisos de incidências.
Falha do sensor de temperatura.
Porta bloqueada (4.7.1).
Não é possível realizar a pirólise.
Falha de bloqueio da porta.
Falha do Software.
Falha do sensor de humidade.
O forno foi concebido a pensar na
conservação do meio ambiente.
Respeite o meio ambiente.
Aqueça previamente
o forno só quando fi zer falta (consulte a tabela).
Use preferentemente moldes de cor escura. Para
grandes períodos de cozedura desligue o forno 5
ou 10 minutos antes do tempo previsto.
Gestão de resíduos de aparelhos eléctricos e
electrónicos.
O símbolo
indica que o aparelho não deve
ser eliminado usando os contentores tradicionais
para resíduos domésticos.
Entregue o seu forno num centro especial de
recolha.
A reciclagem de electrodomésticos evita
consequências negativas para a saúde e para
o meio ambiente, e permite poupar energia e
recursos.
Para mais informação, contacte as autoridades
locais ou o estabelecimento onde adquiriu o
forno.
coloque o restante vidro de forma a ler
a palavra PIROLÍTICO (3.7.11). Retire os
amortecedores (3.7.12) e feche a porta.
Avisos de utilização:
• Certifi que-se de que o forno está
desligado.
• Antes de retirar o vidro, deixe que arrefeça.
• Nunca utilize máquinas de limpeza a vapor.
3.8 Limpeza exterior do forno.
Use produtos
neutros. Seque-o bem com um pano suave.
Corte da alimentação eléctrica durante
a cozedura.
Desligação automática por estar a
funcionar há várias horas (4.7.2).
Não manipule o forno.
Para repará-lo
contacte o serviço técnico.
p o r t u g u ê s
24
Tabela de cozedura
borrego 1,2 Kg
peru 4 Kg
Alimento
vitela 1,5 Kg
190º C
150º C
200º C
170º C
210º C
190º C
200º C
210º C
220º C
200º C
210º C
50 - 60 min
não
não
não
não
não
não
não
sim
sim
sim
não
85 - 95 min
40 - 50 min
115 - 125 min
50 - 60 min
30 - 40 min
15 - 19 min
7 - 9 min
4 - 5 min
18 - 22 min
180º C
220º C
190º C
230º C
210º C
220º C
230º C
240º C
220º C
pizza
pimentos
vermelhos assados
1,25 Kg
pescada assada
/ bacalhau no
forno 1,5 Kg
porco 1,5 Kg
tomates recheados
4 unid.
camarão no
forno
1 Kg
8.4.1 Bolachas
de manteiga
9.1 Superfície
de gratinado
8.4.2
Madalenas
8.5.1 Pão-de-
ló esponjoso
sem gordura
8.5.2 Tarte de
maça
frango 1,25 Kg
descongelação
para todo o tipo
de alimentos
Programa e temperatura
Tempo
Posição
Pré-
aqueci-
mento
Acessórios
car
nes e aves
ver
duras
peixes e
mariscos
vários
TESTES DE APTIDÃO À FUNÇÃO DE ACORDO COM A
NORMA IEC/EN60350
40º C
-
50ºC
não
Fermentação
massa pão/
bolos
sim
Pré-aquecimento
durante 5 min
sim
não
não
não
não
não
Tabuleiro
profundo
Cozedura 2-3 min.
sobre grelha
Tabuleiro
profundo
Molde sobre
grelha
Grelha
Tabuleiro
profundo/standard
2 moldes sobre 1
grelhas e Tabuleiro
2 moldes sobre 1
grelhas e Tabuleiro
25 - 30 min
1
2
2
2
2
2
4
3
2
2
1
2
1
1
1
3
1
3
1
3
1
0
175º C
40º C
-
50ºC
*
De acordo com modelo.
75º C
2-3 min.
185º C 23 min 21 min
180º C 25 min 28 min
185º C
40-45 min
40 min
*160º C 45 min 35 min
*180º C 40 min 50 min
*180º C 50-55 min 65-70 min
NÃO PYRO PYRO
NÃO PYRO PYRO
NÃO PYRO PYRO
250º C 275º C
NÃO PYRO PYRO
22 min
4

25
e n g l i s h
Instruction manual
Important! Read the entire manual before using the oven. The documentation and accessories are
inside the oven.
The texts in the manual correspond to the numbered diagrams.
Safety
• The electrical installation that feeds the oven must have circuit
breakers installed in accordance with current local installation
regulations.
• The oven must be installed by an authorised installer in
accordance with the manufacturer’s instructions and diagrams.
• The electrical installation must be dimensioned for the
maximum power indicated on the reference plate and the
electrical socket must have a regulatory earth connection.
• If the power cord is damaged, it must be replaced by the after-
sales technical service or by similarly qualifi ed staff, to avoid
hazard.
• Ensure the appliance is unplugged from the mains before
replacing the oven lamp, to avoid electric shock.
• Do not use abrasive cleaning products or metal scouring pads
to clean the oven door, as they could scratch the surface and
cause the glass to shatter.
• During operation, some accessible parts may become hot.
Children under the age of 8 must not go near the appliance
unless under permanent supervision.
• Do not touch the heating elements inside the oven.
Important
Keep this manual with the appliance. If you sell or give the
appliance to another person, make sure you also pass on
the user manual. Read these instructions carefully when
using and installing the appliance. They are designed to
protect your own and others’ safety.

26
e n g l i s h
• This appliance can be used by children aged from 8 years
and above and persons with reduced physical, sensory or
mental capabilities or lack of experience and knowledge if they
have been given supervision or instruction concerning use
of the appliance in a safe way and understand the hazards
involved. Children shall not play with the appliance. Cleaning
and user maintenance shall not be made by children without
supervision.
• This appliance is designed for normal household use only.
Do not use it for commercial or industrial purposes. Use
exclusively for cooking food products.
• Do not try to modify the characteristics of the appliance. It
could be dangerous.
• During cleaning by pyrolysis, surfaces become hotter than
during normal use. Keep out of reach of children.
• Before cleaning with pyrolysis, remove all cooking items and
signifi cant overfl ows.
• Do not put heavy weights on the oven door and make sure
that children do not climb or sit on it.
• Always make sure that the oven is switched off before
cleaning.
• After using the oven, make sure that all the controls are in the
off position.
• Do not use the oven as a larder or to store accessories after
use.
• Do not use steam or high pressure devices to clean the device
(electrical device safety reasons)
• The oven door should always be kept closed when working,
for all programmes, including the grill.
e n g l i s h
27
1 2
Installation
Using the oven
To fi nd out which model your oven is
(“
a
”, “
b
”,
“
c
”, “
d
”, “
e
”) compare its control panel with the
control panels shown in the illustrations.
1.1 Unpacking.
Remove all the protective
packaging elements.
1.2 Mains connection.
Always take into account
the data on the reference plate (1.2.1) and
the measurements of the cabinet the oven
will be housed in (1.2.2, 1.2.3).
The appliance must be connected to the
mains with a fi xed single-phase connection
with the neutral-to-neutral (blue) connection
guaranteed (1.2.4). Fit the oven into the
space and centre it (1.2.5). Make sure there
is no excess cable in the upper part (1.2.6).
Screw it to the fi tting using the two screws
supplied (1.2.7). The fi tted furniture or its
surface must be heat-resistant. The time
must be set in order to fi nish the installation.
After a period of inactivity, the machine
will turn to standby and its brightness
will diminish or the screen will switch off,
depending on the model.
0
Identifi cation
2.1 Setting the time.
When you switch on the
oven, the display will fl ash (2.1.1, 2.1.2).
Adjust the time turning the
dial (2.1.3,
2.1.4). The time will automatically be
validated after 3 seconds, or if you press
either the
(2.1.5) or
button (2.1.6).
Note:
The time will need to be reset if a
power cut occurs.
2.2 Changing the time
.
With the oven
switched off, press
until it shows
/
(2.2.1), or press
and hold it down for
a few seconds (2.2.2). The time will fl ash.
Adjust it by turning the
dial (2.2.3, 2.2.4).
The hour will automatically be validated after
a few seconds.
2.3 Beeper function .
Press
or
until
appears (2.3.1, 2.3.2). Adjust the
time turning the
dial (2.3.3). The time
will automatically be validated after a few
seconds and the countdown will start. A
beep will sound when the countdown ends.
Press any button to stop the beep.
2.4
Before using your new oven for the fi rst
time, heat it up while empty
(with no food
in it and with the control turned to
, for
30 minutes at 250ºC). It may produce some
smoke or a bad smell (this is normal and is
caused by the oven heating up grease residue
etc.). When it has cooled down, pre-clean it
by wiping the inside with a damp cloth.
2.5 Accessories.
Depending on the model
there is a Deep Tray (2.5.1), Flat Tray (2.5.2)
and Multifunctional Grill (2.5.3) that work
separately. If it also possible to combine
either tray with the Multifunctional Grill
(2.5.4) to make a set. All the accessories
or sets can be used directly or mounted
on the Partial Extraction Grill (2.5.5) or the
Total Extraction Grill (2.5.6, 2.5.7), (2.5.8).
If you have the partial extraction tray, it can
be used separately or together with trays
(3 types) (2.5.9). The Simple Grill is used
separately (2.5.10). If you have telescopic
rails, remove the tray before installing them in
the oven (2.5.11). The telescopic rails extend
automatically due to the weight of the tray
when the oven is opened (2.5.12). Food must
always be placed on a tray on the telescopic
rails (2.5.13). Bear in mind the position of the
grills when installing them. There are anti-
tipping stops at the sides (2.5.14).
2.6 Accessory positions.
The accessories
can be fi tted in 5 different positions
.
2.7 Cooking the food.
Place the food in the
oven. Choose the accessory or accessories
to be used and their recommended position,
or consult the cooking table. Close the oven
door.
COOKING
2.8 Selecting the cooking function
. Turn
the function selector
and select the
desired function according to the model.
Traditional fanned heat.
For any kind of
dish. Several dishes may be cooked at once
without their fl avours or smells mixing.
Turbo plus.
The heat is produced by the
central element. On the
“ f ”
model, it uses
this function for defrosting, setting the
temperature to 35ºC.
Master Chef.
Smart cooking system.

e n g l i s h
28
Fanned high grill.
This browns the food,
distributing the heat evenly. Ideal for large-
sized roasts.
High grill.
For browning pasta, souffl és and
bechamel sauce.
Low grill.
For hamburgers, toast and food
with a small surface area.
High base heat.
The heat from the oven
base is evenly distributed. Ideal for paellas or
pizzas.
Fanned base heat.
The fan distributes the
base heat evenly. Suitable for paellas.
Traditional heat.
For bread, cakes, cakes
with fi lling and lean meat.
Defrost.
Rapidly thaws any kind of food.
2.9 Selecting the temperature.
The oven
suggests an optimum temperature when
you select the cooking function, the
cooking process will start immediately. You
can change this temperature during the
3 seconds the temperature is fl ashing, or
as follows: press the
button (2.9.1).
The temperature will fl ash. Change the
temperature by turning the
dial (2.9.2).
Alternatively, press the
button until
appears (2.9.3). The temperature will fl ash.
Change it by turning the
dial (2.9.4).
If the ºC button is pressed and held down
(a,b,e), the real temperature inside the oven
will appear on the display.
2.10 Switching off the oven.
In all cases, when
the cooking process is complete, turn the
function selector dial
to (2.10.1).
TIME FUNCTIONS
2.11 Selecting the cooking time
.
Select
the cooking function and the desired
temperature. Press
or
until
starts to fl ash (2.11.1. 2.11.2). Adjust
the cooking time by turning the
dial
(2.11.3, 2.11.4). After a few seconds the
time will automatically be validated and the
countdown will begin. When cooking is
complete, a beep will sound. To stop the
beep, press any button and switch off the
oven.
2.12 Selecting the end time
:
Select the
cooking function, the temperature and the
cooking time. Press
or
until
is
fl ashing (2.12.1, 2.12.2). Adjust the cooking
end time by turning the
dial (2.12.3,
2.12.4). The start of cooking will be delayed
so that it fi nishes at the time shown. When
the end time is reached, the oven will beep.
To stop the beep, press any button and
switch off the oven.
2.13 Automatic switch-off.
If you forget
to switch off the oven, it will switch off
automatically after a certain time. If the
temperature is lower than 100ºC, the
oven will switch off after 10 hours. If the
temperature is higher than 100ºC, it will
switch off after 3 hours.
2.14 Celeris Function.
For pre-heating the oven.
Turn the function selector dial to
and
enter the desired temperature. The oven
will quickly reach the temperature selected.
When it has been reached, place the food
inside the oven and select the cooking
function and cooking time required.
2.15 Child lock.
For preventing children from
playing with the oven. Press the
and
buttons simultaneously until
appears
(2.15.1). To unblock it, repeat the operation.
2.16 Residual heat.
This shows that the oven
is still hot after it has been switched off.
The thermometer will appear on the display
while the temperature inside the oven is
over 60º C.
2.17 Cocción Master Chef. (“e”).
Smart cooking system. This system
automatically calculates the time and
temperature cycles using electronic sensors
to measure the level of humidity and
temperature variations. It has two phases:
Phase 1:
Information gathering. It determines the ideal
cooking time. This phase lasts between 5
and 40 minutes, depending on the dish.
Select
(Master Chef)
on the function
selector dial (2.17.1) and choose the type
of dish to be cooked from the six dishes
suggested by the oven by turning the
dial. After a few seconds, the oven will begin
the cooking process (2.17.2). The table
below shows the food types and correct
levels the tray should be placed at for each
type of food.
Food type
Tray level
Pizza 1
Roast beef
2
Chicken 2
Fish
2
Stuffed vegetables
2
Sweet cake
2
e n g l i s h
29
3
Maintenance and
cleaning
3.1 Cleaning the accessories.
The accessories
are dishwasher-safe. To wash them up by
hand, use ordinary detergent. Leave them to
soak for easier cleaning.
Non-pyrolytic ovens
3.2 Smooth-walled models.
The AquaSliding Function
system makes it
easier to clean the oven with steam. It takes
35 minutes and is done as follows:
• Start with a lukewarm oven.
• Remove all accessories and side guides
from the model.
• Spray 200 ml of water onto the inside
walls of the oven.
Using too much
water could cause overfl ow.
• Depending on the model,
a)
AquaSliding
wait until the oven
indicates the end of the cleaning cycle.
b)
traditional
t 150ºC for 10 minutes.
After this time has elapsed, reduce the
temperature to minimum (35ºC - 75ºC
according to the model) and maintain
for 25 minutes. Failure to follow these
instructions may cause condensation
on the front.
• Switch the oven off.
• Carefully open the oven door, avoiding
contact with the steam.
• At the end of the cycle, remove the water
from inside and wipe away any remaining
dirt with a dishcloth. This cycle is used to
assist cleaning but loses its effectiveness if
the recommended times are not followed.
* Depending on the model, it can assist the
Warning function.
3.3 Self-cleaning rough-walled models.
On
these models, the rear plate and side panels
are covered with a self-cleaning enamel
that removes the grease while the oven is
functioning. The side panels are reversible,
doubling the lifetime of the coating.
If the panels are not performing the self-
cleaning process suffi ciently, they will need
regenerating. To do this, remove all the
accessories and utensils from the inside of
the oven. Thoroughly clean the oven surfaces
that are not self-cleaning. Select the
function.
Set the temperature to 250ºC and set the
time between 30 and 60 minutes, depending
on how dirty the oven is.
When the cleaning programme ends and
the oven has cooled down, wipe the self-
cleaning elements with a damp sponge. They
will then be totally functional again.
Pyrolytic ovens
3.4 Pyrolysis cleaning.
• The cleaning process consists of the dirt
being burnt at high temperatures.
• The smoke and smells are eliminated by a
catalyser.
• There is no need to wait until the oven has
accumulated a large amount of grease to
perform the cleaning process.
• After pyrolysis, when the oven has cooled
At this stage, the display alternatively shows
the type of food selected and the cooking
time remaining (2.17.2, 2.17.3).
No pre-heating is required with Master Chef.
The cooking cycle must start with a cold
oven. If the oven is still hot from a previous
use, allow it to cool down. The residual heat
icon will appear on the display (2.17.4).
Phase
2:
After gathering the information and
calculating the remaining cooking time, the
time left until the cooking process ends will
appear on the display (2.17.5). When the
dish is ready, the oven will switch off and a
beep will sound. To stop the beep, press
.
Important:
Do not open the door during cooking as this
will spoil the calculation and data recording.
The cooking process will be cancelled and
“door” will appear on the display (2.17.6).
e n g l i s h
30
down, wipe it with a damp cloth to remove
the white ash residue.
• Before starting the pyrolysis process,
take all the accessories out of the oven,
including the cooking accessories and the
telescopic runners.
• If any substances are stuck to the inside of
the oven due to spill-overs, remove them
before carrying out the pyrolysis process
as they could catch fi re or give off large
amounts of smoke.
• During the pyrolysis process the surfaces
become hotter than during normal use.
Keep children away from the oven.
Depending on how dirty the oven is, you can
choose between two types of pyrolysis.
Pyrolysis
:
This type of pyrolysis should
only be used when the oven is very dirty. The
cleaning process takes 2 hours. To activate
it, turn the function selector dial
to
(3.4.1).
Note:
Pyrolysis cleaning is possible with this
option, with the enamelled tray accessory.
Place it at level 2. First remove the excess
grease accumulated.
ECO pyrolysis
:
The cleaning process
takes 1 hour 30 minutes. To activate it, turn
the function selector
to
(3.4.2).
Note:
The time and temperature parameters
are set parameters and cannot be altered.
When the process begins, the oven reaches
very high temperatures, the door safety lock
is activated and the pilot light beside the
symbol comes on (3.4.3). When the oven has
cooled down, the pilot light switches off and
the door can be opened.
3.5 Delayed pyrolysis.
You can programme the
pyrolysis end time. Turn the function selector
dial
and select
or
(3.5.1). Press
(3.5.2) or
(3.5.3) until
begins to
fl ash. Adjust the pyrolysis end time by turning
the time selector dial
(3.5.4, 3.5.5).
3.6 Cleaning the inside walls.
Take out the side
runners and clean off any grease or ash that
has been left after the cleaning processes.
Depending on the models, the side runners
are fi xed in two ways, either without a
support (3.6.1, 3.6.2) or with a support
(3.6.4, 3.6.5). When you have removed them,
use a damp cloth to clean the side walls
(3.6.3, 3.6.6). When you have cleaned the
oven walls, replace the runners. If your oven
has a fold-down grill, pull upwards and press
to fold it down (3.6.7) and clean the top wall
with a damp cloth (3.6.8).
3.7 Cleaning the glass.
Cleaning the outside of the glass:
Use a
soft cloth soaked in a glass cleaning product.
Cleaning the inside of the glass:
If the
inside of the glass is dirty, you can remove it
for cleaning.
When the oven has cooled down, open the
door as wide as possible (3.7.1) and fi x it
in place with the red stop supplied in the
accessories bag (3.7.2). Use the remaining
sheet accessory on one side of the glass to
raise up the glass like a lever. Do the same
on the other side of the glass. Remove the
red stop and close the door (3.7.3). Remove
the glass (3.7.4), clean it and dry it with a
cloth (3.7.5). If necessary, remove the whole
glass panel unit inside the door. This unit
consists of either one or two glass panels,
depending on the model, with a black stop
in each corner. To remove them, place your
hand under the door and pull upwards
(3.7.6). When you have taken out the unit,
remove the stops to clean the glass panels
(3.7.7).
When the glass panels are clean (3.7.8) fi t
them onto the rubber stops again, with the
stud facing upwards (3.7.9) and replace the
glass panels so that the letters “L” (left) and
“R” (right) are beside the hinges (3.7.10).
Lastly, place the remaining glass panel so
that the word PYROLYTIC can be read
(3.7.11). Remove the stops (3.7.12) and
close the door.
Warnings:
• Make sure the oven is switched off.
• Allow the glass to cool down before
removing it.
• Never use steam cleaning machines.
3.8 Cleaning the outside of the oven.
Use
neutral cleaning products. Dry the oven well
with a soft cloth.

e n g l i s h
31
5
The Environment
4
Troubleshooting
You can solve the following problems yourself:
4.1 4.1 The oven is not heating up.
Check
it is plugged in and switched on and that
the fuse has not blown. Select a higher
temperature setting.
4.2 The interior light is not working.
Change
the bulb or replace the fuse.
4.3 Smoke is coming out during cooking.
Turn the temperature down and/or clean
the oven.
4.4 The pyrolysis cleaning process is not
being carried out.
Ensure the door
is correctly closed. Locking system
or temperature sensor failure. Call the
Technical Service.
4.5 A beep is sounding.
The selected
temperature setting has been reached. The
cooking cycle is complete.
4.6 The oven makes a noise after cooking.
This is normal, as the fan keeps running until
the temperature inside and outside the oven
is reduced.
4.7 Failure warnings.
Temperature sensor failure.
Door blocked (4.7.1).
Pyrolysis cannot be carried out.
Door block failure.
Software Failure.
Humidity sensor failure.
Power cut during cooking.
The oven automatically switches
off as it has been functioning for
several hours (4.7.2).
Do not try to repair the oven yourself.
Call
the technical assistance service.
This oven has been designed with
environmental protection in mind.
Respect the environment.
Only preheat the
oven when necessary (see table). Use dark
coloured cake tins whenever possible. For
long cooking times, switch off the oven 5 or 10
minutes before the end of cooking time.
Management of waste electrical and
electronic equipment.
The symbol
indicates that the appliance must
not be disposed of in traditional bins for domestic
waste.
Take your oven to the a special collection centre.
Recycling domestic appliances will prevent
negative consequences for health and the
environment and will allow savings on energy and
resources.
For further information, contact the local
authorities or the shop where you bought the
oven.
e n g l i s h
32
Cooking Table
lamb 1,2 Kg
turkey 4 Kg
Food
beef 1,5 Kg
190º C
150º C
200º C
170º C
210º C
190º C
200º C
210º C
220º C
200º C
210º C
50 - 60 min
no
no
no
no
no
no
no
yes
yes
yes
no
85 - 95 min
40 - 50 min
115 - 125 min
50 - 60 min
30 - 40 min
15 - 19 min
7 - 9 min
4 - 5 min
18 - 22 min
180º C
220º C
190º C
230º C
210º C
220º C
230º C
240º C
220º C
pizza
roasted red
peppers
1,25 Kg
baked hake/
baked cod
1,5 Kg
pork 1,5 Kg
stuffed toma-
toes 4 servings
roasted
lobster
1 Kg
8.4.1 Butter
cookies
9.1 Surface
browning
8.4.2 Fairy
cakes
8.5.1 Fat-free
sponge cake
8.5.2 Apple tart
chicken 1,25 Kg
defrosting, all
types of food
Programme and
temperature
Time
Position Preheat
Accessories
meat and poultry
vegetables
fi sh and seafood
sundry
PERFORMANCE TESTING ACCORDING TO
ST
ANDARD IEC/EN60350
40º C
-
50ºC
no
Fermenting
dough for
bread/cakes
yes
Pre-heat
for 5 min
yes
no
no
no
no
no
Deep Tray
Cook 2-3 min.
on grill
Deep Tray
Mould on grill
Grill
Deep Tray/
standard
2 moulds on 1
grills and deep
2 moulds on 1
grills and deep
25 - 30 min
1
2
2
2
2
2
4
3
2
2
1
2
1
1
1
3
1
3
1
3
1
0
175º C
40º C
-
50ºC
*
Depending on the model.
75º C
2-3 min.
185º C 23 min 21 min
180º C 25 min 28 min
185º C
40-45 min
40 min
*160º C 45 min 35 min
*180º C 40 min 50 min
*180º C 50-55 min 65-70 min
NO PYRO
PYRO
NO PYRO
PYRO
NO PYRO
PYRO
250º C 275º C
NO PYRO
PYRO
22 min
4

33
d e u t s c h
Bedienungsanleitung
Sehr wichtig: Lesen Sie das Handbuch vollständig durch, bevor Sie den Ofen benutzen. Die Dokumentation und das
Zubehör fi nden Sie im Inneren des Ofens.
Dieses Handbuch ist so gestaltet, dass die Texte mit den jeweiligen Zeichnungen korrespondieren.
Sicherheit
•
Der elektrische Anschluss zur Stromversorgung der Ofen muss mit
den entsprechenden Vorrichtungen zur Abschaltung gemäß den
lokalen Vorschriften angeschlossen werden.
• Die Installation des Herdes muss durch einen zuständigen
Installateur durchgeführt werden, der die Anweisungen und
Schemata des Herstellers befolgt.
• Die Elektroinstallation muss gemäß der auf dem Typenschild
angegebenen Maximalleistung bemessen werden und die
Steckdose mit Erdung vorschriftsgemäß sein.
• Wenn das Stromkabel beschädigt ist, muss es durch Ihren
Kundendienst oder ähnlich qualifi ziertes Personal ausgetauscht
werden, damit Gefahren vermieden werden.
• Stellen Sie sicher, dass das Gerät abgeschaltet ist, bevor Sie die
Lampe austauschen, um mögliche Stromschläge zu vermeiden.
• Verwenden Sie keine Poliermittel oder harten Metallschwämme für
die Reinigung der Herdtür, da die Fläche zerkratzt und Bruch mit
Glassplittern hervorgerufen werden könnte.
• Es gibt zugängliche Teile des Geräts, die sich während des Betriebs
erhitzen. Kinder unter 8 Jahren dürfen sich daher nicht in der Nähe
des Geräts aufhalten, es sei denn, unter ständiger Aufsicht.
Wichtig!
Bewahren Sie diese Anleitung gut auf. Wenn Sie das Gerät
verkaufen oder einer anderen Person überlassen, vergewissern
Sie sich, dass Sie auch diese Anleitungen mitliefern. Lesen Sie die
Hinweise, bevor Sie das Gerät installieren und benutzen, denn sie
sollen Ihre Sicherheit und die anderer Personen garantieren.

34
d e u t s c h
• Vermeiden Sie das Berühren der Heizelemente des Herds.
• Dieses Gerät kann von Kindern ab 8 Jahren und Personen
verwendet mit verminderten physischen, sensoriellen oder
geistigen Fähigkeiten oder mangelnder Erfahrung und Kenntnis
benutzt werden, sofern sie eine angemessene Unterweisung
oder Anleitung zur sicheren Handhabung des Geräts erhalten
haben und ihnen die mit der Benutzung einhergehenden Gefahren
bewusst sind. Kinder dürfen mit dem Gerät nicht spielen. Die vom
Benutzer auszuführende Reinigung und Wartung dürfen Kinder
nicht ohne Aufsicht ausführen.
• Ihr Gerät ist für den normalen häuslichen Gebrauch vorgesehen.
Es darf nicht gewerblich oder industriell genutzt werden. Es ist nur
zum Garen von Lebensmitteln ausgelegt.
• Versuchen Sie nicht, die Eigenschaften des Geräts zu
manipulieren, das kann gefährlich sein.
• Während einer Pyrolysereinigung werden die Oberfl ächen heißer
als bei der normalen Nutzung. Halten Sie Kinder von dem Herd
fern.
• Entfernen Sie vor der Pyrolysereinigung alle Kochelemente und
größere Speisereste.
• Legen Sie nichts Schweres auf die Herdtür. Achten Sie darauf,
dass Kinder sich nicht auf die Tür setzen oder stellen.
• Wenn Sie den Herdinnenraum reinigen wollen, schalten Sie
zunächst den Herd aus.
• Vergewissern Sie sich nach der Benutzung des Herds, dass alle
Schalter auf Aus-Position stehen.
• Benutzen Sie den Herd nach seiner Benutzung nicht zum
Aufbewahren von Speisen oder Zubehörteilen.
• Das Gerät nicht mit Dampf- oder Hochdruckreinigern reinigen
(Vorschrift zur elektrischen Sicherheit).
• Während des Betriebs muss die Herdtür bei allen Programmen,
einschließlich Grill, geschlossen sein.
d e u t s c h
35
1 2
Installation
Benutzung
Identifi zieren Sie das Modell Ihres Ofens
(„
a
”, „
b
”,
„
c
”, „
d
”, „
e
”) indem Sie die Steuerung Ihres Ofens mit
den Abbildungen vergleichen.
1.1 Auspacken.
Entfernen Sie alle Schutzelemente.
1.2 Anschluss an das Stromnetz.
Beachten Sie
stets die Angaben auf dem Typenschild (1.2.1)
und die Maße des Möbels, in das der Ofen
(1.2.2, 1.2.3) eingesetzt werden soll.
Das Gerät muss über eine einphasige fest
installierte Stromleitung mit dem Netzstrom
verbunden werden, wobei garantiert werden
muss, dass Null (blaue Kabelfarbe) garantiert
mit Null verbunden wird (1.2.4). Setzen
Sie den Ofen in die Möbelöffnung ein und
zentrieren Sie ihn (1.2.5). Achten Sie darauf,
dass überfl üssiges Kabel nicht im oberen Teil
verbleibt (1.2.6). Befestigen Sie ihn am Möbel
mit den zwei mitgelieferten Schrauben (1.2.7).
Das Material dieses Schrankes bzw. dessen
Beschichtung muss hitzebeständig sein.
Um die Installation am Gerät abzuschließen,
muss die Uhrzeit eingestellt werden. Nach
einer gewissen Zeit der Inaktivität wird das
Gerät in den Standby-Modus wechseln,
in dem, je nach Modell, die Leuchtkraft
der Anzeige verringert oder der Bildschirm
abgeschaltet wird.
0
Identifi kation
2.1 Einstellung der Uhrzeit.
Nach dem Anschluss
des Ofens wird die Anzeige blinken (2.1.1,
2.1.2). Stellen Sie die Uhrzeit durch die Drehung
der Steuerung
(2.1.3, 2.1.4) ein. Nach 3
Sekunden oder nach dem Drücken der Taste
(2.1.5) oder
(2.1.6) ist die Uhrzeit
bestätigt.
Hinweis:
Stellen Sie die Uhrzeit neu ein, wenn
es zu einem Ausfall der Stromzufuhr kam.
2.2 Verändern der Uhrzeit
.
Bei
ausgeschaltetem Ofen drücken Sie
, bis Sie
auf die Position
/
gelangen (2.2.1) oder
drücken Sie
für einige Sekunden (2.2.2). Die
Uhrzeit blinkt, durch die Drehung der Steuerung
(2.2.3, 2.2.4) wird die Uhrzeit eingestellt.
Nach einigen Sekunden ist die Uhrzeit
eingestellt.
2.3 Hinweisfunktion .
Drücken Sie
oder
, bis Sie zur Position
(2.3.1, 2.3.2) gelangen.
Stellen Sie die Uhrzeit durch die Drehung der
Steuerung
(2.3.3, 2.3.4) ein. Nach einigen
Sekunden ist die Zeit eingestellt und sie wird
rückwärts abgezählt. Nach dem Ablaufen der
Zeit wird ein Signalton ausgegeben. Um ihn
abzustellen, bitte eine beliebige Taste drücken.
2.4
Bevor Sie den neuen Ofen zum ersten
Mal verwenden, erhitzen Sie ihn zunächst
einmal leer
(ohne Nahrungsmittel, auf der
Position , 250ºC für 30 Minuten. Dabei kann
Rauch oder den schlechter Geruch auftreten
(das ist normal, weil Fettreste, etc. verbrennen).
Nach dem Abkühlen, reinigen Sie das Innere mit
einem feuchten Tuch.
2.5 Zubehör.
Je nach Modell verfügt man über eine
tiefes Blech (2.5.1), ein fl aches Blech (2.5.2)
und einen Rost für diverse Anwendungen
(2.5.3) die unabhängig voneinander eingesetzt
werden können. Sie können auch irgendein
Blech mit dem Rost (2.5.4) als Einheit
einsetzen. Das gesamte Alles Zubehör oder
die Einheiten können direkt oder auf dem
Rost zur Teilentnahme (2.5.5) sowie dem Rost
zur vollständigen Entnahme (2.5.6, 2.5.7)
(2.5.8) angebracht werden. Wenn Sie über
ein Blech zur teilweisen Entnahme verfügen,
wird es unabhängig oder mit den Blechen (3
Modalitäten) benutzt (2.5.9). Der einfache Rost
ist bei der Benutzung unabhängig (2.5.10).
Wenn Sie über selbstausziehbare Führungen
”Impulse” verfügen, bringen Sie diese zunächst
ohne das Blech (2.5.11) im Ofen an. Die
Führungen ”Impulse” werden automatisch über
das Gewicht des Blechs beim Öffnen des Ofens
ausfahren (2.5.12). Es ist vorgeschrieben, ein
Blech als Träger der Nahrungsmittel mit den
Führungen ”Impulse” zu benutzen (2.5.13).
Achten Sie auf die Position der Roste, wenn
Sie sie in den Ofen einführen. Sie verfügen über
seitliche Anschläge um das Umkippen (2.5.14)
zu verhindern.
2.6 Einschubhöhen.
Sie verfügen über 5
Positionen, um das Zubehör einzusetzen
.
2.7 Das zuzubereitende Nahrungsmittel.
Geben
Sie das Nahrungsmittel in den Ofen. Wählen Sie
das Zubehör und die empfohlene Position aus
oder konsultieren Sie die Tabelle für Garzeiten.
Schließen Sie die Tür.
ZUBEREITEN EINES GERICHTS
d e u t s c h
36
2.8 Auswahl der Garfunktion
. Drehen Sie den
Wahlschalter für die Funktionen
und wählen
Sie je nach Modell die gewünschte Funktion
aus.
Ober-, Unterhitze mit Umluft.
Für alle Gerichte.
Es können verschiedene Gerichte gemeinsam
zubereitet werden, ohne dass sich der
Geschmack oder der Geruch vermischen.
Heißluft.
Die Hitze wird durch den Heizkörper
am Lüfter erzeugt. In dem Modell
“ f “
dient
diese Funktion zum Auftauen; dabei muss die
Temperatur auf 35ºC eingestellt werden.
Master Chef.
Intelligentes Garsystem.
Umluft mit Grill.
Zum Gratinieren, wobei die
Hitze gleichmäßig verteilt wird. Ideal für große
Braten.
Großfl ächengrill.
Gratinieren: Nudelgerichte,
Souffl és und Bechamelsoße.
Kleinfl ächengrill.
Hamburger, Toasts und
Nahrungsmittel mit einer kleinen Oberfl äche.
Pizzastufe.
Die starke Hitze von unten wird
gleichmäßig verteilt und das ist ideal für Paellas,
Pizzas.
Unterhitze mit Umluft.
Der Ventilator verteilt
die niedrige Hitze gleichmäßig. Gut geeignet für
Paellas.
Ober-, Unterhitze.
Brot, Kuchen, gefüllte
Pasteten und magere Fleischsorten.
Auftauen.
Zum Abtauen innerhalb kürzester
Zeigt eeignet.
2.9 Auswahl der Temperatur.
Wenn bei der
Auswahl der Backfunktion der Ofen eine
Optimaltemperatur vorschlägt, beginnt
der Backvorgang sofort. Sie können diese
Temperatur innerhalb von 3 Sekunden ändern,
während sie blinkt, oder in der folgenden Form:
Drücken Sie die Taste
(2.9.1), die Temperatur
wird blinken und sie stellen Sie über das Drehen
der Steuerung
(2.9.2) ein. Oder drücken
Sie die Taste
, bis Sie auf die Position
(2.9.3)erreichen, die Temperatur wird blinken und
sie stellen Sie über das Drehen der Steuerung
(2.9.4) ein.
Wird die Taste ºC gedrückt gehalten (a,b,e),
wird die reale Temperatur im Inneren des Ofens
angezeigt.
2.10 Ausschalten des Ofens
. Nach dem Beenden
des Backens, stellen Sie den Wahlschalter für
die Funktionen
auf die Position (2.10.1).
ZEITSCHALT-FUNKTIONEN
2.11 Auswahl der Betriebszeit
.
Wählen Sie
die gewünschte Funktion und Temperatur aus.
Drücken Sie
oder
bis
blinkt (2.11.1.
2.11.2). Stellen Sie die Backzeit durch das
Drehung der Steuerung
(2.11.3, 2.11.4) ein.
Nach einigen Sekunden ist die Zeit eingestellt
und sie wird rückwärts abgezählt. Bei der
Beendigung wird der Ofen einen Signalton
aussenden, drücken Sie irgendeine Taste und
schalten Sie den Ofen ab.
2.12 Auswahl der Endzeit
:
Wählen Sie die
gewünschte Backfunktion, die Temperatur und
die Zeit aus. Drücken Sie
oder
; bis
blinkt (2.12.1, 2.12.2). Stellen Sie die Backzeit
durch das Drehung der Steuerung
(2.12.3,
2.12.4) ein. Die Inbetriebnahme wird verzögert,
damit der Vorgang zur gewünschten Uhrzeit
abgeschlossen wird. Bei der Beendigung wird
der Ofen einen Signalton aussenden. Um ihn
abzuschalten, drücken Sie irgendeine Taste und
schalten Sie den Ofen ab.
2.13 Automatische Abschaltungen.
Wenn Sie
vergessen, den Ofen abzuschalten, schaltet
sich dieser automatisch nach einer bestimmten
Zeitspanne ab. Mit einer Temperatur die
niedriger als 100ºC ist, wird der Ofen nach 10
Stunden automatisch abgeschaltet. Mit einer
Temperatur die höher als 100ºC ist, wird der
Ofen nach 3 Stunden automatisch abgeschaltet.
2.14 Celeris/Booster-Funktion.
Für das Vorwärmen
des Ofens. Drehen Sie den Wahlschalter für
die Funktionen auf die Position
und geben
Sie die gewünschte Temperatur ein. Der Ofen
wird schnell die gewählte Temperatur erreichen.
Ist sie erreicht, geben Sie das Nahrungsmittel
ein und wählen Sie die Kochfunktion und die
notwendige Zeit aus.
2.15 Sperrfunktion.
Um Eingriffe von Kindern zu
verhindern. Drücken Sie simultan die Tasten
und
, bis
angezeigt wird (2.15.1).
Für das Deaktivieren wiederholen Sie den
Vorgang.
2.16 Resthitze.
Hier wird angezeigt, dass der Ofen
noch heiß ist, obwohl er schon abgeschaltet
wurde. Das Thermometer wird auf der Anzeige
angezeigt, wenn die Temperatur im Inneren
noch höher als 60º C ist.
2.17 Garen mit Master Chef. (“e”).
Intelligentes Garsystem. Automatische
Berechnung der Zeitzyklen und
Temperatur durch elektronische Sensoren,
die die Feuchtigkeitsstufe und
Temperaturschwankungen messen.
Das System umfasst zwei Phasen:
d e u t s c h
37
3
Wartung und
Reinigung
3.1 Reinigung des Zubehörs.
Es ist geeignet
für die Spülmaschine. Wenn Sie es von Hand
spülen, benutzen Sie ein normales Spülmittel.
Weichen Sie es zuvor ein, um die Reinigung zu
vereinfachen.
Phase 1:
Zusammenstellen der Information. Bestimmung
der idealen Garzeit. Diese Phase dauert je nach
Gericht zwischen 5 und 40 Minuten. Wählen Sie
an der Bedienfl äche die Funktion
(Master
Chef)
(2.17.1), suchen Sie dann aus den von
dem Herd vorgegebenen sechs Alternativen die
Art der zu garenden Speise aus, indem Sie den
Schalter
entsprechend einstellen. Nach einigen
Sekunden beginnt der Herd mit dem Garvorgang
(2.17.2). Nachfolgende Tabelle zeigt die Art
der Speisen und die Höhe, auf der das Blech
eingeschoben werden muss.
Art des Gerichts
Position des Blechs
Pizza 1
Rinderbraten 2
Hühnchen 2
Fisch 2
Gefülltes Gemüse
2
Kuchen 2
Während dieser Phase zeigt das Display
abwechselnd den gewählten Speisen-Typ und die
verbleibende Garzeit an (2.17.2, 2.17.3).
Beim Garen mit der Master Chef-Funktion ist ein
Vorheizen nicht erforderlich. Der Garzyklus muss
unbedingt bei kaltem Herd beginnen. Wurde der
Herd zuvor benutzt und ist noch warm, lassen Sie
ihn zunächst abkühlen. Auf dem Display erscheint
das Symbol für Restwärme (2.17.4).
Phase
2:
Nach dem Zusammenstellen der Information und
der Berechnung der verbleibenden Garzeit, wird
dieser Zeitwert auf dem Display angezeigt (2.17.5).
Wenn das Gericht gar ist, schaltet der Herd
aus und es ertönt ein Pfeifton, den Sie mit
ausschalten können.
Wichtig:
Während dem Garen darf die Herdtür nicht
geöffnet werden. Das würde die Berechnung und
Registrierung der Information beeinträchtigen und
den Garvorgang annullieren. In einem solchen Fall
zeigt das Display die Meldung „Door“ (2.17.6).
Ofen ohne Pyrolyse.
3.2 Modelle mit glatten Innenwänden.
Funktion AquaSliding
ist ein System, die die
Reinigung des Herds durch den Einsatz von
Wasserdampf erleichtert. Der Reinigungszyklus
dauert 35 Minuten und ist folgendermaßen
vorzunehmen:
• Der Herd muss Anwärmen sein.
• Nehmen Sie alle Zubehörteile und die seitlichen
Führungen (je nach Modell) heraus.
• Sprühen Sie 200 ml Wasser auf die Innenwände
des Herds.
Zu viel Wasser kann zum
Überlaufen führen.
• Je nach Modell,
a)
AquaSliding
Warten Sie, bis der Ofen
die Beendigung des Zyklus zur Reinigung
anzeigt.
b)
Traditionell
bei 150ºC; Dauer: 10
Minuten. Nach Ablauf dieser Zeit stellen Sie
die Temperatur für weitere 25 Minuten auf
das Minimum (35ºC - 75ºC je nach Modell).
Die Nichtbefolgung dieser Hinweise kann zu
Kondensation an der Vorderseite führen.
• Schalten Sie den Herd aus.
• Öffnen Sie die Herdtür vorsichtig und vermeiden
Sie jeden Kontakt mit dem Dampf.
• Am Ende des Zyklus entfernen Sie das Wasser
aus dem Innern und reinigen Schmutzreste mit
einem Tuch. Dieser Zyklus zur Reinigungshilfe
verliert Effektivität, wenn nicht die angegebenen
Zeiten eingehalten werden.
* Je nach Modell kann die Hinweis-Funktion zur
Hilfe benutzt werden.
3.3 Modelle mit selbst reinigender rauer
Innenwand.
Bei diesen Öfen sind die hintere
Platte und die Seitenwände mit einer selbst
reinigenden Beschichtung versehen, die Fett
beseitigt, während der Ofen im Betrieb ist. Die
Beschichtung der Seitenwände ist reaktivierbar
und so wird die Lebensdauer des Ofens erhöht.
Wenn sich die Wände nicht mehr genügend
reinigen, ist es notwendig, sie zu reaktivieren.
Nehmen Sie das gesamte Zubehör und
Kochgefäße aus dem Inneren des Ofens.
Reinigen Sie alle Oberfl ächen des Ofens gut,
d e u t s c h
38
die nicht selbst reinigend sind. Wählen Sie die
Funktion
.
Wählen Sie eine Temperatur von 250º C und eine
Zeitspanne zwischen 30 und 60 Minuten, je nach
Grad der Verschmutzung.
Wenn das Programm zur Reinigung beendet und
der Ofen abgekühlt ist, reinigen Sie alle selbst
reinigenden Teil mit einem feuchten Schwamm
und sie sind nun wieder vollständig funktionsfähig.
Pyrolyseöfen.
3.4 Reinigung durch Pyrolyse.
• Die Reinigung geschieht durch die Entfernung
der Verschmutzung bei hohen Temperaturen.
• Der Rauch und die Gerüche, die dabei auftreten,
werden über einen Katalysator beseitigt.
• Es muss nicht gewartet werden, bis sich
im Ofen viel Fett angesammelt hat, um die
Reinigung durchzuführen.
• Nach der Pyrolyse, wenn der Ofen wieder
abgekühlt ist, reinigen Sie ihn mit einem
feuchten Tuch, um die weiße verbleibende
Asche zu entfernen.
• Bevor Sie die Pyrolyse starten, nehmen Sie alles
Zubehör aus dem Ofen, auch das gesamte
Kochgeschirr und die Teleskopführungen.
• Wenn es größere Schmutzfl ächen durch
Überlaufen gibt, beseitigen Sie diese bevor
Sie die Pyrolyse starten, um zu vermeiden,
dass diese in Brand geraten oder es zu einer
größeren Rauchentwicklung kommt.
• Während der Pyrolyse werden die Oberfl ächen
heißer als bei der normalen Benutzung, weshalb
Sie Kinder fernhalten sollten.
Je nach Grad der Verschmutzung des Ofens können
Sie zwischen zwei Arten der Pyrolyse wählen.
Pyrolyse
:
Benutzen Sie diese, wenn der
Grad der Verschmutzung hoch ist, die Reinigung
wird etwa 2 Stunden dauern. Um sie zu starten,
drehen Sie den Wahlschalter für die Funktionen
auf die Position
(3.4.1).
Hinweis:
In dieser Option ist die Reinigung
über eine Pyrolyse möglich, Zubehör ist das
emaillierte Blech. Positionieren Sie es auf der
Stufe 2. Nehmen Sie zuvor das überschüssige
angesammelte Fett ab.
Pyrolyse ECO
:
Diese Reinigung wird in
1 Stunde und 30 Minuten ausgeführt. Um sie
zu starten, drehen Sie den Wahlschalter für die
Funktionen
auf die Position
(3.4.2).
Hinweis:
Die Parameter für Zeit und Temperatur
sind festgelegt und können nicht verändert
werden.
Zu Beginn des Vorgangs wird der Ofen sehr
hohe Temperaturen erreichen, weshalb die Tür
zur Sicherheit blockiert ist, die Leuchtanzeige
wird mit dem Symbol (3.4.3) aufl euchten.
Wenn die Temperatur wieder zurückgeht, wird die
Leuchtanzeige erlöschen und man kann die Tür
wieder öffnen.
3.5 Verzögerte Pyrolyse.
Es kann die Uhrzeit
programmiert werden, zu der die Pyrolyse
beendet wird. Drehen Sie den Wahlschalter für
die Funktionen
und wählen Sie
oder
(3.5.1). Drücken Sie
(3.5.2) oder
(3.5.3)
bis
blinkt. Stellen Sie die Uhrzeit ein, zu der
die Pyrolyse beendet werden soll, indem Sie den
Wahlschalter für Zeit
(3.5.4, 3.5.5) drehen.
3.6 Reinigung der Innenwände.
Nehmen Sie die
seitlichen Führungen heraus, um die Fettreste
oder die Asche zu beseitigen, die sich nach der
Reinigung hinter ihnen befi nden kann. Je nach
Modell gibt es zwei Formen, wie die seitlichen
Führungen gehalten werden: ohne Halter (3.6.1,
3.6.2) oder mit Halter (3.6.4, 3.6.5). Nach der
Entnahme benutzen Sie ein feuchtes Tuch für die
Reinigung der Seitenwände (3.6.3, 3.6.6). Bringen
Sie nach der Reinigung der Ofenwände die
Führungen wieder an.
Wenn der Ofen über einen Klappgrill verfügt,
ziehen Sie ihn nach oben und drücken Sie, um ihn
zu senken (3.6.7) und reinigen die Oberseite mit
einem feuchten Tuch (3.6.8).
3.7 Reinigung des Glases.
Äußere
Reinigung:
Benutzen Sie ein weiches
Tuch, das mit einem Glasreiniger angefeuchtet
wurde.
Äußere Reinigung:
Wenn das Innere der
Gläser verschmutzt ist, könne Sie zur Reinigung
abgenommen werden.
Wenn der Ofen kalt ist, öffnen Sie die Tür
vollständig (3.7.1) und bringen Sie den roten
Anschlag an, der mit der Zubehör-Tüte geliefert
wird (3.7.2). Führen Sie das andere Zubehörteil
aus Blech in die Seite des Glases ein, um es mit
einer Hebelwirkung anzuheben. Machen Sie das
