ResMed VPAP III ST-A: инструкция
Раздел: Климатическое Оборудование
Тип: Увлажнитель Воздуха
Инструкция к Увлажнителю Воздуха ResMed VPAP III ST-A
1
2
1
3
4
BILEVEL • AdAptIVE sErVo VEntILAtor
User Guide
English • Deutsch • Français • Nederlands • Italiano • Español • Português • Ελληνικά • Magyar • Polski • Türkçe • Русский • Česky • Slovensky
A
(a)
(d)
(c)
(b)
(e)
B
1
2
3
4
5
C
D
2
9
8
5
9
10
10
3
9
6
7
4
1
8
1
2
3

English
ASV only: Attach the mask to the end of the air tubing with
the proximal cuff (e).
Please ensure that you read any specific references in this user
guide that apply to your product type. Use the following list to
WARNING
identify your product type:
Make sure the power cord and plug are in good condition •
Bilevel – VPAP™ ST-A devices •
and the equipment is not damaged.
Adaptive Servo Ventilator (ASV) – AutoSet CS™ devices. •
Only ResMed air tubing should be used with the device. •
This manual is specific to your device. Do not use with other
A different type of air tubing may alter the pressure you
devices. Information for clinicians is available in the clinical guide.
actually receive and reduce the effectiveness of your
treatment.
Indications for Use
Blocking the tubing and/or air inlet of the device while in •
Your device is intended for home and hospital use.
operation could lead to overheating of the device.
Bilevel
Use care when handling the air tubing. Be particularly •
Your bilevel ventilator device is intended to provide noninvasive
careful when attaching the Luer connector to the device. If
ventilation for patients with respiratory insufficiency or obstructive
you kink or excessively twist the sensor tube, it may affect
sleep apnoea (OSA).
the protection offered by the mask pressure alarm system.
Adaptive Servo Ventilator (ASV)
CAUTION
Your adaptive servo ventilator device is intended to stabilise the
Be careful to place the device where it cannot be bumped, •
ventilation of adult patients exhibiting Cheyne-Stokes Respiration
and where no one will trip over the power cord.
(CSR), or central sleep apnoea (CSA) associated with congestive
If you put the device on the floor, make sure the area is free •
heart failure, with or without upper airway obstruction. It is also
from dust and clear of bedding, clothes or other objects
intended for the treatment of patients with obstructive sleep
that could block the air inlet.
apnoea (OSA).
Make sure the area around the device is dry and clean. Take •
Contraindications
care when using liquids around the device.
Positive airway pressure may be contraindicated in some patients
with the following conditions:
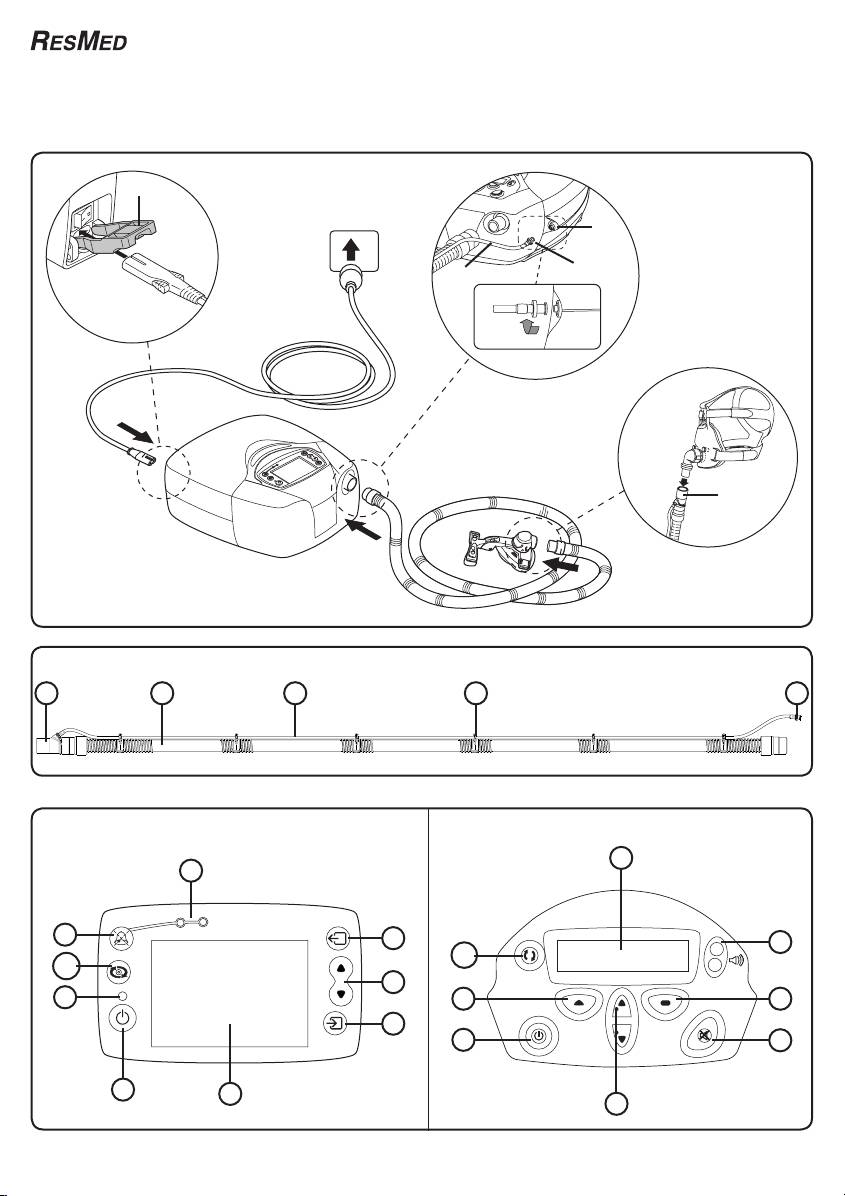
Device Control Panel
Refer to the control panel (illustrations C and D on page 1) that
pneumothorax or pneumomediastinum •
best matches your device.
pathologically low blood pressure, particularly if associated •
Your control panel may have the following items: (1) Start/Stop;
with intravascular volume depletion
(2) LCD screen; (3) Up and Down keys; (4) Enter key; (5) Exit
cerebrospinal fluid leak, recent cranial surgery or trauma •
key; (6) Left key; (7) Right key; (8) Alarm Mute; (9) LEDs;
severe bullous lung disease •
(10) QuickView.
dehydration. •
Starting Treatment
Adverse Effects
Turn the main power switch at the back of the unit to on (1. I).
You should report unusual chest pain, severe headache or
Lie down and arrange the air tubing so that it is free to move if 2.
increased breathlessness to your prescribing physician. An
you turn in your sleep.
acute upper respiratory tract infection may require temporary
ASV only: Select your mask type and run Learn Circuit.
discontinuation of treatment.
To start treatment, press 3.
. (If SmartStart™/Stop is enabled on
The following side effects may arise during the course of therapy
your device, breathing into your mask should start therapy
with the device:
automatically.)
drying of the nose, mouth or throat •
Fit your mask as described in the mask user instructions.4.
bloating •
ear or sinus discomfort •
WARNING
eye irritation •
A mask should not be used unless the device is turned on
skin rashes •
and operating properly.
nosebleed. •
CAUTION
Do not leave long lengths of air tubing around the top of your
Masks and Humidifiers
bed. They could twist around your head or neck while you are
Recommended masks and humidifiers are available from your
sleeping.
place of purchase. For information on using your mask or
humidifier, refer to the user guide supplied with your mask or
Stopping Treatment
humidifier.
To stop treatment at any time, remove your mask and press or,
if your device has SmartStart/Stop enabled, simply remove your
Setting up your Device
mask and treatment will end.
Refer to illustration A on page 1.
There are two sockets at the rear of your device. Insert the 1.
Using the Menus
power cord into the top socket and push the locking clip (a)
Key Functions
down to hold the cord in place.
Up and Down keys: Scrolls through menus and setting options.
Plug the other end into a power outlet.2.
Enter key: Enters menus; changes options; applies settings.
Connect the air tubing to the air outlet of the device. 3.
Exit key: Exits menu or setting.
ASV only: To attach the pressure sensor tube (b) to the device,
Left key: Enters menus; changes options; applies settings.
screw the Luer connector (c) onto the socket (d) on the side
Right key: Exits menu; cancels operation.
of the device. Ensure all components have been correctly
Menu Settings
assembled and check for any split or damaged parts.
Some menu items may not be available on your model.
ASV air tubing is assembled as follows (refer to illustration B
Ramp: Period during which the device increases from a low
on page 1):
pressure to the prescribed treatment pressure.
(1) Proximal cuff; (2) Air tubing; (3) Pressure sensor tube;
(4) Tube clip; (5) Luer connector.
Learn Circuit: Allows the device to ‘learn’ what pressure it needs
to build in to its calculations, based on the components in the
Connect the assembled mask system to the free end of the 2.
system. Select every time you add or remove a component.
air tubing.
2

Mask: Selects your mask type.
Using a Battery to Power the Device
Tube Length: Selects the length of air tubing.
Information regarding suitable DC and battery power supplies for
Humidifier: Selects the type of humidifier used with your device.
your device can be found on www.resmed.com on the Products
SmartStart/Stop: Turns the SmartStart/Stop function on or off.
page under Service & Support > Ventilation Accessories.
Leak Alert/Mask Alarm: If enabled, sounds an alarm when a high
Adding Supplemental Oxygen
mask leak is detected.
Up to 15 L/min of oxygen can be added at the mask or at an
Alarm Vol/Test: Sets the alarm volume and tests the alarm.
oxygen connector between the device (or integrated humidifer)
Backlight: Sets LCD backlight to permanently on (ON) or to turn
and the air tubing while still providing safe and effective therapy.
off after two minutes if no key is pressed (AUTO).
Clock: Sets the time and date.
WARNING
Language: Selects the LCD display language.
When oxygen is added, always ensure that you verify the
Low PS: LOW PS is displayed if your clinician has enabled the
correct operation of triggering and cycling, and activation of
Insufficient Pressure Support alarm.
mask alarm when enabled.
Alarms
Using an Antibacterial Filter
To mute an alarm, press the Alarm Mute key once.
If supplied by your clinician, antibacterial filters can be used
Power failure is indicated by the LCD turning off and:
with your device. Fit the antibacterial filter to the air outlet of
two alternating continuous tones and a red flashing LED, or •
the device (or integrated humidifer). Follow the manufacturers
a single intermittent tone and yellow flashing LED. •
recommendation on the replacement schedule.
The alarm will stop if you press the Alarm Mute key or after
Cleaning and Maintenance
two minutes or when power is restored.
Daily:
A single intermittent tone and yellow flashing LED will alert you to
Disconnect the air tubing and hang it in a clean, dry place until
the following alarm conditions. Follow the steps below to resolve.
next use.
If any of the following messages appear on your LCD screen: •
Weekly:
PRESSURE ERROR
Remove the air tubing and wash it in warm water and mild 1.
IPAP LOWER ALARM
detergent. Rinse thoroughly, hang and allow to dry.
SENSOR ERROR
Before next use, reassemble the mask and headgear.2.
SYSTEM ERROR
Reconnect the air tubing.3.
return your device to your place of purchase.
Monthly:
If any of the following messages appear on your LCD screen: •
CHECK TUBE
Clean the exterior of the device with a damp cloth.1.
LOW PRES ALARM
Check the air filter for holes and blockage by dirt. Replace it 2.
LOW PRESSURE
every six months, or more often in a dusty environment.
(1) check that the air tubing and pressure sensor tube (ASV
Check for any split or damaged components.3.
only) are connected properly; (2) turn the device off and on
For information on cleaning your mask or humidifier, refer to the
again at the power switch and, if the alarm persists, return to
user guide supplied with your mask or humidifier.
your place of purchase.
WARNING
If any of the following messages appear on your LCD screen: •
Beware of electric shock. Do not immerse the device or power
HIGH PRES ALARM
cord in water. Always unplug the device before cleaning and
HIGH PRESSURE
make sure it is dry before reconnecting.
HIGH AVG PRESS
LOW PS
CAUTION
LOW MV
Do not hang the air tubing in direct sunlight as it may •
(1) treatment stops; (2) turn power off; (3) check that the air
harden over time and eventually crack.
tubing and pressure sensor tube (ASV only) are connected
Do not use bleach, chlorine, alcohol, or aromatic-based •
properly and not obstructed; (4) turn the device on again; (5)
solutions, moisturising or antibacterial soaps or scented
(ASV only) perform Air Circuit Learn functions; (6) try using
oils to clean the air tubing or the device. These solutions
the device one more time and, if the alarm persists, return to
may cause hardening and reduce the life of the product.
your place of purchase.
If the following message appears on your LCD screen: •
Changing the Air Filter
FLOW BLOCKED
Disconnect the power cord and air tubing.1.
(1) treatment stops; (2) turn power off; (3) check and remove
Remove the air filter from the air inlet at the back of the device.2.
any blockage in the air circuit; (4) turn the device on again; (5)
Put the new air filter into the air inlet with the blue side facing 3.
try using the device one more time and, if the alarm persists,
out from the device.
return to your place of purchase.
If the following message appears on your LCD screen: •
CAUTION
HIGH LEAK
Do not wash the air filter.
adjust the mask to minimise leak.
If the following message appears on your LCD screen: •
Technical Specifications
NVENT ALARM
Operating pressure range 2 to 30 cm H
2
O (Bilevel)
NO MASK VENT
4 to 20 cm H
2
O (ASV)
ensure your mask vent holes are not blocked and, if the alarm
Power supply Input range 100–240V, 50/60Hz;
persists, contact your place of purchase.
100V, 400Hz (VPAP ST-A with
QuickNav only)
ResLink™
ASV: 60VA
The ResLink is an optional accessory that records data during
VPAP: 2.2A
your therapy so your clinician can observe your progress and
Operating temperature +5°C to +35°C
adjust settings if necessary. For full details on using the ResLink,
refer to the ResLink user guide.
Operating humidity 10–95% non-condensing
3
