Leadtek TERA2321 Zero Client: инструкция
Раздел: Бытовая, кухонная техника, электроника и оборудование
Тип: Программное Обеспечение
Инструкция к Программному Обеспечение Leadtek TERA2321 Zero Client

®
Tera2 PCoIP Zero Client
Quick Start Guide
PRODUCT NAME: Zero Client
MODEL: 292D, 292E, 293D, 293F P/N: W0501G00475A
Table of Contents
English ...................................................... 1
Française ................................................ 6
Deutsch ................................................... 11
Español .................................................. 16
Português ............................................... 21
Italiano .................................................... 26
Русский .................................................. 31
Magyar .................................................... 36
Türk
........................................................ 41
日本語
.................................................... 46
한국어 .................................................. 51
简体中文
................................................. 56
繁體中文 ................................................. 62

English
Tera2 PCoIP® Zero Client
Quick Start Guide
Models: TERA2321 DVI Dual Display PCoIP Zero Client
TERA2321 DVI+DP Dual Display PCoIP Zero Client
TERA2140 DVI Quad Display PCoIP Zero Client
TERA2140 DP Quad Display PCoIP Zero Client
1

Thank you for your purchase. This guide
provides installation instructions for
English
PCoIP zero clients.
RESOLUTION OPTIONS
PACKAGE CONTENTS
Model TERA2321 DVI
• TERA2321 Dual Display PCoIP Zero Client
• 1-2 DVI monitors up to 1920x1200
OR TERA2140 Quad Display PCoIP Zero Client
• 1 DVI + 1 VGA monitor up to 1920x1200
• Power supply
• 1 DVI monitor up to 2560x1600∗
• Cable adapter for dual-link DVI (may be
Model TERA2321 DP+DVI
included, quantity 2 for TERA2140,
• 1 DisplayPort + 1 DVI or VGA monitor
1 for TERA2321)
up to 1920x1200
• Ethernet cable (may be included)
• 1 DisplayPort monitor up to 2560x1600
• Quick Start Guide
Model TERA2140 DVI
• 1-4 DVI monitors up to 1920x1200
• 1-2 DVI monitors up to 2560x1600
• 1-2 DVI monitors up to 1920x1200 + 1 DVI
monitor up to 2560x1600∗
Model TERA2140 DP
• 1-4 DisplayPort monitors up to 1920x1200
• 1-2 DisplayPort monitors up to 2560x1600
• 1-2 DisplayPort monitors up to 1920x1200
+ 1 DisplayPort monitor up to 2560x1600
∗ Each DVI 2560x1600 resolution monitor requires a
DVI to Dual Link DVI adapter
OPERATING AND STORAGE CONDITIONS
• Operating temperature: 0 °C to 40 C °
• Storage temperature: -20 to 70 °C °C
2
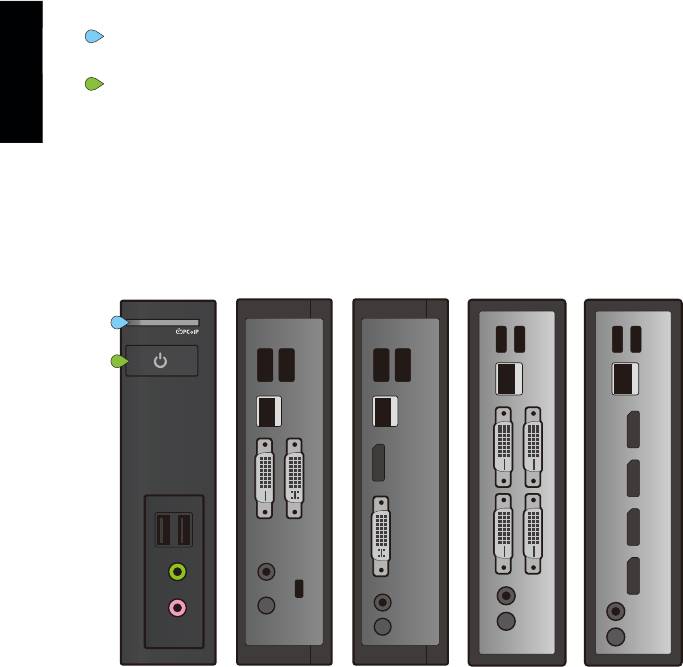
STATUS INDICATORS
Session LED
A
• Solid green – PCoIP session is active.
Power Button LED
B
English
• Solid green – Indicates unit is powered on.
• Flashing green – Host PC in low power state.
• Solid yellow – Client standby power is active
and Wake-on-Lan (WoL) or Wake-on-USB
(WoUSB) is enabled.
• Flashing yellow – Setting up for WoUSB or
client is powering down.
A
B
TERA2321 DVI TERA2321 DP+DVI TERA2140 DVI TERA2140 DP
BUTTON OPERATION
• Press to turn on (when off or in WoL/WoUSB suspend mode)
• Press and hold to turn off
• When in-session
• When connected to a virtual desktop - Press to disconnect.
• When connected to a PCoIP host card - Press to show zero
client control panel with options to disconnect, or power
off the workstation.
3

INSTALLATION STEPS
1. Connect USB keyboard and mouse.
2. Connect one end of the Ethernet cable to the zero client and
the other end to a switch/router. The switch or router should be
on the same network as the host card or virtual desktop server.
English
For more advanced network environments, visit the Teradici
Tech support site at techsupport.teradici.com.
3. Connect monitor cables to the zero client.
4. Connect speakers and/or headphones (optional).
5. Connect power supply to the zero client and a power source.
6. Press front panel button to power on the zero client.
ESTABLISHING A PCoIP CONNECTION
Your zero client is pre-configured to connect directly to a PCoIP host card, but
can be configured to use a third party connection broker such as VMware View
to connect to virtual desktops or PCoIP host cards.
Direct connect to host card
1. Power on host PC with PCoIP host card.
2. Power on the zero client and the connected displays.
3. Ensure the zero client is on the same network as the host card.
4. Wait until the “Connect” dialog appears on screen.
5. Select “Connect” and you will see the message “Discovering hosts,
please wait…”.
6. A list of available hosts is displayed.
7. Select the host card you wish to connect to and click “OK”.
8. The display will show the host PC screen and the zero client’s Session LED
on the front panel will turn green indicating a successful PCoIP connection.
Connect to VMware View brokered VDI desktop and/or PCoIP host card
See PCoIP Zero Client & Host Administrator Guide for detailed setup instructions.
Refer to PCoIP Zero Client & Host Administrator Guide for troubleshooting
and additional information, available at techsupport.teradici.com
4
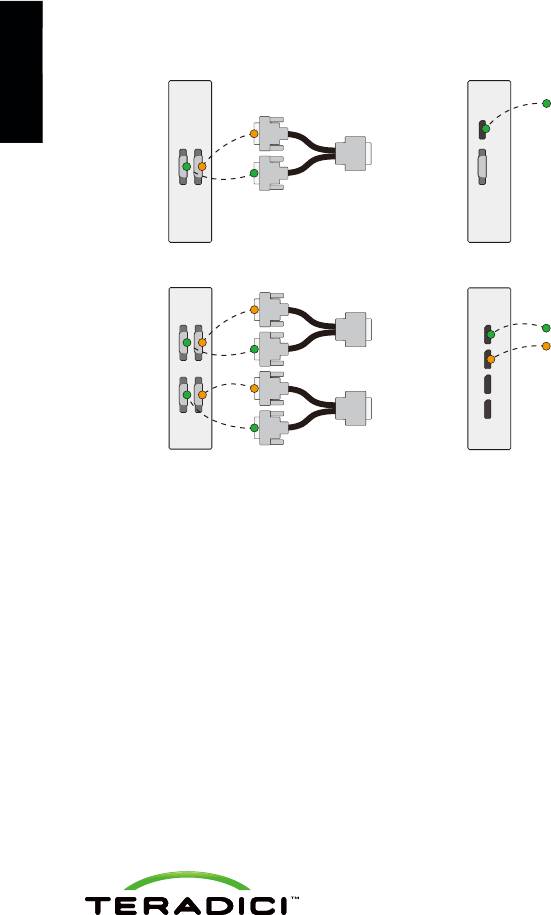
INSTRUCTIONS FOR 2560x1600 RESOLUTION MONITORS
A
Display 1
English
Only supported
A
on DisplayPort
B
2
1 2
Display
A
B
A
1
TERA2321-DVI
TERA2321-DP+DVI
B
2
1 3
Display 1
A
Display 1
1
A
A
B
A
B
1
Display 2
2
B
2 4
B
3
2
A
B
Display 2
4
A
1
TERA2140-DVI
TERA2140-DP
RESOURCES
Available at techsupport.teradici.com
• PCoIP Zero Client & Host Administrator Guide
• PCoIP Protocol Virtual Desktop Network Design Checklist
• Using PCoIP Host Cards with VMware View Guide
© 2004-2012 Teradici Corporation. All rights reserved.
Teradici and PCoIP are trademarks of Teradici Corporation and may be registered in the United
States and/or other countries. All other trademarks are properties of their respective owners.
Specifications are subject to change without notice.
5
