Leadtek TERA2240 Host Card: инструкция
Раздел: Бытовая, кухонная техника, электроника и оборудование
Тип: Программное Обеспечение
Инструкция к Программному Обеспечение Leadtek TERA2240 Host Card

®
Tera2 PCoIP Host Card
Quick Start Guide
PRODUCT NAME: Host Card
MODEL: 292C, 293E P/N: W0501G00474A
Table of Contents
English ...................................................... 1
Française ................................................ 6
Deutsch ................................................... 11
Español .................................................. 16
Português ............................................... 21
Italiano .................................................... 26
Русский .................................................. 31
Magyar .................................................... 36
Türk
........................................................ 41
日本語
.................................................... 46
한국어 .................................................. 51
简体中文
................................................. 56
繁體中文 ................................................. 62

English
Tera2 PCoIP® Host Card
Quick Start Guide
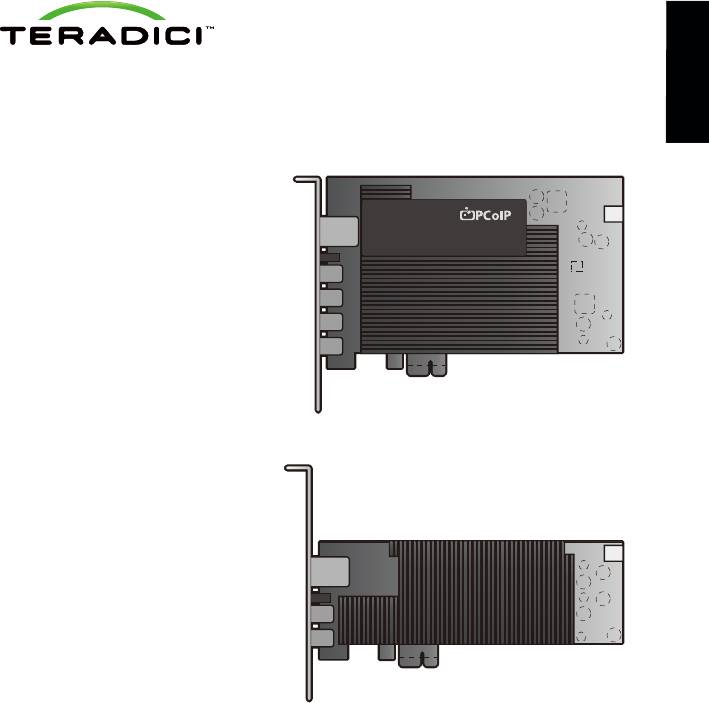
Models: TERA2220 Dual Display PCoIP Host Card
TERA2240 Quad Display PCoIP Host Card
1

Thank you for your purchase. This guide
provides installation instructions for
English
PCoIP host cards and zero client setup.
SYSTEM REQUIREMENTS
• PCI Express x1 compatible card slot Full
Height, Half Length (FHHL) for TERA2240,
Low Profile for TERA2220
• Host PC with 1 or 2 graphics cards
• For 2560x1600 resolution, graphics card
port must be DisplayPort (dual-link DVI is
not supported)
TERA2240 Quad Display PCoIP Host Card
PACKAGE CONTENTS
• TERA2220 Dual Display PCoIP Host Card
OR TERA2240 Quad Display PCoIP Host Card
• PCoIP host card power button cable
• Mini DisplayPort to DisplayPort cables
(may be included; quantity 4 for TERA2240,
2 for TERA2220)
• Mini DisplayPort to single-link DVI cables
(may be included; quantity 4 for TERA2240,
TERA2220 Dual Display PCoIP Host Card
2 for TERA2220)
• Ethernet cable (may be included)
• Quick Start Guide
OPERATING AND STORAGE CONDITIONS
• Operating temperature: 0 °C to 55 C °
• Storage temperature: -20 to 70 °C °C
2

INSTALLATION STEPS
1. Ensure host PC is turned off and unplug the power cables.
2. Remove the chassis cover and locate an available PCIe slot.
3. Remove the expansion slot cover of the appropriate PCIe slot for the PCoIP host card.
English
4. Insert PCoIP host card into PCIe slot and secure metal bracket.
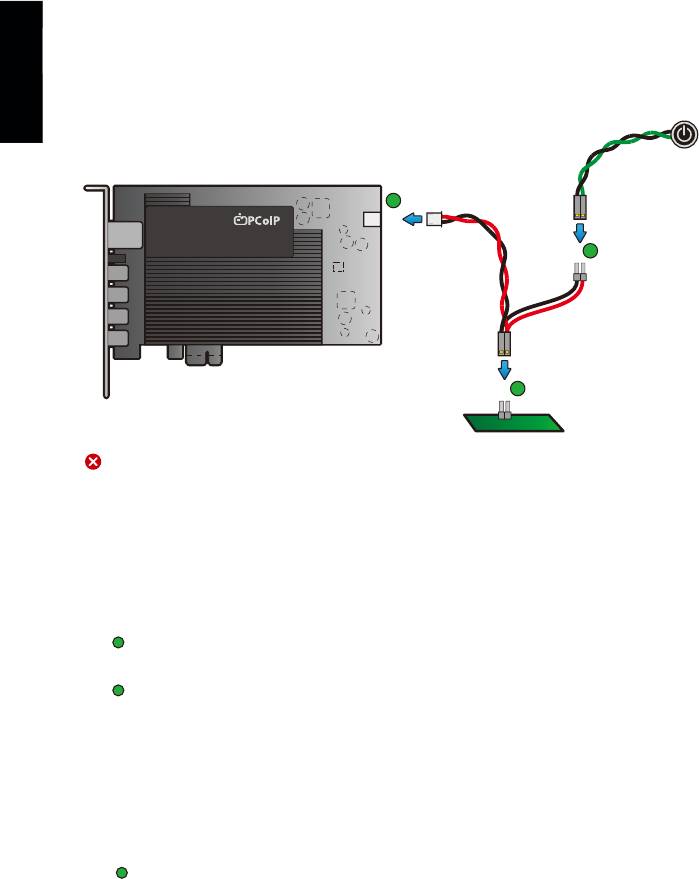
Front Panel
On/Off
Switch
A
C
Host Card
B
Host PC Motherboard
WARNING
Always power down and disconnect devices from AC power before handling them. Failure to do this can
result in personal injury or equipment damage. Some circuitry on the host PC can continue to operate even
though the front panel power switch is off.
5. Install PCoIP host card power button cable
This optional connection allows a remote user to reset the host PC (such as when the operating system
is non-responsive).
Connect the white end of the host card power button cable to the power button cable connector on
A
the host card.
A
B
Locate where the host PC front-panel power button cable connects to the motherboard. Disconnect
the host PC’s front-panel On/Off switch cable from the motherboard’s header, and locate the Power
On/Off signal pins. Connect the red wire on the host card power button cable to the positive terminal
of the Power On/Off pin, and the black wire to the negative terminal. The negative terminal is
typically a ground pin.
NOTE: motherboard to another. See your
The location of the Power On/Off switch pins is different from one
motherboard user manual for details. If you have the connector inversely connected the host PC will not power up.
If possible, connect the host PC’s front-panel On/Off switch cable to the 2-pin header on the host
C
card power button cable. If this is not possible, the host PC’s front-panel On/Off Switch is disabled.
3

6. Connect the host card to your network using the Ethernet port.
7. Connect the host card to one or more GPUs. Starting with port 1 on the host card, use the included mini-
DisplayPort cable to connect to your GPU. Next use port 2 for the 2nd monitor, and so on.
8. Replace the chassis cover and reconnect power cables.
9. Start up host.
English
ESTABLISHING A PCoIP CONNECTION
Your zero client is pre-configured to connect directly to a PCoIP host card, but can be configured to use a
third party connection broker such as VMware View to connect to virtual desktops or PCoIP host cards.
Direct connect to host card
1. Power on host PC with PCoIP host card.
2. Power on the zero client and the connected displays.
3. Ensure the zero client is on the same network as the host card.
4. Wait until the “Connect” dialog appears on screen.
5. Select “Connect” and you will see the message “Discovering hosts, please wait…”.
6. A list of available hosts is displayed.
7. Select the host card you wish to connect to and click “OK”.
8. The display will show the host PC screen and the zero client’s Session LED on the front panel will turn
green indicating a successful PCoIP connection.
Connect to VMware View brokered host card
1. See PCoIP Zero Client & Host Administrator Guide for detailed setup instructions.
Refer to PCoIP Zero Client & Host Administrator Guide for troubleshooting
and additional information, available at techsupport.teradici.com
4

ENDPOINT SELECTION
Host Card Recommended PCoIP Zero Client for Full Functionality
TERA2240 TERA2140
TERA2220 TERA2321 or TERA2140
English
ADDITIONAL SOFTWARE TOOLS
PCoIP Management Console – Manage configuration and firmware updates for all PCoIP host
cards/zero clients.
PCoIP Host Software Driver (recommended) – Provides features such as:
• Improved user experience with latencies over 50ms with a local pointer.
• Exposes user experience controls, connection information and statistics.
• Supports in-session key sequence to disconnect without using the zero client button.
TM
• Required if host cards are brokered by VMware View .
SNMP Monitor – Teradici host cards and zero clients support the SNMP protocol. You can use an SNMP
tool to capture all kinds of read-only information such as bitrates, frame rates, or Mpps.
Windows XP/Linux Audio Codec - Download and install the Realtek High-Definition Audio Codec driver
from www.realtek.com.
RESOURCES
Available at techsupport.teradici.com
• PCoIP Zero Client & Host Administrator Guide
• PCoIP Protocol Virtual Desktop Network Design Checklist
• Using PCoIP Host Cards with VMware View Guide
© 2004-2012 Teradici Corporation. All rights reserved.
Teradici and PCoIP are trademarks of Teradici Corporation and may be registered in the United
States and/or other countries. All other trademarks are properties of their respective owners.
Specifications are subject to change without notice.
5

Française
Carte hôte Tera2 PCoIP®
Guide de démarrage rapide
Modèles: TERA2220 Dual Display Carte Hôte PCoIP
TERA2240 Quad Display Carte Hôte PCoIP
6

Merci pour votre achat. Ce guide donne
les instructions d'installation les Cartes
Hôtes PCoIP et les zero client.
PRE REQUIS SYSTEME
• Slot pour carte PCI Express x1 compatible
Hauteur pleine, demie longueur (FHHL)
Française
pour TERA2240, Low Profile pour
TERA2220
• PC Hôte avec 1 ou 2 cartes graphiques
• Pour une résolution 2560x2600, la carte
graphique doit être DisplayPort (dual-
Carte Hôte PCoIP TERA2240 Quad Display
link DVI n'est pas supporté)
CONTENU DU COLIS
• Carte Hôte PCoIP TERA2220 Dual Display
OU Carte Hôte PCoIP TERA2240 Quad Display
• Cordon d'alimentation Carte Hôte PCoIP
• cordons Mini DisplayPort to DisplayPort
(peuvent être inclus ; quantité 4 pour
TERA2240, 2 pour TERA2220)
• Cables Mini DisplayPort to single-link DVI
(peuvent être inclus ; quantité 4 pour
Carte Hôte PCoIP TERA2220 Dual Display
TERA2240, 2 pour TERA2220)
• câble Ethernet (peut être inclus)
• Guide de démarrage rapide
CONDITIONS D'UTILISATION ET DE STOCKAGE
• Température d'utilisation : de 0° à 55° C
• Température de stockage : de -20° à 70° C
7

PAS-A-PAS D'INSTALLATION
1. S'assurer que le PC hôte est éteint et débrancher les cordons d'alimentation.
2. Retirer le châssis et trouver un slot PCle disponible.
3. Retirer la protection du slot PCle disponible pour la carte hôte.
4. Insérer la carte hôte PCoIP dans le slot PCle et sécuriser les brackets.
Commutateur
on/off
en façade
A
C
Française
Carte Hôte
B
Carte-mère du PC hôte
AVERTISSEMENT
Toujours éteindre et déconnecter les appareils de l'alimentation avant de les manipuler. Ne pas procéder de
la sorte pourrait provoquer des blessures ou endommager le matériel. Certains circuits électriques sur le PC
Hôte peuvent encore être actifs même si le commutateur en façade est sur position off.
5. Installer le cordon de l'interrupteur de la Carte Hôte PCoIP
Cette connexion optionnelle permet à un utilisateur à distance de réinitialiser le PC hôte (par exemple
quand le système d'exploitation ne répond pas)
Connecter l'extrémité blanche du cordon de l'interrupteur de la carte hôte au connecteur du cordon
A
d'alimentation sur la carte hôte.
B
A
Localiser ou le cable du bouton d'alimentation du PC hote est connecté à la carte mere . Deconnecter
ce cable de la carte mere et localiser la broche du signal “power on/off” . Connecter le cable rouge de
la carte hote à la broche portant le signal positif ( + ) de l'alimentation et le cable noire à la borne
negative de l'alimentation. La borne negative est typiquement une borne reliée à la terre.
NOTE:
L'endroit où se trouvent les broches du commutateur Marche/arrêt est différent d'un carte-mère à l'autre.
Se référer au manuel d'utilisation de la carte-mère pour plus de détails. Si le connecteur branché à l'envers, le PC
Hôte ne marchera pas.
C
Si possible, connecter le cordon de l'interrupteur Marche/arrêt du PC Hôte à la double broche du
cordon du bouton alimentation du la carte hôte. Si ce n'est pas possible, l'interrupteur Marche/arrêt
de façade du PC est hors service.
8

6. Connecter la Carte Hôte au réseau en utilisant le port Ethernet.
7. Connecter la Carte Hôte à une ou plusieurs cartes graphiques. En commençant avec le Port 1 sur la carte
hôte, utiliser le cordon mini-DisplayPort pour connecter à votre carte graphique. Utiliser ensuite le Port 2
pour le deuxième moniteur, et ainsi de suite.
8. Remettre en place le châssis et reconnecter les câbles d'alimentation.
9. Démarrer l'hôte.
ETABLIR UNE CONNEXION PCoIP
Votre zero cient est pré-configuré pour se connecter automatiquement à une carte hôte PCoIP, mais peut
Française
être configuré pour utiliser une connexion tierce telle que VMware View pour se connecter à des consoles
virtuelles ou des cartes PCoIP.
Connexion directe à la carte hôte
1. Allumer le PC hôte avec la carte hôte PCoIP.
2. Allumer le zero client et les écrans connectés.
3. S'assurer que le zero client est sur le même réseau que la carte hôte.
4. Attendre que la fenêtre de dialogue “Connect” apparaisse.
5. Selectionner “Connect” et vous verrez le message “Discovering hosts, please wait…”.
6. Une liste des hôtes disponibles apparait.
7. Sélectionner la Carte Hôte que vous voulez connecter et cliquer “OK”.
8.
L'affichage montrera l'écran du PC hôte et le Session Led du zero client en façade avant apparaitra en vert
indiquant une connexion PCoIP réussie.
SE CONNECTER A UNE CARTE HOTE PAR L'INTERMEDIAIRE DE VMWARE VIEW
1. Voir le guide Zero client PCoIP et administration pour détails complémentaires.
Se référer au guide Zero client PCoIP et administration pour les diagnostics de
pannes et informations complémentaires, disponible sur techsupport.teradici.com
9

ENDPOINT SELECTION
Carte Hôte Zero client PCoIP recommandé pour une complète fonctionnalité
TERA2240 TERA2140
TERA2220 TERA2321 or TERA2140
OUTILS SOFTWARE COMPLEMENTAIRES
Console de management PCoIP – Gère la configuration et les mises à jour de micro programmes pour
toutes les cartes hôtes PCoIP/zero clients.
Pilote de l'hôte PCoIP (recommandé) – Fournit des caractéristiques telles que:
Française
• Expérience améliorée de l'utilisateur avec des latences supérieures à 50 ms avec un indicateur local.
• Contrôle de l'expérience de l'utilisateur, information de connexion et statistiques.
• Sequence de touches pour se déconnecter sans utiliser le bouton du zero client.
• Requis si la Carte Hôte est utilisée par l'intermédiaire de VMware View™.
Moniteur SNMP – Les cartes hôtes Teradici et les zero clients supportent le protocole SNMP. Vous pouvez
utiiser un outil SNMP pour capturer toutes sortes d'informations en lecture uniquement telles que les
débits binaires, fréquences d'images ou taux de transfert.
Windows XP/Linux Audio Codec - Télécharge et installe le Codec Audio Realtek High-Definition sur
www.realtek.com.
RESSOURCES
Disponible sur techsupport.teradici.com
• PCoIP Zero Client & Host Administrator Guide
• PCoIP Protocol Virtual Desktop Network Design Checklist
• Using PCoIP Host Cards with VMware View Guide
© 2004-2012 Teradici Corporation. All rights reserved.
Teradici and PCoIP are trademarks of Teradici Corporation and may be registered in the United
States and/or other countries. All other trademarks are properties of their respective owners.
Specifications are subject to change without notice.
10

Tera2 PCoIP® Hostkarte
Kurzanleitung
Models: TERA2220 Dual Monitor PCoIP Hostkarte
TERA2240 Quad Monitor PCoIP Hostkarte
Deutsch
11

Vielen Dank für Ihren Kauf. Die Anleitung
erläutert die Installation der PCoIP Hostkarte
und die Anpassung der Zero Clients.
SYSTEM VORAUSSETZUNGEN
• PCI Express x1 kompatibler Kartenslot
volle Bauhöhe, Halbe Länge (FHHL) für
TERA2240, Low Profile für TERA2220
• Host PC mit ein oder zwei Grafikkarten
• Für die 2560x1600 Auflösung, muss der
Grafikport ein Display Port Anschluss sein
(Dual-Link DVI wird nicht unterstützt)
TERA2240 Quad Monitor PCoIP Hostkarte
Deutsch
PAKET INHALT
• TERA2220 Dual Monitor PCoIP Hostkarte
ODER TERA2240 Quad Monitor PCoIP Hostkarte
• PCoIP Hostkarte Power Button Kabel
• Mini DisplayPort auf DisplayPort Kabel
(kann enthalten sein; 4 x für TERA2240, 2 x
für TERA2220)
• Mini DisplayPort auf Single-Link DVI Kabel
(kann enthalten sein; 4 x für TERA2240, 2 x
TERA2220 Dual Monitor PCoIP Hostkarte
für TERA2220)
• Ethernet Kabel (kann enthalten sein)
• Kurzanleitung
BETRIEBS- UND LAGERBEDINGUNGEN
• Betriebstemperatur: 0 to 55 °C °C
• Lagertemperatur: -20 °C to 70 °C
12

INSTALLATION
1. Stellen Sie sicher, dass der Host PC ausgeschaltet und das Stromkabel entfernt ist.
2. Entfernen Sie die PC Abdeckung um Zugang zum PCIe Slot zu haben.
3. Entfernen Sie die Abdeckung für den PCIe Slot, bevor Sie die PCoIP Hostkarte einstecken.
4. Stecken Sie die Hostkarte in den PCIe Slot und schrauben diese fest (oder sichern
die Karte mit Hilfe der Host PC Vorrichtungen).
Ein-/Ausschalter
auf der
Vorderseite
A
C
Hostkarte
B
Deutsch
Host PC Motherboard
WARNUNG
Bevor Sie an Host PC Arbeiten durchführen, schalten Sie diese immer aus und nehmen den Host PC vom
Stromnetz. Eine Missachtung kann zu Verletzungen oder Geräteschäden führen. Einige Bauteile des Host PCs
können immer noch stromführend sein, auch wenn der Host PC über den Ein-/Ausschalter abgeschaltet
worden ist.
5. Installation des PCoIP Hostkarte Power-Button Kabels
Dieser optionale Anschluss ermöglicht es einem remote Benutzer, den Host PC zurückzusetzen (so als
würde das Betriebssystem nicht mehr reagieren).
Verbinden Sie das weiße Ende des Hostkarten Power-Button Kabels mit dem Power-Button Kabel
A
Anschlusses an der Hostkarte.
B
A
Finden Sie den Anschluss des Ein-/Ausschalter Kabels von der Frontseite des PCs auf dem
Motherboard. Entfernen Sie dieses Kabel vom Motherboard und suchen Sie die On/Off Signal-Pins.
Verbinden Sie die rote Leitung des Hostkarten Power-Button Kabels mit dem positiven Anschluß
Power On/Off Pin und das schwarze Kabel mit dem negativen Anschluss Pin. Der negative Anschluss
Pin ist normalerweise ein Erdungs-Pin.
NOTE:
Die Lokation des Power On/Off Schalter Pins ist von Motherboard zur Motherboard unterschiedlich. Lesen
Sie in Ihrem Handbuch für das Motherboard nach, um weitere Informationen zu erhalten. Wenn Sie das Kabel in
der umgekehrten Reihenfolge angeschlossen haben, lässt sich der Host PC nicht einschalten.
C
Wenn möglich, verbinden Sie das Power On Kabel von der Vorderseite des PCs mit dem 2-Pin
Anschluss des Power-Button Kabels der Hostkarte.
13

6. Verbinden Sie die Hostkarte über den Ethernet Port mit Ihrem Netzwerk.
7. Verbinden Sie die Hostkarte mit ein oder mehreren Grafikarten. Beginnen Sie mit Port 1 auf der Hostkarte
indem Sie das beiliegende mini-Display-Port Kabel verwenden. Als nächstes verwenden Sie Port 2 für den
zweiten Bildschirm und so weiter.
8. Installieren Sie wieder die PC-Abdeckung und schließen Sie den Host wieder am Strom an.
9. Schalten Sie den Host wieder ein.
AUFBAU EINER PCoIP VERBINDUNG
Ihr Zero Client ist voreingestellt, um eine Verbindung mit einer PCoIP Hostkarte aufzubauen. Die Einstellung
kann angepasst werden, so dass eine Verbindung zu einen Third Party Broker wie VMware View aufgebaut
werden kann, um sich mit einem virtuellen Desktop oder einer PCoIP Hostkarten zu verbinden.
Direkte Verbindung mit einer Hostkarte
1. Schalten Sie den Host PC mit eingebauter PCoIP Hostkarte ein.
2. Schalten Sie den Zero Client und die angeschlossenen Bildschirme ein.
Deutsch
3. Stellen Sie sicher, dass sich der Zero Client und die Hostkarte im gleichen Netzwerk befinden.
4. Warten Sie, bis die Meldung “Verbinden” am Bildschirm angezeigt wird.
5. Wählen Sie “Verbinden” und es erscheint die Meldung “Host ermitteln, bitte warten…”.
6. Es wird eine Auflistung aller verfügbaren Hosts angezeigt.
7. Wählen Sie die Hostkarte aus, mit der eine Verbindung hergestellt werden soll und bestätigen Sie mit “OK”.
8.
Am Monitor wird der Bildschirm des Host PCs angezeigt und die Session LED am Zero Client auf der
Vorderseite leuchtet grün, um anzuzeigen, dass eine PCoIP Sitzung erfolgreich aufgebaut worden ist.
Verbindung zu VMware View verwalteten Hostkarten
1. Lesen Sie hierzu die notwendigen Installationsschritte im PCoIP Zero Client
& Host Administration Handbuch.
Es sei auf das PCoIP Zero Client & Host Administrator Handbuch zur Fehlerbehebung und
weiteren Informationen verwiesen, verfügbar auf der techsupport.teradici.com Webseite.
14

ENDGERÄTE AUSWAHL
Hostkarte Empfohlener PCoIP Zero Client für komplette Funktionalität
TERA2240 TERA2140
TERA2220 TERA2321 or TERA2140
ZUSÄTZLICHE SOFTWARE TOOLS
PCoIP Management Console – Verwaltung und Firmware Updates für alle PCoIP Hostkarten und PCoIP
Zero Clients.
PCoIP Host Software Driver (empfohlen) – Stellt unter anderem folgende Funktionen zur Verfügung:
• Verbessertes Arbeiten mit lokalen Druckern sollte die Latenzzeit über 50ms liegen.
• Bietet eine bessere Überwachung, Verbindungsinformationen und Statistiken.
• Eine Verbindung kann innerhalb der Session getrennt werden ohne den Zero Client Button verwenden
zu müssen.
• Wird auf alle Fälle benötigt, wenn die Hostkarte über VMware View™ verwaltet wird.
SNMP Monitor – Die Hostkarten und Zero Clients von Teradici unterstützen das SNMP Protokoll.
Deutsch
Das verfügbare SNMP Tool kann genutzt werden, um Informationen wie Bitrate, Framerate oder
Mpps aufzuzeichnen.
Windows XP/Linux Audio Codec - Download und Installation des Realtek High-Definition Audio Codec
Treibers von www.realtek.com.
WEITERE QUELLEN
Erhältlich auf der techsupport.teradici.com Webseite
• PCoIP Zero Client & Host Administrator Guide
• PCoIP Protocol Virtual Desktop Network Design Checklist
• Using PCoIP Host Cards with VMware View Guide
© 2004-2012 Teradici Corporation. All rights reserved.
Teradici and PCoIP are trademarks of Teradici Corporation and may be registered in the United
States and/or other countries. All other trademarks are properties of their respective owners.
Specifications are subject to change without notice.
15

Tarjeta Host Tera2 PCoIP®
Guía de instalación rápida
Modelos: Tarjeta host PCoIP para dos pantallas TERA2220
Tarjeta host PCoIP para cuatro pantallas TERA2240
Español
16

Gracias por su compra. Esta guía ofrece
instrucciones de instalación para tarjetas
host PCoIP y configuración de cliente cero.
REQUISITOS DEL SISTEMA
• Ranura para tarjetas compatible con PCI
Express x1 Full Height, Half Length
(FHHL) para TERA2240, perfil bajo para
TERA2220
• PC anfitrión con 1 o 2 tarjetas gráficas
• Para resolución de 2560x1600, el puerto
de la tarjeta gráfica debe ser DisplayPort
Tarjeta host PCoIP para cuatro pantallas
(no soporta DVI de conexión dual)
TERA2240
CONTENIDO DEL PAQUETE
• Tarjeta host PCoIP para dos pantallas
TERA2220 tarjeta host PCoIP para cuatroO
pantallas TERA2240
Español
• Cable de botón de alimentación de tarjeta
host PCoIP
• Cables Mini DisplayPort a DisplayPort
(pueden estar incluidos; cantidad: 4 para
TERA2240, 2 para TERA2220)
Tarjeta host PCoIP para dos pantallas
• Cables Mini DVI a DVI de una conexión
TERA2220
(pueden estar incluidos; cantidad: 4 para
TERA2240, 2 para TERA2220)
• Cable Ethernet (puede estar incluido)
• Guía de instalación rápida
CONDICIONES DE OPERACIÓN Y ALMACENAMIENTO
• Temperatura de operación: 0 °C a 55 °C
• Temperatura de almacenamiento: -20 °C a 70 °C
17