Apple LED Cinema Display: Getting Started
Getting Started: Apple LED Cinema Display

Getting Started
Your Apple LED Cinema Display is designed to work seamlessly
with the MacBook family of computers that have a Mini
DisplayPort connector. It features a 24-inch LED-backlit
widescreen display, a MagSafe connector to charge your
MacBook computer, a built-in iSight camera, a speaker system,
and a microphone.
The instructions on the following pages help you set up and use your new display,
including:
Â
Connecting the display to your computer
Â
Using the camera, microphone, speakers, and USB ports
Â
Adjusting your display’s settings
Important:
Read all the installation instructions (and the safety information starting on
page 14) carefully before you first use your display.
For information about the specific computers and graphics cards that are compatible
with your display, go to www.apple.com/displays.
English
7
Setting Up Your Display
Follow these steps to set up your Apple LED Cinema Display:
1
Remove the protective film from the display and cables.
2
Insert the power cord into the display, and then insert the AC plug into a grounded
power outlet.
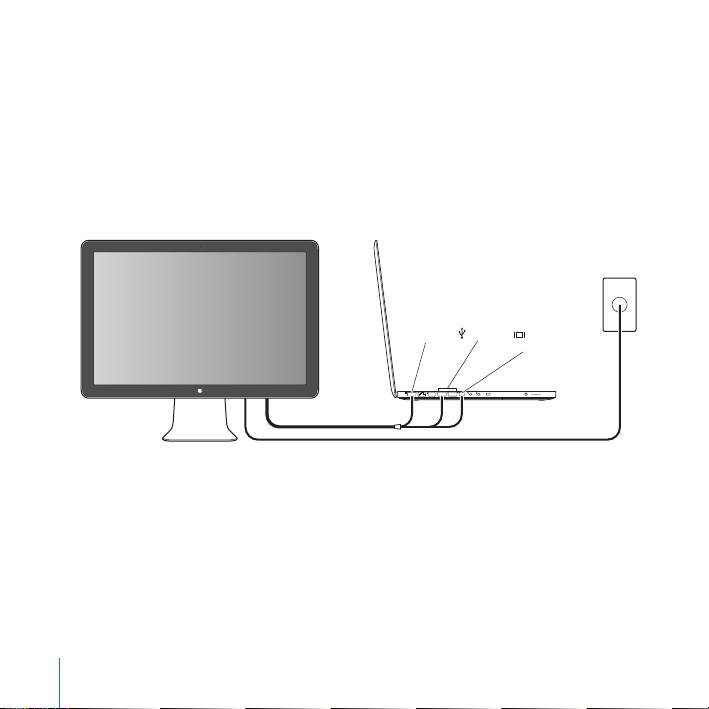
3
Connect the Mini DisplayPort cable to your computer, as shown below.
Apple LED Cinema Display
Mac portable
Power
outlet
MagSafe USB
Mini
DisplayPort
4
Connect the USB cable to your computer to use the display’s built-in iSight camera,
speakers, microphone, and USB ports.
5
Plug the MagSafe connector into the MagSafe power port on your computer to charge
the battery and provide power to your computer.
6
Press the power button on your computer to start it up. The display turns on
automatically when you start up your computer.
8
English

Setting Up Your Computer with the Lid Closed
You can close the lid of your computer and use just your Apple LED Cinema Display.
Follow the setup instructions on the previous page and make sure the MagSafe
connector from the display is plugged into the MagSafe power port on your computer.
To use your Apple LED Cinema Display with your computer’s display closed:
1
Connect an external USB keyboard and mouse to the USB port on your display or use
the Bluetooth® Setup Assistant to set up a wireless keyboard and mouse.
2
Make sure your computer is turned on.
3
Close the display on your computer to put it to sleep.
4
Wait a few seconds, and then press any key on the external keyboard or move the
mouse to wake your computer.
English
9
Using Your Display
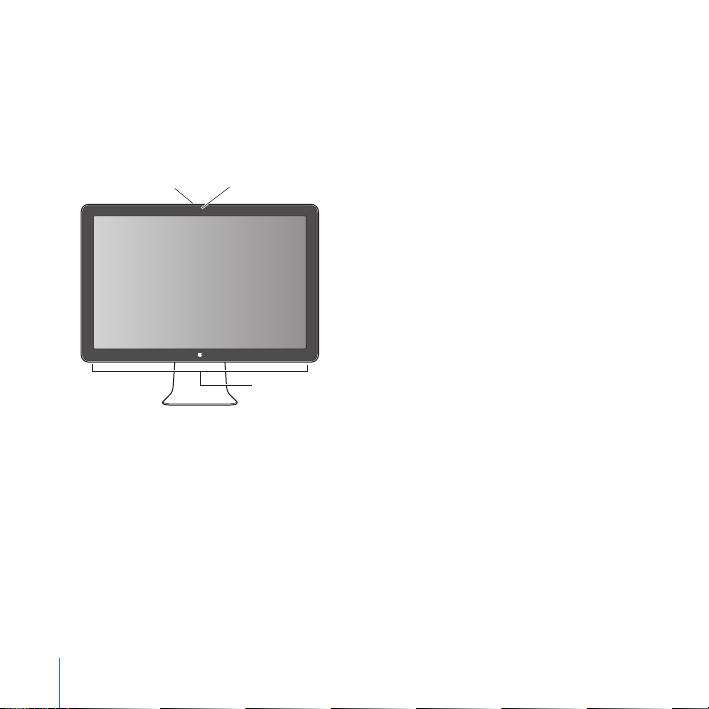
Your Apple LED Cinema Display has a built-in iSight camera, microphone, and display
speaker system. The USB connection between the display and your computer enables
these features.
Built-in
Microphone
iSight camera
Display speaker system
Setting Up Sound Input and Output
You can listen to music, movies, games, and multimedia files through the speaker
system on your display. You can use the microphone to record sounds, or talk with
friends using iChat. Use Sound preferences to manage sound input and output.
To set up sound input:
1
Choose Apple (
) > System Preferences, and then click Sound.
2
Click the Input tab in Sound preferences.
3
Choose Display Audio to input sound through your display’s microphone.
10
English

To set up sound output:
1
Click the Output tab.
2
Choose Display Audio to hear sound through your display’s speaker system.
These sound settings are used whenever your computer is connected to your display.
They remain in effect until you change them.
Using the Built-in iSight
You can use the built-in iSight camera and microphone to capture still images, video,
and audio with applications such as iChat, iMovie, and Photo Booth.
To set up the camera and microphone with iChat:
1
Click the iChat icon in the Dock to open the iChat application.
2
Choose iChat > Preferences, and then click Audio/Video.
3
Choose Display iSight from the Camera pop-up menu.
4
Choose Display Audio from the Microphone pop-up menu.
Setting Up Your Apple LED Cinema Display as an Additional Display
When you leave your computer’s display open, you can mirror the same image on both
displays or use the displays as an extension of your desktop. Use Displays preferences
to set up video mirroring or extended desktop.
To set video mirroring or extended desktop:
1
Choose Apple (
) > System Preferences, and then click Displays.
2
Click Arrangement and follow the onscreen instructions.
English
11

Adjusting the Color and Brightness
You can use your Apple Keyboard to increase
()
or decrease
()
the brightness of
your display. You can also use System Preferences to adjust the resolution, brightness,
and color settings.
To adjust the resolution, the number of colors, or the brightness of your display:
1
Choose Apple (
) > System Preferences, and then click Displays.
2
Click the Display tab.
3
Choose a resolution or color setting, or drag the Brightness slider to adjust the
brightness.
To change the display profile or calibrate your display:
1
Click the Color tab in Displays preferences.
2
Choose a display profile, or click Calibrate to open the Display Calibrator Assistant.
For more information about calibrating your display, choose Help > Mac Help in the
menu bar, and search for “calibrate.”
12
English
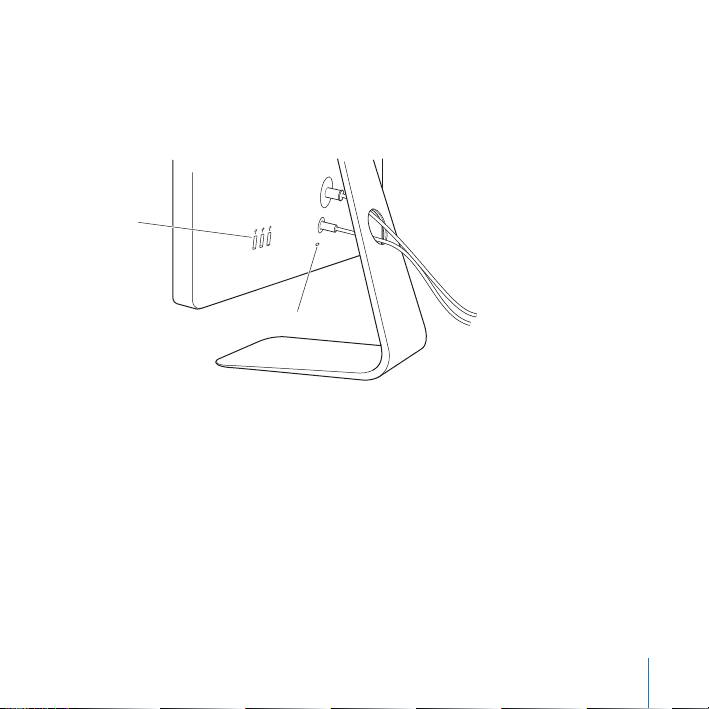
Using the USB Ports and Security Slot
Your display has three powered USB ports on the back. Use these ports to connect a
mouse, keyboard, iPhone, iPod, or other USB peripheral. Make sure the display’s USB
cable is connected to your computer.
USB ports
Security slot
To secure your display, use the security slot to attach a locking cable.
Using a VESA Mounting Solution with Your Display
You can attach your display to an alternative mounting solution, using the VESA Mount
Adapter kit available from the Apple Online Store at www.apple.com/store. Use the kit
to attach your display to any available VESA-compatible mounting solution. Simply
follow the instructions included with the kit.
English
13
Care and Safety
Before you lift or reposition your display, you may need to disconnect the cables and
power cord. Use correct lifting techniques when positioning the display. When lifting or
carrying the display, hold it by the edges. Don’t lift the display by the stand or the cord.
To clean the screen on your display:
1
Disconnect the power cord.
2
Use the cloth that came with your display or another soft, dry cloth to wipe
dust from the screen.
WARNING:
Don’t clean the screen with a cleaner containing alcohol or acetone. Use a
cleaner intended for use with a screen or display. Never spray cleaner directly on the
screen. It may drip inside the display and cause damage.
Follow these safety guidelines for using your display:
Â
The only way to completely disconnect power is to unplug the power cord. Be sure
to pull the plug, not the cord.
Â
Disconnect power immediately if the power cord is frayed or damaged, if you spill
something on the display, or if the display falls or is damaged in some other way.
WARNING:
Use only the power cord that came with your display. The power cord has
a three-wire grounding plug (a plug that has a third grounding pin) that fits only a
grounded AC outlet. If you are unable to insert the plug into an outlet because the
outlet is not grounded, contact a licensed electrician to replace the outlet with a
properly grounded outlet.
14
English

WARNING:
Your display is a high-voltage component and should not be opened for
any reason, even when it’s unplugged. If your display needs service, see “Learning
More, Service, and Support” on page 18.
Ergonomics
Here are some guidelines for adjusting your display to reduce glare and to
accommodate your physical size and shape.
Â
Arrange the display so that the top of the screen is slightly below your eye level
when you’re sitting at the keyboard. The best distance from your eyes to the screen is
up to you, although most people tend to prefer 18 to 28 inches (45 to 70 cm).
English
15
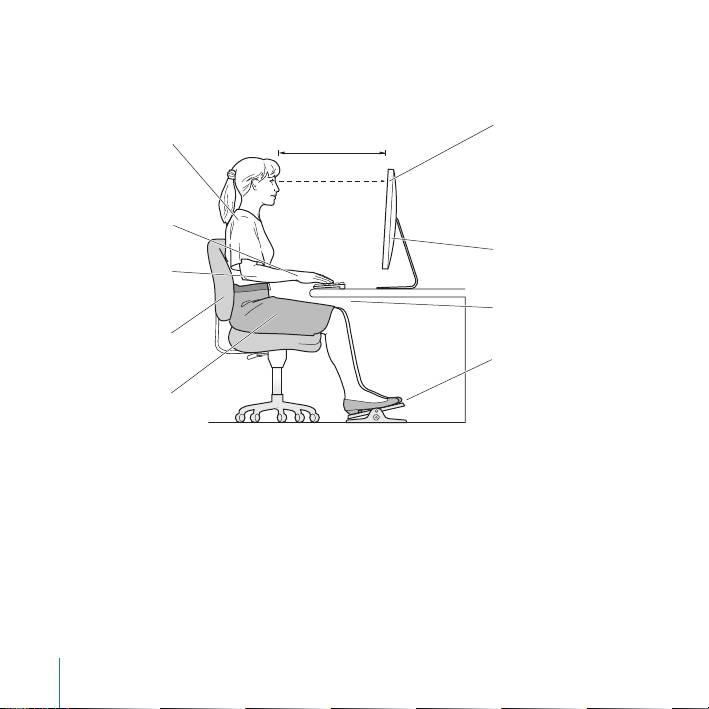
Â
Position the display by tilting it up or down to minimize glare and reflections from
overhead lights and nearby windows.
Shoulders
Top of the screen at or
relaxed
18–28 in. (45–70 cm)
slightly below eye level
(You may need to adjust
the height of your display
Forearms and
by raising or lowering
hands in a
your work surface)
straight line
Screen positioned to
Forearms level
avoid reflected glare
or tilted slightly
Clearance under
work surface
Lower back
supported
Feet flat on the floor
or on a footrest
Thighs tilted
slightly
For more information about health, safety, and maintenance, go to the Apple
ergonomic website at www.apple.com/about/ergonomics.
16
English

Troubleshooting Your Display
Before performing any of these steps, make sure your computer is turned on, the
display is plugged into an outlet, all the cables are connected properly to your
computer and display, and your computer is not in sleep mode.
If the screen doesn’t have an image:
Â
Check the cables and connectors again to make sure they are connected properly to
your computer and the display.
Â
Make sure your computer is turned on and is not in sleep mode. If your computer’s
display is closed, use the external keyboard or mouse to wake the computer from
sleep.
Â
Reset the PRAM by restarting your computer while holding down the Command (x
),
Option, P, and R keys until you hear the startup sound a second time.
If the screen is dim:
Â
Make sure the display brightness controls are set properly. Choose Apple (
) >
System Preferences and click Displays. Drag the Brightness slider to adjust the
brightness.
Â
If the colors on the display are too saturated or not correct, you may need to calibrate
your display. Open Displays preferences, click Color, click Calibrate, and follow the
instructions.
If your portable computer isn’t charging:
Make sure the MagSafe connector from your display is seated properly in the MagSafe
power port on your computer.
English
17
If the built-in iSight camera, microphone, speakers, or USB ports on the display
aren’t working:
Make sure the USB cable from the display is firmly plugged into the USB port on your
computer. The display’s camera, microphone, speakers, and USB ports work only when
this cable is attached to your computer.
More Troubleshooting Information
You can find more troubleshooting information on the Displays support website at:
www.apple.com/support/displays
Learning More, Service, and Support
You can find more information about your display on the Apple website and in
Mac Help.
To learn about
Do this
Using your display
Choose Help > Mac Help in the menu bar, and search for
“displays.”
Displays service, support,
Go to: www.apple.com/support/displays
discussions, troubleshooting,
and software downloads
The latest information about
Go to: www.apple.com/displays
displays
Registering your display Go to: www.apple.com/register
18
English

Specifications
 Model number: A1267
 Resolution: 1920 x 1200 @ 60 Hz
 Ports: Three USB 2.0 ports on the back
 Camera and microphone: Built-in iSight camera with microphone
 Speakers: Built-in 2.1 speakers with 12 W output
Dimensions:
 Weight: 20.92 lb. (9.49 kg)
 Height: 18.84 inches (478.38 mm)
 Width: 22.57 inches (573.22 mm)
 Depth (with stand): 7.76 inches (197.10 mm)
 Viewable: 24 inches (609.60 mm) diagonal
Operating environment:
 Operating temperature: 50° to 95° F (10° to 35° C)
 Relative humidity: 20% to 80% (noncondensing)
 Altitude: 0 to 10,000 feet (0 to 3048 meters)
English 19

")