Brennenstuhl Sensor LED Spot Premium City SH 8005 PIR IP44 anthracite, with PIR sensor: instruction

Brennenstuhl
Sensor LED Spot Premium City SH 8005 PIR IP44 anthracite, with PIR sensor

Class: Lighting

Type:

Manual for Brennenstuhl Sensor LED Spot Premium City SH 8005 PIR IP44 anthracite, with PIR sensor

City LED-Strahler/Flächenleuchte Premium

City premium LED spotlight/zone lighting

A Bedienungsanleitung ......................................................... 3

D Operating Instructions ....................................................... 7

G Mode demploi ................................................................... 11

M Handleiding ........................................................................ 15

J Manuale di istruzioni ......................................................... 19

S Bruksanvisning................................................................... 23

E Manual de instrucciones .................................................... 27

N Instrukcja obsługi .............................................................. 31

B Návod k obsluze ................................................................. 35

I Használati útmutató .......................................................... 39

T Kullanım talimatı ................................................................ 43

F yttöohje .......................................................................... 47

H Οδηγίες χρήσης .................................................................. 51

P Руководство по эксплуатации ........................................ 55

O Manual de instruções ......................................................... 59

C Kasutusjuhend ................................................................... 63

R Návod na používanie ......................................................... 67

Q Navodilo za uporabo .......................................................... 71

K Eksploatavimo instrukcija ................................................. 75

L Lietošanas instrukcija ........................................................ 79

BA_City_LED_Horizontal_A5_130723.indd 1 23.07.13 16:53

A

Ø 6 mm

40 mm

PP

3

7

5

4

PP

2

6

8

1

B

C

180°

2,5 m

2 m6 m 10 m

D

2

BA_City_LED_Horizontal_A5_130723.indd 2 23.07.13 16:53

A

Installations- und Bedienungsanleitung

LED-Strahler / Flächenleuchte Premium

MODELL

LED-Strahler Premium City SH 2705 PIR IP 44,

LED-Flächenleuchte Premium City LH 2705 PIR IP 44,

LED-Strahler Premium City SH 2705 IP 44,

LED-Flächenleuchte Premium City LH 2705 IP 44

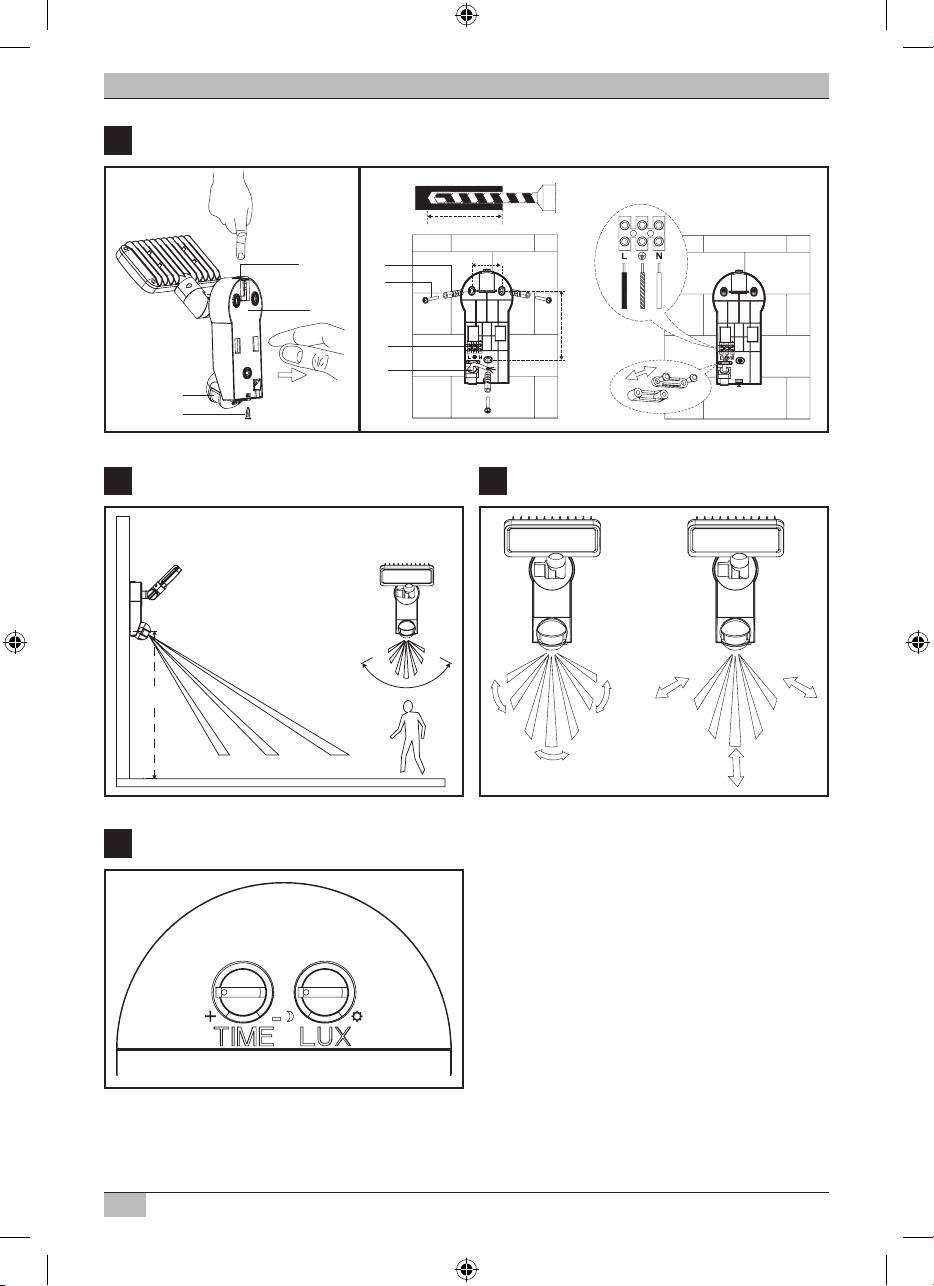
TEILEBESCHREIBUNG (s. Abb. A)

1

Schraube für Anschlusskasten

2

Lüsterklemme

3

Entriegelungstaste

4

Montageplatte

5

Schrauben für Montageplatte

6

Kabeldurchführung

7

Dübel

8

Bewegungsmelder (Modell SH 2705 PIR IP 44 und LH 2705 PIR IP 44)

SICHERHEITSHINWEISE

Hinweis: Bitte lesen Sie unbedingt die folgenden Hinweise, bevor Sie die Leuchte installieren.

Stellen Sie sicher, dass die Netzspannung abgeschaltet ist, bevor Sie die Leuchte anschließen. Die

Installation der Leuchte darf nur von einer qualizierten Fachkraft durchgeführt werden.

Warnung: Diese Leuchte darf ohne alle ordnungsgemäß angebrachten Dichtungsringe nicht

benutzt werden! LED-Leuchten sind extrem hell. Blicken Sie unter keinen Umständen in den

Lichtstrahl der LED-Leuchten, da dies bleibende Schäden an den Augen verursachen kann.

BRANDGEFAHR! Montieren Sie die Leuchte mit einer Entfernung von mindestens 1 m zu

angestrahlten Materialien. Eine übermäßige Wärmeentwicklung kann zu Brandentwicklung

führen.

- - - - 1 m

Eine zerbrochene LED Abdeckung ist vor einer weiteren Benutzung der Leuchte durch eine

original Brennenstuhl LED-Schutzscheibe zu ersetzen.

VERBRENNUNGSGEFAHR! Stellen Sie sicher, dass die Leuchte ausgeschaltet und abgekühlt ist,

bevor Sie diese berühren.

3

BA_City_LED_Horizontal_A5_130723.indd 3 23.07.13 16:53

4

A

Bedienungsanleitung LED-Strahler / Flächenleuchte Premium

TECHNISCHE DATEN

Nennspannung: 220240V~ 50 / 60Hz

Nennleistung: 27 x 0,5W LED

Schutzart: IP 44

Schutzklasse: I

Die LED-Leuchte ist ausschließlich für den normalen Gebrauch und nicht für rauen Betrieb

vorgesehen.

Erfassungsbereich Bewegungsmelder: 180 ° und max. 10 Meter, einstellbar

Zeitspanne: einstellbar von 10 (+/– 5) Sekunden bis 4 (+/– 1) Minuten

Umgebun gstemper atur: 15 ° C + 45 °C

MONTAGE

Hinweis: Die Leuchte muss auf einer trockenen, stabilen und festen Oberäche entsprechend

den Angaben in Abb. B montiert werden. Idealerweise sollte die LED-Leuchte 1,8 bis 2,5 Meter

über dem Boden angebracht werden (s. Abb. B).

Leuchte installieren (s. Abb. A)

Lösen Sie die Schraube

1

am Anschlusskasten, drücken Sie die Entriegelungstaste

3

und

entfernen Sie dann die Montageplatte

4

. Verwenden Sie die Montageplatte, um die Positionen

der Schraubenlöcher auf der Montageäche zu markieren.

Wichtig: Achten Sie darauf, dass Sie keine versteckten Leitungen anbohren. Führen Sie das

Stromkabel durch die Kabeldurchführung

6

der Montageplatte und befestigen Sie diese dann

mit Hilfe von Schrauben

5

und Dübeln

7

an der Wand. Schließen Sie das Stromkabel entsprechend

Abb. A an die Lüsterklemme

2

an (N = blaues Kabel, = grün / gelbes Kabel, L = braunes Kabel).

Befestigen Sie den Lampenkörper wieder an der Montageplatte. Drücken Sie dazu

die Entriegelungstaste

3

und schieben Sie die Leuchte auf die Montageplatte bis die

Entriegelungstaste

3

wieder einrastet. Sichern Sie die Verbindung durch die Schraube am

Anschlusskasten

1

.

Stellen Sie die gewünschte Lichtrichtung ein und ziehen Sie die Schrauben fest. Schalten Sie die

Hauptstromversorgung ein.

Nur für Modell SH 2705 PIR IP 44 und LH 2705 PIR IP 44

Der Bewegungsmelder sollte nicht auf Wärmequellen wie Grills, Klimaanlagen, andere

Außenbeleuchtung, fahrende Autos und Abzugsschächte gerichtet sein, damit lästiges

Falschauslösen vermieden wird. Aus dem gleichen Grund sollte der Bewegungsmelder nicht in

Bereichen mit starken elektromagnetischen Interferenzen angebracht werden. Richten Sie das

Gerät nicht auf spiegelnde Oberächen wie glatte weiße Wände, Swimming Pools, etc.

Die technischen Angaben für den Erfassungsbereich (max. 10 Meter bei 180 °) können je nach

Montagehöhe und -Standort leicht variieren. Der Erfassungsbereich des Geräts kann sich bei

Temperaturveränderungen ebenfalls ändern. Bevor Sie den Montageort für das Gerät auswählen,

sollten Sie wissen, dass der Bewegungsmelder am empndlichsten auf Bewegungen reagiert,

die quer durch sein Erfassungsfeld laufen und am wenigsten empndlich bei Bewegungen, die

direkt auf den Bewegungsmelder zu bzw. weg laufen (s. Abb C). Geht die Bewegung direkt auf

den Bewegungsmelder zu oder davon weg, bedeutet dies eine erhebliche Reduzierung des

Erfassungsbereichs (s. Abb. C).

BA_City_LED_Horizontal_A5_130723.indd 4 23.07.13 16:53

5

A

LED-Strahler / Flächenleuchte Premium Bedienungsanleitung

BEWEGUNGSMELDER EINSTELLEN

(Nur für Modell SH 2705 PIR IP 44 und LH 2705 PIR IP 44)

Am Bewegungsmelder benden sich zwei Regler (s. Abb. D)

Zeiteinstellung (TIME):

Die Länge der Zeitspanne, die das Licht nach Aktivierung an bleibt, kann zwischen 10 (+/– 5)

Sekunden und 4 (+/– 1) Minuten eingestellt werden. Durch drehen des TIME-Reglers von (+) nach

(–) wird die Zeitspanne verkürzt.

Hinweis: Wurde das Licht einmal durch den Bewegungsmelder ausgelöst, startet die Zeitspanne

bei jeder weiteren Erfassung wieder neu.

Lichteinstellung (LUX):

Das LUX-Reglermodul vergt über eine integrierte Abtasteinrichtung (Fotozelle), die Tageslicht

und Dunkelheit erkennt. Symbol () bedeutet, dass der Bewegungsmelder bei Tag und bei Nacht

auslöst, während er bei Symbol () nur nachts reagiert.

Regler einstellen (s. Abb. D)

Stellen Sie den LUX-Regler auf Symbol () und warten Sie für ein paar Sekunden. Stellen Sie dabei

sicher, dass der TIME-Regler auf Minimum (–) eingestellt ist. Das Licht schaltet jetzt ein und bleibt

für einige Sekunden an.

Richten Sie den Bewegungsmelder so aus, dass der gewünschte Bereich erfasst wird. Lassen Sie

eine Person quer durch den abzusuchenden Bereich laufen und verändern Sie den Sensorwinkel

so lange, bis sich die Leuchte durch die Bewegung einschaltet (s. Abb. C). Stellen Sie den TIME-

Regler auf die gewünschte Einschalt-Zeit.

Um die LUX-Schwelle einzustellen, bei der das Licht nachts automatisch einschaltet, drehen Sie den

LUX-Regler von Tageslicht auf Nacht. Hinweis: Muss das Licht früher eingeschaltet werden, z. B.

bei Dämmerung, warten Sie auf das gewünschte Lichtniveau, drehen Sie dann langsam den LUX-

Regler in Richtung Tageslicht-Position, während jemand durch die Mitte des Erfassungsbereichs

läuft. Lassen Sie den LUX-Regler los, wenn das Licht einschaltet.

WARTUNG UND REINIGUNG

Der LED-Strahler enthält keine Komponenten, die gewartet werden müssen. Die LEDs können nicht

ausgetauscht werden. Benutzen Sie zur Reinigung nur ein trockenes oder leicht angefeuchtetes

Tuch und verwenden Sie keine Lösungsmittel, ätzenden Reinigungsmittel o.ä.

ENTSORGUNG

Elektrogeräte umweltgerecht entsorgen!

Elektrogeräte gehören nicht in den Hausmüll!

Gemäß Europäischer Richtlinie 2012/19/EU über Elektro- und Elektronikaltgeräte

müssen verbrauchte Elektrogeräte getrennt gesammelt und einer umweltgerechten

Wiederverwertung zugeführt werden. Möglichkeiten zur Entsorgung des ausgedienten

Geräts erfahren Sie bei Ihrer Gemeinde- oder Stadtverwaltung.

BA_City_LED_Horizontal_A5_130723.indd 5 23.07.13 16:53

6

A

Bedienungsanleitung LED-Strahler / Flächenleuchte Premium

FEHLERBEHEBUNG UND BENUTZERHINWEISE

Problem Mögliche Ursache Empfohlene Lösung

Licht geht nicht an

1. Kein Netzstrom. Überprüfen Sie alle

bei Bewegung im

Verbindungen und

Erfassungsbereich.

Sicherun gen / Schalter.

2. Beleuchtung in der Nähe

Bewegungsmelder

ist zu hell.

neu ausrichten oder

Gerätestandort verändern.

3. Regler falsch eingestellt. Sensorwinkel oder Regler neu

einstellen.

Licht geht aus unersichtlichem

1. Wärmequellen

Sensorkopfrichtung weg von

Grund an (falscher Auslöser)

wie Klimaanlagen,

diesen Quellen ausrichten.

Lüftungsönungen,

Abzüge von Heizgeräten,

Grills, andere

Außenbeleuchtung oder

fahrende Autos aktivieren

den Bewegungsmelder.

2. T iere / Vögel oder Haus tiere. Eine Neuausrichtung des

Sensorkopfes kann hilfreich

sein.

3. Spiegelungen von

Bewegungsmelder neu

Swimming Pools oder

ausrichten.

spiegelnde Flächen.

Hinweis: Unter kalten Wetterbedingungen reagieren alle Geräte mit PIR-Sensor sensibler

als bei warmem Wetter.

HERSTELLER

Hugo Brennenstuhl GmbH & Co. KG

Seestraße 1 3 ∙ 72074 Tübingen ∙ Germany

H. Brennenstuhl S.A.S.

F-67460 Souelweyersheim

lectra-t ag

Blegistrasse 13 ∙ CH-6340 Baar

www.brennenstuhl.com

BA_City_LED_Horizontal_A5_130723.indd 6 23.07.13 16:53

D

Installation and Operating Instructions

Premium LED spotlight /zone lighting

MODEL

LED spotlight Premium City SH 2705 PIR IP 44,

LED zone lighting Premium City LH 2705 PIR IP 44,

LED spotlight Premium City SH 2705 IP 44,

LED zone lighting Premium City LH 2705 IP 44

PARTS DESCRIPTION (see Fig. A)

1

Screw for terminal box

2

Lustre terminal

3

Unlock button

4

Assembly plate

5

Screws for assembly plate

6

Cable bushing

7

Dowels

8

Motion detector (model SH 2705 PIR IP 44 and LH 2705 PIR IP 44)

SAFETY INSTRUCTIONS

Notice: Please read the following instructions before your install the lamp. Make sure that the

current is shut o before you connect the lamp. The lamp may only be installed by a qualied

professional.

Warning: This lamp may not be used without all of the o-rings properly installed! LED lamps are

extremely bright. Under no circumstance should you look into the LED lamp as this can cause

permanent damage to the eyes.

RISK OF FIRE! Assemble the lamp at a minimum distance of 1m to the material being illuminated.

Excessive heat development can lead to re.

- - - - 1 m

A broken LED cover must be replaced with a Brennenstuhl LED protection disc prior to continuing

to use the lamp.

RISK OF BURN INJURY! Make sure that the lamp is switched o and cool before you touch it.

7

BA_City_LED_Horizontal_A5_130723.indd 7 23.07.13 16:53

8

D

Operating Instructions Premium LED spotlight /zone lighting

TECHNICAL DATA

Nominal voltage: 220240V~ 50 / 60Hz

Nominal power: 27 x 0,5W LED

Protection type: IP 44

Protection class: I

The LED lamp is solely for normal use and not designed for raw operation.

Motion detector range: 180 ° and max. 10meter, adjustable

Duration: adjustable from 10 (+/– 5) seconds up to 4 (+/– 1) minutes

Ambient te mperature: 15 ° C + 45 °C

INSTALLATION

Notice: The lamp must be installed on a dry, stable and solid surface in accordance with the

specications in Fig. B. Ideally, the LED lamp should be installed 1.8 to 2.5 above the ground (see

Fig. B).

Install the lamp (see Fig. A)

Release the screw

1

on the terminal box, press the unlock button

3

and remove the assembly

plate

4

. Use the assembly plate to mark the positions of the screw holes on the assembly surface.

Important: Make sure not to drill into any hidden lines. Guide the power cable through the cable

bushing

6

on the assembly plate and attach it to the wall using the screws

5

and dowels

7

.

Attach the power cable to the lustre terminal

2

in accordance with Fig. A (N = blue cable,

= green / yellow cable, L = brown cable).

Reattach the body of the lamp to the assembly plate. To do this, press the unlock button

3

and

slide the lamp onto the assembly plate until the unlock button

3

locks back into place. Secure the

connection by screwing it to the terminal box

1

.

Set the desired direction of the light and tighten the screws. Switch the main power supply on.

Only for model SH 2705 PIR IP 44 and LH 2705 PIR IP 44

The motion detector should not be directed at heat sources such as grills, air conditioners, other

outside lighting, moving cars and exhaust shafts in order to avoid annoying false triggering. For

the same reason, the motion detector should not be installed in areas with strong electromagnetic

interference. Do not direct the device at reective surfaces such as smooth white walls, swimming

pools, etc.

The technical specications for the sensor range (max. 10 meter at 180 °) can vary slightly

depending on the installation height and location. The sensor range on the device can also

change if the temperature changes. Before you select the installation location for the device, you

should know that the motion detector reacts most sensitively to movements that run straight

across its range and least sensitively to movements that run directly toward or away from the

motion detector (see Fig. C). If the movement is directly toward or away from it, this means a

signicant reduction of the sensor range (see Fig. C).

BA_City_LED_Horizontal_A5_130723.indd 8 23.07.13 16:53

9

D

Premium LED spotlight /zone lighting Operating Instructions

SETTING THE MOTION DETECTOR

(Only for model SH 2705 PIR IP 44 and LH 2705 PIR IP 44)

There are two controllers on the motion detector (see Fig. D)

Time setting (TIME):

The length of the duration that the lamp remains on after activation can be set to between 10

(+/– 5) seconds and 4 (+/– 1) minutes. By turning the TIME controller from (+) to (), the duration

is shortened.

Notice: If the light has been triggered by the motion detector, the duration restarts with each

detection.

Light setting (LUX):

The LUX controller has an integrated sensor device (photocell) that recognises daylight and

darkness. Symbol () means that the motion detector is triggered during the day and at night

and when set at the () symbol, it only reacts at night.

Setting the controllers (see Fig. D)

Set the LUX controller to the () symbol and wait for a few seconds. Make sure that the TIME

controller is set to minimum (–). The lamp will now turn on and remain on for several seconds.

Direct the motion detector so that the desired area is within its range. Have a person walk across

the area to be detected and change the sensor angle until the lamp turns on from the movement

(see Fig. C). Set the TIME controller to the desired time.

To set the LUX threshold, at which the light should automatically turn on at night, turn the LUX

controller from daylight to night. Notice: If the light needs to be turned on earlier, e.g., at dusk,

wait for the desired light level, then slowly turn the LUX controller toward the daylight position

while someone walks through the centre of the sensor range. Let the controller go when the light

turns on.

MAINTENANCE AND CLEANING

The LED lamp does not contain any components that require maintenance. The LEDs cannot be

replaced. To clean, use only a dry or lightly moistened cloth and do not use any cleaning solvents,

acidic cleaning agents, etc.

DISPOSAL

Dispose of electrical devices in an environmentally responsible manner!

Do not dispose of electrical devices with household rubbish

In accordance with Directive 2012/19/EU on waste electrical and electronic equipment,

used electrical equipment must be collected separately and reused or recycled in an

environmentally responsible manner. Please contact your local authorities for available

disposal options for your worn-out device.

BA_City_LED_Horizontal_A5_130723.indd 9 23.07.13 16:53

10

D

Operating Instructions Premium LED spotlight /zone lighting

TROUBLESHOOTING AND USER INSTRUCTIONS

Problem Possible cause Possible solution

Light does not go on from

1. No power. Check all connections and

motion within the sensor

fuses / s witches.

range.

2. Lighting close up is too

Redirect the motion detector

bright.

or change the device's

location.

3. Controller set incorrectly. Adjust sensor angle or

controller.

The light goes on for no

1. Heat sources such as air

Adjust the sensor head away

apparent reason (false trigger)

conditioners, ventilation

from these sources.

openings, heating

equipment outlets, grills,

other outdoor lighting or

moving cars activate the

motion detector.

2. A nimals / birds or p ets . Readjusting the sensor head

can be helpful.

3. Reections from swimming

Readjust the motion detector.

pools or reective surfaces.

Notice: Under cold weather conditions, all devices with PIR sensors are more sensitive than

in warm weather.

MANUFACTURER

Hugo Brennenstuhl GmbH & Co. KG

Seestraße 1 3 ∙ 72074 Tübingen ∙ Germany

H. Brennenstuhl S.A.S.

F-67460 Souelweyersheim

lectra-t ag

Blegistrasse 13 ∙ CH-6340 Baar

www.brennenstuhl.com

BA_City_LED_Horizontal_A5_130723.indd 10 23.07.13 16:53

G

Mode d’installation et d’emploi

Projecteur / Lampe à LED Premium

MODÈLE

Projecteur à LED Premium City SH 2705 PIR IP 44,

Lampe à LED Premium City LH 2705 PIR IP 44,

Projecteur à LED Premium City SH 2705 IP 44,

Lampe à LED Premium City LH 2705 IP 44

DESCRIPTION DES PIÈCES (voir ill. A)

1

Vis pour le boîtier de raccordement

2

Domino de raccordement

3

Touche de déverrouillage

4

Plaque de montage

5

Vis pour la plaque de montage

6

Traversée de câble

7

Chevilles

8

Détecteur de mouvements (modèles SH 2705 PIR IP 44 et LH 2705 PIR IP 44)

INDICATIONS DE SÉCURITÉ

Remarque: Lisez absolument les indications suivantes avant d’installer la lampe. Assurez-vous

que la tension de secteur est désactivée avant de raccorder la lampe. Seul un professionnel

qualié est autorisé à eectuer l’installation de la lampe.

Avertissement: Cette lampe ne doit pas être utilisée sans que toutes les bagues détanchéité

soient mises en place de manière règlementaire ! Les lampes à LED sont très lumineuses. Ne

regardez en aucun cas dans le rayon lumineux des lampes à LED, car il peut en résulter un

endommagement permanent des yeux.

RISQUE D’INCENDIE ! Montez la lampe à une distance d’au-moins 1mètre des matériaux éclairés.

Un développement excessif de chaleur peut entraîner un développement d’incendie.

- - - - 1 m

Avant de poursuivre l’utilisation de la lampe, un couvercle brisé doit être remplacé par une vitre

de protection Brennenstuhl d‘origine pour les LED.

RISQUE DE BRÛLURE ! Assurez-vous que la lampe est éteinte et refroidie avant de toucher

celle-ci.

11

BA_City_LED_Horizontal_A5_130723.indd 11 23.07.13 16:53

12

G

Mode d’emploi Projecteur / Lampe à LED Premium

CARACTÉRISTIQUES TECHNIQUES

Tension nominale: 220240V~ 50 / 60Hz

Puissance nominale: 27 LED de 0,5W

Type de protection: IP 44

Classe de protection: I

La lampe à LED est destinée exclusivement à lusage normal et non pas pour un fonctionnement

à forte épreuve.

Zone de saisie du détecteur de mouvements: 180 ° et 10mètres au max, réglable

Laps de temps: réglable de 10 (+/– 5) secondes à 4 (+/– 1) minutes

Température ambiante : 15 °C + 45 °C

MONTAGE

Remarque: la lampe doit être montée sur une surface sèche, stable et solide conformément aux

indications de l‘ill. B. L’idéal serait de monter la lampe à LED à une distance de 1,8 à 2,5mètres

au-dessus du sol.

Installation de la lampe (voir ill. A)

Desserrez la vis

1

du boîtier de raccordement, appuyez sur la touche de déverrouillage

3

, puis

retirer la plaque de montage

4

. Utilisez la plaque de montage pour marquer les positions des

trous des vis sur la surface de montage.

Important: veillez à ne pas percer de ls cachés. Passez le câble électrique à travers la traversée

de câble

6

de la plaque de montage, puis xez-le au mur à laide de vis

5

et de chevilles

7

.

Raccordez le câble électrique au domino de raccordement

2

(N = câble bleu, = câble vert / jaune,

L = câble brun) conformément à l’ill. A.

Fixez de nouveau le corps de la lampe sur la plaque de montage. Pour cela, appuyez sur la touche

de déverrouillage

3

et poussez la lampe sur la plaque de montage jusqu’à ce qu’à ce que la

touche de déverrouillage

3

s’encliquète à nouveau. Assurez la connexion à laide de la vis sur le

boîtier de raccordement

1

.

Réglez l‘orientation de la lumière que vous souhaitez et serrez bien les vis. Activez lalimentation

électrique principale.

Uniquement pour les modèles SH 2705 PIR IP 44 et LH 2705 PIR IP 44

Le détecteur de mouvements ne doit pas être orienté vers des sources de chaleur comme les grills,

les climatiseurs, dautres éclairages extérieurs, des voitures qui roulent et des hottes, an d‘éviter

tout déclenchement involontaire importun. Pour la même raison, le détecteur de mouvements

ne doit pas être monté dans des zones à fortes interférences électromagnétiques. N’orientez pas

l’appareil vers des surfaces rééchissantes comme des murs blancs, piscines etc.

Les indications techniques relatives à la zone de saisie (max. 10 mètres à 180 °) peuvent varier

légèrement en fonction de la hauteur et du lieu de montage. La zone de saisie de lappareil

peut changer également en cas de changements de température. Avant de sélectionner le lieu

de montage de lappareil, il faut de savoir que le détecteur de mouvements réagit avec la plus

grande sensibilité aux mouvements qui se produisent en travers de son champ de saisie et avec

la plus faible sensibilité aux mouvements s’approchant ou s’éloignant de l’appareil (voir ill. C). Le

mouvement s’approchant directement du détecteur de mouvements ou sen éloignant implique

une réduction considérable de la zone de saisie (voir ill. C).

BA_City_LED_Horizontal_A5_130723.indd 12 23.07.13 16:53

13

G

Projecteur / Lampe à LED Premium Mode d’emploi

GLAGE DU DÉTECTEUR DE MOUVEMENTS

(Uniquement pour les moles SH 2705 PIR IP 44 et LH 2705 PIR IP 44)

Le détecteur de mouvements comporte deux régulateurs (voir ill. D)

Réglage du temps (TIME):

La durée du laps de temps, pendant lequel la lumière reste allumée après l’activation, peut être

réglée entre 10 (+/– 5) secondes et 4 (+/– 1) minutes. Le laps de temps est raccourci en tournant le

régulateur TIME de (+) vers (–).

Remarque: si la lumière a été allumée une fois par le détecteur de mouvements, le laps de temps

redémarre à nouveau lors de chaque nouvelle saisie.

Réglage de la lumière (LUX):

Le module de régulation LUX dispose d’un dispositif de balayage intégré (cellule photoélectrique),

qui reconnaît la lumière du jour et lobscurité. Le symbole () signie que le détecteur de

mouvements se déclenche pendant le jour et la nuit, alors qu’il ne réagit que pendant la nuit avec

le symbole ().

Réglage du régulateur (voir ill. D)

Réglez le régulateur LUX sur le symbole () et attendez pendant quelques secondes. Assurez-

vous que le régulateur TIME est réglé sur minimum (–). La lumière s’allume maintenant et reste

allumée pendant quelques secondes.

Orientez le détecteur de mouvement de manière à saisir la zone souhaitée. Faites traverser la zone

à scruter par une personne et modiez l‘angle du capteur jusqu‘à ce que la lampe soit activée par

le mouvement (voir ill. C). Réglez le régulateur TIME sur la durée d’activation souhaitée.

Pour régler le seuil LUX, pour lequel la lampe s’allume automatiquement la nuit, tournez le

régulateur LUX de la lumière du jour à la nuit. Remarque: si la lumière doit être activée plus tôt,

par exemple lors du crépuscule, attendez le niveau de lumière souhaité, puis tournez lentement

le régulateur LUX en direction de la position lumière du jour, pendant que quelqu’un traverse le

centre de la zone de saisie. Relâchez le régulateur LUX quand la lumière s’allume.

MAINTENANCE ET NETTOYAGE

Le projecteur à LED ne contient aucun composant nécessitant une maintenance. Les LED ne

peuvent pas être remplacées. Pour le nettoyage, utilisez uniquement un chion sec ou légèrement

humidié, n’utilisez aucun solvant, produit corrosif et autres produits similaires.

ELIMINATION DES DÉCHETS

Jetez les appareils électriques conformément aux impératifs écologiques !

Ne jetez pas les appareils électriques dans les ordures ménagères !

Conformément à la directive européenne 2012/19/EU sur les vieux appareils électriques et

électroniques, les appareils électriques usés doivent être collectés séparément et transportés

dans un centre de recyclage conforme aux impératifs écologiques. Vous obtiendrez des

informations sur les possibilités d’élimination de l’appareil usé auprès de l’administration de

votre commune ou municipalité.

BA_City_LED_Horizontal_A5_130723.indd 13 23.07.13 16:53

14

G

Mode d’emploi Projecteur / Lampe à LED Premium

SOLUTIONS DES PROBLÈMES ET INDICATIONS POUR L’UTILISATEUR

Problème Cause possible Solution recommandée

La lumière ne s’allume pas en

1. Pas de courant de secteur. Vériez toutes les connexions

cas de mouvement dans la

et les fusibles / interru pteurs.

zone de saisie.

2. Eclairage trop lumineux à

Réorienter le détecteur de

proximité.

mouvements ou changer

l’emplacement de l’appareil.

3. Le régulateur est mal réglé. Régler à nouveau langle du

capteur ou le régulateur.

La lumière s’allume pour

1. Les sources de chaleur

Orienter la direction de la tête

une raison inconnue

comme les climatiseurs,

du capteur en léloignant de

(déclenchement involontaire)

orices d’aération, hottes

ces sources.

d‘appareils de chauage,

grills, autres éclairages

extérieurs ou voitures

qui roulent activent le

détecteur de mouvements.

2. A nimaux / oiseaux ou

Une nouvelle orientation de la

animaux domestiques.

tête du capteur peut s‘avérer

utile.

3. Miroitement de piscines

Orienter à nouveau le

ou de surfaces avec eet

détecteur de mouvements.

rééchissant.

Remarque : Tous les appareils dotés d’un capteur PIR réagissent avec une plus grande

sensibilité dans des conditions météorologiques froides que par temps chaud.

FABRICANT

Hugo Brennenstuhl GmbH & Co. KG

Seestraße 1 3 ∙ 72074 Tübingen ∙ Allemagne

H. Brennenstuhl S.A.S.

F-67460 Souelweyersheim

lectra-t ag

Blegistrasse 13 ∙ CH-6340 Baar

www.brennenstuhl.com

BA_City_LED_Horizontal_A5_130723.indd 14 23.07.13 16:53

M

Installatie- en bedieningshandleiding

LED-spot / lamp Premium

MODEL

LED-spot Premium City SH 2705 PIR IP 44,

LED-lamp Premium City LH 2705 PIR IP 44,

LED-spot Premium City SH 2705 IP 44,

LED-lamp Premium City LH 2705 IP 44

BESCHRIJVING VAN ONDERDELEN (zie afb. A)

1

Schroef voor aansluitdoos

2

Kroonsteen

3

Vergrendelingsknop

4

Montageplaat

5

Schroeven voor montageplaat

6

Kabelmof

7

Pluggen

8

Bewegingsmelder (model SH 2705 PIR IP 44 en LH 2705 PIR IP 44)

VEILIGHEIDSWAARSCHUWINGEN

Tip: Lees de onderstaande instructies zorgvuldig door voordat u de lamp installeert. Controleer

of de netstroom uitgeschakeld is, voordat u de lamp aansluit. De lamp mag alleen door een

gekwaliceerd vakman worden geïnstalleerd.

Waarschuwing: Deze lamp mag alleen gebruikt worden wanneer alle dichtingsringen correct

zijn gemonteerd. LED-lampen zijn uiterst helder. Kijk nooit in de lichtstraal van de LED-lampen,

want dit kan blijvende schade aan de ogen veroorzaken.

BRANDGEVAAR! Monteer de lamp op een afstand van minstens 1meter van belichte materialen.

Overmatige hitte kan namelijk brand veroorzaken.

- - - - 1 m

Vervang een gebroken LED-veiligheidsglas met een origineel LED-veiligheidsglas van

Brennenstuhl voordat u de lamp opnieuw gebruikt.

VERBRANDINGSGEVAAR! Controleer of de lamp uitgeschakeld en afgekoeld is voordat u de

lamp aanraakt.

15

BA_City_LED_Horizontal_A5_130723.indd 15 23.07.13 16:53

16

M

Handleiding LED-spot / lamp Premium

TECHNISCHE GEGEVENS

Nominale spanning: 220240V~ 50 / 60Hz

Nominaal vermogen: 27 x 0,5W LED-lampjes

Beschermingsgraad: IP 44

Beschermingsklasse: I

De LED-lamp is uitsluitende bedoeld voor normaal gebruik en niet voor zwaar gebruik.

Detectiebereik van bewegingssensor: 180 ° en max. 10meter, instelbaar

Inschakelduur: instelbaar vanaf 10 (+/– 5) seconden tot 4 (+/– 1) minuten

Omgev ingstempe ratuur: 15 °C + 45 °C

MONTAGE

Opmerking: monteer de lamp op een droog, stabiel en vast oppervlak en in overeenstemming

met de instructies in afb. B. Idealiter installeert u de LED-lamp 1,8 tot 2,5meter boven de grond

(zie afb. B).

Lamp installeren (zie afb. A)

Draai de schroeven

1

op de aansluitdoos los, druk op de vergrendelknop

3

en verwijder de

montageplaat

4

. Gebruik de montageplaat om de positie van de schroefgaten te markeren op

het montageoppervlak.

Belangrijk: Zorg ervoor dat u niet in verborgen leidingen boort. Steek de voedingskabel door de

kabelmof

6

van de montageplaat en bevestig de plaat op de muur met behulp van de schroeven

5

en pluggen

7

. Sluit de stroomkabel aan op de kroonsteen

2

in overeenstemming met afb. A

(N = blauwe kabel, = groen / gele kabel, L = bruine kabel).

Bevestig de behuizing van de lamp opnieuw op de montageplaat. Dat doet u door op de

vergrendelknop

3

te drukken en de lamp op de montageplaat te schuiven tot de vergrendelknop

3

opnieuw vastklikt. Zet de verbinding vast met behulp van de schroeven op de aansluitdoos

1

.

Stel de gewenste lichtrichting in en draai de schroeven vast. Schakel de stroomvoorziening in.

Alleen voor modellen SH 2705 PIR IP 44 en LH 2705 PIR IP 44

Om een vals alarm te voorkomen, mag de bewegingssensor niet gericht zijn op warmtebronnen

zoals grills, airconditioners, andere buitenverlichting, rijdende auto‘s en afzuigkappen. Om

dezelfde reden mag de bewegingssensor niet in gebieden met sterke elektromagnetische

interferenties worden geïnstalleerd. Richt het apparaat niet op spiegelende oppervlakken zoals

gladde witte wanden, zwembaden, etc.

De technische gegevens voor het detectiebereik (max. 10 meter bij 180 °) kunnen variëren

naargelang de montagehoge en montageplek. Het detectiebereik van het apparaat kan ook bij

temperatuurschommelingen veranderen. Voordat u de montageplek voor het apparaat kiest,

dient u te weten dat de bewegingssensor het meest gevoelig reageert op bewegingen die dwars

door het bewegingsveld lopen, en dat de bewegingssensor het minst gevoelig reageert op

bewegingen die in rechte lijn naar of weg van de sensor lopen (zie afb. C). Als de beweging in

rechte lijn naar of weg van de sensor loopt, betekent dit dat het detectiebereik aanzienlijk kleiner

wordt (zie afb. C).

BA_City_LED_Horizontal_A5_130723.indd 16 23.07.13 16:53

17

M

LED-spot / lamp Premium Handleiding

DE BEWEGINGSSENSOR INSTELLEN

(Alleen voor modellen SH 2705 PIR IP 44 en LH 2705 PIR IP 44)

Op de bewegingssensor bevinden zich twee regelaars (zie afb. D)

De inschakelduur instellen (TIME):

De lengte van de tijd dat het licht na activering ingeschakeld blijft, kan tussen 10 (+/– 5) seconden

en 4 (+/– 1) minuten worden ingesteld. Door de TIME-regelaar van (+) naar (–) te draaien, wordt de

inschakelduur korter gemaakt.

Tip: Als het licht eenmaal door de bewegingssensor is geactiveerd, wordt deze tijdsduur bij elke

verdere detectie opnieuw begonnen.

Het licht instellen (LUX):

De LUX-regelmodule is uitgerust met een ingebouwde detectievoorziening (fotocel) die daglicht

en schemering herkent. Symbool () betekent dat de bewegingssensor zowel overdag als ‚s

nachts werkt, terwijl hij bij symbool () alleen ‚s nachts reageert.

Regelaar instellen (zie afb. D)

Stel de LUX-regelaar in op het symbool () en wacht een paar seconden. Zorg er daarbij voor dat

de TIME-regelaar ingesteld is op minimum (–). Het licht schakelt nu in en blijft enkele seconden

ingeschakeld.

Richt de bewegingssensor zo, dat het gewenste bereik gedekt wordt. Laat een persoon dwars

door het dekkingsbereik lopen en stel de hoek van de sensor zo in, dat de lamp door de beweging

wordt ingeschakeld (zie afb. C). Stel de TIME-regelaar in op de gewenste inschakeltijd.

Om de LUX-waarde in te stellen waarbij het licht s’nachts automatisch ingeschakeld, draait u de

LUX-regelaar vanuit de dagstand naar de nachtstand. Tip: Als het licht vroeger moet worden

ingeschakeld, bv. bij schemerlicht, wacht dan tot het gewenste lichtniveau is bereikt en draai

langzaam de LUX-regelaar in de richting van de dagstand terwijl iemand door het midden van het

detectiebereik loopt. Laat de LUX-regelaar los zodra het licht inschakelt.

ONDERHOUD EN REINIGING

De LED-spot bevat geen onderdelen die moeten worden onderhouden. De LED-lampjes kunnen

niet worden vervangen. Gebruik voor de reiniging alleen een droog of licht bevochtigde doek en

gebruik geen oplosmiddelen, bijtende reinigingsmiddelen etc.

VERWIJDERING

Elektrische apparaten milieuvriendelijk vernietigen!

Elektrische apparaten behoren niet bij het huisvuil!

Volgens Europese richtlijn 2012/19/EU voor elektrische en elektronische apparaten moeten

gebruikte elektrische apparaten gescheiden worden ingezameld en op milieuvriendelijke

wijze worden afgevoerd. Voor mogelijkheden over vernietiging van afgedankte apparaten

kunt u informeren bij uw gemeente of stadsbestuur.

BA_City_LED_Horizontal_A5_130723.indd 17 23.07.13 16:53

18

M

Handleiding LED-spot / lamp Premium

PROBLEEMOPLOSSING EN TIPS VOOR GEBRUIKERS

Probleem Mogelijke oorzaak

Aanbevolen oplossing

Het licht schakelt

1. Geen stroom. Controleer alle verbindingen

bij beweging in het

en zekeringen / schakelaar s.

detectiebereik niet in.

2. Er bevindt zich te felle

Verander de richting van de

belichting in de buurt.

bewegingssensor of monteer

hem op een andere plek.

3. De regelaar is verkeerd

Stel de hoek van de sensor of

ingesteld.

de regelaar opnieuw in.

Het licht schakelt om

1. Warmtebronnen

Richt de sensorkop weg van

onbekende redenen in (vals

zoals airconditioners,

deze warmtebronnen.

alarm).

afzuigkappen, luchtuitlaten

van verwarmingsapparaten,

grills, andere

buitenverlichting

of rijdende autos

activeren mogelijk de

bewegingsmelder.

2. (Huis)dieren of vogels. Het kan helpen om de sensor

in een andere richting in te

stellen.

3. Spiegeling van

Stel de bewegingssensor

zwembaden of

opnieuw in.

reecterende

oppervlakken.

Opmerking: bij koud weer reageren alle apparaten met een PIR-sensor gevoeliger dan bij

warm weer.

FABRIKANT

Hugo Brennenstuhl GmbH & Co. KG

Seestraße 1 3 ∙ 72074 Tübingen ∙ Duitsland

H. Brennenstuhl S.A.S.

F-67460 Souelweyersheim

lectra-t ag

Blegistrasse 13 ∙ CH-6340 Baar

www.brennenstuhl.com

BA_City_LED_Horizontal_A5_130723.indd 18 23.07.13 16:53

J

Istruzioni per l’installazione e luso

Faretto / Lampada a LED Premium

MODELLO

Faretto a LED Premium City SH 2705 PIR IP 44,

Lampada a LED Premium City LH 2705 PIR IP 44,

Faretto a LED Premium City SH 2705 IP 44,

Lampada a LED Premium City LH 2705 IP 44

DESCRIZIONE DEI COMPONENTI (v. illustr. A)

1

Vite per cassetta di connessione

2

Morsetto della lampada

3

Tasto di sbloccaggio

4

Piastra di montaggio

5

Viti per piastra di montaggio

6

Passacavo

7

Tasselli

8

Sensore di movimento (modello SH 2705 PIR IP 44 e LH 2705 PIR IP 44)

INDICAZIONI DI SICUREZZA

Avvertenza: Leggere assolutamente le seguenti indicazioni prima di installare la lampada.

Accertarsi che la tensione di rete sia disattivata prima di collegare la lampada. L’installazione della

lampada può essere eseguita solo da personale qualicato.

Avvertimento: Questa lampada non può essere utilizzata senza tutti gli anelli di tenuta

regolarmente applicati. Le lampade a LED sono estremamente luminose. Non guardare mai, per

nessun motivo, nel fascio luminoso delle lampade a LED, poiché ciò potrebbe causare danni

permanenti alla vista.

PERICOLO D’INCENDIO! Montare la lampada a una distanza di almeno 1m dai materiali irradiati.

Uno sviluppo spropositato di calore può portare a far divampare un incendio.

- - - - 1 m

Una copertura per LED rotta deve essere sostituita con un vetro di protezione originale per LED

della Brennenstuhl prima di continuare a utilizzare la lampada.

PERICOLO DI BRUCIATURE! Accertarsi che la lampada sia spenta e si sia rareddata prima di

toccarla.

19

BA_City_LED_Horizontal_A5_130723.indd 19 23.07.13 16:53

20

J

Manuale di istruzioni Faretto / Lampada a LED Premium

DATI TECNICI

Tensione nominale: 220240V~ 50 / 60Hz

Potenza nominale: 27 x 0,5W LED

Tipo di protezione: IP 44

Classe di protezione: I

La lampada a LED è prevista esclusivamente per un uso normale e non per un utilizzo

professionale.

Campo di copertura del sensore di movimento: 180 ° e massimo 10metri, regolabile

Intervallo: regolabile da 10 (+/–5) secondi no a

4 (+/–1) minuti

Temp eratura amb iente: 15 ° C + 45 °C

MONTAGGIO

Avvertenza: La lampada deve essere montata su una supercie asciutta, stabile e solida secondo

le indicazioni di cui all’illustr. B. Idealmente, la lampada a LED dovrebbe essere montata a

un’altezza di 1,8/2,5metri da terra (v. illustr. B).

Installazione della lampada (v. illustr. A)

Allentare la vite

1

sulla cassetta di connessione, premere il tasto di sbloccaggio

3

e togliere,

quindi, la piastra di montaggio

4

. Utilizzare la piastra di montaggio per segnare le posizioni dei

fori per le viti sulla supercie di montaggio.

Importante: Prestare attenzione, anché non venga forato alcun cavo nascosto. Condurre il cavo

di alimentazione attraverso il passacavo

6

della piastra di montaggio e ssare poi quest’ultima

con l’aiuto delle viti

5

e dei tasselli

7

alla parete. Collegare il cavo di alimentazione secondo

l’illustr. A al morsetto della lampada

2

(N = cavo blu, = cavo verde / giallo, L = cavo marrone).

Fissare nuovamente il corpo della lampada alla piastra di montaggio. Per farlo, premere il tasto di

sbloccaggio

3

e spingere la lampada sulla piastra di montaggio, nché il tasto di sbloccaggio

3

non scatti nuovamente in posizione. Fissare il collegamento alla cassetta di connessione tramite

la vite

1

.

Regolare la posizione desiderata della lampada e serrare saldamente le viti. Attivare l’alimentazione.

Solo per modelli SH 2705 PIR IP 44 e LH 2705 PIR IP 44

Il sensore di movimento non dovrebbe essere rivolto verso fonti di calore come grill, impianti di

climatizzazione, altre fonti di illuminazione esterna, auto in movimento e pozzetti di scarico, onde

evitare fastidiose false attivazioni. Per lo stesso motivo, il sensore di movimento non dovrebbe

essere montato in aree a forte interferenza elettromagnetica. Non orientare l’apparecchio verso

superci riettenti come pareti piatte e bianche, piscine, ecc.

Le informazioni tecniche per il campo di copertura (massimo 10 metri a 180 °) possono

variare leggermente in base all’altezza e alla posizione di montaggio. Il campo di copertura

dellapparecchio può variare anche in seguito a delle oscillazioni di temperatura. Prima di scegliere

il punto di montaggio dellapparecchio occorre sapere che il sensore di movimento reagisce più

sensibilmente ai movimenti trasversali rispetto al suo campo di copertura e con minor sensibilità

ai movimenti che si avvicinano al sensore di movimento o se ne allontanano direttamente (v.

illustr. C). Un movimento diretto verso il sensore di movimento o che si allontani direttamente

dallo stesso comporta una signicativa riduzione del campo di copertura (v. illustr. C).

BA_City_LED_Horizontal_A5_130723.indd 20 23.07.13 16:53

Table of contents

    Annotation for Brennenstuhl Sensor LED Spot Premium City SH 8005 PIR IP44 anthracite, with PIR sensor in format PDF