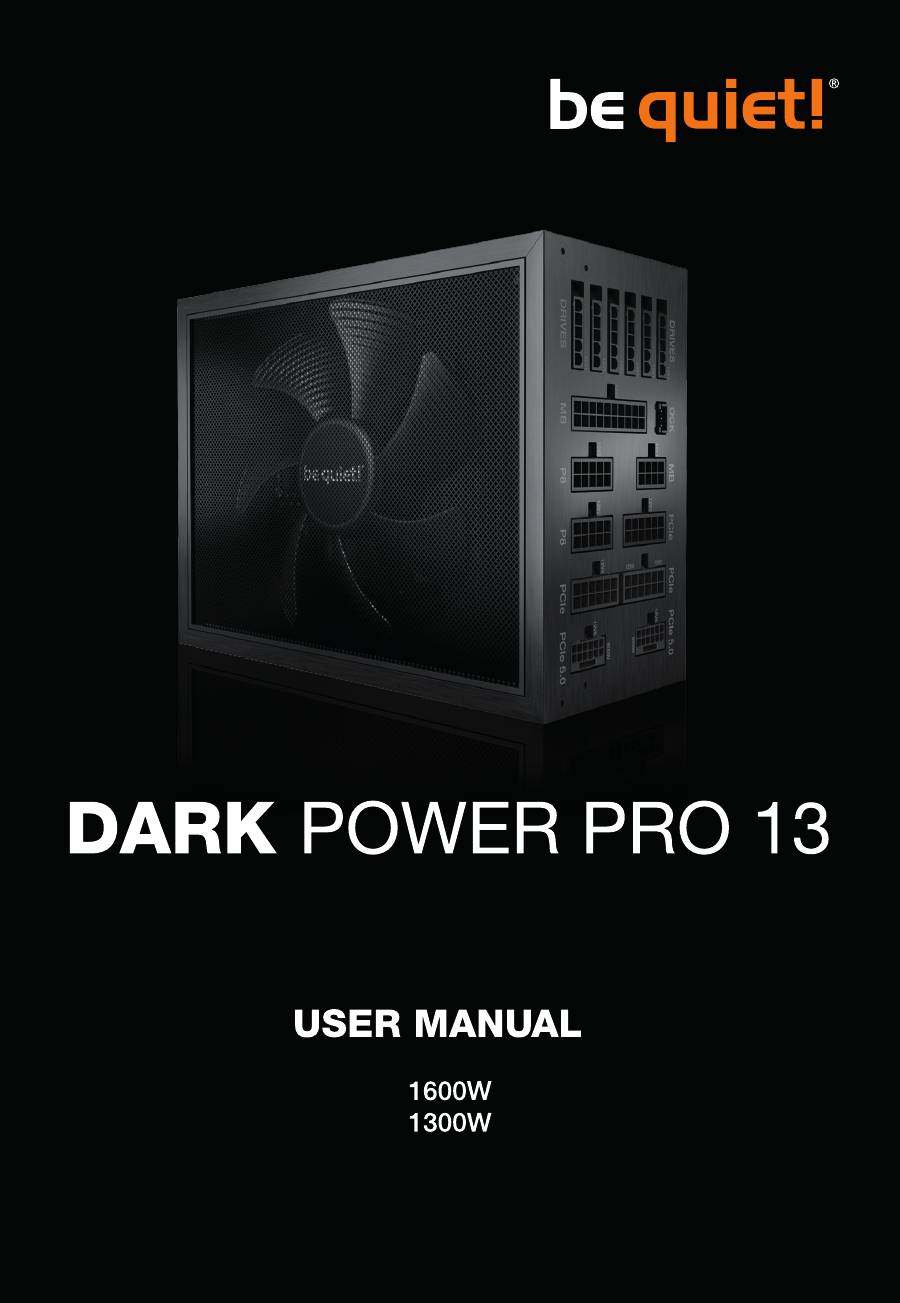
be quiet! 1600W Dark Power Pro 13 80 PLUS Titanium Power Supply: инструкция
Раздел: Аксессуары для фото- и видеотехники
Тип:
Инструкция к be quiet! 1600W Dark Power Pro 13 80 PLUS Titanium Power Supply

2

3
ENGLISH
INDEX
Technical data ������������������������������������������������������������������������������������������������������������������������������������� 42
Introduction ������������������������������������������������������������������������������������������������������������������������������������������� 7
Safety instructions ������������������������������������������������������������������������������������������������������������������������������� 7
Compatibility ����������������������������������������������������������������������������������������������������������������������������������������� 7
Installing your new power supply ��������������������������������������������������������������������������������������������������������� 8
Safety functions ������������������������������������������������������������������������������������������������������������������������������������ 8
Frequent problems and troubleshooting ��������������������������������������������������������������������������������������������� 8
Accessories ������������������������������������������������������������������������������������������������������������������������������������������ 9
Notes on disposal ��������������������������������������������������������������������������������������������������������������������������������� 9
Warranty ������������������������������������������������������������������������������������������������������������������������������������������������ 9
Manufacturer’s details �������������������������������������������������������������������������������������������������������������������������� 9
Copyright ���������������������������������������������������������������������������������������������������������������������������������������������10
DEUTSCH
Technische Daten ������������������������������������������������������������������������������������������������������������������������������� 42
Einleitung ���������������������������������������������������������������������������������������������������������������������������������������������11
Sicherheitshinweise ����������������������������������������������������������������������������������������������������������������������������11
Kompatibilität ���������������������������������������������������������������������������������������������������������������������������������������12
Installation Ihres neuen Netzteils ��������������������������������������������������������������������������������������������������������12
Sicherungsfunktionen ��������������������������������������������������������������������������������������������������������������������������13
Häufige Probleme und Fehlerbehebung ���������������������������������������������������������������������������������������������13
Zubehör ������������������������������������������������������������������������������������������������������������������������������������������������13
Entsorgungshinweise���������������������������������������������������������������������������������������������������������������������������13
Garantie������������������������������������������������������������������������������������������������������������������������������������������������14
Herstellerangaben �������������������������������������������������������������������������������������������������������������������������������14
V1/23
FRANÇAIS
Copyright ���������������������������������������������������������������������������������������������������������������������������������������������14
Introduction ������������������������������������������������������������������������������������������������������������������������������������������15
Consignes de sécurité �������������������������������������������������������������������������������������������������������������������������15
Compatibilité ����������������������������������������������������������������������������������������������������������������������������������������16
Installation de votre nouveau bloc d’alimentation ������������������������������������������������������������������������������16
Systèmes de sécurité ��������������������������������������������������������������������������������������������������������������������������17
Problems les plus fréquents et dépannage ����������������������������������������������������������������������������������������17
Accessoires �����������������������������������������������������������������������������������������������������������������������������������������17
Consignes d’élimination et de recyclage ��������������������������������������������������������������������������������������������17
Garantie������������������������������������������������������������������������������������������������������������������������������������������������18
Données techniques ��������������������������������������������������������������������������������������������������������������������������� 42

4
Dane techniczne ��������������������������������������������������������������������������������������������������������������������������������� 42
Informations constructeur �������������������������������������������������������������������������������������������������������������������18
Droits d’auteur �������������������������������������������������������������������������������������������������������������������������������������18
Wprowadzenie �������������������������������������������������������������������������������������������������������������������������������������19
Wskazówki dotyczące bezpieczeństwa ����������������������������������������������������������������������������������������������19
Kompatybilność �����������������������������������������������������������������������������������������������������������������������������������19
Instalacja nowego zasilacza ��������������������������������������������������������������������������������������������������������������� 20
Funkcje bezpieczeństwa �������������������������������������������������������������������������������������������������������������������� 20
Częste problemy i ich rozwiązywanie ������������������������������������������������������������������������������������������������21
Akcesoria ���������������������������������������������������������������������������������������������������������������������������������������������21
Uwagi dotyczące usuwania odpadów ������������������������������������������������������������������������������������������������21
РУССКИЙ
ESPAÑOL
Gwarancja ��������������������������������������������������������������������������������������������������������������������������������������������21
Dane Producenta �������������������������������������������������������������������������������������������������������������������������������� 22
Prawa Autorskie ���������������������������������������������������������������������������������������������������������������������������������� 22
Indicaciones ����������������������������������������������������������������������������������������������������������������������������������� ����23
Indicaciones de seguridad ���������������������������������������������������������������������������������������������������������������� 23
Compatibilidad �������������������������������������������������������������������������������������������������������������������������������������24
Instalación de su nuevo bloque de alimentación ��������������������������������������������������������������������������������24
Funciones de seguridad ��������������������������������������������������������������������������������������������������������������������� 25
Problemas frecuentes y resolución ���������������������������������������������������������������������������������������������������� 25
Accesorios ������������������������������������������������������������������������������������������������������������������������������������������ 25
Notas sobre la eliminación de residuos ��������������������������������������������������������������������������������������������� 25
Garantía ����������������������������������������������������������������������������������������������������������������������������������������������� 26
Datos del fabricante���������������������������������������������������������������������������������������������������������������������������� 26
Copyright �������������������������������������������������������������������������������������������������������������������������������������������� 26
Введение
��������������������������������������������������������������������������������������������������������������������������������������������
27
Инструкция по безопасности
����������������������������������������������������������������������������������������������������������
27
Совместимость
���������������������������������������������������������������������������������������������������������������������������������
27
Установка нового блока питания
����������������������������������������������������������������������������������������������������
28
Функции безопасности
��������������������������������������������������������������������������������������������������������������������
28
Частые проблемы и их решение
�����������������������������������������������������������������������������������������������������
29
Аксессуары
����������������������������������������������������������������������������������������������������������������������������������������
29
Замечания по утилизации
����������������������������������������������������������������������������������������������������������������
29
Гарантия
���������������������������������������������������������������������������������������������������������������������������������������������
29
Подробности о производителе
�������������������������������������������������������������������������������������������������������
30
Авторские права
�������������������������������������������������������������������������������������������������������������������������������
30
Datos técnico �������������������������������������������������������������������������������������������������������������������������������������� 42
POLSKI
Технические характеристики ���������������������������������������������������������������������������������������������������������� 42

5
简介
����������������������������������������������������������������������������������������������������������������������������������������������������� 31
安全说明
���������������������������������������������������������������������������������������������������������������������������������������������� 31
兼容性
�������������������������������������������������������������������������������������������������������������������������������������������������� 31
安装新电源
������������������������������������������������������������������������������������������������������������������������������������������ 32
安全功能
���������������������������������������������������������������������������������������������������������������������������������������������� 32
常见问题及排除方法
���������������������������������������������������������������������������������������������������������������������������� 32
附件
����������������������������������������������������������������������������������������������������������������������������������������������������� 33
废弃注意事项
��������������������������������������������������������������������������������������������������������������������������������������� 33
保固
����������������������������������������������������������������������������������������������������������������������������������������������������� 33
制造商详细信息
����������������������������������������������������������������������������������������������������������������������������������� 33
版权
����������������������������������������������������������������������������������������������������������������������������������������������������� 33
簡體中文
簡介
����������������������������������������������������������������������������������������������������������������������������������������������������� 34
安全說明
���������������������������������������������������������������������������������������������������������������������������������������������� 34
相容性
�������������������������������������������������������������������������������������������������������������������������������������������������� 34
安裝新的電源供應器
���������������������������������������������������������������������������������������������������������������������������� 35
安全功能
���������������������������������������������������������������������������������������������������������������������������������������������� 35
常見問題和疑難排解
���������������������������������������������������������������������������������������������������������������������������� 35
配件
����������������������������������������������������������������������������������������������������������������������������������������������������� 36
處置注意事項
��������������������������������������������������������������������������������������������������������������������������������������� 36
保固
����������������������������������������������������������������������������������������������������������������������������������������������������� 36
製造商詳細資訊
����������������������������������������������������������������������������������������������������������������������������������� 36
版權
����������������������������������������������������������������������������������������������������������������������������������������������������� 36
繁體中文
技术数据
���������������������������������������������������������������������������������������������������������������������������������������������� 42
はじめに
����������������������������������������������������������������������������������������������������������������������������������������������� 37
安全上の注意
�������������������������������������������������������������������������������������������������������������������������������������� 37
互換性
�������������������������������������������������������������������������������������������������������������������������������������������������� 37
新しい電源装置を取り付ける
��������������������������������������������������������������������������������������������������������������� 38
安全機能
���������������������������������������������������������������������������������������������������������������������������������������������� 38
よくある問題とトラブルシューティング
������������������������������������������������������������������������������������������������ 39
付属品
�������������������������������������������������������������������������������������������������������������������������������������������������� 39
廃棄に関する注意事項
������������������������������������������������������������������������������������������������������������������������� 39
保証
����������������������������������������������������������������������������������������������������������������������������������������������������� 39
保証
���������������������������������������������������������������������������������������������������������������������������������������������������� 40
著作権
�������������������������������������������������������������������������������������������������������������������������������������������������� 40
日本語
技術的データ
��������������������������������������������������������������������������������������������������������������������������������������� 42
技術資料
���������������������������������������������������������������������������������������������������������������������������������������������� 42

6
*LIMITED WARRANTY
������������������������������������������������������������������������������������������������������������������������41
Label ��������������������������������������������������������������������������������������������������������������������������������������������������� 42
Voltage regulation ������������������������������������������������������������������������������������������������������������������������������ 42
Operating conditions ������������������������������������������������������������������������������������������������������������������������� 42
Minimal load ��������������������������������������������������������������������������������������������������������������������������������������� 42
Rail Splittings �������������������������������������������������������������������������������������������������������������������������������������� 43
PCI-e wiring diagram (optimal) ����������������������������������������������������������������������������������������������������������� 43
Dimensions ����������������������������������������������������������������������������������������������������������������������������������������� 43
Connectivity and cable lengths ���������������������������������������������������������������������������������������������������������� 44
TECHNICAL DATA »

7
1.
INTRODUCTION
We are delighted that you have chosen to use a be quiet! Dark Power Pro 13 in your PC� Please read
and follow all the information contained in these instructions carefully prior to installation� Should
you have any further questions, please contact our customer service� See contact information in
item Manufacturer's details�
2.
SAFETY INSTRUCTIONS
The power supply is only guaranteed to function properly if the instructions are followed�
Caution:
Only use original be quiet! power cables� Check the compatibility on bequiet�com if you
use be quiet! power cables not supplied with this power supply� Using not be quiet! power cables or
cables of older power supply unit series may lead to defects!
Connect the power supply directly with a power source� Don’t use a outlet power strip�
Never open the power supply case� There is a risk of fatal injury when working on power sources�
The electronic components inside the case generate a high voltage that is dangerous to humans�
Even after disconnecting the power supply from a power source, some parts still have high voltages�
If you notice traces of smoke, damaged cables and exposure to liquids, immediately disconnect the
power from the power source and do not use it again�
Please have any and all necessary repairs conducted by an authorized expert!
Opening the device voids your warranty.
∙
Never handle the power supply with wet or damp hands when in operation�
∙
Never insert objects into the power supply’s apertures/fans�
∙
Note that the power supply is designed for use indoors in conditions without high levels of
moisture in the ambient air� Using the power supply outdoors will lead to serious damage�
∙
Never work on the power supply while it is connected to a power source� In this case, always set
the power switch to "0" and / or disconnect the power plug�
∙
In the event of a short circuit in the device, unplug the AC cable and do not use the device�
Make sure that your PC is not located directly next to a heating system or any other source of heat�
Make sure that your computer case is sufficiently ventilated by means of additional fans; with today’s
complex and powerful systems a power supply is incapable of dissipating the heat produced in the
PC case without additional support�
If you want to clean your power supply, disconnect it completely from the power source and never
use a damp cloth or cleaning agent� Clean the power supply from the outside using a dry cloth�
Before using the power supply, allow it to warm up to room temperature for one hour to prevent
condensation accumulating in the power supply�
3.
COMPATIBILITY
The be quiet! Dark Power Pro 13 series power supplies are compatible with all recent popular power
supply and motherboard specifications such as:
∙
Intel ATX12V 3�0, Power Supply Design Guide Version 2�0
∙
PCIe 5�0
∙
BTX Version 1�0a
∙
E-ATX Server Dual Motherboards via 8-Pin Connector
∙
EPS12V Version 2�92
∙
Intel C6/C7 Status for the new processor generation
∙
Energy Star 8�0 guidelines
∙
ErP guidelines

8
4.
INSTALLING YOUR NEW POWER SUPPLY
Caution:
Please read „Safety instructions“ before you begin the installation�
Note:
You will need a screwdriver to fit the power supply in your PC� Only use the screws provided�
If applicable, first remove your old power supply.
∙
Therefore, carefully disconnect your PC from any power sources�
∙
Disconnect all plugs from the motherboard and all other components and then pull out the power
supply carefully�
Fitting your new be quiet! Dark Power Pro 13 power supply:
∙
Place the new power supply in the space provided in the PC case and connect to the rear panel
using the four screws provided� Do not use excessive force�
∙
Plug the 20/24 pin connector into the socket provided on the motherboard� If you have a 24 pin
connection, place the remaining 4 pins in the correct position before you plug the connector into
the socket� If you have a motherboard with a 20 pin connector, fold the additional 4 pins to one side�
∙
Now plug the 12V-P4 or P8 connector into the socket provided on the motherboard�
Overclocking Key
The Overclocking Key groups the individual 12V-rails to a single 12V-rail�
You can enable the overclocking function permanently by setting the jumper provided directly at the power
supply� Or you can enable the overclocking function by pressing the switch on the slot cover provided as
needed� The overclocking key is connected to the power supply using the connector labeled accordingly�
When you switch on the overclocking function at the slot, a LED lights on the slot cover switch�
Important:
Only press the “Overclocking Key” when the power supply is switched off!
Only connect the overclocking key or the jumper provided, to the Overclocking Key connector on the
power supply! Do not connect any other device – such as a fan – to this connector! To ensure trouble-
free system operations, you should disable the overclocking key if you do not need this function�
5.
SAFETY FUNCTIONS
This be quiet! power supply features the following safety functions, designed to protect the power
supply and connected components against damage� If one of these safeguards is triggered, the
system will usually reboot or power off� In this case, you should immediately check your PC for
errors� If you would like to learn more about the safety functions, please check out the “Technical
data” section of your be quiet! power supply at www�bequiet�com�
6.
FREQUENT PROBLEMS AND TROUBLESHOOTING
Problem: The selected voltages (via BIOS/UEFI) are to low/high
If you check the power supply voltages via the BIOS/UEFI on the motherboard or the operating
system, note that they may be displayed incorrectly� This typically results from imprecise
measurements by motherboard and does not necessarily imply a genuine problem�
Problem: After installing a new graphics card, the PC will not power on, or it crashes frequently.
You have installed a new higher performance graphics card in your system and now your PC fails to boot,
or it crashes immediately with minimal workload� The power supply is inadequately dimensioned for your
graphics card� Before making a purchase, please refer to our PSU calculator tool on www�bequiet�com�
The tool will help you to find the right be quiet! power supply from our range of products�
Important note:
If the problems persist, please contact our customer service department� Check our website
www�bequiet�com for business hours and detailed information�
OCP (Over current protection)
SCP (Short circuit safeguard)
UVP (Undervoltage protection)
OTP (Temperature safeguard)
OVP (Overvoltage protection)
OPP (overload protection)

9
7.
ACCESSORIES
The power supply package includes the following accessories: Power cables, Slot cover with
Overclocking Key, Jumper for permanent enabling of the overclocking function, AC cable, Operating
manual, Cable ties, Velcros, Cable combs, Screws for installing the power supply
8.
NOTES ON DISPOSAL
Due to European directives* you are no longer allowed to dispose of used electrical and electronic
devices as unsorted domestic waste� The devices must be collected separately� The trash can on
wheels pictogram indicates the need to dispose of the device separately�
Please help to protect the environment and make sure, once you have decided to stop using
the device, that you dispose of it responsibly via the correct collection system�
In Germany, you are legally** required to dispose of used devices separately, instead of
as domestic waste� Your local waste disposal authority has set up one or more collection
points at which used devices from private households in your area can be handed in free of charge�
In some cases waste disposal authorities will pick up used devices, even from private households�
Please refer to your local household waste collection brochure, or visit your town hall or community
administration office, for more information on handing in or collecting used devices in your area�
* Complies with Directive of the European Parliament and of European Council on waste electrical
and electronic equipment (WEEE)�
** Corresponds to the law on sale, return and sustainable disposal of electrical and electronic
equipment (Electrical and Electronic Equipment Act – ElektroG)
9.
WARRANTY
10-year manufacturer’s warranty for consumers (original purchase from authorised be quiet! dealers only)�
Your original purchase receipt will be required before warranty performance is rendered� Please
keep it in a safe place�
Opening the device, manipulations and / or technical modifications of any kind and damage due to
external mechanical force will void your warranty�
To read the warranty terms and conditions in full, see Service/Warranty Conditions on our homepage
at bequiet�com�
Our General Terms and Conditions of Business apply; for details, please refer to bequiet�com on the internet�
10. MANUFACTURER’S DETAILS
Listan GmbH | Wilhelm-Bergner-Straße 11c | 21509 Glinde | Germany
For support in Germany, you can call our free service hotline,
Check our website www�bequiet�com for business hours and detailed informations�
Tel� 0049 40 736 7686 - 44 Fax 0049 40-7367686-69
Email: service@bequiet�com
Internet: www�bequiet�com
UK Authorised Representative (for authorities only) | ProductIP (UK) Ltd�
8, Northumberland Av� | London WC2N 5BY

10
11. COPYRIGHT
∙
You are not allowed to reproduce, disclose, publish or store the contents of this documentation,
or excerpts of it, without the prior written consent of Listan�
∙
be quiet! is a registered trademark of Listan GmbH� Other products and company names
mentioned in this documentation may be brands or trademarks of their respective owners�
∙
In accordance with company policy, all Listan products are subject to ongoing development�
Listan reserves the right to make changes and improvements to any product described in this
documentation without prior announcement�
∙
Under no circumstances shall Listan be held liable for loss of data and income, or for any specific,
incidental, direct, or indirect damage, however it arises�
∙
The content of this documentation represents the current state-of-art� Listan does not assume,
whether expressed or implicit, any liability for the correctness or completeness of the content
of this documentation, including, but not limited to the implicit guarantee of market suitability
and aptitude for a special purpose, unless applicable laws or jurisdiction stringently stipulate
such a liability� Listan retains the right to make changes to this documentation or to withdraw the
documentation at any time without prior announcement�

11
1.
EINLEITUNG
Wir freuen uns, dass Sie sich dazu entschieden haben, ein be quiet! Dark Power Pro 13 in Ihrem
Rechner einzusetzen� Vor der ersten Inbetriebnahme befolgen Sie bitte alle Punkte dieser Anleitung�
Falls Sie weitere Fragen haben, richten Sie diese gerne an unseren Kundenservice� Siehe hierzu
Kontaktdaten unter „Herstellerangaben“�
2.
SICHERHEITSHINWEISE
Vor der ersten Inbetriebnahme befolgen Sie bitte alle Punkte dieser Anleitung� Nur dann
ist ein ordnungsgemäßer Betrieb des Netzteils sichergestellt�
Achtung:
Verwenden Sie nur original be quiet! Power Cable� Prüfen Sie die Kompatibilität auf
bequiet�com wenn sie be quiet! Power Cable verwenden, die nicht mitgeliefert wurden� Das
Verwenden von anderen Kabeln oder Kabel älterer Netzteilserien kann zu einem Defekt führen!
Verbinden Sie das Netzteil direkt mit einer Steckdose� Benutzen Sie keine Mehrfachsteckdosen�
Arbeiten an Stromquellen können zu lebensbedrohlichen Verletzungen führen� Bei Rauchspuren,
beschädigten Kabeln und Einwirkung von Flüssigkeiten ist das Netzteil sofort vom Stromnetz zu
trennen und danach nicht mehr in Betrieb zu nehmen� Schrauben Sie das Netzteil niemals auf� Im
Inneren befinden sich Bauteile, die auch bei längerem Nichtgebrauch hohe Spannungen aufweisen
können�
Bitte lassen Sie Reparaturen nur von autorisiertem Fachpersonal durchführen! Ein Öffnen des
Gerätes führt zum Garantieverlust.
∙
Nehmen Sie niemals das Gerät mit nassen oder feuchten Händen in Betrieb�
∙
Stecken Sie keine Gegenstände in die Öffnungen/Gebläse des Netzteiles�
∙
Beachten Sie, dass das Netzteil für die Inbetriebnahme in Innenräumen ohne hohe Luftfeuchtigkeit
vorgesehen ist� Der Außeneinsatz führt zu schweren Beschädigungen des Netzteils�
∙
Führen Sie keine Arbeiten am Netzteil durch, wenn sich dieses unter Netzspannung befindet� In
diesen Fällen immer Netzschalter auf "0" stellen und/oder den Netzstecker herausziehen�
∙
Bei einem Kurzschluss im Gerät, entfernen Sie das Netzkabel und nehmen Sie das Netzteil nicht
erneut in Betrieb�
Stellen Sie sicher, dass Ihr PC nicht direkt neben einer Heizung oder einer anderen Wärmequelle
betrieben wird�
Sorgen Sie für eine ausreichende Belüftung Ihres Computergehäuses durch zusätzliche Lüfter,
da bei heutigen komplexen und leistungsfähigen Systemen ein Netzteil allein nicht mehr für den
Abtransport der im PC-Gehäuse produzierten Wärme ausreicht�
Für den Fall, dass Sie Ihr Netzteil reinigen möchten, trennen Sie das Netzteil komplett vom Stromnetz
und benutzen Sie keine feuchten Tücher oder Reinigungsmittel� Reinigen Sie das Netzteil nur von
außen mit Hilfe eines trockenen Tuches� Ein Öffnen des Gerätes führt zum Garantieverlust�
Nehmen Sie das Netzteil erst nach einer Stunde in Raumluftumgebung in Betrieb, da sich
anderenfalls Kondenswasser im Netzteil bilden könnte�

12
3.
KOMPATIBILITÄT
Die be quiet! Netzteile der Dark Power Pro 13 Serie sind mit allen aktuell gängigen Netzteil- sowie
Mainboard-Spezifikationen kompatibel wie u�a�:
∙
Intel ATX12V 3�0, Power Supply Design Guide Version 2�0
∙
PCIe 5�0
∙
BTX Version 1�0a
∙
E-ATX Server Dual Mainboards mittels 8-Pin-Connector
∙
EPS 12V Version 2�92
∙
Intel C6/C7 Status der neuen Prozessorgeneration
∙
Energie Star 8�0 Guidelines
∙
ErP Richtlinien
4.
INSTALLATION IHRES NEUEN NETZTEILS
Achtung:
Lesen Sie bitte den Punkt „Sicherheitshinweise“ bevor Sie mit der Installation beginnen�
Anmerkung:
Zum Einbau des Netzteils in Ihren PC benötigen Sie einen Schraubendreher� Benutzen
Sie nur die mitgelieferten Schrauben aus dem Lieferumfang�
Bauen Sie wenn nötig, zunächst ihr altes Netzteil aus:
∙
Trennen Sie Ihren PC von allen vorhandenen Stromquellen�
∙
Trennen Sie alle Stecker vom Mainboard sowie allen weiteren Komponenten�
∙
Nun entfernen Sie die Schrauben an der Rückseite des Netzteiles und entnehmen das Netzteil
vorsichtig aus dem PC-Gehäuse�
Der Einbau Ihres neuen be quiet! Dark Power Pro 13 Netzteiles:
∙
Setzen Sie das neue Netzteil an den vorgesehenen Platz im PC-Gehäuse und schrauben Sie es an
der Rückseite mit den vier mitgelieferten Schrauben fest� Verwenden Sie keine übermäßige Kraft�
∙
Stecken Sie den 20/24-Pin Stecker in die vorgesehene Buchse am Mainboard� Wenn Sie über
einen 24-Pin Anschluss verfügen, dann bringen Sie die zusätzlichen 4-Pins in die richtige Position,
bevor Sie den Stecker in die Buchse am Mainboard stecken� Beim Einsatz eines Mainboards mit
einem 20-Pin Stecker klappen Sie die zusätzlichen 4 Pins einfach zur Seite�
∙
Nun stecken Sie den 12V-P4 oder P8-Stecker für die CPU in die vorgesehene Buchse auf dem
Mainboard�
Overclocking Key:
Der Overclocking Key fasst die einzelnen 12V-Schienen zu einer 12V-Schiene zusammen�
Sie können die Overclocking Funktion mittels des mitgelieferten Jumpers direkt am Netzteil
permanent aktivieren oder Sie aktivieren die Overclocking Funktion mittels des Schalters an dem
mitgelieferten Slotblech nach Bedarf� Der Overclocking Key wird mit der gekennzeichneten Buchse
am Netzteil verbunden�
Wenn Sie die Overclocking Funktion am Slotblech aktivieren, leuchtet am Slotblech-Schalter eine
LED�
Wichtig:
Betätigen Sie den Overclocking Key nur bei ausgeschaltetem Netzteil!
Schießen Sie nur den mitgelieferten Overclocking Key oder den mitgelieferten Jumper an der, für den
Overclocking Key vorgesehenen Buchse am Netzteil an! Schließen Sie hier auf keinen Fall andere
Geräte wie zum Beispiel Lüfter an! Um einen reibungslosen Betrieb Ihres Systems zu gewährleisten
sollten Sie den Overclocking Key deaktivieren, wenn Sie diese Funktion nicht benötigen�

13
5.
SICHERHEITSFUNKTIONEN
Das be quiet! Netzteil ist mit zahlreichen Sicherungsfunktionen ausgestattet� Diese schützen das
Netzteil und die daran angeschlossenen Komponenten vor Beschädigungen� Sollte eine dieser
Sicherungen auslösen, kommt es in den meisten Fällen zu einem Neustart oder zum Abschalten des
Systems�In einem solchen Fall sollte der PC sofort auf einen möglichen Fehler überprüft werden�
Wenn Sie mehr über die Sicherheitsfunktionen des Netzteils erfahren möchten, besuchen Sie bitte
die „Technischen Daten“ des Netzteils unter www�bequiet�com�
6. HÄUFIGE PROBLEME UND FEHLERBEHEBUNG
Problem: Die ausgelesenen Spannungen (über BIOS oder UEFI) sind zu niedrig/hoch
Wenn Sie im BIOS oder UEFI des Mainboards oder im Betriebssystem die Spannungen des
Netzteils überprüfen, kann es vorkommen, dass diese falsch dargestellt werden� Dies liegt meist an
der ungenauen Messung des Mainboards und muss nicht zwangsweise der Realität entsprechen�
Problem: Nach dem Einbau einer neuen Grafikkarte springt der PC nicht mehr an oder
stürzt bei jeder Gelegenheit ab.
Das Netzteil ist zu schwach für ihre Grafikkarte ausgelegt� Bitte schauen Sie vor dem Kauf in
unserem Watt-Konfigurator unter www�bequiet�com nach� Hier wird Ihnen das richtige be quiet!
Netzteil aus unserem Sortiment empfohlen�
Wichtiger Hinweis:
Falls Probleme weiter bestehen, setzen Sie sich bitte umgehend mit unserem Kundenservice
in Verbindung� Prüfen Sie unsere Website unter www�bequiet�com für unsere Servicezeiten und
weitere Details�
7. ZUBEHÖR
Im Lieferumfang des Netzteils ist folgendes Zubehör enthalten: Kabelsatz, Slotblech
mit Overclocking Key, Jumper zur permanenten Aktivierung der Overclocking-Funktion,
Kaltgerätekabel, Bedienungsanleitung, Kabelbinder, Klettbinder, Kabelkämme sowie Schrauben
zur Netzteilbefestigung
8. ENTSORGUNGSHINWEISE
Gebrauchte Elektro- und Elektronikgeräte dürfen gemäß europäischer Vorgaben* nicht mehr zum
unsortierten Siedlungsabfall gegeben werden� Sie müssen getrennt erfasst werden� Das Symbol
der Abfalltonne auf Rädern mit Balken weist auf die Notwendigkeit der getrennten Sammlung hin�
Helfen auch Sie mit beim Umweltschutz und sorgen Sie dafür dieses Gerät in die hierfür
vorgesehenen Systeme der Getrenntsammlung zu geben, wenn Sie es nicht mehr weiter nutzen wollen�
In Deutschland sind Sie gesetzlich** verpflichtet, ein Altgerät einer vom unsortierten Siedlungsabfall
getrennten Erfassung zuzuführen� Die öffentlich-rechtlichen Entsorgungsträger (Kommunen) haben
hierzu Sammelstellen eingerichtet, an denen Altgeräte aus privaten Haushalten Ihres Gebietes für Sie
kostenfrei entgegengenommen werden� Möglicherweise holen die rechtlichen Entsorgungsträger
die Altgeräte auch bei den privaten Haushalten ab�
Bitte informieren Sie sich auch über Ihren lokalen Abfallkalender bei ihrer Stadt oder ihrer
Gemeindeverwaltung über die in Gebiet zur Verfügung stehenden Möglichkeiten der Rückgabe oder
Sammlung von Altgeräten�
* Entspricht der Richtlinie des europäischen Parlaments und des Rates über Elektro- und Elektronik-
Altgeräte
** Entspricht dem Gesetz über das Inverkehrbringen, die Rücknahme und die umweltverträgliche
Entsorgung von Elektro- und Elektronikgeräten (Elektro- und Elektronikgerätegesetz - ElektroG)
OCP (Überstromschutz)
SCP (Kurzschlusssicherung)
UVP (Unterspannungsschutz)
OTP (Temperatursicherung)
OVP (Überspannungsschutz)
OPP (Überlastschutz)

14
9.
GARANTIE
∙
10 Jahre Herstellergarantie für Endkonsumenten (nur Ersterwerb vom autorisierten be quiet!-
Händler)�
∙
Vorortaustausch in den ersten 12 Monaten ab Kaufdatum vom autorisierten be quiet!-Händler
Vorortaustausch nur innerhalb Deutschlands und Frankreichs.
Der Austausch kann nur in dem Land erfolgen, in dem das Netzteil gekauft wurde� Alle eingehenden
Rücksendungen werden von unserer Serviceabteilung geprüft� Falls sich ein Netzteil als fehlerfrei
herausstellen sollte, wird es an Sie zurückgeschickt� Darüber hinaus behalten wir uns vor, eine
Prüfpauschale für den entstandenen Aufwand zu erheben�
Sollte an Ihrem be quiet!-Netzteil innerhalb der ersten 12 Monate nach Kaufdatum ein Defekt
auftreten, wenden Sie sich bitte an unsere Service-Hotline, um technische Details und Fragen zu
klären� Besuchen Sie für weitere Details den Service-Bereich unserer Netzseite� Hier können Sie
sich über die genauen Garantiebedingungen informieren�
Das Öffnen des Gerätes, Manipulationen oder bauliche Veränderungen jeglicher Art, sowie
Beschädigungen durch äußere mechanische Einwirkungen führen zum totalen Garantieverlust�
Die ausführlichen Garantiebedingungen können im Bereich "Service" unter www�bequiet�com
eingesehen werden�
Es gelten unsere Allgemeinen Geschäftsbedingungen, die Sie unter www�bequiet�com abrufen
können�
10. HERSTELLERANGABEN
Listan GmbH | Wilhelm-Bergner-Straße 11c | 21509 Glinde
Für weitere Unterstützung erreichen Sie uns innerhalb Deutschlands unter der unten stehenden
Service-Hotline�
Prüfen Sie unsere Website unter www�bequiet�com für unsere Servicezeiten und weitere Details�
Tel� 040 736 7686 - 44 Fax 0049 40-7367686-69
Email: service@bequiet�com
Internet: www�bequiet�com
11. COPYRIGHT
∙
Der Inhalt dieser Dokumentation darf ohne vorherige schriftliche Genehmigung durch Listan in keiner
Form, weder ganz noch teilweise, vervielfältigt, weitergegeben, verbreitet oder gespeichert werden�
∙
be quiet! ist eine eingetragene Marke der Firma Listan GmbH� Andere in dieser Dokumentation erwähnten
Produkte- und Firmennamen können Marken oder Handelsnamen ihrer jeweiligen Eigentümer sein�
∙
Listan entwickelt entsprechend ihrer Politik die Produkte ständig weiter� Listan behält sich deshalb das
Recht vor, ohne vorherige Ankündigungen jedem der in dieser Dokumentation beschriebenen Produkte
Änderungen und Verbesserungen vorzunehmen�
∙
Listan ist unter keinen Umständen verantwortlich für den Verlust von Daten und Einkünften oder für
jedweder besonderen, beiläufigen, mittelbaren oder unmittelbaren Schäden, wie immer diese auch
zustande gekommen sind�
∙
Der Inhalt dieser Dokumentation wird so präsentiert, wie er aktuell vorliegt� Listan übernimmt weder
ausdrücklich noch stillschweigend irgendeine Gewährleistung für die Richtigkeit oder Vollständigkeit
des Inhalts dieser Dokumentation, einschließlich, aber nicht beschränkt auf die stillschweigende
Garantie der Markttauglichkeit und der Eignung für einen bestimmten Zweck, es sei denn, anwendbare
Gesetze oder Rechtssprechung schreiben zwingend eine Haftung vor� Listan behält sich das Recht vor,
jederzeit ohne vorherige Ankündigung Änderungen an dieser Dokumentation vorzunehmen oder die
Dokumentation zurückzuziehen�

15
1.
INTRODUCTION
Nous vous remercions d'avoir choisi un bloc Dark Power Pro 13 signé be quiet!� Avant la première
mise en service, nous vous recommandons de lire attentivement ce manuel et d’en observer les
consignes� Si vous avez d’autres questions, nous vous invitons à prendre contact avec notre service
après-vente, dont vous trouverez les coordonnées dans la rubrique « Informations constructeur »�
2.
CONSIGNES DE SÉCURITÉ
Le bon fonctionnement de votre alimentation est uniquement garanti si les instructions
sont correctement suivies
Attention :
Veuillez utiliser uniquement les câbles fournis avec votre alimentation� Si vous utilisez
des câbles d'alimentation be quiet! non fournis avec cette alimentation, vérifiez la compatibilité sur
bequiet�com� Utiliser des câbles d'alimentation d’une autre marque que be quiet ! ou les câbles
d’une gamme d'alimentations plus ancienne peut entraîner des défaillances�
Connectez l’alimentation directement à une source d’alimentation� N’utilisez pas de multiprise�
Veillez à ne jamais ouvrir votre bloc d’alimentation� Les composants électroniques qui se trouvent à
l’intérieur peuvent être soumis à de hautes tensions et mettre en danger votre sécurité� Nous vous
rappelons que même une fois débranchés, les composants restent sous tension�
Si vous remarquez des traces de fumée, des câbles endommagés ou l'exposition à des liquides,
débranchez immédiatement le bloc d'alimentation de sa source d'alimentation et veillez à ne plus
l'utilisez�
Veuillez faire effectuer toutes les réparations nécessaires par un expert agréé! L'ouverture de
l'appareil annule votre garantie.
∙
Ne jamais manipuler un bloc d’alimentation avec les mains humides ou mouillées
∙
Ne pas insérer d’objet dans les orifices ou dans le ventilateur de l’alimentation
∙
Veuillez noter que votre bloc d’alimentation a été conçu pour fonctionner en intérieur, dans un
environnement dépourvu d’humidité� L’utilisation de votre bloc d’alimentation en extérieur peut
conduire à de sérieuses défaillances
∙
Ne manipulez pas votre bloc d’alimentation lorsqu’il est branché sur secteur� Dans ce cas, veillez
préalablement à mettre l’interrupteur du bloc en position «O» et/ou débranchez la prise secteur
∙
En cas de court-circuit, veuillez ne pas remettre en marche votre bloc d’alimentation
Assurez-vous que votre ordinateur ne se trouve pas directement à côté d'un système de chauffage
ou de toute autre source de chaleur�
Assurez-vous que votre PC est suffisamment ventilé, en utilisant des ventilateurs additionnels ; avec
les systèmes surpuissants et complexes actuels, les alimentations ne peuvent plus assurer seuls la
dissipation de la chaleur à l’intérieur de votre PC�
Si vous souhaitez nettoyer votre bloc d’alimentation, veuillez le débrancher� Ne pas utiliser un chiffon
humide ou des produits de nettoyage� Nettoyez uniquement l’extérieur du bloc d’alimentation à
l’aide d’un chiffon sec�
Avant la première utilisation de votre bloc d’alimentation, il est recommandé de le laisser à
température ambiante une heure avant de le mettre en marche� Cela permettra d’éviter toute
condensation à l’intérieur de votre bloc�

16
3.
COMPATIBILITÉ
Les blocs d’alimentation Dark Power Pro 13 sont compatibles avec la plupart des caractéristiques
courantes des cartes mères et des alimentations les plus récentes :
∙
Intel ATX12V 3�0, Power Supply Design Guide Version 2�0
∙
PCIe 5�0
∙
BTX Version 1�0a
∙
E-ATX Server Dual Motherboards via 8-Pin Connector
∙
EPS12V Version 2�92
∙
Intel C6/C7 Status pour les nouvelles générations de processeurs
∙
Programme Energy Star 8�0
∙
Directives ErP
4.
INSTALLATION DE VOTRE NOUVEAU BLOC D’ALIMENTATION
Attention :
Nous vous invitons à lire le paragraphe « Consignes de sécurité » en préambule à
l’installation de votre bloc d’alimentation�
Remarque :
vous aurez besoin d’un tournevis pour effectuer l’installation de votre bloc
d’alimentation� Utilisez exclusivement les vis fournies�
Le cas échéant, démontez votre ancien bloc d’alimentation.
∙
Pour ce faire, déconnectez soigneusement votre PC de toute source d’alimentation�
∙
Débranchez toutes les connecteurs de la carte mère et de tous les autres composants, puis
débranchez le câble d'alimentation avec précaution
Montage de votre nouveau bloc d’alimentation Dark Power Pro 13 :
∙
Placez le nouveau bloc d’alimentation à l’emplacement prévu dans le boîtier et fixez-le sur la face
arrière, à l’aide des quatre vis fournies� Veillez à n’exercer aucune pression excessive�
∙
Branchez le connecteur 20/24 broches dans la fiche correspondant à la carte mère� Si la carte
mère est équipée en 24 broches, mettez les quatre broches additionnelles dans la position
correcte et branchez le connecteur mâle dans le connecteur femelle de la carte mère� En cas
d’utilisation d’une carte mère à connecteur 20 broches, rabattez simplement les 4 broches
surnuméraires sur le côté�
∙
Branchez ensuite le connecteur 12V-P4/ 12V-P8 du processeur sur la carte mère
Clef overclocking :
La clef overclocking permet de basculer les différents rails 12V vers un seul
rail 12V massif� La fonction Overclocking peut être activée à tout moment au moyen du cavalier livré
à cet effet� Elle peut également être activée au moyen de l'équerre fournie�
Elle se raccorde au bloc d'alimentation via le connecteur dédié� Lorsque la fonction overclocking est
activée via l'équerre, une LED s'allume�
Important :
la touche „Overclocking Key“ ne doit être actionnée que lorsque le bloc d‘alimentation
est à l‘arrêt� Connectez uniquement la clef d’overclocking ou le cavalier fourni au connecteur
„Overclocking Key“ de l’alimentation! Ne connectez aucun autre périphérique - tel qu'un ventilateur
- à ce connecteur!
Pour que le système fonctionne sans problème, vous devez désactiver la clé d’overclocking si vous
n’avez pas besoin de cette fonction�
17
5.
SYSTÈMES DE SÉCURITÉ
Ce bloc d’alimentation be quiet! est équipé des systèmes de sécurité, suivants, conçus pour
protéger votre bloc d’alimentation et vos composants de tous dommages� Dans la plupart des cas,
si l’une des sécurités se déclenche, le système redémarre ou s’éteint complètement� Si c’est le cas,
nous vous invitons à vérifier immédiatement les erreurs de votre PC� Vous pouvez vous reporter à la
rubrique « Caractéristiques» sur www�bequiet�com�
6.
PROBLEMES LES PLUS FRÉQUENTS ET DÉPANNAGE
Problème: les tensions mesurées (par le BIOS/UEFI) sont trop basses/élevées
Si vous mesurez les tensions du bloc d‘alimentation au moyen du BIOS/UEFI de la carte mère ou sur
le système d‘exploitation, il est possible que les valeurs affichées soient inexactes� Ceci provient en
général de l‘imprécision de mesure de la carte mère et ne reflète pas forcément la réalité�
Problème: après le montage d‘une nouvelle carte graphique, l‘ordinateur ne démarre plus ou
plante inopinément
Suite à l’installation d’une nouvelle carte graphique plus performante sur votre système, votre ordinateur
ne démarre plus ou plante très régulièrement� Votre alimentation est très certainement sous dimensionnée�
Avant votre achat, veuillez consulter notre configurateur sur www�bequiet�com� Le programme vous recom-
mandera le bloc d‘alimentation de la gamme be quiet! le plus approprié compte tenu de votre configuration�
Remarque importante:
Si les problèmes persistent, nous vous invitons à prendre contact avec notre service après-vente� Consultez
notre site Web www�bequiet�com pour connaître les heures d'ouverture et obtenir des informations détaillées�
7.
ACCESSOIRES
Votre bloc d’alimentation est livré avec les accessoires suivants: Câbles d‘alimentation ; équerre avec
bouton Overclocking Key ; cavalier d‘activation permanente de la fonction Overclocking ; câble de terre ;
instructions d‘utilisation ; attache-câbles ; velcros ; étrille pour câbles ; vis de fixation du bloc d‘alimentation�
8.
CONSIGNES D’ÉLIMINATION ET DE RECYCLAGE
En application des directives européennes*, les appareils électriques et électroniques
usagés ne peuvent plus être jetés avec les déchets ménagers� Ils doivent être triés, comme
l’indique le symbole du conteneur à déchets barré d’une croix� Aidez-nous à protéger
l'environnement et assurez-vous, une fois que vous avez décidé de cesser d'utiliser l'appareil, que
vous vous en débarrassez de manière responsable via le système de collecte approprié�
En Allemagne, vous êtes légalement ** tenu de mettre au rebut les appareils usagés séparément,
plutôt que comme déchets ménagers� Votre autorité locale en charge de l'élimination des déchets a
créé un ou plusieurs points de collecte où les appareils usagés appartenant à des ménages privés
de votre région peuvent être remis gratuitement� Dans certains cas, les autorités responsables de
l'élimination des déchets récupèreront les appareils usagés, même auprès des ménages� Veuillez
vous reporter à la brochure sur la collecte des déchets ménagers de votre localité ou contacter
votre mairie ou votre bureau d'administration locale pour plus d'informations sur la remise ou la
collecte des appareils usagés dans votre région� * Conforme à la directive du Parlement européen
et du Conseil européen sur les déchets d'équipements électriques et électroniques (DEEE)� **
Correspond à la loi sur la vente, le retour et la mise au rebut durable des équipements électriques et
électroniques (Loi sur les équipements électriques et électroniques - ElektroG)
OCP (protection contre les surintensités)
SCP (protection contre les courts-circuits)
UVP (protection contre les sous-tensions)
OTP (protection contre la surchauffe)
OVP ((protection contre les surtensions)
OPP (protection contre les surcharges)

18
9.
GARANTIE
10 ans de garantie constructeur pour le consommateur final (uniquement dans le cadre d’un achat
initial auprès d‘un distributeur be quiet! agréé)� Votre facture d'achat originale sera à fournir avant de
pouvoir faire jouer la garantie� Gardez-la précieusement�
L'ouverture de l'appareil, les manipulations et / ou modifications techniques de tout type et les
dommages dus à une force mécanique externe annuleront la garantie�
Pour lire les conditions de garantie dans leur intégralité, voir Conditions de service / garantie sur
notre page d’accueil bequiet�com�
Nous vous invitons à vous reporter à nos conditions générales de garantie, sur le site www�bequiet�
com�
10. INFORMATIONS CONSTRUCTEUR
Listan GmbH | Wilhelm-Bergner-Straße 11c | 21509 Glinde | Allemagne
Si vous avez besoin de joindre notre service après-vente,
Consultez notre site Web www.bequiet.com pour connaître les heures d'ouverture et obtenir des
informations détaillées.
Tel� +49 40 736 7686 - 44 Fax +49 40-7367686-69
Email: service@bequiet�com
Internet: www�bequiet�com
11. DROITS D’AUTEUR
∙
Le contenu de la présente documentation ne peut être reproduit, distribué, diffusé ou enregistré
d’aucune manière que ce soit, ni en tout ni en partie, sans l’autorisation préalable écrite de Listan
GmbH�
∙
be quiet! est une marque déposée de la société Listan GmbH� Les autres noms de produits et de
sociétés mentionnés dans la présente documentation peuvent être des marques ou des noms
commerciaux appartenant à leurs propriétaires respectifs�
∙
Listan procède au développement continu de ses produits conformément à sa politique� Par
conséquent, Listan se réserve le droit de procéder à des modifications et améliorations de chacun
des produits décrits dans la présente documentation, sans aucun préavis�
∙
Listan décline toute responsabilité en cas de pertes de données et de revenus, de dommages
particuliers, accessoires, directs ou indirects, quels qu’ils soient, et quelle qu’en soit l’origine�
∙
La présente documentation décrit le produit sous sa forme actuelle� Listan décline toute
responsabilité expresse ou tacite pour l’exactitude et l’intégralité du contenu de la présente
documentation, y compris, sans s’y limiter, de la garantie tacite de l’aptitude à la commercialisation
et à un usage défini, sauf dans les cas où la législation applicable ou la jurisprudence exigent une
telle responsabilité�
Listan se réserve le droit de procéder à tout moment et sans avis préalable à des modifications de
la présente documentation, ou à son retrait�

19
1.
WPROWADZENIE
Cieszymy się, że zdecydowałeś się zamontować w swoim komputerze be quiet! Dark Power Pro
13� Przed instalacją należy uważnie przeczytać i przestrzegać wszystkich informacji zawartych w
niniejszej instrukcji� W razie dalszych pytań prosimy o kontakt z naszym działem obsługi klienta�
Zobacz informacje kontaktowe w punkcie Dane producenta�
2.
WSKAZÓWKI DOTYCZĄCE BEZPIECZEŃSTWA
Tylko przestrzeganie instrukcji gwarantuje prawidłową pracę zasilacza�
Uwaga:
używaj wyłącznie oryginalnego zestawu przewodów zasilających� Jeśli chcesz użyć przewodów
zasilających od innego zasilacza be quiet! sprawdź kompatybilność przewodów na bequiet�com� Używanie
przewodów innego producenta lub z innej, starszej serii zasilaczy be quiet! może doprowadzić do usterki!
Podłącz zasilacz bezpośrednio do źródła zasilania� Nie używaj listwy zasilającej�
Nigdy nie otwieraj obudowy zasilacza� Podczas pracy przy źródłach prądu istnieje ryzyko śmiertelnych
obrażeń� Komponenty elektroniczne wewnątrz obudowy generują wysokie napięcie, które jest
niebezpieczne dla ludzi� Nawet po odłączeniu zasilania niektóre części nadal mają wysokie napięcie�
Jeśli zauważysz ślady dymu, uszkodzone kable lub kontakt z płynami, natychmiast odłącz zasilacz
od źródła prądu i nie używaj go ponownie�
Wszelkie niezbędne naprawy należy zlecać autoryzowanemu ekspertowi! Otwarcie urządzenia
powoduje utratę gwarancji.
∙
Nigdy nie obsługuj zasilacza mokrymi lub wilgotnymi rękami�
∙
Nigdy nie wkładaj przedmiotów do otworu wentylatora zasilacza�
∙
Należy pamiętać, że zasilacz jest przeznaczony do użytku wewnątrz pomieszczeń w warunkach o niskiej
wilgotności powietrza� Korzystanie z zasilacza na zewnątrz prowadzi do jego poważnych uszkodzeń�
∙
Nigdy nie manipuluj przy zasilaczu, gdy jest on podłączony do źródła prądu� W takim przypadku
zawsze ustaw przełącznik zasilania w pozycji „0” i / lub odłącz wtyczkę zasilania�
∙
W przypadku zwarcia w urządzeniu odłącz kabel zasilający i nie uruchamiaj ponownie zasilacza�
Upewnij się, że komputer nie znajduje się bezpośrednio obok systemu grzewczego lub innego źródła ciepła�
Upewnij się, że obudowa komputera jest wystarczająco wentylowana za pomocą dodatkowych
wentylatorów� Przy dzisiejszych złożonych i wysokowydajnych systemach sam zasilacz nie jest w
stanie odprowadzić ciepła wytwarzanego w obudowie komputera bez dodatkowego wsparcia�
Jeśli chcesz wyczyścić zasilacz, odłącz go całkowicie od źródła zasilania i nigdy nie używaj wilgotnej
szmatki lub środka czyszczącego� Oczyść zasilacz z zewnątrz za pomocą suchej szmatki�
Przed użyciem zasilacza pozwól mu nagrzać się do temperatury pokojowej przez jedną godzinę, aby
zapobiec tworzeniu się skroplin w zasilaczu�
3.
KOMPATYBILNOŚĆ
Zasilacze be quiet! serii Dark Power Pro 13 są kompatybilne ze wszystkimi aktualnie stosowanymi
specyfikacjami zasilaczy oraz płyt głównych, takimi jak:
∙
Intel ATX12V 3�0, Power Supply Design Guide Version 2�0
∙
PCIe 5�0
∙
BTX wersja 1�0a
∙
Podwójne płyty główne serwerowe E-ATX za pośrednictwem złącza 8-Pin
∙
EPS12V wersja 2�92
∙
Stan Intel C6 / C7 dla nowej generacji procesorów
∙
Wytyczne Energy Star 8�0
∙
Wytyczne ErP

20
4.
INSTALACJA NOWEGO ZASILACZA
Uwaga:
Przed rozpoczęciem instalacji przeczytaj „Wskazówki bezpieczeństwa”�
Uwaga:
Do zamontowania zasilacza, potrzebny będzie śrubokręt� Używaj tylko śrub dostarczonych
w zestawie�
Jeśli dotyczy, najpierw usuń stary zasilacz.
∙
Należy ostrożnie odłączyć komputer od wszelkich źródeł zasilania�
∙
Odłącz wszystkie wtyczki od płyty głównej i wszystkich innych komponentów, a następnie
ostrożnie wyciągnij zasilacz�
Montaż nowego zasilacza be quiet! Dark Power Pro 13:
∙
Umieść nowy zasilacz w miejscu znajdującym się w obudowie komputera i podłącz go do panelu
tylnego za pomocą czterech dostarczonych śrub� Nie używaj nadmiernej siły�
∙
Podłącz złącze 20/24 pin do gniazda na płycie głównej� Jeśli masz połączenie 24-pinowe, umieść
pozostałe 4 styki we właściwej pozycji przed podłączeniem złącza do gniazda� Jeśli masz płytę
główną z 20-pinowym złączem, odegnij dodatkowe 4 piny na jedną stronę�
∙
Teraz podłącz złącze 12V-P4 lub P8 do gniazda na płycie głównej�
Overclocking Key
Overclocking Key łączy poszczególne linie 12V w jedną linię 12V�
Funkcję overclockingu można włączyć na stałe, umieszczając zworkę bezpośrednio w zasilaczu�
Możesz także włączyć funkcję podkręcania, naciskając przełącznik na zaślepce gniazda, jeśli jest
to wymagane�
Overclocking Key jest podłączony do zasilacza za pomocą odpowiednio oznaczonego złącza�
Po włączeniu funkcji przetaktowywania na przełączniku pokrywy gniazda świeci się dioda LED�
Ważne:
Przycisk „Overclocking” należy naciskać tylko przy wyłączonym zasilaniu!
Do złącza Overclocking Key podłączaj tylko i wyłącznie Overclocking Key lub dołączoną zworkę! Nie
podłączaj do tego złącza żadnego innego urządzenia – np� wentylatora!
Aby zapewnić bezproblemowe działanie systemu, należy wyłączyć klucz overclockingu, jeśli nie
potrzebujesz tej funkcji�
5.
FUNKCJE BEZPIECZEŃSTWA
Ten zasilacz be quiet! posiada następujące funkcje bezpieczeństwa, zaprojektowane w celu
ochrony przed uszkodzeniem samego zasilacza jak i podłączonych komponentów� Jeśli zostanie
uruchomione jedno z tych zabezpieczeń, system zwykle uruchamia się ponownie lub wyłącza się�
W takim przypadku należy natychmiast sprawdzić komputer PC pod kątem błędów� Jeśli chcesz
dowiedzieć się więcej o funkcjach bezpieczeństwa, sprawdź zakładkę „Dane techniczne” na stronie
Twojego zasilacza be quiet! na www�bequiet�com�
OCP (Zabezpieczenie nadprądowe)
SCP (Zabezpieczenie zwarciowe)
UVP (Zabezpieczenie podnapięciowe)
OTP (Zabezpieczenie temperaturowe)
OVP (Ochrona przepięciowa)
OPP (Zabezpieczenie przeciążeniowe)
Аннотация для be quiet! 1600W Dark Power Pro 13 80 PLUS Titanium Power Supply в формате PDF
Топ 10 инструкций
Другие инструкции
") Sachtler Ace XL Tripod System with CF Legs & Ground Spreader (75mm Bowl)
Sachtler System Ace XL MS AL with Fluid Head, Ace 75/2 D Tripod, Mid-Level Spreader & Bag
be quiet! Dark Power Pro 12 1500W 80 PLUS Titanium Modular Power Supply
be quiet! Dark Power Pro 11 650W 80 Plus Platinum Modular Power Supply
Sachtler Ace XL Tripod System with CF Legs & Ground Spreader (75mm Bowl)
Sachtler System Ace XL MS AL with Fluid Head, Ace 75/2 D Tripod, Mid-Level Spreader & Bag
be quiet! Dark Power Pro 12 1500W 80 PLUS Titanium Modular Power Supply
be quiet! Dark Power Pro 11 650W 80 Plus Platinum Modular Power Supply