Sachtler Ace XL Tripod System with CF Legs & Ground Spreader (75mm Bowl): инструкция
Раздел: Видео Аудио Фото Оборудование
Тип: Экшн Камера
Инструкция к Экшн Камере Sachtler Ace XL Tripod System with CF Legs & Ground Spreader (75mm Bowl)
HEAD
1
139 mm (5.5 in.)
140 mm (5.5 in.)
154 mm (6 in.)
13 mm
1.7 kg (3.7 lbs)
2 - 8 kg (4.4 - 17.6 lbs)
Ace XL MS
@ 55 mm (2.1 in.) cog
1018
3+0
3+0
Ace XL GS
8
1019
2
+90°/-75°
Fluid Head and
-30°C/+60°C
(-22°F to +140°F)
Tripod
104 mm
(4.1 in.)
Manual
Bowl
75 mm
Pan bar
16 mm (0.6 in.)
Pan bar
374 mm (14.7 in.)
Illuminated level bubble
Ace XL MS
CR1225
Flat base
Bowl base
Ace XL GS
Copyright © 2012 Vitec Group plc Publication part no. S2150-4992/1 Specifications are subject to change without notice
3
6 8
9
‘CLICK’
!
4
‘1’
7
10
11
5
12
7
EN
PT
The warranty expires if:
A garantia termina se:
(a) The fluid head was operated improperly or not in
(a) A cabeça fluida foi operada inadequadamente ou
line with the specified technical data.
não de acordo com os dados técnicos especificados.
(b) The fluid head housing was opened by
(b) O invólucro da cabeça fluida for aberto por
unauthorised personnel.
pessoal não autorizado.
Sachtler reserve the right to make changes to
A Sachtler se reserva o direito de fazer modificações
product design and performance as technology
no projeto e no desempenho do produto à medida
advances. Please register your product for an
que a tecnologia avança. Registre seu produto para
extended warranty period at www.sachtler.com
um período de garantia mais longo em
www.sachtler.com.
Max. 10 kg
(22 lbs)
‘1’
DE
CN
Die Gewährleistung erlischt in folgenden Fällen:
如果出现以下情况,则不予保修:
(a) Wenn der Fluidkopf falsch oder nicht gemäß den
angegebenen technischen Daten benutzt wurde.
(a)液压云台操作不当或没有按照品技
(b) Wenn das Gehäuse des Fluidkopfes durch nicht
格使用。不符合规定的技术数据。
autorisierte Personen geöffnet wird.
Sachtler behält sich das Recht vor, Änderungen am
(b)液压云台的外壳被未经授权的人员打开
Produktdesign und der Spezifikation vorzunehmen,
过。
wenn technologische Fortschritte dies ermöglichen.
Bitte registrieren Sie Ihr Produkt für eine
sachtler保留因技术更新而对产品设计和性
Verlängerung der Garantiedauer unter
能进行变更的权利。请在
www.sachtler.com.
www.sachtler.com 为您的产品注册可以
延长保修期。
!
FR
La garantie expire si :
AR
AR
(a) La tête fluide a été utilisée de manière impropre
ou non conforme aux caractéristiques techniques
spécifiées.
(b) Le carter de la tête fluide a été ouvert par une
personne non autorisée.
Sachtler se réserve le droit de modifier la conception
et les performances du produit au gré des progrès
techniques. Veuillez enregistrer votre produit sous
www.sachtler.com pour bénéficier d'une période de
garantie étendue.
‘CLICK’
RU
Условия прекращения гарантии:
ES
(a) ненадлежащее использование панорамной
головки или эксплуатация ее без учета указанных
La garantía deja de tener validez si:
технических параметров;
(a) la cabeza fluida es sometida a un uso indebido o
(b) вскрытие корпуса панорамной головки не
no conforme a los datos técnicos especificados.
уполномоченным на то специалистом.
(b) se abre la carcasa de la cabeza fluida por parte
‘CLICK’
Компания Sachtler оставляет за собой право на
de personal no autorizado.
изменение дизайна и эффективности работы
Sachtler se reserva el derecho de realizar
устройства по мере развития технологии. Для
modificaciones en materia de diseño y rendimiento
получения продленной гарантии зарегистрируйте
del producto a medida que la tecnología avanza.
устройство на веб-сайте по адресу:
Registre su producto si desea disfrutar de un período
www.sachtler.com.
de garantía ampliada www.sachtler.com.
Arabic
.
.
.
Arabic
:
a(
)
.
b(
)
.
Sachtler
.
com.sachtler.www

RU
EN
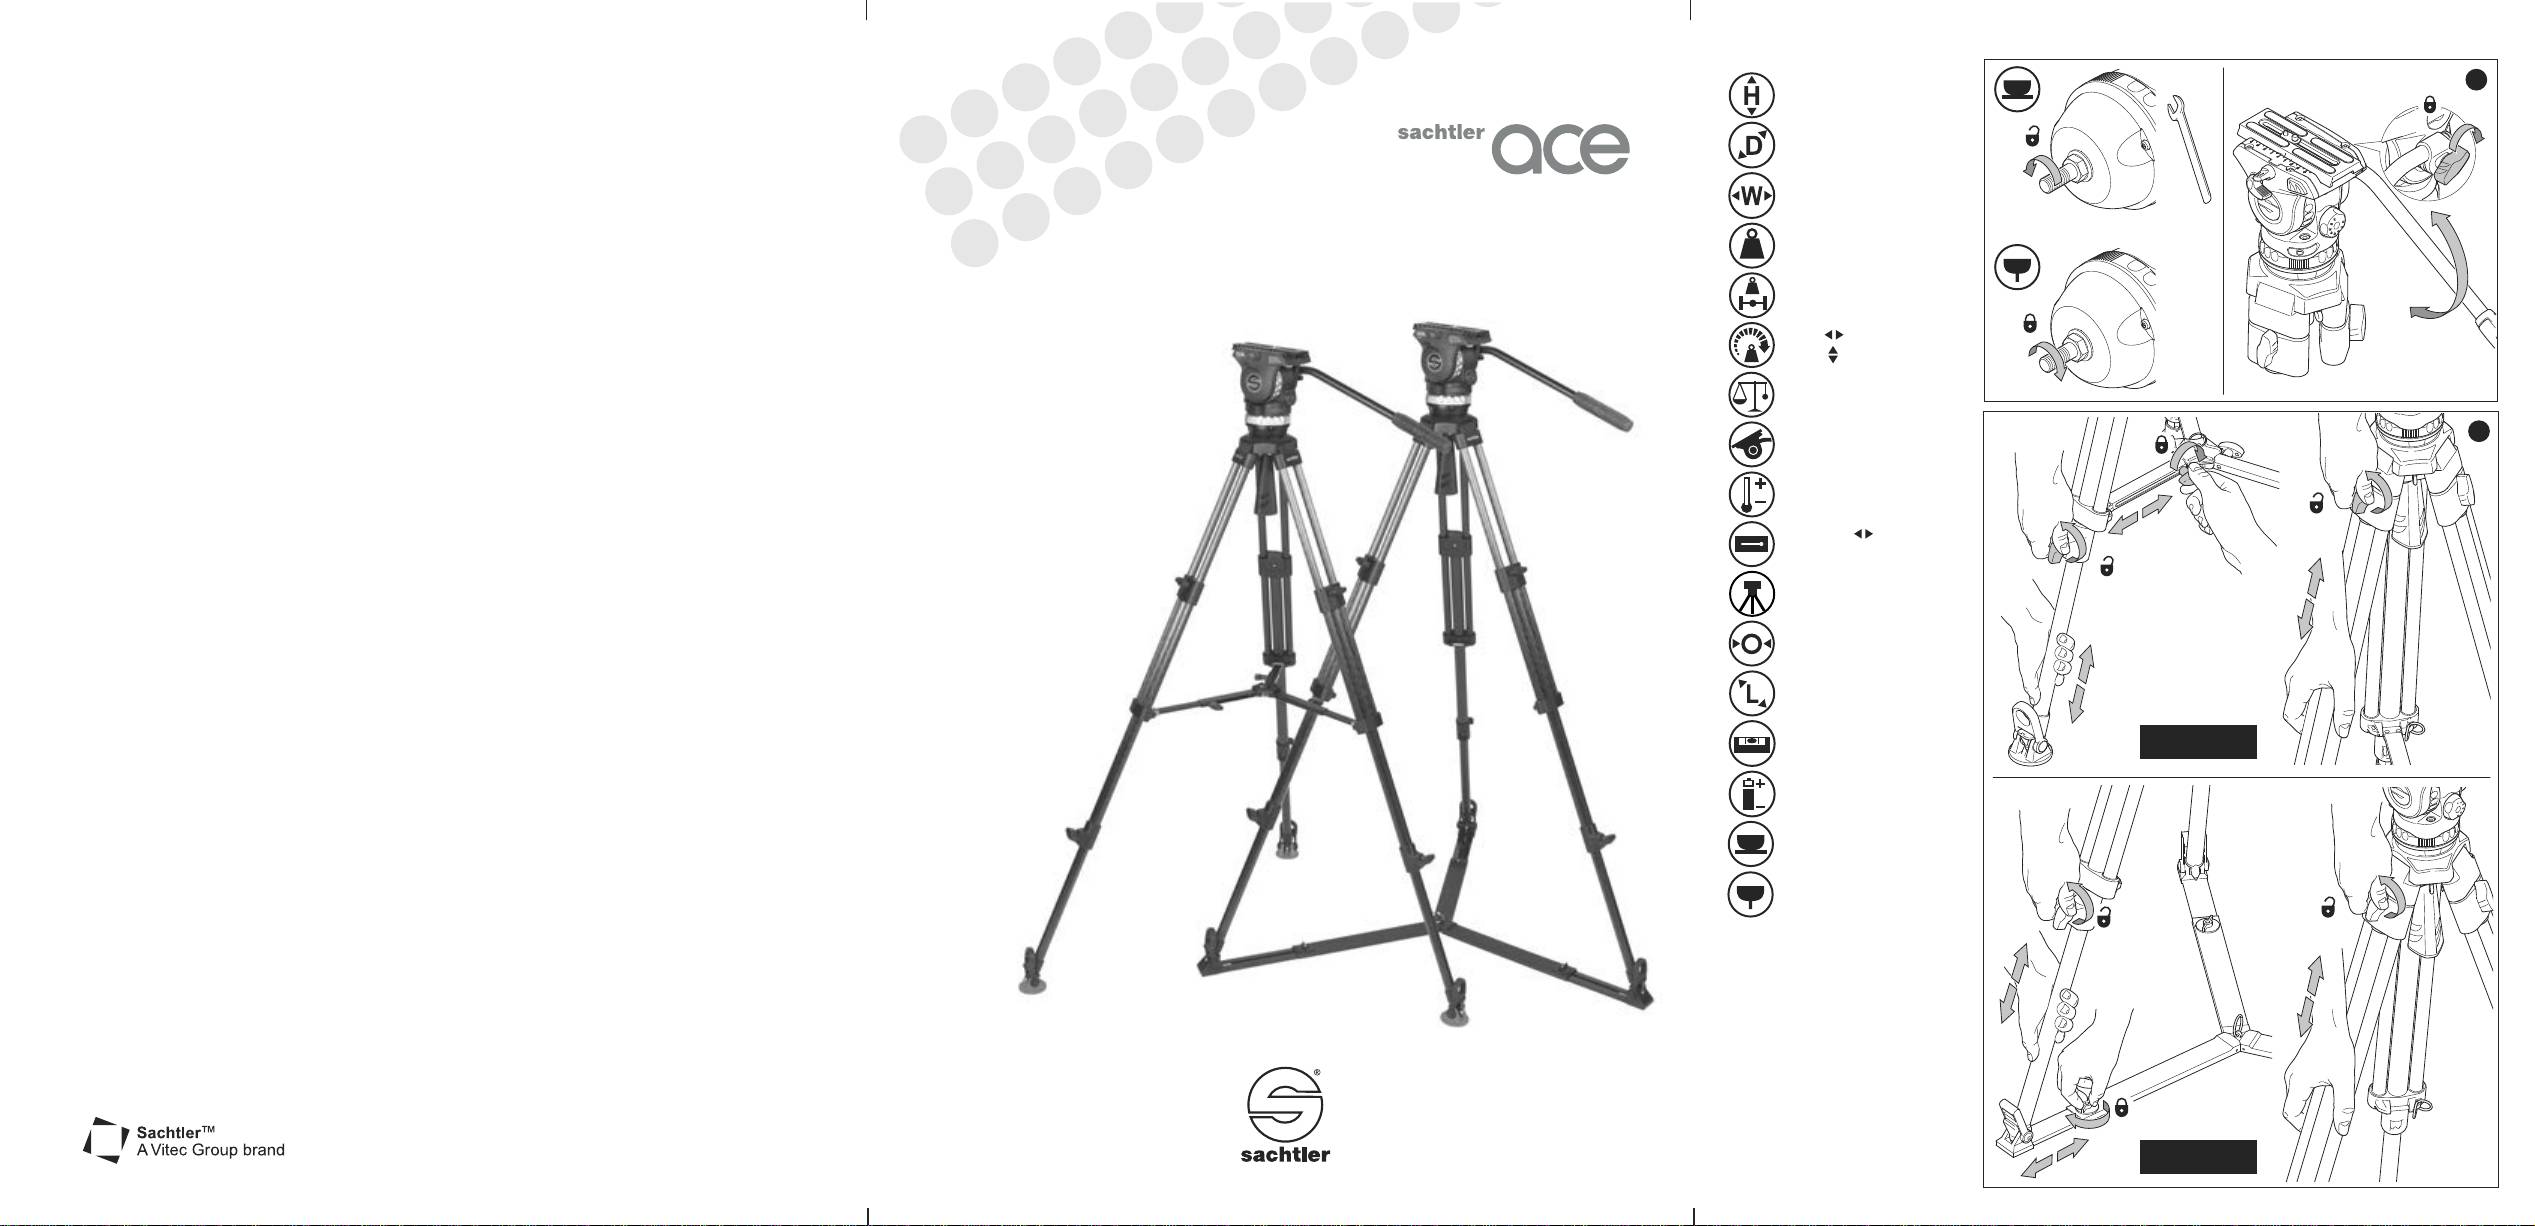
УСТАНОВКА ШТАТИВА
1 2 3
Разблокируйте вертикальный фиксатор.
TRIPOD SETUP
1 2 3
Удерживая панорамную ручку, отрегулируйте
Adjust the counterbalance: tilt the fluid head forwards
Отрегулируйте положение панорамной ручки
противовес таким образом, чтобы камера
Adjust the pan bar position. Loosen the pan bar
and backwards through the horizontal position to
Ослабьте зажим панорамной ручки и
зафиксировалась на месте.
clamp and adjust the angle of the pan bar handle.
engage the spring at the selected step.
отрегулируйте ее угол. Затяните зажим
Настройте противовес: наклоните головку
Tighten the pan bar clamp.
NOTE: If the camera does not remain in position
панорамной ручки.
вперед-назад в горизонтальной плоскости, чтобы
Open the tripod
hands-free, lock the vertical brake and adjust the
Раскрытие штатива
зацепить пружину на нужном шаге.
position of the camera. If the camera falls forward,
ПРИМЕЧАНИЕ. Если камера не
Hold the fluid head with one hand. Loosen the tripod
reposition the camera to the rear of the head. If the
Удерживая панорамную головку одной рукой,
зафиксировалась, заблокируйте вертикальный
lower-stage leg locks and extend the legs to the
camera falls backward, reposition the camera to the
ослабьте нижние стопоры опор штатива и
required height.
front of the head.
вытяните опоры на необходимую высоту.
фиксатор и отрегулируйте ее положение. Если
Tighten the leg locks.
Затяните стопоры.
камера наклоняется вперед, переместите ее к
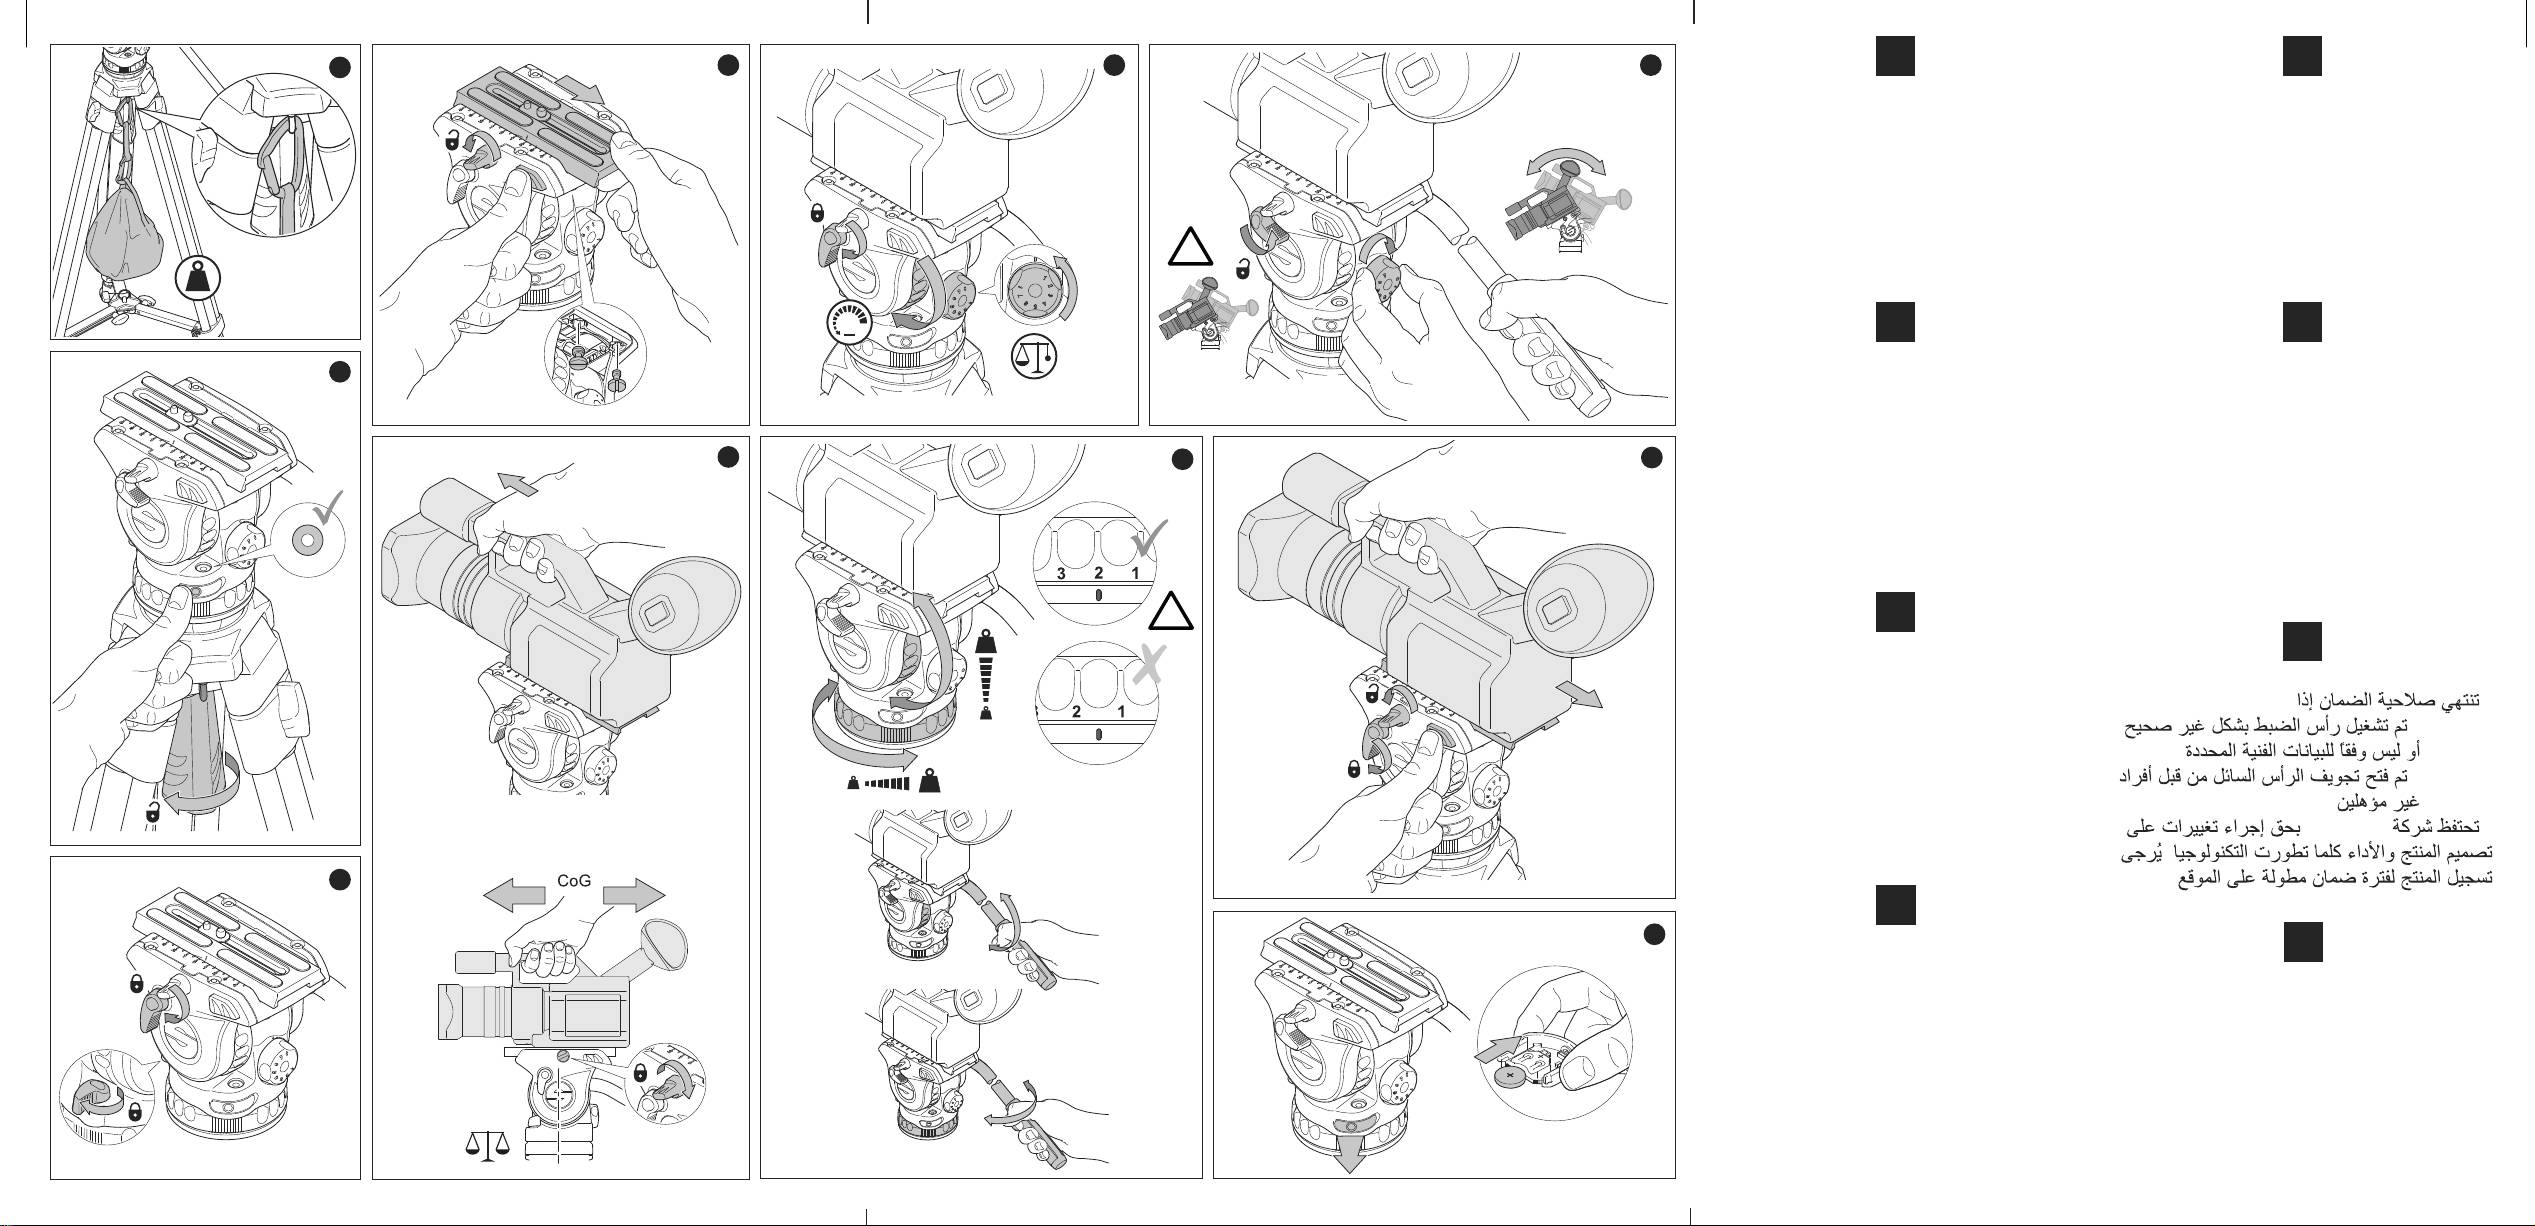
Setting drag
10
задней части панорамной головки. Если камера
Расположите штатив в соответствии с условиями
Set the tripod footprint to suit the shooting
наклоняется назад, переместите ее к передней
environment. Loosen the spreader locks and adjust
The fluid head has 3 drag levels horizontally and
съемки. Ослабьте стопоры распорки и
части панорамной головки.
отрегулируйте ее высоту. Затяните зажимы
to the required length.
vertically. Drag is turned off when the 0 setting is
selected. To adjust the drag, rotate the drag ring to
распорки.
Настройка сопротивления
10
Tighten the spreader clamps.
the required setting while slowly moving the fluid
Ослабьте верхние стопоры опор штатива и
У панорамной головки имеется 3 уровня
Loosen the tripod upper-stage leg locks and extend
head vertically or horizontally until the drag
вытяните опоры на необходимую высоту.
сопротивления по горизонтали и вертикали.
the legs to the required height.
mechanism engages.
Затяните стопоры.
Сопротивление отключено, если выбрано
Tighten the leg locks.
Brakes
ПРИМЕЧАНИЕ. Для стабилизации штатива,
значение 0. Чтобы настроить сопротивление,
например при съемке в ветреную погоду,
поверните регулятор сопротивления на нужную
NOTE: In windy conditions, attach a weight
To prevent the fluid head from moving, lock the
настройку и медленно сдвиньте панорамную
(max.10 kg/22 lbs) to the tripod tie-down to stabilise
vertical and horizontal brakes. Do not use the brakes
подвесьте груз (максимум 10 кг) к крючку штатива.
головку по вертикали или горизонтали до
the tripod.
to apply drag.
НАСТРОЙКА ПАНОРАМНОЙ ГОЛОВКИ
зацепления регулятора.
FLUID HEAD SETUP
REMOVING THE CAMERA
11
Выравнивание
4
Фиксаторы
Levelling
4
Lock the brakes. Loosen the camera plate clamping
Ослабьте зажим чаши. Выровняйте панорамную
Чтобы панорамная головка не двигалась,
Loosen the bowl clamp. Level the fluid head using
screw. Press the camera plate release button whilst
головку по пузырьковому уровню. Нажмите кнопку
заблокируйте вертикальный и горизонтальный
sliding the camera to the rear of the head.
подсветки пузырькового уровня при
фиксаторы. Не используйте фиксаторы для
the level bubble. Press the button to illuminate the
создания сопротивления.
level bubble if required.
необходимости.
TRANSPORT AND STORAGE
Затяните зажим чаши.
Снятие камеры
11
Tighten the bowl clamp.
Open the vertical and horizontal brakes and set the
Крепление камеры
5 6
7
Заблокируйте фиксаторы. Ослабьте винтовой
Mounting the camera
5 6
7
balance and drag settings to maximum.
Заблокируйте горизонтальный и вертикальный
зажим основания камеры. Нажмите кнопку снятия
Lock the horizontal and vertical brakes.
Adjust the position of the pan bar handle.
фиксаторы.
камеры и сдвиньте камеру к задней части
панорамной головки.
Loosen the camera plate clamping screw. Pull the
Loosen the spreader locks and reduce the tripod
Ослабьте винтовой зажим основания камеры.
camera plate to the rear of the fluid head whilst
footprint by pulling the spreader ring vertically.
Сдвиньте камеру к задней части панорамной
ТРАНСПОРТИРОВКА И ХРАНЕНИЕ
pressing the red release button.
Hold the fluid head with one hand. Loosen all the
головки, нажав красную кнопку снятия камеры.
Разблокируйте вертикальный и горизонтальный
Attach the camera plate to the camera using the
tripod leg locks on the upper and lower stages.
Установите камеру на основание, используя
фиксаторы и установите для баланса и
camera screws and pin supplied. Spare camera
Carefully collapse the tripod legs.
прилагаемый крепеж. Запасные винты камеры
сопротивления максимальные значения.
screws can be stored under the platform.
Tighten the leg locks and close the tripod.
можно хранить под платформой.
Отрегулируйте положение зажима панорамной
NOTE: Some cameras, incl. DSLRs, do not require
Clip the two leg ties onto the leg tubes to prevent the
ПРИМЕЧАНИЕ. Для некоторых камер, включая
ручки.
the pin. Remove the 1/4 in. screw to release the pin
tripod from opening during transport or storage.
DSLR, штырь не требуется. Отверните винт 1/4
Ослабьте стопоры распорки и сложите штатив,
plate.
дюйма для ослабления пластины.
REPLACING THE BATTERY
12
вертикально потянув за кольцо распорки.
Hold the camera with one hand. Insert the camera
Удерживая камеру одной рукой, вставьте
Удерживая панорамную головку одной рукой,
plate onto the rear of the platform. Slide forwards
To replace the battery, prise out the battery
основание камеры в отверстие с задней стороны
платформы. Сдвиньте камеру вперед, чтобы
ослабьте верхние и нижние стопоры опор
until the locking button secures the camera plate
compartment and remove the old battery from the
штатива. Аккуратно сложите опоры штатива.
onto the platform.
battery holder (using tweezers).
закрепить основание на платформе с помощью
кнопки блокировки.
Затяните стопоры опор и закройте штатив.
Position the camera C of G over the axis of the fluid
Insert the new battery and replace the battery
Стяните опоры двумя фиксаторами, чтобы штатив
head. Tighten the clamping screw to secure the
compartment.
Расположите камеру таким образом, чтобы центр
не раскрылся во время транспортировки или
camera.
ее тяжести находился над осью вращения
панорамной головки. Затяните винтовой зажим,
хранения.
Setting the counterbalance
8 9
чтобы зафиксировать камеру.
ЗАМЕНА БАТАРЕИ
12
CAUTION! Hold the pan bar to prevent the camera
Настройка противовеса
8 9
Для замены батареи нажмите на фиксатор и
from falling away.
ВНИМАНИЕ! Удерживайте панорамную ручку,
извлеките старую батарею из держателя (с
Lock the vertical brake. Set the vertical drag and the
чтобы камера не изменила положение.
помощью пинцета).
counterbalance to 1.
Заблокируйте вертикальный фиксатор.
Вставьте новую батарею и установите фиксатор
Open the vertical brake. Holding the pan bar, adjust
Установите для вертикального сопротивления и
на место.
the counterbalance setting, until the camera remains
противовеса значение 1.
in position hands-free.
DE AR
STATIVAUFBAU
1 2 3
Öffnen Sie die Vertikalbremse. Halten Sie den
89
123
Stellen Sie die Position des Schwenkarms ein. Lösen
Schwenkarm fest und stellen Sie den
Sie die Klemmschraube und stellen Sie den Winkel
Gewichtsausgleich auf die Stufe, bei der die Kamera
des Schwenkarmgriffs ein. Ziehen Sie die
freihändig in Position bleibt.
Klemmschraube fest.
Anpassen des Gewichtsausgleichs: Schwenken Sie
den Fluidkopf nach vorn und hinten durch die
Stativ öffnen
horizontale Position, um die Feder an der gewählten
Halten Sie den Fluidkopf mit einer Hand fest. Lösen
Stufe zu aktivieren.
Sie den Klemmgriff an der unteren Stufe und ziehen
HINWEIS: Wenn die Kamera freihändig nicht in
Sie die Beine des Stativs in die gewünschte Höhe.
Position bleibt, verriegeln Sie die Vertikalbremse und
Ziehen Sie die Klemmgriffe an.
stellen Sie die Position der Kamera ein. Wenn die
Passen Sie die Stellfläche des Stativs an die
Kamera nach vorn fällt, positionieren Sie sie weiter
jeweilige Umgebung an. Lösen Sie die Klemmung
hinten am Kopf. Wenn die Kamera nach hinten fällt,
der Spinne und passen Sie die Länge an.
positionieren Sie sie weiter vorn am Kopf.
Ziehen Sie die Klemmgriffe wieder fest.
Einstellen der Dämpfung
10
Lösen Sie den Klemmgriff an der oberen Stufe und
Der Fluidkopf hat horizontal und vertikal je drei
ziehen Sie die Beine des Stativs in die gewünschte
Dämpfungsstufen. Die Dämpfung ist abgeschaltet,
Höhe. Ziehen Sie die Klemmgriffe an.
wenn sie auf 0 eingestellt ist. Um die Dämpfung
10
HINWEIS: Bringen Sie beim Arbeiten in windigen
einzustellen, drehen Sie den Steuerring in die
Umgebungen ein Gewicht (max. 10 kg) am Stativ an,
gewünschte Stellung und bewegen Sie den Fluidkopf
um es zu stabilisieren.
langsam in vertikaler und horizontaler Richtung, bis
der Dämpfungsmechanismus einrastet.
AUFBAU DES FLUIDKOPFES
Bremsen
Nivellierung
4
Um die Bewegung des Fluidkopfes zu verhindern,
Lösen Sie die Klemmschale. Nivellieren Sie den
verriegeln Sie die Vertikal- und Horizontalbremsen.
Fluidkopf mit der Nivellierlibelle. Drücken Sie bei
Verwenden Sie die Bremsen nicht, um eine
4
Bedarf auf den Knopf, um die Nivellierlibelle zu
Dämpfung zu erzielen.
beleuchten. Ziehen Sie die Klemmschale fest.
ABBAU DER KAMERA
11
Montieren der Kamera
5 6
7
11
Verriegeln Sie die Bremsen. Öffnen Sie die
Verriegeln Sie die horizontalen und vertikalen
Klemmung der Kameraplatte. Drücken Sie den
Bremsen.
Verriegelungshebel, während Sie die Kamera zur
Öffnen Sie die Klemmung der Kameraplatte. Drücken
Rückseite des Fluidkopfes schieben.
Sie den roten Verriegelungshebel und ziehen Sie
567
gleichzeitig die Kameraplatte zur Rückseite des
TRANSPORT UND AUFBEWAHRUNG
Fluidkopfes.
Öffnen Sie die Vertikal- und Horizontalbremse und
Befestigen Sie die Kameraplatte an der Kamera mit
stellen Sie den Gewichtsausgleich und die Dämpfung
den mitgelieferten Schrauben.
auf den maximalen Wert ein. Stellen Sie die Position
Ersatz-Kameraschrauben können unter der Plattform
des Schwenkarmgriffs ein.
aufbewahrt werden.
Lösen Sie die Klemmung der Spinne und verringern
HINWEIS: Einige Kameras, einschließlich die
Sie die Stellfläche des Stativs, indem Sie den
DSLR-Modelle, benötigen keinen Pin. Entfernen Sie
Mittelstern nach oben ziehen.
die 1/4 "-Schraube, um die Pinplatte abzunehmen.
Halten Sie den Fluidkopf mit einer Hand fest. Lösen
DSLR :
Halten Sie die Kamera mit einer Hand. Schieben Sie
Sie alle Stativklemmungen an der oberen und
1/4 .
die Kameraplatte auf die Rückseite der
unteren Stufe. Fahren Sie die Stativbeine vorsichtig
.
Kameraplattform. Schieben Sie sie nach vorn, bis die
ein.
Sperrtaste die Kameraplatte auf der Plattform sichert.
Ziehen Sie die Klemmgriffe an und schließen Sie das
Der Schwerpunkt muss genau über dem Drehpunkt
Stativ.
des Fluidkopfes zentriert werden. Ziehen Sie die
Klemme Sie die beiden Beinbefestigungen an die
12
Klemmung fest, um die Kamera zu fixieren.
Beine, um zu verhindern, dass sich das Stativ beim
Einstellen des Gewichtsausgleichs
8 9
Transport oder bei der Aufbewahrung öffnet.
VORSICHT! Halten Sie den Schwenkarm fest, um zu
AUSTAUSCH DER BATTERIE
12
verhindern, dass die Kamera herunterfällt.
Zum Austausch der Batterie nehmen Sie bitte das
Verriegeln Sie die Vertikalbremse. Stellen Sie die
Batteriefach heraus. Entfernen Sie die alte Batterie
vertikale Dämpfung und den Gewichtsausgleich auf
(mit einer Pinzette). Setzen Sie die neue Batterie ein
1.
und befestigen Sie das Batteriefach wieder im
Fluidkopf.

CN FR
三脚架安装
1 2 3
打开垂直制动。握住拍手柄,调节动平衡
INSTALLATION DU TRÉPIED
1 2 3
Desserrez le frein vertical. En tenant le manche,
调节拍手柄位置。拧松拍手柄夹并调节杆
设 置, 直 到松 手后 摄像 机仍 保持 在原 位
ajustez le réglage du contrepoids de manière à ce
Ajustez la position du manche. Desserrez la molette
que la caméra reste en position sans avoir à la tenir.
du manche et ajustez l'angle de la poignée du
柄的角度。拧紧拍手柄夹。
置。
manche. Serrez la molette du manche.
Ajustez le contrepoids : basculez la tête fluide vers
调节动平衡:在水平位置前后俯仰液压云
l'avant puis l'arrière en passant par la position
打开三脚架
台,以便在所选步骤啮合弹簧。
Ouverture du trépied
horizontale pour engager le ressort dans le cran
Maintenez la tête fluide avec une main. Desserrez
choisi.
一只手握住液压云台。松开三脚架下支腿
注:如果松手后摄像机不能保持在原位,
les verrous de la partie inférieure des jambes et
REMARQUE : si la caméra ne reste pas en position
锁扣,将腿拉至所需高度。
则锁定垂直制动并调节摄像机的位置。如
étendez ces dernières à la hauteur souhaitée.
sans être tenue, serrez le frein vertical et ajustez la
拧紧支腿锁扣。
果摄像机向前滑动,则将摄像机重新定位
Serrez les verrous des jambes.
position de la caméra. Si la caméra tombe vers
根据拍摄环境设置三脚架撑开面积。松开
于压头的靠后位置。如果摄像机向后滑动
Réglez la surface au sol du trépied en fonction de
l'avant, positionnez-la de nouveau à l'arrière de la
l'environnement de travail. Desserrez les verrous du
tête. Si la caméra tombe vers l'arrière, positionnez-la
延伸器的旋锁,调节到所需长度。
,则 将 摄 像 机 重新 定位 于压 头的 靠前 位
triangle et ajustez à la longueur souhaitée. Serrez les
de nouveau à l'avant de la tête.
拧紧延伸器紧旋。
置。
verrous du triangle.
Réglage de la friction
10
松开三脚架上支腿锁扣,将腿拉至所需高
设置阻尼
10
Desserrez les verrous de la partie supérieure des
La tête fluide dispose de 3 niveaux de friction
jambes et étendez ces dernières à la hauteur
horizontalement et verticalement. La friction est
度。
液压云台有 3 个水平和垂直方向的阻尼级别
souhaitée.
désactivée lorsque le réglage est défini sur 0. Pour
拧紧支腿锁扣。
。如果设置为 0,则阻尼关闭。若要调整阻
Serrez les verrous des jambes.
ajuster la friction, faites pivoter la roue crantée
jusqu'à l'obtention du réglage souhaité, puis
注:在有风的情况下,可在三脚架上挂重
尼,请旋转阻尼环到所需设置,同时沿着
REMARQUE : En cas d'exposition au vent, fixez un
déplacez lentement la tête fluide verticalement ou
物(最多 10 公斤/22 磅),使三脚架保持稳
水平或垂直方向慢慢移动液压云台,直至
poids (max. 10 kg/22 lbs) à l'arrimage du trépied pour
horizontalement, jusqu'à ce que le mécanisme de
stabiliser ce dernier.
定。
阻尼机构啮合。
friction s'enclenche.
INSTALLATION DE LA TÊTE FLUIDE
Freins
液压云台安装
制动
Mise à niveau
4
Pour éviter que la tête fluide ne bouge, serrez les
调至水平
4
为了防止液压云台移动,请锁上水平和垂
Desserrez la fixation à bol. Procédez à la mise à
freins vertical et horizontal. N'utilisez pas les freins
pour ajuster la friction.
直制动。请勿使用制动来施加阻尼。
niveau de la tête fluide à l'aide du niveau à bulle.
拧松球碗固定螺。使用水准气泡将液压云
Appuyez sur le bouton pour éclairer le niveau à bulle
RETRAIT DE LA CAMÉRA
11
台调至水平。如有需要,按下按钮照亮水
拆卸摄像机
11
si nécessaire.
准气泡。
Serrez la fixation à bol.
Serrez les freins. Desserrez la vis de fixation de la
锁定制动。拧松摄像机滑板夹紧螺丝。按
plaque de caméra. Appuyez sur le bouton de
拧紧球碗固定螺。
5 6
7
libération de la plaque de caméra tout en faisant
下摄像机滑板释放钮,同时将摄像机滑向
Montage de la caméra
Verrouillez les freins horizontal et vertical.
glisser la caméra vers l'arrière de la tête.
安装摄像机
5 6
7
云台的后方。
Desserrez la vis de serrage de la plaque de caméra.
TRANSPORT ET STOCKAGE
将水平和垂直制动锁紧。
运输和存放
Tirez la plaque de caméra vers l'arrière de la tête
Desserrez les freins vertical et horizontal et réglez
fluide tout en appuyant sur le bouton de libération
l'équilibre et la friction au maximum.
拧松摄像机滑板夹紧螺丝。按住红色释放
打开垂直和水平制动,并将衡重和阻尼设
rouge.
Ajustez la position de la poignée du manche.
按钮的同时,将摄像机板向至液压云台的
置为最大值。
Fixez la plaque à la caméra à l'aide des vis et de la
Desserrez les verrous du triangle et réduisez la
后端推。
调节拍手柄的位置。
broche de caméra fournies. Des vis de caméra de
réserve peuvent être stockées sous la plate-forme.
surface au sol du trépied en tirant la bague du
使用摄像机螺钉和销把滑板安装在摄像机
松开延伸器的锁扣,垂直拉延伸器环,将
triangle verticalement.
REMARQUE : certains appareils, par exemple les
上。备用的摄像机螺钉可以存放在平台下。
三脚架支腿收回。
appareils photo reflex numériques, ne requièrent pas
Maintenez la tête fluide avec une main. Desserrez
tous les verrous de jambes des niveaux supérieur et
注:包括数码单反相机在内的某些相机不
一只手握住液压云台。松开三脚架支腿的
l'utilisation de l'attache. Retirez la vis 1/4" pour libérer
la plaque de fixation.
inférieur. Rentrez les jambes du trépied avec
需要插销。可取下1/4英寸螺丝,松开插销
所有上和下锁扣。小心折起三脚架支腿。
précaution.
Maintenez la caméra avec une main. Insérez la
板。
拧紧支腿锁扣,收起三脚架。
plaque de caméra à l'arrière de la plateforme.
Serrez les verrous et fermez le trépied.
Faites-la glisser vers l'avant jusqu'à ce que le bouton
Clipsez les deux attaches sur les tubes des jambes
用一只手握住摄像机。把摄像机滑板插入
将两个支腿绑带系紧在支腿杆上,防止三
de verrouillage fixe la plaque sur la plate-forme.
pour éviter que le trépied ne s'ouvre lors de son
平台后端上。向前滑动,直到锁定按钮将
脚架在运输或存方中打开。
Positionnez le centre de gravité de la caméra sur
transport ou de son stockage.
摄像机滑板固定在平台上。
12
更换电池
l'axe de la tête fluide. Serrez la vis pour fixer la
REMPLACEMENT DE LA PILE
12
caméra.
将摄像机的重心定位在液压云台的轴上。
Pour remplacer la pile, retirez la pile de son
如需更换电池,并从电池仓中取出旧电池
Installation du contrepoids
8 9
拧紧夹紧螺钉,固定摄像机。
compartiment (à l'aide de pincettes).
(使用小钳子)。
ATTENTION ! Tenez le manche pour éviter toute
Insérez la nouvelle pile et repositionnez le
设置动平衡
8 9
装入新电池,然后重新安装电池盒。
chute de la caméra.
compartiment.
Serrez le frein vertical. Réglez la friction verticale et
注意!紧握拍手柄,防止摄像机坠落。
le contrepoids sur 1.
锁紧垂直制 动。把垂直阻尼和 衡 重 设 置
为1。
PTES
AJUSTE DEL TRÍPODE
1 2 3
Abra el freno vertical. Mientras sujeta el brazo
CONFIGURAÇÃO DO TRIPÉ
1 2 3
permaneça na posição sem as mãos.
Ajuste la posición del brazo panorámico. Afloje el
panorámico, ajuste la posición del contrabalanceo
hasta que la cámara se mantenga en la posición
Ajuste a posição do punho de câmera. Solte a
Para ajustar o contrapeso: incline a cabeça fluida
dispositivo de sujeción y ajuste el ángulo del asa del
fixação do punho de câmera e ajuste o ângulo do
para frente e para trás na posição horizontal para
brazo panorámico. Apriete el dispositivo de sujeción.
deseada sin ayuda de las manos.
cabo do punho de câmera. Aperte a fixação do
engatar a mola no degrau selecionado.
Ajuste el contrabalanceo: incline la cabeza fluida
Apertura del trípode
punho de câmera.
OBSERVAÇÃO: Se a câmera não permanecer na
hacia delante y hacia detrás a lo largo de la posición
Sujete la cabeza fluida con una mano. Afloje los
horizontal para engranar el resorte en el punto
Abra o tripé
posição sem as mãos, trave o freio vertical e ajuste a
posição da câmera. Se câmera cair para frente,
bloqueos de las patas del tramo inferior y despliegue
seleccionado.
Segure a cabeça fluida com uma mão. Solte as
reposicione-a para a parte de trás da cabeça. Se
las patas hasta la altura requerida.
NOTA: Si la cámara no se mantiene sin sujetarla con
travas de perna do estágio inferior do tripé e estenda
câmera cair para trás, reposicione-a para a parte da
Apriete los bloqueos de las patas.
las manos, bloquee el freno vertical y ajuste la
as pernas até a altura desejada. Aperte as travas de
frente da cabeça.
perna.
Ajuste el espacio del trípode en función del entorno
posición de la cámara. Si la cámara se cae hacia
delante, vuelva a colocar la cámara hacia la parte de
Ajustando a resistência
10
en el que vaya a trabajar con la cámara. Afloje los
Ajuste as dimensões do tripé para que elas se
bloqueos del triángulo y ajústelo a la longitud
atrás de la cabeza. Si la cámara se cae hacia atrás,
ajustem ao ambiente de filmagem. Solte as travas do
A cabeça fluida tem três níveis de resistência
requerida. Apriete los dispositivos de sujeción del
vuelva a colocar la cámara hacia la parte delantera
espaçador e ajuste o comprimento necessário.
horizontal e verticalmente. A resistência é desativada
triángulo.
de la cabeza.
Aperte as braçadeiras do espaçador.
quando o ajuste 0 é selecionado. Para ajustar o
Afloje los bloqueos de las patas del tramo superior y
Ajuste de resistencia al arrastre
10
arrasto, gire o anel para configuração necessária, ao
Solte as travas de perna do estágio superior do tripé
mesmo tempo que move lentamente o cabeçote
despliegue las patas hasta la altura requerida.
La cabeza fluida tiene tres niveles de resistencia al
e estenda as pernas até a altura desejada. Aperte as
móvel na direção horizontal ou vertical até que o
Apriete los bloqueos de las patas.
arrastre en sentido horizontal y vertical. La resisten-
travas de perna.
mecanismo se conecte.
NOTA: En caso de mucho viento, enganche un peso
cia al arrastre se desactiva cuando se selecciona el
OBSERVAÇÃO: Em condições ventosas, prenda um
ajuste 0. Para ajustar la resistencia al arrastre, gire el
Travões
(máx. 10 kg/22 libras) a la fijación del trípode para
peso (máx. de 10 kg/22 lbs) à âncora do tripé para
estabilizarlo.
anillo de resistencia al arrastre hasta la posición
estabilizá-lo.
Para evitar que a cabeça fluida se movimente, trave
exigida mientras mueve lentamente la cabeza fluida
os travões vertical e horizontal. Não use os travões
AJUSTE DE LA CABEZA FLUIDA
vertical u horizontalmente hasta que el mecanismo
CONFIGURAÇÃO DA CABEÇA FLUIDA
para aplicar resistência.
Nivelación
4
de resistencia al arrastre encaje.
Nivelamento
4
REMOVENDO A CÂMERA
11
Afloje el dispositivo de sujeción de la copa. Nivele la
Frenos
Solte a braçadeira da base. Nivele a cabeça fluida
Trave os travões. Solte o parafuso de fixação da
cabeza fluida utilizando el nivel de burbuja. Apriete el
Para evitar que la cabeza fluida se mueva, bloquee
usando a bolha de nível. Pressione o botão para
placa da câmera. Pressione o botão de liberação da
botón para iluminar el nivel de burbuja si fuera
los frenos horizontales y verticales. No use los frenos
acender a bolha de nível, se necessário.
placa da câmera enquanto desliza a câmera para a
necesario.
para aplicar resistencia al arrastre.
Aperte a fixação da base.
parte traseira da cabeça.
Apriete el dispositivo de sujeción de la copa.
EXTRACCIÓN DE LA CÁMARA
11
Montagem da câmera
5
6
7
TRANSPORTE E ARMAZENAMENTO
Montaje de la cámara
5
6
7
Bloquee los frenos. Afloje el tornillo de sujeción de la
Trave os travões horizontal e vertical.
Abra os travões vertical e horizontal e defina as
Bloquee los frenos horizontales y verticales.
placa de la cámara. Pulse el botón de liberación de
Solte o parafuso de fixação da placa da câmera.
configurações de balanço e resistência para o
Afloje el tornillo de sujeción de la placa de la cámara.
la placa de la cámara mientras desliza la cámara
Puxe a placa da câmera para trás da cabeça fluida
máximo.
Tire de la placa hacia la parte de atrás de la cabeza
hacia la parte de atrás de la cabeza fluida.
enquanto pressiona o botão de liberação vermelho.
Ajuste a posição do punho de câmera.
fluida mientras presiona el botón rojo de liberación.
TRANSPORTE Y ALMACENAMIENTO
Prenda a placa da câmera à câmera usando os
Solte as travas do espaçador e reduza as dimensões
Sujete la placa a la cámara usando los tornillos y el
Abra los frenos verticales y horizontales y coloque la
parafusos e o pino da câmera fornecidos. Os
do tripé puxando o anel do espaçador verticalmente.
perno que se proporcionan. Los tornillos de repuesto
parafusos sobressalentes da câmera podem ser
se pueden guardar bajo la plataforma.
posición de equilibrado y resistencia al arrastre en el
Segure a cabeça fluida com uma mão. Solte todas
máximo.
armazenados sob a plataforma.
as travas de perna do tripé nos degraus superior e
NOTA: algunas cámaras, incluidas las DSLR, no
Ajuste la posición del asa del brazo panorámico.
OBSERVAÇÃO: Algumas câmeras, inclusive as
inferior. Feche com cuidado as pernas do tripé.
necesitan pasador. Quite el tornillo de 1/4 pulg. para
DSLRs, não precisam de um pino de fixação.
liberar la placa del pasador.
Afloje los bloqueos del triángulo y reduzca el espacio
Remova o parafuso de 1/4 pol. (6 mm) para soltar a
Aperte as travas de perna e feche o tripé.
Sujete la cámara con una mano. Inserte la placa de
del trípode; para ello tire del anillo del triángulo de
placa de fixação.
Prenda as duas amarrações de perna nos tubos de
la cámara en la parte de atrás de la plataforma.
forma vertical.
Segure a câmera com uma mão. Insira a placa da
perna para evitar que o tripé abra durante o
Deslícela hacia delante hasta que el botón de
Sujete la cabeza fluida con una mano. Afloje todos
câmera na parte traseira da plataforma. Deslize para
transporte ou armazenamento.
bloqueo asegure la placa de la cámara en la
los bloqueos de las patas del trípode de los tramos
frente até que o botão de travamento prenda a placa
TROCANDO A PILHA
12
plataforma.
superiores e inferiores. Baje con cuidado las patas
da câmera na plataforma.
Para trocar a pilha, remova-a do compartimento de
Sitúe el centro de gravedad de la cámara sobre el
del trípode.
Posicione o C de G da câmera sobre o eixo da
bateria (usando pinças).
eje de la cabeza fluida. Apriete el tornillo de sujeción
Apriete los bloqueos de las patas y cierre el trípode.
cabeça fluida. Aperte o parafuso de fixação para
para asegurar la cámara.
Enganche los dos ganchos de las patas en sus tubos
estabilizar a câmera.
Insira a nova pilha e recoloque o compartimento.
Ajuste del contrabalanceo
8 9
para evitar que el trípode se abra durante el
Definindo o contrapeso
8 9
transporte o almacenamiento.
¡CUIDADO! Sujete el brazo panorámico para evitar
ATENÇÃO! Segure o punho de câmera para evitar
que la cámara se caiga.
CAMBIO DE LA PILA
12
que a câmera caia.
Bloquee el freno vertical. Ajuste la resistencia vertical
Para cambiar la pila, saque la pila antigua de su
Trave o freio vertical. Ajuste a resistência vertical e o
al arrastre y el contrabalanceo a 1.
compartimento (usando unas pinzas).
contrapeso para 1.
Introduzca la pila nueva y vuelva a colocar el
Abra o freio vertical. Segurando o punho de câmera,
compartimento.
ajuste a definição de contrapeso até que a câmera
