Ricoh GF-1: инструкция
Раздел: Хобби и туризм
Тип: Фонарь
Инструкция к Фонарю Ricoh GF-1
GF-1
External TTL Flash
INSTRUCTION MANUAL
Externer TTL-Blitz
BEDIENUNGSANLEITUNG
Flash TTL externe
MANUEL D’INSTRUCTIONS
Flash externo TTL
MANUAL DE INSTRUCCIONES
Flash TTL esterno
MANUALE DI ISTRUZIONI
Внешняя вспышка TTL
РУКОВОДСТВО ПО ЭКСПЛУАТАЦИИ
GF-1
External TTL Flash
INSTRUCTION
MANUAL
Read Before Use
Thank you for purchasing this Ricoh equipment.
•
The GF-1 is a ash designed
for use exclusively with
cameras equipped with
the Ricoh ash interface
(hereafter, Type R cameras).
•
When the GF-1 is attached
to compatible Type R
cameras, it can be used
as a TTL automatically
controlled ash.
Cameras other than Type R: All other cameras except those
described above.
With the GR Digital, GR Digital II, Caplio GX100, Caplio GX200, the
ash can be used in Ambient light auto and Manual ash modes.
* For the latest information on the cameras supported by this
ash, please visit the Ricoh website.
http://www.ricoh.com/r_dc/option/other/
Before using the equipment, please be sure to read the
instruction manual, check the content and correctly use the
equipment.
EN - 1
Safety Precautions
Warning Symbols
Various symbols are used throughout this instruction manual and
on the product to prevent physical harm to you or other people
and damage to property. The symbols and their meanings are
explained below.
This symbol indicates matters that may lead to
Danger
imminent risk of death or serious injury if ignored
or incorrectly handled.
This symbol indicates matters that may lead to
Warning
death or serious injury if ignored or incorrectly
handled.
This symbol indicates matters that may lead
Caution
to injury or physical damage if ignored or
incorrectly handled.
Sample Warnings
The symbol alerts you to actions that must be performed.
The symbol alerts you to prohibited actions.
The
symbol may be combined with other symbols to
indicate that a specic action is prohibited.
Examples
Do not touch Do not disassemble
Observe the following precautions to ensure safe use of this
equipment.
Danger
Do not attempt to disassemble, repair or alter the equipment
yourself. The high-voltage circuitry in the equipment poses
signicant electrical hazard.
Do not attempt to disassemble, alter or directly solder the
batteries.
Do not put the batteries in a re, attempt to heat them, use
them in a high temperature environment such as next to a
re or inside a car, or abandon them. Do not put them into
water or the sea or allow them to get wet.
Do not attempt to pierce, hit, compress, drop, or subject the
batteries to any other severe impact or force.
EN - 2
Do not use a battery that is signicantly damaged or
deformed.
Warning
Turn o the power immediately in the event of abnormalities
such as smoke or unusual odors being emitted. Remove the
batteries as soon as possible, being careful to avoid electric
shocks or burns.
Turn o the power immediately if any metallic object, water,
liquid or other foreign object gets into the ash unit. Remove
the batteries as soon as possible, being careful to avoid
electric shocks or burns.
Follow these precautions to prevent the batteries from
leaking, overheating, igniting or exploding.
•
Do not use any batteries other than those specically
recommended for the equipment.
•
Do not carry or store together with metal objects such as
ballpoint pens, necklaces, coins, hairpins, etc.
•
Do not put the batteries into a microwave or high pressure
container.
•
If leakage of battery uid or a strange odor, color change,
etc. is noticed during use or during charging, remove the
batteries from the ash unit immediately and keep them
away from re.
Keep the battery used in this equipment out of the reach
of children to prevent accidental ingestion. Consumption
is harmful to human beings. If swallowed, seek medical
assistance immediately.
Keep the equipment out of the reach of children.
Do not touch the internal components of the equipment
if they become exposed as a result of being dropped or
damaged. The high-voltage circuitry in the equipment could
lead to an electric shock. Remove the batteries as soon as
possible, being careful to avoid electric shocks or burns. Take
the equipment to your nearest dealer or service center if it
is damaged.
Do not use the equipment in wet areas as this could result in
re or electric shock.
Do not use the equipment near ammable gases, gasoline,
benzene, thinner or similar substances to avoid the risk of
explosion, re or burns.
Do not use the equipment in locations where usage is
restricted or prohibited as this may lead to disasters or
accidents.
EN - 3
Do not re the ash direct to the eye at short distance. It may
damage the eye. When taking ash picture especially toward
a baby, it is recommended to keep the ash unit at least 1
meter (3.3 feet) away from the subject.
Do not leave or store the ash unit in temperatures over 40˚C,
such as in an automobile.
Caution
Contact with uid leaking from a battery can lead to burns. If
part of your body comes in contact with a damaged battery,
rinse the area with water immediately. (Do not use soap.)
If a battery starts to leak, remove it immediately from the
equipment and wipe the battery chamber thoroughly before
inserting a new battery.
Do not allow the ash unit to get wet. In addition, do not
operate it with wet hands. Both pose the risk of electric
shock.
Do not re the ash at drivers of vehicles, as this may cause
the driver to lose control and result in a trac accident.
Do not use the ash in unstable locations. You may lose your
balance, fall or drop the ash, resulting in injury.
To prevent the ash from overheating or deteriorating, keep
the number of continuous ashes to no more than 20 ashes.
After 20 continuous ashes, do not use the ash for at least
10 minutes.
With cameras other than Type R, the ash will re
automatically and continue ring in interval shooting mode;
do not use the ash in this mode.
Do not use benzine, thinner or other alcoholic agents to clean
the unit.
Remove the batteries when not in use for a long period of
time.
EN - 4
Supplied Equipment
• Flash • Flash stand • Instruction manual • Pouch
• Warranty
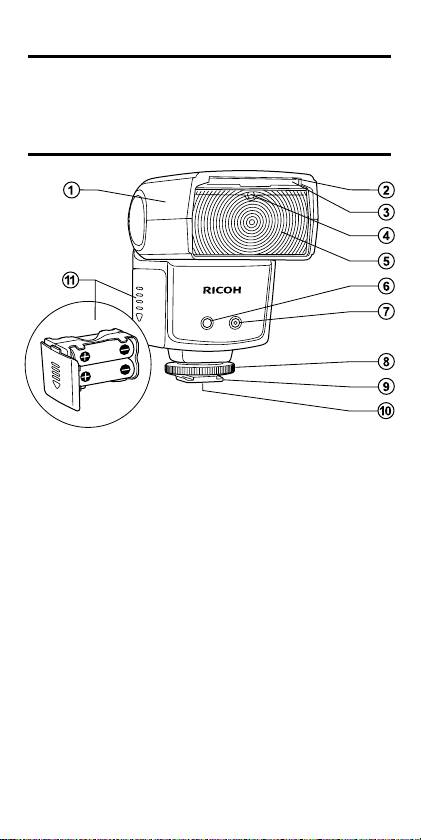
Name of Parts
1 Flash head
7 Ambient light automatic
2 Catch-light panel
sensor
3 Wide panel (18 mm)
8 Lock ring
4 Slave sensor
9
Hot shoe mounting foot
5 Flash element
0 Hot shoe contacts
6 AF auxiliary light
a Battery magazine
EN - 5
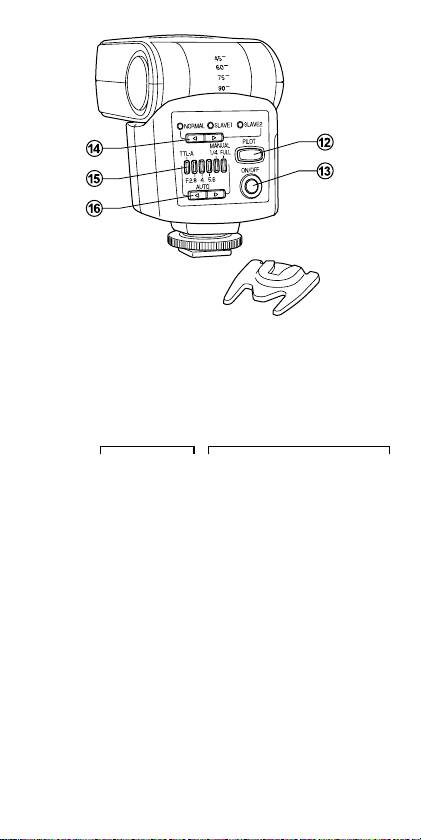
Flash stand
b PILOT lamp / Test ash button
c ON/OFF button
d Mode select button
(NORMAL → SLAVE1 → SLAVE2)
e Flash power level indication lamps (6 LEDs)
f Flash power level select button
AUTO MANUAL
TTL-A
→
F2.8
→
4
→
5.6
→
1/4
→
FULL
→
Manual ash
output adjustment
* In manual ash output adjustment mode, the two rightmost
ash power level indication lamps (1/4 and FULL) will light up.
(Only when using Type R cameras)
EN - 6
Basic Operation
Caution
Before attaching or removing the ash unit, turn o the power of
both the ash unit and the camera.
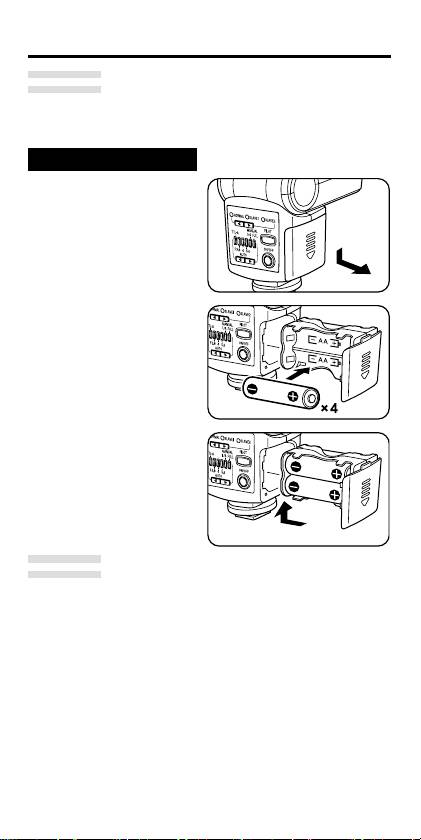
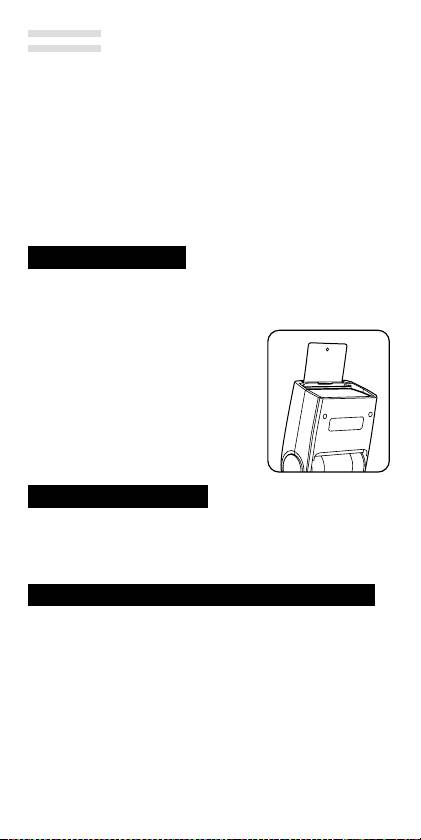
Inserting batteries
1 Slide down the battery
magazine's cover and pull
out the battery magazine.
2 Insert 4× AA batteries as
shown in the illustration.
Check the polarity of the
batteries and make sure to
insert them correctly.
3 Insert the battery magazine
into the ash unit and slide
up the cover to close it.
Caution
•
Replace the batteries with new batteries all of the same type
and brand, or with fully charged rechargeable batteries all of
the same type and brand. In addition, always replace all four
batteries at the same time. If the batteries are inserted in the
wrong direction, the ash will not work.
•
When replacing the batteries right after the ash red
consecutively, overheating may occur; be careful not to burn
yourself.
EN - 7
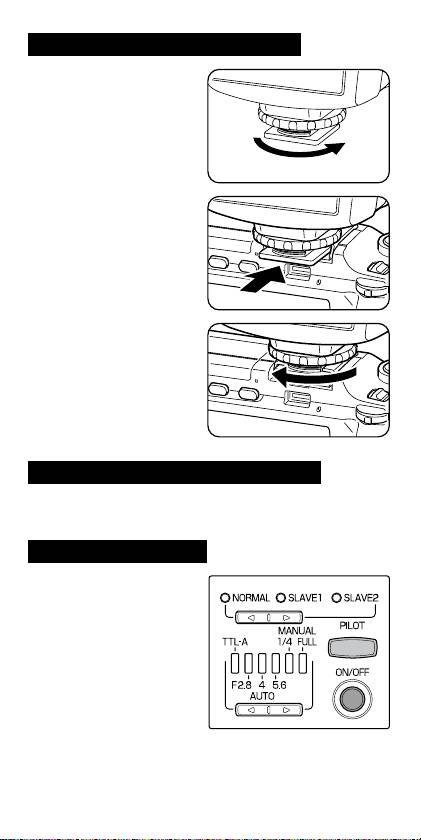
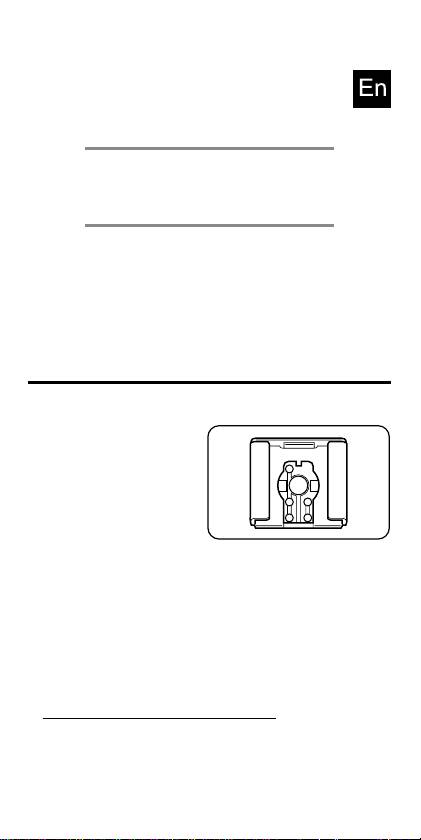
Mounting the ash on a camera
1 Turn the lock ring as shown
in the illustration to loosen
it.
2 Insert the ash unit into the
hot shoe on the camera.
Securely insert the ash unit
all the way into the hot shoe.
3 Turn the lock ring as shown
in the illustration to x the
ash unit to the camera.
Removing the ash from a camera
1 Loosen the lock ring completely before removing the ash
unit.
Turning on the ash
1 Press the ON/OFF button
to turn on the ash. When
the power is turned on,
the PILOT lamp lights up in
red and the ash starts to
charge.
2 After a few seconds, when
the PILOT lamp turns green,
the ash is completely
charged and ready to be
used.
EN - 8

Turning o the ash
1 Keep the ON/OFF button pressed for about 2 seconds to turn
o the ash.
Power saving mode
To save battery power, the ash unit will automatically enter
stand-by mode about 2 minutes after the camera's Auto Power
O is activated. In stand-by mode, the PILOT lamp blinks in red
every 2 seconds.
If you operate any of the buttons on the ash unit, or if the
camera is turned on, the ash will automatically wake up from
stand-by mode.
If the ash unit is left in stand-by mode for 30 minutes, the Auto
Power O function will be activated and the ash will be turned
o completely. To use the ash in such case, turn on the power of
the ash unit again.
* In slave mode the ash unit will not enter stand-by mode and
the Auto Power O function will be activated only after 60
minutes.
EN - 9

TTL ash photography —Pre-ash —
Only with Type R cameras
In this mode, when you press the shutter release button the ash will
automatically re at the most appropriate level.
* In movie, dynamic range (DR), interval shooting, or M-Cont
Plus (HI) mode, the ash will not re.
1 Turn on the camera.
2 When you press the ON/OFF button on the ash unit, it will
turn on automatically in TTL mode.
3 When the PILOT lamp turns green, the ash is ready for
shooting.
4 Press the shutter release button halfway to focus on the
subject.
5 Press the shutter release button to re the ash and take the
picture.
6 When using a zoom lens, if the focal length changes, the
illumination coverage changes accordingly and the ash unit
is automatically adjusted for the optimal illumination angle.
When using the ash, the shutter speed and aperture of the
camera depend on the position of the camera's mode dial, as
follows.
* When the ash mode on the camera is set to Flash Synchro, the
shutter speed is automatically adjusted to match ambient light
conditions.
Mode Shutter speed Aperture
5
Automatic Automatic
P Automatic Automatic
A Automatic Selected aperture
S Selected shutter speed Automatic
M Selected shutter speed Selected aperture
EN - 10

Reference
About the illumination coverage
With Type R cameras, the illumination coverage will vary from 24 mm
to 105 mm, depending on the focal length.
You can use a illumination coverage of 105 mm to cover also focal
lengths beyond 105 mm toward the telephoto end. However,
when using focal lengths under 24 mm toward the wide angle
end, please use the wide panel (18 mm). In such case, the
illumination coverage will not be automatically linked to the
zoom position.
* All illumination coverage values given are 35-mm camera
equivalents.
About the focal length
If the image appears too dark even when using ash, get closer to
the subject or select a higher ISO setting on the camera.
To Better Enjoy Flash Photography
Ambient light auto ash
1 Set the ash mode to NORMAL with the Mode select button
and the ash power level to F2.8 - 5.6 with the Flash power
level select button. If the subject is relatively far or if you want
a short interval between ashes, select a power level of F2.8.
To get a deeper depth of eld, select a power level of F5.6.
2 Manually select the aperture on the camera to match the
aperture value selected on the ash unit. If the camera does
not oer the exact same value, select the closest value.
When using a zoom lens, check the aperture value again
after adjusting the zoom and correct the aperture value if
necessary.
3 Set a shutter speed slower than 1/250 second.
* For details on the camera's settings, see the Camera User
Guide.
* Depending on the shooting conditions (subject, surroundings,
color and reectiveness of the background, etc.) the resulting
image may not come out as you expected. In such case, try
changing the aperture value on the camera or the shooting
distance.
EN - 11

Type R cameras
Set the shooting mode to Manual exposure or Aperture priority
mode. The correct exposure cannot be achieved in 5 mode,
Program shift mode or Shutter priority mode.
Also, when the ISO setting is set to AUTO, the ash unit will be
automatically adjusted to match the selected setting. If the ISO
setting is set to a certain value, please check the procedure for
cameras other than Type R.
* In movie, dynamic range (DR), interval shooting, or M-Cont
Plus (HI) mode, the ash will not re.
Cameras other than Type R
The ISO setting on the camera is not linked with the ash unit.
Manually select the aperture value on the camera to match the ISO
setting, using the following table as reference.
Aperture
value on the
ISO64 ISO80 ISO100 ISO200 ISO400
ash unit
2.8 2.2 2.5 2.8 4 5.6
4 3.2 3.6 4 5.6 8
5.6 4.5 5 5.6 8 11
Manual ash
When you cannot get the exposure you intended using the TTL
auto or Ambient light auto mode, you can use manual ash to set
the desired ash output level.
1 Set the ash mode to NORMAL with the Mode select button
and the ash power level to FULL or 1/4 with the Flash power
level select button.
2 When using manual ash, use the following formula to select
the aperture value.
Aperture value = Guide No. ÷ Shooting distance
Example) If the guide No. is 20 and the shooting distance is 5
m, the appropriate aperture value is 20÷5=4, that is F4.
The ash unit’s output (guide No.) varies depending on the
zoom position. Refer to “Guide No. Table (ISO 100)“ on the
page EN - 18.
3 Set a shutter speed slower than 1/250 second.
EN - 12
* For details on the camera's settings, see the Camera User
Guide.
* In movie, dynamic range (DR), interval shooting, or M-Cont
Plus (HI) mode, the ash will not re.
Only with Type R cameras
With Type R cameras the ash output level can be changed on
the camera within the range 1/1 to 1/64.
1 Set the ash mode to NORMAL with the Mode select button
and the ash power level to Manual ash output adjustment
(the two rightmost ash power level indication lamps on) with
the Flash power level select button. Adjust the ash output
level while checking the image on the picture display on the
camera.
Perform the manual ash output level adjustment only after
the ash is attached to the camera.
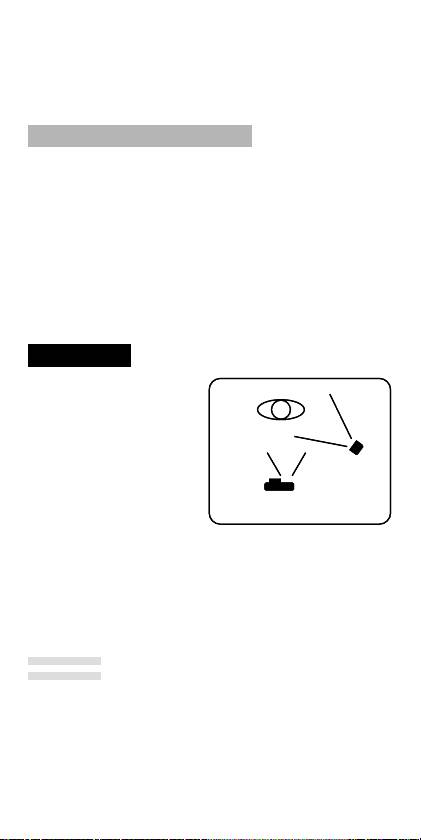
Slave ash
This ash unit features a slave
ash function.
In slave ash mode, this ash
unit will re when it detects
the light from another ash.
GF-1
GF-1
The slave ash function is
especially eective in the
following situations.
Camera's built-in ash
Camera's built-in ash
•
When you do not want to
illuminate the subject from the front with the main ash light
source
•
When you want the this ash unit to re without having it
attached to the hot shoe
•
When the distance to the subject is too far and the ash
cannot reach the subject
•
When you want to add several ashes to an array
Caution
•
If the ash does not re, check the position and the angle of
the ash.
•
In slave ash mode, if the ash accidentally detects other
camera's ash, it may re before shooting. Check that the ash
unit is ready for another re by the PILOT lamp.
EN - 13

SLAVE1: Mode for cameras with a pre-ash (triggered once)
and a main ash (Type R and other cameras)
SLAVE2:
Mode for cameras with a main ash only
Following is the explanation for how to use the camera's
built-in ash as a trigger.
Type R cameras
If you are using the camera’s built-in ash as a trigger, do not
attach this ash unit to the hot shoe. The built-in ash may not
be able to open.
1 Turn on the power of the camera and the ash unit and set the
ash to always re.
2
Set the ash mode to SLAVE1 with the Mode select button.
When set to slave mode, the ash unit’s AF auxiliary light
blinks.
3 Set the ash power level to Ambient light auto (F2.8 to 5.6) or
Manual ash (1/4 or FULL) with the Flash power level select
button.
Caution
The camera's Red-eye ash function is not available.
When using Ambient light auto
Set the aperture value.
1
Manually select the aperture on the camera to match the
aperture value selected on the ash unit. If the camera does
not oer the exact same value, select the closest value. When
using a zoom lens, check the aperture value again after
adjusting the zoom and correct the aperture value if necessary.
2 Use the supplied ash stand or other device to place the ash
unit at the desired location and adjust its angle as desired.
3 Press the camera's shutter release button once to check that
the ash res under the conditions selected.
If the ash does not re, verify the position of the slave sensor
and the operating distance.
If after checking the results of a test shot the image is too dark,
select a smaller aperture value on the camera. If it is too bright,
select a larger aperture value instead.
EN - 14
When using Manual ash
Use the following formula to select the aperture value.
Aperture value = Guide No. of this ash unit ÷ Distance between
the main light source and the subject
For details about this ash unit's guide No., refer to “Guide No.
Table (ISO 100)” on the page EN - 18.
Cameras other than Type R
Using the Mode select button, set the ash mode to SLAVE1 or
SLAVE2, according to the type of the camera's built-in ash. In
this case, the camera's Red-eye ash function is not available.
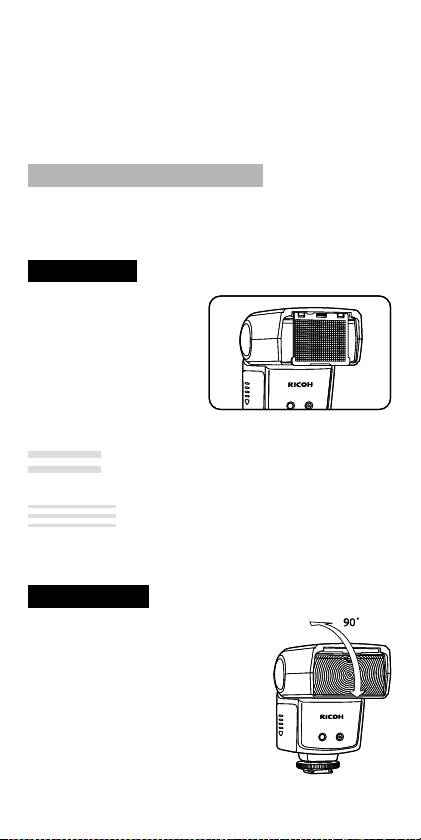
Wide panel
•
You can pull out the built-in
wide panel and place it
on the ash as shown in
the illustration to use a
shooting angle of 18 mm.
•
The catch-light panel will
be pulled out at the same
time so please push the
catch-light panel back inside.
Caution
Return the wide panel to its place when using bounce ash.
Reference
The wide panel diuses the light of the ash, making it eective
when you want to use a softer light or shooting close-ups.
Bounce ash
Mostly when shooting indoors, you can
use the ceiling or walls to reect the light
of the ash (Bounce ash). Bounce ash
can reduce hard shadows and result in
more natural pictures. Bounce ash can
also be convenient when shooting babies
and toddlers for whom a direct ash
would be too harsh.
•
You can change the angle of the ash
head upwards and set it to 45˚→60˚→
75˚→90˚.
EN - 15
Caution
When using bounce ash, the illumination coverage is xed at
50 mm.
•
When the ceiling or walls are too far, the reected light of the
ash may not be enough and the bounce ash may not be
eective.
•
If the ceiling or walls are not white, the reected light may be
aected, taking their color.
•
If the reected light is attenuated too much and the bounce
ash is not eective enough, select a higher ISO setting on
the camera.
Catch-li ght panel
When using bounce ash, you can also use the catch-light panel
at short distance to direct some of the light at a human subject,
adding a glint in their eyes and brightening their expression.
•
When you pull out the wide panel,
the catch-light panel will be pulled
out at the same time. Push the wide
panel back inside.
•
When using the catch-light panel, set
the ash head upwards at a 90˚ and
use bounce ash.
Flash compensation
When using Type R cameras, you can compensate the ash
output level using the TTL auto or Ambient light auto mode. For
details, see the Camera User Guide.
1st curtain / 2nd curtain synchronization
For details, see the Camera User Guide.
EN - 16

Specications
20 (at 24 mm) - 30 (at 105 mm)
Guide No.
16 (at 24 mm, using the wide panel)
24 mm - 105 mm (18 mm with the wide panel)
Illumination
Automatically linked to the focal length of the
Coverage
lens as per the auto power zoom (only Type R
cameras)
4 × AA batteries (sold separately)
Power Source
•
Lithium batteries and rechargeable NiMH
batteries can be used.
Approx. 200 ashes with alkaline batteries
Battery Life
(based on Ricoh’s measurements)
Enters stand-by mode after about 2 minutes of
the camera entering stand-by mode or being
turned o.
Energy Saving
Powers o automatically after 30 minutes in
stand-by mode.
In slave mode, powers o automatically after 60
minutes without operation.
Approx. 4.7 seconds (with rechargeable Nickel-
Flash Interval
hydrogen batteries)
Approx. 5 seconds (with alkaline batteries)
Flash Output
Pre-ash TTL, Ambient light automatic, Manual
Adjustment
ash
AF Auxiliary
Built-in
Light
Color
5,600K
Temperature
1/250 second (full power ash)
Flash Duration
1/250 - 1/20,000 second (TTL ash)
Slave Flash SLAVE1, SLAVE2 switching
Dimensions
65 mm × 95 mm × 80 mm (2.6×3.7×3.2 inch)
(W×H×D)
Weight Approx. 240 g (excluding batteries)
*
The specications of the equipment may change without prior notice.
EN - 17

Guide No. Table (ISO 100)
Flash output level
Zoom
position
FULL 1/2 1/4 1/8 1/16 1/32 1/64
24mm 20 14 10 7 5 4 3
28mm 22 16 11 8 6 4 3
35mm
24 17 12 8 6 4 3
50mm 26 18 13 9 7 5 3
70mm 28 20 14 10 7 5 4
85mm 29 21 15 10 7 5 4
105mm 30 21 15 11 8 5 4
* All values given at ISO100. For values at ISO200 multiply by 1.4×; for
values at ISO400 multiply by 2×.
* When using slave ash, and with cameras other than Type R, the
zoom position is xed at 24 mm.
Troubleshooting
The ash unit will not charge.
•
Check the polarity of the batteries. If a battery was inserted in
the wrong direction, insert it in the correct direction.
•
Check whether the batteries are empty. In such case, replace
with new batteries.
The ash unit will not re.
•
Check whether the ash unit is correctly attached to the
camera. Insert the ash unit all the way into the hot shoe and
tightly close the lock ring.
•
If the hot shoe contacts are dirty, wipe them clean with a soft,
dry cloth.
•
If the ash was powered o automatically by the Auto Power
O function, turn on the ash unit again.
The picture is over- or underexposed.
•
Check the ash mode. If it is set to Manual ash, set it to TTL
mode.
EN - 18

INFORMATION TO THE USER
USA FCC Part15 Class B
The equipment has been tested and found to comply with the limits
for a Class B digital device, pursuant to part 15 of the FCC Rules. These
limits are designed to provide reasonable protection against harmful
interference in a residential installation. This equipment generates, uses,
and can radiate radio frequency energy and if not installed and used in
accordance with the instructions, may cause harmful interference to radio
communications. However, there is no guarantee that interference will
not occur in a particular installation. If this equipment does cause harmful
interference to radio or television reception, which can be determined
by turning the equipment o and on, then user is encouraged to try to
correct the interference by one or more of the following measures:
•
Reorient or relocate the receiving antenna.
•
Increase the separation between the equipment and receiver.
•
Connect the equipment to an outlet on a circuit dierent from that
to which the receiver is connected.
•
Consult the dealer or an experienced radio/TV technician for help.
Changes or modications not expressly approved by the party responsible
for compliance could void the user’s authority to operate the equipment.
Properly shielded and grounded cables and connectors must be used for
connection to a host computer in order to comply with FCC emission limits.
An AC adapter with a ferrite core must be used for RF interference suppression.
This device complies with Part 15 of the FCC Rules.
Operation is subject to the following two conditions:
(1) This device may cause harmful interference, and
(2) This device must accept any interference received, including
interference that may cause undesired operation.
Note to Users in Canada
Note: This Class B digital apparatus complies with Canadian ICES-003
Remarque Concernant les Utilisateurs au Canada
Avertissement : Cet appareil numérique de la classe B est conforme à
la norme NMB-003 du Canada
Warranty
Fill in all the prescribed details and safely keep the warranty after
making sure all the information is correct.
Customer Support
Ricoh Service Centers
In case of malfunction, please contact one of the Ricoh service
centers listed in the Camera User Guide of the digital camera.
•
Reproduction in full or part is prohibited without permission.
© 2009 Ricoh Co., Ltd.
•
The content of this instruction manual may change without
prior notice.
RICOH COMPANY, LTD.
Ricoh Building, 8-13-1, Ginza, Chuo-ku,
Tokyo 104-8222, Japan
EN - 19
