Lindhaus Valzer Hepa Class A: инструкция
Раздел: Бытовая, кухонная техника, электроника и оборудование
Тип: Пылесос
Инструкция к Пылесосу Lindhaus Valzer Hepa Class A
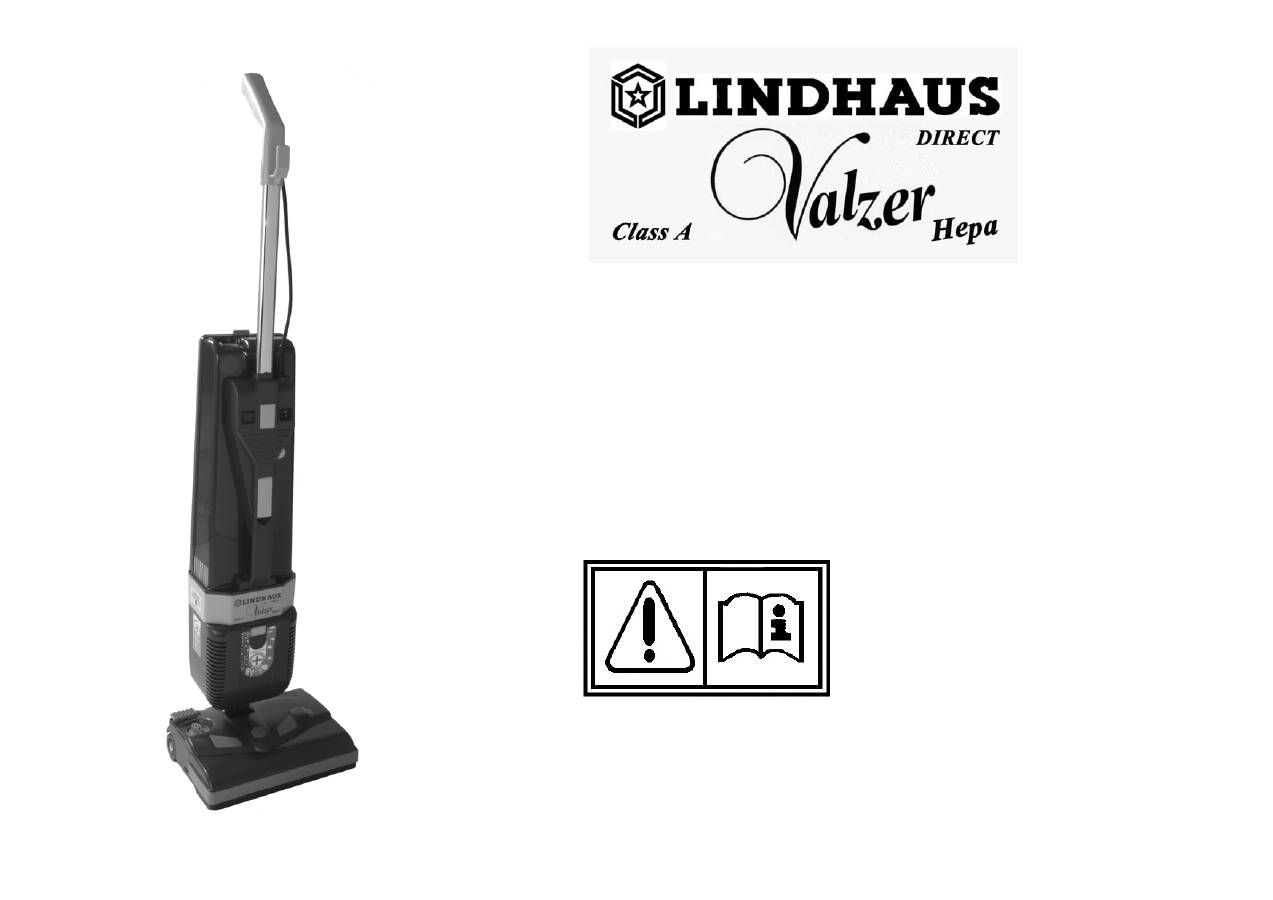
DOMESTIC UPRIGHT VACUUM CLEANER
MODELS
: 05 11 01 ELECTRIC BROOM V. 230/50
M30esc POWER NOZZLE V. 230/50
04 12 07 CARPET CLEANER 12” V. 120/60
U.S.A.
04 12 06 CARPET CLEANER 12” V. 100/55
JAPAN
OWNERS GUIDE AND PARTS MANUAL
ISTRUZIONI
PER
L’USO
E
LISTA
DELLE
PARTI
DI
RICAMBIO
BEDIENUNGSANWEISUNG
UND
ERSATZTEILLISTE
ИНСТРУКЦИЯ
ПОЛЬЗОВАТЕЛЯ
И
СПИСОК
ДЕТАЛЕЙ
INSTRUCCIONES Y EQUIPOS
05/2013
TABLE OF CONTENTS
Important safety instructions 3
3 way switch 4
Know your machine 5
Assembly instructions 6
Operating instructions 6
Brush adjustment 7
Accessories 8
Maintenance 9-10
Dry Cleaning System 11
Specifications 12
Parts list 13-14
Warranty 15-16
RECORD THE MODEL AND
SERIAL NUMBER OF YOUR
MACHINE AND KEEP FOR
FUTURE REFERENCE.
MODEL NUMBER______________
SERIAL NUMBER______________
INDICE
Norme di sicurezza 3
Interruttore a 3 vie 4
Conoscere la vostra macchina 5
Messa in funzione 6
Istruzioni per
il funzionamento 6
Regolazione spazzola 7
Accessori 8
Manutenzione 9-10
Lavaggio a secco 11
Dati tecnici 12
Lista ricambi 13-14
Garanzia 15-16
REGISTRATE IL MODELLO E IL
NUMERO DI SERIE DELLA VS
MACCHINA E CUSTODITE PER
FUTURE REFERENZE.
MODELLO________________________
NUMERO DI SERIE________________
INHALTSVERZEICHNIS
Zur besonderen Beachtung 3
Hauptschalter zu 3 positionen 4
Lernen Sie Ihre Maschine kennen 5
Ihre Maschine in Betrieb setzen 6
Bedienungsanleitung 6
Saugbürsten- Höhenverstellung 7
Zubehör 8
Wartung 9-10
Trockenreinigung 11
Technische Daten 12
Liste der Ersatzteile 13-14
Garantie 15-16
SCHREIBEN SIE SICH HIER DIE
SERIENNUMMER UND DEN
MODELLTYP AUF.
MODELLTYP______________________
SERIENNUMMER__________________
СОДЕРЖАНИЕ
Инструкция
по
технике
безопасности
3
Переключатель
4
Познакомьтесь
с
Вашей
машиной
5
Инструкция
по
сборке
6
Инструкция
по
эксплуатации
6
Регулировка
щетки
7
Аксессуары
8
Эксплуатация
9-10
Система
сухой
химической
чистки
11
Спецификация
12
Перечень
деталей
13-14
Гарантия
15-16
ЗАПИШИТЕ
МОДЕЛЬ
И
СЕРИЙНЫЙ
НОМЕР
ВАШЕЙ
МАШИНЫ
ДЛЯ
ДАЛЬНЕЙШЕГО
ИСПОЛЬЗОВАНИЯ
.
НОМЕР
МОДЕЛИ
______________
СЕРИЙНЫЙ
НОМЕР
INDICE
Instrucciones importantes de seguridad 3
Interruptor de 3 vias 4
Conozca su machina 5
Instrucciones para el montaje 6
Instrucciones de funcionamiento 6
Regulación de la altura del bateador 7
Accesorios 8
Mantenimiento 9-10
Función lavado en seco 11
Característica técnicas 14
Lista de piezas de recambios 13-14
Garantía 15-16
RECUERDE EL MODELO Y EL N° DE
SERIE DE SU MACHINA, GUARDALO
COMO REFERENCIA PARA EL
FUTURO.
MODELO_________________________
NUMERO DE SERIE________________
CONGRATULATIONS:
-
MANUFACTURER
-
COSTRUTTORE
-
HERSTELLER
-
ПРОИЗВОДИТЕЛЬ
-
CONSTRUCTOR
SRL
Via Belgio,22 - Zona Ind.
35127 PADOVA - ITALY
The machine is distributed by:
-
We wish to congratulate you on having purchased
Valzer
,
certainly one of the best and technologically
advanced dual motor carpet cleaners. We thank you for your choice and enjoy your new
Valzer
!
CONGRATULAZIONI:
-
Ci complimentiamo con voi per aver scelto
Valzer
, sicuramente uno dei migliori e tecnologicamente più
avanzati battitappeti a due motori. RingraziandoVi per la preferenza accordataci, Vi auguriamo un piacevolissimo utilizzo del Vs.
nuovo
Valzer
!
-
GLÜCKWUNSCH:
Wir gratulieren Ihnen für Ihre Wahl, sicher ist Ihr
Valzer,
einer der besten und fortschrittlichsten zweimotorigen
Bürstsauger. Wir danken Ihnen für Ihre Vorliebe und wünschen Ihnen eine angenehme Anwendung Ihrer neuen Maschine.
ПОЗДРАВЛЯЕМ
!
-
Поздравляем
Вас
с
приобретением
пылесоса
Valzer,
одного
из
лучших
и
технологически
совершенных
двухмоторных
пылесосов
для
ковровых
покрытий
.
Благодарим
за
Ваш
выбор
!
-
CONGRATULACIONES:
Nos felicitamos con Ustedes por haber escogito
Valzer
, una de las mejores batidoras a dos motores
tecnologicamente màs avanzada.Les agradecemos por su preferencia y les deseamos un agradable uso de este nuevo
Valzer
!

WHEN USING AN ELECTRICAL APPLIANCE, BASIC PRECAUTIONS SHOULD ALWAYS BE FOLLOWED, INCLUDING THE FOLLOWING IMPORTANT SAFETY INSTRUCTIONS
Read these operating instructions carefully before using
WARNING
To reduce the risk of fire, electric shock or injury:
1. Always disconnect the plug when the machine is not in use
and before doing any maintenance or cleaning of the machine.
2. Do not use outdoors or on wet surfaces.
3. This unit can be used by children from 8 years old and persons with reduced physical, sensory or mental capabilities or lack of experience and knowledge if they received supervision or instruction concerning use of the appliance in a safe and included the risks involved. Children should not play with the appliance. The cleaning and maintenance performed by the user should not be done by children without supervision.
4. Use the machine only as described on the present manual.
Use only manufacturer’s recommended attachements.
5. Do not use with damaged cord or plug. If the machine is not
working as it should, has been dropped, damaged, left
outdoors, or dropped into the water, return it to a authorized
dealer for service.
6. Do not pull or carry by cord, use cord as a handle, close
door on cord, or pull cord around sharp edgesor corners. Do
not run appliance over cord. Keep cord away from heated
surfaces.
7. Do not unplug by pulling on cord. To unplug, gasp the plug,
not the cord.
8. Do not handle plug or appliance with wet hands
9. Do not put any object into openings. Do not use with any
opening blocked; keep free of dust, lint, hair, and anything that
may reduce the air flow.
10. keep hair, loose clothing, fingers, and all parts of body
away from openings and moving parts.
11. Turn off all controls before unplugging.
12. Use extra care when using on stairs.
13. Do not use to pick up flammable or
combustible liquid, such as gasoline, or use in areas ahere
they may be present.
14. Do not suck up matches, ash or cigarettes
that are still burning.
15. Avoid vacuuming hard or sharp objects or
damage may result.
16. Use and keep this machine in a dry
environment and at a temperatures between +5°C
+35°C
(+41°F
+95°F).
17. Do not expose to the sun and UV rays
QUANDO SI USANO APPARECCHI ELETTRICI, DEVONO ESSERE SEGUITE NORMALI PRECAUZIONI, INCLUSE LE SEGUENTI NORME DI SICUREZZA
Leggere attentamente il manuale di istruzioni prima dell’uso
ATTENZIONE
Per ridurre il rischio di fuoco, scosse elettriche o danni:
1. Staccare sempre la spina dalla presa di corrente quando
l’apparecchio non è in uso o prima di eseguire regolazioni o
manutenzioni.
2. Non usare la macchina all’esterno o su superfici bagnate.
3. Questo apparecchio può essere utilizzato da bambini da 8 anni in su e da persone con ridotte capacità fisiche sensoriali o mentali o mancanza di esperienza e conoscenza se hanno ricevuto assistenza o formazione sull'uso dell'apparecchio, sulla sicurezza e sui rischi implicati. I bambini non devono giocare con l'apparecchio. La pulizia e la manutenzione da parte dell'utente non dovrebbe essere fatto dai bambini senza supervisione.
4. Usare l’apparecchio solo come descritto nel presente manuale.
Usare solo gli accessori raccomandati dal costruttore.
5. Non usare con cavo o spina danneggiati. Se la macchina non
funziona come dovrebbe, è caduta, danneggiata, lasciata
all’esterno, o caduta nell’acqua, ritornatela ad un centro assistenza
autorizzato.
6. Non tirare mai o trasportare l’apparecchio per il cavo di
alimentazione, o tirare il cavo intorno a spigoli, chiudere porte sul
cavo. Tenere il cavo lontano da fonti di calore.
7. Non staccare mai la spina tirando il cavo. Tirare la spina non il
cavo.
8. Non tenere la spina o l’apparecchio con mani bagnate.
9. Non infilare nessun oggetto nelle aperture.
Non usare con le aperture ostruite; mantenerle
libere da polvere, capelli e qualsiasi cosa che possa ridurre il
passaggio d’aria.
10. Mantenere sempre capelli, indumenti larghi, dita e tutte le parti
del corpo lontani dalle aperture e dalle parti in movimento.
11. Spegnere tutti i controlli e la macchina stessa prima di staccare
la spina.
12. Prestare particolare attenzione nell’uso su scale.
13. Non usare per aspirare liquidi in genere ed infiammabili, come
benzina o in zone dove questa è presente.
14. Non aspirare fiammiferi, cenere e mozziconi di sigarette accesi.
15. Evitare di aspirare oggetti duri o taglienti per non danneggiare il
sacco raccogli polvere e l’apparecchio stesso.
16. Usare e conservare l'apparecchio all'interno di ambienti asciutti
e ad una temperatura da
+5°C
+35°C (+41°F
+95°F)
17. Non esporre l’apparecchio ai raggi solari e UV
WENN MAN ELEKTRISCHE GERÄTE BENÜTZT SOLLTE MAN GEWISSE VORSICHTSMASSNAHMEN BEACHTEN, EINSCHLIEßLICH DER FOLGENDEN ZUR BESONDEREN BEACHTUNG
Lesen Sie die ganze Gebrauchsanweisung vor dem Gebrauch durch
ACHTUNG
um Feuergefahr, Elektroschocks oder Schäden einzuschränken:
1. Gerät nie mit angeschlossenem
Netzkabel abstellen. Den Netzstecker bei längerer Nichtverwendung und
vor jeder Wartungsarbeit aus der Steckdose ziehen.
2. Die Maschine weder draussen noch auf nassen
Oberflächen benützen
3. Dieses Gerät kann von Kindern ab 8 Jahren und Personen mit eingeschränkten physischen, sensorischen oder geistigen Fähigkeiten oder mangels Erfahrung und Wissen, wenn sie Aufsicht oder ausführliche Anleitung zur Benutzung des Geräts in einem sicheren erhielt verwendet werden und enthalten die Risiken. Kinder sollten nicht mit dem Gerät spielen. Die Reinigung und Wartung durch den Benutzer durchgeführt werden sollte nicht von Kindern ohne Aufsicht erfolgen.
4.Gebrauchsanweisung und Warnungen des
Herstellers beachten. Nur zugelassenes Zubehör verwenden.
5.Gerät nie bei beschädigtem Netzkabel benutzen.
Gerät zum Service Center bringen wenn es nicht richtig funktioniert,
heruntergefallen ist oder dem Regen ausgesetzt wurde.
6.Gerät nie am Kabel tragen oder ziehen. Das
Kabel sollte nicht in Türen eigeklemmt oder über
scharfkantige Gegenstände gezogen werden. Gerät nie über das Kabel
rollen. Kabel weit von heissen Oberflächen fernhalten.
7.Das Kabel stets am Stecker und niemals am Kabel selbst aus der
Steckdose ziehen.
8.Die Maschine und den Stecker nie mit nassen Händen anfassen
9. Keine Gegenstände in die Öffnungen einfügen.
Gerät nicht mit verstopften Öffnungen benützen und von Staub, Haare
und alles was den Luftzug einschränken könnte, freihalten.
10.Hände, Haare, Füße und Kleider weit von den
Öffnungen und sich bewegenden Teilen des Gerätes fernhalten.
11. Vor dem Ausziehen des Kabels alle Bedienungselemente und die
Maschine selbst ausschalten.
12. Bei der Anwendug auf Treppen besonders vorsichtig sein.
13.Keine entzündbare Flüssigkeiten wie Benzin aufsaugen.
14. Zigaretten, Zündhölzer, heisse Asche und andere rauchenden oder
brennenden Gegenstände nicht aufsaugen.
15.Das Aufsagen von scharfkantigen oder harten
Gegenständen vermeiden, um den Staubbeutel
und die Maschine selbst nicht zu beschädigen
16.Gerät an einem trocknen Platz benutzen und aufbewahren,
Temperatur zwischen +5°C
+35°C (+41°F
+95°F).
17.Gerät nicht Sonnenstrahlen und UV-Strahlen aussetzen
ВО ВРЕМЯ ИСПОЛЬЗОВАНИЯ ЭЛЕКТРОПРИБОРОВ , ВСЕГДА НЕОБХОДИМО СОБЛЮДАТЬ ТЕХНИКУ БЕЗОПАСНОСТИ , ВКЛЮЧАЯ СЛЕДУЮЩЕЕ : ИНСТРУКЦИЯ ПО ТЕХНИКЕ БЕЗОПАСНОСТИ
Внимательно
прочитайте
эту
инструкцию
по
эксплуатации
ВНИМАНИЕ
.
Чтобы
уменьшить
риск
пожара
,
удара
электротоком
или
травмы
:
1.
Всегда
отключайте
машину
из
розетки
,
когда
она
не
используется
,
а
также
перед
обслуживанием
и
чисткой
машины
.
2.
Не
используйте
на
влажной
поверхности
или
на
улице
.
3.
Это
устройство
может
быть
использовано
детей
от
8
лет
и
лицам
с
ограниченными
физическими
,
сенсорными
или
умственными
способностями
или
с
недостатком
опыта
и
знаний
,
если
они
получали
контроля
или
инструктирования
по
вопросам
использования
прибора
в
безопасном
и
включены
риски
.
Дети
не
должны
играть
с
прибором
.
Очистка
и
обслуживание
выполняемые
пользователем
не
должно
быть
сделано
путем
детей
без
присмотра
.
4.
Используйте
пылесос
только
так
,
как
указано
в
инструкции
.
Используйте
только
рекомендованные
производителем
насадки
.
5.
Не
используйте
пылесос
с
поврежденным
электрошнуром
или
вилкой
.
Если
машина
не
работает
,
как
следует
,
была
брошена
,
повреждена
,
оставлена
на
улице
,
или
брошена
в
воду
,
верните
ее
авторизированному
дилеру
для
обслуживания
.
солнечных
лучей
и
ультрафиолета
.
6.
Не
тяните
пылесос
за
шнур
,
не
используйте
шнур
как
ручку
,
не
прищемляйте
шнур
дверьми
,
не
затягивайте
шнур
вокруг
острых
углов
.
Не
пылесосьте
через
провод
.
Держите
провод
вдали
от
нагретых
поверхностей
.
7.
Не
вытягивайте
вилку
из
розетки
за
шнур
.
8.
Не
берите
устройство
или
вилку
мокрыми
руками
.
9.
Не
кладите
никаких
предметов
на
отверстия
.
Не
используйте
пылесос
с
забитыми
отверстиями
.
Следите
,
чтобы
пылесос
не
засорялся
волосами
или
любыми
предметами
,
которые
могут
уменьшить
поток
воздуха
.
10.
Держите
волосы
,
свободную
одежду
,
пальцы
и
все
части
тела
вдали
от
отверстий
и
движущихся
частей
.
11.
Выключайте
все
кнопки
управления
,
прежде
чем
вынуть
вилку
из
розетки
.
12.
Будьте
внимательны
на
ступеньках
.
13.
Не
засасывайте
воспламеняемые
жидкости
,
например
,
бензин
.
Не
используйте
пылесос
в
местах
,
где
могут
быть
подобные
вещества
.
14.
Не
засасывайте
спички
,
пепел
или
сигареты
,
которые
все
еще
горят
.
15.
Избегайте
засасывания
твердых
или
острых
предметов
,
которые
могут
повредить
машину
.
16.
Используйте
и
храните
пылесос
только
в
сухом
помещении
и
при
температуре
+5 - +35 °
С
.
17.
Избегайте
попадания
прямых
солнечных
лучей
и
ультрафиолета
.

NOTE
IMPORTANT INFORMATION
Your vacuum cleaner international marking to indicate the
ON
and
OFF
position of the main power
switch. The
1
indicates
ON
and the
0
indicates
OFF.
3 WAY SWITCH:
on request for some Countries, the machine can be supplied with a 3 way power
switch.
Position: 1
both motors are working
0
off
2
only the vacuum motor is working
INTERRUTTORE A 3 VIE:
per alcuni mercati, su richiesta, possono essere fornite macchine
con interruttore di accensione a 3 vie.
Positione: 1
entrambi i motori sono accesi
0
spento
2
solo il motore aspirante è acceso
HAUPTSCHALTER ZU 3 POSITIONEN
: auf Anfrage, können für einige Märkte, Maschinen mit 3
Hauptschalter zu 3 Positionen geliefert werden.
Position
:
1
Beide Motoren arbeiten
0
Aus
2
Es arbeitet nur der Saugmotor
INTERRUPTEUR À 3 VOIES
: Sur demande, pour certains marchés, des appareils avec interrupteur
mise en marche à trois voies peuvent être fournis.
Position: 1
les deux moteurs sont en marche
0
off
2
seul le moteur de l’aspirateur est en marche
INTERRUPTOR DE 3 VIAS:
sobre demanda, para algunos mercados, puendense suministrar máquinas
con interruptor de encender de tres vias.
Posición: 1
los dos motores están funcionando
0
off
2
Sólo funciona el motor de la aspiradora.
Technical improvements
Lindhaus reserves the right to make technical improvements and modifications without prior notice. For
this reason, the appliance can deviate in details from the leaflet information.
Migliorie tecniche
Lindhaus si riserva il diritto di apportare delle migliorie tecniche e delle modifiche senza preavviso. In tal
caso alcuni dettagli potranno non risultare conformi alle informazioni riportate sulla documentazione
tecnica.
Technische Verbesserungen
Lindhaus behält sich technische Verbesserungen im Rahmen der Modellpflege vor.
Daher kann das Gerät in Details von Prospektangaben abweichen.
Технические
усовершенствования
Lindhaus
оставляет
за
собой
право
на
технические
усовершенствования
и
модификации
без
предварительного
уведомления
.
По
этой
причине
,
устройство
может
отличаться
в
деталях
от
информации
указанной
в
буклете
.
Mejoras técnicas
Lindhaus reserva el derecho a hacer cualquier modificatión y arreglo técnico sin previo aviso. Por esta
razón, los detalles acerca de la maquina podrían resultar diferentes de las informaciones indicadas en el
manual de información.
4
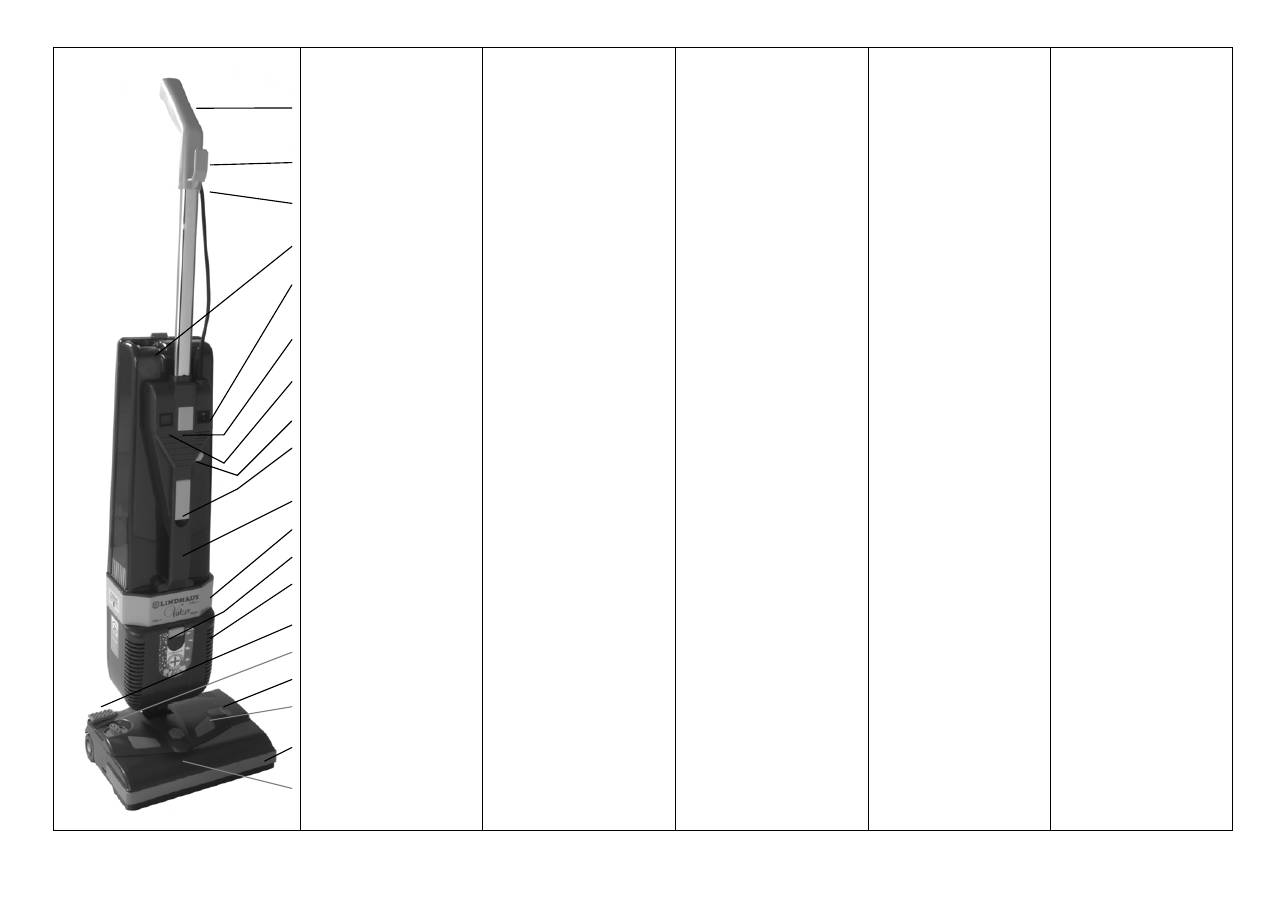
KNOW YOUR MACHINE
Handle
Cord strain relief
(Backside of handle)
Upper cord hook
Upper sliding door
Power switch
Handle and cord release button
Bag full light
Vacuum sound control
Lower cord hook
Carrying handle
Vacuum body
Grill Latch
Exaust filter grill
Pedal
Brush adjustement knob
Red light
Green light
Bumper
Brush housing
CONOSCI LA TUA
MACCHINA
Impugnatura
Gancio (parte posteriore
dell’impugnatura)
Gancio reggicavo superiore
Sportello scorrevole superiore
Interruttore
Pulsante ferma manico
Spia sacco pieno
Regolazione potenza aspirante
Gancio reggicavo inferiore
Impugnatura di trasporto
Corpo aspirante
Pulsante griglia
Griglia con microfiltro
Pedalino
Regolatore altezza
Spia rossa
Spia verde
Paracolpi
Elettrospazzola
LERNEN SIE IHRE
MASCHINE KENNEN
Griff
Kabelhaken (hinter dem Griff)
Oberer Kabelhaken
Öberer gleitender Deckel
Hauptschalter
Griffverriegelungsknopf
Staubbeutelfüllanzeige
Einstellung der Saugleistung
Unterer Kabelhaken
Traggriff
Saugkörper
Gitterknopf
Gitter mit Mikrofilter
Pedal
Bürstenhöhen-Einstellknopf
Rote Lampe
Grüne Lampe
Schutzprofil
Bürstengehäuse
ПОЗНАКОМЬТЕСЬ
С
ВАШЕЙ
МАШИНОЙ
Рукоятка
Крепление
шнура
(
с
тыльной
стороны
рукоятки
)
Верхний
держатель
шнура
Заслонка
верхнего
отверстия
Переключатель
питания
Кнопка
освобождения
провода
и
рукоятки
Индикатор
заполнения
пылесборника
Регулятор
силы
всасывыния
и
уровня
шума
Нижний
держатель
провода
Ручка
для
ношения
Корпус
пылесоса
Защелка
решетки
фильтра
Решетка
выходного
фильтра
Педаль
для
наклона
корпуса
пылесоса
Регулятор
высоты
щетки
Красный
индикатор
Зеленый
индикатор
Резиновый
бампер
Корпус
щетки
CONOZCA SU MAQUINA
Empuñadura
Gancho (parte posterior de la
empuñadura)
Gancho sujeta cable superior
Tapa corrediza superior
Interruptor
Botón de bloqueo mango
Indicador de borsa llena
Regulador de la potenzia asp.
Gancho sujeta cable inferior
Empuñadura de transporte
Cuerpo aspirante
Boton pulsador rejilla
Rejilla con microfiltro
Pedal
Regulación de la altura
Luz roja
Luz verde
Goma de protección
Turbo cepillo
5
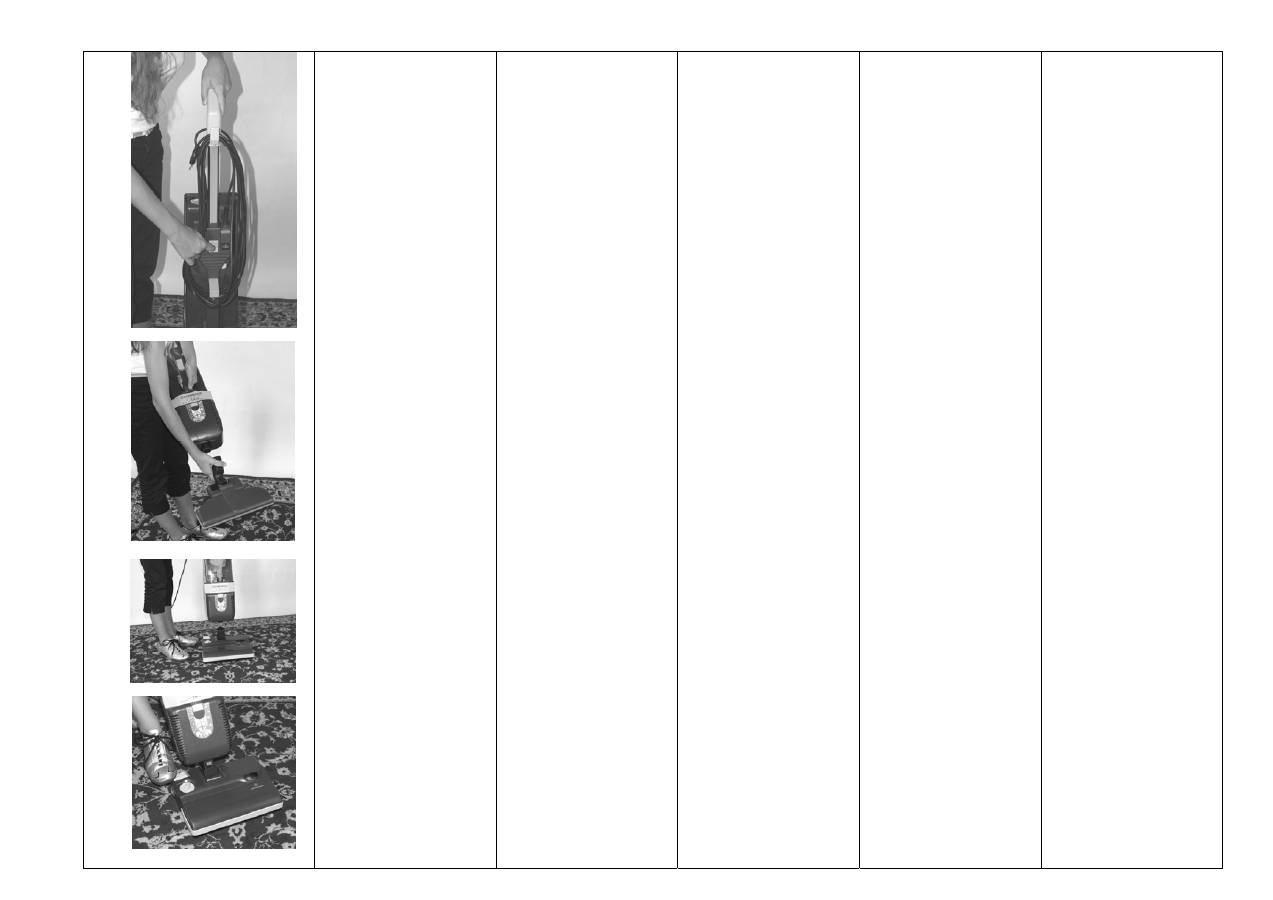
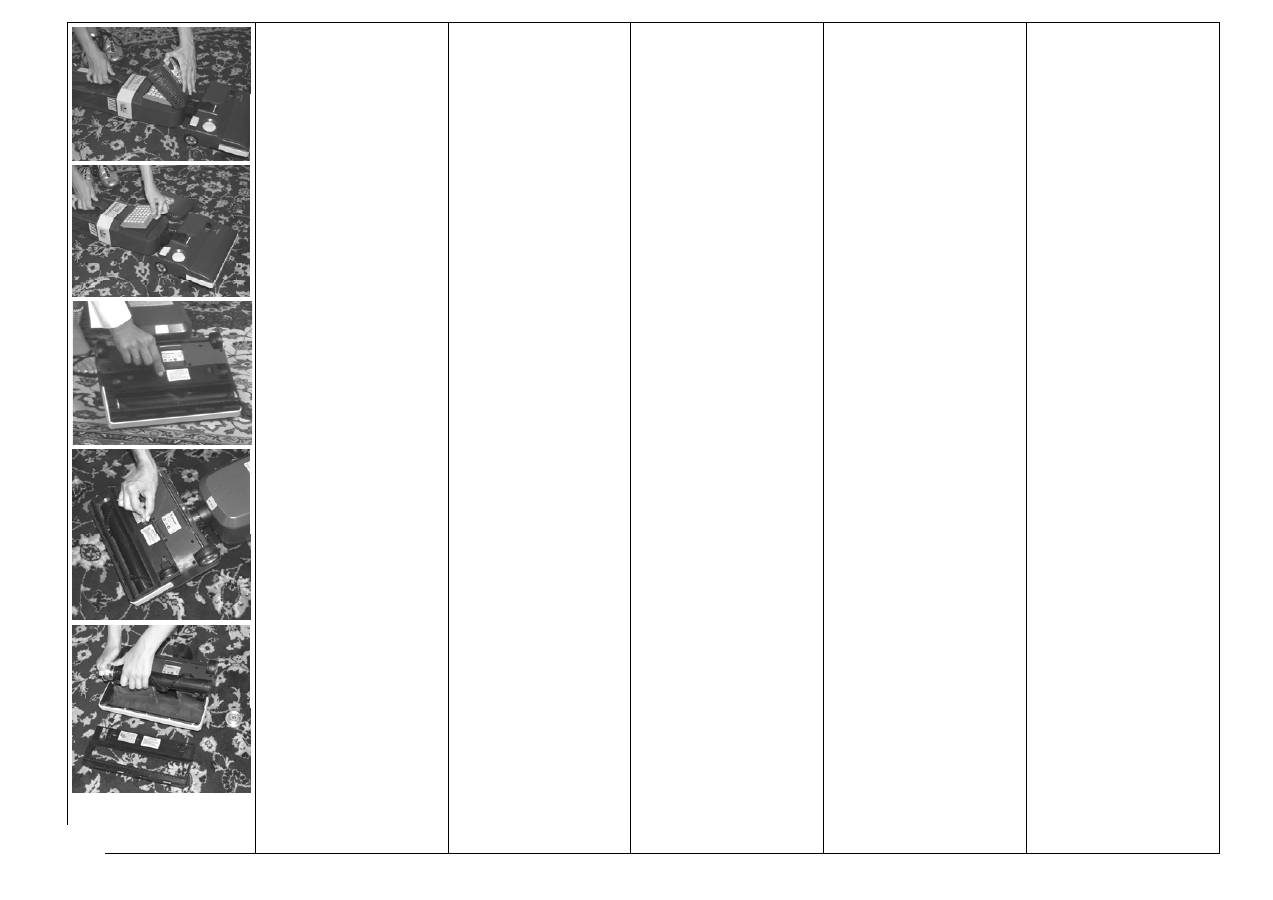
ASSEMBLY INSTRUCTIONS
Insert the chrome handle into the
hole in the top of the switch
housing. Push down until the
button snaps into the proper
position.
Wind the electrical cord around the
cord hook on the handle and the
swing out cord hook on the front
of the machine. To release the
cord, push the buttons between the
switch and bag full light and push
the handle down. Slide the handle
back into the locked position
before using the machine.
Push the vacuum body into the
joint of the brush housing, with a
slight pressure, until the
connection locks.
OPERATING INSTRUCTIONS
Switch on the machine (power
switch), depress the foot pedal (by
foot) and move the vacuum body
in working position. The brush
motor will automatically turn on.
ISTRUZIONI PER LA MESSA
IN FUNZIONE
Inserire il tubo cromato
nell’apposita sede e premere fino a
quando il pulsante scatta
nell’apposita sede.
Avvolgere il cavo tra i ganci
avvolgicavo superiore e inferiore
situati nel retro della macchina.
Per sganciare il cavo dagli appositi
agganci premere i pulsanti e
spingere l’impugnatura verso il
basso.
Riportare l’impugnatura in
posizione di blocco prima di usare
la macchina.
Inserire il corpo aspirante nello
snodo con una leggera pressione
fino a far scattare il pulsante.
ISTRUZIONI PER IL
FUNZIONAMENTO
Accendere la macchina, premere il
pedalino di sgancio snodo ed
inclinare la macchina in posizione
di lavoro. Il motore elettrospazzola
si accenderà automaticamente.
MONTAGE
Die verchromte Führungsstange in
die Öffnung des Sauggeräts
einsetzen und hinunterdrücken bis
der Arretier-Knopf einschnappt.
Netzkabel zwischen dem oberen
und dem unteren Kabelhaken, die
sich auf der Rückseite der
Maschine befinden, aufrollen Das
aufgewickelte Netzkabel kann
schnell vom Haken gelöst werden
indem die Arretierknöpfe gedrückt
werden und die Führungsstange
nach unten geschoben wird, bis der
Knopf einrastet.
Das Sauggerät am Gelenk des
Saugfußes anschliessen. Leicht
drücken, bis die Verbindung
einschnappt.
BEDIENUNG DER
MASCHINE
Hauptschalter einschalten und die
Führungsstange durch Drücken des
Fußpedals entrasten und in
Arbeitsposition bringen. Der
Bürstenmotor wird erst in Betrieb
gesetzt, wenn die Führungsstange
in Arbeitsposition gebracht wird.
ИНСТРУКЦИЯ
ПО
СБОРКЕ
Вставьте
хромированную
ручку
в
отверстие
сверху
корпуса
переключателя
.
Нажмите
до
тех
пор
,
пока
кнопка
не
приймет
правильное
положение
между
переключателем
и
индикатором
заполнения
пылесборника
.
Снимите
шнур
с
держателей
и
вытяните
его
впереди
машины
.
Для
освобождения
шнура
нажмите
кнопку
между
переключателем
и
индикатором
заполнения
пылесборника
,
а
затем
нажмите
ручкувниз
.
Перед
началом
работы
снова
зафиксируйте
ручку
.
Вставте
корпус
пылесоса
в
крепление
корпуса
щетки
с
легким
нажимом
до
тех
пор
,
пока
крепления
защелкнутся
.
ИНСТРУКЦИЯ
ПО
ЭКСПЛУАТАЦИИ
Включите
машину
(
нажав
переключатель
),
нажмите
ногой
педаль
и
одновременно
опустите
корпус
в
рабочее
положение
.
Мотор
щетки
включится
автоматически
.
INSTRUCCIONES PARA EL
MONTAJE
Introduzca el tubo
cromado dentro
del hueco que está encima del
interruptor. Empuje hacia abajo
hasta que el botón encaje en el
hueco que está entre el interruptor
y el indicador de bolsa llena.
Enrolle el cable alrededor del
gancho superior e inferior. Para
soltar el cable, pulse el botón que
está situado entre el interruptor y
el indicador de bolsa llena. Poner
la empuñadura en posición de
bloqueo, antes de usar la máquina.
Conectar la aspiradora con una
ligera presión hasta que se bloque
el boton.
INSTRUCCIONES DE
FUNCIONAMIENTO
Encienda la máquina, pulse el
pedal con el pie e incline la
máquina en posición de trabajo. El
motor del cepillo se encenderá
automaticamente
6
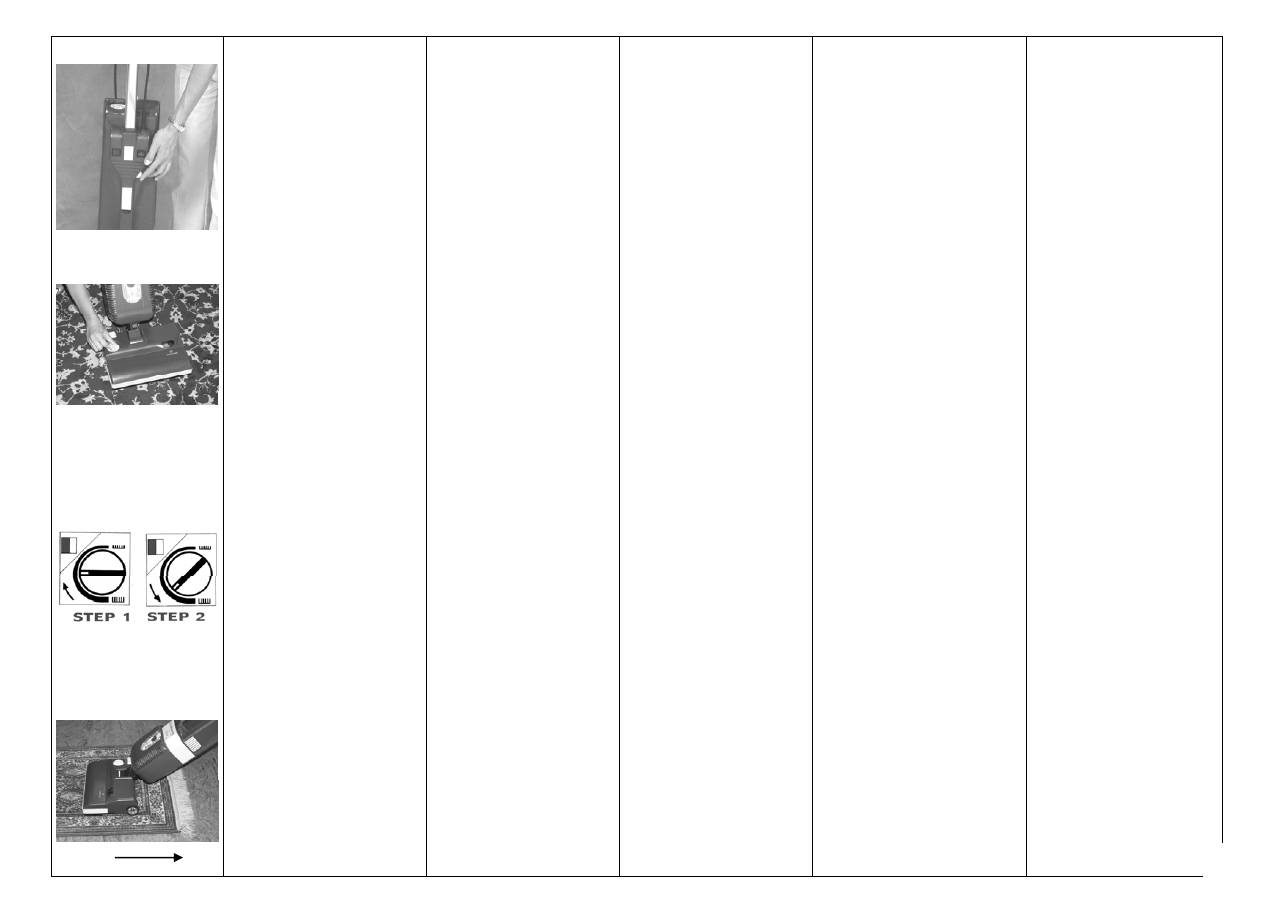
The variable suction control
(NOT AVAILABLE ON V.120/60
VERSION)allows you to vary the
amount of suction for different
applications. Example:
- Vacuuming carpets and floors - Set
on
Maximum
- Drapes, lamp shades, etc. or using the
DCS (dry carpet system)-Set on
Minimum.
BRUSH HEIGHT
ADJUSTEMENT
Your carpet cleaner has several built in
safeguards to protect components from
overload damage. The electronic
circuitry that operates the red light on
the base indicates that the motor is
overloading because the brush height is
set too low or there are debris
hindering the movement of the brush
roller. If the overload is excessive the
circuitry will shut off the brush motor
and the red light will stay on until the
problem is corrected. When the
problem is corrected turn the switch
off, wait for a moment and turn it back
on. Make sure you unplug the machine
while inspecting the brush roller for
debris.
STEP 1:
With machine on and handle
in normal operating position, slowly
rotate brush adjustment knob clockwise
until red light turns on.
STEP 2:
Turn brush adjustment knob
slowly counterclockwise until red light
turns off.
NOTE:
If the red light goes on and off
intermittently while vacuuming, this is
correct. If the red light stays on all the
time, turn the knob as STEP 2.
In case of fringed carpets the machine
must be used from the centre to the
outside. With one colour carpet or
those whose weaves have tendency to
form lines, it’s better to follow the
direction of the material to get a
consistent surface appearance.
La regolazione della potenza
aspirante consente di scegliere la
condizione più adatta al tipo di
lavoro da svolgere:
- Battitappeto / Aspirapolvere :
Max.
- Tende e lavaggio a secco:
Min.
DISPOSITIVO PER REGOLARE
L’ALTEZZA
Il Vs. battitappeto ha diversi
dispositivi di sicurezza per
proteggere
i componenti da danni
dovuti a sovraccarico. Il circuito
elettronico che mette in funzione la
spia rossa sulla base indica che il
motore è in sovraccarico perché
l’altezza della spazzola è troppo
bassa o perché ci sono detriti che
bloccano il funzionamento del rullo.
Se il sovraccarico è eccessivo il
circuito spegnerà il motore
elettrospazzola e la spia rossa rimarrà
accesa finché il problema non viene
risolto. Spegnere l’interruttore,
togliere la spina e quando il
problema è risolto, riaccendere la
macchina.
PASSO:1
con la macchina accesa e
con l’impugnatura in posizione
normale di lavoro, ruotate piano in
senso orario il regolatore finché la
spia rossa si accende.
PASSO 2:
ruotate il regolatore in
senso antiorario fino a che la spia
rossa si spegne.
NOTA:
se la spia rossa si accende in
modo intermittente mentre la
macchina è in lavoro, la regolazione
è corretta. Se invece rimane sempre
accesa, regolare come passo 2.
In caso di tappeti con frange bisogna
procedere dall’interno verso
l’esterno. Con tappeti a tinta unita o
moquette con trame che tendono a
formare strisce, è consigliabile
seguire la direzione del pelo per
ottenere una superficie omogenea.
Die Regulierung der Ansaugleistung
erlaubt es, die Einstellung
auszuwählen, die für die
auszuführende Arbeit am besten
geeignet ist:
Bürstsauger/Staubsauger:
Max.
Vorhänge und Trockenreinigung:
Min.
SAUGBÜRSTEN
HÖHENVERSTELLUNG
Bürstenverstellung drehen, um die
Bürstenhöhe von 1 mm-10mm zu
verstellen. Die Bürstenhöhe sollte
den jeweiligen Teppichbelägen
angepasst werden.
Die Bürstmotor-Kontrollampe in
grüner Position zeigt die korrekte
Höheneinstellung der Bürste an.
Sobald die Lampe auf rot wechselt,
ist die Bürste zu tief eingestellet.
Nach einigen Sekunden Betrieb auf
Rotlicht schaltet der Motor
automatisch ab.
Hauptschalter ausschalten, Netzkabel
aus der Steckdose ziehen und, wenn
das Problem behoben ist, schalten
Sie die Maschine nochmals ein.
SCHRITT 1:
Bei eingeschalteter
Maschine und mit Griff in normaler
Arbeitsstellung, den Regler langsam
im Uhrzeigersinn drehen, bis sich die
rote Kontrollampe einschaltet.
SCHRITT 2:
Den Regler gegen den
Uhrzeigersinn drehen, bis sich die
rote Kontrolllampe ausschaltet.
ANMERKUNG:
Wenn die rote
Kontrolllampe ab und zu aufleuchtet
während die Maschine
arbeitet, ist die Regulierung korrekt,
wenn sie hingegen immer anbleibt
regulieren wie Schritt 2.
Teppiche mit Fransen sollten von
innen nach aussen gesaugt werden.
Unifarbige oder tieffloorige
Teppiche sollten immer in Richtung
des Floors (im Strich) gesaugt
werden.
Регулирование
силы
всасывания
(
не
доступно
в
моделях
V.120/60
VERSION)
позволяет
изменять
силу
всасывания
для
различных
применений
.
Например
,
-
Чтобы
пропылесосить
ковры
и
полы
,
установаите
«
Maximum
»
-
Чтобы
пропылесосить
шторы
,
абажуры
и
т
.
д
.,
с
использованием
системы
сухой
химической
чистки
,
установите
«
Minimum
».
РЕГУЛИРОВКА
ВЫСОТЫ
ЩЕТКИ
Ваш
пылесос
имеет
несколько
встроенных
степеней
защиты
для
обеспечения
безопасность
компонентов
от
перегрузки
.
Электронная
цепь
,
которая
управляет
красным
индикатором
на
корпусе
,
показывает
перегрузку
мотора
из
-
за
слишком
маленькой
высоты
щетины
или
осколков
,
затрудняющих
движение
вала
щетки
.
Если
перегрузка
будет
чрезмерной
,
цепь
отключит
мотор
щетки
,
и
красный
индикатор
будет
гореть
до
тех
пор
,
пока
неполадка
не
будет
исправлена
.
После
исправления
неполадки
выключите
машину
,
и
,
спустя
несколько
секунд
,
включите
обратно
.
Убедитесь
,
что
машина
выключена
из
розетки
во
время
проверки
вала
щетки
.
ШАГ
1
:
Включив
машину
и
установив
рукоятку
в
Рабочее
положение
,
медленно
вращайте
ручку
регуляции
щетки
по
часовой
стрелке
,
пока
не
включится
красный
индикатор
.
ШАГ
2:
Поверните
рукоятку
регуляции
щетки
медленно
против
часовой
стрелки
,
пока
красный
индикатор
не
погаснет
.
Примечание
:
Если
красный
индикатор
поочередно
гаснет
и
загорается
во
время
уборки
,
все
в
порядке
.
Если
красный
индикатор
горит
все
время
,
поверните
переключатель
,
согласно
ШАГ
2.
Если
Вы
пылесосите
дорожку
с
краями
,
обработанными
бахромой
,
придерживайтесь
направления
от
центра
к
краям
.
Работая
на
ковролине
,
следуйте
естественному
направлению
ворса
для
получения
гладкой
,
однородной
поверхности
.
La regulación de la aspiración
permite elegir la condición de trabajo
más idónea:
Batidura/Aspiradora:
Max.
Cortinas y lavado a seco:
Min.
DISPOSITIVO PARA REGULAR
LA ALTURA
Su bateador tiene varios dispositivos
de seguridad para proteger los
componentes de daños debidos a
problemas de sobrecarga. El circuito
electrónico que pone en
funcionamiento la luz roja, indica que
el motor está sobrecargado porque la
altura del cepillo está colocada
demasiado baja o hay deshechos que
dificultan el movimiento del rodillo.
Si la sobrecarga es excesiva, el
circuito desconectará el motor del
cepillo y la luz roja permanecerá
encendida hasta que el problema sea
corregido. Cuando el problema esté
corregido, apague la luz, espere un
momento y vuélvalo a enchufar.
Asegúrese de tener todo bien revisado
antes de volver a enchufar la
máquina.
PASO 1:
Con la máquina encendida
y el mango en posición normal de
trabajo, lentamente gire la ruedecilla
en el sentido de las agujas del reloj
hasta que la luz roja se encienda.
PASO 2:
Gire la ruedecilla
lentamente en sentido contrario a las
agujas del reloj, hasta que la luz roja
se apague.
NOTA:
Si la luz roja se enciende y
apaga intermitentemente mientras
aspiramos, es correcto. Si la luz roja
permanece todo el tiempo encendida,
gire la ruedecilla como le indicamos
en el paso 2.
En el caso de alfombras con flecos la
máquina debe ser usada desde el
centro hacia fuera solamente. Con una
alfombra lisa ó cuyos tejidos tienen
una tendencia a formar líneas, es
aconsejable seguir la dirección del
material para conseguir un aspecto
consistente en la superficie.
7
STANDARD
OPTIONAL
ACCESSORIES
A.
Universal nozzle with
wheels M29R + F
B.
Wrapp. of 10 paper bags
C.
Strip of 10 air freshener
D.
Upholstery tool
E.
Tube bent with air
control
F.
Dusting brush for
upholstery
G.
Telescopic wand
H.
Round dust for
telescopic crevice tool
I.
Telescopic crevice tool
J.
Extension hose
K.
Lindhaus Powder
L.
Accessory bag
M.
Lindhaus Spotter
N.
Hepa filter
O.
Carbon/Active filter
P.
Blower port
Q.
Back pack kit
* Ask your dealer which are
the
standard accessories
ACCESSORI
A.
Spazzola universale con
ruote M29R + F
B.
Conf. 10 sacchi filtro
C.
Strip 10 profumatori
D.
Bocchetta con setola
E.
Impugnatura con
regolatore
F.
Pennello per bocchetta
G.
Tubo telescopico
H.
Pennello per lancia
telescopica
I.
Lancia telescopica
J.
Tubo estensibile
K.
Confezione microspugne
detergenti Lindhaus
L.
Borsa porta accessori
M.
Smacchiatore Lindhaus
N.
Filtro Hepa
O.
Filtro a carboni attivi
P.
Soffiatore
Q.
Kit tracolla
* Chiedete al Vs. rivenditore
quali sono gli accessori di serie.
ZUBEHÖR
A.
Universalstaubbürste
M29R + F
B.
Filterbeutel Packung 10 St.
C.
Duftfilter Strip (10 St.)
D.
Polsterdüse
E.
Griff mit Regulator
F.
Bürste für Polsterdüse
G.
Teleskopisches Rohr
H.
Bürste für teleskopische
Flachdüse
I.
Teleskopische Flachdüse
J.
Dehnbarer Schlauch
K.
Lindhaus Granulat
L.
Zubehörtasche
M.
Lindhaus Teppichfleckenlöser
N.
Hepa Filter
O.
Aktivkohlen-Filter
P.
Gebläse
Q.
Schulterkit
* Bitte fragen Sie Ihren Händler, welches
das Standardzubehör ist.
АКСЕССУАРЫ
A.
Универсальная
насадка
с
колесами
М
29R + F
B.
Коробка
10
бумажных
пылесборников
C.
Полоска
с
10
освежителями
воздуха
D.
Насадка
для
чистки
мягкой
мебели
E.
Согнутая
труба
с
воздушным
контролем
F.
Насадка
для
сбора
пыли
с
мягкой
мебели
G.
Телескопическая
труба
H.
Круглая
щетка
для
телескопической
насадки
для
щелей
I.
Телескопическая
насадка
для
щелей
J.
Дополнительный
шланг
K.
Порошок
Lindhaus
L.
Сумка
для
аксессуаров
M.
Пятновыводитель
Lindhaus
N.
Фильтр
НЕРА
O.
Фильтр
с
активированным
углем
P.
Разъем
для
продува
Q.
«
Рюкзак
-
кенгуру
»
для
ношения
на
спине
*
За
информацией
о
стандартном
наборе
аксессуаров
,
обращайтесь
к
дилеру
.
ACCESORIOS
A.
Cepillo Universal con ruedas
M29R + F
B.
Caja de 10 bolsas de papel
C.
Lámina de 10 ambientadores
(pastillas olorosas)
D.
Cepillo con cerdas
E.
Mango con regulación de
Aspiración
F.
Cepillo
G.
Tubo telescópico
H.
Cepillo para lanza
telescópica
I.
Lanza telescópica
J.
Tubo extensible
K.
Paquete esponjas limpiadoras
Lindhaus
L.
Bolsa porta accesorios
M.
Quitamanchas Lindhaus
N.
Filtro Hepa.
O.
Filtro Carbón Activo
P.
Accesorio de soplar
Q.
Correas dorsales
* Pregunte a su vendeor cuales son
los accesorios estándard.
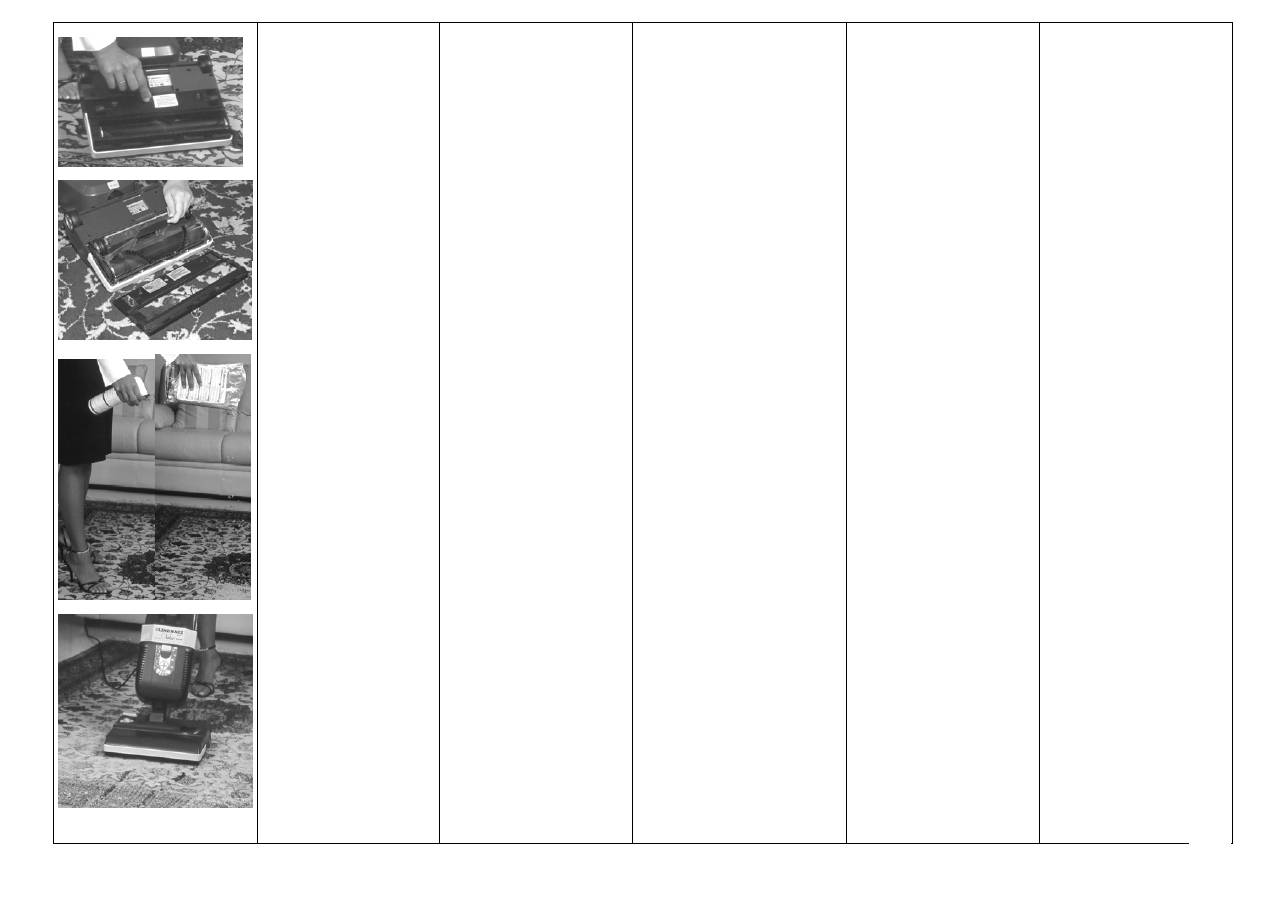
ACCESSORIES
HOSE AND TOOL
To use the accessories in the tool
kit slide open the accessory port
on the top of the vacuum body
and insert the flexible hose.
With the special blower port
accessory (optional) your
vacuum cleaner becomes a
blower.
BACK PACK KIT
(optional)
A practical carring strap set is
available, as an accessory, to
convert your carpet cleaner to a
back pack unit for vacuuming
confined areas; e.g. stairs,buses,
theaters,etc.
ACCESSORI
PER ASPIRAZIONE
Per utilizzare gli accessori, aprite
lo sportello scorrevole superiore e
inserite il tubo flessibile.
Con lo speciale accessorio
“Soffiatore” (optional) la Vs.
macchina può anche soffiare.
KIT TRACOLLA
(optional)
Una pratica cinghia disponibile
come accessorio, per trasformare il
Vs. battitappeto in un
aspirapolvere dorsale per la pulizia
in luoghi scomodi ed angusti; ad
esempio scale, autobus, teatri, ecc.
ZUBEHÖR
Um das Zubehör zu benutzen,
schieben Sie die obere
Verschlußklappe zur Seite und
stecken Sie den Saugschlauch hinein.
Mit dem speziellen “Blaszubehör”
(optional) kann Ihr Sauger auch
blasen.
SCHULTER KIT
(optional)
Ein praktisches Tragset (als separater
Artikel erhältlich) erlaubt dem
Benützer den Sauger in einen
Rückensauger zu vewandeln, um
auch schwer zugängliche Stellen wie
Treppen, Busse oder zwischen
Stuhlreihen zu saugen.
ДОПОЛНИТЕЛЬНЫЙ
ШЛАНГ
И
ПРИСПОСОБЛЕНИЯ
Для
использования
аксессуаров
откройте
дополнительный
вход
на
корпусе
пылесоса
и
вставьте
шланг
.
С
помощью
специального
разъема
Вы
можете
использовать
пылесос
для
продува
.
«
РЮКЗАК
-
КЕНГУРУ
»
ДЛЯ
НОШЕНИЯ
НА
СПИНЕ
(
дополнительно
)
Вы
можете
использовать
приспособление
для
ношения
на
спине
для
превращения
вертикального
пылесоса
в
переносной
при
уборке
закрытых
участков
;
напр
.
лестницы
,
окна
,
лепные
потолки
.
ACCESORIOS PARA LA
ASPIRACIÓN
Para usar los accesorios, hay que
abrir la puerta corredera superior
e insertar el tubo flexible.
Con el utensilio especial
“Soplador” (opcional), su
aspiradora puede también soplar.
CORREAS DORSALES
(opcional)
Una práctica correa (opcional)
disponible como accesorio para
convertir su aspiradora batidora
en aspiradora de mochila para el
limpiado de lugares estrechos y
angostos; por ejemplo: escaleras,
teatros, autobuses, etc.
8
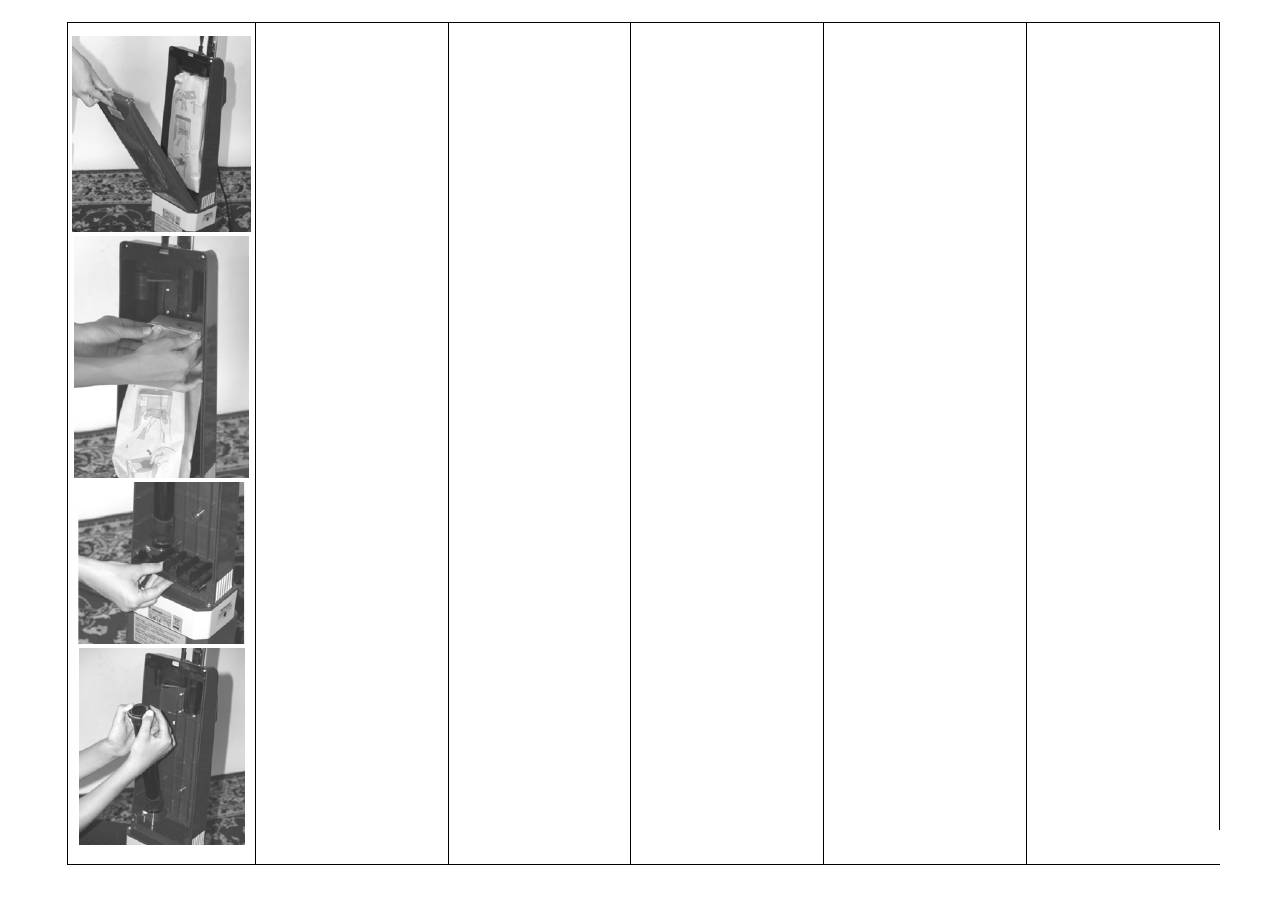
CAUTION!
ALWAYS DISCONNECT THE
POWER CORD BEFORE
PERFORMING ANY MACHINE
MAINTENANCE
MAINTENANCE
CHANGING THE PAPER
FILTER BAG
Depress the latch on the top of the
bag compartement and remove it.
Remove the full dust bag by holding
the top of the bag and pulling down
and out. Insert new bag by sliding it
in and up (refer to the illustration
printed on the bag). Replace the
paper bag whenever red full bag light
is on. Never operate the machine
without an original Lindhaus paper
bag.
VACUUM INLET FILTER
This filter protects the vacuum motor
from damage due to spilled paper
bags and provides for the 3
rd
stage of
filtration.
Remove filter from grill and replace
every 5 filter bags.
Never operate machine without the
inlet filter.
CLOGGING
If your Lindhaus Valzer should
become clogged it disassembles
easily for cleaning.
-Remove vacuum body from power
nozzle by pushing neck latch button
and pulling apart body and housing.
Look in neck to inspect for debris in
brush housing. Clean and reassemble
-Slide open accessory port door,
inspect passage way and reove debris
if required
-Take off paper bag, inspect for
debris in passage way to accessory
port
-In extreme cases it may be
necessary to remove and clean the
blank tube that runs parallel to the
paper bag in the vacuum housing
ATTENZIONE!
STACCARE SEMPRE LA
SPINA DALLA PRESA DI
CORRENTE PRIMA DI
ESEGUIRE QUALSIASI
MANUTENZIONE.
MANUTENZIONE
SOSTITUZIONE DEL SACCO
FILTRO
Aprire lo sportello premendo
l’apposito pulsante.
Sfilare il sacco di carta seguendo
all’inverso le istruzioni di
montaggio stampate sulla
confezione dei filtri. Il sacco si
sostituisce ogni qual volta si
accende la spia rossa del corpo
aspirante. Non usare mai l’ap-
parecchio senza il sacco filtro
originale Lindhaus all’interno.
FILTRO INTERNO
Questo filtro protegge il motore da
eventuali danni provocati da
fuoriuscite del sacco e consente il
3° stadio di filtraggio.
Togliere il filtro dalla griglia
sostituirlo ogni 5 sacchi filtro.
Non utilizzare la macchina senza
filtro.
OSTRUZIONI
Se la Vs. Lindhaus Valzer si
ostruisce, si smonta facilmente per
la pulizia
-Staccare il corpo aspirante
dall’elettrospazzola premendo il
pulsante dello snodo. Guardare se
ci sono detriti nello snodo. Pulire e
riassemblare
- Aprire lo sportellino sopra ed
ispezionare l'interno e se
necessario rimuovere i detriti.
- Togliere il sacco filtro e
controllare il pasasaggio fino al
tubo di aspirazione interno
-In casi estremi può essere
necessario rimuovere e pulire il
tubo di aspirazione parallelo al
sacco carta nel contenitore.
ACHTUNG!
IMMER NETZKABEL AUS DER
STECKDOSE ZIEHEN WENN
DIE MASCHINE
WEGGERÄUMT ODER
GEWARTET WIRD.
WARTUNG
AUSTAUSCH DES
FILTERBEUTELS
Öffnen und Abheben der Rückklappe
des Sauggeräts durch Drücken der
Taste an der oberen Kante. Den
vollen Staubsack am verstärkten
Ende oben anfassen, nach unten
ziehen und entfernen. Den neuen
Staubsack einsetzen (Bilder auf
Papiersack beachten).Den Staubsack
jedesmal ersetzen sobald die rote
Lampe aufleuchtet.
Gerät nie ohne einen originalen
Lindhaus Staubbeutel benutzen.
INNERER FILTER
Dieser Filter schützt den Motor vor
eventuellen Staubpartikeln aus dem
Staubsack. Nach jedem dritten
Staubsackwechsel sollte der
Luftfilter gereinigt werden.
Luftfilter mit Halterung
herausziehen, Schaumstoffeinsatz
mit lauwarmem Wasser auswaschen.
Vollkommen trocknen lassen und
wieder einsetzen. Die Maschine nie
ohne Filter benutzen.
VERSTOPFUNG
Sollte Ihr Lindhaus Valzer verstopft
sein, ist er zur Reinigung leicht zu
demontieren
- Trennen Sie den Saugfuß vom
Gerät, indem Sie den
Verriegelungsknopf am Gelenk
drücken. Kontrollieren Sie das Rohr
des Gelenkes und säubern es, wenn
erforderlich
- Schieben Sie die Verschlußklappe
des Saugschlauchanschlusses zur
Seite und kontrollieren Sie das
Saugrohr
- Nehmen Sie den Papierbeutel ab
und kontrollieren Sie, ob der
Anschlusstutzen verstopft ist
-In seltenen Fällen kann es nützlich
sein, das Saugrohr, welches parallel
zum Papierbeutel im Gehäuse liegt,
herauszunehmen und zu reinigen.
ВНИМАНИЕ
!
ВСЕГДА
ОТКЛЮЧАЙТЕ
ШНУР
ИЗ
РОЗЕТКИ
ПЕРЕД
ЛЮБЫМИ
ДЕЙСТВИЯМИ
ПО
ОБСЛУЖИВАНИЮ
ОБСЛУЖИВАНИЕ
ЗАМЕНА
БУМАЖНОГО
ФИЛЬТРУЮЩЕГО
ПЫЛЕСБОРНИКА
Отодвиньте
защелку
вверху
отделения
пылесборника
и
снимите
крышку
.
Чтобы
снять
заполненный
пылесборник
,
возьмите
его
за
верхнюю
часть
и
потяните
его
вниз
к
себе
.
Вставьте
новый
пылесборник
по
направляющим
внутрь
и
вверх
(
согласно
иллюстрациям
на
упаковке
).
Смена
пылесборника
проводится
каждый
раз
,
когда
загорается
красный
индикатор
заполненности
пылесборника
.
Никогда
не
используйте
пылесборники
других
производителей
.
ВХОДНОЙ
ФИЛЬТР
ПЫЛЕСОСА
Этот
фильтр
защищает
мотор
пылесоса
от
повреждений
,
связанных
с
разрывом
пылесборника
и
обеспечивает
3-
ю
степень
фильтрации
.
Чистите
фильтр
каждый
третий
раз
,
когда
меняете
пылесборник
.
Никогда
не
используйте
пылесос
без
входного
фильтра
.
ЗАСОРЕНИЕ
Если
Ваш
LINDHAUS VALZER
засорился
,
его
легко
разобрать
для
чистки
.
-
Отсоедините
корпус
пылесоса
от
электрощетки
,
нажав
кнопку
защелки
сверху
.
Проверьте
наличие
затора
в
корпусе
щетки
,
заглянув
вовнутрь
трубки
.
Очистите
и
соберите
пылесос
.
-
Откройте
заслонку
дополнительного
порта
для
аксессуаров
,
проверьте
проход
и
прочистите
засорение
.
-
Снимите
пылесборник
,
проверьте
,
есть
ли
засорение
по
пути
в
дополнительное
отверстие
.
-
В
экстренных
случаях
необходимо
снять
и
прочистить
черную
трубку
,
которая
расположена
параллельно
бумажному
пылесборнику
в
корпусе
пылесоса
.
PRECAUCIONES!
DESENCHUFE SIEMPRE EL
CABLE ANTES DE LLEVAR A
CABO CUALQUIER
MANTENIMIENTO.
MANTENIMIENTO
SUSTITUCIÓN DE LA BOLSA
FILTRO
Pulse el botón de la parte superior
del compartimiento de la bolsa y
sáquelo.Quite la bolsa llena de polvo
sosteniendo la parte superior de la
bolsa, tire hacia abajo y sáquela.
Inserte una nueva bolsa y deslícela
hacia arriba (como lo indica la
ilustración impresa en la bolsa).
Cambiar la bolsa cada vez el
indicador rojo se queda
encendido.Nunca use la máquina sin
la bolsa original Lindhaus.
FILTRO INTERNO
Este filtro protege el motor de los
daños casuales que pudiera provocar
la rotura de la bolsa de papel, y es la
3ª fase de filtración. Cada tres
cambios de bolsa se debe limpiar este
filtro. Quitar el filtro de la rejilla y
lavarlo en agua templada. Secar el
filtro completamente antes de
ponerlo de nuevo en la máquina.
Nunca use la máquina sin este filtro.
OBSTRUCCIÓN
Si su Lindhaus Valzer llegara a
obstruírse se desmonta fácilmente
para su limpieza.
- Saque el cuerpo aspirante del
bateador presionando el pulsador.
Saque el tubo y mire se está
obstruído. En caso de que esté
obstruído, límpielo y vuelva a
ponerlo de nuevo en su sito
- Sacar la bolsa de papel y mirar si el
tubo que va conectado a la bolsa
está´limpio y no está obstruido
- En caso extremo puede ser
necesario quitar y limpiar el tubo de
aspiracion que va paralelo a la bolsa
de papel
9
CLEANING THE
ELECTROSTATIC EXHAUST
FILTER (FOR V.120/60
VERSION ONLY)
The electrostatic exhaust filter
catches any particles that may escape
from the filter bag, vacuum inlet
filter, or lower motor filter. The
electrostatic exhaust filter is located
just below the carrying handle.
Replace the filter every fifth time
you change the bag (more often in
very dusty applications). To replace
the electrostatic filter:
1. Depress the latch on the top of the
filter grill and remove it.
2. Remove the filter from the filter
holder and insert a new original
Lindhaus filter in its space (when
you put the grill into place, with one
hand hold the filter while the other
inserts the grill).
3. Snap the filter cover back into
place.
Never operate the machine without
the original Lindhaus Electrostatic
Exhaust Filter in place.
HEPA FILTER
(optional on V.120/60 version)
Your carpet cleaner Lindhaus can be
equipped with a special filter for
healthcare environments which
ensures 99.97% filtration efficiency
at 0.3 micron. In case the filter bag
should break, the Hepa filter must
also be replaced. Change the Hepa
filter every 10 bags.
CHANGING THE BRUSH
- Changing the brush is not difficult
but you may want your dealer to
replace it while inspecting other
components for wear.
-
Remove the bush shoe plate by
turning the RED clips
- Pull off right support bearing (non
belt side).
-Hold pulley with one hand and turn
the brush ¼ turn (clockwise). Pull
brush off shaft.
-When necessary replace brush
bearings and brush shaft.
SOSTITUZIONE FILTRO
HEPA USCITA ARIA
(Optional nella versione V.120/60)
Il vostro battitappeto Lindhaus è
dotato di uno speciale filtro
assoluto per ambienti sanitari che
assicura un’efficienza filtrante del
99,97% a 0,3 micron.
In caso di rottura del sacco filtro,
anche il filtro Hepa deve essere
sostituito.
La durata massima del filtro Hepa
è di 10 sacchi filtro.
Per sostituire il filtro:
1. Togliere la griglia premendo
l’apposito pulsante.
2. Rimuovere la contro griglia e
sostituire il microfiltro originale
Lindhaus facendo attenzione ad
applicarlo nella corretta posizione
(quando si rimonta la griglia, con
una mano tenere il filtro e con
l’altra inserire la griglia).
3. Rimontare la griglia.
Non usare mai la macchina
senza il Filtro Hepa originale
Lindhaus.
SOSTITUZIONE DEL RULLO
-Sostituire il rullo non è difficile
ma forse è preferibile che il Vs
rivenditore lo sostituisca durante il
controllo di altri componenti
soggetti ad usura.
-Ruotare le tre clip ROSSE e
rimuovete il coperchio rullo dalla
base elettrospazzola.
-Ruotate il rullo sollevandolo dalla
base in modo parallelo.
- Togliere il supporto rullo dal lato
opposto alla puleggia.
-Tenere la puleggia ben bloccata
con una mano e ruotare il rullo di
¼ di giro in senso orario. Togliere
il rullo dall’albero.
-Quando è necessario, sostituire i
supporti in alluminio e l’albero.
AUSTAUSCHEN DES
HEPA FILTERS
(Freigestellt in der Version
V.120/60)
Der Lindhaus-Sauger ist mit einem
speziellen Filter für Reinräume
ausgestattet, der eine
Filtrierleistungsfähigkeit von 99,97
% zu 0,3 Mikron sicherstellt.
Sollte der Papierfilterbeutel reißen,
muß auch der Hepa-Filter gewechselt
werden.
Der Hepa-Filter muß immer nach 10
Papierfilterbeutel erneuert werden.
Um den Filter zu ersetzen:
1. Filterdeckelklinke drücken und
Auslaßfilterdeckel entfernen.
2. Filter aus der Halterung
herausnehmen und mit einem neuen
originalen Lindhaus Filter ersetzen
(bei Zurückstellung des Gitters mit
einer Hand den Filter halten und mit
der anderen das Gitter einsetzen).
3. Das Gitter zurückstellen.
Gerät nie ohne den originalen
Lindhaus Hepa - Filter benutzen.
AUSTAUSCH DER
BÜRSTENWALZE
- Die Bürstenwalze kann ohne
spezielle Werkzeuge
herausgenommen und ausgetauscht
werden. Vor der Demontage
Netzakabel aus der Steckdose
ziehen.
- Entfernen Sie den Walzendeckel
indem die roten Halter gedreht
werden
- Bürstenwalze herausheben.
Metallabdeckung auf der offenen
Seite wegziehen.
- Das Antriebsrad mit Keilriemen mit
einer Hand festhalten, mit der
anderen die Bürstenwalze im
Uhrzeigersinn drehen bis sie sich
löst, und herausgezogen werden
kann.
- Die Ersatzbürste in der
umgekehrten Reihenfolge montieren.
ЗАМЕНА
ВЫХОДНОГО
ФИЛЬТРА
ОЧИСТКИ
ВОЗДУХА
(
для
моделей
V.120/60
)
Электростатический
выходной
фильтр
улавливает
любые
частицы
,
которые
проникли
через
фильтрующий
пылесборник
,
входной
фильтр
мотора
или
нижний
фильтр
мотора
.
Электростатический
выходной
фильтр
расположен
прямо
под
несущей
ручкой
.
Замену
этого
фильтра
необходимо
производить
каждый
пятый
раз
при
замене
пылесборника
(
и
более
часто
в
пыльных
помещениях
).
Для
замены
электростатического
фильтра
,
1.
Откройте
защелку
сверху
решетки
фильтра
и
снимите
ее
.
2.
Извлеките
Фильтр
из
держателя
и
замените
его
новым
.
3.
Захлопните
крышку
фильтра
.
Никогда
не
используйте
пылесос
без
выходного
фильтра
очистки
воздуха
производства
Lindhaus.
ФИЛЬТР
НЕРА
(
дополнительно
для
модели
V.120/60)
Ваш
пылесос
Lindhaus
может
быть
оборудован
специальным
фильтром
для
обеспечения
99.97%
фильтрации
частиц
размером
0.3
микрона
.
Если
бумажный
мешок
рвется
,
фильтр
НЕРА
необходимо
заменить
.
Необходимо
производить
замену
фильтра
НЕРА
каждый
10
раз
при
замене
пылесборника
.
ЗАМЕНА
ЩЕТКИ
-
Заменить
щетку
несложно
,
но
Ваш
продавец
может
заменить
ее
во
время
проверки
других
компонентов
.
-
Снимите
нижнюю
крышку
с
корпуса
щетки
,
повернув
Красные
зажимы
.
-
Снимите
правый
металлический
подшипник
(
со
стороны
без
приводного
ремня
)
-
Возьмите
шкив
одной
рукой
и
проверните
щетку
на
¼
оборота
.
Снимите
щетку
со
штифта
.
При
необходимости
можно
заменить
подшипники
и
штифт
.
SUSTITUCIÓN DEL
FILTRO HEPA
(Opcional en la version V.120/60)
Su Bateador Lindhaus esta equipado
con un filtro especial para ambientes
sanitarios, el cuál, asegura un filtrado
eficiente del 99,97% a 0,3 micrones.
En caso de rotura de la bolsa, el filtro
Hepa también necesita ser sostituido.
La duración máxima del filtro Hepa
es de 10 bolsas.
Para sustituir el filtro:
1. Presione el pulsador de la rejilla y
sáquelo.
2. Saque el filtro de la rejilla y
inserte un nuevo filtro Lindhaus en
su lugar (soportar el microfiltro con
una mano).
3. Monte otra vez la rejilla.
Nunca debe de utilizar el aparato
sin un filtro hepa riginal Lindhaus.
SUSTITUCIóN DEL RODILLO
- Sustituir el cepillo giratorio no es
difícil, pero es preferible que su
vendedor lo sustituya mientras revisa
otros componentes antes de
comenzar a desmontarlo.
- Quitar la tapa rodillo girando los
tres ganchos ROJOS
- Girar el cepillo desde fuera de la
placa de modo paralelo.
- Sostener la polea con una mano y
girar el cepillo 1/4 (en sentido de la
agujas del reloj). Quitar el rodillo.
- Cuando sea necesario, sustituir el
soporte de aluminio y el mango del
rodillo.
10
DRY CLEANING SYSTEM
Dry carpet cleaning function
After thoroughly vacuuming your
carpet it is equally important to
sanitize the area (once a month for
home use, more often in public
areas).
Follow these directions carefully:
1. UNPLUG YOUR VACUUM
2. Remove the bush shoe plate by
turning the RED clips
3. Install the RED conveyor
4. Open the upper sliding door to
avoid motor overheating
5. For stains or high traffic areas
on carpets, use the Lindhaus
spotter first
6. Sprinkle the Lindhaus Dry
carpet compound (1 Kg every 15
m
2
- 2 pounds per 150 square feet)
7. Using the Valzer converted to
DCS go over the carpet as you
would when vacuuming. This
evenly distributes and penetrates
the product into your carpet.
8. Wait until the carpet is
completely dry (usually 30 min.-
longer if very humid)
9.
UNPLUG YOUR VACUUM
10.Remove the brush shoe
plate; clean the base housing with
a cloth or a brush to remove any
residual product.
11
.
Remove the RED conveyor
and reassemble the channel cover
12. Reassemble the shoe plate and
vacuum the carpet thoroughly.
DRY CLEANING SYSTEM
Funzione lavaggio a secco
Dopo aver aspirato bene in entrambe
le direzioni il Vs. tappeto, una volta
al mese (uso domestico) o più spesso
(locali pubblici), è importante
igenizzare tappeti e moquette nel
seguente modo:
1.
STACCARE LA SPINA
2.
Rimuovere il coperchio rullo
dopo aver ruotato gli appositi
agganci ROSSI
3.
Montare il "convogliatore
ROSSO" per chiudere la bocca
di aspirazione
4.
Aprire lo sportellino scorrevole
per evitare il surriscaldamento
del motore aspirante.
5.
In caso di macchie o
superfici particolarmente
sporche, utilizzare lo
smacchiatore Lindhaus
6.
Spargere le microspugne
Lindhaus (1 Kg ogni 15 m
2
)
7.
Usando Valzer convertito in
DCS, massaggiare il tappeto
passando in entrambe le
direzioni fino a far penetrare le
microspugne.
8.
Attendere fino a totale
asciugatura (circa 30 min.-di
più se molto umido)
9.
STACCARE LA SPINA
10.
Smontare il coperchio rullo e
pulire bene la base ed i supporti
rullo con un panno o una
spazzola fino a totale rimozione
delle microspugne residue.
11.
Togliere il "convogliatore
ROSSO" e rimontare il
coperchio rullo
12.
Aspirare tutte le
microspugne passando in
entrambe le direzioni.
DRY CLEANING SYSTEM
Trockenreinigung
Nachdem der Teppich in beide
Richtungen gesaugt worden ist, sollte er
auch hygienisiert werden und zwar
einmal im Monat zuhause und häufiger in
öffentlichen Lokalen.
Dabei ist folgendes zu beachten:
1.
NETZSTECKER AUS DER
STECKDOSE ZIEHEN
2.
Entfernen Sie den Walzendeckel
indem die roten Halter gedreht
werden
3.
Den „ROTEN“ Übermittler
aufmontieren damit der Saugkanal
geschlossen wird.
4.
Öffnen Sie die obere gleitende
Öffnung damit der Saugmotor nicht
überhitzt wird.
5.
Flecken oder besonders stark
verschmutzte Bereiche mit dem
Lindhaus Eco Dry Spotter
behandeln
6.
Streuen Sie die Lindhaus
Mikroschwämmchen (1 Kg je 15
m
2
)
7.
Durch die Benützung des in DCS
konvertierten Valzer, bürsten Sie in
beide Richtungen des Teppichs
sodass die Mikroschwämmchen
eindringen.
8.
Vollkommen trocknen lassen (ca 30
min, länger falls noch feucht).
9.
NETZSTECKER AUS DER
STECKDOSE ZIEHEN
10.
Walzenabdeckung entfernen,
Bürstengehäuse mit einem Tuch
oder einer Bürste reinigen um alle
restlichen Schwämmchen zu
beseitigen.
11.
Den ROTEN Übermittler entfernen
und den Saugkanaldeckel wieder
aufmontieren
12.
Die Mikroschwämmchen
aufsaugen, indem man den Teppich
in beide Richtungen saugt
СИСТЕМА
СУХОЙ
ЧИСТКИ
Функция
сухой
чистки
ковров
После
тщательной
уборки
ковра
пылесосом
,
важно
провести
санитарную
уборку
поверхности
(
один
раз
в
месяц
для
домашнего
использования
и
чаще
в
общественных
местах
)
Внимательно
следуйте
инструкциям
:
1.
ОТКЛЮЧИТЕ
ПЫЛЕСОС
ИЗ
РОЗЕТКИ
2.
Снимите
крышку
на
щетке
,
повернув
красные
зажимы
.
3.
Закройте
канал
всасывания
красной
пластиковой
шторой
.
4.
Откройте
крышку
с
верхнего
отверстия
,
чтобы
избежать
перегрева
.
5.
Для
удаления
пятен
и
очистки
мест
частого
прохода
предварительно
используйте
спрей
-
пятновыводитель
Lindhaus.
6.
Равномерно
рассыпьте
порошок
Lindhaus (
прибл
. 1
кг
/ 15
м
.
кв
.)
7.
Используя
Valzer,
как
систему
сухой
чистки
,
промассажируйте
ковер
.
Эта
процедура
позволит
порошку
очистить
каждый
участок
ковра
.
8.
Подождите
,
пока
ковер
полностью
высохнет
(
прибл
.
30
мин
.)
9.
ОТКЛЮЧИТЕ
ПЫЛЕСОС
ИЗ
РОЗЕТКИ
10.
Снимите
крышку
на
щетке
;
протрите
корпус
салфеткой
или
щеткой
для
удаления
остатков
порошка
.
11.
Снимите
красную
шторку
с
канала
всасывания
12.
Установите
крышку
щетки
и
тщательно
пропылесосьте
ковер
DRY CLEANING SYSTEM
Función lavado en seco
Después de haber aspirado bien en
ambas direcciones su alfombra, una
vez al mes (uso doméstico) o más a
menudo (locales públicos) es
importante higienizar alfombras y
moquetas de la siguiente manera:
1. DESCUELGUE EL
ENCHUFE
2. Quitar la tapa rodillo girando los
ganchos rojos
3.Montar el “conveyor ROJO” para
cerrar la boca de aspiración.
4. abrir la tapa corrediza superior
para evitar el sobrecalentamiento del
motor de aspiración
5.En caso de manchas o superficies
particularmente sucias, utilizar
Lindhaus Eco dry spotter.
6.Derramar las microesponjas
Lindhaus Eco Dry (1 kg cada 15 m²)
7.Con el uso de Valzer tranformado
en DCS, masajear en ambas
direcciones hasta que las
microesponjas penetren.
8.Esperar hasta que se seque
totalmente (más o menos 30 min. y
más si hay mucha humedad)
9.DESCUELGUE EL ENCHUFE
10.Desmontar la tapa del rodilo,
limpiar bien la base con un paño o un
cepillo hasta remover totalmente las
microesponjas presentes.
11.Quitar el “conveyor ROJO” y
remontar la tapa del rodillo.
12. Aspirar todas las microesponjas
pasando en ambas direcciones.
11

SPECIFICATIONS
SUCTION BODY
-Voltage (see data place on the machine)
- Input power 700 W
- Notched commutator
- Rotor assembled on two ball bearings
-
Double insulation
- Suction body made of thermoplastic
material, shockproof, high resistance,
antistatic
POWER HEAD
- Voltage same as the suction body
- Input power 150 W
- Notched commutator
- Rotor assembled on two ball bearings
- Electronic overload control
- Brush height adjustment 1
10 mm
- Width: 12” (300mm)
DECLARATION OF CONFORMITY
In conformity with the following standards:
In conformity with the following standards:
EN 60335-1+Amds.
EN 60 335-2-2+Amds.
EN 55014-1:2000 + A1:2001 + A2:2002;
EN 55014-2:1997 + A1:2001;
EN 55104 : 1995.
Direttives of reference:
CEE 73/23
,
2006/95/CE,
CEE 89/336; 2002/95 CE (ROHS)
APPROVALS:
Europe:
IMQ
U.S.A. and Canada
Russia:
GOST STANDARD
DATI TECNICI
CORPO ASPIRANTE
-Tensione di alimentazione (vedi targhetta
caratteristica sulla macchina)
- Potenza assorbita 700 W
- Collettore ad intaglio
- Rotore montato su 2 cuscinetti a sfere
- Doppio isolamento
- Corpo macchina in materiale
termoplastico, antiurto, alta resistenza,
antistatico
ELETTROSPAZZOLA
- Tensione di alimentazione (vedi targhetta
caratteristica sulla macchina)
- Potenza assorbita 150 W
- Collettore ad intaglio
- Rotore montato su 2 cuscinetti a sfere
- Controllo elettronico del sovraccarico
- Regolazione in altezza 1
10 mm
- Larghezza : 12” (300mm)
DICHIARAZIONE DI CONFORMITA’
Conforme alle seguenti norme:
EN 60335-1+Amds.
EN 60 335-2-2+Amds.
EN 55014-1:2000 + A1:2001 + A2:2002;
EN 55014-2:1997 + A1:2001;
EN 55104 : 1995.
Direttives of reference:
CEE 73/23
,
2006/95/CE,
CEE 89/336; 2002/95 CE (ROHS)
APPROVAZIONI
:
Europa:
IMQ
U.S.A. e Canada
Russia:
GOST STANDARD
TECHNISCHE DATEN
SAUGGERÄT
- Versorgungsspannung (siehe Typenschild
auf der Maschine)
- Leistungsaufnahme 700 W
- Kerbkollektor
- Rotor auf zwei Kugellager montiert
- Doppelte Isolierung
- Maschinenkörper aus thermoplastischem,
stoßfestem, antistatischem Material mit
hohem Stosswiderstand.
SAUGBÜRSTE
- Versorgungsspannung (siehe Typenschild
auf der Maschine)
- Leistungsaufnahme 150 W
- Kerbkollektor
- Rotor auf zwei Kugellager montiert
- Elektronische Kontrolle der Überladung
- Höhenregelung 1
10 mm
- Breite: 12” (300mm)
KONFORMITÄTSERKLÄRUNG
Diese Erklärung stimmt mit folgenden
Normen überein:
EN 60335-1+Amds.
EN 60 335-2-2+Amds.
EN 55014-1:2000 + A1:2001 + A2:2002; EN
55014-2:1997 + A1:2001;
EN 55104 : 1995.
Direttives of reference:
CEE 73/23
,
2006/95/CE,
CEE 89/336; 2002/95 CE (ROHS)
BILLIGUNG:
Europa:
IMQ
U.S.A. und Canada
Russia:
GOST STANDARD
СПЕЦИФИКАЦИЯ
ПЫЛЕСОС
-
Напряжение
(
смотрите
данные
на
пылесосе
)
-
Мощность
электродвигателя
700
Вт
-
Ротор
на
2
подшипниках
-
Двойная
изоляция
-
Корпус
машины
,
сделан
из
термопластика
,
высокой
прочности
,
жароустойчивый
,
удароустойчивый
,
антистатический
.
ЭЛЕКТРОЩЕТКА
-
Напряжение
такое
же
,
как
в
пылесосе
-
Мощность
электродвигателя
150
Вт
-
Вращающийся
вал
ротора
на
2
подшипниках
-
Устройство
электронного
контроля
перегрузки
-
Регуляция
высоты
щетки
1-10
мм
-
Ширина
щетки
300
мм
СООТВЕТСТВИЕ
Соответствует
следующим
стандартам
:
EN 60335-1+Amds.
EN 60 335-2-2+Amds.
EN 55014-1:2000 + A1:2001 + A2:2002; EN
55014-2:1997 + A1:2001;
EN 55104 : 1995.
Рекомендации
:
CEE 73/23
,
2006/95/CE,
CEE 89/336; 2002/95 CE (ROHS)
ОДОБРЕННО
Европа
:
IMQ
U.S.A. and Canada ETL
Russia:
GOST STANDARD
CARACTERÍSTICAS TÉCNICAS
CUERPO DE ASPIRACIÓN
- Tension de alimentación (ver la placa
sobre la máquina).
- Energía absorbida 700 W.
- Colector de entalle
- Rotor montado sobre 2 cojinetes.
-
Doble aislamiento
- Cuerpo de la máquina hecho o fabricado
de material termoplástico a prueba de
golpes, alta resistencia y antistático.
CEPILLO
ELÉCTRONICO
- Tension de alimentación (ver la placa
sobre la máquina).
- Energía absorbida 150 W
- Colector de entalle
- Rotor montado sobre 2 cojinetes.
- Control electrónico de sobrecarga
- Regulación de la altura
1
10 mm
- Anchura: 12” (300mm)
DECLARACIÓN
DE
CONFORMIDAD
En conformidad con las siguentes normas:
EN 60335-1+Amds.
EN 60 335-2-2+Amds.
EN 55014-1:2000 + A1:2001 + A2:2002;
EN 55014-2:1997 + A1:2001;
EN 55104 : 1995.
Direttives of reference:
CEE 73/23
,
2006/95/CE,
CEE 89/336; 2002/95 CE (ROHS)
APROVACIONES:
Europa:
IMQ
U.S.A. y Canada
Russia:
GOST STANDARD
12
ETL
ETL
ETL
ETL
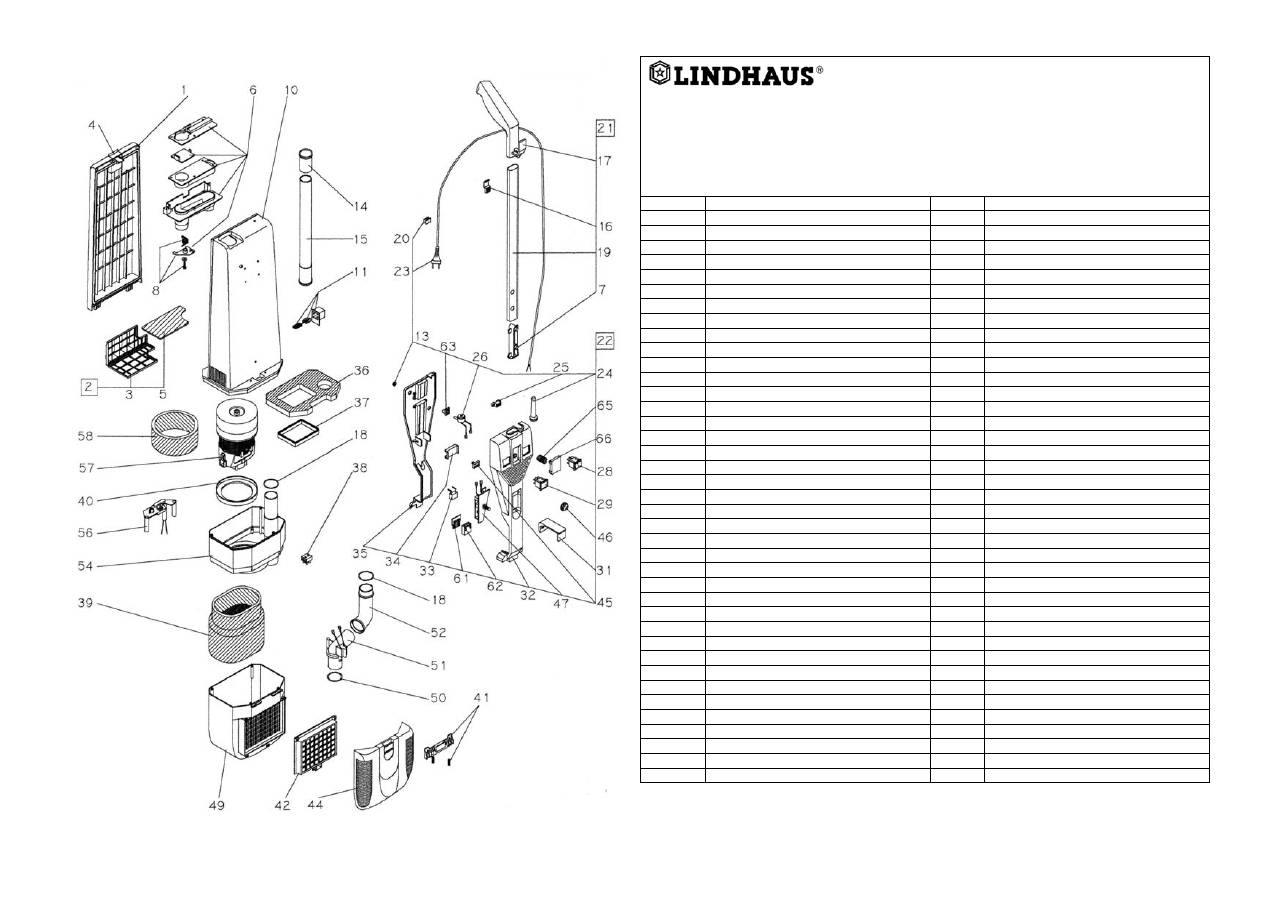
Valzer Hepa Hepa Class A
Suction Body
Corpo aspirante Saugkörper Corps aspirant Cuerpo aspirante
SPARE PARTS LIST - LISTA PARTI DI RICAMBIO
LISTE
DER ERSATZTEILE- LISTE PIÈCES DE RECHANGE –
LISTA PIEZAS DE RECAMBIO
PART. DESCRIPTION PART. DESCRIPTION
V 1
Bag housing cover
V 38
Terminal block 2 pos.
V 2
Grill complete
V 38
Terminal block 3 pos.
V 3
Grill filter holder
V 39
Foam motor filter
V 4
Bag door latch + spring
V 40
Motor gasket
V 5
Internal filter
V 41
Grill hook kit
V 6
Bag entrance with Safety support
V 42
Exhaust Hepa filter
V 7
Button + support + spring 2 pos.
V 42
Exhaust microfilter (V.120/60 only)
V 8
Safety support kit
V 44
External grill
V 10
Bag housing complete
V 47
Circuit board (V.230)
V 11
Valve kit
V 47
Circuit board (V.100)
V 13
O ring
V 49
Vacuum motor housing
V 14
Sleeve tube connection
V 50
O ring
V 15
Internal tube
V 51
Curve support
V 16
Upper hook
V 52
Upper curve
V 17
Handle grip (only)
V 54
Inner vacuum motor housing
V 18
O ring
V 56
Cord clampV. 120/60 3 way
V 19
Chromate tube (only)
V 56
Cord clampV. 230/50 – V. 100/55
V 20
Cord clip
V 57
Motor V. 240/50
V 21
Handle tube assembly
V 57
Motor V. 120/60
V 22
Ele. System ass. 120/60 3 way
V 57
Motor V. 100/55
V 22
Ele. System ass. 100/55
V 58
Foam filter group
V 22
Ele. System ass. 230/50
V 61
Contact cover
V 23
Cord 2 x 1 Schuko plug
V 62
Contact housing
V 23
Cord 2 x 1 UK plug
V 63
Adapter
V 23
Cord 2 x 18 AWG USA plug
V 65
Handle button
V 24
Strain relief V. 100-120
V 66
Handle spring
V 24
Strain relief V. 230
V 25
Cable clamp
V 26
Vacuum sensor
V 28
Main switch 15A
V 28
Main switch 3 WAY
V 29
Indicator light
V 31
Cord hook
V 32
Cover handle
V 33
Condenser (V.230)
V 34
Comb wire holder
V 35
Frame handle
V 36
Foam intermediate filter
V 37
Gasket
13
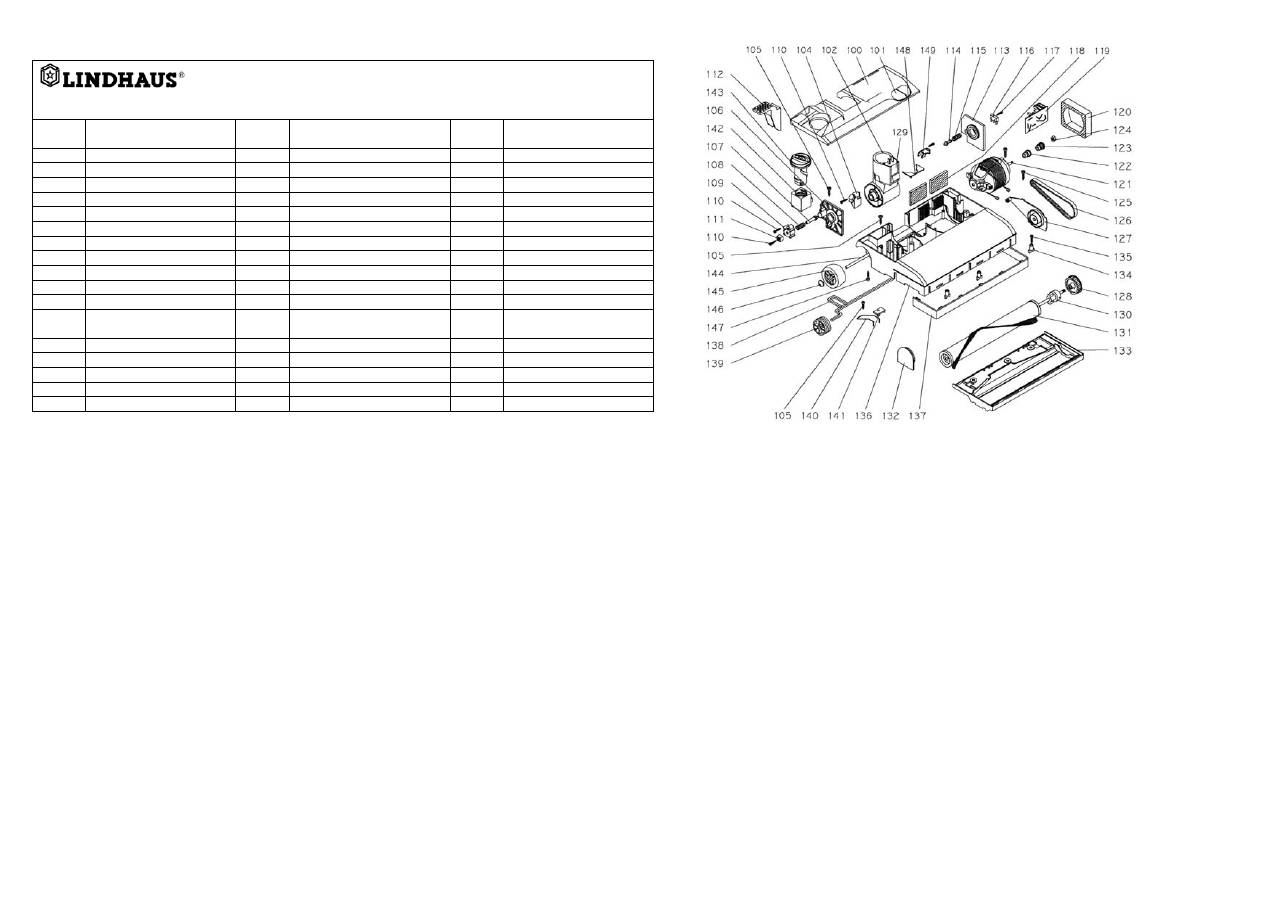
Power Nozzle M30esc
SPARE PARTS LIST - LISTA PARTI DI RICAMBIO - LISTE
DER ERSATZTEILE
LISTE DE PIECES - LISTA DE PIEZAS
PART. DESCRIPTION PART. DESCRIPTION
PART.
DESCRIPTION
V 100
Main brush cover
V 116
Microswitch
V 132
Brush support w/bearing
V 101
Lens set red and green new
V 117
Screw 2.2 x 16
V 133
Brush shoe plate M30
V 102
Swivel Joint complete
V 118
Filter
V 134
Roller cover hook
V 102
Joint complete (V.120/60)
V 119
Circuit board
V 135
Screw 3.5 x 9.5 TG
V 103
Joint kit
V 120
Motor filter
V 136
Body main brush head M30
V 104
Joint pin slide
V 121
Brush motor
V 137
Bumper M30
V 105
Screw 3.9 x 13
V 122
Pinion spacer
V 138
Front axle
V 106
Support right joint
V 123
Pinion
V 139
Front rubber wheel
V 107
Plunger handle release
V 124
Nut M4
V 140
Spring
V 108
Spring dowel release
V 125
Screw 3.9 x 16
V 141
Spring stop plate
V 109
Bushing
V 126
Timing belt 6 mm
V 142
Brush adjuster
V 110
Screw 2.9 x 16
V 127
Transmission support
w/bearing
V 143
Adjusting knob
V 111
Slide
V 128
Pulley with insert
V 144
Rear axle
V 112
Foot pedal
V 130
Brush shaft with insert M30
V 145
Rear rubber wheel
V 113
Support left joint
V 131
Brush roller M30
V 146
Wheel retainer
V 114
Switch activator pin
V 147
Screw 3.5 x 19
V
115
Spring
Ограниченная
Гарантия
Lindhaus
Lindhaus
Гарантирует
только
покупателю
(
далее
«
Покупатель
),
что
каждый
новый
пылесос
не
имеет
дефектов
материала
и
работы
при
доставке
.
Гаранития
Lindhaus
ограничена
ремонтом
и
заменой
частей
по
усмотреню
Lindhaus
и
/
или
авторизированных
сервис
центров
компании
,
с
предоплатой
расходов
на
перевозку
(
за
счет
Покупателя
).
Огранченная
гарантия
Lindhaus
не
распространяется
на
устройства
,
приобретенные
не
у
Авторизированного
дилера
Lindhaus.
Гарантийный
талон
заполняется
и
выдается
немедленно
при
покупке
.
Применяются
специальные
ограничения
и
исключения
.
Эта
ограниченная
гарантия
истекает
через
два
года
с
момента
покупки
.
На
оборудование
Lindhaus,
используемое
на
коммерческих
предприятиях
,
ограниченная
гарантия
составляет
один
год
.
СЛУЧАИ
,
НА
КОТОРЫЕ
НЕ
РАСПРОСТРАНЯЕТСЯ
ГАРАНТИЯ
,
ВКЛЮЧАЮТ
,
НО
НЕ
ОГРАНИЧИВАЮТСЯ
:
Ущерб
,
нанесенный
при
несчастных
случаях
,
неправильном
использовании
,
или
происшествиях
,
рассматриваемых
как
стихийные
явления
(
попадание
молнии
,
наводнение
и
т
.
д
.)
Ущерб
при
перевозке
Машины
,
которые
сдаются
в
аренду
Ущерб
от
неправильного
или
неполного
обслуживания
пылесоса
Относительно
небольшие
изменения
,
включающие
закручивание
болтов
и
гаек
и
т
.
д
.,
не
связанных
с
заменой
частей
пылесоса
.
Ремонт
или
изменения
организацией
,
не
являющейся
заводом
-
производителем
или
авторизированным
сервис
-
центром
Lindhaus.
Обычный
износ
частей
оборудования
-
ручек
,
колесиков
,
щеток
,
форсунок
,
шлангов
,
фильтров
,
пылесборников
,
проводов
,
угольных
щеток
-
не
рассматривается
как
дефект
работы
или
материала
.
«
Эта
гарантия
покрывает
все
дефекты
работы
и
материалов
на
гарантийный
период
.
Гарантия
не
покрывает
любой
ущерб
,
произошедший
при
неправильном
или
некорректном
использовании
,
халатности
при
работе
с
оборудованием
или
его
частями
,
которым
требуется
замена
вследствие
обычного
износа
».
Последующая
замена
мотора
по
гарантии
может
быть
произведена
только
в
случае
производственного
дефекта
(
это
будет
проверено
и
подтверждено
в
авторизированных
сервис
центрах
Lindhaus).
Если
,
после
проверки
возвращенной
машины
либо
ее
части
/
частей
, Lindhaus
установит
,
что
дефект
не
покрывается
гарантией
,
все
расходы
,
понесенные
Lindhaus
в
связи
с
заменой
или
ремонтом
указанной
машины
либо
ее
части
/
частей
,
возлагаются
на
Покупателя
.
Любые
части
,
возвращенные
Lindhaus
на
замену
,
становятся
собственностью
Lindhaus.
Ни
при
каких
обстоятельствах
Lindhaus
не
несет
ответственности
за
непрямой
,
специальный
,
случайный
,
вытекающий
или
иной
ущерб
,
включающий
,
но
не
ограничивающийся
повреждением
или
потерей
имущества
или
оборудования
,
утраченными
выгодами
или
доходами
,
требованиями
клиентов
,
или
ущербом
для
доброй
воли
или
репутации
компании
,
прямо
или
непрямо
вытекающих
из
продажи
,
работы
или
использования
пылесоса
,
или
любых
расходов
,
связанных
с
ним
или
ответственностью
Lindhaus
по
данному
договору
.
Lindhaus
не
несет
ответственности
перед
Покупателем
за
любые
заявления
,
ущербы
,
травмы
,
действия
или
причины
действий
,
основанные
на
небрежности
или
прямой
ответственности
. Lindhaus
не
дает
гарантии
,
что
пылесос
будет
продаваем
,
или
что
такая
машина
будет
соответствовать
любой
конкретной
цели
.
Более
того
, Lindhaus
не
дает
прямых
или
косвенных
гарантий
,
кроме
ограниченной
,
указанной
в
данном
документе
.
Дополнительно
,
никакое
представление
или
гарантия
,
прямая
или
косвенная
,
сделанная
дилером
,
торговым
представителем
или
агентом
Lindhaus,
и
не
указанная
в
данном
документе
,
не
накладывает
обязательства
на
Lindhaus.
Оригинальные
запасные
части
Lindhaus
не
имеют
дефектов
материала
или
работы
на
период
в
90
дней
после
«
установки
»,
и
попадают
под
все
ограничения
и
исключения
данной
ограниченной
гарантии
.
14

Lindhaus Limited Warranty
Lindhaus warrants to the original purchaser only (“Buyer”) that each new vacuum cleaner shall be free from defect in material and workmanship
upon delivery. Lindhaus’liability is limited to repair or replacement of parts at the discretion of Lindhaus and/or the factory authorised service
centres, transportation prepaid.
This limited warranty expires three years after the date of purchase by the buyer.
A warranty registration card is to be completed and returned immediately at the time of purchase.
Specific limitations and exclusions apply.
ITEMS NOT COVERED BY WARRANTY INCLUDE, BUT ARE NOT LIMITED TO:
Damage resulting from accidents, abuse, misuse or acts of God (lightning flood, etc.)
Damage in transit
Rental units
Failure due to lack of proper maintenance or care
Relatively minor adjustments such as tightening of screws or bolts, etc. not connected with the replacement of parts.
Repairs or alterations by an organisation other than the factory or an authorised Lindhaus Service Centre.
Normal wear items, handles, wheels, bristles, nozzles, hoses, paper bags, filters and cords.
Lindhaus equipment used in commercial applications has a limited warranty of two years with exception of electric motors with carbon brushes,
being subject to wear , their durability depends on the number of hours of use and on the established substitution of filters. It does not depend on
the years of life of the machine. Example: In the commercial application , working 8 hours a day for 20 days per month, in 6 months the lifetime of
the motor is over. The eventual substitution of the motor under warranty will therefore be effected only in case of production defect (this has to be
verified by the authorized Lindhaus service centers) and not in case of total wear. If, after inspection of the returned machine or any part or parts,
Lindhaus determines that the defect is not covered by the warranty, all expenses incurred by Lindhaus in connection with the replacement or repair
if the machine or any parts thereof shall be at the buyer’s responsibility. Any parts returned to Lindhaus for replacement shall become the
property of Lindhaus. In no event shall Lindhaus be liable for any indirect, special, incidental, consequential or other damages including
but not limited to damage or loss of property or equipment, lost revenues or profits, claims of customers, or harm to goodwill or
business reputation directly or indirectly arising from the sale, handling or use of the vacuum cleaner, or from any other costs relating
thereto and Lindhaus’s liability hereunder. Lindhaus shall not be liable to the buyer for any claims, damages, injures, actions, or causes
of action whatsoever based on negligence or strict liability. Lindhaus makes no warranty that its vacuum cleaner shall be merchantable
or that such machine shall be fit for any particular purpose. Moreover Lindhaus makes no expressed or implied warranties except for the
limited warranty set forth herein. In addition no representation or warranty, expressed or implied, made by any dealer, sales
representative, or field agent of Lindhaus which is not specifically set forth herein shall be binding on Lindhaus.
Genuine Lindhaus replacement parts shall be free from defects in material and workmanship for a period of 90 days after “installation” and shall be
subject in all respects to the limitations and exclusions of this limited warranty.
Lindhaus Certificato di Garanzia limitata
La Lindhaus garantisce ai Clienti originali solo (diretti acquirenti) che ogni nuovo aspirapolvere sarà esente da difetti di
materiale e di fabbricazione prima della consegna. La responsabilità della Lindhaus e la tutela del cliente nei confronti
della Lindhaus, è chiaramente limitata alla riparazione e sostituzione dei pezzi difettosi presso la ns. fabbrica o centro
autorizzato di assistenza, con trasporto prepagato dal cliente. Il certificato di garanzia limitata Lindhaus è da
considerarsi
nullo e non valido
se l'apparecchio non è stato acquistato presso un rivenditore autorizzato Lindhaus.
Questa garanzia limitata scade tre anni dopo la data di acquisto.
Gli apparecchi Lindhaus utilizzati per
uso professionale
sono garantiti 2 anni.
NON SONO COPERTI DALLA GARANZIA:
Danni causati da incidenti, cattivo uso, fulmini, acqua e fuoco.
Danni causati dal trasporto.
Apparecchi a noleggio
Rotture dovute a una non appropriata manutenzione o cura.
Minori adattamenti tipo: viti allentate e regolazioni varie.
Riparazioni non effettuate dalla fabbrica o dai centri assistenza autorizzati.
Parti sottoposte ad usura normale: manici, ruote trasportatrici, spazzole, dispositivo di accoppiamento delle spazzole,
bocchette, tubi,
sacchi per polvere, filtri, cavi, spazzole motore non dovranno essere considerati difetti di produzione o di materiali.
Questa garanzia copre tutti i difetti di fabbrica e di materiali per il periodo di garanzia. La garanzia non copre nessun
danno risultante da cattivo uso, abuso e negligenza nell'uso del prodotto o qualsiasi parte che necessiti la sostituzione a
causa di normale usura.
L'eventuale sostituzione in garanzia dei motori avverrà pertanto soltanto in caso di difetto di fabbrica accertato dai centri
assistenza autorizzati Lindhaus. Se dopo l’ispezione di una macchina o di pezzi ritornati, la Lindhaus stabilisce che il difetto
non è coperto da garanzia, tutte le spese che la Lindhaus incontrerà nella riparazione della macchina o delle parti, saranno a
carico del cliente. Tutte le parti ritornate alla Lindhaus per sostituzione diventeranno di proprietà della Lindhaus.
IN NESSUN CASO, LA LINDHAUS SARA’ RESPONSABILE PER DANNI INDIRETTI, ACCIDENTALI
CONSEGUENTI DA ALTRI DANNI
. La Lindhaus non sarà responsabile nei confronti dei clienti per rivendicazioni, danni,
lesioni, azioni o cause di azioni qualsiasi basate su negligenze o precise responsabilità. I ricambi originali Lindhaus dovranno
essere privi di difetti di materiale per un periodo di 90 giorni dopo l’installazione e saranno sottoposti a tutte le limitazioni ed
esclusioni del presente certificato di garanzia limitato. La Lindhaus non garantisce che i suoi prodotti siano vendibili o che le
sue macchine possano essere usate per ogni altro fine. Inoltre la Lindhaus non fornisce alcuna ulteriore garanzia eccetto per la
presente garanzia limitata. Nessuna ulteriore rappresentazione o garanzia, espressa o implicita fatta da rivenditori,
rappresentanti o agenti della Lindhaus che non sia specificata nella presente dovrà ricadere sulla Lindhaus.
Lindhaus beschränkter Garantieschein
Lindhaus garantiert den Originalkunden (nur den Direktkäufern), daß jeder neue Staubsauger vor der Lieferung frei von Material- und
Fabrikationsfehlern ist. Die Haftung von Lindhaus und der Kundenschutz gegenüber Lindhaus beschränkt sich offensichtlich auf die Reparatur oder
den Austausch der defekten Teile in unserer Fabrik oder in einem autorisierten Kundendienstzentrum, bei vom Kunden vorausbezahltem Transport.
Diese beschränkte Garantie verfällt drei Jahre nach dem Kaufdatum.
AUSGENOMMEN VON DER GARANTIELEISTUNG SIND:
Schäden, die durch Unfälle, Mißbrauch, Blitzschlag, Wasser oder Feuer verursacht werden.
Transportschäden - Mietgeräte
Brüche, die auf eine unsachgemäße Wartung oder Pflege zurückzuführen sind
Geringere Anpassungen wie: gelockerte Schrauben und verschiedene Regulierungen
Reparaturen, die nicht von der Fabrik oder den autorisierten Kundendienstzentren durchgeführt worden sind
Verschleißteile: Griffe, Transporträder, Bürsten, Vorrichtungen für die Kupplung der Bürsten, Rohransätze, Schläuche, Staubbeutel, Kabel,
Filter
Die für den professionellen Gebrauch verwendeten Lindhaus Geräte haben eine zweijährige Garantie mit Ausnahme der elektrischen
Bürstmotoren, die der Abnützung unterliegen. Die Dauer hängt von der Anzahl der Arbeitsstunden ab und von der vorgeschriebenen
Auswechslung der Filter, nicht von der Anzahl Lebensjahre der Maschine. Beispiel: Im professionellen Gebrauch, wenn eine Maschine 8 Stunden
am Tag für 20 Tage im Monat arbeitet, dann ist in 6 Monaten die Lebensdauer des Motors zu Ende. Die eventuelle Auswechslung des Motors unter
Garantie wird nur dann stattfinden, wenn sichergestellt wurde (von den autorisierten Lindhaus Kundendienstzentren) dass es sich um einen
Fabrikationsfehler handelt und nicht bei totaler Abnutzung. Wenn Lindhaus bei der Untersuchung eines eingesandten Geräts oder eingesandter
Teile feststellt, daß der Fehler nicht von der Garantie gedeckt wird, gehen alle Reparaturkosten des Geräts oder der Teile zu Lasten des Kunden.
Alle zum Austausch an Lindhaus zurückgesandten Teile gehen in den Besitz von Lindhaus über. IN KEINEM FALL WIRD LINDHAUS FÜR
INDIREKTE, UNVORHERGESEHENE SCHÄDEN HAFTEN, DIE SICH AUS ANDEREN SCHÄDEN ERGEBEN. Lindhaus haftet gegenüber dem
Kunden nicht für Ansprüche, Schäden, Verletzungen, Handlungen oder Gründe für Handlungen jeglicher Art, die auf Nachlässigkeit oder
bestimmte Verantwortung beruhen. Die originalen Lindhaus Ersatzteile müssen nach der Installation für einen Zeitraum von 90 Tage frei von
Materialfehlern sein und unterliegen allen Beschränkungen und Ausschließungen des vorliegenden beschränkten Garantiescheins. Lindhaus
garantiert nicht, daß seine Produkte für jeden Zweck verkäuflich sind oder benutzt werden können. Außerdem gibt Lindhaus mit Ausnahme der
vorliegenden beschränkten Garantie keine weitere Garantie. Keine weitere ausgesprochene oder miteinbegriffene Darstellung oder Garantie, die
von Verkäufern, Vertretern oder Agenten von Lindhaus gemacht wird, die nicht in der vorliegenden Garantie genau angegeben ist, darf auf
Lindhaus zurückfallen.
Lindhaus certificado de Garantía limitada
Lindhaus garantiza a los clientes originales (directos compradores) solamente que cada nueva aspiradora estará exenta de defectos en
material y fabricación antes de la entrega. La responsabilidad de Lindhaus y el recurso exclusivo del cliente contra Lindhaus están
claramente limitados a las reparaciones y sustituciones de las piezas defectuosas por nuestra fábrica o por el centro de asistencia autorizado
Lindhaus con transporte prepagado por el cliente. Esta garantía limitada caduca tres año después de la fecha de adquisición por el cliente.
QUEDAN EXCEPTUADOS DE LA GARANTÍA:
Los daños provocados por accidentes, uso incorrecto, rayos, agua, y fuego.
Daños causados por el transporte.
Máquinas de alquiler.
Rupturas debidas a la carencia de un apropiado mantenimiento o cuidado.
Modificaciones menores como: ajuste de tornillos, reglajes varios.
Reparaciones no efectuadas por la fábrica o por los centros de asistencia autorizados.
Piezas que se gastan por su uso: mangos, ruedecillas, cepillos, dispositivo de emparejamiento de los cepillos, boquillas, tubos, bolsas
de papel, cables, etc.
Los aparatos Lindhaus utilizados para uso profesional están garantizados por 2 año, con excepción de los motores eléctricos de escobillas,
que estén sujetos a desgaste, siendo su duración dependiente de el nombre de las oras de utilización, de la sustitución de los filtros, y no del
nombre de años de vida de la máquina. Ej.: en el uso profesional, trabajando 8 horas al día durante 20 días al mes, en 6 meses, la visa del
motor termina. Eventual sustitución del motor en garantía serán efectuada solo en caso de defecto de fabricación (por los centros de
asistencia autorizados Lindhaus) y no en caso de desgaste total. Si después de la inspección de la máquina o de cualquier pieza devuelta,
Lindhaus determina que el defecto no lo cubre la garantía, todos los gastos que Lindhaus encontrará en la reparación de la máquina o de
sus piezas, serán responsabilidad del cliente. Cualquier pieza devuelta a Lindhaus para su sustitución, pasará a ser propiedad de Lindhaus.
EN NINGÚN CASO LA LINDHAUS SERÁ RESPONSABLE DE DAÑOS INDIRECTOS, ACCIDENTALES CONSIGUIENTES DE OTROS
DAÑOS. Lindhaus no será responsable de reclamaciones, daños, lesiones, acciones o causas de acciones, cualquiera que sean, basadas
en negligencias o precisas responsabilidades. Los recambios originales Lindhaus tendrán que estar libres de defectos de materiales por 90
días a partir de la instalación y tendrán todas las limitaciones de garantía hasta aquí descritas. Lindhaus no garantiza que sus productos
sean vendibles o que sus máquinas puedan ser usadas para otros fines. Además Lindhaus no ofrece alguna garantía ulterior, excepto por la
presente garantía limitada. Ninguna ulterior representación o garantía, expresa o implícita, hecha por consignatarios, representantes o
agentes de Lindhaus que no sea especificada en la siguiente, tendrá que recaer en Lindhaus.

WARRANTY- GARANZIA – GARANTIE - GARANTIA
Product name - Nome del prodotto - Name des Produkts - Nom du produit - Nombre del product
Valzer
Valzer
+ M30esc
Serial N° - N° serie - Seriennummer - N° de série: ___________________
Date - Data – Date- Fecha: _____________________________________________________
Buyer name - Nome dell’acquirente - Name des Käufers - Nom de l’acheteur - Nombre del comprador:
_______________________________________________________________________________________________
Where is used - Luoghi di utilizzo - Benutzungsorte - Lieu d’utilisation - Lugares de uso:
Commercial - Professionale - Gewerbe - Professionnel - Profesional
Home - Casa - Haushalt - Maison - Casa
Address - Indirizzo - Anschrift - Adresse - Dirección:
________________________________________________________________________Tel_____________________
City - Città - Stadt -Ville - Ciudad
State - Stato - Staat - Pays - País Z.I.P. - C.a.p. - P.L.Z. - C.P - C.P
Did you purchase a Lindhaus product for:
Clean emission
Low sound level
High quality
Warranty
Styling
Price
Ha deciso di acquistare un prodotto Lindhaus per:
Efficienza filtrante
Bassa rumorosità
Alta qualità
Garanzia
Stile
Prezzo
Sie haben sich für ein Lindhaus-Produkt entschieden wegen:
Filtrierleistungsfähigkeit
Geräuschentwicklung
Hohe Qualität
Garantie
Stil
Preis
Vous avez décidé d’acheter un produit Lindhaus:
Efficacité de filtration
Faible bruit
Haute qualité
Garantie
Stil
Prix
Ud. ha decidido comprar un producto Lindhaus:
Eficiencia filtrante
Bajo nivel de ruido
Alta cualidad
Garantía
Estilo
Precio
Was your instruction manual easy to understand? - Il libretto di istruzioni è stato di facile comprensione?
War die Gebrauchsanweisung leicht verständlich? - Le manuel d’instruction est-il de facile compréhension?
¿El manual de uso ha sido de fácil comprensión?
Yes-Si-Ja-Oui- Sí
No-No-Nein-Non-No
Suggestions-Suggerimenti- Ratschläge-suggestions Sugerensias:
________________________________________________________________________________________________
WARRANTY REGISTRATION AND SURVEY (ONLY U.S.A.)
Valzer
Valzer
+ M30e
Serial Number:__________________________________
Electronic Shut Off
Buyer: Surname____________________________________________________________________
Name______________________________________________________________________
Address_____________________________________________________________________
Zip Code_______________ Town___________________________Tel.__________________
Did you purchase a Lindhaus product for:
Clean emission
Low sound level
High quality
Warranty
Styling
Price
Where is used:
Home
School
Contract cleaning
Office
Store
Other____________
Was your instruction manual easy to understand?:
Yes
No
Suggestions:_____________________________________________________________________________________
PURCHASE DATE___________________
DEALER STAMP