Iomega EN61000-3-3: инструкция
Раздел: Профоборудование
Тип: Аппарат
Инструкция к Аппарату Iomega EN61000-3-3

Desktop
Hard Drive
USB 2.0
Quick Start Guide
Pikaopas
Guide de démarrage rapide
Gyors útmutató
Schnellstart-Handbuch
Stručná příručka
Guida di installazione rapida
Wprowadzenie
Guía de instrucciones rápidas
Краткое руководство по началу работы
Guia de uso rápido
Οδηγός γρήγορης εκκίνησης
Snel aan de slag
Hızlı Başlama Kılavuzu
Snabbstartguide
Introduktion
Hurtigreferanse
Quick Install • Installation rapide
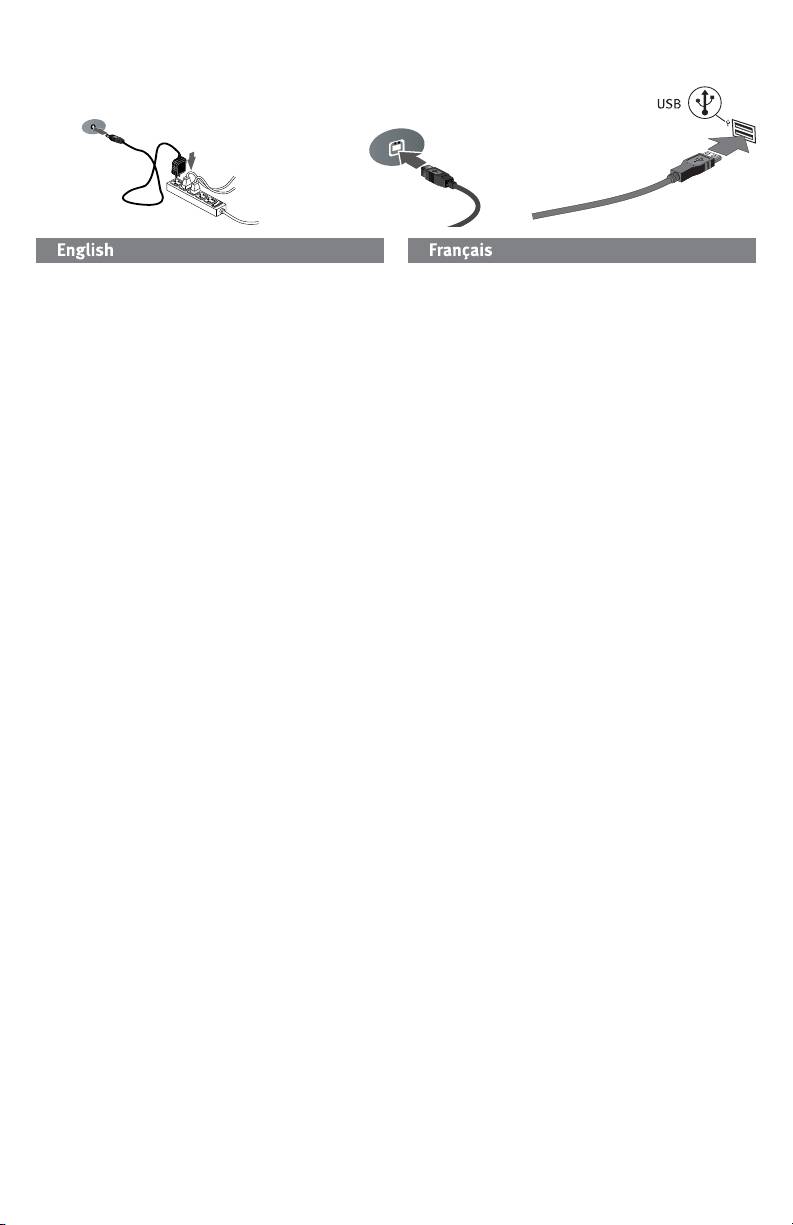
1. Connect the included power supply to the back of the
1. Connectez l’alimentation fournie à l’arrière du disque,
drive and to a power outlet.
puis connectez-la à une prise secteur.
CAUTION! Do not move the drive while it is powered up
ATTENTION ! Ne déplacez pas le disque lorsqu’il est sous
to avoid drive damage or data loss.
tension pour éviter tout dommage ou perte de données.
2. Connect the USB cable to the back of the drive and
2. Connectez le câble USB à l’arrière du lecteur et à votre
your computer. Make sure the power switch on the
ordinateur. Vérifiez que l’interrupteur d’alimentation à
back of the drive is ON.
l’arrière du lecteur est sur ON.
PC Users: The drive icon should appear in My
Utilisateurs de PC : l’icône du disque dur doit apparaître
Computer or Windows Explorer.
sur le Poste de travail ou dans l’Explorateur Windows.
Mac Users: You will need to reformat the drive. See
Utilisateurs de Mac : vous devez reformater le disque dur.
instructions below.
Reportez-vous aux instructions ci-dessous.
CAUTION! To prevent data loss, do not disconnect the drive
ATTENTION ! Pour éviter toute perte de données, ne
during data transfer (drive activity light flashing). Always
déconnectez pas le lecteur pendant un transfert de données
use the safe removal procedure for your operating system
(voyant d’activité du lecteur clignotant).
when disconnecting the drive.
Formatage du disque pour Mac OS
Formatting the Drive for Mac OS
Le disque dur est livré formaté NTFS. Utilisez l’utilitaire
The drive ships formatted NTFS. Use Disk Utility to reformat
de disque pour reformater le disque dur Mac OS étendu
the drive Mac OS Extended Journaled.
(journalisé).
NOTE: The following instructions work for Mac OS X, version
REMARQUE : les instructions suivantes fonctionnent pour
10.4 or above. For Mac OS X version 10.1 through 10.3.9,
Mac OS X, version 10.4 ou ultérieure. Pour les versions Mac
use Disk Utility, Erase to format the drive. See Mac Help if
OS X versions 10.1 à 10.3.9, utilisez Utilitaire de disque, puis
you need more detailed instructions.
Effacer pour reformater le disque.
1. Select Applications → Utilities → Disk Utility
1. Sélectionnez Applications → Utilitaires →
2. In the left hand column, click on the drive icon for the
Utilitaire de disque
Iomega Hard Drive. Make sure you click on the orange
2. Dans la colonne de gauche, cliquez sur l’icône du disque
drive icon, not the volume icon.
dur Iomega. Assurez-vous de cliquer sur l’icône orange
3. Select the Partition tab.
du disque, pas sur l’icône de volume.
4. Change Volume Scheme from Current to 1 Partition.
3. Sélectionnez l’onglet Partitionner.
5. Select Mac OS Extended (Journaled) from the Format
4. Modifiez la configuration de volume de Actuel à 1
drop-down menu.
Partition.
6. Click on the Options button.
5. Sélectionnez Mac OS étendu (journalisé) dans le menu
déroulant Format.
7. Select the type of partition needed for your Mac:
6. Cliquez sur le bouton Options.
GUID Partition Table for bootability on an Intel-based
Macintosh computer.
7. Sélectionnez le type de partition requise pour votre Mac :
Apple Partition Map for a PowerPC-based Mac.
Tableau de partition GUID pour l’amorçage sur un
ordinateur Macintosh basé sur Intel.
8. Click OK.
Carte de partition Apple pour un Mac basé sur PowerPC.
9. Click the Partition button. The drive is ready to use
when the format completes.
8. Cliquez sur OK.
9. Cliquez sur le bouton Partitionner. Le disque peut être
utilisé dès que le formatage est terminé.
2

Schnellstart • Installazione rapida
1. Schließen Sie das mitgelieferte Netzteil an der Rückseite des
1. Collegare l’alimentatore in dotazione al retro dell’unità
Laufwerks und an eine Steckdose an.
e inserirlo in una presa di corrente.
ACHTUNG! Bewegen Sie das Laufwerk während des
ATTENZIONE! Non spostare l’unità mentre è accesa per
Einschaltvorgangs nicht, um Laufwerkbeschädigungen oder
evitare danni o perdite di dati.
Datenverluste zu vermeiden.
2. Collegare il cavo USB al retro dell’unità e del computer.
2. Schließen Sie ein USB-Kabel an der Geräterückseite und
Assicurarsi che l’interruttore di accensione situato sul
an Ihrem Computer an. Vergewissern Sie sich, dass der
retro dell’unità sia su ON.
Netzschalter an der Rückseite des Laufwerks eingeschaltet
ist (ON).
Utenti PC: l’icona dell’unità compare in Risorse del
computer o in Esplora risorse.
PC-Benutzer: Das Laufwerksymbol sollte im Arbeitsplatz
oder im Windows-Explorer angezeigt werden.
Utenti Mac: sarà necessario riformattare l’unità.
Vedere le istruzioni riportate qui di seguito.
Mac-Benutzer: Sie müssen das Laufwerk neu formatieren.
Anweisungen hierzu finden Sie weiter unten.
ATTENZIONE! Per evitare che si verifichino perdite di
dati, non scollegare l’unità durante il trasferimento di
ACHTUNG! Um Datenverluste zu vermeiden, trennen Sie das
Laufwerk während der Datenübertragung nicht vom Computer
informazioni (spia di attività dell’unità lampeggiante).
(Kontrolllämpchen am Laufwerk blinkt).
Formattazione dell’unità per Mac OS
Formatieren des Laufwerks für Mac OS
L’unità viene fornita formattata in NTFS. Utilizzare utility
Das Laufwerk ist mit NTFS vorformatiert. Verwenden Sie das Date
Disco per riformattare l’unità Mac OS Extended Journaled.
nträgerdienstprogramm, um das Laufwerk mit Mac OS Extended
Journaled neu zu formatieren.
NOTA: le seguenti istruzioni sono valide per Mac OS X,
versione 10.4 o successive. Per Mac OS X, da 10.1 a 10.3.9,
HINWEIS: Die folgenden Anweisungen gelten für Mac OS X,
utilizzare l’Utility disco, Cancella per formattare l’unità. Per
Version 10.4 oder höher. Verwenden Sie den Befehl „Löschen“
ulteriori informazioni consultare il menu Aiuto del Mac.
des Datenträgerdienstprogramms für Mac OS X Version 10.1
bis 10.3.9. In der Mac-Hilfe finden Sie weitere ausführliche
1. Selezionare Applicazioni
→
Utility
→
Utility disco
Anweisungen.
2. Nella colonna a sinistra, fare clic sull’icona dell’unità
1. Wählen Sie Anwendungen → Dienstprogramme →
corrispondente all’unità Iomega Hard Drive.
Datenträgerdienstprogramm
Assicurarsi di fare clic sull’icona arancione dell’unità e
2. Klicken Sie in der linken Spalte auf das Laufwerksymbol für
non sull’icona del volume.
die Iomega-Festplatte. Stellen Sie sicher, dass Sie auf das
3. Selezionare la scheda Partizione.
orangefarbene Laufwerksymbol und nicht auf das Volume-
Symbol klicken.
4. Modificare il volume dello schema da Attuale in
Partizione 1.
3. Wählen Sie die Registerkarte Partition.
5. Selezionare Mac OS Extended (Journaled) dal menu a
4. Ändern Sie das Volume-Schema von Aktuell auf 1 Partition.
discesa Formattazione.
5. Wählen Sie Mac OS Extended (Journaled) aus dem
Dropdown-Menü Format aus.
6. Fare clic sul pulsante Opzioni.
6. Klicken Sie auf die Schaltfläche Optionen.
7. Selezionare il tipo di partizione richiesta per il sistema
Mac in uso:
7. Wählen Sie den für Mac erforderlichen Partitionstyp aus:
GUID Partition Table für Bootfunktion auf einem Intel-
Tabella di partizione GUID per avviabilità su computer
basierten Macintosh-Computer.
Macintosh basato su Intel.
Apple Partition Map für einen PowerPC-basierten Mac.
Mappa delle partizioni Apple per computer Mac
basato su PowerPC.
8. Klicken Sie auf OK.
9. Klicken Sie auf die Schaltfläche Partition. Sobald die
8. Scegliere OK.
Formatierung abgeschlossen ist, können Sie das Laufwerk
9. Fare clic sul pulsante Partizione. Sarà possibile
verwenden.
utilizzare l’unità al termine della formattazione.
3
