Grandstream Networks GXV3662: инструкция
Раздел: Безопасность
Тип:
Инструкция к Grandstream Networks GXV3662

GXV3662_HD/GXV3662_FHD
HD IP CAMERA
Grandstream Networks, Inc.
1297 Beacon Street, 2nd Floor
深圳市南山高新科技园中区
Brookline, MA 02446, USA
科发路2号1栋(朗峰大厦)5楼
Tel : +1 (617) 566 – 9300
电话: +86 755-2601-4600
Fax: +1 (617) 247 – 1987
传真: +86 755-2601-4601
Quick Start Guide
www.grandstream.com www.grandstream.cn
For Warranty and RMA information, please visit www.grandstream.com

Content
English.....................................................1
Español.................................................. 13
Français................................................. 25
简体中文 ................................................37
Deutsch................................................49
Italiano................................................61
Русскй................................................73
EN
PRECAUTIONS
GXV3662_HD/GXV3662_FHD
• Do not attempt to disassemble, or modify the device
IndIcators and connectors
• Do not use a third party power adapter
• Do not expose this device to temperatures outside the
range of -30 °C to +50 °C
• Do not expose the GXV3662_HD/GXV3662_FHD to
environment outside of the following humidity range:
IR-CUT
10-90% RH (non-condensing)
Internal Temperature
Filter
Regulator
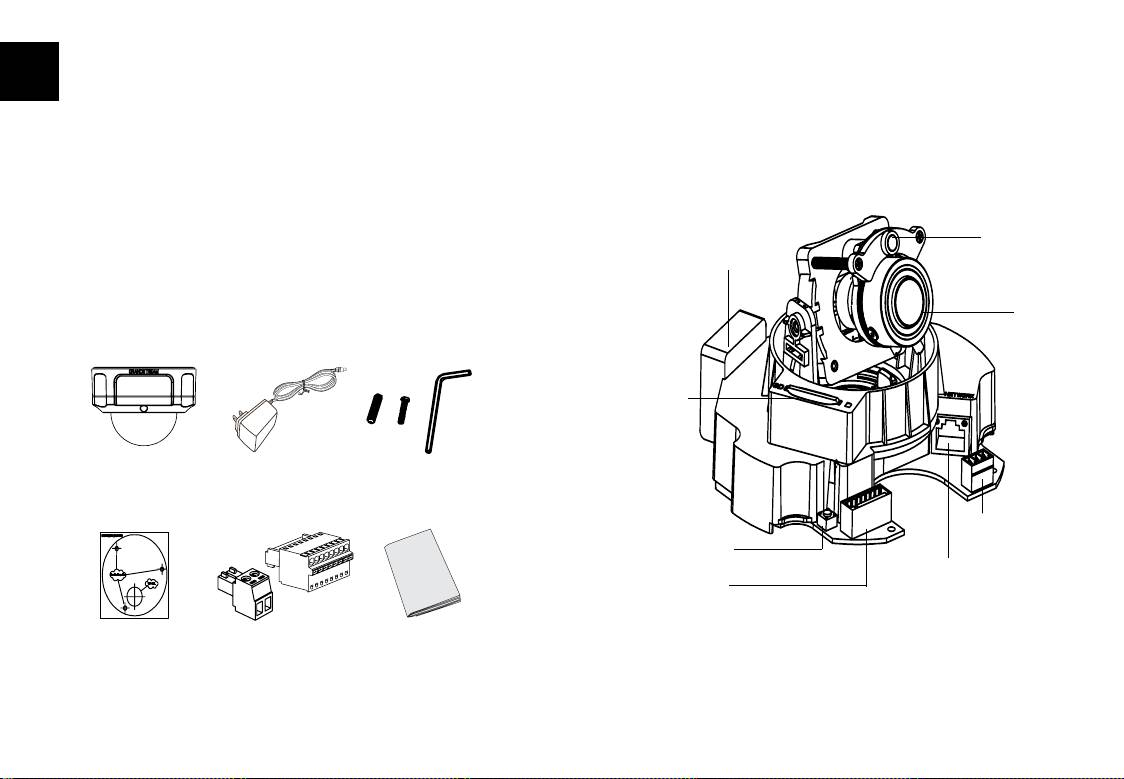
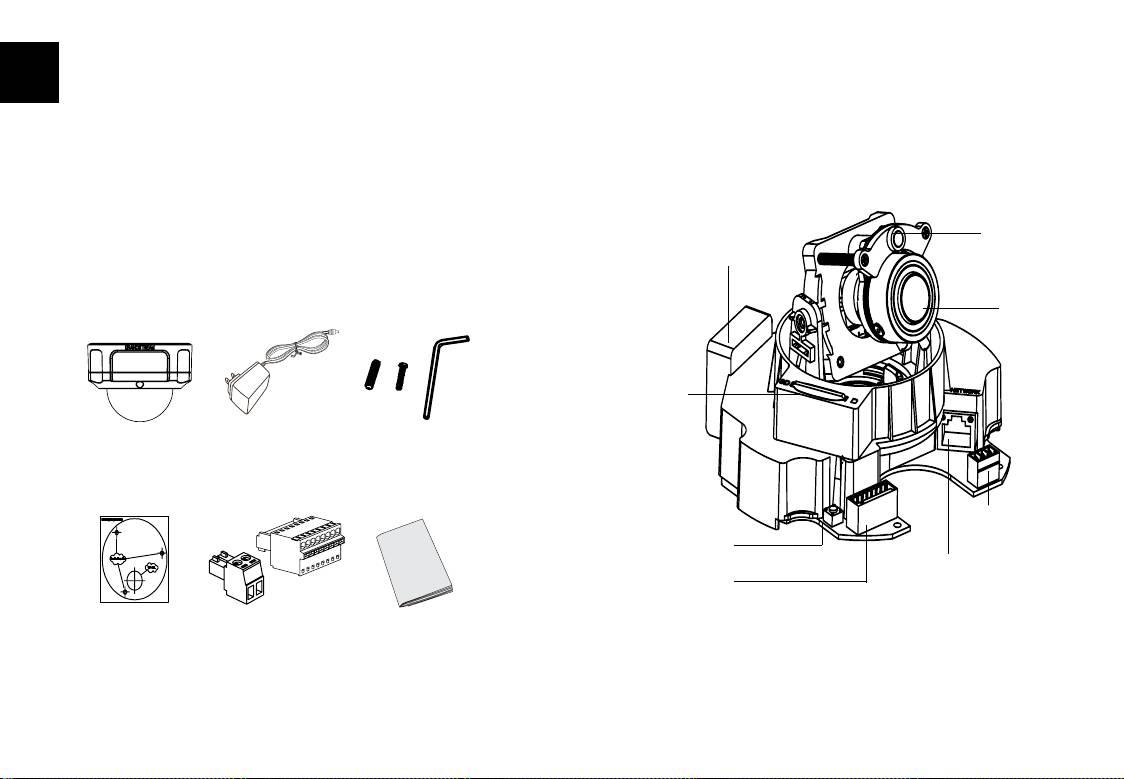
PACKAGE CONTENTS
Lens
SD Card
Slot
12V
x3 x3
GXV3662_HD/
Power Adapter
Tool Set
GXV3662_FHD
Power Port
Reset Button
Network Port
Alarm/Audio
Alignment Sticker
Terminal Block
Quick Start Guide
~1~ ~2~
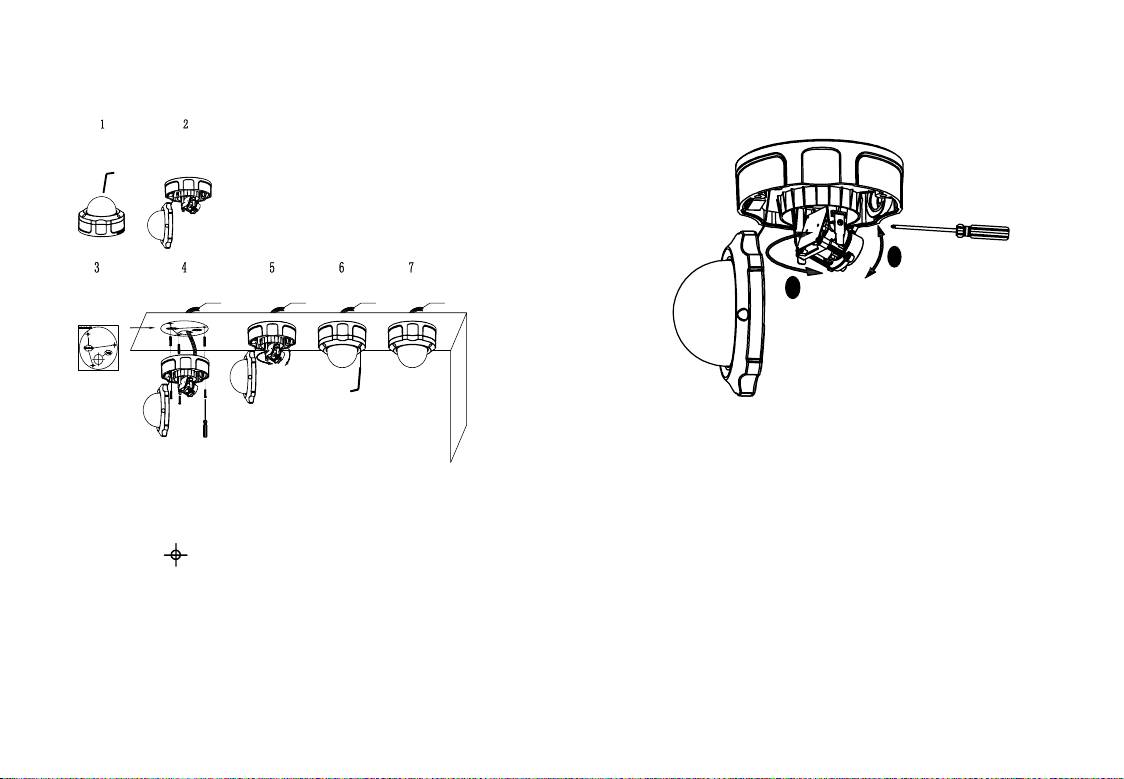
InstaLLatIon
Lens adjustment
1
2
1. Adjust the lens VERTICALLY:
- Loosen the screws on both sides of axle.
- Adjust the lens to desired position. Allowed adjustment
range is 0 ° ~160 °.
- Tighten the screws to nish adjustment.
2. Adjust the lens HORIZONTALLY:
- Turn the lens to desired position. Allowed adjustment
range is 0 ° ~ 356 °.
~3~ ~4~
Cable Cable Cable Cable
Step 1: Take out the 3 screws on
the housing. Use the tool
comes with the package.
Step 2: Open the cover.
Step 3: Attach the alighment sticker onto the surface.
Step 4: Drill 3 holes at the place where the mounting holes
are (
) and hammer the 3 plastic anchors into
the holes. Then, insert the screws. Feed the
cables through the cable hole.
Step 5: Adjust the lens (More details on page 4).
Step 6: Screw back to the housing.
Step 7: Complete the installation.
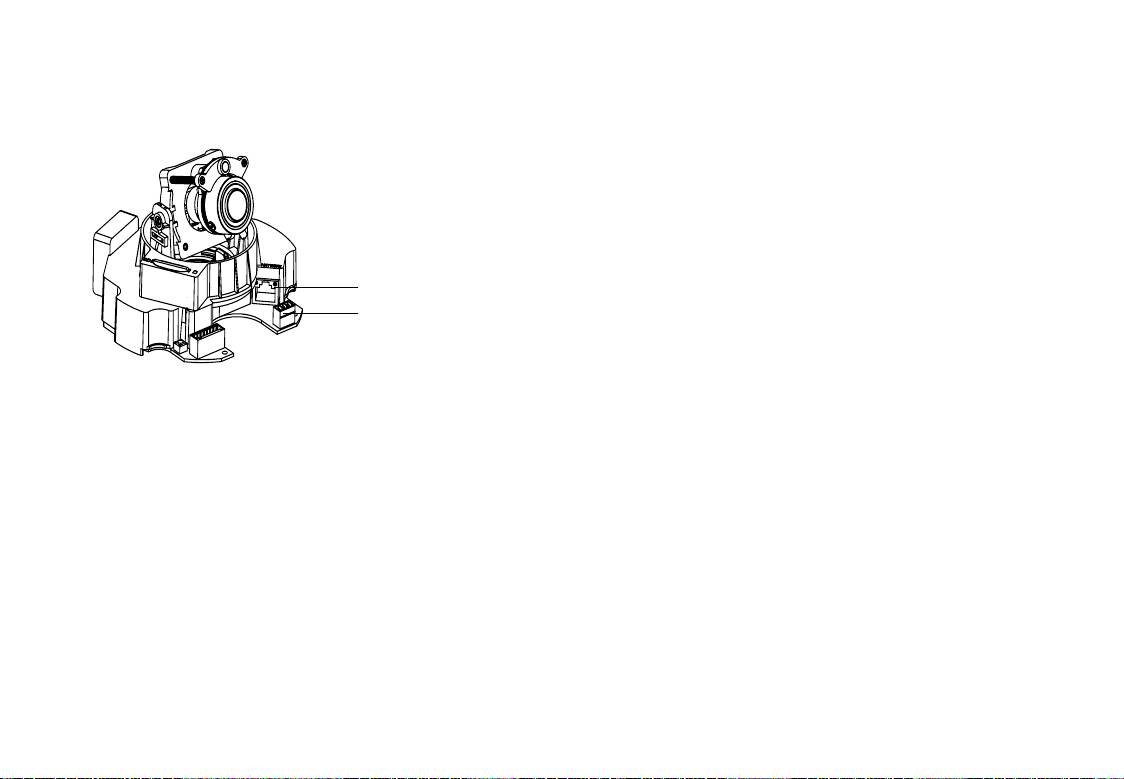
CONNECTING THE
GXV3662_HD/GXV3662_FHD
GXV3662_HD/GXV3662_FHD
CONFIGURATION
Conguring the GXV3662_HD/GXV3662_
FHD using Firefox or Microsoft Internet
Explorer
Connect the GXV3662_HD/GXV3662_FHD
Network Port
to the DHCP server
Power Port
S
tep 1: Download and install GS_Search tool:
http://www.grandstream.com/products/tools/
surveillance/gsurf_pro.zip
Option A - Power over Ethernet (PoE)
Step 2: Run Gsurf_Pro->Manage Tool->Search tool.
When using a PoE switch, plug an RJ45 Ethernet cable
into the network port. Insert the other end into a Power
over Ethernet (PoE) switch.
Step 3: Click on button to start device
detection.
Option B - Power Adaptor
Step 4: The detected devices will appear in the Output
eld.
Insert the power adapter into the 12V DC port on the
GXV3662_HD/GXV3662_FHD. Plug the other end of the
adapter into an AC power outlet.
Plug an RJ45 Ethernet cable into the network port. Insert
the other end into a hub, switch or router.
~5~ ~6~

Step 7: Once you log into the GXV3662_HD/GXV3662_
FHD web interface, the device will indicate that an
Active-X or video plug-in is required. Follow the
displayed instruction to download and install
Active-X or the video plug-in.
Step 8: If downloading or installing is unsuccessful due to
browser setting or slow Internet connection,
please download the les from the link below.
Save and install the program then restart the
browser. The video will now appear embedded
inside the camera’s web interface.
• Internet Explorer (32-bit):
http://www.grandstream.com/products/tools/surveillance/
activex_control_manual_install_3.1.0.32.rar
• Firefox:
http://www.grandstream.com/products/tools/surveillance/
refox_plugin.exe.
Step 5: Double click on the detected device. The default
browser (32-bit IE in this example) will open dis-
Step 9: Here is a sample screenshot with successful
playing the camera’s web interface.
Active-X or Plug-in installation. Click on the play
button to view the video feed.
Step 6: A pop-up window will prompt for user name and
password. The default administrator user name
and password are both set to “admin” as the
default factory conguration.
~7~ ~8~

Step 2: Run the GS_Search tool as above. It will show
the original IP of the GXV3662_HD/GXV3662_
FHD (default IP address 192.168.1.168)
Step 3: Input the NEW IP Address, Subnet Mask and
Default Gateway, according to your network
conguration. Please check with local system
administrator for the necessary information.
Step 4: Click on “Modify IP”. The desired IP address will
be applied to the GXV3662_HD/GXV3662_FHD.
Step 10: Click through the menu on the left hand side of
the web UI for more advanced congurations.
Connect the GXV3662_HD/GXV3662_FHD
using Static IP
If the camera does not get response from the DHCP server
Please download the User Manual, refer to online docu-
or the network after 3 minutes, it can be accessed by the
ments and FAQ for more detailed information:
default IP: 192.168.1.168.
http://www.grandstream.com/index.php/products/ip-video-
Step 1: Use RJ-45 Ethernet cable to connect your com-
surveillance
puter network port directly to the Ethernet socket
http://www.grandstream.com/support
of GXV3662_HD/GXV3662_FHD.
http://www.grandstream.com/support/tools
~9~ ~10~

GXV3662_HD/GXV3662_FHD
GXV3662_HD/GXV3662_FHD
SAMPLE CONNECTION DIAGRAM
LENS SPECIFICATIONS
Image Sensor
GXV3662_HD: 1/3”, 1.2 Megapixel
Resolution
CMOS, 1280H x 960V
GXV3662_FHD: 1/3”, 3.1 Megapixel
CMOS, 2048H x 1536V
Lens Type 1/3”, 3.3~12mm, F1.6~F3.2, DC~Iris;
Manual focus: 50cm~∞;
H: 89.8º~23.9º; V: 63.6º~17.9º
Operation
Light Sensor, mechanical IR Cut lter,
Mode
color/black & white mode
Minimum
0.05 Lux
Illumination
Responsivity GXV3662_HD: 5.48V/lux-sec (550nm)
GXV3662_FHD: 1.9V/lux-sec (550nm)
Pixel Dynamic
GXV3662_HD:
Range
Wide dynamic range of 120dB with
SNRMAX 44dB
GXV3662_FHD:
Wide dynamic range of 100dB with
SNRMAX 39dB
Maximum Video
GXV3662_HD: 1280 x 960 (30fps)
Resolution and
GXV3662_FHD: 2048 x 1536 (15fps)
Frame Rate
1920 x 1080 (30fps)
~11~ ~12~
ES
PRECAUTIONS
IndIcadores y conectores deL
GXV3662_HD/GXV3662_FHD
• No intente abrir, desarmar o modicar la unidad
• No use un adaptador de corriente de otra marca
• No exponga esta unidad a temperaturas fuera de este
rango: -30 °C to +50 °C
• No exponga esta unidad a condiciones húmedas fuera
del rango de 10 a 90% RH (no condensadas)
Regulador interno de
Filtro
temperatura
IR-Cut
CONTENIDO
Lente
12V
Ranura
x3
x3
de tarjeta
SD
GXV3662_HD/
Adaptador
Set de herramientas
GXV3662_FHD
de corriente
Puerto de
corriente
Boton de
reset
Puerto de Red
Alarma/Audio
Sticker de
Bloque de
Guía de Instalación
alineamiento
terminales
Rápida
~13~ ~14~
