Apple LED Cinema Display (27): инструкция
Раздел: Компьютерная техника, комплектующие, аксессуары
Тип: Монитор
Инструкция к Монитору Apple LED Cinema Display (27)
Оглавление
- Начало работы
- Настройка монитора
- Настройка MacBook при закрытой крышке
- Использование монитора Использование встроенной камеры iSight и микрофона
- Настройка звукового входа и выхода
- Настройка монитора Apple LED Cinema в качестве дополнительного монитора Настройка разрешения, яркости и цвета
- Использование портов USB и слота безопасности
- Использование монтажного комплекта VESA с Вашим монитором Безопасность и уход
- ПРЕДУПРЕЖДЕНИЕ. Монитор является прибором высокого напряжения, и его
- Эргономика
- Устранение неполадок монитора
- Дополнительная информация по устранению неполадок Дополнительная информация, обслуживание и поддержка
- Спецификации

Apple LED Cinema Display

Apple Inc.
Apple, the Apple logo, Apple Cinema Display, iChat, iMovie,
© 2010 Apple Inc. All rights reserved.
iPhone, iPod, iSight, Mac, MacBook, MagSafe, and Photo Booth are
trademarks of Apple Inc., registered in the U.S. and other countries.
Under the copyright laws, this manual may not be copied, in whole
or in part, without the written consent of Apple.
Apple Store is a service mark of Apple Inc., registered in the U.S.
and other countries.
The Apple logo is a trademark of Apple Inc., registered in the U.S.
and other countries. Use of the “keyboard” Apple logo (Option-
ENERGY STAR® is a U.S. registered trademark.
Shift-K) for commercial purposes without the prior written consent
The Bluetooth® word mark and logos are registered trademarks
of Apple may constitute trademark infringement and unfair
owned by Bluetooth SIG, Inc. and any use of such marks by Apple
competition in violation of federal and state laws.
is under license.
Every eort has been made to ensure that the information in
Other company and product names mentioned herein may be
this manual is accurate. Apple is not responsible for printing or
trademarks of their respective companies. Mention of third-party
clerical errors.
products is for informational purposes only and constitutes
Apple
neither an endorsement nor a recommendation. Apple assumes
1 Innite Loop
no responsibility with regard to the performance or use of these
Cupertino, CA 95014
products.
408-996-1010
www.apple.com

Contents
6 Getting Started
7 Setting Up Your Display
9 Using Your Display
13 Care and Safety
15 Ergonomics
16 Troubleshooting Your Display
17 Learning More, Service, and Support
18 Specications
19 Käyttöönotto
20 Näytön käyttöönotto
22 Näytön käyttäminen
26 Huolto ja turvallisuus
28 Ergonomia
29 Näytön vianmääritys
30 Lisätiedot, huolto ja tuki
31 Tekniset tiedot
3

33 Klargjøre skjermen
35 Bruke skjermen
39 Vedlikehold og sikkerhet
41 Ergonomi
42 Problemløsing
43 Service, support og mer informasjon
44 Spesikasjoner
45 Pierwsze kroki
46 Podłączanie monitora
48 Korzystanie z monitora
52 Dbałość i bezpieczeństwo
54 Ergonomia
55 Rozwiązywanie problemów z monitorem
56 Dodatkowe informacje, serwis i pomoc
57 Dane techniczne
58 Introdução
59 Instalação do monitor
61 Utilização do monitor
65 Cuidado e segurança
67 Ergonomia
68 Resolução de problemas do monitor
69 Mais informações, assistência e suporte
70 Especicações
4

71 Komma igång
72 Installera skärmen
74 Använda skärmen
78 Skötsel och säkerhet
80 Ergonomi
81 Felsöka bildskärmen
82 Mer information, service och support
83 Teknisk information
84 Начало работы
85 Настройка монитора
87 Использование монитора
91 Безопасность и уход
93 Эргономика
94 Устранение неполадок монитора
95 Дополнительная информация, обслуживание и поддержка
96 Спецификации
97 Regulatory Compliance Information
98 Apple and the Environment
5

Getting Started
Your Apple LED Cinema Display is designed to work seamlessly
with Mac computers that have a Mini DisplayPort connector.
It features an LED-backlit widescreen display, a MagSafe
connector to charge your MacBook computer, a built-in iSight
camera, a microphone, and a speaker system.
The instructions on the following pages help you set up and use your new display.
Learn how to:
 Connect your display to your computer
 Use your display’s camera, microphone, speaker system, and USB ports
 Adjust your display’s settings
Note: You can connect your Apple LED Cinema Display to a Mac desktop computer
that has a Mini DisplayPort.
Important: Carefully read all the installation instructions (and the safety information
starting on page 13) before you set up and use your display.
For information about the specic computers and graphics cards that are compatible
with your display, go to www.apple.com/displays.
6 English
Setting Up Your Display
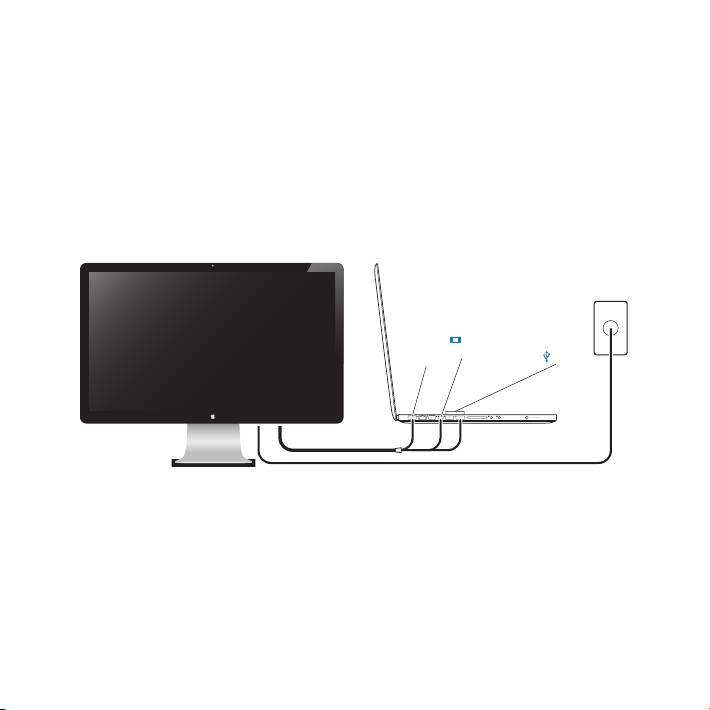
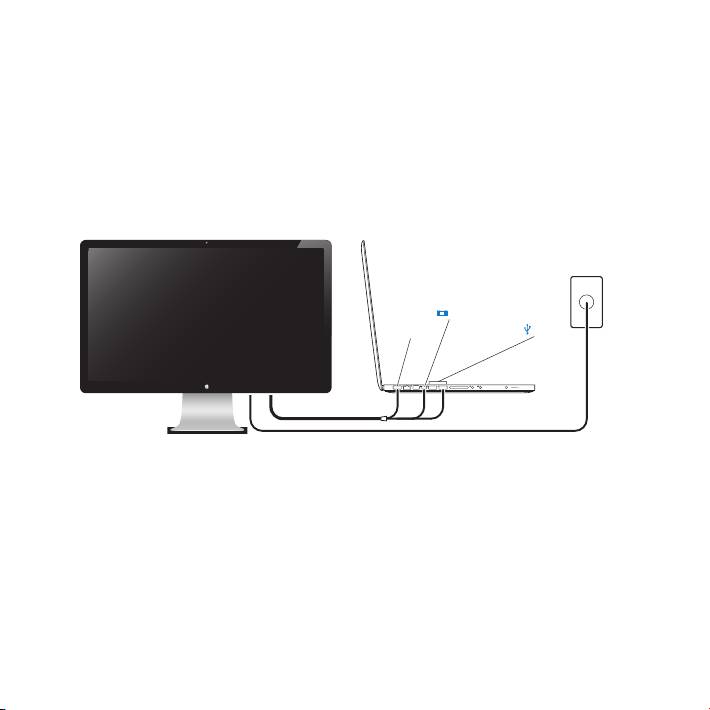
Follow these steps to set up your Apple LED Cinema Display:
1 Remove the protective lm from the display and cables.
2 Insert the power cord into the display, and then insert the AC plug into a grounded
power outlet.
3 Plug the MagSafe connector into the MagSafe power port on your MacBook to charge
the battery and provide power to your computer.
7English
Apple LED Cinema Display
MacBook
Grounded
power outlet
Mini
MagSafe USB
DisplayPort
4 Connect the USB cable to your computer to use the display’s built-in iSight camera,
microphone, speaker system, and USB ports.
5 Connect the Mini DisplayPort cable to your computer.
6 Press the power (®) button on your computer to start it up. The display turns on
automatically when you start up your computer.

Setting Up Your MacBook with the Lid Closed
You can close the lid of your MacBook and use just your Apple LED Cinema Display.
Follow the setup instructions on the previous page and make sure the MagSafe
connector from the display is plugged into the MagSafe power port on your MacBook.
To use your Apple LED Cinema Display with your MacBook lid closed:
1 Connect an external USB keyboard and mouse to a USB port on your display, or use the
Bluetooth® Setup Assistant to set up a wireless keyboard and mouse.
2 Make sure your MacBook is turned on.
3 Close the lid on your MacBook to put it to sleep.
4 Wait a few seconds, and then press any key on the external keyboard or click the
mouse to wake your MacBook.
8 English
Using Your Display
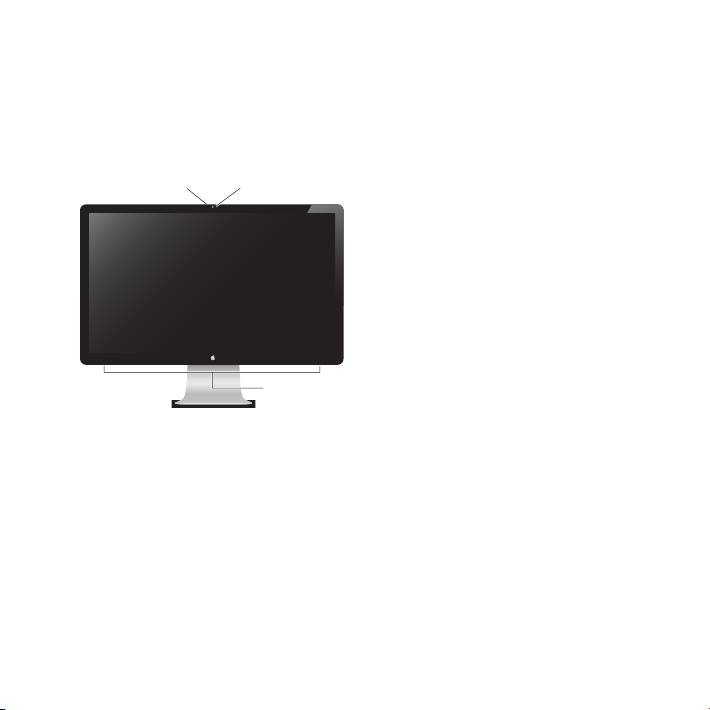
Your Apple LED Cinema Display has a built-in iSight camera, microphone, and speaker
system. The USB connection between the display and your computer is required for
these features.
Microphone
Speaker system
9English
Built-in
iSight camera
Using the Built-in iSight Camera and Microphone
You can use the built-in iSight camera and microphone to capture still images, video,
and sound using applications such as iChat, iMovie, and Photo Booth.
To set up the camera and microphone with iChat:
1 Click the iChat icon in the Dock to open the iChat application.
2 Choose iChat > Preferences, and then click Audio/Video.
3 Choose Display iSight from the Camera pop-up menu.
4 Choose Display Audio from the Microphone pop-up menu.

Setting Up Sound Input and Output
You can listen to music, movies, games, and multimedia les through the speaker
system on your display. You can use the microphone to record sounds, or talk with
friends using iChat. Use Sound preferences to manage sound input and output.
To set up sound input:
1 Choose Apple () > System Preferences, and then click Sound.
2 Click the Input tab in Sound preferences.
3 Choose Display Audio to input sound through your display’s microphone.
To set up sound output:
1 Choose Apple () > System Preferences, and then click Sound.
2 Click the Output tab in Sound preferences.
3 Choose Display Audio to hear sound through your display’s speaker system.
If your Mac computer supports sound output through the Mini DisplayPort in addition
to the USB port, you can choose either Mini DisplayPort or USB Audio for audio output.
These sound settings are used whenever your computer is connected to your display.
They remain in eect until you change them.
10 English

Setting Up Your Apple LED Cinema Display as an Additional Display
When you leave the lid on your MacBook open, you can mirror the same desktop
image on both displays or use the additional display as an extension of your desktop.
Use Displays preferences to set up video mirroring or extended desktop.
To set up video mirroring or extended desktop:
1 Choose Apple () > System Preferences, and then click Displays.
2 Click the Arrangement tab and follow the onscreen instructions.
Adjusting the Resolution, Brightness, and Color
Your Apple LED Cinema Display can automatically adjust the screen brightness for
current light conditions using the built-in ambient light sensor. You can turn auto-
brightness on or o in Displays preferences.
To change the resolution or brightness:
1 Choose Apple () > System Preferences, and then click Displays.
2 Choose a resolution or drag the Brightness slider.
You can also use the brightness keys on an external Apple Keyboard to increase ( ) or
decrease ( ) the brightness of your display.
To change the display color prole or calibrate your display:
1 Click the Color tab in Displays preferences.
2 Choose a display color prole, or click Calibrate to open the Display Calibrator Assistant.
For more information about calibrating your display, choose Help > Mac Help in the
menu bar and search for “calibrate.”
11English

Using the USB Ports and Security Slot
Your Apple LED Cinema Display has three powered USB ports on the back. Use these
ports to connect a mouse, keyboard, iPhone, iPod, or other USB peripheral.
Important: You can use these USB ports to charge your iPhone or iPod, even when
your display isn’t connected to a computer. If you use one of these ports to sync
information between your computer and an iPhone or iPod, make sure the display’s
USB cable is connected to your computer.
USB ports
Security slot
To secure your display, attach a locking cable to the security slot.
12 English

Using a VESA Mounting Solution with Your Display
You can attach your display to an alternative mounting solution, using the VESA Mount
Adapter Kit available from the Apple Online Store at www.apple.com/store. Use the
kit to attach your display to any available VESA-compatible mounting solution. Simply
follow the instructions included with the kit.
Care and Safety
Before you lift or reposition your display, you may need to disconnect the cables and
power cord. Use correct lifting techniques when positioning the display. When lifting or
carrying the display, hold it by the edges. Don’t lift the display by the stand or the cord.
To clean the screen on your display:
1 Disconnect the power cord.
2 Use the cloth that came with your display, or another soft, dry cloth, to wipe dust from
the screen.
WARNING: Don’t clean the screen with a cleaner containing alcohol or acetone. Use a
cleaner intended for use with a screen or display. Never spray cleaner directly on the
screen. It may drip inside the display and cause damage.
13English

Don’t operate your display in areas with signicant amounts of airborne dust, or smoke
from cigarettes, cigars, ashtrays, stoves, or replaces, or near an ultrasonic humidier
using unltered tap water. Tiny airborne particles produced by smoking, cooking,
burning, or using an ultrasonic humidier with unltered water may, in rare instances,
enter the ventilation openings of your display and, under certain conditions, result in a
slight haze on the inside surface of the glass panel that covers the display.
Follow these safety guidelines for using your display:
 The only way to completely disconnect power is to unplug the power cord. Be sure to
pull the plug, not the cord.
 Disconnect power immediately if the power cord is frayed or damaged, if you spill
something on the display, or if the display falls or is damaged in some other way.
WARNING: Use only the power cord that came with your display. The power cord has
a three-wire grounding plug (a plug that has a third grounding pin) that ts only a
grounded AC outlet. If you are unable to insert the plug into an outlet because the
outlet is not grounded, contact a licensed electrician to replace the outlet with a
properly grounded outlet.
WARNING: Your display is a high-voltage component and should not be opened for
any reason, even when it’s unplugged. If your display needs service, see “Learning
More, Service, and Support” on page 17.
14 English
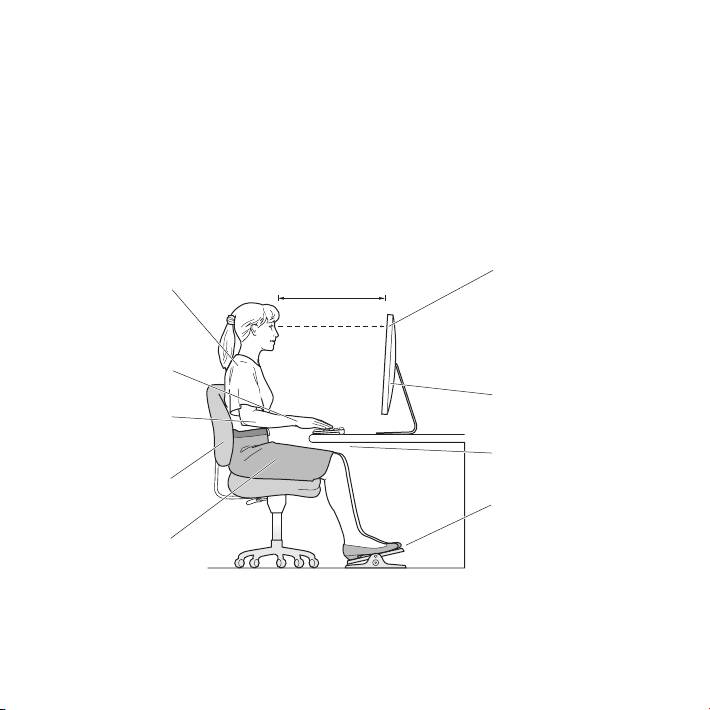
Ergonomics
Here are some guidelines for adjusting your display to reduce glare and to
accommodate your physical size and shape.
 Arrange the display so that the top of the screen is slightly below your eye level
when you’re sitting at the keyboard. The best distance from your eyes to the screen is
up to you, although most people tend to prefer 18 to 28 inches (45 to 70 cm).
 Position the display by tilting it up or down to minimize glare and reections from
overhead lights and nearby windows.
Shoulders
relaxed
Forearms and
hands in a
straight line
Screen positioned to
Forearms level
avoid reflected glare
or tilted slightly
Lower back
supported
Feet flat on the floor
or on a footrest
Thighs tilted
slightly
15English
Top of the screen at or
18–28 in. (45–70 cm)
slightly below eye level
(You may need to adjust
the height of your display
by raising or lowering
your work surface)
Clearance under
work surface
For more information about health, safety, and maintenance, go to the Apple
ergonomic website at www.apple.com/about/ergonomics.

Troubleshooting Your Display
Before performing any of these steps, make sure your computer is turned on, the
display is plugged into an outlet, all the cables are connected properly to your
computer and display, and your computer is not in sleep mode.
If the screen doesn’t have an image:
 Check the cables and connectors again to make sure they are connected properly to
your computer and the display.
 Make sure your computer is turned on and is not in sleep mode. If the lid on your
MacBook is closed, use the external keyboard or mouse to wake the MacBook from
sleep.
 Unplug the display’s power cord from the grounded power outlet, wait a few
minutes, then plug it in again.
 Reset the PRAM by restarting your computer while holding down the Command (x),
Option, P, and R keys until you hear the startup sound a second time.
If the screen is dim:
 Make sure the display brightness is set properly. Choose Apple () > System
Preferences and click Displays. Drag the Brightness slider to adjust the brightness.
 If the colors on the display are too saturated or not correct, you may need to calibrate
your display. Open Displays preferences, click the Color tab, click Calibrate, and follow
the instructions.
If your MacBook isn’t charging:
Make sure the MagSafe connector from your display is seated properly in the MagSafe
power port on your MacBook.
16 English

If the built-in iSight camera, microphone, speaker system, or USB ports on the
display aren’t working:
Make sure the USB cable from the display is rmly plugged into the USB port on your
computer. The display’s camera, microphone, speaker system, and USB ports work only
when this cable is connected to your computer.
More Troubleshooting Information
You can nd more troubleshooting information on the Displays support website at:
www.apple.com/support/displays
Learning More, Service, and Support
You can nd more information about your display on the Apple website and in
Mac Help.
To learn about See
Using your display Mac Help and search for “displays.”
Display service, support,
The Displays Support site at www.apple.com/support/displays.
discussions, troubleshooting,
and software downloads
The latest information about
The Apple Display site at www.apple.com/displays.
displays
Registering your display The Apple Product Registration site at www.apple.com/register.
17English

Specications
 Model number: A1316
 Resolution: 2560 x 1440 @ 60 Hz
 Ports: Three high-speed USB 2.0 ports on the back
 Camera and microphone: Built-in iSight camera with microphone
 Speakers: Built-in 2.1 speakers with 49 W output
Dimensions:
 Weight: 23.5 lb. (10.7 kg)
 Height: 19.2 inches (488.1 mm)
 Width: 25.65 inches (651.7 mm)
 Depth (with stand): 8.2 inches (208.13 mm)
 Viewable: 27 inches (685.8 mm) diagonal
Operating environment:
 Operating temperature: 50° to 95° F (10° to 35° C)
 Relative humidity: 20% to 80% (noncondensing)
 Altitude: 0 to 10,000 feet (0 to 3048 meters)
18 English

Käyttöönotto
Apple LED Cinema Display on suunniteltu toimimaan
saumattomasti mini-DisplayPort-liitännällä varustettujen
Mac-tietokoneiden kanssa. Siinä on LED-taustavalaistu
laajakuvanäyttö, MagSafe-liitäntä MacBook-tietokoneen
lataamiseen, sisäinen iSight-kamera, mikrofoni ja
kaiutinjärjestelmä.
Seuraavien sivujen ohjeet auttavat sinua ottamaan käyttöön ja käyttämään uutta
näyttöäsi. Opit kuinka:
 Liittää näyttö tietokoneeseen
 Käyttää näytön kameraa, mikrofonia, kaiutinjärjestelmää ja USB-portteja
 Säätää näytön asetuksia
Huomaa: Voit liittää Apple LED Cinema Display -näytön Mac-pöytäkoneeseen, jossa on
mini-DisplayPort-liitäntä.
Tärkeää: Lue kaikki asennusohjeet (ja turvallisuustiedot, alkaen sivu 26) huolellisesti
ennen näytön käyttöönottoa ja käyttöä.
Tietoja näytön kanssa yhteensopivista tietokoneista ja näytönohjaimista löytyy
osoitteesta www.apple.com/fi/displays.
19Suomi
Näytön käyttöönotto
Ota Apple LED Cinema Display käyttöön seuraamalla näitä ohjeita:
1 Poista suojakalvot näytöstä ja kaapeleista.
2 Liitä virtajohto näyttöön ja virtapistoke maadoitettuun pistorasiaan.
3 Jos haluat ladata MacBookin akkua ja antaa sille virtaa, liitä MagSafe-liitin MacBookin
MagSafe-porttiin.
20 Suomi
Apple LED Cinema Display
MacBook
Maadoitettu pistorasia
Mini-DisplayPort
MagSafe USB
4 Jos haluat käyttää näytön sisäistä iSight-kameraa, mikrofonia, kaiutinjärjestelmää ja
USB-portteja, liitä USB-kaapeli tietokoneeseen.
5 Liitä mini-DisplayPort-kaapeli tietokoneeseen.
6 Käynnistä tietokone painamalla käynnistyspainiketta (®). Näyttö kytkeytyy
automaattisesti päälle, kun tietokone käynnistetään.
