Valera X-MASTER: instruction
Class: Beauty, health, sport, tourism, hobbies
Type: Hair Clipper/Trimmer
Manual for Valera X-MASTER
00060627
-06/
13
GB
D
F
I
E
NL
PT
FI
HU
CS
RO
PL
GR
HE
TR
UK
RU
SA
ZH
IR
Stamp and signature of delear
Stempel und Unterschrift des Händlers
Cachet et signature du commerçant
Timbro e firma del rivenditore
Sello y firma del proveedor
Stempel en handtekening van de handelaar
Carimbo e firma do revendedor
Myyjän leima ja allekirjoitus
Eladó pecsétje és aláírása
razítko a podpis prodejce
Tampila i semnãtura vãnzãtorului
Piecz
ę
c i podpis sprzedawcyù
Guarantee card
Garantiekarte
Carte de garantie
Certificato di garanzia
Tarjeta de garantià
Garantiekarte
Certificado de garantia
Takuutodistus
Certificat de garan
ţ
ie
Záru
ční list
Garancialevél
Karta Gwarancyijna
Garanti sertificası
ϩΎ̴ηϭήϓ
ϱΎπϣ
ϭ
ήϬϣ
ΖϧΎϤο
ϪϣΎϧ
Professional hair clippers Set
Translation from original instructions
6
Professionelles Haarschneide-Set
Übersetzung der Originalanweisungen
10
Set tondeuse à cheveux professionnelle
Traductions à partir des instructions d'origine
14
Set Tagliacapelli Professionale
Istruzioni originali
18
Juego para el corte de cabello profesional
Traducción de las instrucciones originales
22
Professionele haartrimset
Vertaling van de originele instructies
26
Set para cortar o cabelo profissional
Tradução das instruções originais
30
Ammattikäyttöön kehitetty hiustenleikkuukone
Alkuperäisen käyttöohjeen käännös
34
Professzionális hajvágó készlet
Az eredeti utasítások fordítása
38
Souprava profesionálního strojku na vlasy
Překlad originálních pokynů
42
Set Aparat de tuns profesional
Traducerea instrucţiunilor originale
46
Profesjonalna maszynka do strzyżenia włosów
Tłumaczenie oryginalnej instrukcji
50
54
Σετ επαγγελματικής κουρευτικής μηχανής
μεταφράσεις από τις αρχικές οδηγίες
58
Profesyonel Saç Kesme Makinesi Seti
Orijinal talimatların çevirisi
62
Професійний набір для підстригання волосся
Переклад з оригінальних інструкцій
66
Профессиональный набор для стрижки волос
Перевод с оригинальных инструкций
70
74
专业理发器套装
翻译自原文说明
78
85
ϲϓήΤϟ
ήόθϟ
κϗ
ίΎϬΟ
ϢϘσ
ΔϴϠλϷ
ΕΎϤϴϠόΘϟ
Ϧϣ
ΔϤΟήΗ
ϞϤόϟέϮΘγΩ
ί
ϪϤΟήΗ
̶Ϡλ
̵Ύϫ
ϪϓήΣ
̶ϧίϮϣ
ϦϴηΎϣ
ϪϋϮϤΠϣ
̵
Distributed by Ligo Electric SA - 6853 Ligornetto - Switzerland
Valera is a registered trademark of Ligo Electric S.A. - Switzerland
ʭʩʮʢʣ
ʺʸʥʴʱʺ
ʺʥʰʥʫʮʬ
ʹʥʮʩʹ
ʺʥʠʸʥʤ
00060627 cop giu2013 04/06/2013 12.29 Pagina 1
OPERATING INSTRUCTIONS - Type 652.02 - Type 652.03
Read these instructions carefully before using the appliance.
Available also on www.valera.com
WARNINGS
•For additional protection, the installation of a residual
current device (RCD) having a rated residual operating
current not exceeding 30mA is advisable in the
electrical circuit supplying the bathroom. Ask your
installer for advice.
•Make sure the unit is perfectly dry before using it.
•WARNING: Do not use this appliance near
bathtubs, showers, basins or other vessels
containing water.
•This appliance can be used by children from 8 years of
age and over, and by persons with limited physical,
sensory or mental abilities or who lack the relevant
experience and knowledge, if they are suitably
supervised or have been educated to use the appliance
safely and made aware of the associated risks.
•Do not allow children to play with the appliance.
•Children must not perform cleaning and maintenance
procedures unless supervised.
•Do not use your unit if it is not working properly. Do
not try to repair this electrical unit yourself, rather
contact an authorized technician. If the supply cord is
damaged, it must be replaced by the manufacturer, its
service agent or similarly qualified person in order to
avoid a hazard.
•When the appliance is used in a bathroom, unplug it
after use since the proximity of water presents a hazard
even when the appliance is switched off.
•Only connect this unit to alternating current and check that the mains supply voltage corresponds
to that indicated on the unit.
•Always switch off the appliance after use and disconnect the plug from the mains power socket.
Do not remove the plug from the mains power socket by pulling the cable.
•Do not pull the plug out of the power supply socket when your hands are wet.
•Before switching on the appliance, always check its conditions and also control the transformer
and power cable.
•The elements used to pack the unit (plastic bags, cardboard box, etc.) must be kept out of reach
of children as they are a potential danger to them.
•This unit must only be used for the purposes for which it is expressly intended. Any other use is
to be considered improper and therefore dangerous. The manufacturer accepts no responsibility
for damage caused by improper or erroneous use.
English
Ligo Electric SA - 6853 Ligornetto - Switzerland
6
Name and full address of purchaser
Name und vollständige Anschrift des Käufers
Nom et adresse completè de l’acheteur
Nome e indirizzo completo dell’acquirente
Nombre y dirección completa del comprador
Naam en adres van de consument
Nome e endereço do cliente
Ostajan nimi ja täydellinen osoite
Vevo
˝ neve éstelies cime
Jméno a adresa záhaznika
Numele i adresa completa˘ a compãrãtorului
Nazwisko oraz pelny adres kupuj
ą
cego
Alıcının tam ismi ve adresi
Mod. Nr.
Date of purchase
Kaufdatum
Date d’achat
Data d’acquisto
Fecha de adquisición
Datum aankoop
Data de compra
Ostopäivämäärä
Eladás dátuma
Datum prodeje
Data cumpãrãrii
Data zakupu
Satın alma tarihi
έΪϳήΧ
ϞϣΎϛ
ϲϧΎθϧ
ϭ
ϡΎϧ
ΪϳήΧ
ΦϳέΎΗ
4
2
5
3
6
9
8
B
1
2
A
A
B
1 = 0.8 mm
2 = 1.3 mm
3 = 1.8 mm
4 = 2.4 mm
5 = 3.0 mm
100%
75%
50%
25%
1 2 3 4
5
3.0
7
1
1
8
6
7
8
4
3
2
13
14
5
652.02
06520301
06520330
06520310
06520347
11
12
06520399
06520398
9
06520302
10
06520305
00060627 cop giu2013 04/06/2013 12.29 Pagina 2
7
MAINS POWER SUPPLY
Connect the transformer the (fig.1- ref. 9) by inserting the plug into the appliance socket (fig.1 - ref.5).
Plug the transformer into the mains.
Warning: if the appliance does not work with mains power when the battery charge has run down
completely, switch it off, recharge the battery for about five minutes and then switch back on again,
running on mains power.
BATTERY OPERATION
Type 652.02
•The appliance has a LED charge indicator (fig. 2).
••
4 LEDs lit = 100% charge
••
3 LEDs lit = 75% charge
••
2 LEDs lit = 50% charge
••
1 LEDs lit = 25% charge
•The LED charge indicator (fig. 1 - ref. 8) blinks when the battery is below the level of 25% charge.
•Only recharge the battery when you note a clear reduction in appliance power.
•When the battery is fully discharged, the appliance automatically switches off.
Type 652.03
•Only recharge the battery when you note a clear reduction in appliance power.
•When the battery is fully discharged, the appliance automatically switches off.
RECHARGING THE BATTERY
•Before using the appliance for the first time, charge the battery for 3 hours (Type 652.02) or 3,5
hours (Type 652.03). For subsequent charges, allow the appliance to charge for at least 2,5 hours
(Type 652.02) or 3 hours (Type 652.03).
•Switch off the appliance using the switch (fig.1 - ref.3). The battery can only be charged when the
appliance is switched off.
•Connect the transformer (fig.1 - ref.9) by inserting the plug into the appliance socket (fig.1 - ref.5).
Or connect the transformer to the base (fig.1 - ref.6) by inserting the plug into the base plug (fig.1
-ref.5), then place the appliance on the base.
•Plug the transformer into the mains.
•During battery charging the red light comes on (fig. 1 - ref. 8).
•
Type 652.02:
while charging the battery, the 4 green LEDs indicate the charge level reached. When
3 LEDs are steady on (after approx. 90 min. recharging), the appliance is ready to operate in
cordless mode up to 70 min.
USE
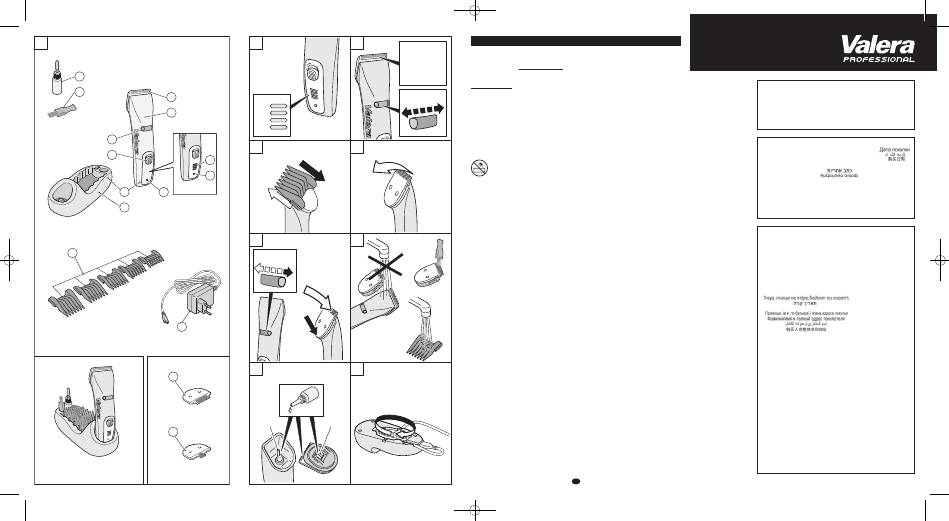
COMPONENTS
1 Clipper
2 Set of blades for hair, 46 mm
3 On/off switch
4 Cutting length selector
5 Socket for transformer
6 Base
7 Battery charge indicator (Type 652.02 only)
8 LED charge control
9 Charger
10 Guide combs
11 Cleaning brush
12 Lubricating oil
13 Beard and moustache blade set
(
optional
; not supplied with the appliance)
14 Sculpting blade set
(
optional
; not supplied with the appliance
•Do not expose the appliance to temperatures below 0°C or above 40°C. Avoid exposing the
appliance to direct and prolonged sunlight.
•Do not leave the appliance on charge in wet places and do not recharge the appliance when it is
wet.
•The appliance comes equipped with a NiMH battery. To help protect the environment, the batteries
should not be included with ordinary domestic waste, but should be taken to a special collection
point instead.
•Have the battery removed by qualified technical personnel or by the treatment and recycling centre.
•Do not expose the battery to liquid, moisture or high humidity
•Keep the battery away from magnetic fields, sources of heat and naked flames.
•Danger of scratches or cuts. Do not use a comb or a set of blades if they are damaged. Replace
them immediately, as they may cause injury.
•Take care not to scratch the skin when handling the appliance with the set of blades without combs.
The appliance can operate either using mains power or in cordless mode, as it has a
rechargeable battery.
00060627 int giu2013 04/06/2013 12.30 Pagina 7
8
•
Type 652.03:
after approx. 90 min. recharging, the red light (fig. 1 - ref. 8) begins to flash. When
reaching this charge level, the appliance is ready to operate in cordless mode up to 70 min.
•When fully recharged, the red light (fig. 1 - ref. 8) switches off.
•When the battery is fully charged, the appliance can be used up to 110 minutes without connection
to the mains.
•After a certain number of operating hours, charge duration in cordless mode may decrease
significantly.
•The maximum charge level is reached after 4 - 5 recharging procedures.
ADJUSTING THE CUTTING LENGTH
The appliance is equipped with the VARIO-CUT SYSTEM, which allows the selection of 5 different
cutting lengths (fig. 3) using the proper selector (fig. 1 - ref. 4).
CUTTING WITH GUIDE COMBS
Depending on the type of cut desired, the appliance can be used with or without a guide comb
(fig. 1 - ref. 10). Guide combs are used to achieve different cutting lengths ranging from 4 to 20 mm.
FITTING AND REMOVING THE GUIDE COMB
•Switch off the appliance.
•To fit the guide comb, slide and push it into place (fig. 4, A).
•To remove it, do the reverse operation (fig. 4, B).
CHANGING BLADES
•Switch off the appliance.
•To remove the blades, push them out of their slot from underneath (fig. 5).
•IMPORTANT: to replace the blades, set the selector (fig. 1 - ref. 4) to "3.0" (fig. 6); first insert
the rear part into the slot (fig. 6, A), then push the front to close it (fig. 6, B).
•IMPORTANT: before fitting the blade, make sure that the motor pin (fig. 8 - ref. 1) is adjusted so
that it can slot into the space on the inner side of the blade (fig. 8 - ref. 2).
CABLE REEL
The base (fig. 1 - ref. 6) has a compartment where part of the cable can be wrapped if the full length
is not required (fig. 9).
CARE AND MAINTENANCE
The cleaning and maintenance procedure must be carried out after every use.
•Switch OFF the appliance and disconnect it from the mains supply before performing any
maintenance or changing any parts.
•Never immerse the appliance in water!
•After every use, remove the guide comb then use the small brush to eliminate any hair from the
cutting head and its seat.
•Clean the outside of the appliance with a soft cloth (slightly damp if necessary). Never use solvents
or abrasive detergents!
•Remove the cutting head (fig.5) and evenly oil the blades and the seat of the motor pin which is
located on the inside (fig. 8).
•If after prolonged use, and despite regular cleaning and lubrication, the cutting ability of the
appliance appears to be diminished, the cutting head must be replaced.
DISPOSAL
The appliance must be disposed of in compliance with applicable environmental standards.
This appliance conforms to European Directives 2004/108/EC, 2006/95/EC,
2009/125/EC and Regulation (EC) No. 278/2009.
00060627 int giu2013 04/06/2013 12.30 Pagina 8
9
VALERA is a registered trade mark of Ligo Electric S.A. - Switzerland
The symbol on the product or on its packaging indicates that this product may not be treated
as household waste. Instead it shall be handed over to the applicable collection point for the recycling
of electrical and electronic equipment. By ensuring this product is disposed of correctly, you will help
prevent potential negative consequences for the environment and human health, which could
otherwise be caused by inappropriate waste handling of this product. For more detailed information
about recycling of this product, please contact your local city office, your household waste disposal
service or the shop where you purchased the product.
GUARANTEE
VALERA guarantees the appliance you have bought at following conditions:
1. The guarantee conditions for this appliance are as defined by our dealer in the country of sale. In
Switzerland and in the countries subject to the European directive 44/99/CE the guarantee period
is 24 months for domestic use and 12 months for professional or similar use. The guarantee
period starts from the date of purchase as stated on the present guarantee card regularly filled
out and stamped by the dealer or on the sale’s invoice.
2. The guarantee is applicable only against submission of the present guarantee card or the sale’s
invoice.
3. The guarantee covers the elimination of all defects arisen during the guarantee period resulting
from proven faults in material or workmanship. The elimination of the defects will be made either
by repairing the appliance or exchanging it. The guarantee does not cover any damage arising
from incorrect connection to the power supply, improper use, breakage, normal wear and non-
compliance with the Instructions for Use.
4. All other claims of any nature, including those for eventual damages outside of the appliance, are
excluded, unless our liability is legally mandatory.
5. The guarantee service is carried out free of charge; it does not affect the expiry date of the
guarantee.
6. The guarantee becomes void if repairs are undertaken by unauthorized persons.
For UK only: this guarantee in no way affects your rights under statutory law.
In case of defect, please return the appliance well packed and together with the guarantee card
regularly dated and stamped to one of our Valera Service Centres or to the dealer who will send it
to the official importer for the guarantee service.
00060627 int giu2013 04/06/2013 12.30 Pagina 9
10
BEDIENUNGSANLEITUNG - Type 652.02 - Type 652.03
Bitte lesen Sie die folgende Bedienungsanleitung vor dem Gebrauch des Gerätes aufmerksam
durch.
Verfügbar auch auf www.valera.com
HINWEIS
•Wichtig: als zusätzlicher Schutz wird die Installation einer Fehlerstromschutzeinrichtung (FI) mit einem Bemessungauslösestrom von nicht mehr als 30 mA im Badezimmerstromkreis empfohlen. Lassen Sie sich von Ihrem Elektroinstallateur beraten. •Stellen Sie sicher, dass das Gerät völlig trocken ist, bevor Sie es benutzen. •ACHTUNG: Benutzen Sie dieses Gerät nicht in der Nähe von Badewannen, Waschbecken oder sonstigen mit Wasser gefüllten Behältern. •Diese Geräte können von Kindern ab 8 Jahren sowie von Personen mit reduzierten physischen, sensorischen oder mentalen Fähigkeiten oder Mangel an Erfahrung und/oder Wissen benutzt werden, wenn sie beaufsichtigt oder bzgl. des sicheren Gebrauchs des Gerätes unterwiesen wurden und die daraus resultierenden Gefahren verstanden haben. •Kinder dürfen nicht mit dem Gerät spielen. •Reinigung und Wartung dürfen nicht durch Kinder durchgeführt werden, es sei denn sie sind beaufsichtigt. •Wenn der Gerät in einem Badezimmer verwendet wird, ist nach Gebrauch der Stecker zu ziehen, da die Nahe von Wasser eine Gefahr darstellt, auch wenn der Trockner ausgeschaltet ist. •Wenn die Anschlussleitung dieses Gerates beschadigt wird, muss sie durch den Hersteller oder seinen Kundendienst oder eine ahnlich qualifizierte Person ersetzt werden, um Gefahrdungen zu vermeiden.
•Betreiben Sie das Gerät ausschließlich mit Wechselstrom und prüfen Sie, dass die
Versorgungsspannung mit der auf dem Gerät angegebenen übereinstimmt.
•Nach dem Gebrauch muss das Gerät stets ausgeschaltet und der Stecker aus der Steckdose
gezogen werden. Ziehen Sie den Netzstecker nicht am Kabel aus der Steckdose.
•Ziehen Sie den Netzstecker nicht mit nassen Händen aus der Steckdose.
Deutsch
00060627 int giu2013 04/06/2013 12.30 Pagina 10
11
•Überprüfen Sie das Gerät vor dem Einschalten stets auf seinen einwandfreien Zustand und
kontrollieren Sie auch das Netzteil und das Netzkabel.
•Verpackungsteile des Gerätes (Plastiktüten, Kartons, usw.) nicht in Reichweite von Kindern lassen.
Sie stellen eine potentielle Gefahr dar.
•Dieses Gerät darf nur für solche Zwecke benutzt werden, für die es eigens entwickelt wurde. Jeder
bestimmungsfremde Gebrauch stellt eine potentielle Gefahr dar. Der Hersteller haftet nicht für
durch Missbrauch eventuell verursachte Schäden.
•Das Gerät keinen Temperaturen unter 0 °C oder über 40 °C aussetzen. Direkte oder länger
anhaltende Sonneneinstrahlung muss vermieden werden.
•Das Gerät nicht in feuchten Räumen und/oder in nassem Zustand aufladen.
•Das Gerät ist mit einer NiMH-Batterie ausgestattet. Akkus und Batterien dürfen nicht im Hausmüll
entsorgt werden. Geben Sie diese bitte bei den öffentlichen Sammelstellen ab.
•Die Batterie von einem Fachmann oder bei einem Behandlungs- und Verwertungszentrum entfernen
lassen.
•Die Batterie nicht übermäßiger Feuchtigkeit aussetzen oder mit Flüssigkeiten in Kontakt bringen.
•Die Batterie in einem angemessenen Sicherheitsabstand von Magnetfeldern, Wärmequellen und
offenen Flammen halten.
•Gefahr von Schnitten oder Kratzern. Ein beschädigter Kamm oder Klingensatz darf auf keinen Fall
weiter verwendet, sondern muss sofort ausgewechselt werden.
•Wird das Gerät mit dem Klingensatz ohne Aufsteckkämme benutzt, ist sorgfältig darauf zu achten,
dass die Haut nicht verletzt wird.
Das Gerät ist mit einem Akku ausgestattet und kann daher sowohl mit Netzstrom als auch
kabellos benutzt werden.
NETZBETRIEB
Den Transformator (Abb. 1 - Pos. 9) anschließen, indem der Stecker in die entsprechende
Gerätebuchse gesteckt wird (Abb. 1 - Pos. 5).
Den Transformator an die Steckdose anschließen.
Hinweis: Falls das Gerät bei vollständig entladener Batterie nicht mit Netzversorgung funktionieren
sollte, das Gerät ausschalten, die Batterie ca. fünf Minuten aufladen und das am Netz
angeschlossene Gerät wieder einschalten.
BATTERIEBETRIEB
Type 652.02
•Das Gerät verfügt über eine LED-Ladeanzeige (Abb. 2).
••
4 leuchtende LEDs = 100% Ladung
••
3 leuchtende LEDs = 75% Ladung
••
2 leuchtende LEDs = 50% Ladung
••
1 leuchtende LED = 25% Ladung
•Das Blinken der Ladekontrollleuchte (Abb.1 - Pos. 8) zeigt an, dass die Batterieladung unter 25%
beträgt.
•Die Batterie nur aufladen, wenn die Geräteleistung merklich abnimmt.
•Bei entladener Batterie schaltet sich das Gerät automatisch ab
Type 652.03
•Die Batterie nur aufladen, wenn die Geräteleistung merklich abnimmt.
•Bei entladener Batterie schaltet sich das Gerät automatisch ab
AUFLADEN DER BATTERIE
•Vor der ersten Benutzung des Gerätes muss die Batterie 3 Stunden (Type 652.02) bzw. 3,5 Stunden
(Type 652.03) aufgeladen werden. Bei den nächsten Aufladevorgängen das Gerät mindestens 2,5
Stunden (Type 652.02) oder 3 Stunden (Type 652.03) aufladen.
GEBRAUCH DES GERÄT
KOMPONENTEN
1 Haarschneider
2 Haar-Klingensatz 46 mm
3 Ein-/Aus-Schalter
4 Wahlschalter Schnittlänge.
5 Anschlussbuchse für Transformator
6 Ladestation
7 Akku-Ladeanzeige. (Nur Type 652.02)
8 Ladekontrollleuchte.
9 Netzteil
10 Führungskämme
11 Reinigungspinsel
12 Schmieröl
13 Klingensatz für Bart und Schnurrbart
(
optional
; nicht im Lieferumfang enthalten)
14 Klingensatz für Konturen
(
optional
; nicht im Lieferumfang enthalten)
00060627 int giu2013 04/06/2013 12.30 Pagina 11
12
•Das Gerät über den Schalter (Abb. 1 - Pos. 3) ausschalten. Das Aufladen der Batterie ist nur bei
ausgeschaltetem Gerät möglich.
•Den Transformator (Abb. 1 - Pos. 9) anschließen, indem der Stecker in die entsprechende
Gerätebuchse gesteckt wird (Abb. 1 - Pos. 5).
Oder den Transformator an die Ladestation anschließen (Abb. 1 - Pos. 6), indem der Stecker in die
Buchse der Ladestation gesteckt wird (Abb. 1 - Pos. 5) und das Gerät auf die Ladestation stellen.
•Den Transformator an die Steckdose anschließen.
•Während des Ladevorgangs schaltet sich die rote Kontrollleuchte ein (Abb.1 - Pos.8).
•
Type 652.02:
während des Ladevorgangs der Batterie zeigen die 4 grünen LEDs den erreichten
Ladezustand an. Mit 3 dauerhaft leuchtenden LEDs (ca. 90 Min. Ladezeit) kann das Gerät bereits
bis 70 Minuten im kabellosen Betrieb arbeiten.
•
Type 652.03:
nach ca. 90 min. Ladezeit beginnt die rote Kontrollleuchte (Abb.1 - Pos.8) zu blinken.
Mit diesem Ladezustand kann das Gerät bereits bis 70 Minuten im kabellosen Betrieb arbeiten.
•Nach erfolgter Aufladung erlischt die rote Kontrollleuchte (Abb.1 - Pos.8).
•Mit vollständig aufgeladener Batterie kann das Gerät 110 Minuten ohne Netzversorgung betrieben
werden.
•Nach einer gewissen Betriebsstundenzahl kann die Laufdauer im kabellosen Betrieb merklich
abnehmen.
•Den maximalen Ladezustand erhält man nach 4 - 5 Ladevorgängen.
EINSTELLEN DER SCHNITTLÄNGEN
Das Gerät ist mit dem VARIO-CUT SYSTEM ausgestattet, mit dem 5 verschiedene Schnittlängen
(Abb. 3) über den entsprechenden Schnittlängeneinsteller (Abb. 1 - Pos. 4) ausgewählt werden
können.
SCHNITT MIT DEN FÜHRUNGSKÄMMEN
Je nach gewünschtem Haarschnitt kann das Gerät mit oder ohne Führungskämme benutzt werden
(Abb. 1 - Pos. 10). Mit den Führungskämmen können unterschiedliche Schnittlängen von 4 bis 20
mm erzielt werden.
EINSETZEN UND ABNAHME DES FÜHRUNGSKAMMS
•Das Gerät ausschalten.
•Zum Einsetzen des Führungskamms diesen in seinen Sitz schieben (Abb. 4A)
•Zum Herausziehen umgekehrt verfahren (Abb.4B).
KLINGENWECHSEL
•Das Gerät ausschalten.
•Zur Entnahme der Klingen diese von unten aus ihrem SItz drücken (Abb. 5).
•ACHTUNG: Zum Einsetzen der Klingen den Schnittlängeneinsteller (Abb. 1 - Pos. 4) auf “3.0”
(Abb. 6) stellen; zunächst das hintere Teil einsetzen (Abb. 6, A), danach das Vorderteil
zuschieben (Abb. 6, B).
ACHTUNG: Prüfen Sie vor der Montage der Klinge, ob der Motorzapfen (Abb. 8 - Pos. 1) so
ausgerichtet ist, dass er in die Aufnahme an der Klingeninnenseite einrastet (Abb. 8 - Pos. 2).
KABELAUFROLLFACH
Die Ladestation (Abb. 1 - Pos. 6) verfügt über ein Fach zum Aufrollen des Kabels, falls es nicht in
seiner gesamten Länge benötigt wird (Abb. 9)
REINIGUNG UND WARTUNG
Reinigung und Wartung sind nach jedem Gebrauch durchzuführen.
•Wartungs- oder Austauscharbeiten dürfen ausschließlich am ausgeschalteten und vom
Transformator getrennten Apparat ausgeführt werden.
•Das Gerät nicht in Wasser tauchen!
•Nach jedem Gebrauch den Kamm abnehmen und mit der Bürste die Haarreste vom Schneidkopf
und seinem Sitz entfernen.
•Das Gerätegehäuse mit einem weichen, eventuell leicht feuchten Tuch reinigen. Keinesfalls
Lösemittel oder Scheuermittel verwenden!
•Den Schneidkopf (Abb. 5) abnehmen und die Klingen und den Sitz des innenliegenden
Motorzapfens regelmäßig ölen.
00060627 int giu2013 04/06/2013 12.30 Pagina 12
13
Das Symbol auf dem Produkt oder seiner Verpackung weist darauf hin, dass dieses Produkt
nicht als normaler Haushaltsabfall zu behandeln ist, sondern an einem Sammelpunkt für das
Recycling von elektrischen und elektronischen Geräten abgegeben werden muss. Durch Ihren Beitrag
zum korrekten Entsorgen dieses Produktes schützen Sie die Umwelt und die Gesundheit Ihrer
Mitmenschen. Umwelt und Gesundheit werden durch falsches Entsorgen gefährdet. Weitere
Informationen über das Recycling dieses Produkts erhalten Sie von Ihrem Rathaus, Ihrer Müllabfuhr
oder dem Geschäft, in dem Sie das Produkt gekauft haben.
VALERA ist eine eingetragene Schutzmarke der Ligo Electric S.A. - Schweiz
•Falls nach längerem Gebrauch und trotz ordnungsgemäßer Reinigung und Ölung die
Schneidleistung des Gerätes nachlässt, muss der Schneidkopf ersetzt werden. (Abb. 8)
ENTSORGUNG
Das Gerät muss den geltenden Umweltschutzbestimmungen entsprechend entsorgt werden.
Dieses Gerät erfüllt die Bestimmungen der europäischen Richtlinien 2004/108/EG,
2006/95/EG, 2009/125/EG und der Verordnung (EG) Nr. 278/2009.
GARANTIEBEDINGUNGEN
VALERA leistet für dieses Gerät - zusätzlich zu der gesetzlichen Gewährleistung des Händlers aus
Kaufvertrag - dem Endabnehmer gegenüber eine Garantie zu nachstehenden Bedingungen:
1. Für dieses Gerät gelten die Garantiebedingungen unseres Händlers im Verkaufsland. In der
Schweiz und in den Ländern, wo die europäische Verordnung 44/99/CE gilt, beträgt die
Garantiezeit 24 Monate bei privatem Gebrauch und 12 Monate bei gewerblichem oder einem
solchen gleichzusetzenden Gebrauch. Die Garantiezeit beginnt am Kauftag des Gerätes, der
durch die ausgefüllte Garantiekarte oder einen sonstigen Kaufbeleg nachzuweisen ist.
2. Die Garantie wird nur bei Vorlage der Garantiekarte oder eines Kaufbeleges geleistet.
3. Die Garantieleistung umfasst die Behebung aller innerhalb der Garantiezeit auftretenden Mängel
des Gerätes, die nachweislich auf Material- oder Fertigungsfehlern beruhen. Die Behebung der
Mängel kann nach unserer Wahl durch Instandsetzung oder durch Umtausch des Gerätes
erfolgen. Nicht unter Garantie fallen Mängel oder Schäden, die durch nicht vorschriftsmässigen
elektrischen Anschluss, durch unsachgemässe Handhabung sowie durch Nichtbeachtung der
Gebrauchsanleitung entstanden sind.
4. Weitere Ansprüche irgendwelcher Art, insbesondere solche auf Ersatz ausserhalb des Gerätes
entstandener Schäden, sind – soweit die Haftung nicht zwingend gesetzlich angeordnet ist -
ausgeschlossen.
5. Die Garantieleistungen werden ohne Berechnung durchgeführt; sie bewirken weder eine
Verlängerung noch einen Neubeginn der Garantiezeit.
6. Diese Garantie erlischt bei Eingriff nicht autorisierter Stellen.
Sollten Sie die Garantie in Anspruch nehmen müssen, dann senden Sie bitte das defekte Gerät gut
verpackt an eine unserer autorisierten Service-Stellen. Vergessen Sie nicht, unbedingt die
Garantiekarte und/oder den Kaufbeleg beizufügen, da ohne diese keine Garantieleistung erfolgen
kann.
00060627 int giu2013 04/06/2013 12.30 Pagina 13
Table of contents
- •Wichtig: als zusätzlicher Schutz wird die Installation einer Fehlerstromschutzeinrichtung (FI) mit einemBemessungauslösestrom von nicht mehr als 30 mA imBadezimmerstromkreis empfohlen. Lassen Sie sichvon Ihrem Elektroinstallateur beraten. •Stellen Sie sicher, dass das Gerät völlig trocken ist, bevor Sie es benutzen. •ACHTUNG: Benutzen Sie dieses Gerät nicht in der Nähe von Badewannen, Waschbecken odersonstigen mit Wasser gefüllten Behältern. •Diese Geräte können von Kindern ab 8 Jahren sowie von Personen mit reduzierten physischen,sensorischen oder mentalen Fähigkeiten oder Mangelan Erfahrung und/oder Wissen benutzt werden, wennsie beaufsichtigt oder bzgl. des sicheren Gebrauchsdes Gerätes unterwiesen wurden und die darausresultierenden Gefahren verstanden haben. •Kinder dürfen nicht mit dem Gerät spielen. •Reinigung und Wartung dürfen nicht durch Kinder durchgeführt werden, es sei denn sie sindbeaufsichtigt. •Wenn der Gerät in einem Badezimmer verwendet wird, ist nach Gebrauch der Stecker zu ziehen, da die Nahevon Wasser eine Gefahr darstellt, auch wenn derTrockner ausgeschaltet ist. •Wenn die Anschlussleitung dieses Gerates beschadigt wird, muss sie durch den Hersteller oder seinenKundendienst oder eine ahnlich qualifizierte Personersetzt werden, um Gefahrdungen zu vermeiden.
- •Important: pour garantir une protection optimale, il est conseillé d’installer dans l’installation électriquealimentant l’appareil un interrupteur différentiel avecune prise de courant différentielle ne dépassant pas 30mA. Contactez votre électrotechnicien de confiancepour tout renseignement complémentaire. •Vérifier que l’appareil soit complètement sec avant de l’utiliser •ATTENTION: ne pas utiliser cet appareil à proximité de baignoires, de lavabos ou autresrécipients contenant de l'eau. •Il est requit un âge minimum de 8 ans pour l’utilisation de cet appareil. •L’utilisation de cet appareil par des personnes aux capacités physiques, sensorielles ou mentales réduitesest fortement déconseillée à moins qu’elles soientsurveillées ou qu’elles aient été instruites correctementquant à l’utilisation de l’appareil de la part de tiers •Cet appareil doit être tenu hors de portée des enfants.•Le nettoyage et l’entretien de l’appareil ne doivent pas être effectuées par des enfants non surveillés. •N’utilisez pas l’appareil s’il présente des anomalies. N’essayez pas de réparer vous-même l’appareilélectrique, adressez-vous à un technicien agréé. Toutcâble d’alimentation endommagé doit être remplacépar le fabricant, son service d’assistance technique oupar une personne ayant une compétence analogue defaçon à éviter tout risque de choc électrique. •En cas d’utilisation de l’appareil dans une salle de bains, débranchez-le après utilisation car la présenced’eau dans la même pièce pourrait être dangereux,même si l’appareil est éteint.
- •Importante: per garantire una protezione supple- mentare si consiglia di installare nell’impianto elettrico,con il quale viene alimentato l’apparecchio, uninterruttore differenziale con una corrente di interventonon superiore a 30 mA. Per maggiori informazionirivolgersi all’elettrotecnico di fiducia. •Assicurarsi che l’apparecchio sia perfettamente asciutto prima di utilizzarlo. •ATTENZIONE: non utilizzare questo apparecchio in prossimità di vasche da bagno, lavelli o altrirecipienti che contengano acqua. •Il presente apparecchio può essere utilizzato dai bambini a partire da 8 anni di età e da persone dalleridotte capacità fisiche, sensoriali o mentali, oppurecon mancanza di esperienza e di conoscenza se sitrovano sotto adeguata sorveglianza, oppure se sonostati istruiti circa l’uso dell’apparecchio in modo sicuroe se si rendono conto dei pericoli correlati. •I bambini non devono giocare con l’apparecchio.•Le operazioni di pulizia e di manutenzione non devono essere effettuate dai bambini senza sorveglianza. •Non utilizzare il vostro apparecchio se presenta un’anomalia. Non cercare di riparare l’apparecchioelettrico da soli, bensì rivolgersi ad un tecnicoautorizzato. Se il cavo di alimentazione è danneggiato,deve essere sostituito dal costruttore o dal suo servizioassistenza tecnica o comunque da una persona conqualifica similare, in modo da prevenire ogni rischio. •Quando l'apparecchio è usato in un bagno, scollegarlo dall'alimentazione elettrica dopo l'uso, perché lavicinanza all'acqua rappresenta un pericolo anchequando l'apparecchio è spento.
- •Importante: para garantizar una protección suplementaria, se aconseja colocar en la instalacióneléctrica de alimentación del aparato, un interruptordiferencial con una corriente de intervención que nosupere los 30 mA. Para mayores informaciones,dirigirse al electrotécnico de confianza. •Antes de usar el aparato, controle que esté bien seco. •ATENCIÓN: no utilizar este aparato cerca de bañeras, lavabos u otros recipientes quecontengan agua. •Este aparato puede ser utilizado por niños a partir de los 8 años de edad y también por personas concapacidades físicas, sensoriales o mentales reducidas,o carentes de experiencia y de conocimiento, siempreque lo hagan bajo las instrucciones y la vigilancia deuna persona que les haya explicado el modo de usodel aparato y los peligros que puede implicar. •Los niños no deben jugar con el aparato.•La limpieza y el mantenimiento no deben ser efectuados por los niños sin vigilancia. •No utilice el aparato si está averiado. No intente reparar nunca el aparato. Si está averiado, tiene que llevarlo aun centro técnico autorizado. Si el cable dealimentación está dañado, debe ser sustituido por elfabricante o por el servicio de asistencia técnica o poruna persona con una calificación similar, para prevenircualquier riesgo. •Cuando se utilice el aparato en el baño, desenchúfelo una vez que haya terminado. La proximidad del aguasupone un peligro, incluso cuando está apagado.
- • Belangrijk: voor extra veiligheid raden wij u aan deelektrische installatie waarmee het apparaat gevoedwordt te voorzien van een aardlekschakelaar met eenstroomsterkte van niet meer dan 30 mA. Wendt u voormeer informatie tot uw elektrotechnicus. •Controleer voor gebruik van het apparaat of het goed droog is. •LET OP: gebruik dit apparaat niet in de buurt van badkuipen, wastafels of andere houders metwater. •Dit apparaat mag worden gebruikt door kinderen vanaf 8 jaar en door personen met beperkte lichamelijke,zintuiglijke of geestelijke vermogens of met weinigervaring en/of kennis, mits deze personen onderpassend toezicht staan of geïnstrueerd zijn over hetgebruik van het apparaat en ze zich bewust zijn van debijbehorende gevaren. •Kinderen mogen niet met het apparaat spelen.•De reiniging en het onderhoud mogen niet zonder toezicht door kinderen worden uitgevoerd. •Gebruik uw apparaat niet als deze niet goed functioneert. Probeer het elektrische apparaat niet zelfte repareren, maar wend u tot een erkende technicus.Als het netsnoer beschadigd is, moet het wordenvervangen door de fabrikant, de onderhoudsdienst of inelk geval door een persoon met een vergelijkbarekwalificatie om elk risico uit te sluiten. •Als het toestel in een badkamer wordt gebruikt, moet na gebruik de stekker uit het stopcontact wordengenomen, aangezien de aanwezigheid van water altijdgevaar oplevert, zelfs wanneer het toestel isuitgeschakeld.
- • Importante: para garantir uma protecção suplementaré aconselhável instalar no sistema eléctrico, com oqual o aparelho é alimentado, um interruptor diferencialcom uma corrente de intervenção não superior a 30mA. Para mais informações, contacte um electricistada sua confiança. •Certifique-se de que o aparelho está devidamente seco antes de o utilizar. •ATENÇÃO: não utilize este aparelho junto a banheiras, bancas ou outros recipientes quecontenham água. •O presente aparelho pode ser utilizado por crianças a partir de 8 anos de idade e por pessoas comcapacidades físicas, sensoriais ou mentais reduzidas,ou sem experiência e conhecimentos, desde queestejam sob vigilância adequada, que tenham sidoinstruídos acerca da utilização segura do aparelho eque estejam conscientes dos perigos associados. •As crianças não devem brincar com o aparelho.•As operações de limpeza e de manutenção não devem ser efectuadas por crianças sem vigilância. •Não utilize o aparelho se este apresentar alguma anomalia. Não tentar reparar o aparelho eléctrico,deverá antes contactar um técnico autorizado. Se ocabo de alimentação estiver danificado, deverá sersubstituído pelo fabricante ou assistência técnica, oupor uma pessoa com habilitação similar, de forma aprevenir quaisquer riscos. •Quando utilizar o aparelho numa casa de banho, desligue-o da alimentação eléctrica após o uso, pois aproximidade com a água constitui um perigo, mesmocom o aparelho desligado.
- • Tärkeää: lisäsuojauksen varmistamiseksisähköjärjestelmään on suositeltavaa asentaaerotuskytkin, jonka laukeami-skynnys on korkeintaan 30 mA. Kysy lisätietojaasiantuntevalta sähköasentajalta. • Tarkista ennen käyttöä, että laite on täysin kuiva. • HUOMIO: älä käytä tätä laitetta kylpyammeen, pesualtaan tai muun vettä sisältävän astianlähellä. • Laitteen käyttö on sallittu yli 8-vuotiaille lapsille ja fyysisesti, aisteiltaan tai henkisesti rajoitteisillehenkilöille tai henkilöille, joilla ei ole kokemusta laitteenkäytöstä, vain siinä tapauksessa, että käyttöä valvotaanriittävästi tai heille on neuvottu käyttämään laitettaturvallisella tavalla ja he ovat tietoisia käyttöön liittyvistävaaroista. • Älä anna lasten leikkiä laitteella.• Lapset eivät saa puhdistaa tai huoltaa laitetta ilman valvontaa. • Älä käytä laitetta, jos siinä on jokin toimintahäiriö. Älä yritä korjata sähkölaitetta omatoimisesti, vaan käännyaina ammattitaitoisen sähköasentajan puoleen. Joslaitteen virtajohto vaurioituu, vaarojen välttämiseksijohdon saa vaihtaa vain valmistaja tai valtuutettuhuoltoliike tai joku muu ammattitaitoinensähköasentaja. • Jos laitetta käytetään kylpyhuoneessa, irrota pistoke pistorasiasta käytön jälkeen, sillä vesi aiheuttaa vaaranmyös silloin, kun laitteesta on kytketty virta pois päältä.
- • Fontos: fokozott védelem biztosításához javasoljuk, hogy a berendezés tápfeszültségét biztosítóelektromos hálózatba egy nem több, mint 30 mAbeavatkozási áramerősségű differenciál megszakítólegyen beépítve. Amennyiben további információkravan szüksége, forduljon szokásos villanyszerelőjéhez. • A használata előtt ellenőrizze a készüléket, hogy teljesen száraz-e. • FIGYELEM: A készüléket ne használja fürdőkád, mosdó vagy más víztároló edény közelében. • A készüléket 8 évnél idősebb gyermekek, valamint korlátozott fizikai, érzékszervi vagy mentálisképességű, illetve tapasztalattal és ismeretekkel nemrendelkező személyek csak megfelelő felügyeletmellett használhatják, vagy pedig ha biztonságosanmegtanították számukra a készülék használatát, éstudatában vannak a készülékkel kapcsolatosveszélyeknek. • Gyermekek nem játszhatnak a készülékkel.• Felügyelet nélküli gyermekek nem végezhetik a tisztítási és karbantartási műveleteket. • Ne használja a készüléket, ha rendellenességet mutat. Ne próbálja egyedül megjavítani az elektromoskészüléket, forduljon erre felhatalmazottszakemberhez. Ha a tápvezeték megsérült, a gyártó, agyártó vevőszolgálata vagy hasonló felkészültségűszakember ki kell, hogy cserélje úgy, hogy mindenkockázatot el lehessen kerülni. • Amikor a készüléket fürdőszobában használja, húzza ki a csatlakozódugaszt a használat után, mivel a vízközelsége még akkor is veszélyt jelent, amikor akészülék ki van kapcsolva.
- • Důležité: pro zvýšení bezpečnosti doporučujeme, aby hodnota chrániče instalovaného v elektrickém systémunebyla větší než 30 mA. Pro další informace kontaktujtekvalifikovaného elektrikáře. • Před použitím se ujistěte, že je přístroj suchý. • POZOR: Tento přístroj nepoužívejte v blízkosti vany, umyvadla nebo jiných nádob s vodou. • Tento přístroj smí používat děti od 8 let věku a osoby s omezenými fyzickými, smyslovými nebo duševnímischopnostmi nebo nedostatkem zkušeností a znalostí,pokud jsou pod vhodným dohledem nebo pokud bylipoučeni o bezpečném používání tohoto přístroje apokud si uvědomují související nebezpečí. • Děti si nesmí s přístrojem hrát.• Čištění a údržba se nesmí svěřit dětem bez dozoru.• Přístroj nepoužívejte, pokud vykazuje závady. Nesnažte se elektrický přístroj opravovat sami,obracejte se vždy na příslušnou opravnu. Pokud jepřívodní kabel poškozený, musí jej vyměnit výrobcenebo jeho oprávněné servisní středisko nebo osoba sobdobnou kvalifikací tak, aby se předešlo jakémukoliriziku. • Jestliže používáte přístroj v koupelně, vytáhněte po použití zástrčku ze zásuvky, protože voda jenebezpečná i pro vypnutý přístroj.
- • Important: pentru a garanta o protecţie suplimentară, este recomandat ca un întrerupător diferenţial cu uncurent de intervenţie nu mai mare de 30 mA să fieinstalat în sistemul electric cu care e alimentat aparatul.Pentru mai multe informaţii consultaţi un electrician. • Asiguraţi-vă că aparatul este perfect uscat înainte de a-l folosi. • ATENŢIE: nu utilizaţi acest aparat în apropierea căzilor, a chiuvetelor sau a altor recipiente careconţin apă. • Acest aparat poate fi utilizat de copii începând cu vârsta de 8 ani şi de persoane cu capacităţi fizice, senzorialesau mentale reduse, sau de persoane lipsite deexperienţă şi de cunoştinţe, dacă acestea suntsupravegheate în mod corespunzător sau dacă au fostinstruite în legătură cu utilizarea aparatului în mod sigurşi dacă înţeleg care sunt pericolele legate de acesta. • Copiii nu trebuie să se joace cu aparatul.• Operaţiile de curăţare şi de întreţinere nu trebuie să fie efectuate de copii nesupravegheaţi. • Nu folosiţi aparatul dacă nu funcţionează corect. Nu încercaţi să reparaţi defecţiunile, duceţi aparatul la unservice. Dacă este deteriorat cablul de alimentare,trebuie să fie înlocuit de către producător sau deserviciul său de asistenţă tehnică, sau oricum de cătreo persoană cu o calificare similară, astfel încât să seevite orice risc. • Când aparatul este utilizat în baie, scoateţi-l din priză după utilizare, pentru că apropierea apei reprezintă unpericol chiar şi atunci când aparatul este stins.
- • Ważne: aby zapewnić dodatkową ochronę, w instalacji elektrycznej zasilającej urządzenie zaleca się montażwyłącznika różnicowoprądowego o prądzie zasilanianieprzekraczającym 30 mA. Więcej informacji możnauzyskać u kompetentnego elektromontera. • Upewnić się, że urządzenie jest całkowicie suche przed jego użyciem. • UWAGA: nie używać urządzenia w pobliżu wanien, umywalek lub innych zbiornikównapełnionych wodą. • Urządzenie może być obsługiwane przez dzieci w wieku powyżej 8 lat oraz przez osoby o ograniczonejsprawności fizycznej, sensorycznej lub umysłowej,bądź nieposiadające doświadczenia i umiejętności,jeżeli znajdują się one pod odpowiednim nadzorem lubzostały poinstruowane w zakresie bezpiecznej obsługiurządzenia i są świadome związanych z nią zagrożeń. • Pilnować, aby dzieci nie bawiły się urządzeniem.• Czyszczenie i konserwacja nie mogą być wykonywane przez dzieci pozostające bez odpowiedniego nadzoru. • Nie używać urządzenia, jeśli pojawią się nieprawidłowości w jego funkcjonowaniu. Nie próbowaćsamemu naprawiać urządzenia elektrycznego, leczzwrócić się do wykwalifikowanego technika. Jeżeliprzewód zasilający jest uszkodzony, ze względówbezpieczeństwa należy zlecić jego wymianęproducentowi, autoryzowanemu serwisowi lub osobieo podobnych kwalifikacjach. • Jeśli urządzenie jest używane w łazience, po zakończeniu jego używania należy wyjąć wtyczkę zkontaktu, ponieważ bliskość wody stanowi zagrożenie,pomimo że urządzenie jest wyłączone.
- 1 . ʹʥʮʩʹʤ ʺʬʩʧʺ ʩʰʴʬ ʩʸʮʢʬ ʤʹʡʩ ʤʰʥʫʮʤʹ ʠʣʥʥ . 2 . ʺʧʬʷʮʬ ʪʥʮʱʡ ʤʰʥʫʮʡ ʹʮʺʹʤʬ ʯʩʠ , ʭʩʺʥʸʩʹ ʸʧʠ ʭʩʮ ʸʥʷʮ ʬʫ ʥʠ ʸʥʩʫ . 3 . ʬʩʢ ʬʲʮ ʭʩʣʬʩʬ ʹʥʮʩʹʬ ʸʺʥʮ ʸʩʹʫʮʤ 8ʥʸʤʡʥʤʥ ʤʣʩʮʡ ʷʸʥ ʪʠ ʺʥʩʥʬʡʢʥʮ ʩʬʲʡʬʥ ʺʥʧʩʨʡʤʥ ʹʥʮʩʹʤ ʺʥʠʸʥʤ ʭʤʬ . 4 . ʸʩʹʫʮʡ ʷʧʹʬ ʭʩʣʬʩʬ ʺʺʬ ʯʩʠ . 5 . ʸʢʥʡʮʥ ʩʠʸʧʠ ʭʣʠ ʩʣʩʡ ʷʸʥ ʪʠ ʤʹʲʩ ʸʶʥʮʤ ʯʥʩʷʩʰ . 6 . ʥʠʩʶʥʤʬʥ ʸʩʹʫʮʤ ʺʠ ʺʥʡʫʬ ʹʩ ʹʥʮʩʹʤ ʳʥʱʡ ʬʮʹʧʤʮ . ʩʣʩ ʬʲ ʷʸʥ ʪʠ ʤʹʲʺ ʲʷʺʤ ʺʠʶʥʤ ʬʡʫ ʺʫʩʹʮ ʩʣʩ ʬʲ ʠʬʥ ʲʷʺʤ ʬʹ ʥʺʫʩʹʮ ʬʮʹʧʤ . 7 . ʺʥʡʥʨʸ ʭʩʩʣʩʡ ʬʮʹʧʬ ʸʶʥʮʤ ʺʠ ʱʩʰʫʤʬ ʯʩʠ . 8 . ʬʡʫʤ ʭʠ ʷʥʣʡʬ ʹʩ ʬʮʹʧʬ ʬʡʫʤ ʺʱʰʫʤ ʩʰʴʬ ʯʩʷʺ . ʬʴʨʩʹ ʪʮʱʥʮ ʭʸʥʢʬ ʺʥʰʴʬ ʹʩ ʠʬʥ ʤʣʩʮʡ ʤʩʲʡʡ .
- *
- • Σημαντικό: Για μεγαλύτερη προστασία, συνιστάται να τοποθετήσετε στην ηλεκτρική εγκατάσταση από τηνοποία τροφοδοτείται η συσκευή ένα διαφορικόδιακόπτη με ρεύμα λειτουργίας έως 30 mA. Γιαπερισσότερες πληροφορίες, απευθυνθείτε σε ένανέμπειρο ηλεκτρολόγο. • Βεβαιωθείτε ότι η συσκευή είναι εντελώς στεγνή πριν από τη χρήση. • ΠΡΟΣΟΧΗ: μη χρησιμοποιείτε τη συσκευή αυτή κοντά σε μπανιέρες, νεροχύτες ή άλλα δοχεία πουπεριέχουν νερό. • Η συσκευή αυτή μπορεί να χρησιμοποιηθεί από παιδιά ηλικίας 8 ετών και άνω, καθώς και από άτομα μεμειωμένες σωματικές, αισθητήριες ή διανοητικέςικανότητες ή με έλλειψη εμπειρίας και γνώσεων εφόσονβρίσκονται υπό επίβλεψη ή έχουν λάβει οδηγίες σχετικάμε την ασφαλή χρήση της συσκευής και έχουνκατανοήσει τους σχετικούς κινδύνους. • Τα παιδιά δεν πρέπει να παίζουν με τη συσκευή.• Οι εργασίες καθαρισμού και συντήρησης δεν πρέπει να εκτελούνται από παιδιά χωρίς επίβλεψη. • Μη χρησιμοποιείτε τη συσκευή εάν εμφανίζει κάποια δυσλειτουργία. Μην επιχειρήσετε να επισκευάσετε τηνηλεκτρική συσκευή μόνοι σας. Απευθυνθείτε σεεξουσιοδοτημένο τεχνικό. Εάν το καλώδιο τροφοδοσίαςυποστεί ζημιά, πρέπει να αντικατασταθεί από τονκατασκευαστή ή από τον εξουσιοδοτημένο τεχνικόσέρβις ή από άλλο τεχνικό με παρόμοια εξειδίκευση,ώστε να αποφευχθεί κάθε κίνδυνος. • Όταν η συσκευή χρησιμοποιείται στο μπάνιο, πρέπει να την αποσυνδέετε από το ηλεκτρικό δίκτυο μετά τηχρήση, καθώς υπάρχει κίνδυνος από τυχόν επαφή μετο νερό ακόμη και όταν η συσκευή είναι σβηστή.
- • Önemli: ekstra bir koruma sağlamak amacıyla, cihazaelektrik sağlayan elektrik besleme tesisatına 30 mAdeğerli bir otomatik atmalı diferansiyel şalter (devrekesici) takılması önerilir. Daha fazla bilgi için, lütfen elektrikçinizle temasageçiniz. • Kullanmadan önce cihazın tamamen kuru olduğundan emin olunuz. • DİKKAT: bu cihazı banyo küvetinin, evyenin veya su içeren diğer kapların yakınında kullanmayınız. • Bu cihaz, 8 yaşın üzerindeki çocuklar ve fiziksel, duyusal veya zihinsel kapasitesi düşük ya da deneyimiyetersiz kişiler tarafından yeterli gözetim altındaoldukları ya da cihazın güvenli bir şekilde kullanımı ileilgili bilgilendirildikleri ve ilgili tehlikeler konusundabilinçli oldukları takdirde kullanılabilir. • Çocuklar cihaz ile kesinlikle oynamamalıdır.• Temizlik ve bakım işlemleri gözetim altında olmayan çocuklar tarafından gerçekleştirilmemelidir. • Eğer herhangi bir bozukluk varsa cihazı kullanmayınız. Elektrikli cihazları asla kendi başınıza tamir etmeyekalkmayınız, daima yetkili bir teknisyen çağırınız.Elektrik kablosu, hasarlı olması halinde herhangi birriski önlemek için imalatçı firma veya teknik destekservisi tarafından ya da benzer vasıflara sahip bir kişitarafından değiştirilmelidir. • Cihaz banyoda kullanıldığında, kullandıktan sonra fişini prizden çekiniz çünkü suyun varlığı, cihaz kapalı bileolsa bir tehlike arz eder.
- • Важливо: Для гарантії додаткової безпекирекомендовано встановити в основнійелектромережі, до якої підключено пристрій,диференційне реле-запобіжник, розраховане наробочий струм до 30 мА. За докладнішоюінформацією зверніться до кваліфікованогоелектрика. • Перед використанням перевірте, чи повністю сухий прилад. • УВАГА: не використовуйте цей прилад біля ванн, душових кабінок, резервуарів та іншихємностей з водою. • Діти віком від 8 років та особи з обмеженими фізичними, психічними та сенсорнимиможливостями або недостатнім досвідом тазнаннями, можуть користуватися цим приладом, заумови що вони знаходяться під відповіднимнаглядом або були проінструктовані щодо безпечноїексплуатації приладу й усвідомлюють наявнийризик. • Не дозволяйте дітям гратися з приладом.• Чищення та догляд за приладом не повинні виконуватися дітьми без нагляду. • Не користуйтесь несправним приладом. Не намагайтеся самостійно полагодити електроприлад,зверніться до уповноваженого фахівця. З метоюзапобігання ризикам заміну несправного шнуруживлення має виконувати виробник, фахівці з йогосервісного центру або фахівці з відповідноюкваліфікацією. • Якщо прилад використовується у ванній кімнаті, необхідно після користування від’єднати його відрозетки електромережі, тому що близькість водистановить небезпеку навіть тоді, коли приладвимкнено.
- • Внимание: Для обеспечения дополнительнойзащиты рекомендуется установить в системеэлектропроводки, к которой подключается прибор,дифференциальный выключатель с токомсрабатывания не выше 30 мА. За более подробнойинформацией обращайтесь к квалифицированномуэлектрику. • Прежде чем пользоваться прибором, убедись, чтобы он полностью высох. • ВНИМАНИЕ: не используйте этот прибор поблизости от ванн, раковин или другихемкостей, заполненных водой. • Данный прибор может использоваться детьми от 8 лет и людьми с ограниченными физическими,сенсорными или умственными возможностями,либо с недостатком опыта и знаний в случае, еслиони находятся под надлежащим присмотром, либобыли проинструктированы о безопасном способеэксплуатации прибора и отдают себе отчет овозникающих при этом рисках. • Не давайте детям играть с прибором.• Операции по чистке и техобслуживанию прибора не должны проводиться детьми без надзора. • Не используйте прибор, если в нем наблюдается неисправность. Не пытайтесь самиотремонтировать электрический прибор, аобратитесь к авторизованному мастеру. Есликабель питания поврежден, его замена должнапроводиться самим изготовителем илиспециалистами его сервисного центра, либо жетехником с подобной им квалификацией с цельюпредупреждения всех возможных рисков. • Если аппарат используется в ванной комнате, необходимо после этого вынуть вилку шнурапитания из розетки, так как близость водыпредставляет опасность, даже когда приборвыключен.
- • ϡΎϫ : ϲϠοΎϔΗ ϊσΎϗ ΐϴϛήΘΑ ϲ λϮϧ ˬϲϓΎοϹ ϥΎϤπϟ ϑΪϬΑ ϕϮϔϳ ϻ έΎϴΘΑ Ω ϭΰϣ 30 ˰ ήϴΒϣ ϡ 30 A ϲΎΑήϬϜϟ ίΎϬΠϟ ϲϓ ίΎϬΠϟ ΔϳάϐΘΑ ϡϮϘϳ ϱάϟ . ϲϨϘΘΑ ϞμΗ ˬΕΎϣϮϠόϤϟ Ϧϣ ΪϳΰϤϠϟ κΘΨϣ ϲΎΑήϬϛ . • ϝΎϤόΘγϻ ϞΒϗ
- • 重要提示: 为了保证具有额外的保护,建议在浴室电 路中安装一个额定剩余工作电流不超过30 mA的剩余电流装置。详情请向安装技工咨询。 • 确保本器具在使用之前完全干燥。 • 注意:请勿在浴缸、水槽或其它装有水的容器 附近使用本器具。 • 8岁以上的儿童,以及身体残疾、聋盲或智障人士, 或缺乏经验和知识的人士可在适当的监督下使用本器具,或者教他们安全使用本器具,并且他们意识到相关的危险。 • 儿童不得玩弄本器具。• 儿童不得在无人监督的情况下清洁和保养本器具。• 器具出现故障时,请勿使用本器具。请勿尝试自行 修理本器具,必须请求授权的技术人员进行。如果电源线损坏,必须由制造商、售后技术服务中心或具备等同资格的技术人员予以更换,以防危险产生。 • 如果在浴室使用本器具,用后应拔出电源插头,因 为接近水源,即使关机也会很危险。
- • ϢϬϣ : ϪΑ ̶ϣ ϪϴλϮΗ ˬήΘϬΑ ΖχΎϔΣ ί ϥΎϨϴϤσ έϮψϨϣ Ω ΩϮη έ ̶ϣ ϪϳάϐΗ έ ϩΎ̴ΘγΩ Ϫ̯ ̵έΪϣ ̶ϠοΎϔΗ ΪϴϠ̯ ΎΑ ϩΎ̴ΘγΩ ̮ϳ ΪϨ̯ ί ζϴΑ ϥ Ωή̰ϠϤϋ ϥΎϳήΟ Ϫ̯ ΪϴϨ̯ ΐμϧ 30 ̶Ϡϴϣ ΪηΎΒϧ ή̢ϣ .ϪόΟήϣ ΩΎϤΘϋΩέϮϣ ϕήΑ ϦϴδϨ̰Η ̮ϳ ϪΑ ήΘθϴΑ ΕΎϋϼσ ̵ήΑ ΪϴϨ̯ . • ΪηΎΑ ̮θΧ
