Nikon 24mm-f-35D-PC-E-Nikkor – page 2
Manual for Nikon 24mm-f-35D-PC-E-Nikkor
Table of contents
- Notes on Safety Operations
- Observe the following precautions when handling the camera and lens
- 1. Nomenclature
- 2. Major features
- Note on the shift and tilt lock-release knobs 3. Usable cameras and available functions
- Cameras
- Aperture stop-down button (one-touch preset aperture operation)
- Important 4. Mounting lens
- 5. Using bayonet hood HB-41
- 6. Determining exposure When using the Nikon D4, D3-Series, Df, When using other Nikon cameras
- Determining exposure (with an external exposure meter) 7. The shift/tilt function Important
- The shift function
- The tilt function Revolving
- 8. Focusing
- 9. Depth of field
- 10. Taking flash pictures using cameras with a built-in flash
- 11. Recommended focusing screens
- 12. Lens care 13. Standard accessories
- 14. Optional accessories 15. Specifications
- Weight: Approx. 730 g (25.7 oz) 16. Customer service

2. Major features
This is a retrofocus-type perspective control (PC) lens that
lets you emphasize or correct near and far perspective, or
control depth of field. It also lets you correct distortion
En
caused by the camera angle. Moreover, you can use the
lens’ tilt and shift mechanism to achieve focus of the entire
subject plane when it is not parallel to the camera.
• This lens features automatic aperture control. When it is
mounted on a Nikon D4, D3-Series, Df, D800-Series,
D700, D610, D600, D300-Series, D90, D7100, D7000,
D5300, D5200, D5100, D5000, D3200, D3100 or D3000
camera, the user can use all exposure modes to take
images without operating the aperture stop-down button.
• More accurate exposure control is possible when this is
mounted on a Nikon camera with 3D Color Matrix
Metering capability, because subject distance information
is transferred from the lens to the camera body (without
tilting and/or shifting) (with maximum aperture while
mounted on cameras).
• The use of three aspherical and three ED (extra-low
dispersion) lens elements ensures sharp pictures virtually
free of color fringing. Also, by utilizing a 9-blade
diaphragm that produces a nearly circular aperture, out-
of-focus images in front of or behind the subject are
rendered as pleasing blurs.
• The Nano Crystal Coat deposited on some of the lens
elements ensures that fine, clear images can be
reproduced under various shooting conditions, from the
sunny outdoors to spotlighted interior scenes.
• A total of two SB-R200 Wireless Remote Speedlights can
be attached to the front of the lens*.
* When attaching an SB-R200, tighten the shift lock
release knob. Failure to do so may cause the lens to shift
down under the weight of the SB-R200. Tilting and/or
shifting the lens while the SB-R200 is attached is not
recommended.
21

Note on the shift and tilt lock-release knobs
The lens does not lock completely by turning the shift
and tilt lock-release knobs. This is not a malfunction.
Turning the shift and tilt lock-release knobs too tightly
En
to lock the lens or forcibly shifting/tilting the lens when
it is locked can damage it.
3. Usable cameras and available functions
There may be some restrictions or limitation of available
functions. Refer to your camera’s user’s manual for details.
One-touch
Exposure
Aperture
Mounting
1
preset
Tilting/
mode*
Cameras
setting by
to a
aperture
shifting
2
camera
camera
P*
SAM
operation
D4, D3-Series
Df, D800-Series,
D700, D610, D600,
3
*
D300-Series, D90,
4
*
5
6
*
*
D7100, D7000, D5300,
D5200, D5100, D5000,
D3200, D3100, D3000
D2-Series, D1-Series,
D200, D100, D80,
D70-Series, D60,
D50, D40-Series,
*7
F6, F5, F4-Series
,
F100,
8
*
5
6
F80-Series/
—
*
*
———
9
*
N80-Series*,
F75-Series/
N75-Series*,
F65-Series/
N65-Series*,
Pronea 600i/6i*
: Possible
—
: Impossible
* Sold exclusively in the USA
** Sold exclusively in the USA and Canada
22

One-touch
Exposure
Aperture
Mounting
1
preset
Tilting/
mode*
Cameras
setting by
to a
aperture
shifting
2
camera
camera
P*
SAM
operation
En
F90X/N90s*,
F90-Series/N90*,
F70-Series/N70*,
F60-Series/N60*,
F55-Series/
N55-Series*,
F50-Series/N50*,
F-401x/N5005*,
F-401s/N4004s*,
————————
F-401/N4004*,
F-801s/N8008s*,
F-801/N8008*,
F-601
M/N6000*,
F3AF, F-601/
N6006*,
F-501/N2020**,
Pronea S,
Nikon MF cameras
: Possible
—
: Impossible
* Sold exclusively in the USA
** Sold exclusively in the USA and Canada
*1 Exposure will be incorrect when the lens is shifted and/or
tilted.
*2
P includes AUTO (General-Purpose Program) and Vari-Program
System.
*3 When the lens power or the camera is turned off
(including using the auto meter off function) while
stopping down the lens aperture, the diaphragm blades
fully open to the maximum aperture. This is not a
malfunction.
*4 Stopping down the lens aperture activates AE-L (AE
lock).
*5 Handle the lens with care while shifting and/or tilting.
Failure to do so may cause the lens to scratch the
camera body.
23

*6 See “Mounting lens” (P. 25)
*7
Diaphragm blades open and close after each press of the
shutter button, and exposure will be incorrect for
continuous shooting.
En
*8 When the lens power or the camera is turned off
(including using the auto meter off function) while
stopping down the lens aperture, the lens aperture
remains at the stopped down setting. When the camera
is turned on again or the camera shutter release button
is lightly pressed, the diaphragm blades open once and
then close. This is not a malfunction.
*9 When the camera is turned off using the auto meter off
function while stopping down the lens aperture, lightly
press the shutter release button to display the selected
aperture value in the camera’s LCD or view finder before
shooting. Failure to do this may lead to incorrect
exposure when the shutter release button is fully
depressed.
Aperture stop-down button (one-touch preset
aperture operation)
• The lens aperture can be stopped down from maximum
aperture to a selected aperture by pressing the aperture
stop-down button. Pressing the button again fully opens
the aperture. Whether the aperture is stopped down or
not, check the camera viewfinder, or check the
diaphragm from the front of the lens.
• Even at maximum aperture after canceling the aperture
stop-down, the preset aperture value is displayed on the
camera body.
• When using the D4, D3-Series, Df, D800-Series, D700, D610,
D600, D300-Series, D90, D7100, D7000, D5300, D5200,
D5100, D5000, D3200, D3100 or D3000 camera, the
aperture is stopped down to a selected aperture
automatically by pressing the shutter release button, even
when the aperture is fully open (maximum aperture) before
shooting. When the lens power or the camera is turned off
(including using auto meter off function) after stopping
down the lens aperture by pressing the aperture stopdown
button, the aperture stop-down is cancelled and the
diaphragm blades fully open to the maximum
aperture.
24

Important
• When the lens is mounted to a camera other than the D4
or D3-Series, shift, tilt and/or revolve the lens with care.
Failure to do so, may result in the lens scratching the
En
camera body.
• This lens is a manual focus lens, and autofocus is not
possible even when the camera's focus mode is set to
AF mode.
•
Use of tilt/shift function can cause some vignetting or slight
color change. (Vignetting is the darkening of the corners
around the image.)
• When mounted on Nikon DX format digital SLR cameras,
such as the D300-Series and D7000, the lens’ picture
angle becomes 61° and its 35 mm equivalent focal length
is approx. 36 mm.
• Be careful not to soil or damage the CPU contacts.
• If the lens mount rubber gasket is damaged, be sure to
visit your nearest Nikon authorized dealer or service
center for repair.
• In low temperatures, new or fully charged batteries
should be used in the camera.
4. Mounting lens
a
Set the shift amount and tilt amount to 0 by rotating the
shift and tilt knobs (Fig. 2).
Note: Avoid attaching/detaching the lens to/from the
camera while using tilt, shift and/or revolving, and
without locking each knob. Failure to do so can
lead to you pinching your fingers between the lens
and the camera body, or the lens scratching the
camera body.
Fig. 2
25
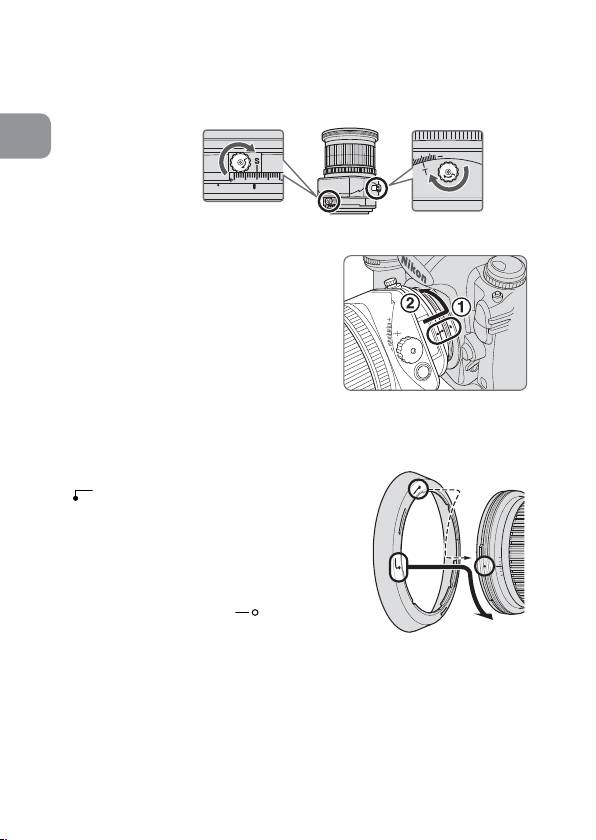
b
Set the tilt and shift knobs. (Fig. 3)
Note: Turning either knob too tightly may damage the
knob.
En
Fig. 3
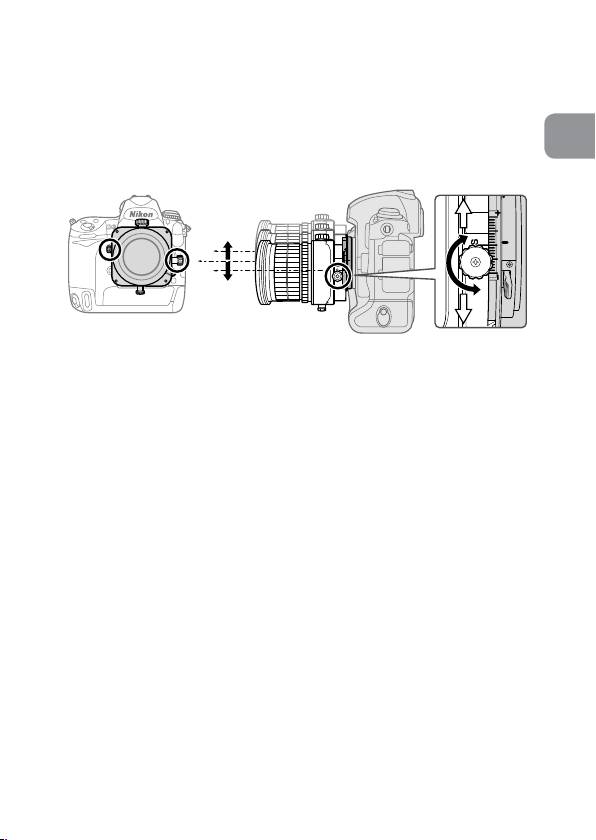
c
Turn the camera power off,
align the mounting indexes on
the lens and camera and then
twist the lens counterclockwise
until it locks into place. (Fig. 4)
•
Mounting the lens to a
camera while camera’s power
is on, may prevent the camera
Fig. 4
from operating correctly.
5. Using bayonet hood HB-41
Align the lens hood attachment index
(
) on the hood (either of two
indexes) with the lens hood mounting
index on the lens, and turn the hood
clockwise until it click stops to secure.
• Make sure that the lens hood
mounting index aligns with the lens
hood setting index (
).
• If the lens hood is not correctly
Fig. 5
attached, vignetting can occur.
• To facilitate attachment or removal of the hood,
hold it by its base around the lens hood
attachment index rather than its outer edge.
• To store the lens hood, attach it in the reverse position.
26

6. Determining exposure
When using the Nikon D4, D3-Series, Df,
D800-Series, D700, D610, D600, D300-Series,
D90, D7100, D7000, D5300, D5200, D5100,
En
D5000, D3200, D3100 or D3000 camera
a
Set the shift and tilt amount to 0 by
rotating the shift and tilt knobs.
(Fig. 2)
b
Set the camera’s exposure mode.
c
With A or M exposure mode, set the
aperture using the aperture ring or the
camera’s command dial. When using the
Fig. 6
camera’s command dial, set the aperture
to minimum aperture lock (L) (Fig. 6).
With P or S mode, set the aperture using
the camera’s command dial.
When using other Nikon cameras
a
Set the shift and tilt amount to 0 by rotating the shift
and tilt knobs. (Fig. 2)
b
Set the camera’s exposure mode to M.
c
Press the aperture stop-down button to fully open the
aperture, set the aperture ring to “3.5” (maximum
aperture), and set the shutter speed for correct
exposure.
d
Set the desired aperture by rotating the aperture ring
and shift the shutter speed by the same number of
changed steps.
• Setting the aperture ring to minimum aperture lock (L)
fixes the aperture at f/32 (minimum aperture).
• Set the aperture with the lens’ aperture ring even on a
camera that requires aperture to be set via its command
dial. With a camera that has the custom setting menu
“aperture setting with lens’ aperture ring,” this setting
is not required.
27

Determining exposure (with an external exposure
meter)
a
Set the shift and tilt amount to 0 by rotating the shift
and tilt knobs. (Fig. 2)
En
b
Set the camera’s exposure mode to M.
c
Set the desired aperture via the lens’ aperture ring or the
camera’s command dial and read the aperture value
displayed in the camera’s LCD panel or selected aperture
ring value. Input the aperture value to the external
exposure meter to determine exposure, and set the
shutter speed.
• When using a camera other than the D4, D3-Series, Df,
D800-Series, D700, D610, D600, D300-Series, D90, D7100,
D7000, D5300, D5200, D5100, D5000, D3200, D3100 or
D3000, set the aperture with the lens’ aperture ring even on
a camera that requires aperture to be set via its command
dial. With a camera that has the custom setting menu
“aperture setting with lens’ aperture ring,” this setting is not
required.
7. The shift/tilt function
Important
• Use of a tripod is recommended for correct shooting.
• Turning each knob too tightly can cause damage.
• Use of tilt/shift function can cause some vignetting.
(Vignetting is the darkening of the corners around the
image.) To counteract this, close the aperture (choose a
larger f-number), or compensate the exposure before
shooting.
• Determining correct exposure with shift and/or tilt use
requires experience. We recommend that you take a
series of test shots until you feel comfortable with the
operation.
28
• When the lens is mounted to a camera other than the D4
or D3-Series, shift and/or tilt the lens with care. Failure to
do so, may result in your fingers being nipped between
the lens and the camera body, or the lens scratching the
En
camera body.
The shift function
Fig. 7
When the shift knob is rotated, the lens is shifted horizontally (or
vertically, when the lens is revolved) parallel to the camera body
(±11.5 mm).
By shifting, you can recompose the frame of the shot
without moving the camera.
This lets you correct the perspective distortion of the
subject or exclude unwanted objects from appearing in
front of the main subject (p. 207).
• After shifting, tighten the shift lock release knob to fix
the lens’ shift position.
Note: When shifting the lens, be careful not to pinch your
fingers between the lens and the grip of the camera
body.
29
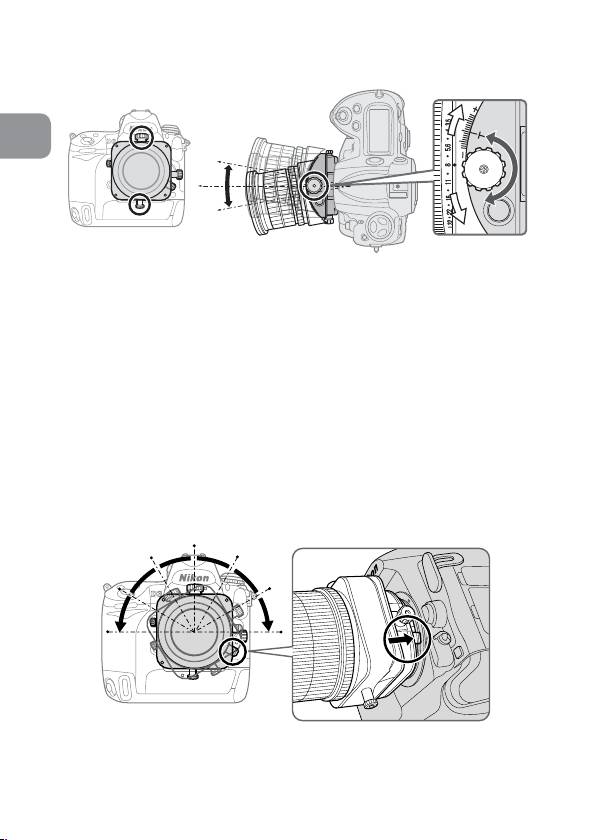
The tilt function
En
Fig. 8
By rotating the tilt knob, the lens is tilted up and down (or
right and left, when the lens is revolved) ±8.5° to the
camera body. By tilting, you can obtain clear focus of the
entire subject plane when it is not parallel to the camera or
can focus small areas of the subject which are parallel to
the camera (p. 207).
• After tilting, tighten the tilt lock release knob to fix the
lens’ tilt position.
• Note that tilting the lens also changes the viewfinder
image.
• Once the lens is tilted, neither the depth-of-field scale nor
the distance scale on the lens barrel can be used.
Revolving
Fig. 9
30
This lens can be revolved up to 90° right or left. By
revolving the lens, the shift function can be changed to
operate vertically, and the tilt function can be changed to
operate horizontally.
En
• Before rotating the lens, set the shift and tilt amount to
“0” by rotating the shift and tilt knob.
Note:
When revolving the lens while using tilt and/or shift,
be careful to avoid nipping your fingers between the
lens and the camera body or scratching the camera
body with the lens. Failure to lock each knob can also
have the same effect.
• Push the revolving lever and rotate the lens holding the
square parts of the lens.
• Click stops are provided in 30° steps both right and left.
At 30° and 60°, you can rotate the lens without pushing
the revolving lever.
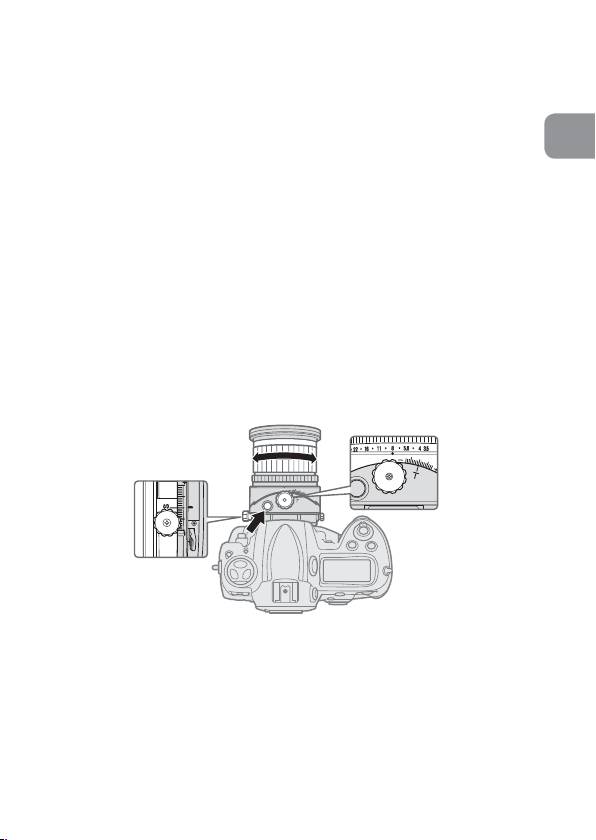
8. Focusing
Fig. 10
a
Set the aperture to its maximum by pressing the
aperture stop-down button, and focus by rotating the
focus ring.
b
Before shooting, press the aperture stop-down button
again to stop-down the aperture.
31
•
When using the Nikon D4, D3-Series, Df, D800-Series,
D700, D610, D600, D300-Series, D90, D7100, D7000,
D5300, D5200, D5100, D5000, D3200, D3100 or D3000
camera, you can take a picture without operating the
En
aperture stop-down button (the aperture can be stopped
down to a selected aperture automatically by pressing the
shutter release button without pressing the aperture stop-
down button). Alternatively, the aperture stop-down button
can be used.
• While using tilting and/or shifting, the camera’s
electronic range finder cannot be used to confirm
correct focusing. Focus should be confirmed by checking
the image in the camera's viewfinder.
•
When you change the degree of tilt and/or shift after
focusing the subject will become out of focus.
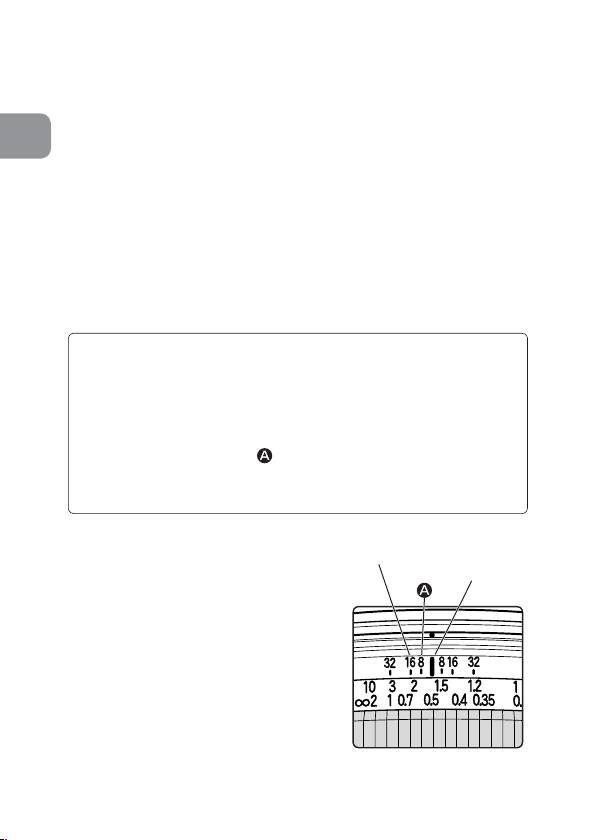
Infrared compensation
For photography using infrared film, attach a red (R60)
filter to the lens and compensate the focus manually.
First, focus on the subject manually. Rotate the focus
ring to realign the desired distance scale number
(“0.5 m” in fig. 11) to
(“8” on the depth of field
scale in fig. 11) to compensate the focus. Attach an
R60 filter for infrared photography.
9. Depth of field
Depth of field scale
• Approximate depth of field can
Distance index
be determined by checking the
depth of field scale.
• Using the aperture stop-down
button of the lens or the camera’s
depth-of-field preview (stop-down)
button (with the D4, D3-Series, Df,
D800-Series, D700, D610, D600,
D300-Series, D90, D7100 or
D7000 camera), the depth of field
can be observed while looking
Fig. 11
through the camera viewfinder.
32

• For more information, see p. 234.
Note: When the lens is tilted, neither the depth of field
scale nor the distance scale can be used. (Both scales
can be used when the lens is shifted only.)
En
10. Taking flash pictures using cameras with
a built-in flash
To prevent vignetting, do not use a lens hood, and take
images referring to the shooting distance below.
Note: The following limitations are only for shooting
without tilt and/or shift. When using the camera’s
built-in flash for tilt/shift shooting, vignetting will be
greater than shooting without tilt/shift. For tilt/shift
shooting, use of camera's built-in flash is not
recommended.
Cameras Available shooting distance
D800-Series,
1.5 m (4.9 ft) or greater
D700, D610, D600
D300-Series,
1 m (3.3 ft) or greater
D200, D100
D90, D80,
2 m (6.6 ft) or greater
D70-Series, D50
D5200, D5100,
D5000, D3200,
3 m (9.9 ft) or greater
D3100, D3000,
D60, D40-Series
Other cameras Vignetting occurs at all shooting
distances
33

11. Recommended focusing screens
Various interchangeable focusing screens are available for
certain Nikon SLR cameras to suit any picture-taking
situation. The ones recommended for use with this lens are:
En
Screen
EC-B
G1
ABCE
F
G2 G3 J K L M P U
Camera
EC-E
G4
F6
◎◎ ◎ ◎◎
○
F5+DP-30
◎◎ ◎ ◎
◎◎
(+1.0)
◎
◎
◎
◎
F5+DA-30
◎◎
○
(+1.0)
(+0.5)
(+0.5)
(+1.0)
◎
◎
◎
◎
◎
F4+DP-20
◎
(+1.0)
(+1.0)
(+1.0)
(+1.0)
(+1.0)
◎
◎
○
◎
◎
◎
F4+DA-20
(+1.0)
(+1.0)
(+0.5)
(+1.0)
(+1.0)
(+1.0)
◎: Excellent focusing
○: Acceptable focusing
Slight vignetting or moiré patterns appear in the
viewfinder, but not on the film.
− : Not available.
( ): Indicates degree of exposure compensation needed
(Center-Weighted metering only). For F6 cameras,
compensate by selecting “Other screen” in Custom
Setting “b6: Screen comp.“ and setting the EV level to
-2.0 to +2.0 in 0.5 EV steps. When using screens other
than type B or E, “Other screen” must be selected even
when the required compensation value is “0” (no
compensation required). For F5 cameras, compensate
using Custom Setting #18 on the camera body. For
F4-Series cameras, compensate using the Exposure
Compensation Dial for the focusing screen.
See user’s manual of the camera body for more details.
Blank box means not applicable. Since type M screen can be
used for both macrophotography at a magnification ratio of 1:1
or above and for photomicrography, it has different applications
than other screens.
34

Note:
• For F5 cameras, only EC-B, EC-E, B, E, J, A, L focusing
screens are usable in Matrix Metering.
• When using the B and E focusing screens in cameras
other than those listed above, refer to the columns for
En
the B and E screens.
12. Lens care
• When the lens is not in use, set the tilt and shift amount
to “0.” The lens has many moving parts and can be easily
soiled by dust, dirt or water drip.
• Clean the lens surfaces with a blower brush. To remove
dirt and smudges, use a soft, clean cotton cloth or lens
tissue moistened with ethanol (alcohol) or lens cleaner.
Wipe in a circular motion from center to outer edge,
taking care not to leave traces or touch other parts of the
lens.
• Never use thinner or benzene to clean the lens as this
might damage it, result in a fire, or cause health
problems.
• To protect the front lens element, an NC filter is
recommended at all times. A lens hood also helps protect
the front of the lens.
• When storing the lens in its lens case, attach both front
and rear caps.
• When the lens will not be used for a long time, store it in
a cool, dry place to prevent mold. Also store the lens
away from direct sunlight or chemicals such as camphor
or naphthalene.
• Do not get water on the lens or drop it in water as this
will cause it to rust and malfunction.
• Reinforced plastic is used for certain parts of the lens. To
avoid damage, never leave the lens in an excessively hot
place.
13. Standard accessories
• 77 mm snap-on front lens cap LC-77 • Rear lens cap
• Bayonet hood HB-41 • Flexible lens pouch CL-1120
35

14. Optional accessories
• 77 mm screw-in filters
15. Specifications
En
Type of lens: D-type NIKKOR lens with built-in CPU
and Nikon bayonet mount
Focal length: 24 mm
Maximum
f/3.5
aperture:
Lens
13 elements in 10 groups
construction:
(3 ED, 3 aspherical and some Nano
Crystal Coat-deposited lens elements)
Picture angle: 84° with 35 mm (135) format Nikon
film-SLR cameras and Nikon FX format
digital SLR cameras
61° with Nikon DX format digital SLR
cameras
71° with IX240 system cameras
Maximum
1/2.7
reproduction ratio:
Distance
Output to camera body
information:
Focusing: Manually via separate focus ring
Shooting
Graduated in meters and feet from
distance scale:
0.21 m (0.75 ft) to infinity (∞)
Closest focusing
0.21 m (0.75 ft) from focal plane
distance:
No. of diaphragm
9 pcs. (rounded)
blades:
Diaphragm: Electrically automatic/One-touch
preset aperture operation
Aperture scale: f/3.5—f/32
36

Lens movement: Shift and tilt movement at right angles
Maximum shift amount: ±11.5mm
Maximum tilt amount: ±8.5°
Lens rotation: 90° right and left (click-stop for each
En
30° step)
Exposure
Via full-aperture method
measurement:
Attachment size: 77 mm (P = 0.75 mm)
Dimensions: Approx. 82.5 mm dia. x 108 mm
(extension from the camera’s lens
mount flange)
Weight: Approx. 730 g (25.7 oz)
Specifications and designs are subject to change without
any notice or obligation on the part of the manufacturer.
16. Customer service
• Shift and tilt movement can be modified to move in the
parallel direction.
• The shift lock release knob can also be changed for a
larger one, and the shift knob can be changed for a small
one, but this may affect mounting the lens to the camera
or lens operation.
• For details, contact a Nikon authorized service
representative.
37

Hinweise für sicheren Betrieb
ACHTUNG
Keinesfalls zerlegen.
Beim Berühren der Innenteile von Kamera oder Objektiv droht
Verletzungsgefahr. Überlassen Sie Reparaturen unbedingt ausschließlich
qualifizierten Technikern. Kommt es durch einen heftigen Stoß (z.B. Fall auf
den Boden) zu einem Bruch von Kamera oder Objektiv, so trennen Sie
De
zunächst das Produkt vom Stromnetz bzw. entnehmen die Batterie(n) und
geben es dann an eine autorisierte Nikon-Servicestelle zur Überprüfung ab.
Bei einer Störung sofort die Stromversorgung ausschalten.
Bei Entwicklung von Rauch oder ungewöhnlichem Geruch durch Kamera
oder Objektiv entnehmen Sie sofort die Batterie(n); dabei vorsichtig
vorgehen, denn es besteht Verbrennungsgefahr. Bei einem Weiterbetrieb
unter diesen Umständen droht Verletzungsgefahr.
Nach dem Abtrennen von der Stromversorgung geben Sie das Gerät an eine
autorisierte Nikon-Servicestelle zur Überprüfung ab.
Kamera oder Objektiv keinesfalls bei Vorhandensein von
brennbarem Gas einsetzen.
Wird elektronisches Gerät bei brennbarem Gas betrieben, so droht u.U.
Explosions- oder Brandgefahr.
Keinesfalls durch Objektiv oder Sucher in die Sonne blicken.
Beim Betrachten der Sonne oder anderer starker Lichtquellen durch Objektiv
oder Sucher droht eine permanente Schädigung des Sehvermögens.
Dem Zugriff von Kindern entziehen.
Es ist unbedingt dafür zu sorgen, dass Kleinkinder keine Batterien oder
andere Kleinteile in den Mund nehmen können.
Beim Umgang mit Kamera und Objektiv unbedingt die
folgenden Vorsichtmaßnahmen beachten:
• Schützen Sie die Kamera und das Objektiv vor Feuchtigkeit. Andernfalls
droht Brand- oder Stromschlaggefahr.
• Handhaben oder berühren Sie die Kamera bzw. das Objektiv keinesfalls
mit nassen Händen. Andernfalls droht Stromschlaggefahr.
•
Bei Gegenlichtaufnahmen nicht das Objektiv gegen die Sonne richten oder
das Sonnenlicht direkt durch das Objektiv eintreten lassen. Dies könnte eine
Überhitzung der Kamera verursachen und ein Brand könnte die Folge sein.
•
Vor einem längeren Nichtgebrauch des Objektivs bringen Sie den vorderen und
hinteren Deckel an und bewahren das Objektiv geschützt vor direkter
Sonnenlichteinwirkung auf. Andernfalls droht Brandgefahr wegen möglicher
Fokussierung von Sonnenlicht durch das Objektiv auf brennbare Gegenstände.
• Gehen Sie vorsichtig mit dem Objektiv um, wenn Sie die Kamera oder
das Objektiv handhaben.
Andernfalls besteht die Gefahr, dass Ihre Finger zwischen Objektiv und
Kameragehäuse eingeklemmt werden oder dass das Objektiv das
Kameragehäuse zerkratzt.
38
Wir danken Ihnen für das Vertrauen, das Sie uns mit dem Kauf des
Nikon PC-E NIKKOR 24mm f/3.5D ED erwiesen haben.
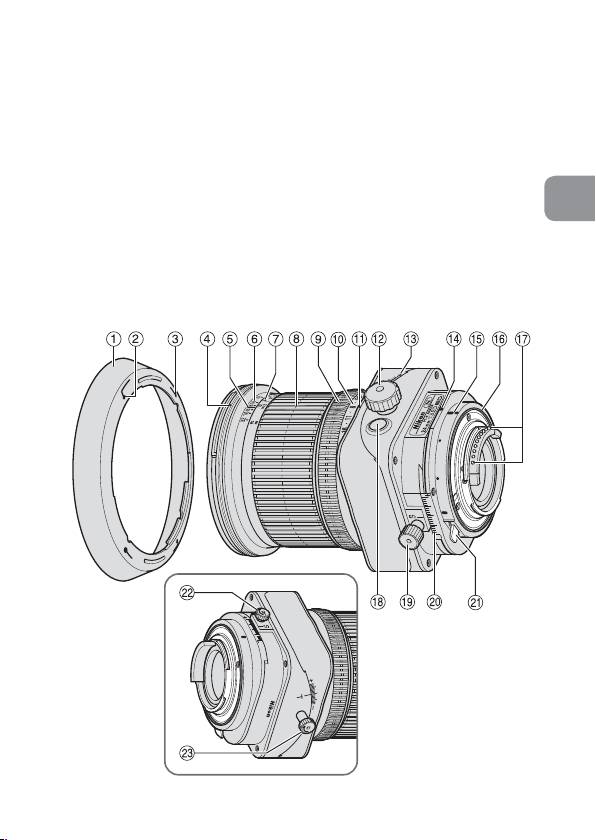
1. Nomenklatur
1
Gegenlichtblende
8
Entfernungseinstellring
&
CPU-Kontakte
2
Montagemarkierung
9
Blendenring
*
Abblendtaste
der Gegenlichtblende
0
Blendenskala
(
Dezentrierknopf
3
Kontrollmarkierung
!
Blendenindex
)
Dezentrierskala
De
der Gegenlichtblende
@
Verschwenkungsknopf
q
Drehhebel
4
Montagemarkierung
#
Verschwenkungsskala
w
Klemmschraube für
für Gegenlichtblende
$
Drehender Index
Dezentrierbewegung
5
Entfernungsindexlinie
%
Index zum Ansetzen
e
Klemmschraube für
6
Schärfentiefeskala
^
Gummiring der
Schwenkbewegung
7
Entfernungsskala
Objektivfassung
39

2. Wichtige Ausstattungsmerkmale
Das Retrofokus-Objektiv dient sowohl der Perspektivekorrektur (PC)
als auch der Steuerung der Schärfentiefe. So gestattet es zum
Beispiel die Ausschaltung perspektivischer Verzerrung und die
Scharfabbildung diagonal durchs Bild laufender Strukturen.
•
Das Objektiv ist mit einer automatischen Blendensteuerung
ausgestattet. Wird es an einem Kameramodell Nikon D4, D3-Serie,
Df, D800-Serie, D700, D610, D600, D300-Serie, D90, D7100,
De
D7000, D5300, D5200, D5100, D5000, D3200, D3100 oder
D3000 angebracht, können Sie sämtliche Belichtungssteuerungen
ohne Betätigung der Abblenddtaste verwenden.
• Das Objektiv überträgt die eingestellte Entfernung an die Kamera
und ermöglicht so eine präzisere Belichtungssteuerung (3D-
Matrixmessung), ohne Schwenken bzw. Drehen bei maximaler
Lichtstärke und wenn es an der Kamera angesetzt ist).
• Der Einsatz dreier asphärischer und dreier ED-Linsen (mit
besonders geringer Dispersion) gewährleistet scharfe, nahezu
farbsaumfreie Bilder. Neun Blendenlamellen sorgen für eine
nahezu kreisrunde Blendenöffnung, sodass außerhalb des
Schärfenbereichs vor und hinter dem Motiv liegende Elemente in
ansprechende Unschärfe getaucht werden.
• Die Nanokristallvergütung einiger Linsen sorgt für klare Bilder in
den unterschiedlichsten Aufnahmesituationen, von
Außenaufnahmen bei hellem Sonnenschein bis hin zu
Innenaufnahmen bei grellem Scheinwerferlicht.
• An der Vorderseite des Objektivs können bis zu zwei Slave-
Blitzgeräte vom Typ SB-R200 angebracht werden*.
* Beim Anbringen eines SB-R200 müssen Sie die Klemmschraube
für die Dezentrierbewegung anziehen. Ansonsten kann das
Objektiv sich aufgrund des Gewichts des SB-R200 nach unten
verschieben. Es ist nicht empfehlenswert, das Objektiv zu
verschwenken und/oder verschieben, wenn das SB-R200
angebracht ist.
Hinweis zu den Dezentrier- und Verschwenkungsköpfen
Das Objektiv wird von den Dezentrier- und
Verschwenkungsköpfen nicht vollständig verriegelt. Dies ist keine
Fehlfunktion. Ein zu kräftiges Festziehen der Knöpfe oder das
gewaltsame Dezentrieren/Verschwenken bei verriegeltem Objektiv
können das Objektiv beschädigen.
40
