NZXT Sentry LXE: Installation
Installation: NZXT Sentry LXE
Table of contents
- Installation
- Parts Specification Chart / Tabelle mit den technischen Daten der Komponenten / Tabla de especificación de • Temperature Control Board: All probes, power, battery, and fan control connectors are connected to this board. • Control board power connector • Temperature control board battery
- • 5 x 3pin fan control wires • Fan Control Board to Aluminum frame power cable • 5 x Temperature Probe
- Touch interface Usage / Verwendung der Sensorschnittstelle / Uso de la interfaz táctil /
- Support and Service

Installation
Thank you for purchasing an NZXT product.
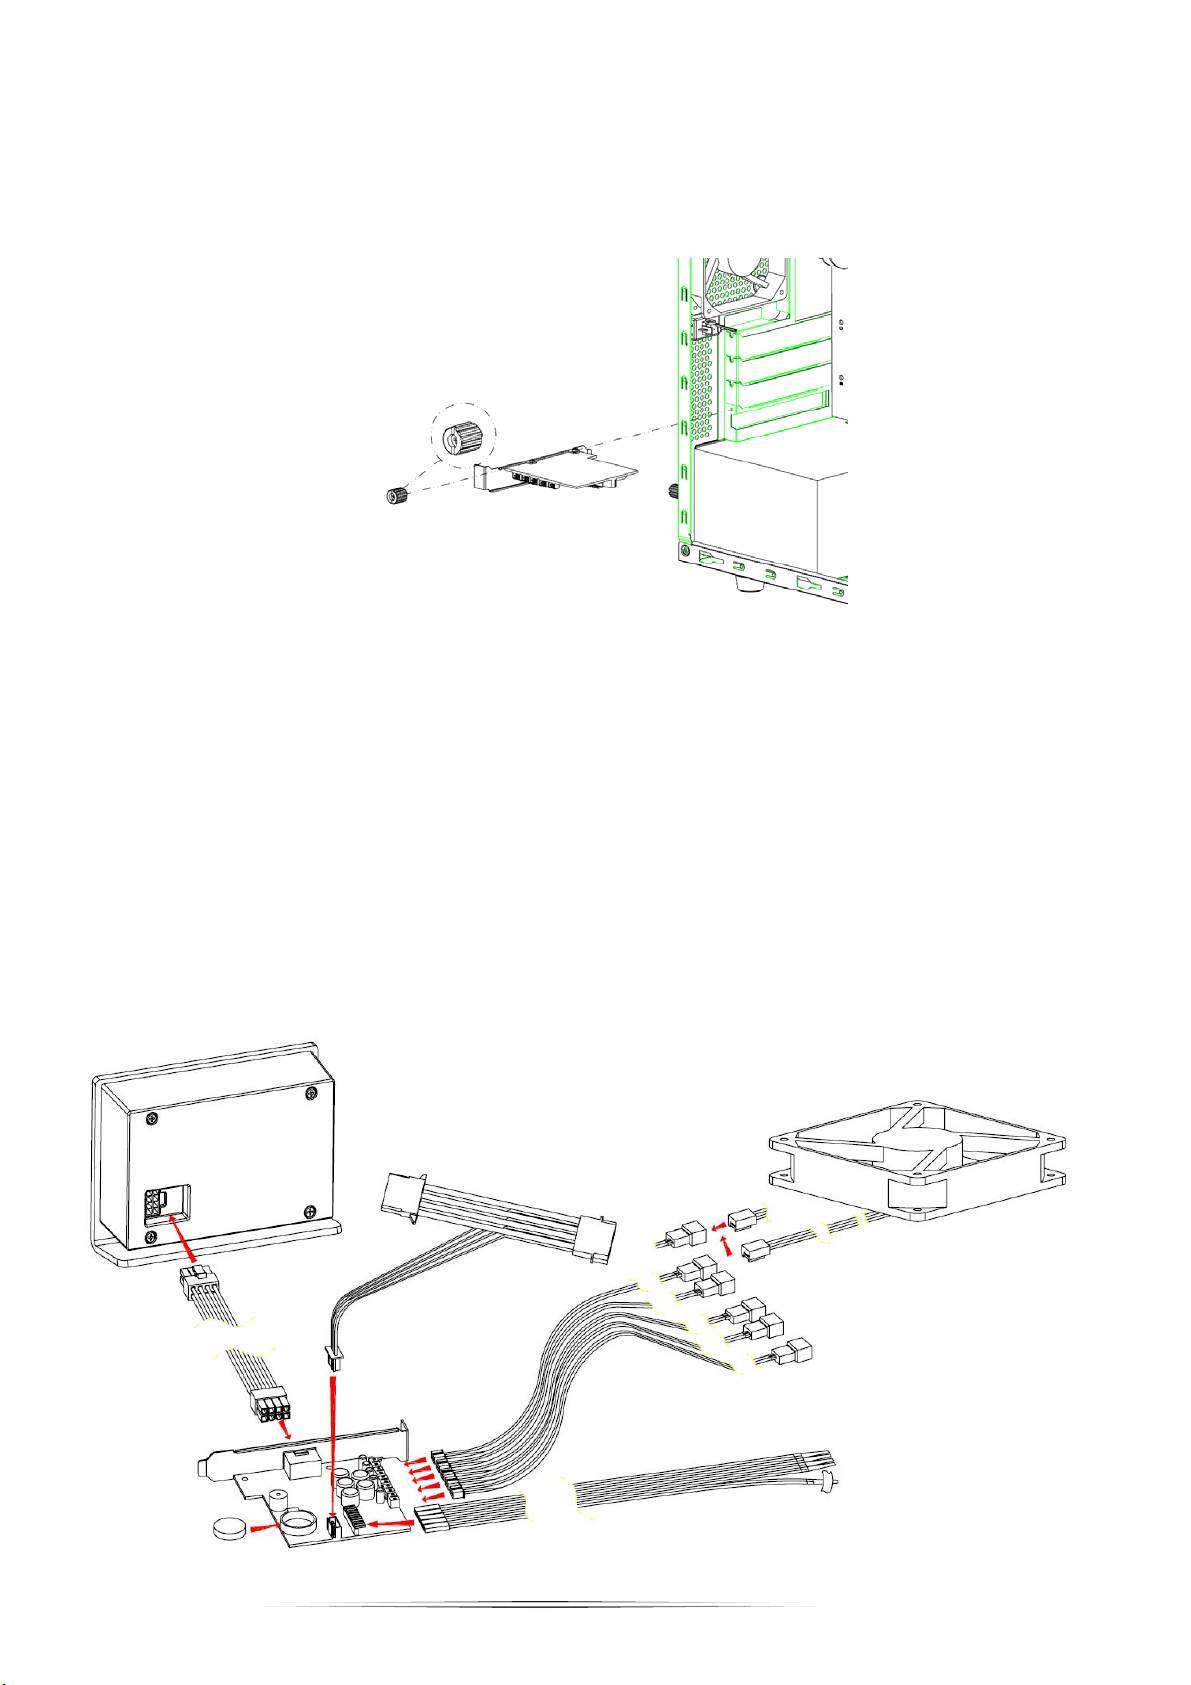
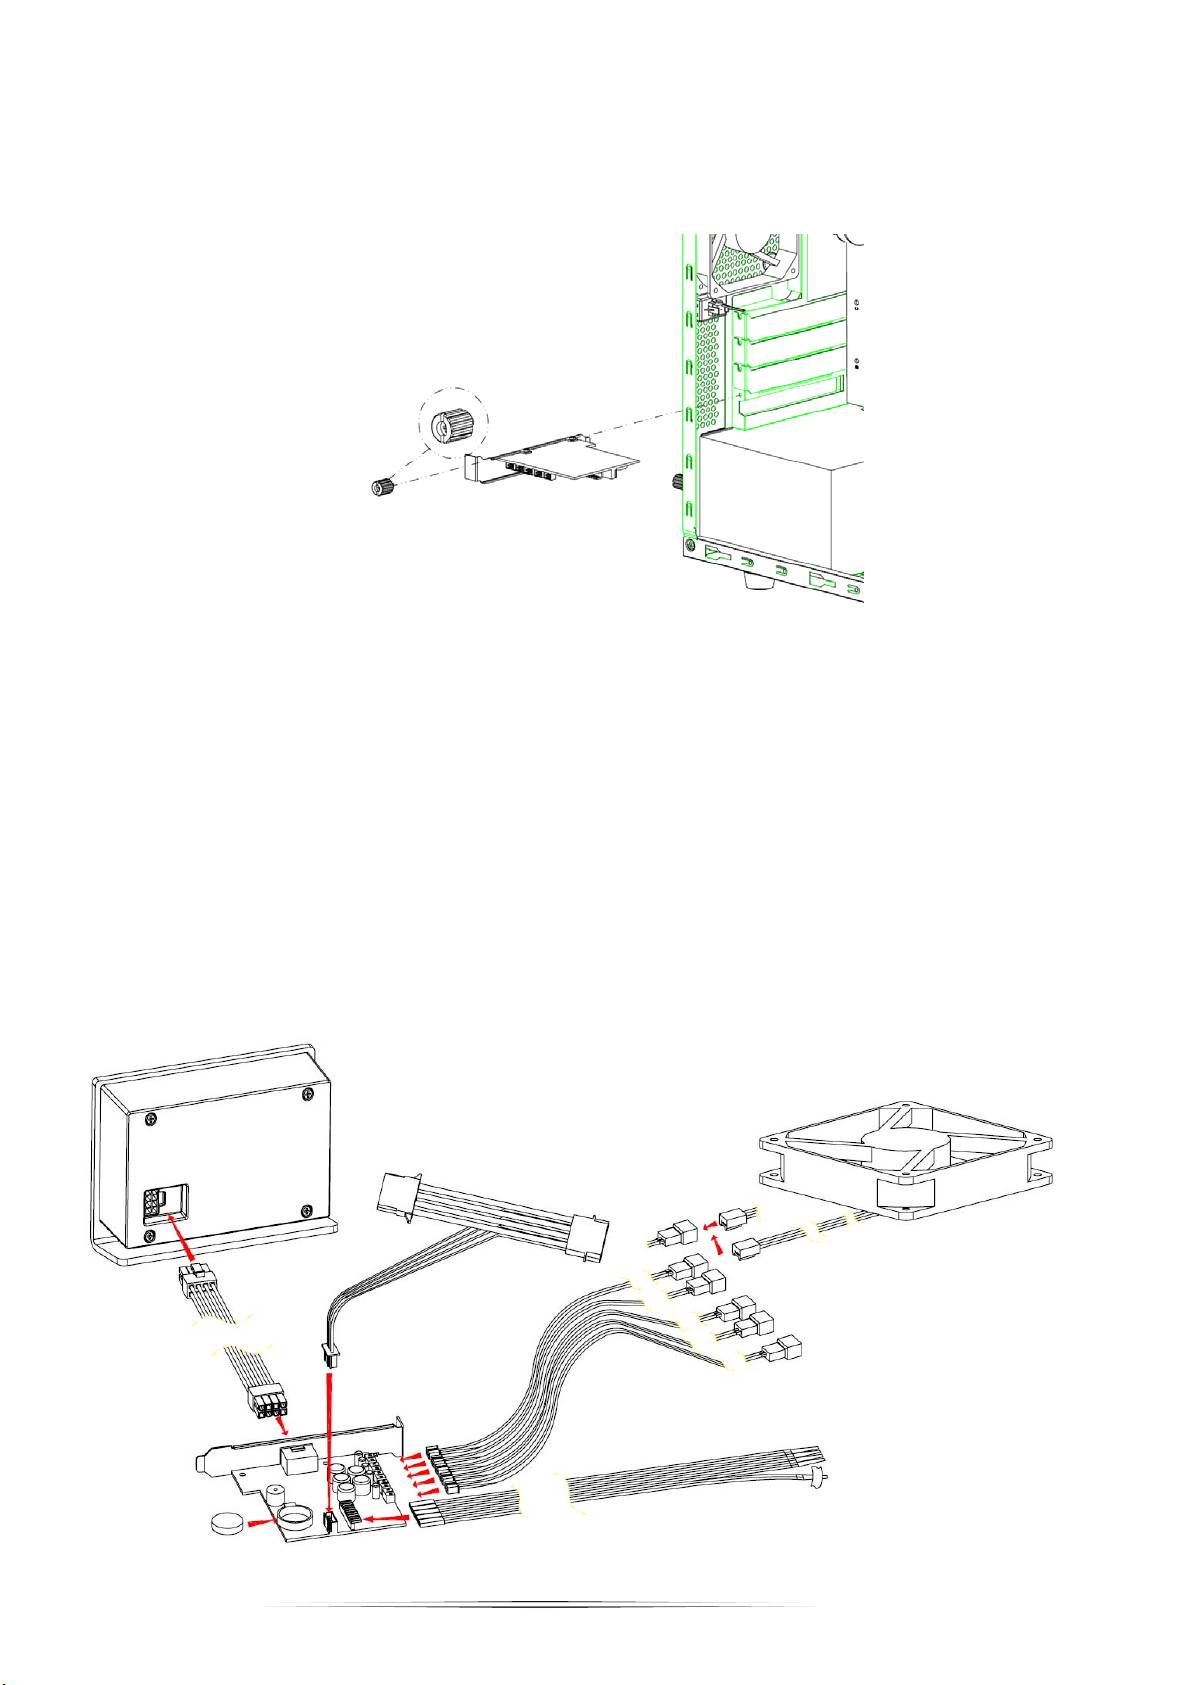
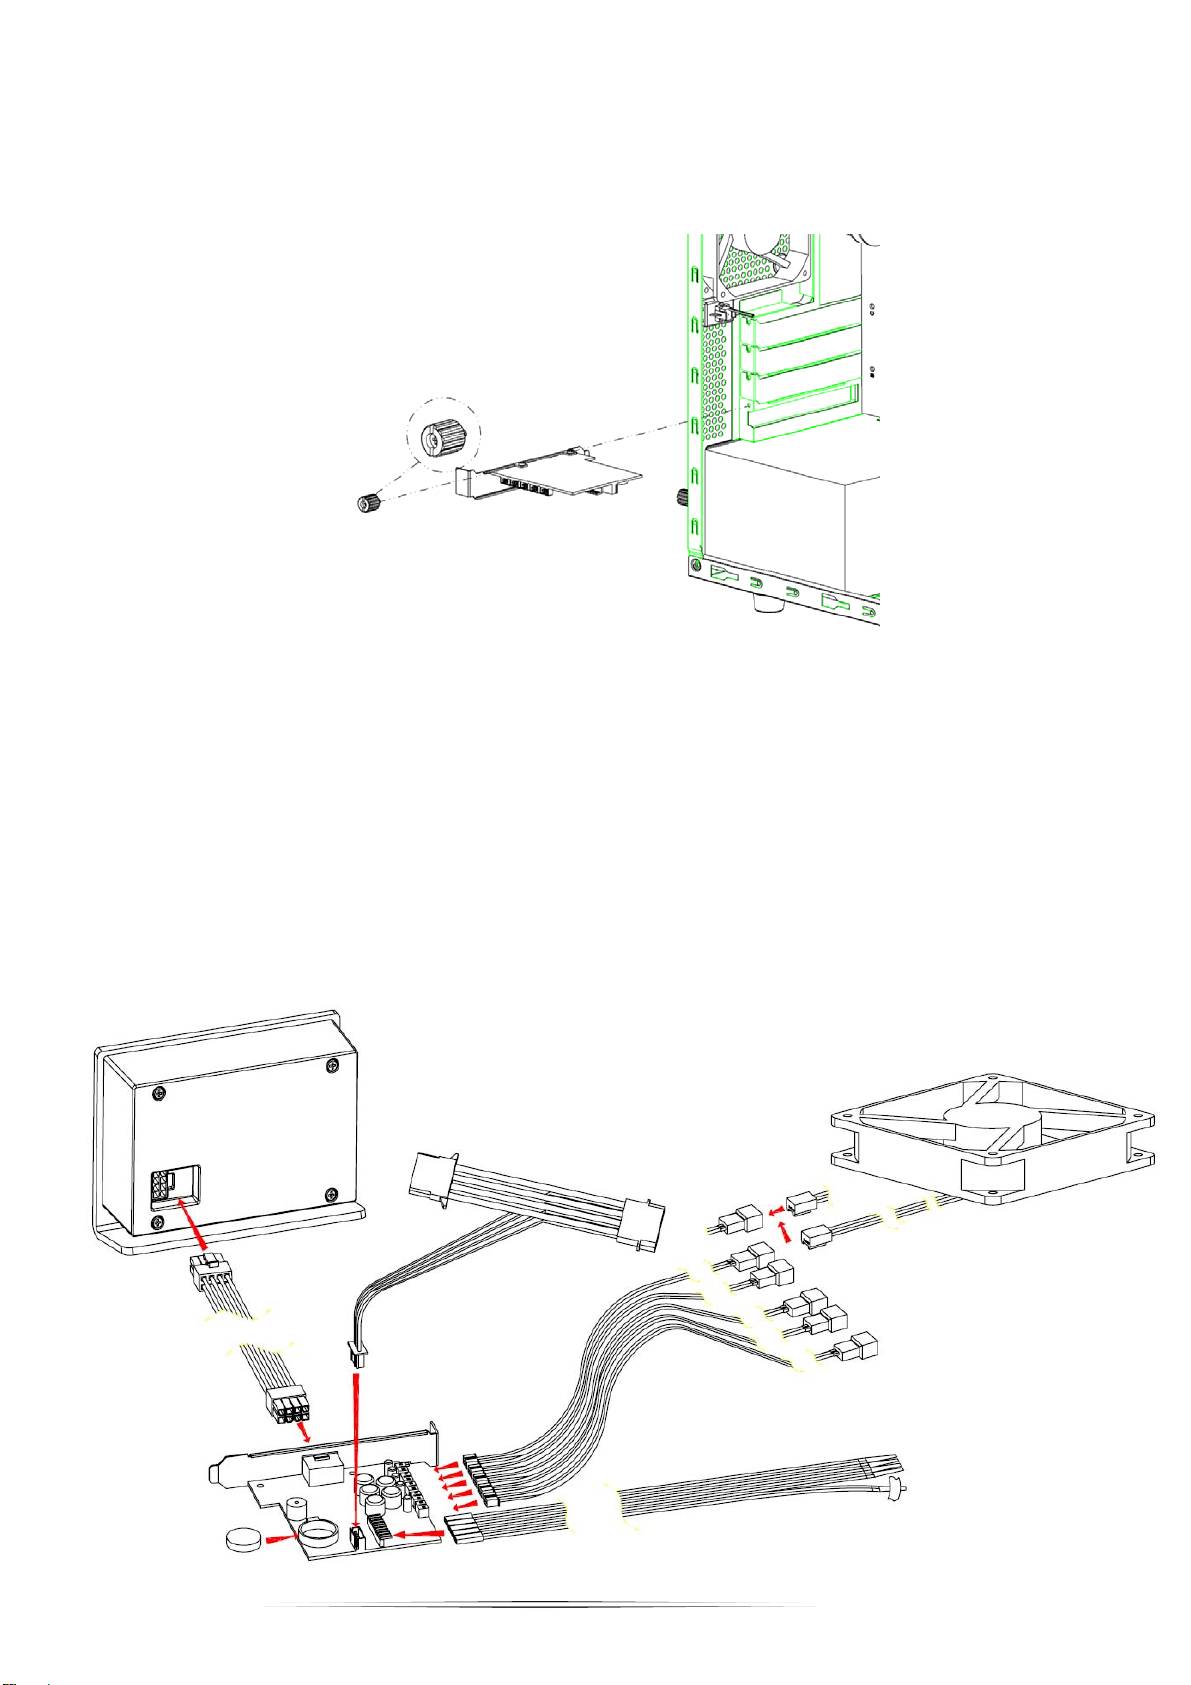
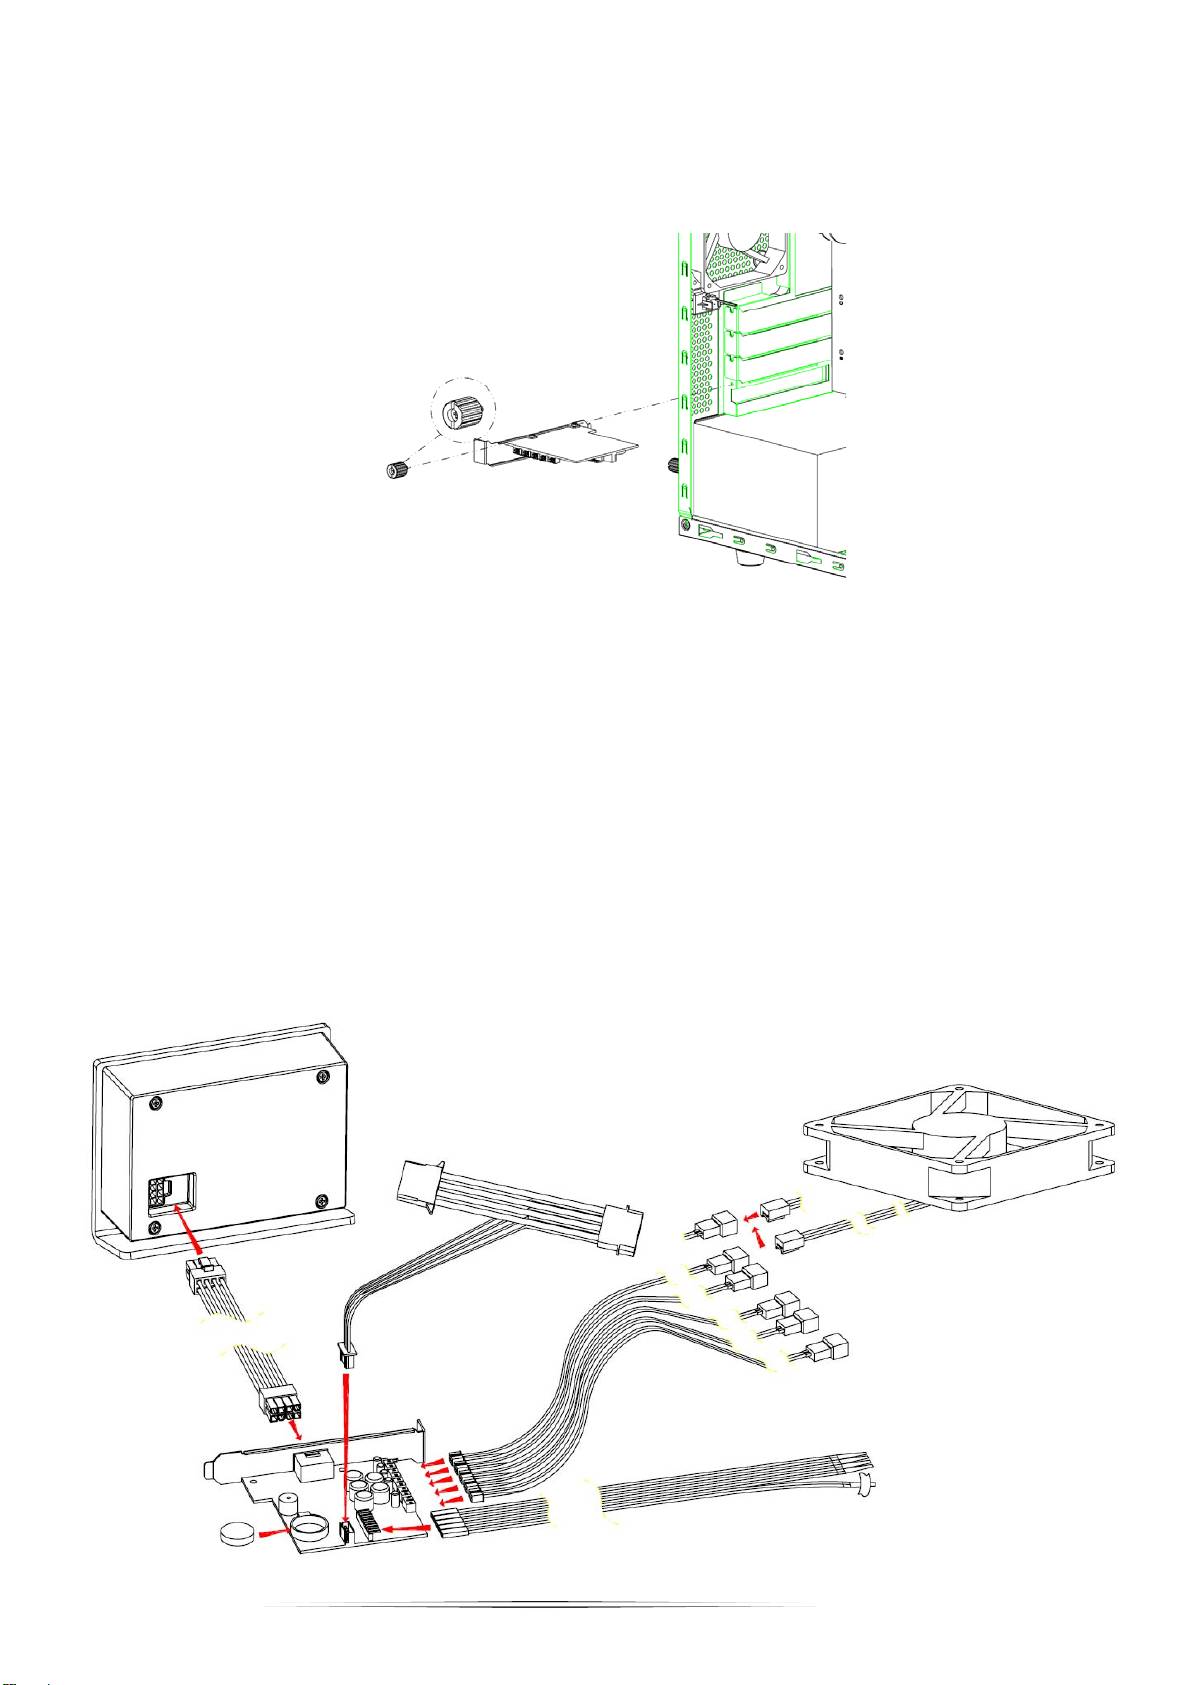
1. Open the side panel to your computer chassis and screw the temperature controller into a free PCI slot
2. Connect the power cable to the controller board and the molex to the power supply.
3. Connect the 3pin fan connectors to the board and fans you want to control and detect.
4. Connect the fan probes to the board insuring the red line is aligned to the left side. Tape the probes to the areas
to detect temperatures (Recommended is CPU, GPU and Hard drive locations).
5. Insert the battery into the controller board.
6. Finally, using the cable connected, connect the board to the external display.
7. Power on your PC to begin usage.
2
Installation
Vielen Dank für den Kauf eines NZXT-Produktes.
1. Öffnen Sie die seitliche Blende Ihres Computergehäuses; installieren Sie den Temperatur-Controller mit Hilfe einer Schraube
in einem freien PCI-Steckplatz.
2. Schließen Sie das Netzkabel an der Controller-Platine und den Molex-Stecker am Netzteil an.
3. Verbinden Sie die Lüfter, die Sie steuern und erkennen möchten, über die dreipoligen Lüfteranschlüsse mit der
Platine.
4. Achten Sie beim Anschließen der Temperaturfühler an der Platine darauf, die rote Linie an der linken Seite
auszurichten. Befestigen Sie die Fühler mit Klebestreifen an den gewünschten Stellen, an denen die
Temperaturen gemessen werden sollen (empfohlen: CPU, GPU und Festplatten).
5. Legen Sie die Batterie in die Controller-Platine ein.
6. Verbinden Sie die Platine schließlich über das Kabel mit dem externen Anzeigegerät.
7. Schalten Sie Ihren Computer zur Inbetriebnahme des Produktes ein.
3
Instalación
Gracias por adquirir un producto de NZXT.
1. Abra el panel lateral del chasis del equipo y atornille el controlador de temperatura en una ranura PCI disponible.
2. Conecte el cable de alimentación a la tarjeta del controlador y el conector Molex a la fuente de alimentación.
3. Enchufe los conectores de tres contactos de los ventiladores a la tarjeta y a los ventiladores que desee controlar
y detectar.
4. Conecte las sondas de los ventiladores a la tarjeta asegurándose de que la línea roja está alineada con el lado
izquierdo. Sujete con una cinta las sondas en las zonas correspondientes para detectar las temperaturas. Las
ubicaciones recomendadas son: CPU, GPU y disco duro.
5. Inserte la batería en la tarjeta del controlador.
6. Finalmente, mediante el cable conectado, conecte la tarjeta a la pantalla externa.
7. Encienda su PC y comience a utilizarlo.
4

Installation
Merci d’avoir fait l’acquisition d’un produit NZXT.
1. Ouvrez le panneau latéral du boîtier de votre ordinateur puis vissez le régulateur de température dans une fente PCI libre
2. Connectez le câble d'alimentation au panneau du régulateur et le molex à la source d'alimentation.
3. Connectez les connecteurs de ventilateur à 3 fiches au panneau et aux ventilateurs que vous souhaitez contrôler
et détecter.
4. Connectez les sondes de ventilateur au panneau en vous assurant que la ligne rouge est alignée avec le coté
gauche. Collez les sondes aux emplacements pour détecter les températures (Nous vous recommandons les
emplacements CPU, GPU et le disque dur).
5. Insérez la batterie dans le panneau du régulateur.
6. Enfin, en utilisant le câble connecté, connectez le panneau à l'affichage externe.
7. Allumez votre PC pour commencer l'utilisation.
5
インストール
NZXT の製品をご購入いただきありがとうございます。
1. ご使用のコンピュータケースのサイドパネルを開き、温度コントローラを空き PCI スロットにネジ止めします。
2. 電源ケーブルをコントローラボードおよび電源に接続します。
3. 3 ピンコネクタを、コントロールおよび検知するボードとファンに接続します。
4. ファンプローブをボードに接続し、赤いラインが左端に位置していることを確認します。プローブを温度検知す
る場所にテープで留めます(CPU、GPU およびハードドライブの位置を推奨します)。
5. バッテリをコントローラボードに挿入します。
6. 最後に、接続したケーブルを使用して、ボードを外部ディスプレーに接続します。
7. ご使用の PC の電源を入れて使用を開始します。
6
Установка
Благодарим Вас за приобретение изделия компании NZXT.
1. Откройте боковую панель корпуса компьютера, вставьте терморегулятор в свободный слот PCI и прикрутите его.
2. Подсоедините кабель питания к плате регулятора и разъемом molex к источнику питания.
3. Подсоедините 3-контактный разъем вентилятора к плате и вентиляторам, которыми необходимо
управлять и для которых необходимо проводить измерения.
4. Подсоедините датчики вентилятора к плате, красный провод подсоедините к левой стороне. Прикрепите
датчики к устройству, температуру которого необходимо измерить (рекомендуется провести
измерения
температуры ЦП, графического процессора и жесткого диска).
5. Вставьте батарею в плату регулятора.
6. Подсоедините подключенный к плате кабель к внешнему дисплею.
7. Включите компьютер, чтобы начать использование устройства.
7

安装
感谢您购买 NZXT 产品。
1. 打开计算机机箱的侧面板,将温度控制器装入可用的 PCI 插槽并拧上螺丝。
2. 将电源线连接到控制器板,将 molex 连接到电源。
3. 将 3 针风扇接头连接到板子和您要控制和检测的风扇。
4. 将风扇探针连接到板子,确保红色线对齐左侧。用胶带将探针贴附在要检测温度的区域(推荐 CPU、GPU 和硬盘驱
动器位置)。
5. 将电池插入控制器板。
6. 最后,使用所连接的线缆将板子连接到外部显示器。
7. 打开 PC 的电源以开始使用。
8
