Grandstream GXP2140 Quick Installation Guides: instruction
Class: Office Equipment
Type: Phone
Manual for Grandstream GXP2140 Quick Installation Guides

Grandstream Networks, Inc.
126 Brookline Ave, 3rd Floor
Boston, MA 02215 USA
Voice: (617) 566-9300
Fax: (617) 249-1987
www.grandstream.com
GXP2140 Enterprise IP Phone
Quick Installation Guide
For Warranty and RMA information, please visit www.grandstream.com

Content
English...............................................................................1
简体中文........................................................................10
Español............................................................................19
Français...........................................................................27
Deutsch............................................................................35
Italiano.............................................................................43
Русскй.............................................................................51
EN
PRECAUTIONS:
WARNING:
Please DO NOT power cycle the GXP2140 during system boot
The GXP2140 is not pre-congured to support or
up or rmware upgrade. You may corrupt rmware images and cause the unit to
carry emergency calls to any type of hospital, law
malfunction.
enforcement agency, medical care unit (“Emergency
WARNING:
Use only the power adapter included in the GXP2140 package.
Service(s)”) or any other kind of Emergency Service.
Using an alternative non-qualied power adapter may possibly damage the unit.
You must make additional arrangements to access
OVERVIEW:
Emergency Services. It is Your responsibility to pur-
GXP2140 is a next generation enterprise grand IP Phone that features up to 4
lines, 4.3 inch TFT color LCD, 5 XML programmable context-sensitive soft keys,
chase SIP-compliant Internet telephone service, prop-
dual Gigabit network ports, integrated PoE and Bluetooth, 5-way conference,
erly congure the GXP2140 to use that service, and
and Electronic Hook Switch(EHS). The GXP2140 delivers superior HD audio
quality, rich and leading edge telephony features, protection for privacy, and
periodically test your conguration to conrm that it
broad interoperability with most 3rd party SIP devices and leading SIP/NGN/IMS
works as You expect. If You do not do so, it is Your re-
platforms.GXP2140 is the perfect choice for enterprise users looking for a high
quality, feature rich multi-line executive IP phone with advanced functionalities
sponsibility to purchase traditional wireless or landline
and performance.
telephone services to access Emergency Services.
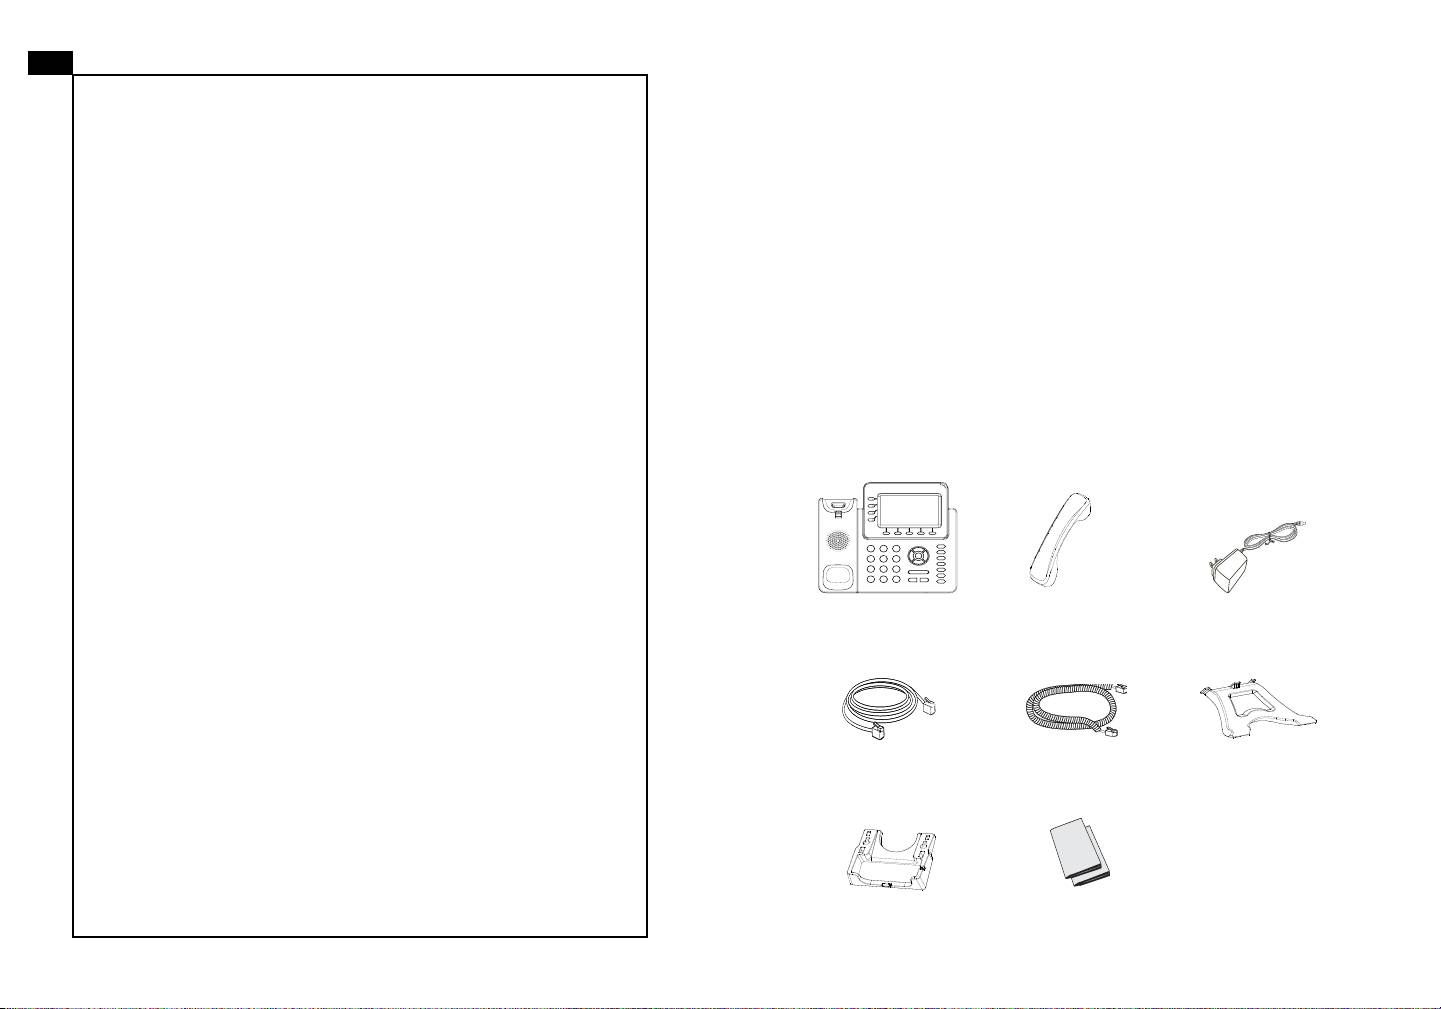
PACKAGE CONTENTS:
GRANDSTREAM DOES NOT PROVIDE CON-
NECTIONS TO EMERGENCY SERVICES VIA THE
GXP2140. NEITHER GRANDSTREAM NOR ITS
12V
OFFICERS, EMPLOYEES OR AFFILIATES MAY
BE HELD LIABLE FOR ANY CLAIM, DAMAGE, OR
1 x Phone Main Case 1 x Handset
1 x 12V Power adapter
LOSS, AND YOU HEREBY WAIVE ANY AND ALL
SUCH CLAIMS OR CAUSES OF ACTION ARISING
FROM OR RELATING TO YOUR INABILITY TO USE
THE GXP2140 TO CONTACT EMERGENCY SER-
VICES, AND YOUR FAILURE TO MAKE ADDITION-
1 x Phone Cord1 x Ethernet Cable 1 x High Stand
AL ARRANGEMENTS TO ACCESS EMERGENCY
SERVICES IN ACCORDANCE WITH THE IMMEDI-
ATELY PRECEDING PARAGRAPH
.
1 x Quick Installation Guide/
1 x Wall Mount
1 x GPL license
1 2
PHONE SETUP:
Installing the phone (Phone Stand) :
For installing the phone on the table with the phone stand, attach the phone stand
to the bottom of the phone where there is a slot for the phone stand. (Upper half,
bottom part).
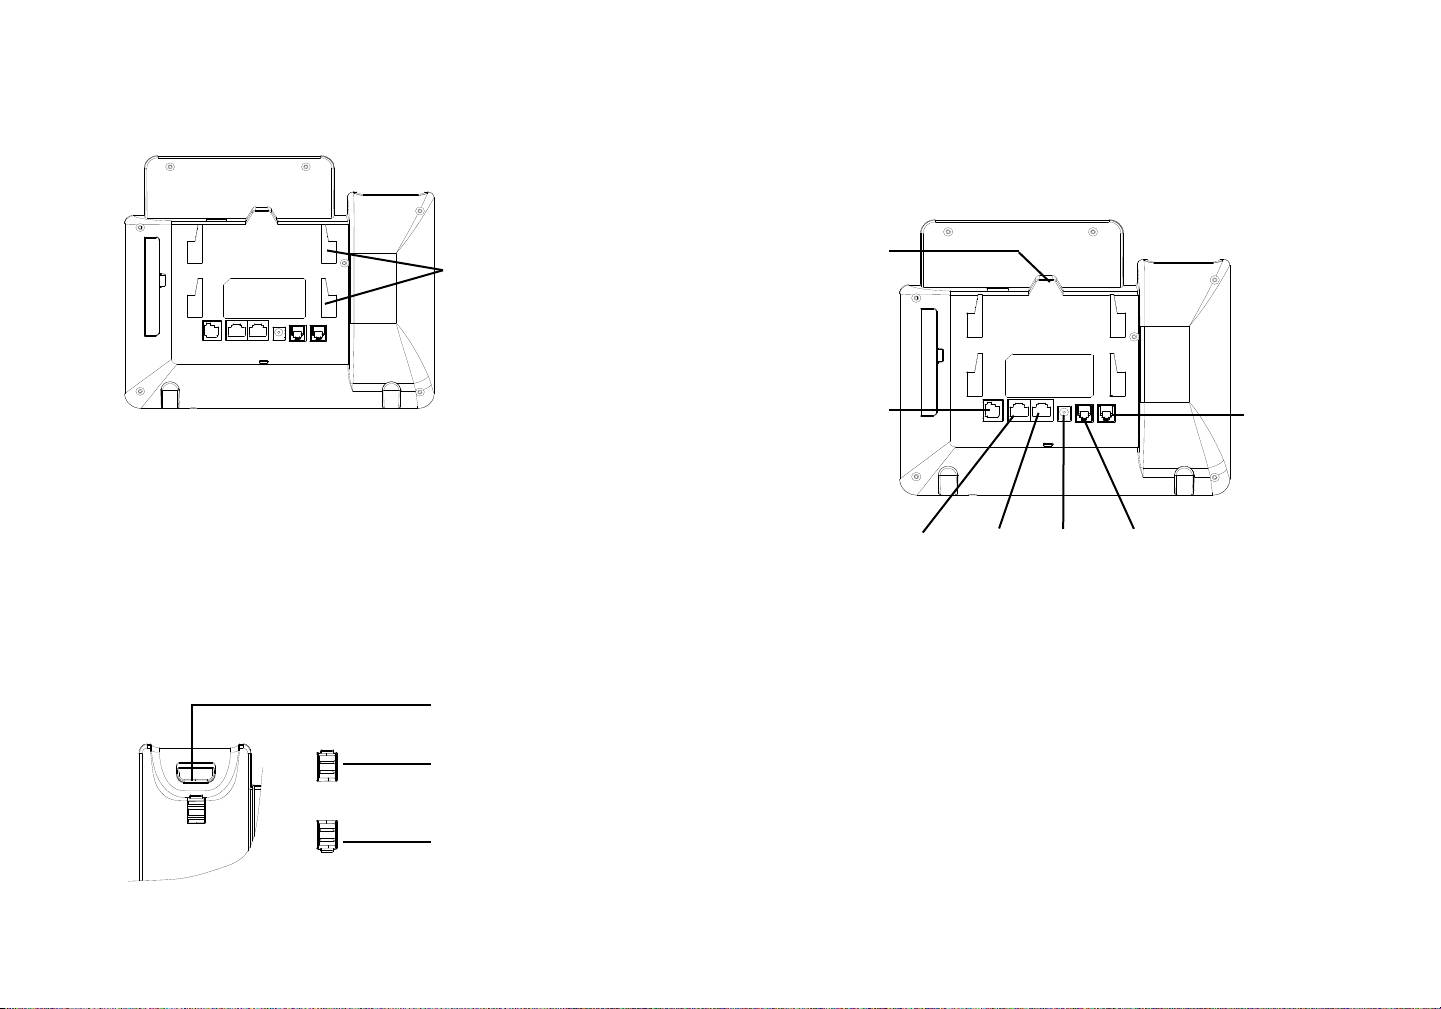
CONNECTING THE PHONE:
USB Port
Slot for the wall
mount spacers and
phone stand
Extension
Handset Port
Module Port
Installing the phone (Wall Mount):
1. Attach the wall mount spacers to the slot for wall mount spacers on the back
of the phone.
PC Port
LAN Port Power
Headset Port
2. Attach the phone to the wall via the wall mount hole.
3. Pull out the tab from the handset cradle (See gure below).
To setup the GXP2140, follow the steps below:
4. Rotate the tab and plug it back into the slot with the extension up to hold the
handset while the phone is mounted on the wall (See gure below).
1. Connect the handset and main phone case with the phone cord.
Handset Rest
2. Connect the LAN port of the phone to the RJ-45 socket of a hub/switch or a
router (LAN side of the router) using the Ethernet cable.
Tab with extension up
3. Connect the 12V DC output plug to the power jack on the phone; plug the power
adapter into an electrical outlet.
4. The LCD will display provisioning or rmware upgrade information. Before con-
Tab with extension down
tinuing, please wait for the date/time display to show up.
5. Using the phone embedded web server or keypad conguration menu, you can
further congure the phone using either a static IP or DHCP.
3
4
Table of contents
- Content English...............................................................................1 简体中文........................................................................10 Español............................................................................19 Français...........................................................................27 Deutsch............................................................................35 Italiano.............................................................................43 Русскй.............................................................................51
- EN
- PHONE CONFIGURATION:
- GXP2140 EXTENSION MODULE:
- ZH
- 注意事项: 安装电话:
- 安装电话 (桌面支架): 使用GXP2140键盘:
- GXP2140扩展板:
- ES
- CONFIGURACIÓN DEL TELÉFONO:
- FR Le GXP2140 n’est pas préconguré pour prendre en
- LE MODULE D’EXTENSION DU CONFIGURATION DU TELEPHONE: GXP2140:
- DE
- KONFIGURATION DES TELEFONS: GXP2140 TASTENERWEITERUNGSMODUL
- IT
- CONFIGURAZIONE DEL TELEFONO:
- RU
- КОНФИГУРАЦИЯ ТЕЛЕФОНА: МОДУЛЬ РАСШИРЕНИЯ GXP2140:
