SeaSonic Electronics 750W FOCUS GX ATX 3.0 80 PLUS Gold Desktop Power Supply: инструкция
Раздел: Аксессуары для фото- и видеотехники
Тип:
Инструкция к SeaSonic Electronics 750W FOCUS GX ATX 3.0 80 PLUS Gold Desktop Power Supply
POWER SUPPLY
INSTALLATION GUIDE
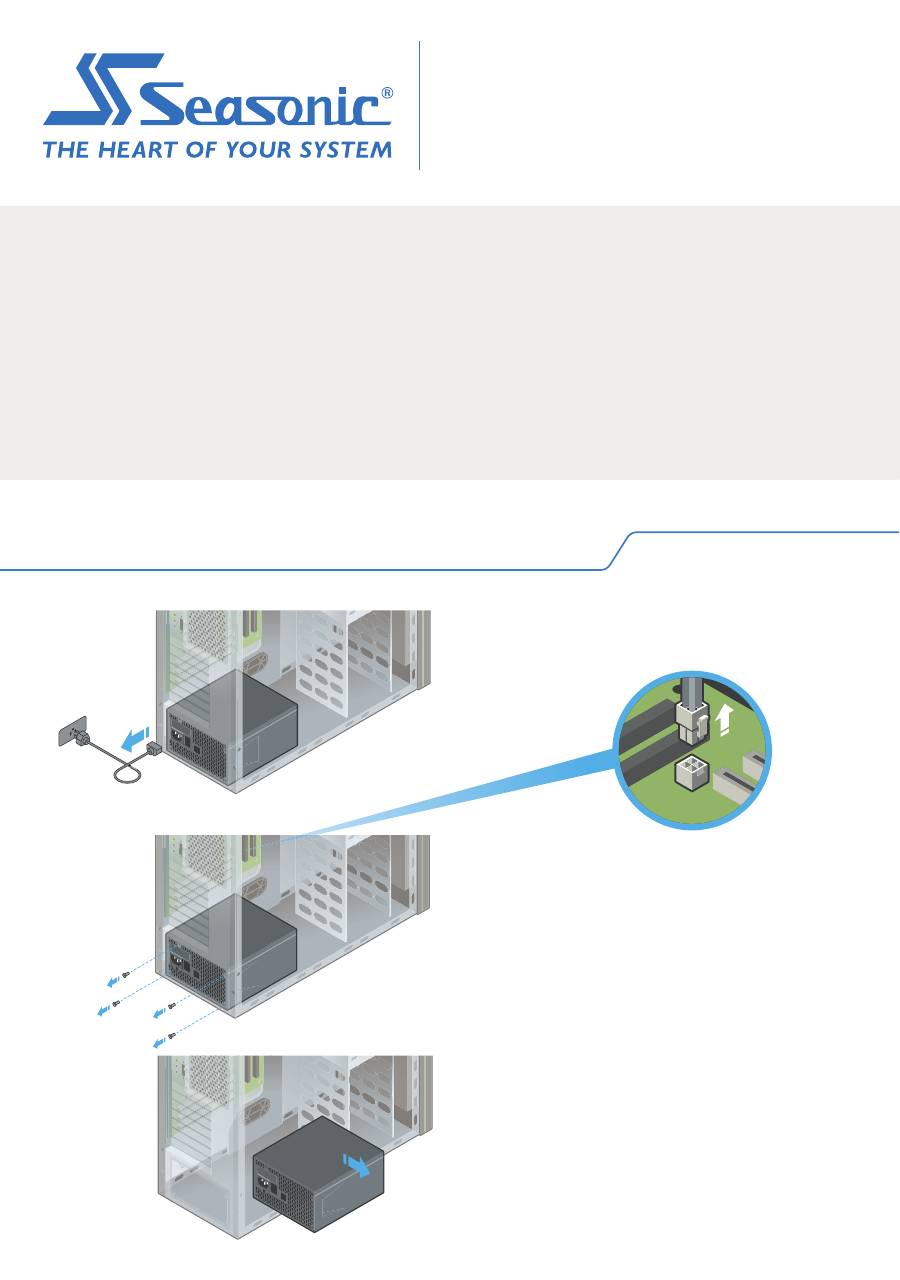
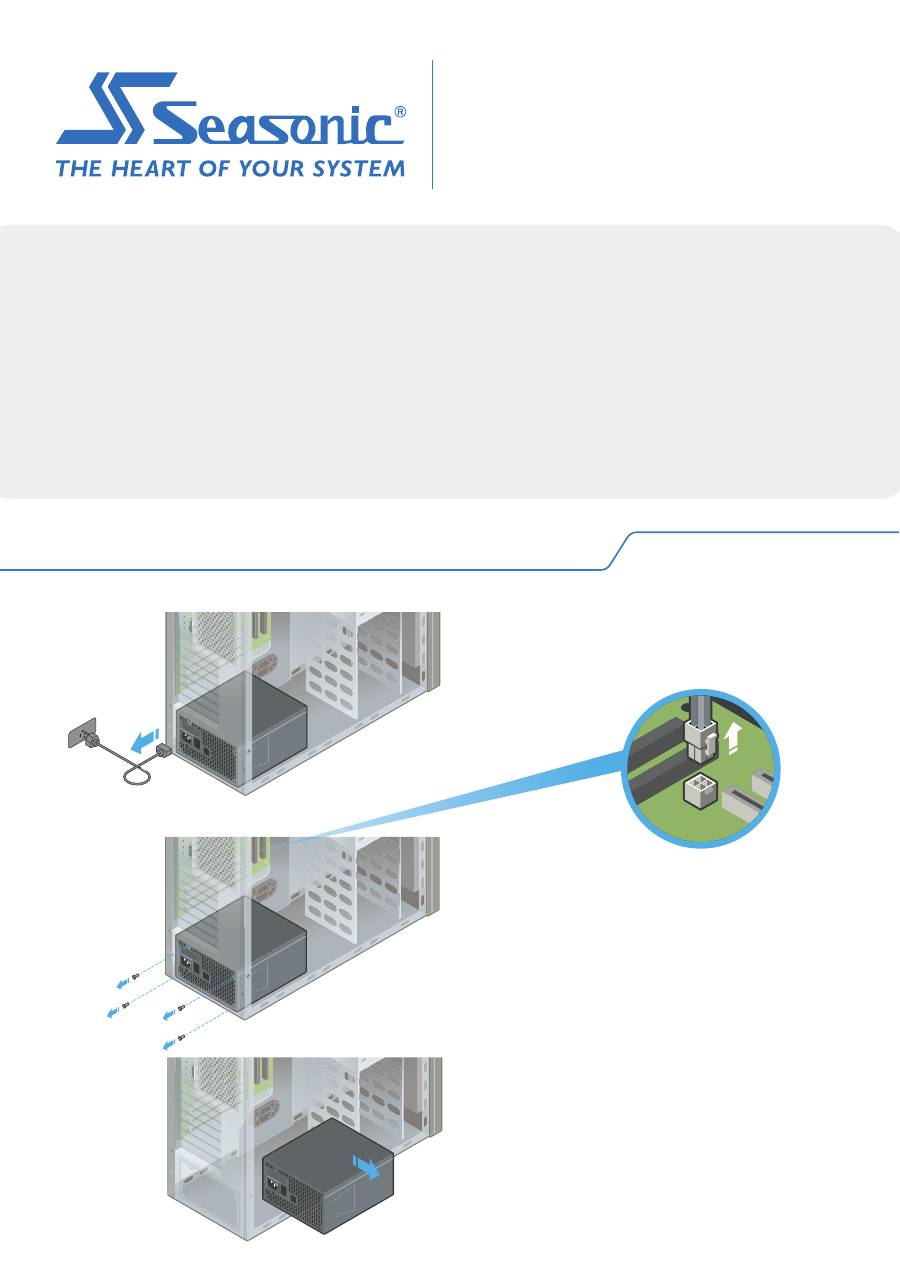
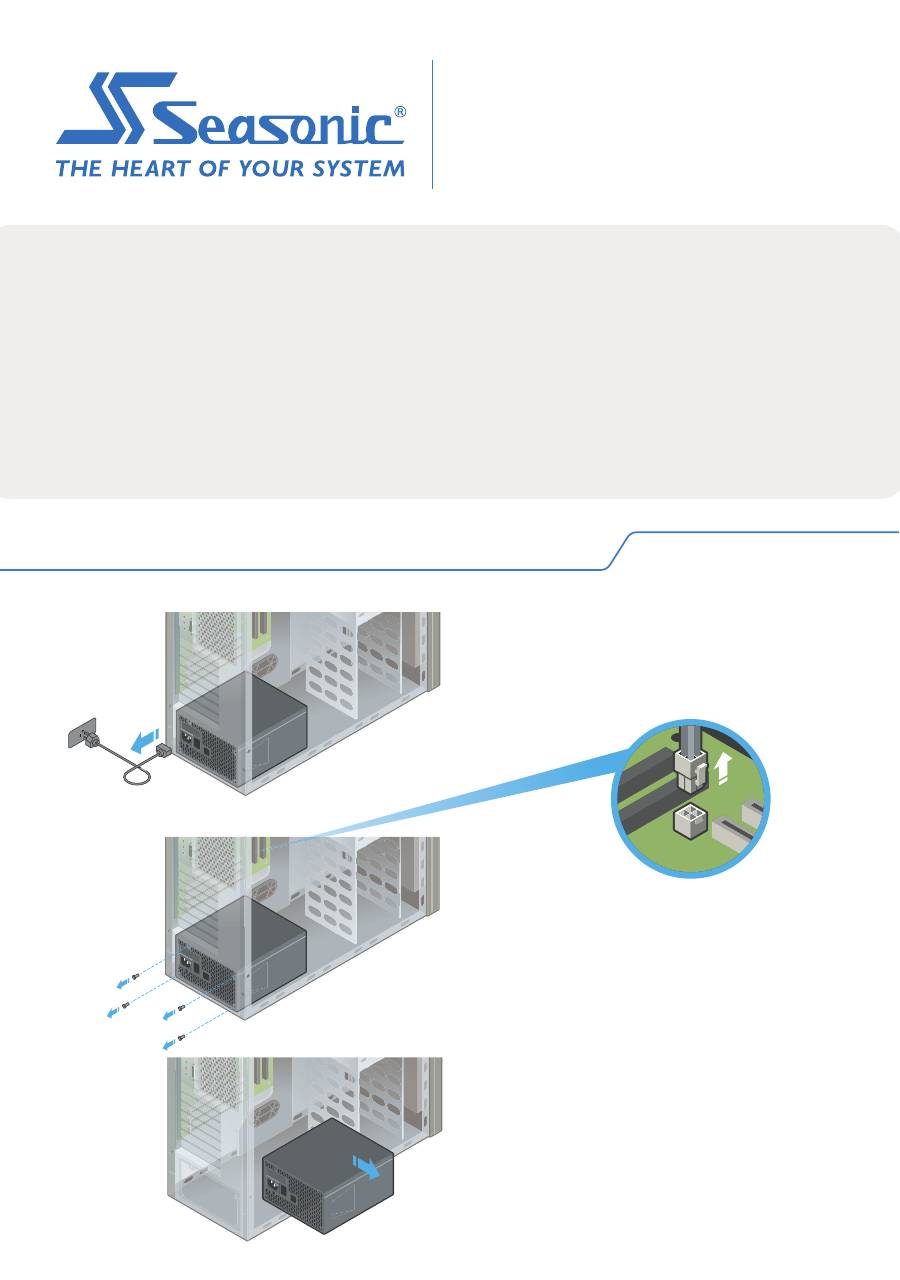
1. Remove your old PSU (power supply unit)
1.1.
Disconnect your AC power cord
from the wall socket and the back of
the power supply.
1.2.
Disconnect
all DC cable connectors.
1.3.
Remove all 4 mounting screws.
1.4.
Remove your old PSU.
WARNING! IMPORTANT SAFETY INFORMATION
• NEVER, under any circumstances, open the power supply
unit. High voltage inside. WARRANTY IS VOID once the
cover is removed.
• DO NOT insert any object into the fan grill or the ventilation
area of the power supply unit.
• DO NOT place any object in front of the fan or the
ventilation area of the power supply unit that may obstruct
or restrict airflow.
• USE ONLY the Seasonic modular cables provided with the
power supply unit.
• Keep the power supply unit in a dry environment, away
from humidity.
• The power supply unit is for integration into a computer
system and not intended for external or outdoor usage.
Warning!
This device complies with Part 15 of the FCC Rules.
Operation is subject to the following two conditions:
(1) this device may not cause harmful interference, and
(2) this device must accept any interfer ence received,
including interference that may cause undesired operation.
• Product: Switching Power Supply
• Model name: Please refer to the rating label on the product.
• Contact: www.seasonic.com/contact-us
BUMWHGUD3AW
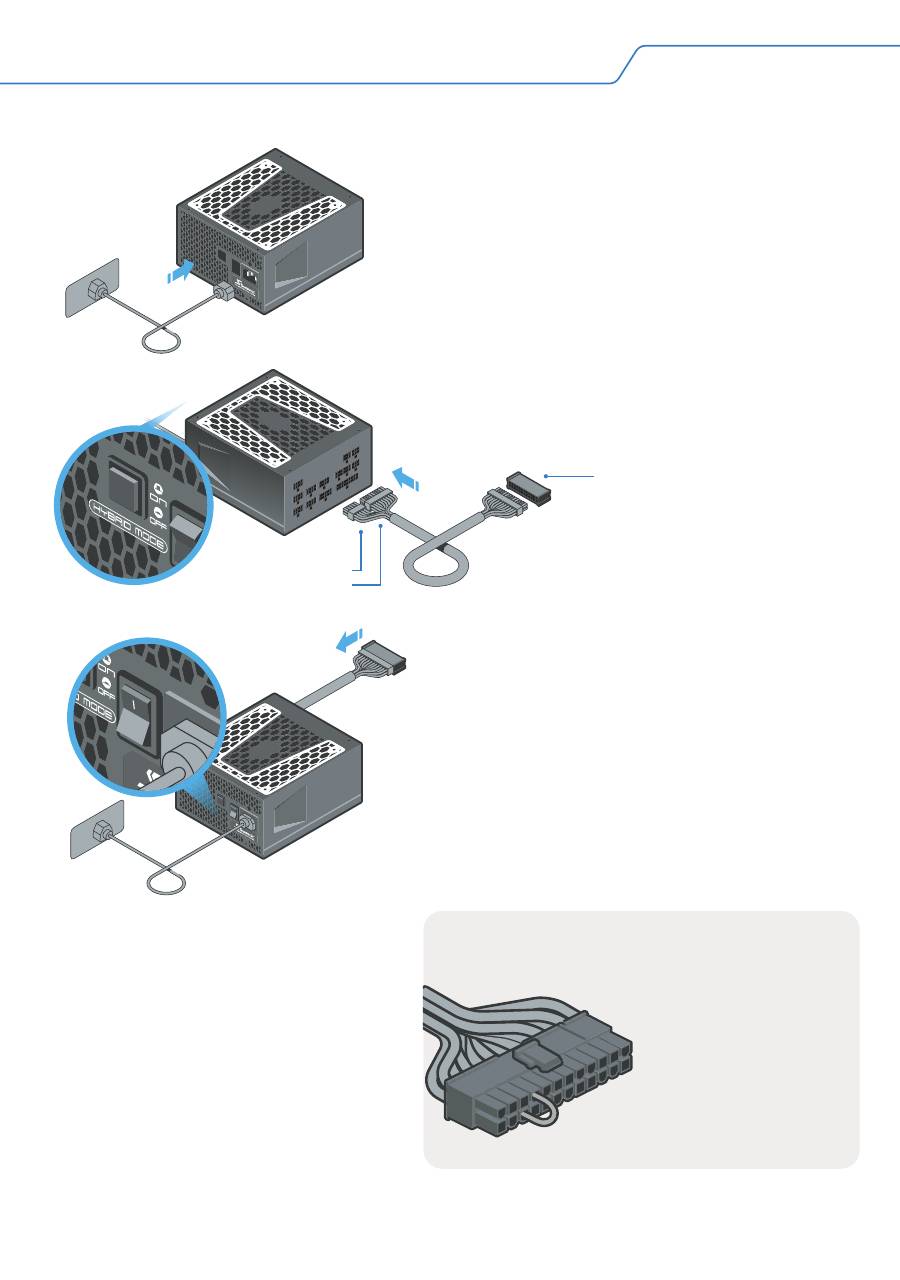
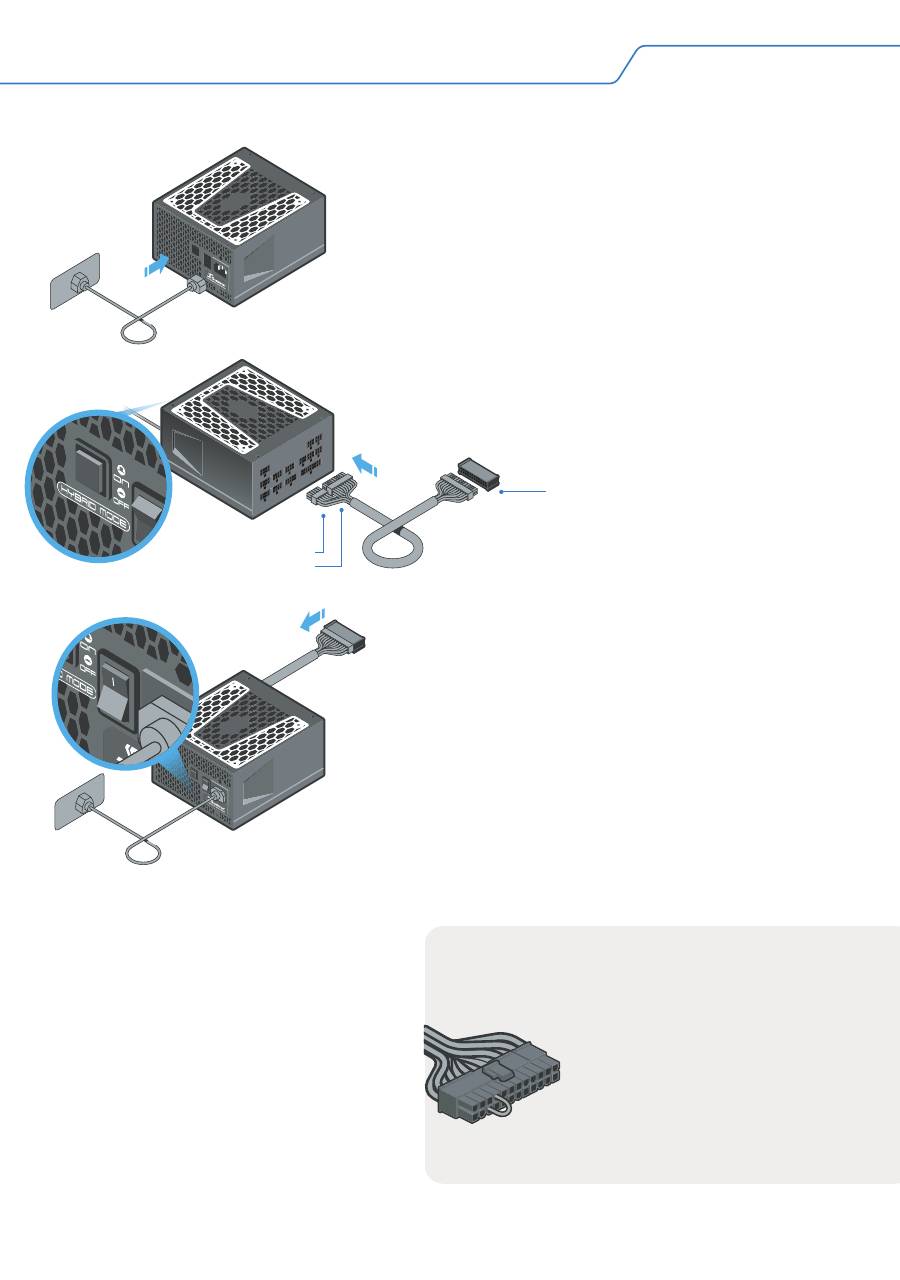
2.1.
Plug the AC power cord into the PSU. Make
sure that the AC power is coming directly from
the wall outlet.
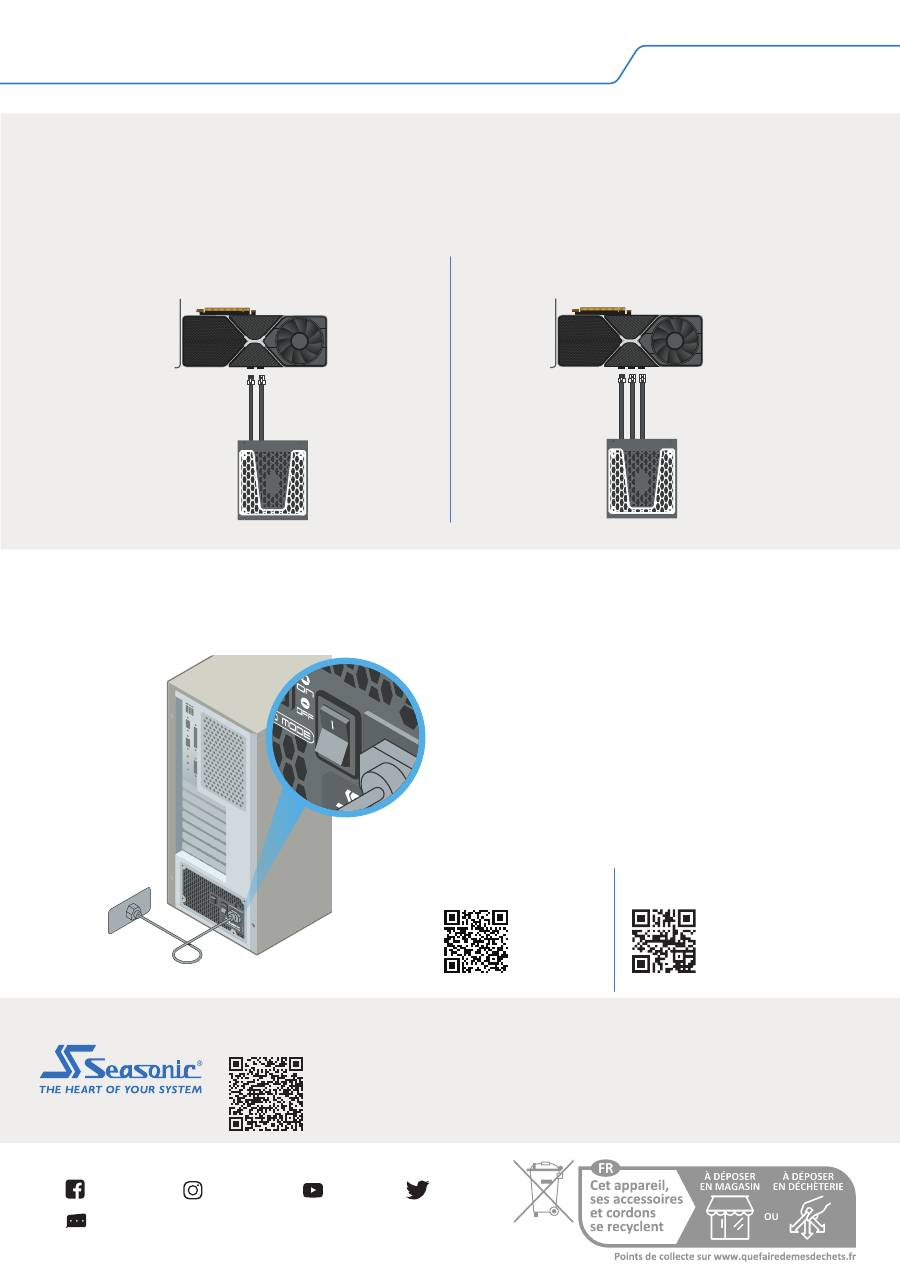
2.3.
If your power supply features a fan control
switch, set it to “Normal” Mode*.
* In Hybrid or Fanless Mode (S³FC) the fan will not turn.
It is recommended to use a high quality surge protector to
protect the PSU and the system.
** If you do not have a power supply tester, refer to the
paper clip method described below.
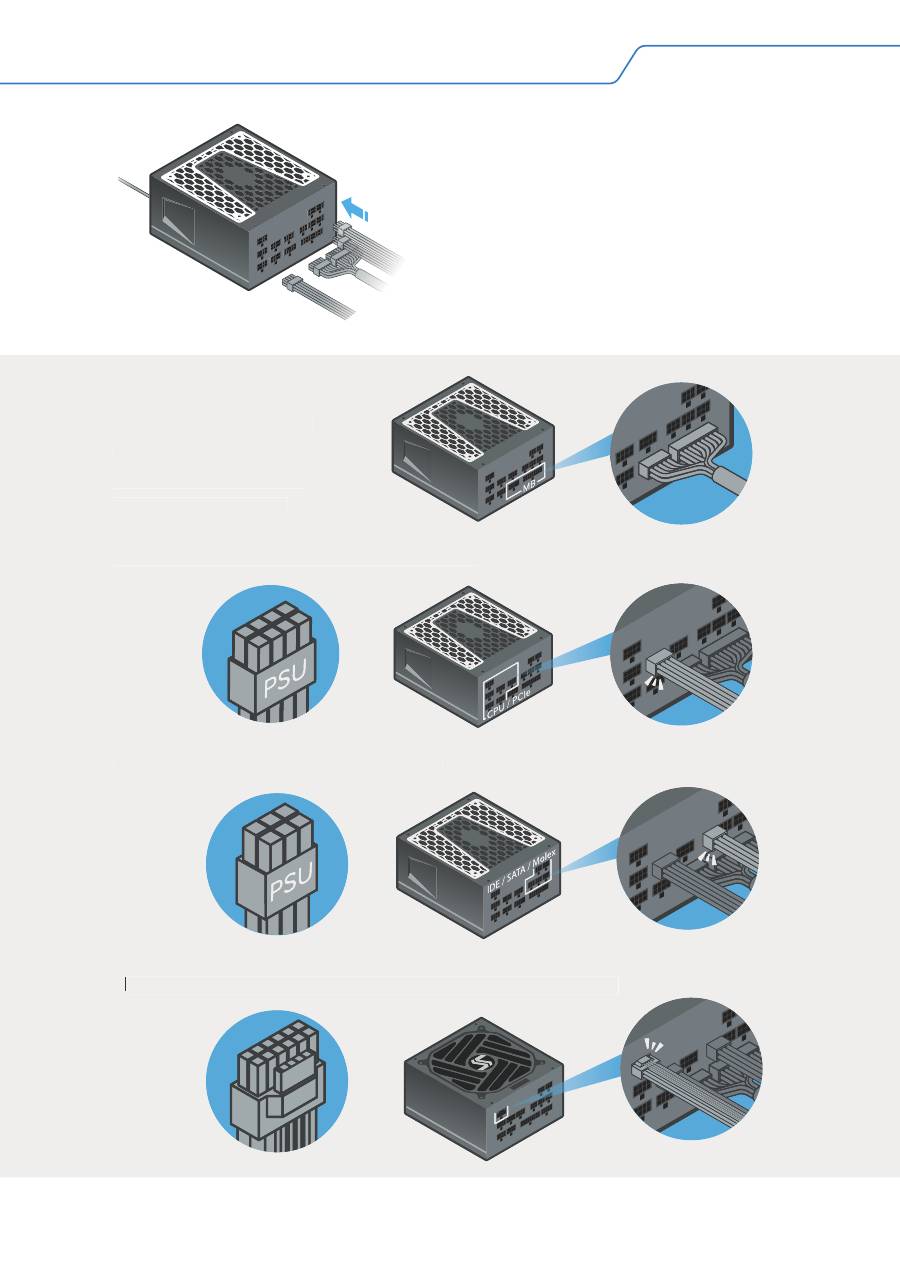
2.2.
Connect both the 18-pin and 10-pin
connectors of the motherboard cable to the PSU.
2.4.
If you have a Power Supply Tester**, attach
it to the 24-pin motherboard connector. There is
a notch on the Tester that helps to make a
perfect fit with the 24-pin connector.
2.5.
(Optional) For testing a Fanless PSU or a
PSU without the fan control switch, attach an
external fan or LED light using a Molex cable to
the PSU.
2.6.
Turn on the power supply by
setting the I/O switch to the “I” (ON)
position.
The drawings illustrate a fully modular PSU with a fan control switch and a Power Supply Tester; the features and
accessories of your PSU might be different.
If the power supply fan starts
spinning (or the externally attached
LED light turns on), then your PSU
is working.
Power Supply Tester
10-pin Connector
18-pin Connector
2. Test your Seasonic PSU before installation
Use a paper clip or a
piece of wire to create
a short circuit on the
24-pin motherboard
connector by
connecting the pins
shown on the
illustration.
Paper clip method
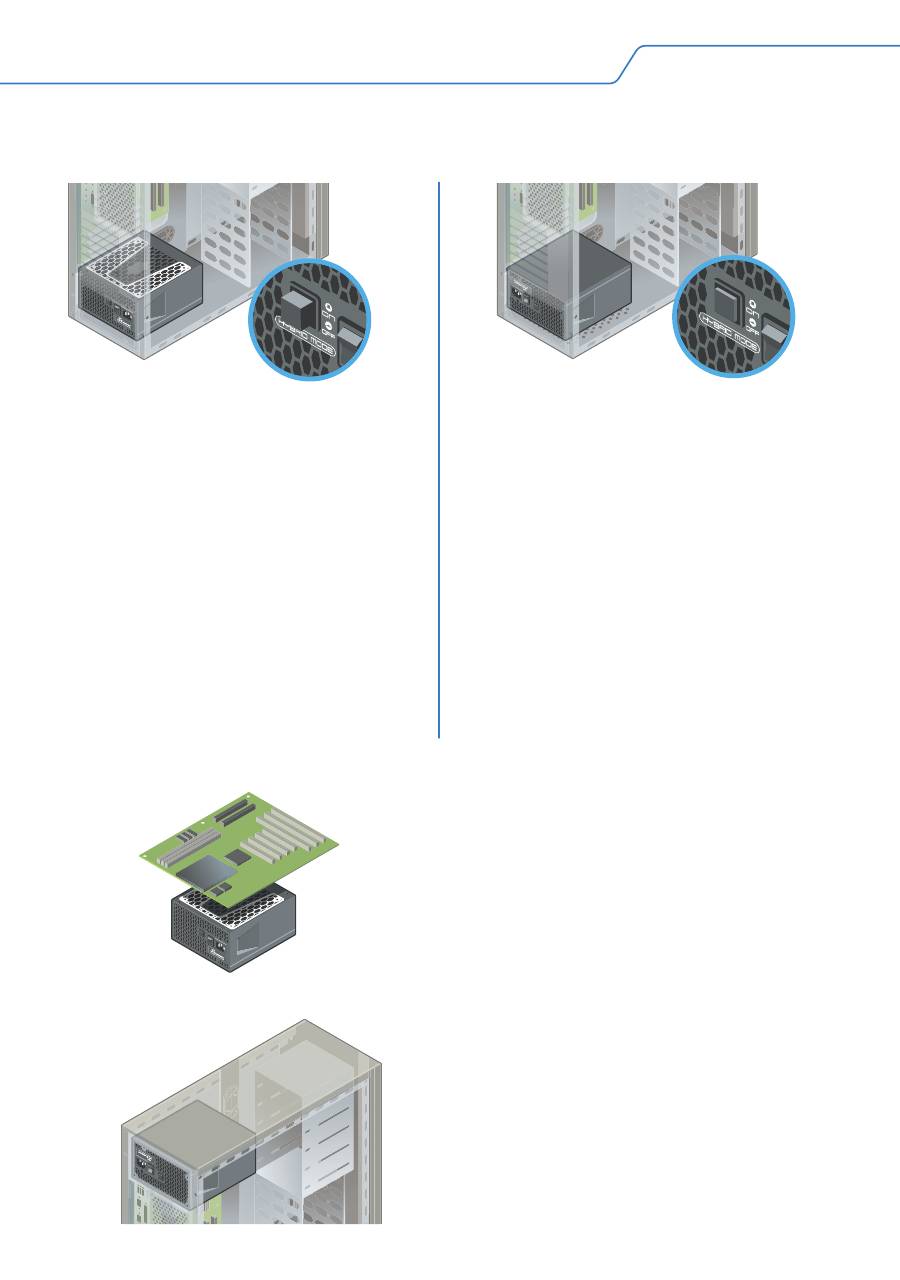
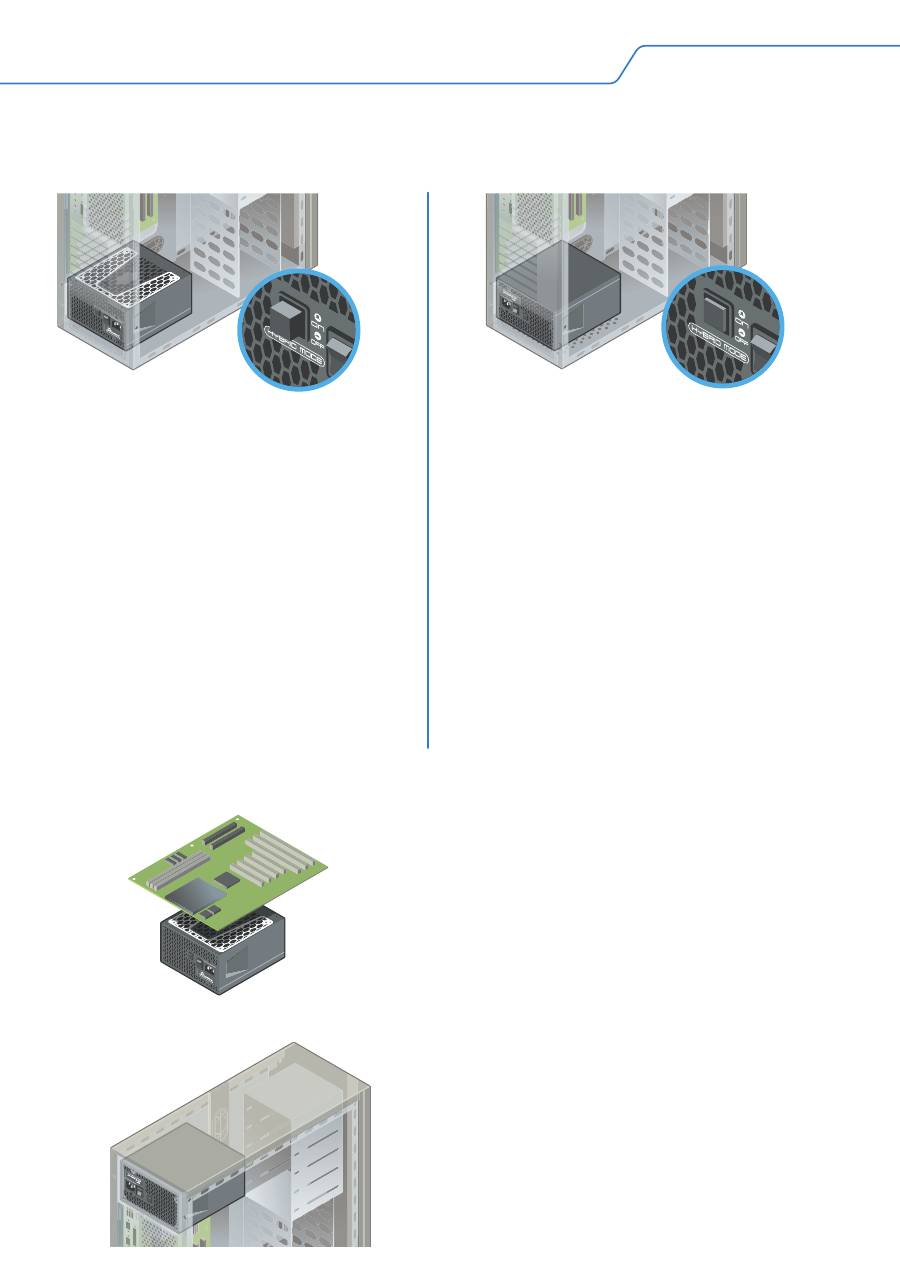
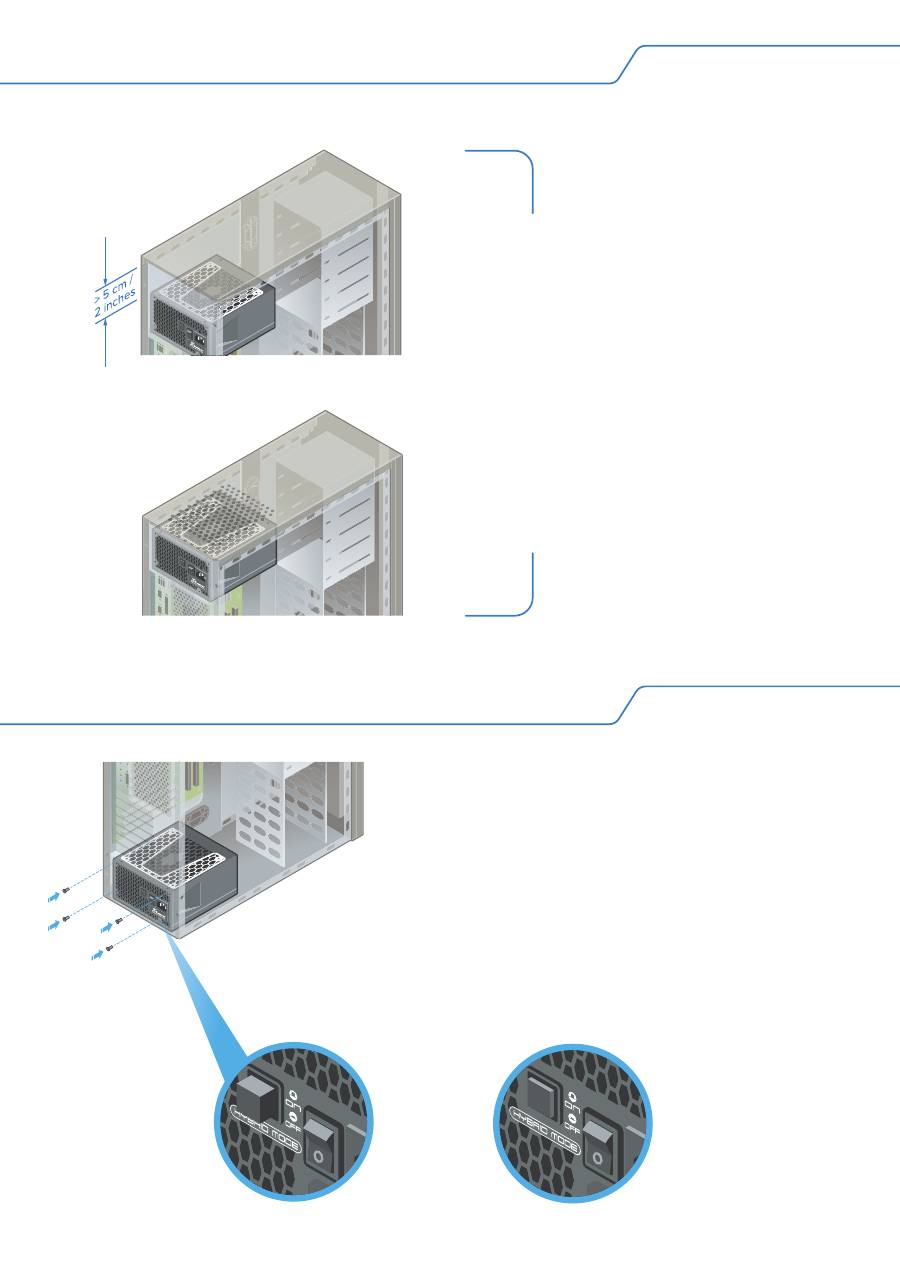
3. Position your PSU
3.1.
Bottom of the case
The fan control setting determines the optimal PSU placement.
Fanless PSU
The PSU must be mounted into the
computer case with the ventilation
top cover facing UPWARD.
In “Hybrid” mode
Seasonic recommends to install your
PSU with ventilation top cover facing
UPWARD, towards the direction of the
motherboard. This will ensure natural
heat dissipation.
In “Normal” mode
Although the direction of mounting is
optional, it is not recommended to
install the PSU with the ventilation top
cover facing downward if there are
no ventilation holes on the bottom of
the case. There should always be
enough clearance left between the
PSU and the bottom case panel.
3.3.
Top of the case
3.2.
Flat Desktop-, SFX- or ITX systems
Seasonic recommends the PSU to be
mounted with its ventilation top cover
facing DOWNWARD.
In general, it is recommended to mount
the PSU with the ventilation top cover
facing the motherboard. Due to the
different varieties of case layouts,
however, please also consult the case
manufacturer's instruction manual for
more information.
To learn about the ventilation of your computer
case, please refer to the case manufacturer’s
instruction manual.
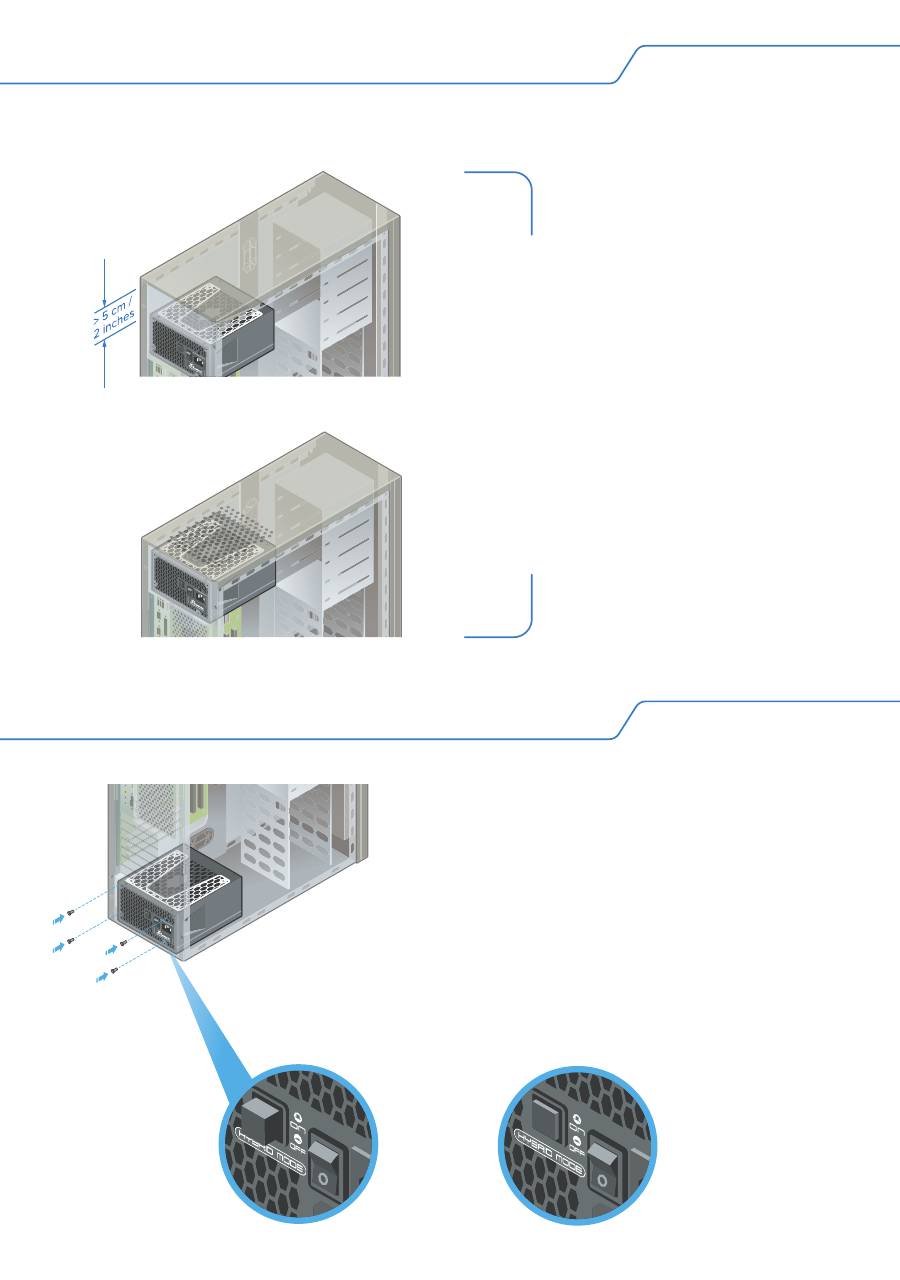
3. Position your PSU
3.3.
Top of the case
Mount the power supply with the
ventilation top cover facing UPWARD
only if there is enough space (at least
5 cm / 2 inches) available between the
PSU ventilation top cover and the metal
plate of the case, and only if the case
has a ventilation panel on top.
4. Install your Seasonic PSU
4.1.
Secure all 4 mounting screws.
4.2.
Make sure the PSU power switch is
in the “O” (OFF) position.
4.3.
Select the fan control type if your
PSU has this option.
Note: First power OFF the PSU before changing
the fan control to take effect.
Hybrid
Mode
Normal
Mode
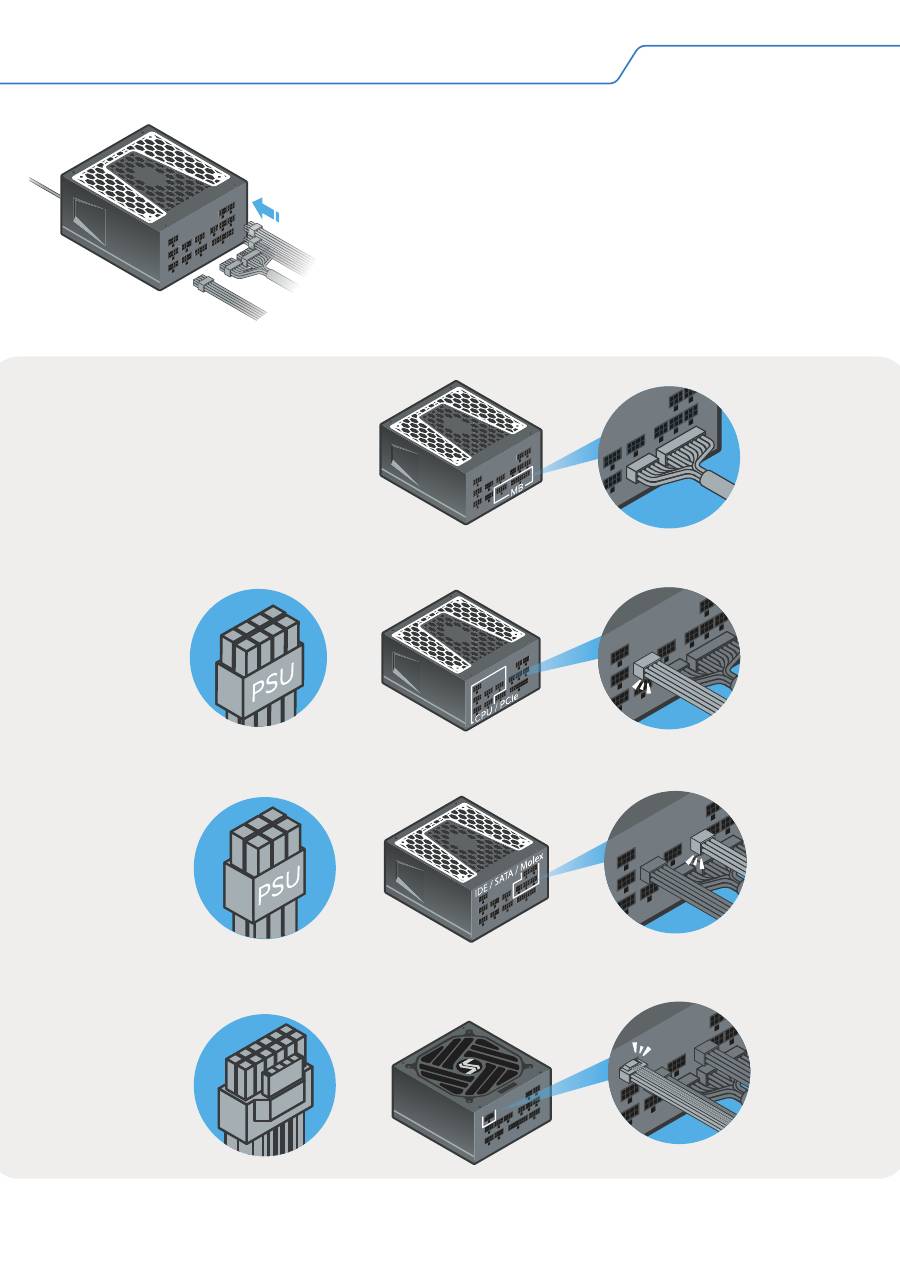
Please make sure both
connectors on the
power supply side are
properly connected.
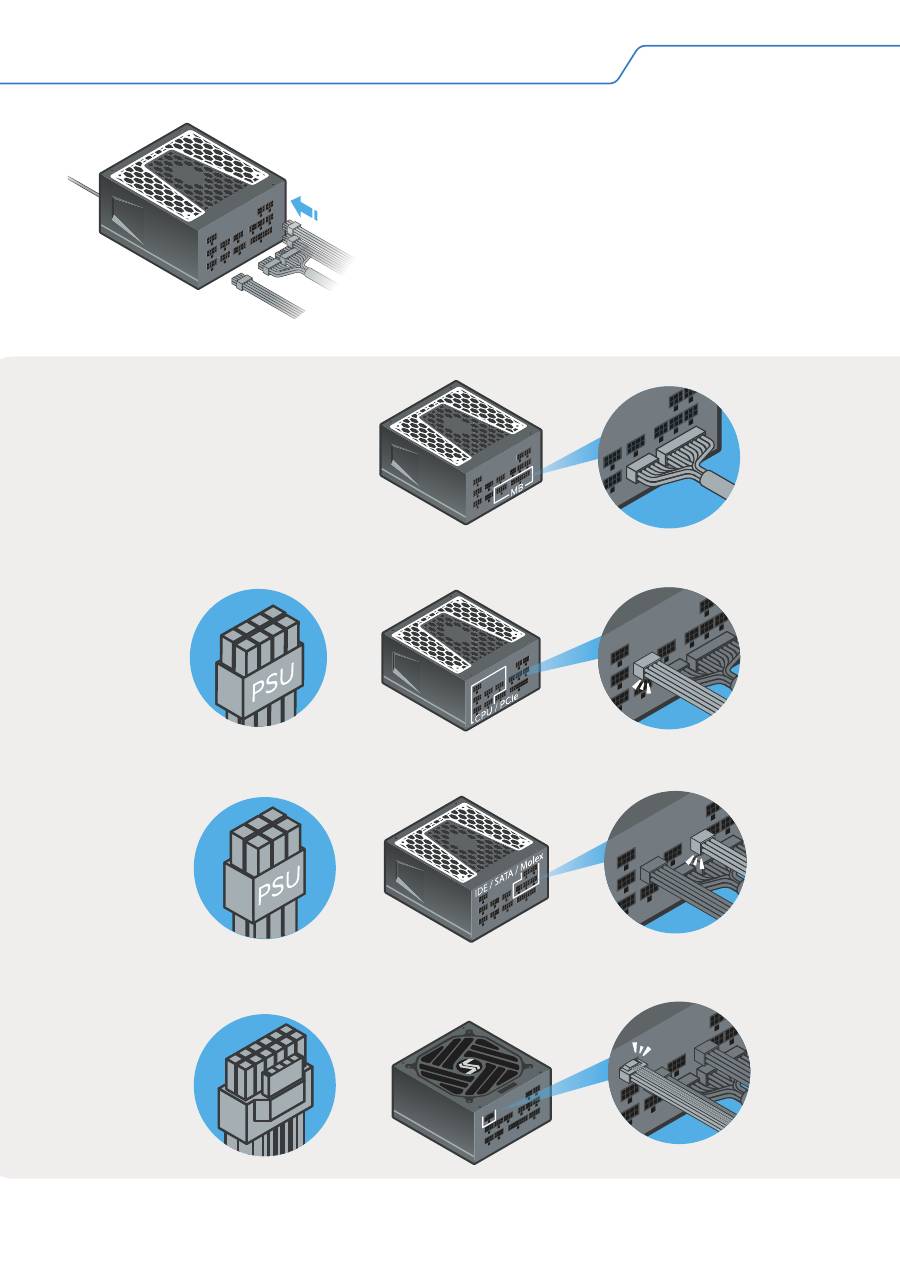
4. Install your Seasonic PSU
4.4.
Connect all the necessary system DC
cables (Motherboard, CPU, VGA, HDD,
Optical Drivers, etc). The connectors should
click to lock in.
ATTENTION! Use only cables provided by
Seasonic!
Should you require additional
cables, please contact Seasonic.
Note: The power supply drawings are for illustration purposes only, your actual model might look different.
Motherboard Cable
CPU and PCIe Cables (8-pin connectors)
Peripheral Cables (6-pin connectors)
ATX 3.0 Compatible 12VHPWR Cable (16-pin connector)
12VHPWR
Please make sure both
Please make sure both
connectors on the
connectors on the
power supply side are
power supply side are
properly connected.
properly connected.
Motherboard Cable
CPU and PCIe Cables (8-pin connectors)
Peripheral Cables (6-pin connectors)
ATX 3.0 Compatible 12VHPWR Cable (16-pin connector)
AA
12VHPWR
12VHPWR
12VHPWR
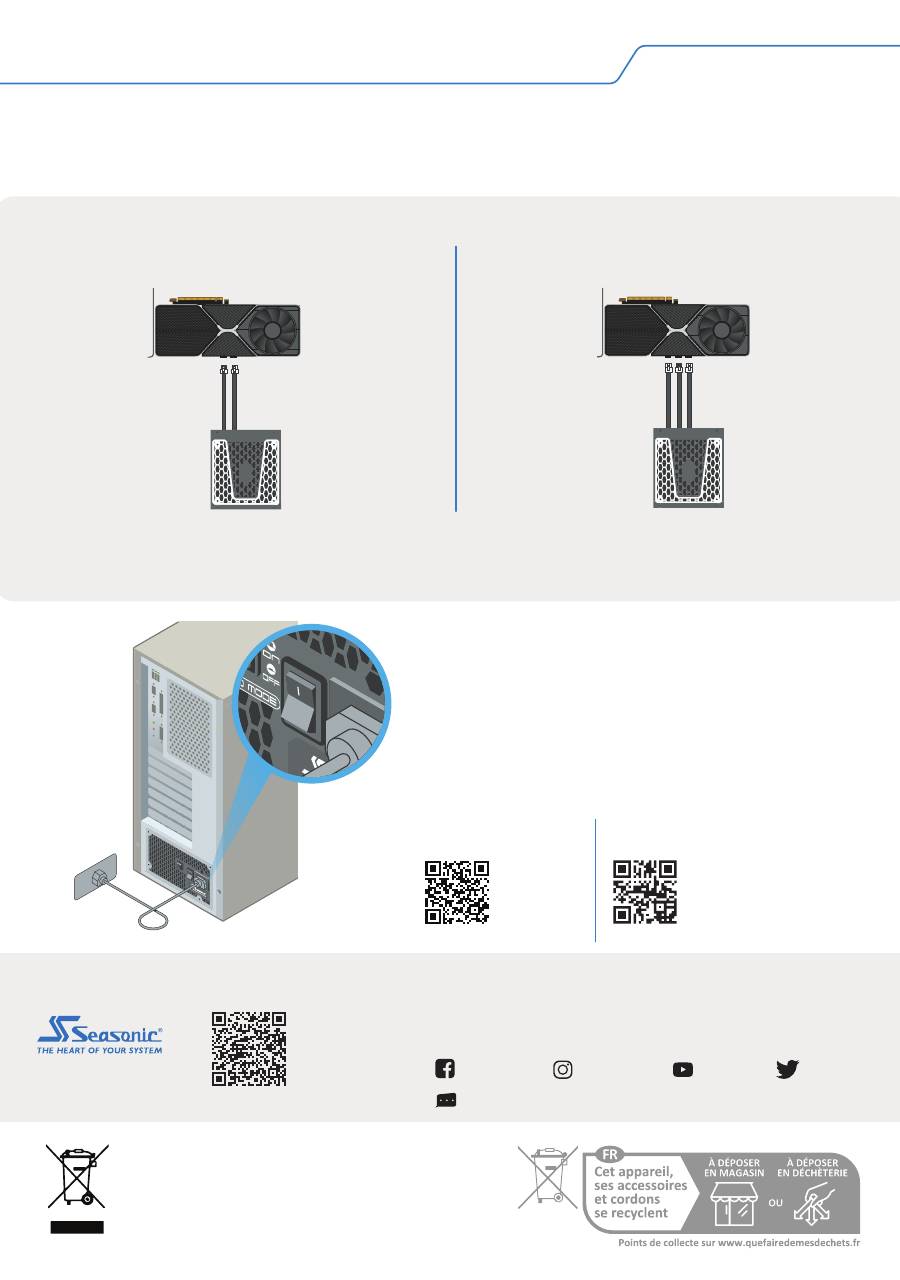
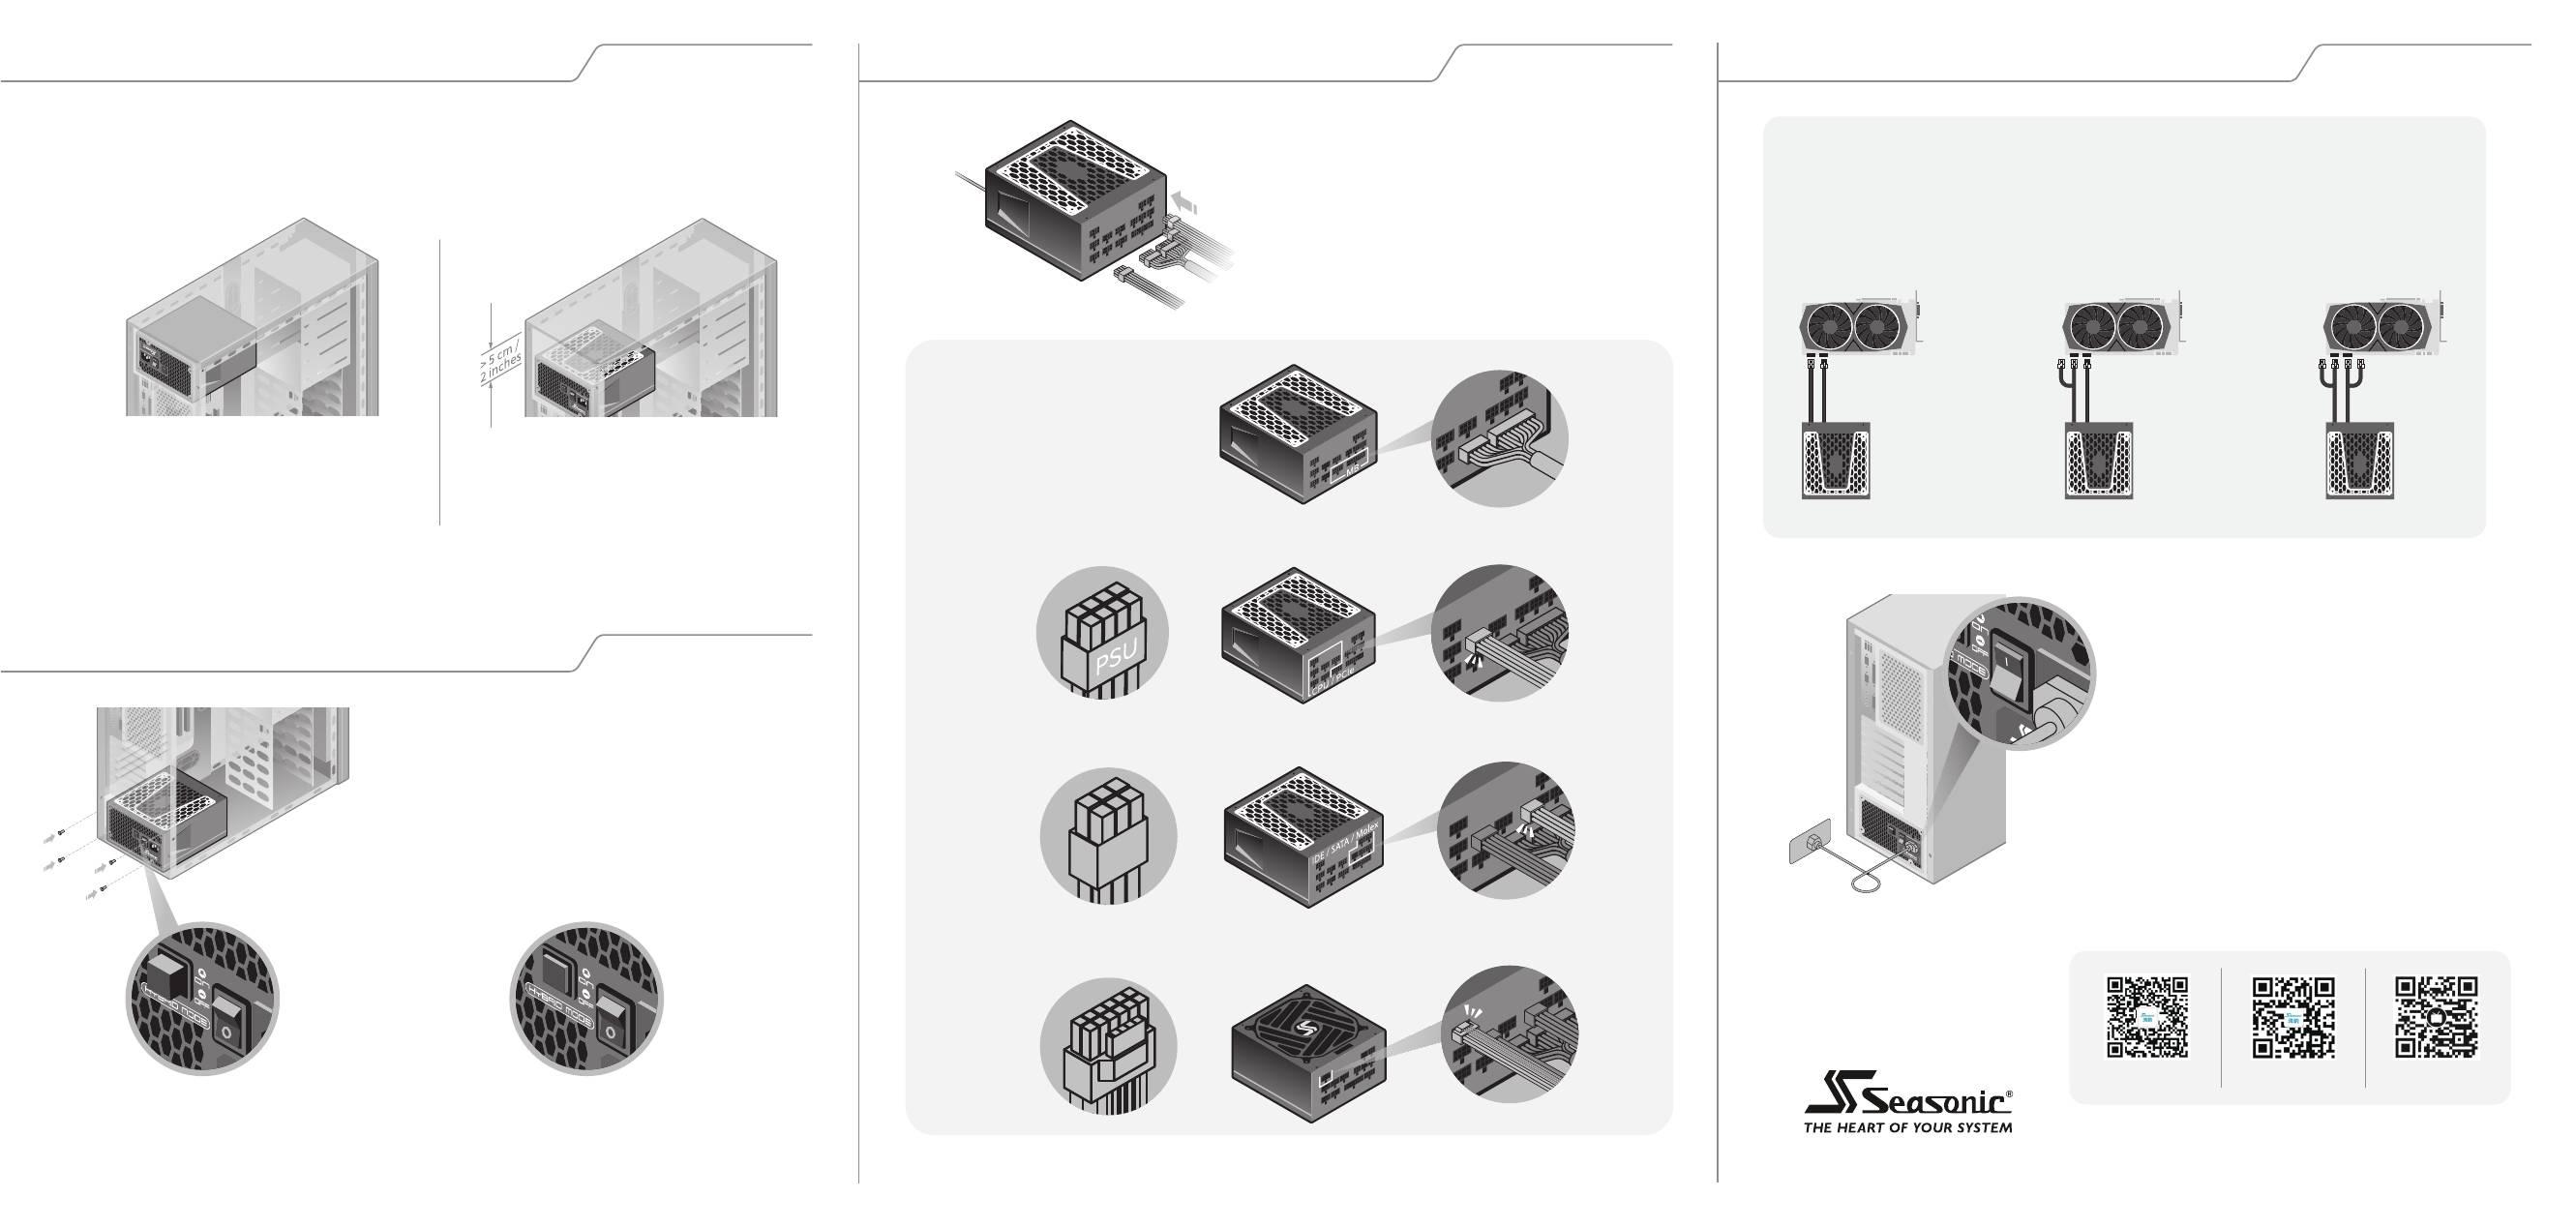
4.5.
Connect the AC power cord to the
PSU. Plug the AC power cord into the
wall socket.
4.6.
Click the AC ON/OFF switch to the
“I” (ON) position.
ATTENTION! The intended use of the PSU is to power PC systems. For mining
usage, please contact Seasonic for special cables.
4. Install your Seasonic PSU
High powered graphics cards
are usually outfitted with two or three PCIe
power connector slots. Seasonic prefers the use of two or three separate PCIe
cables to connect these cards to your power supply.
Recommendations
Three PCIe power connector slots
Two PCIe power connector slots
Tech Support Online Chat on SEASONIC.COM
Seasonic
seasonic
seasonic
seasonic
Headquarters
Sea Sonic Electronics Co., Ltd.
American Office
Seasonic Electronics, Inc.
301 N. Aerojet Dr.,
Azusa, CA, 91702, USA
European Office
Sea Sonic Europe B.V.
Everdenberg 117, NL - 4902 TT
Oosterhout, The Netherlands
seasonic.com/
user-manual
User Manual
seasonic.com/
product-registration
Product Registration
INSTALLATIONSANLEITUNG FÜR DAS NETZTEIL
1. Entfernen Sie Ihr altes Netzteil
1.1.
Ziehen Sie das Netzkabel aus
der Steckdose und von der
Rückseite des Netzteils ab.
1.2.
Ziehen Sie alle DC-Kabelstecker ab.
1.3.
Entfernen Sie alle 4
Befestigungsschrauben.
1.4.
Entfernen Sie Ihr altes Netzteil.
ACHTUNG! WICHTIGER SICHERHEITSHINWEIS
• Öffnen Sie NIEMALS, unter keinen Umständen das Netzteil.
Im Inneren herrscht eine hohe Stromspannung. DIE
GARANTIE ERLISCHT, sobald die Abdeckung entfernt wird.
• Stecken Sie KEINE Gegenstände in das Lüftergitter oder
den Lüftungsbereich des Netzteils.
• Stellen Sie KEINE Gegenstände, die den Luftstrom
behindern oder einschränken könnten vor den Lüfter oder
den Lüftungsbereich des Netzteils.
• Benutzen Sie NUR die modularen Kabel von Seasonic, die
zusammen mit dem Netzteil geliefert wurden..
• Halten Sie das Netzteil in einer trockenen Umgebung und
vor Feuchtigkeit geschützt.
• Das Netzteil ist für den Einbau in ein Computersystem und
nicht für den Einsatz im Freien gedacht..
ACHTUNG!
Dieses Gerät entspricht Teil 15 der FCC-Bestimmungen.
Der Betrieb unterliegt den folgenden zwei
Voraussetzungen:
(1) dieses Gerät darf keine schädlichen Störungen
verursachen, und
(2) dieses Gerät muss alle empfangenen Störungen
tolerieren, einschließlich Interferenzen, die einen
unerwünschten Betrieb verursachen können.
• Produkt: Schaltnetzteil
• Modellbezeichnung: Bitte beachten Sie das
Typenschild auf dem Produkt.
• Kontakt: www.seasonic.com/contact-us

2.1.
Schließen Sie das Netzkabel an das Netzteil
an. Vergewissern Sie sich, dass der Strom direkt
aus der Steckdose kommt.
2.3.
Wenn Ihr Netzteil über einen Schalter für die
Lüftersteuerung verfügt, stellen Sie diesen auf den
Modus "Normal"*.
* Im Hybrid- oder lüfterlosen Modus (S³FC) dreht sich der
Lüfter nicht.
Es wird empfohlen, einen hochwertigen
Überspannungsschutz zu verwenden, um sowohl das
Netzteil als auch das System zu schützen.
** Wenn Sie kein Prüfgerät haben, verwenden Sie die unten
beschriebene Büroklammer-Methode.
2.2.
Verbinden Sie sowohl den 18-poligen als auch
den 10-poligen Stecker des Motherboard-Kabels
mit dem Netzteil.
2.4.
Wenn Sie über ein Prüfgerät für die
Stromversorgung** verfügen, schließen Sie es
an den 24-poligen Motherboard-Anschluss an.
Auf dem Prüfgerät befindet sich eine Kerbe, die
eine perfekte Verbindung mit dem 24-poligen
Stecker ermöglicht.
2.5.
(Optional) Zum Testen eines lüfterlosen
Netzteils oder eines Netzteils ohne Schalter für
die Lüftersteuerung schließen Sie einen
externen Lüfter oder eine LED-Leuchte mit
einem Molex-Kabel an das Netzteil an.
2.6.
Schalten Sie die
Stromversorgung ein, indem Sie den
E/A-Schalter auf die Position "I" (ON
bzw. EIN) stellen.
Wenn sich der Lüfter des
Netzteils zu drehen beginnt (oder
die extern angebrachte
LED-Leuchte aufleuchtet), dann
funktioniert Ihr Netzteil.
Prüfgerät für die
Stromversorgung
10-poliger Stecker
18-poliger Stecker
2. Testen Sie Ihr Netzteil vor der Installation
Verwenden Sie eine Büroklammer
oder ein Stück Draht, um einen
Kurzschluss am 24-poligen
Motherboard-Anschluss zu
erzeugen, indem Sie die in der
Abbildung gezeigten Stifte
miteinander verbinden.
Die Büroklammer-Methode
Die Zeichnungen zeigen ein vollständig modulares Netzteil mit einem Schalter zur Lüftersteuerung und einem
Netzteil-Prüfgerät. Die Funktionen und das Zubehör Ihres Netzteils können davon abweichen.
3. Positionieren Sie Ihr Netzteil
3.1.
Boden des Gehäuses
Die Einstellung der Lüftersteuerung bestimmt die optimale Platzierung des Netzteils.
Lüfterloses Netzteil
Das Netzteil muss mit der oberen
Lüftungsabdeckung nach OBEN in
das Computergehäuse eingebaut
werden.
Im "Hybrid"-Modus
Seasonic empfiehlt, das Netzteil so zu
installieren, dass die obere Abdeckung
der Belüftung nach OBEN, in Richtung
des Motherboards, zeigt. Dies sorgt für
eine natürliche Wärmeableitung.
Im "Normal"-Modus
Obwohl die Einbaurichtung optional ist,
wird empfohlen, das Netzteil mit der
Lüftungsabdeckung nicht nach unten
einzubauen, wenn sich auf der
Unterseite des Gehäuses keine
Lüftungsöffnungen befinden. Zwischen
dem Netzteil und der Bodenplatte des
Gehäuses sollte immer genügend
Abstand verbleiben.
3.3.
Oberseite des Gehäuses
3.2.
Bei flachen Desktop-, SFX- oder ITX-Systemen im
Seasonic empfiehlt, das Netzteil so zu
montieren, dass die obere
Lüftungsabdeckung nach UNTEN zeigt.
Allgemeinen wird empfohlen, das Netzteil
so zu montieren, dass die obere
Lüftungsabdeckung zum Motherboard
zeigt. Aufgrund der unterschiedlichen
Ausstattungsvarianten sollten Sie jedoch
auch die Bedienungsanleitung des
Gehäuse-Herstellers zu Rate ziehen.
Informationen zur Belüftung Ihres
Computergehäuses finden Sie in der
Bedienungsanleitung des Herstellers.

3. Positionieren Sie Ihr Netzteil
3.3.
Oberseite des Gehäuses
Montieren Sie das Netzteil nur dann mit
der oberen Lüftungsabdeckung nach
OBEN, wenn genügend Platz (mind-
estens 5 cm) zwischen der oberen
Lüftungsabdeckung des Netzteils und
der Metallplatte des Gehäuses vorhan-
den ist, und nur, wenn das Gehäuse
über eine Lüftungsplatte auf der
Oberseite verfügt.
4. Installieren Sie Ihr Seasonic Netzteil
4.1.
Ziehen Sie alle 4 Befestigungsschrauben fest.
4.2.
Vergewissern Sie sich, dass der Netzschalter
des Netzteils in der Position "O" (OFF bzw. AUS)
steht.
4.3.
Wählen Sie die Art der Lüftersteuerung, wenn
Ihr Netzteil diese Option bietet.
Hinweis: Schalten Sie erst das Netzteil aus, bevor Sie die
Lüftersteuerung ändern.
Hybrid-Modus
Normal-Modus
Vergewissern Sie sich,
dass beide Stecker an der
Seite des Netzteiles richtig
angeschlossen sind.
4. Installieren Sie Ihr Seasonic Netzteil
4.4.
Schließen Sie alle notwendigen
Gleichstromkabel des Systems an (Motherboard,
CPU, VGA, HDD, optische Laufwerke usw.). Die
Stecker sollten mit einem Klick einrasten.
ACHTUNG! VERWENDEN SIE NUR VON
SEASONIC GELIEFERTE KABEL!
Sollten Sie
zusätzliche Kabel benötigen, wenden Sie sich bitte
an Seasonic.
Hinweis: Die Zeichnungen des Netzteils dienen nur zur Veranschaulichung, Ihr tatsächliches Modell
kann anders aussehen.
Motherboard-Kabel
CPU- und PCIe-Kabel (8-polige Stecker)
Peripheriekabel (6-polige Stecker)
ATX 3.0 kompatibles 12VHPWR Kabel (16-poliger Stecker)
12VHPWR
4.5.
Schließen Sie das AC-Netzkabel an
das Netzteil an. Stecken Sie das
Netzkabel in die Steckdose.
4.6.
Zum Einschalten schieben Sie den
Ein/Aus-Schalter (ON/OFF) auf ON (EIN).
Erinnerung
Das WEEE-Symbol (durchgestrichene Mülltonne) weist
darauf hin, dass das Netzteil nicht über den normalen
Hausmüll entsorgt werden darf. Wenn Ihr örtliches
Elektronikgeschäft Ihr Netzteil nicht zurücknimmt, wenden
Sie sich bitte an Ihr örtliches Recyclingzentrum für
Elektronikschrott, um es ordnungsgemäß zu recyceln.
ACHTUNG! Das Netzteil ist für die Stromversorgung von PC-Systemen vorgesehen. Für den
Einsatz im Mining kontaktieren Sie bitte Seasonic für spezielle Kabel.
4. Installieren Sie Ihr Seasonic Netzteil
Hochleistungsgrafikkarten Grafikkarten
sind in der Regel mit zwei oder drei
PCIe-Steckplätzen für den Strom ausgestattet. Seasonic bevorzugt die Verwendung von
zwei oder drei separaten PCIe-Kabeln, um solche Karten mit Ihrem Netzteil zu verbinden.
Empfehlungen
Drei PCIe-Steckplätze für den Stromanschluss
Zwei PCIe-Steckplätze für den Stromanschluss
Tech Support Online Chat on SEASONIC.COM
Seasonic
seasonic
seasonic
seasonic
Headquarters
Sea Sonic Electronics Co., Ltd.
American Office
Seasonic Electronics, Inc.
301 N. Aerojet Dr.,
Azusa, CA, 91702, USA
European Office
Sea Sonic Europe B.V.
Everdenberg 117, NL - 4902 TT
Oosterhout, The Netherlands
seasonic.com/
user-manual
Benutzerhandbuch
seasonic.com/
product-registration
Produktregistrierung
GUIDE D'INSTALLATION D'UN BLOC D'ALIMENTATION ELECTRIQUE
1. Remplacement de votre ancien bloc d'alimentation (PSU)
1.1.
Veuillez débrancher le câble
d’alimentation de votre prise
électrique ainsi que de votre bloc
d’alimentation.
1.2.
Veuillez débrancher tous les câbles
de votre bloc d’alimentation.
1.3.
Veuillez dévisser les quatre vis qui
maintiennent votre bloc d’alimentation.
1.4.
1.4. Veuillez retirer votre ancien
bloc d’alimentation.
ATTENTION! NOTE IMPORTANTES RELATIVES À LA SÉCURITÉ
• N’ouvrez JAMAIS, en aucun cas, le bloc d’alimentation. Hautes
tensions à l’intérieur. La GARANTIE EST ANNULÉE lorsque le capot est
enlevé.
• NE PAS introduire d’objets dans la grille du ventilateur ni dans la zone
de ventilation (structure en nid d’abeille) du bloc d’alimentation.
• NE PAS placer d’objet en face du ventilateur ni dans la zone de
ventilation (structure en nid d’abeille) du bloc d’alimentation, qui
puisse entraver ou restreindre la circulation d’air.
• Utilisez SEULEMENT les câbles modulaires Seasonic fournis avec le
bloc d’alimentation.
• Conservez le bloc d’alimentation dans un environnement sec, à l’abri
de l’humidité.
• Le bloc d’alimentation est destiné à être intégré dans un ordinateur et
n’est pas destiné à une utilisation externe ou à l’extérieur.
ATTENTION!
Cet appareil est conforme à la partie 15 du règlement de la FCC.
Le fonctionnement est soumis aux deux conditions suivantes :
(1) cet appareil ne peut pas causer d’interférences nocives, et
(2) cet appareil doit accepter toutes interférences reçues, y compris
des interférences pouvant causer un fonctionnement non souhaité.
• Produit : Bloc d'Alimentation Electrique à Découpage.
• Nom du Modèle : Veuillez-vous référer à l'étiquette sur le produit.
• Contact : www.seasonic.com/contact-us
2.1.
Veuillez brancher le câble d’alimentation à votre bloc
d’alimentation. Veillez à ce que le câble d’alimentation
soit bien branché directement à votre prise électrique.
2.3.
Si votre bloc d’alimentation possède un bouton de
gestion du ventilateur, merci de le mettre sur Normal*.
* En mode Hybride ou Fanless (S³FC), le ventilateur ne tournera pas.
Il est recommandé d’utiliser une protection anti-surtension de qualité
afin de protéger votre bloc d’alimentation ainsi que votre ordinateur.
** Si vous n'avez pas de testeur d'alimentation inclut,
veuillez-vous référer à la méthode de test avec un trombone
décrite ci-dessous.
2.2.
Veuillez brancher à votre bloc d’alimentation les
connecteurs 10 et 18 broches du câble ATX de votre
carte-mère.
2.4.
Si vous avez un testeur d’alimentation**, veuillez
brancher ce dernier au connecteur 24 broches pour
carte-mère. Un détrompeur est présent sur le testeur
qui correspondra au détrompeur de votre
connecteur 24 broches.
2.5.
(Optionnel) Afin de tester un bloc d'alimentation
dit "Fanless" ou un bloc d'alimentation sans gestion
du ventilateur, veuillez brancher un ventilateur à un
câble Molex branché au bloc d'alimentation.
2.6.
Veuillez allumer votre bloc
d’alimentation en appuyant sur le
bouton ON/OFF afin de le mettre en
position "I".
Si le ventilateur de votre bloc
d’alimentation se met à tourner
(ou le ventilateur branché au
câble Molex), votre alimentation
est fonctionnelle.
Testeur d'Alimentation
Connecteur 10 broches
Connecteur 18 broches
2. Tester votre bloc d'alimentation Seasonic avant installation
Utilisez un trombone ou un
morceau de fil électrique afin de
créer un court-circuit sur le
connecteur 24 broches du câble
ATX 24 broches. Veuillez-vous
référer au dessin d'illustration
pour les broches concernées.
Méthode de démarrage avec un trombone
Les images utilisées illustrent un bloc d'alimentation entièrement modulaire avec un bouton pour la gestion du
ventilateur et un testeur d'alimentation. Les caractéristiques et accessoires de votre alimentation peuvent varier.

3.1.
En bas de votre boitier PC
La gestion du ventilateur détermine l'installation optimale pour votre bloc d'alimentation.
Bloc d’alimentation Fanless
Le bloc d’alimentation doit être
monté dans votre boitier avec la
partie ventilée supérieure faisant
face vers le HAUT, en direction de
la carte-mère.
En mode "Hybride"
Seasonic recommande d’installer votre
bloc d’alimentation avec le ventilateur
faisant face vers le HAUT, en direction
de la carte-mère. Cela permet d’utiliser
la convection naturelle pour évacuer la
chaleur.
En mode "Normal"
Bien que le sens de montage soit
optionnel dans ce cas, il n’est pas
recommandé d’installer le bloc
d’alimentation avec le ventilateur faisant
face vers le bas s’il n’y a pas d’aération
de disponible en bas de votre boitier.
Veillez à toujours avoir un minimum de
distance entre le bloc d'alimentation et
le bas de votre boitier PC.
3.3.
Haut du boitier
3.2.
Boitier Plat, SFX ou ITX
Seasonic recommande d’installer votre
bloc d’alimentation avec le ventilateur
faisant face vers le BAS.
De manière générale, il est recommandé
d’installer votre bloc d’alimentation avec
le ventilateur faisant face à votre
carte-mère. En raison des différents
agencements internes disponibles sur le
marché, il est toutefois conseiller de
consulter le manuel d’utilisation de votre
boitier pour plus d’information.
Afin d’en savoir plus à propos du refroidissement de
votre boitier, merci de bien vouloir vous référer au
manuel d’utilisation de ce dernier.
3. Positionnement de votre bloc d'alimentation
3.3.
Haut du boitier
Veuillez installer votre bloc d’alimenta-
tion avec le ventilateur vers le HAUT
seulement s’il y a suffisamment
d’espace (au moins 5cm) de disponible
entre le dessus du bloc d’alimentation et
le panneau supérieur de votre boitier
mais également si ce dernier a des trous
d’aération prévu à cet effet.
4.1.
Sécurisez les quatre vis de montage.
4.2.
Veillez à ce que le bouton de votre bloc
d’alimentation soit positionné sur "O" (OFF).
4.3.
Veuillez sélectionner le type de régulation
pour le ventilateur si votre bloc d’alimentation
propose cette option.
Remarque : Veillez à ce que votre bloc d'alimentation soit bien
éteint avant de changer la gestion du ventilateur.
Mode Hybride
Mode Normal
3. Positionnement de votre bloc d'alimentation
4. Installation de votre bloc Seasonic
Veillez à ce que chaque
connecteur du câble de la
carte-mère soit correctement
branché au bloc d’alimentation.
4.4.
Veuillez brancher tous les câbles nécessaires à vos
différents composants (carte-mère, CPU, carte graphique,
disque dur, lecteur optique, etc.). Veillez à ce que les
connecteurs de chaque câble soient bien branché. Un clic
devrait se faire entendre.
ATTENTION ! VEILLEZ À N’UTILISER QUE LES CÂBLES
FOURNIS PAR SEASONIC !
Si vous avez besoin de câbles
supplémentaires, merci de bien vouloir nous contacter.
Remarque : L'image du bloc d'alimentation est uniquement à but d'illustration. Votre produit peut être différent.
Câble de la carte-mère
Câbles CPU et PCIe (Connecteur 8 broches)
Câbles périphérique (Connecteur 6 broches)
Cable 12VHPWR pour bloc compatible ATX 3.0 (Connecteur 16 broches)
12VHPWR
4. Installation de votre bloc Seasonic

4.5.
Veuillez brancher votre câble d’alimentation
secteur à votre bloc d’alimentation. Branchez par la
suite votre câble d’alimentation secteur à votre
prise électrique.
4.6.
Veuillez appuyer sur le bouton ON/OFF et
mettre ce dernier sur la position "I" (ON).
ATTENTION ! L’usage prévu pour votre bloc d’alimentation est d’alimenter un ordinateur. Pour
une utilisation pour du minage, merci de bien vouloir contacter le support technique Seasonic
afin d’obtenir des câbles spécifiques.
4. Installation de votre bloc Seasonic
Les cartes graphiques les plus consommatrices du marché
sont souvent équipées de
deux ou trois connecteurs PCIe. Seasonic recommande d’utiliser deux ou trois différents
câbles PCIe pour alimenter de telles cartes graphiques avec votre bloc d’alimentation.
Recommandations
Trois connecteurs d'alimentation PCIe
Deux connecteurs d'alimentation PCIe
Tech Support Online Chat on SEASONIC.COM
Seasonic
seasonic
seasonic
seasonic
Headquarters
Sea Sonic Electronics Co., Ltd.
American Office
Seasonic Electronics, Inc.
301 N. Aerojet Dr.,
Azusa, CA, 91702, USA
European Office
Sea Sonic Europe B.V.
Everdenberg 117, NL - 4902 TT
Oosterhout, The Netherlands
seasonic.com/
user-manual
Manuel d'Utilisation
seasonic.com/
product-registration
Enregistrement Produit

电源安装说明书
�. 如更换电源,请先移除旧电源
�.�. 从墙上的插座和电源背后移除
AC交流电源线。
�.�. 移除电源到主板、显卡、硬盘等设备之
间的所有DC直流连接线。
�.�. 逆时针拧下四颗螺丝钉。
�.�. 移除旧电源。
开机检测器
��-pin 接口
��-pin 接口
�. 在安装前请先测试您的电源
�.�. 将AC电源线插入电源。确保AC电源线直
接连接墙壁插座。建议您使用高质量防浪涌
插座保护电源和您的设备。
�. 电源安装
�.�. 下置式电源安装方式(电源安装在机箱底部)
�.�. 一体机、SFX或者ITX主机。
通常情况下,建议您安装电源时将通风口朝向主板。由
于存在不同种类的机箱布局,请查阅机箱使用说明书
获取更多信息。
�.�. 将主板模组线的��-pin和��-pin接头连
接到电源上标示M/B的接口处。
�.�. 如果您的电源带有风扇温控开关,请按
下开关将其调至普通模式(风扇保持转动)。
开关弹起开启混合温控(Hybrid)模式,风扇在无风
扇模式下,不会转动。
�.�. 连接开机检测器和主板的��-pin接头。
��-pin接头请直接插入检测器上的凹口内。
�.�. 将电源AC插口旁边的 I/O开关打到 I ,
启动电源。
如果风扇开始转动,表示电源正常运转。
在混合模式下
建议安装电源时将通风口朝上,也就是
面向主板的方向放置,确保自然散热。
无风扇电源
把电源安装至电脑机箱时,请确保通风
口朝上。
在普通模式下
尽管安装方向是可选的,但是在机箱底部
没有通风孔的情况下,不建议将电源风扇
朝下安装。
请参考机箱的使用说明书,了解您的机箱的散
热风道设计。
�. 在安装前请先测试您的电源
在安装前请先测试您的电源,建议您使用包装内的开机检测器测试电源。
测试方式:
请扫描下方二维码,观看视频教程,或至官网 https://seasonic.com/zhs/faq 了解更多测试
方式。
开机检测器使用方式:
风扇控制设置决定了电源的最佳位置
警告!重要安全信息!
· 在任何情况下,都不要拆开电源装置。电源内部的高压电可能危及人身安全。
当产品被拆开后,质保将失效。
· 请不要将任何物体插入风扇网罩、栅格或电源的通风口。
· 请不要将任何物体放在电源的风扇或通风口前,这会阻碍电源风扇散热气流。
· 仅可使用海韵电源包装提供的原装模组线。
· 请将电源放置于干燥的环境中,远离潮湿的环境。
· 电源仅适用于安装到电脑主机内部,非外接或室外使用。
· 请不要在通电时插拔电源模组线,请在断电后进行。
BUMWHGCN2AW
�. 电源安装
�.�. 上置式电源安装方式(电源安装在机箱顶部)
建议安装电源时将风扇进气口朝下,即朝
向主板方向。
�. 安装您的电源
�. 安装您的电源
�.�. 拧紧全部四个螺丝钉。
�.�. 确保电源开关处于关闭状态。
�.�. 连接所有必须的系统模组线(主板、CPU、
显卡、硬盘以及光驱等),用力确保接头插到底。
注意!只能使用海韵提供的原装线,否则可能烧
毁您的设备!
混合模式:
请保持开关弹起
在电源轻载时为
Fanless无风扇模式,
风扇启停。
普通模式:
请按下开关
风扇在普通模式
下保持转动。
�.�. 将AC电源线连接到电源上,将另外一
端的插头插入墙上的插座。
�.�. 将电源AC插口旁边的 I/O开关打到 I,
启动电源。
�.�. 选择风扇温控开关温控类型,如果您
的电源带有此选项。
�. 安装您的电源
高端显卡通常有�或者�个PCIe电源接口,这类显卡的持续功率通常大于���W,
请务必使用�到�根单独的PCIe模组线去连接显卡和电源。
推荐
图片示例为带有风扇启停功能的全模组电源,您的购买的电源可能与图示有所不同。
如果您希望将电源通风口朝上安装,请确认电
源和机箱之间有最少�cm的散热空间。
微信关注海韵
微博关注海韵
联系我们: cn.support@seasonic.com
Bilibili关注海韵
注意!模组线标识PSU端请连接电源本体
请确认主板接口的��Pin
和��Pin两个接口妥善连
接电源
主板线
CPU 和 PCIe 线 (�-pin)
周边设备线 (�-pin)
��VHPWR线 (��-pin) 兼容ATX�.�
注意!模组线标识PSU端请连接电源本体
请注意! Hybrid模式不支持通电中切换开关, 请断电后切换。
12VHPWR

POWER SUPPLY USER’S MANUAL
NETZTEIL BENUTZERHANDBUCH
BLOC D’ALIMENTATION MANUEL D’UTILISATEUR
FUENTE DE ALIMENTACIÓN MANUAL DE USUARIO
ALIMENTATORE MANUALE DELL’UTILIZZATORE
FONTE DE ALIMENTAÇÃO MANUAL DO USUÁRIO
電源供應器使用手冊
电源供应器使用手冊
РУКОВОДСТВО ПОЛЬЗОВАТЕЛЯ БЛОКА ПИТАНИЯ
ПОСІБНИК КОРИСТУВАЧА БЛОКА ЖИВЛЕННЯ
FOR ALL SEASONIC CONSUMER POWER SUPPLIES

2

3
ENGLISH ............................................................................................................................................................................................ 4
DEUTSCH ........................................................................................................................................................................................ 12
FRANÇAIS ....................................................................................................................................................................................... 20
ESPAÑOL ......................................................................................................................................................................................... 28
ITALIANO ........................................................................................................................................................................................ 36
PORTUGUÊS ................................................................................................................................................................................... 42
繁體中文
...................................................................................................................................................................................... 48
简体中文
...................................................................................................................................................................................... 54
РУССКИЙ ........................................................................................................................................................................................ 60
УКРАЇНСЬКА .................................................................................................................................................................................. 68

4
I. Carton Contents
Power supply
Modular cable pack
User manual
AC power cord
Accessory bag
II. WARNING! IMPORTANT SAFETY INFORMATION
NEVER, under any circumstances, open the power supply unit. High voltage inside. WARRANTY IS
VOID once the cover is removed.
DO NOT insert any object into the fan grill or the ventilation area of the power supply unit.
DO NOT place any object in front of the fan or the ventilation area of the power supply unit that
may obstruct or restrict airflow.
USE ONLY the Seasonic modular cables provided with the power supply unit.
Keep the power supply unit in a dry environment, away from humidity.
The power supply unit is for integration into a computer system and not intended for external or
outdoor usage.
ENGLISH
ENGLISH

5
III. Power Supply Removal
1. Please first read
Chapter II. Warning! Important Safety Information
above.
2. Make certain that your system is entirely powered off; set the power supply’s AC power switch to
the “O” (OFF) position and disconnect the power cord from the AC outlet.
3. Open the computer case (please refer to the manufacturer’s user manual).
4. Carefully disconnect all the power supply’s connectors from the mainboard and the peripherals.
5. Unscrew the mounting screws securing the power supply unit to the back panel of the case.
6. Carefully remove the power supply from the case.
IV. Power Supply Installation
1. Place the Seasonic power supply into the space provided within the case and use the four
mounting screws provided in the accessory bag to secure it to the back panel of the case. Do not
over-tighten the screws.
a. For power supplies with a built-in fan, the fan side top cover should be facing the mainboard.
(Depending on the type of computer case, this can mean either upwards or downwards
facing fan cover.)
ENGLISH

6
b. For fanless power supplies, Sea Sonic recommends to mount fanless power supplies into
the computer case with their ventilation cover facing UPWARDS. However, there are extra
mounting-screw holes provided on the back of the power supply to allow for reverse
mounting, if necessary
2. Mainboard connection:
a. DO NOT force the connectors into place; the connectors are “keyed” so they can only fit one
way. Make sure the connectors lock in their place securely.
b. Connect the power supply end of the 24/20-Pin convertible connector to the appropriate
receptor on the power supply unit.
c. Connect the mainboard end of the 24/20-Pin convertible connector to the mainboard.
Depending on the mainboard, you may need to either attach or detach the 4-Pin module of
the 24/20-Pin connector.
d. Connect the + 12 V 4-Pin connector and the EPS + 12 V connector, if applicable.
e. If your system requires dual EPS + 12 V connectors, please connect the 8-Pin end of the
second CPU 8-Pin connector into the appropriate 8-Pin receptor on the power supply unit.
Then connect the mainboard end of this 8-Pin connector to the mainboard.
3. Peripheral components connection:
a. Connect one end of the peripheral cable to the power supply and the other end to the
component.
ENGLISH

7
b. DO NOT use excessive force to attach the connectors; the connectors are “keyed” so they can
only fit one way.
c. Make sure that the connectors lock in tightly and securely.
4. Close the computer case according to the manufacturer’s instructions.
5. Plug in the AC power cord provided in the box and switch the AC On/Off switch on the back panel
of the power supply to the “I” (On) position.
6. You are now ready to start your computer powered by Seasonic.
V. Troubleshooting
If the power supply unit fails to function properly, please go through the below checklist.
1. Check to make sure the AC power cord is properly connected to the AC source and the power
supply unit.
2. Check to make sure the AC source is On.
3. Check to make sure the AC On/Off switch on the back panel of the power supply unit in the “I”
(On) position.
4. Check and secure all mainboard and peripheral connectors.
5. The AC on/off switch on the back of the power supply unit can be toggled between “I” and “O” a
few times with a 0.5 second delay in between to make sure the power supply unit is reset.
ENGLISH

8
6. If you are still experiencing difficulties to get the power supply unit to function properly, please
visit www.seasonic.com for further technical support instructions.
Notes
The operation of power supply is a “pull” technology, which means that the unit only provides the
power as demanded by the mainboard and the system components.
If there is a mainboard malfunction, the power supply will not turn on.
If there is a peripheral component malfunction, the power supply will not provide power to that
particular component.
This power supply complies with the newest ErP 2013 requirements. For proper system function
please update your main-board BIOS to the newest version and configure the BIOS in accordance
to ErP 2013 requirements - enable all Energy Savings functions for standby and normal operations
and disable audio always-on. Please consult your motherboard manufacturer for further
assistance.
ENGLISH

9
VI. Warranty
Seasonic’s warranty covers all power supplies beginning from the date of purchase, against defects in
materials or workmanship. During the warranty period, Sea Sonic maintains the discretion to either
repair units or replace broken components with parts of similar or equal performance, provided that:
The product is returned to the point of purchase, postage prepaid.
The product was properly used according to the manufacturer’s intended purposes.
The product was not damaged due to acts of nature, such as lightening, flood or fire.
The product’s cover was never removed and the warranty sticker was not broken.
For additional details, please visit www.seasonic.com/rma
ENGLISH

10
Notes
Warranty terms may vary between different geographic regions.
For consumers in Australia – Our goods come with guarantees that cannot be excluded under
the Australian Consumer Law. You are entitled to a replacement or refund for a major failure and
compensation for any other reasonably foreseeable loss or damage. You are also entitled to have
the goods repaired or replaced if the goods fail to be of acceptable quality and the failure does
not amount to a major failure.
Local distributor:
Powerhouse PC Australia
service@powerhousepc.com.au
www.powerhousepc.com.au
PO Box 6139 Silverwater, NSW 2128, Sydney, Australia
Tel: +61 2 9648 6268
Fax: +61 2 9648 6269
ENGLISH

11
VII. Disclaimer
All efforts have been made to ensure accuracy of all information provided herein. Sea Sonic assumes
no liability, expressed or implied, for any damage(s) occurring to your system’s components or other
devices as a result of any mistake or omission during power supply installation or removal, or due to
any defect or failure of the product itself.
Please visit our homepage www.seasonic.com for further details.
