Midland BT Eva – страница 2
Инструкция к Портативной Рации Midland BT Eva

Exiting from the Setup mode
Switching your Midland BTCity/BTEva
To exit the Setup mode double click the “Control” button. Once the
on and o
red light turns o, the blue led starts blinking. Now you can use
your BTCity/BTEva.
Switching the unit on:
Press and hold “Control” button down for approximately 3 seconds
until the BLUE indicator lights.
Using the features of the Bluetooth
devices
Switching the unit o:
Press and hold both “Control” and “VOL-” buttons together for ap-
Using the telephone feature
UK
proximately 3 seconds until the RED indicator ashes 3 times, thus
To use the Telephone feature, be sure the units are correctly paired
lessening the chances that you might turn o the unit accidentally
together.
(especially whilst wearing heavy gloves).
Pairing the unit with a mobile phone
1. Enable the Bluetooth device search feature on your mobile phone.
Adjusting the volume
As this procedure varies according to the brand and model of the
Your Midland BTCity/BTEva uses AGC technology, which automatically
mobile phone, refer to the manual supplied to your particular pho-
adjusts the listening volume in relation to background noises.
ne for further information.
However, it is also possible to manually adjust the volume by means
2. Set the BTCity/BTEva unit in “Setup” mode, then press the Control
of the “Volume+” and “Volume -“buttons.
button on the unit until the red and blue indicators start ashing.
Attention: volume can be adjust only when an audio connection
3. After a few seconds the mobile phone will display “Midland BTCi-
is active.
ty/BTEva”. Select it and follow the instructions provided in your
mobile phone manual to accept the pairing. When prompted,
enter the pairing code, which is 0000 (four zeroes). Your mobile
Pairing with Bluetooth devices
phone should then display a conrmation message if the pairing
operation has been successfully completed
Your Midland BTCity/BTEva is a Bluetooth unit that can be paired with
4. The BTCity/BTEva will automatically exit the set up mode (red indi-
other Bluetooth devices, such as a mobile phone or another BTCity/
cator on) and go to the working mode (blue light ashing).
BTEva device for Intercom communications.
Before performing this procedure, it is necessary to set BTCity/BTEva
Answering a call
into the Setup mode.
When you hear the phone ring, you can answer in two dierent ways:
Vocally:
Setup mode
Simply say one word to answer the call and start talking.
Switch o the BTCity/BTEva device. Press and hold down the
Remembering that you can only do this if you answer the call
central button “Control” for about 7 sec. until the red indicator
after the third Ring. (Be aware that some phones may not
switches on permanently. BTCity/BTEva is now in “Setup” mode
support voice answering)
and can therefore be paired with other devices.
Manually:
Tap the “Control” button and start speaking.
5
Rejecting a call
Pause, Forward and Backward.
If you don’t wish to answer, you can let the mobile phone ring or press
the “Control” button for a few seconds (you will hear one audio con-
Volume -
Volume+
rmation tone).
backward
forward
Making a call
There are several ways to make a call.
From the mobile keypad:
Dial the number on the mobile keypad:
Press “Send” on the mobile phone.
To redial the last number:
Control
Press and hold “Control” button for 3 seconds in order to redial the
Pause/Play
last number (you will hear one audio conrmation tone).
To make a voice call:
Briey press “Control” button. If your mobile phone supports voice
calls, you will be asked to speak the name of the contact you wish
Available controls:
to call.
To play/pause music: double click the “Control” button.
Priority: Calls have a high priority, which means that all other commu-
To skip forward to the next song: keep pressed the “Volume+”
nications are temporarily disabled when a call arrives and automatically
button.
re-enabled once the call ends.
To skip backwards to the previous song: keep pressed the
“volume-“ button.
Attention: the voice call command is possible only if the BTCity/
To enable your connected MP3 Player (ADP/AVRCP): press
BTEva has never been connected to another BTCity/BTEva for
and hold down the “Volume +” and “Volume-“ buttons for 3 se-
Intercom communication.
conds (this feature is active by default).
Ending a call
To disable the MP3 player: press and hold down the ”Volume+”
There are several ways to end a call:
and “volume-“ buttons (2 beeps will conrm it).
Wait for the called person to end the call.
Priority: the music listening mode has the lowest priority. Therefore, it
Press the “Control” button for 3 seconds (you will hear an audio
will always be disabled when another type of communication is ena-
conrmation tone).
bled.
Press “End” button on the mobile phone.
Using the MP3 player feature of the mobile phone
Pairing the unit with a GPS Sat-Nav
Many mobile phones are now designed to be used as stereo MP3
It is generally possible to pair the BTCity/BTEva unit with all GPS Sat-
players. The BTCity/BTEva device fully supports the A2DP and AVRCP
Navs that support Bluetooth earpieces.
protocols that enable you to listen to stereo music and remotely con-
Midland BTCity/BTEva has been successfully tested for use with GPS
trol your mobile phone’s MP3 player. You can even use the buttons
ZUMO Sat-Navs manufactured by Garmin and TOMTOM Rider 1 and
on the BTCity/BTEva unit to control the following play options: Play,
2 Sat-Navs.
6

1. On your GPS Sat-Nav, enable the Bluetooth earphone search fea-
3. Then press the “Volume –“button on the second unit until the RED
ture. As this procedure varies according to the brand and model of
and BLUE lights begin to ash rapidly and alternately.
GPS, we recommend you refer to the manual supplied with your
4. Now both BTCity/BTEva units are trying to pair to each other.
GPS Sat-Nav for further information.
When successfully paired, the blue led of each device will light for
2. Ensure that the BTCity/BTEva is in Setup mode (Red light on) &
1 sec and go back to setting mode (red light always on) waiting for
Press the “Control” button on the BTCity/BTEva unit until the red
additional pairing or setting procedures.
and blue indicators start to ash.
5. To use the two devices, exit the setting mode: Double click on the
3. After a few seconds the GPS Sat-Nav will display “Midland BTCity-
“Control” button. The red light will quit and the blue light will be-
BTEva”. Select it and follow the instructions provided in the GPS
gin to ash. Now you can use your BTCity/BTEva.
UK
Sat-Nav manual to accept the pairing. When prompted, enter the
Intercom
pairing code, which is 0000 (four zeroes).
The Intercom feature can be enabled in two ways:
The GPS should then display a conrmation message if the pairing
Manual activation:
operation has been successfully completed.
Press “Control” button, on one of the two units. Communication is
4. The BTCity/BTEva unit returns to the Setup mode (red indicator
enabled and remains active until you press the “Control” button
permanently on) to indicate that it is ready to be paired with other
again. You will hear 1 audio tone when the Intercom feature is
devices.
enabled and 2 audio tones when it is disabled.
If you pair the BTCity/BTEva unit with a GPS Sat-Nav, you will not be
Voice activation (VOX):
able to pair it with a mobile phone. This problem can be easily solved
This is enabled by default. To start an Intercom communication,
by pairing the mobile phone directly with the GPS Sat-Nav and by
simply start talking. The communication will remain active for all
then pairing your GPS with the Midland BTCity/BTEva. In this case, the
the time you are talking.
mobile phone features will be managed by the GPS Sat-Nav.
Attention: the rst intercom activation must be done manually
Using the intercom feature
with the control button. After that, the VOX activation will be
available.
To use the Intercom feature, be sure both BTCity/BTEva units are tur-
ned on and previously paired together.
If there is no conversation, the Intercom is automatically closed
The two units supplied in the Midland BTCity/BTEva TWIN Pack, are
after 20 seconds.
already paired and ready for use, which means that it is not necessary
To re-open it, simply start talking again. When the Intercom is
to perform this procedure.
“VOX” activated, you can decide to disable it before the predened
If the devices are not part of the same pack, or one of the BTCity/BTEva
time, simply by pressing the ”Control” button once.
units has been purchased separately, you need to pair them in order to
To disable the voice activation mode, follow the instructions provi-
be able to use the Intercom function.
ded in the “Special congurations” section.
Pairing with another BTCity/BTEva device
Intercom and GPS
1. Place both BTCity/BTEva units in Setup mode (red indicator per-
If BTCity/BTEva is connected to a GPS, the Intercom feature won’t
manently on)
be disabled when the GPS talks. Intercom and GPS features work si-
2. Press the “Volume +” button on the rst unit until the RED and
multaneously. The same is for phone calls when the mobile phone is
BLUE lights begin to ash rapidly and alternately.
connected to the GPS.
7

Due to this functionality, when the phone is connected to the GPS, it
Priority: the wired audio input has the lowest priority when compared
can happen that not always the phone calls are managed correctly. In
to the other Bluetooth connections (including the Intercom) and will
this case you can decide to disable the “Intercom+GPS “ feature and
therefore always be disabled when another Bluetooth communication
listen to your GPS talk or phone call without interferences. (note the
is opened.
“Special conguration” section)
Using a i-Pod/MP3 Player
Priority:
Listening to music
With phone: The intercom feature is disabled during a phone call, and
is automatically re-enabled as soon as these communications end.
To listen to music from the wired input, connect the audio source
With music: Bluetooth music is disabled when the Intercom is open.
using the cable supplied with the BTCity/BTEva unit. The volume level
With GPS navigator: In case of GPS navigator street indications, the
is automatically adjusted by the AGC system, which means that you
intercom feature is not disable, allowing the intercom conversation to
only need to adjust the volume of your iPod/ MP3 player to a level that
be keep open, together with the GPS indication in background.
will allow you to listen to music in normal speed.
Attention: never set the volume of the MP3 Player to the maxi-
Distance
mum possible.
Two Midland BTCity/BTEva units can communicate up to a maximum
Hint: We recommend that you perform a few tests adjusting the volume
range of approximately 200meters outdoors. The maximum coverage
of your iPod/MP3 player so at the normal speed the Headset volume is
depends on the presence of obstructions in the area or on the head
suited to your needs. The AGC system will automatically increase the
orientation.
volume on higher speed. Make a note to remember this setting for fu-
ture trips.
Resetting all paired devices
Attention: the volume adjustment, (“Volume+” and “Volume
Sometimes you may nd it necessary to delete all the pairing referen-
–“) buttons, cannot be used to adjust the volume of the wired
ces stored in the BTCity/BTEva unit (reset operation).
audio source(eg MP3 player).
To perform this operation, switch o the BTCity/BTEva and keep
Enabling/disabling the wire input
pressed the “Control” button. The red led turns on.
The wire input can be enabled and disabled
Simultaneously press and hold down the “Volume +” and “Volume
Enabling: double click the “Control” button (you will hear one au-
–“ buttons for 4 seconds. The Blue Light will be lit on for 1 sec.
dio conrmation tone).
This procedure deletes all the paired Bluetooth devices stored in the
Disabling: double click the “Control” button(you will hear two au-
memory and it is therefore possible to start a new “clean” pairing
dio conrmation tones).
session.
Attention: this function is available only if there is no music
active via Bluetooth.
Using the wired audio input
Using a Two Way Radio transceiver
Your Midland BTCity/BTEva is also supplied with a wired audio input
(labeled AUX), that can be used to connect an audio source, like an
To be able to use the transceiver, it is necessary to purchase a specic
iPod (or any other MP3 Player) or a PMR446 transceiver for communi-
cable (sold separately) in order to connect the radio to your Midland
cations in group or for a coverage increase.
BTCity/BTEva:
8

Some manufacturers radios use a dierent pin conguration, so we
lower limit, the RED light will not ash.
recommend that you ask your dealer as to which cable is best suited
4. Double press the “Control” button; the Blue light will ash several
to your needs.
times, in order to let you know the selected sensitivity:
To communicate via the attached radio, press the transmission Press
once = VOX disabled
To Talk (PTT) button to speak and release it to listen. It is not possible
Twice = very low sensitivity
to talk and listen simultaneously. Communications can be activated
3 times= low sensitivity
also without pushing the PTT button, by enabling the VOX function.
4 times= medium sensitivity
5 times = high sensitivity
Default = low sensitivity
Special congurations
UK
5. The light indicator is now back to steady RED (“Set up mode”) and
Some Midland BTCity/BTEva features can be congured to suit specic
the changes are conrmed
needs:
6. If needed, you can adjust again the sensitivity repeating the steps
Adjusting/ Disabling the VOX feature (Intercom and telephone)
from point 2, otherwise exit the Setting mode by double clicking
Wired connection always on
the “Control” button. Once the red light turns o, the blue led
Intercom and GPS
starts blinking. Now you can use your BTCity/BTEva.
Adjusting/ Disabling the VOX feature
Disabling the VOX feature (Intercom and telephone)
(Intercom and telephone)
Follow all the procedure described in the previous steps and choose
The Intercom feature can be enabled both manually and vocally
the option 1 (VOX disabled). You will see the blue led blinks once.
(VOX). The VOX activation is inuenced by the background noise and
Wired connection always on
therefore by the speed.
This feature let you keep the wired connection always on, even when
For optimum results, it is possible to choose one of the following four
the phone or the intercom is open. This feature can be useful when
microphone sensitivity levels: high, medium, low and very low. The
you connect a PMR446 transceiver.
default setting of BTCity/BTEva is “low”. It is also possible to disable
Enabling:
the VOX feature in order to activate the Intercom and phone call an-
Enter the “Setup” mode.
swering features in manual mode only.
Press the “Volume+” and “Volume -” buttons for one second. The
Adjusting the sensitivity of the microphone (VOX)
blue LED will ash once.
1. Enter the Setup mode: Switch your BTCity/BTEva o.
To exit the “Setup” mode double press the “Control” button.
Press and hold down the central button (Control) until the red in-
Disabling:
dicator switches on permanently. Your BTCity/BTEva is now in “Set
Follow the same procedure up described; now the blue LED will
up mode”.
ash twice
2. Press the “Volume+” and “Control” buttons till the red indicator
To exit the “Setup” mode double press the “Control” button.
will turn to steady blue.
Intercom and GPS
3. Now, press “Volume +” or “Volume -“to increase or reduce sensi-
tivity. Every time you press the Volume buttons the RED light will
Disabling:
ash for conrmation. When you reach the end of the upper and
Enter the “Setup” mode.
9
Press the “Control” and “Volume -” buttons for one second. The
to Intercom communications.
blue LED will ash once.
This can be prevented by enabling the “Wired connection always
To exit the “Setup”mode double press the “Control” button.
on” or “Disabling the VOX feature” (both explained in the previous
Enabling again:
section).
Follow the same procedure up described; now the blue LED will
Disable the VOX feature, as explained in the previous section, to make
ash twice
sure that the intercom will not automatically be activated when you
To exit the “Setup”mode double press the “Control” button.
speak on the PMR446. To enable the Intercom feature when using this
conguration, you will have to press “Control” button manually. (This
operation disables radio communications that will be automatically
Recommendations for specic uses
re-enabled when the Intercom feature is disabled).
The section that follows, provides a few useful suggestions on how to
Attention! If you disable the VOX feature, you will only be able to
achieve maximum performance from your BTCity/BTEva unit.
answer incoming phone calls by pressing the “Control” button.
Using a PMR446 transceiver
Using the BTSki Audio Kit accessory (optional)
To be able to use the transceiver, it is necessary to purchase a specic
cable (sold separately) in order to connect the radio to your Midland
This optional kit is the Bluetooth solution designed for winter sports
BTCity/BTEva:
(use without helmets or with semi rigid type ski helmets). The audio
Some manufacturers radios use a dierent pin conguration, so
system is made up of two ultra thin stereo speakers and a boom mike,
we recommend that you ask your dealer as to which cable is best
all contained in a soft material lining
suited to your needs
To communicate via the attached radio, press the transmission Press
The audio system includes two ultra-at stereo speakers and one mi-
Top Talk (PTT) button to speak and release it to listen. It is not possible
crophone with boom, all assembled into a earwarmer headset.
to talk and listen simultaneously. The cable connected to the transcei-
ver has a PTT button that can be placed on the handlebar of your bike
or held in your hand (If you are the pillion rider).
Adjust the volume of the transceiver to your needs, remembering that
the volume adjustment is controlled by the automatic AGC system
and that it will therefore be automatically increased in relation to
background noise.
Fitting and removing your Midland BTCity/BTEva
If you wish to use a PMR446 transceiver for group communications
and simultaneously maintain the Intercom feature enabled between
The BTCity/BTEva can be easily tted by sliding it downwards so that
two BTCity/BTEva devices, you must remember that the Intercom fe-
it ts into the slot of the xing device.
ature is enabled every time you speak by means of the BTCity/BTEva’s
BTCity/BTEva is maintained in position thanks to the xing clip loca-
VOX feature.
ted on the upper section (A).
Consequently, radio communications will be disabled whilst you are
To detach the BTCity/BTEva, simply press the xing clip and push the
talking with somebody, because they have a lower priority compared
unit upwards.
10
Be sure the BTCity/BTEva unit is placed between the two “V” shapes
strap.
A
UK
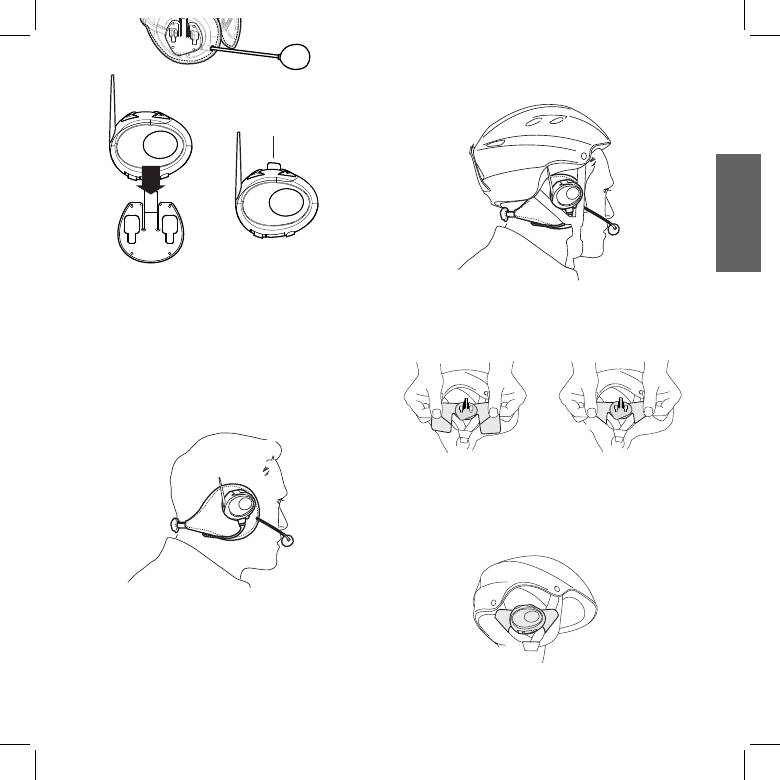
If your helmet is not equipped with the two removable pads, you
Using the BTCity/BTEva without helmet
could anyway mount your BTCity/BTEva system by using the supplied
Velcro-band. Be sure to x the Velcro-band as shown in the gure.
After have xed your BTCity/BTEva on its suitable tool and have inser-
ted the audio kit plug into the central socket, wear your earwarmer
headset as shown in the gure. Please, be sure to have placed the
microphone in the right way, with the white sign oriented towards
your mouth.
Now, x the BTCity/BTEva on the Velcro-band. Wear your headset, in-
sert the connection cable of the headset into the BTCity/BTEva device
and wear the helmet.
Using the BTCity/BTEva with a semi-rigid helmet
To place the BTCity/BTEva into a semi-rigid helmet you should rst of
all remove the little triangular pads, used to cover the ears in most of
helmets on sale, and then put your helmet directly on the earwarmer
headset audio system.
11

Use at your own risk
European CE Notice Certication and Safety
Approvals Information
The use of the headphone-headset will impair your ability to hear
other sounds and others around you.
This product is CE marked according to the RTTE Directive (99/5/EC)
Listening to music or speaking on a telephone may prevent you from
and is free use in all the EU countries.
hearing others around you and distract you from riding safely. The use
Users are not permitted to make any changes or modications to the
of such headphone-headset while riding or skiing may endanger you
device.
and others, and its use, in some areas, could not be allowed.
Modications which are not expressly approved by the producer inva-
Using this headset at a high volume may result in permanent hearing
lidate the warranty card.
loss.
For further information, please go to our website
If you experience ringing in your ear or any other hearing related pain,
www.cte.it
reduce the volume or discontinue using this device. With continued
use at high volume, your ears may become accustomed to the sound
level, which may result in permanent damage to your hearing.
Please use this device at a safe volume level.
Warranty
Midland will repair or replace, at its option without charge, any BT
CITY/EVA device which fails due to a defect in material or workman-
ship within TWO Years following the initial consumer purchase.
In the event of a product defect, please return it to the authorized
customer service or to the Manufacturer himself.
To make use of this warranty, it is necessary to return to the autho-
rized service
centre:
The aected product (or accessory)
The original proof of purchase, which clearly indicates the name
and address of the seller and the date and place of purchase.
This warranty does not apply to accidents of any kind, exposure to
pressure, extreme temperatures (outside of -10°C to 55°C), submer-
sion water damage, battery leak or abuse.
This warranty does not include the cost of labor for removal or re-
installation of the product.
12

LIGHT AND SOUND SIGNALS
LED indication Status
GENERAL
None Unit is switched o or full charged when connected to the power supply
Single Blue ash every 3 seconds Unit being turned on/ Unit in working mode
Triple red ash Unit being turned o
UK
Single Red ash every 3 seconds Standby - low battery
RED and BLUE (together) every 3 seconds Active (Intercom, phone call or Bluetooth connection in progress)
RED and BLUE (together) and one ash of RED light every
Active but low battery
3 seconds
Single red ash every 2 seconds Unit in charge when connected to the power supply
Steady Blue Unit in charge when connected to the power supply: full battery charge
SETUP
Steady Red Setup mode
Rapid Red-Blue alternating ash Pairing mode (searching for devices)
Steady Blue for two second Successful pairing/ Reset paired devices
Audio signals Status
Ascending tone (low-high) Unit being turned on
Descending tone (high-low) Unit being turned o
Enable/Disable the Intercom 1 tone = enabled / 2 tones = disabled
1 tone Specic feature turned on
2 tones Specic feature turned o
13

UNIT FUNCTIONS
If you want to... …do this
GENERAL
Turn on the unit Press the Control button for 3 seconds at least (start Blue ash)
Turn o the unit Press the Control and VOL- buttons together for 3 seconds (triple Red ash)
Increase the volume Short press the Volume Up control
Decrease the volume Short press the Volume Down control
MOBILE PHONE
Answer a call Short press of the Control button / say a word
Reject a call Long press the Control Button / remain silent until the rings stop
Terminate a call Short press the Control Button
Short press the Control button and state the name of the person to call (only if your
Voice Dial
BTCity/BTEva has not been paired with another BTCity/BTEva device).
Redial Last number Long press of the Control button
INTERCOM (if paired with another BTCity/BTEva device)
Start using the Intercom Start talking/short press the Control button
Stop talking (after 20 sec. you will return to stand by mode)/Short press the Control
Stop using the Intercom
button
BLUETOOTH MP3 player of the mobile phone
Activate the MP3 player Press and hold down the VOL+ and VOL- buttons for 3 seconds
Play and Pause Double click the Control button
Forward (next song) While the music play, keep pressed of the VOL+ button for 3 sec.
Backward (previous song) While the music play, keep pressed of the VOL- button for 3 sec.
Deactivate the MP3 Player Press and hold down the VOL+ and VOL- buttons for 3 seconds
WIRED CONNECTION
Activate /Deactivate Double click the Control button (only if Music via Bluetooth is disabled)
14

SETUP/PAIRING
Enter SETUP mode Press the Control button for 7 seconds while the unit is o
Exit SETUP mode While in Setup mode, double click the Control button. The Red light will turn o and
the Blue light starts ashing.
While in Setup mode, press the Control button until the LED light ash Red and Blue
Pairing a Phone
alternately
While in Setup mode, press the Volume + on one unit (the light will ash Red and
Pairing your BTCity/BTEva with another BTCity/BTEva
Blue alternately), press the Volume- on the other unit (the light will ash Red and
UK
device
Blue alternately). On a successful pairing, both light turn to Blue for one second.
While in Setup mode, long press he Volume + and he Volume -. On a successful reset,
Reset all paired devices
the Blue light will turn on for two second.
SPECIAL SETUP CONFIGURATION
While in Setup mode, press short the Control and VOL+ buttons (blue light on).
Now, press “Volume +” or “Volume-“ to increase or reduce sensitivity. Double click
the Control button to visualize the VOX status. Go back to the SETUP mode (Red light
always on).
Change VOX sensitivity or disable it
VOX STATUS (Blue light ashing):
Once = VOX disable
Twice = very low sensitivity
3 times = low sensitivity
4 times = medium sensitivity.
5 times = high sensitivity
Enabling: In “Setup” mode, press the “Volume+” and “Volume -” buttons for one
second. The blue LED will ash once.
Wired connection always on
Disabling: Follow the same procedure up described; now the blue LED will ash
twice
Disabling: Enter the “Setup” mode. Press the “Control” and “Volume -” buttons for
one second. The blue LED will ash once. To exit the “Setup”mode double press the
Intercom and GPS
“Control” button.
Enabling again: Follow the same procedure up described; now the blue LED will
ash twice. To exit the “Setup”mode double press the “Control” button.
CTE International herewith declares that the product complies with the essential requirements of EC Directive 99/05/EC; the declaration of confor-
mity of the device can be consulted onto www.midlandradio.eu
15

16

INHALT
Midland BTCity/BTEva ..........................................................................................................................................................2
Akku laden ..........................................................................................................................................................................3
Beschreibung der Einheit und Montagehalterung ..................................................................................................................3
Beschreibung der BTCity/BTEva.......................................................................................................................................................................... 3
Beschreibung Audioset ...................................................................................................................................................................................... 3
Beschreibung der Montagehalterung ................................................................................................................................................................ 4
Midland BTCity/BTEva ein- und ausschalten ...........................................................................................................................5
Lautstärke einstellen ...........................................................................................................................................................5
Pairing (Verbinden) mit Bluetooth-Geräten...........................................................................................................................5
Ausstattungsmerkmale der Bluetooth-Geräte .......................................................................................................................5
Telefonfunktion ................................................................................................................................................................................................. 5
D
MP3-Player-Funktion des Handys ...................................................................................................................................................................... 6
Gerät mit GPS-Navigationsgerät verbinden ....................................................................................................................................................... 6
Gegensprechfunktionen nutzen......................................................................................................................................................................... 7
Alle verbundenen Geräte zurücksetzen .................................................................................................................................8
Kabel-Audioeingang ............................................................................................................................................................8
iPod/MP3-Player ................................................................................................................................................................................................ 8
Funkgerät .......................................................................................................................................................................................................... 8
Besondere Kongurationen .................................................................................................................................................9
Einstellen/Sperren der VOX-Funktion (Gegensprechen und Handy) ................................................................................................................... 9
Verkabelte Verbindung „immer an“ .................................................................................................................................................................... 9
Gegensprechen und GPS .................................................................................................................................................................................... 9
Empfehlungen für besondere Anwendungen .......................................................................................................................10
PMR446 Funkgerät .......................................................................................................................................................................................... 10
BTSki Audiokit (optional) ....................................................................................................................................................10
Benutzung auf eigene Gefahr .............................................................................................................................................12
Gewährleistung..................................................................................................................................................................12
LICHT- UND SOUNDSIGNALE .................................................................................................................................................14
GERÄTEFUNKTIONEN ...........................................................................................................................................................15
1

1 Steckerladegerät mit 2 Mini-USB Steckern
Midland BTCity/BTEva
Mikrofon Schaumstoabdeckung zur Unterdrückung von
Vielen Dank, dass Sie sich für das Midland BTCity/BTEva, das drahtlose
Windgeräuschen, Inbusschlüssel und Klettverschluß für die Montage
Gegensprech-Multimediasystem für Motorradfahrer, entschieden
Die Einheiten im TWIN Set sind bereits gepaart und können
haben. Das Midland BTCity/BTEva wurde für den Einsatz direkt am Helm
sofort für den Sprechverkehr benutzt werden.
entwickelt und zur Benutzung mit Bluetooth Geräten, wie Mobiltelefone,
GPS Navigationsgeräte und MP3-Player. Auf Wunsch kann es auch mit
Technische Eigenschaften des Midland BTCity/BTEva
einem anderen Midland BTCity/BTEva Gerät verbunden werden und als
Allgemein:
schnurlose Sprechanlage zwischen Fahrer/Sozius oder zwischen Fahrer/
Bluetooth Vers. 2.0 Stereo (Headset/Freihand/A2D Protokoll)
Fahrer im Motorrad-zu-Motorrad Modus in einem Radius von 200
Das AGC System kontrolliert automatisch die Lautstärke in Bezug
Metern verwendet werden. Das Midland BTCity/BTEva ist auch mit einer
auf die Umgebungsgeräusche
Kabelverbindung ausgestattet, um einen iPod/MP3-Player oder ein
Sprachgesteuerte (VOX) oder manuelle Kommunikationsmöglichkeit
PMR446 Funkgerät anzuschließen, welches eine maximale Reichweite
Privater oder oener (3-Wege Kommunikation) Anrufmodus
von 5 km im Motorrad-zu-Motorrad Modus erreicht.
Manuelle Steuerung zum Aktivieren von: Telefon, Sprechanlage
und Schnurlosverbindung
Midland BTCity/BTEva ist in zwei Versionen erhältlich:
Vollständig Wasserdicht
BTCity/BTEva Einzelset mit nur einer Einheit
Lithium-Polymerakku mit 8 Stunden Sprechzeit (bis zu 2 Tagen
BTCity/BTEva Intercom TWIN mit zwei Einheiten
Bereitschaftszeit)
Je nach gekauftem Modell enthält die Packung folgenden Inhalt:
Ladezeit ca. 4 Stunden
BTCity/BTEva
Bluetooth Verbindungen:
1 BTCity/BTEva Kommunikationseinheit
Identische Geräte für Fahrer zu Sozius oder Fahrer zu Fahrer
1 Audioset mit zwei Stereolautsprechern, Stabmikrofon und
Sprechverbindung mit einer maximalen Reichweite bis zu 200 Meter
Kabelmikrofon
Bluetooth Geräte
1 Befestigungsplatte mit doppelseitigem Klebeband zur
- Handy mit MP3-Player Stereo (A2DP Protokoll), GPS (Garmin
Befestigung der Einheit am Helm
Zumo und TomTom Rider 1 und 2)
1 Klammer zur Befestigung der Einheit am Helm
- PMR446 Funkgerät ( mit eingebauter oder externer
1 Stereo Audiokabel zum Anschluss eines iPods oder MP3-Players
Bluetooth Verbindung) für Gruppen Motorrad-zu-Motorrad
1 Steckerladegerät mit Mini USB-Stecker
Kommunikation
Mikrofon Schaumstoabdeckung zur Unterdrückung von
Windgeräuschen, Inbusschlüssel und Klettverschluß für die Montage
Kabelverbindungen:
Für Stereo Audioeingang (iPod/MP3-Player)
BTCity/BTEva TWIN
Für PMR446 Funkgeräte (mit optionalem Kabel)
2 BTCity/BTEva Kommunikationseinheit
Achtung: Bevor Sie das BTCity/BTEva das erste Mal in Betrieb
2 Audiosets mit zwei Stereolautsprechern, Stabmikrofon und
nehmen, müssen Sie es mindestens 5 bis 6 Stunden laden.
Kabelmikrofon
2 Befestigungsplatten mit doppelseitigem Klebeband zur
Achtung: Das Midland BTCity/BTEva ist konzipiert, um Regen
Befestigung der Einheit am Helm
und Wasser zu widerstehen. Achten Sie jedoch darauf, dass bei
2 Klammern zum Befestigen der Einheit am Helm
Regen die Anschlüsse mit den Gummischutzkappen vollständig
2 Stereo Audiokabel zum Anschluss eines iPods oder MP3-Players
abgedeckt werden.
2
Handyfunktionen benutzt.
Akku laden
Lautstärke +: erhöht die Lautstärke
Laden Sie den Akku vor der ersten Benutzung des Geräts auf. Das
Lautstärke -: verringert die Lautstärke
erste Laden sollte mindestens 5-6 Stunden dauern, danach der
Ladevorgang 4 Stunden.
Zum Laden das Steckernetzteil in eine Steckdose stecken
(Gummiabdeckung anheben).
Die LED leuchtet rot, sobald der Ladevorgang beginnt.
Laden Sie das Headset, bis die blaue LED aueuchtet.
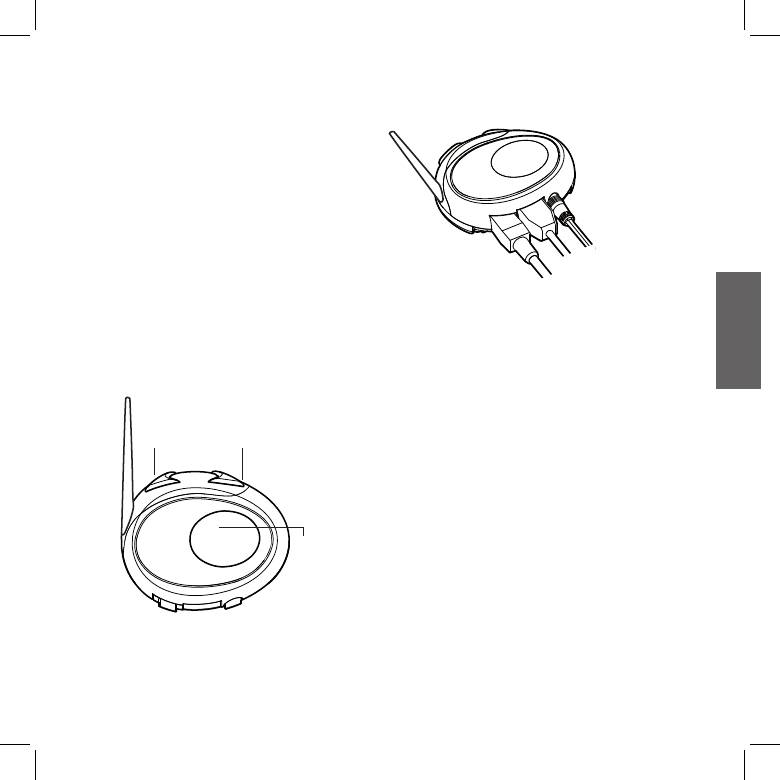
Zusatzbuchse für
Bei vollständiger Ladung (blaue LED leuchtet) trennen Sie das
Audiogeräte
Headset vom Ladegerät ab.
Achtung: Bei jedem Anschluss (oder Abziehen) des Mini-USB-
Ladebuchse
Audioset Buchse
Ladesteckers wird das Gerät automatisch ausgeschaltet. Wenn
Sie das Gerät während des Ladens benutzen möchten, dann
schalten Sie es bitte erst ein, nachdem Sie das Ladekabel
Beschreibung der Kabelverbindung
eingesteckt haben.
Ladebuchse: hier kann das Gerät mit einem Standard Mini-USB-
D
Netzteil geladen werden
Beschreibung der Einheit und
Audioset Buchse: hier können Sie ein Audioset anschließen
Montagehalterung
(Stereo-Headset und Mikrofon)
Zusatzbuchse für Audiogeräte (AUX): hier können Sie eine
Audioquelle, wie z. B. einen Stereo iPod/MP3-Player oder PMR446
Funkgerät anschließen
Lautstärke +Lautstärke -
Beschreibung Audioset
Das Audiosystem beinhaltet zwei ultraache Stereolautsprecher
und zwei austauschbare Mikrofone, die jeweils mit Halterung und
Kabelverbindung geliefert werden.
Montage der Stereolautsprecher
Die zwei Stereolautsprecher haben einen Klett-/Klebestreifen zur
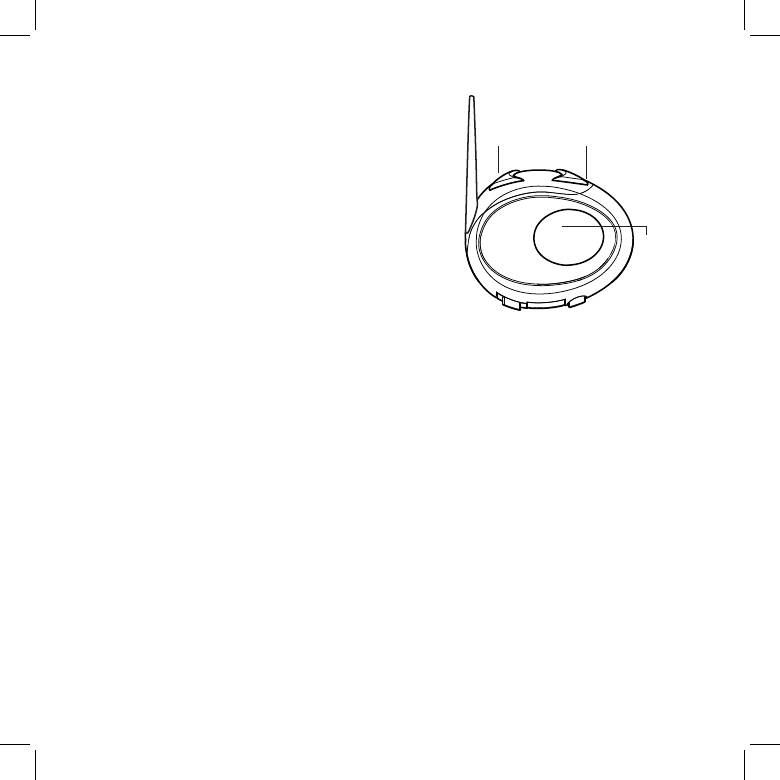
Steuerung
Befestigung an Ihren Helm.
Achten Sie darauf, dass Sie nicht Ihr Ohr ganz mit dem
Lautsprecher abdecken, Sie müssen immer Verkehrsgeräusche
und Signale hören können.
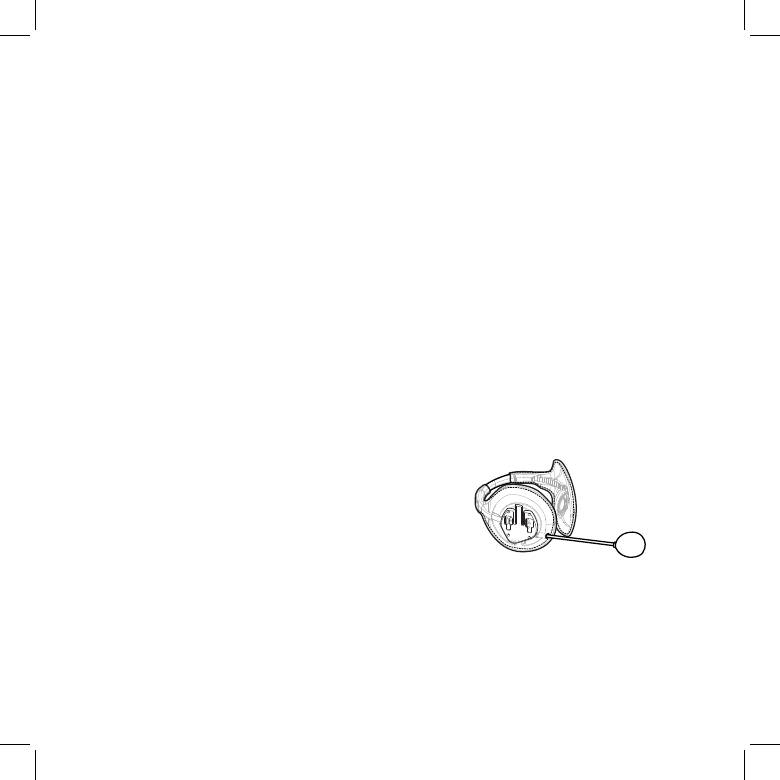
Das Mikrofon kann auf zwei Arten am Helm befestigt werden:
Das BTCity/BTEva hat 3 Multifunktionstasten und 3 Kabelanschlüsse
auf der Unterseite.
Stabmikrofon
Beschreibung der Tastenfunktion:
Setzen Sie das Klett-/Klebeband zwischen dem Polster und der harten
Steuerung: wird zum Aktivieren/Deaktivieren und Verwalten von
Schale des Helmes an, sodass das Mikrofon direkt vor Ihrem Mund ist
3
und das weiße Symbol auf Ihren Mund zeigt. Dieses Mikrofon ist für
oene und klappbare Helme geeignet.
Abstandhalter
Kabelmikrofon
Setzen Sie das Mikrofon mit dem Klett-/Klebestreifen auf der Innenseite
Ihres Helmes vor Ihrem Mund an. Dieses Modell ist eher für Helme mit
Vollgesichtsschutz geeignet. Der Ministecker am Mikrofon erlaubt Ihnen
ein Mikrofon zu wählen, das am besten zu Ihrem Helm passt.
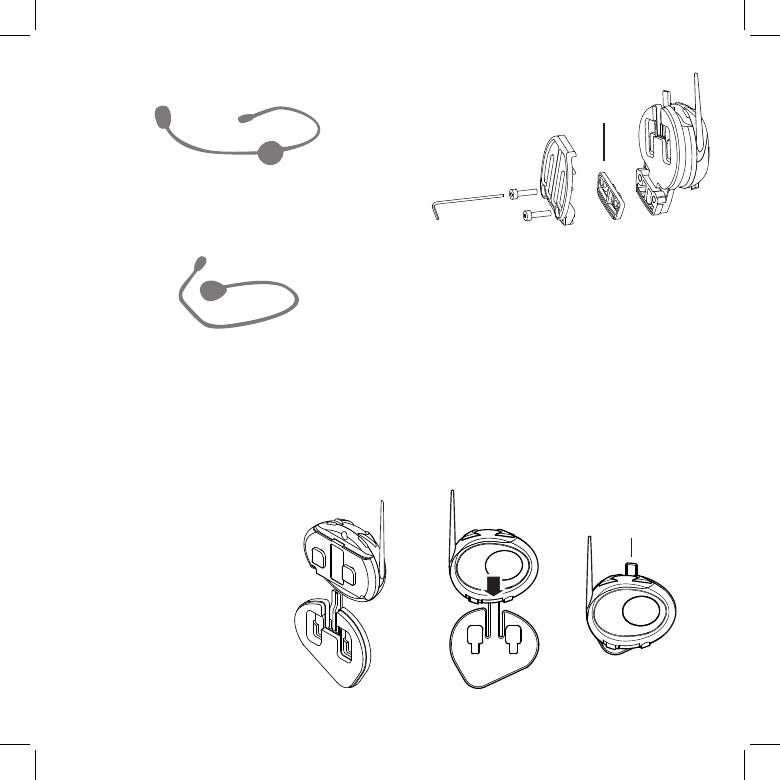
Klammer
Lösen Sie die zwei Schrauben der Klammer mit einem Inbusschlüssel
und setzen Sie die Rückplatte zwischen dem Helmpolster und der
äußeren harten Schale an. Danach ziehen Sie die beiden Schrauben
an, um die Klammer zu befestigen. In der Klammer bendet sich ein
kleiner Abstandhalter aus Kunststo, der für ein festeres Schließen
der Klammer herausgenommen werden kann.
Audioset Buchse
Das Audioset muss dann mit einem L-Stecker am mittleren Anschluss
Befestigen und entfernen Ihres Midland BTCity/BTEva
des Midland BTCity/BTEva angeschlossen werden.
Das BTCity/BTEva kann leicht am Helm befestigt werden, indem
es so nach unten geschoben wird, dass es in die Führung der
Beschreibung der Montagehalterung
Montagevorrichtung passt (Platte mit doppelseitigem Klebeband oder
Klammer). Das BTCity/BTEva wird mithilfe der Befestigungsklammer
Das Midland BTCity/BTEva kann auf zwei Arten am Helm befestigt
im oberen Teil in Position gehalten (A).
werden: entweder mit der Platte mit doppelseitigem Klebeband oder mit
Um das BTCITY/BTEVA zu entfernen, drücken Sie die
der Klammer. Mit dieser Methode können Sie die BTCity/BTEva Einheit
Befestigungsklammer und schieben Sie die Einheit nach oben.
jederzeit sicher an Ihrem Helm befestigen und wieder entfernen, um
das Gerät zu laden oder zu verstauen.
Platte mit doppelseitigem Klebeband
A
Die Montageplatte hat auf einer Seite ein
doppelseitiges Klebeband. Reinigen Sie die
Kontaktäche am Helm, bevor Sie die Platte
montieren, entfernen Sie die Schutzfolie
des doppelseitigen Klebebandes, setzen die
Montageplatte am Helm an und drücken Sie
diese für einige Sekunden an.
4

Midland BTCity/BTEva ein- und ausschalten
Ausstattungsmerkmale der Bluetooth-Geräte
Einschalten:
Telefonfunktion
Halten Sie die Steuertaste für ca. 3 Sekunden gedrückt, bis die
Um die Telefonfunktion zu nutzen, müssen die Geräte korrekt miteinander
BLAUE LED leuchtet.
verbunden sein.
Ausschalten:
Gerät mit Handy verbinden
Halten Sie die Tasten „Steuerung“ und „Lautstärke-“ gleichzeitig
1. Aktivieren Sie die Bluetooth Gerätesuche auf Ihrem Handy.
für ca. 3 Sekunden gedrückt, bis die ROTE LED 3 Mal blinkt, damit
Diese Prozedur ist je nach Hersteller und Modell unterschiedlich;
vermeiden Sie ein versehentliches Ausschalten (besonders wenn
beziehen Sie sich auf die Bedienungsanleitung, die Ihrem Handy
Sie dicke Handschuhe tragen).
beiliegt.
Lautstärke einstellen
2. Versetzen Sie das BTCity/BTEva in „Pairing“ Modus und drücken Sie
die Taste „Steuerung“, bis die rote und blaue LED blinken.
Ihr Midland BTCity/BTEva benutzt AGC Technologie, welche
3. Nach einigen Sekunden zeigt das Display des Handys „Midland
automatisch die Hörerlautstärke den Hintergrundgeräuschen
BTCity/BTEva“ an. Wählen Sie es und folgen Sie den Anweisungen
anpasst. Sie können jedoch die Lautstärke auch manuell mit den
in der Bedienungsanleitung des Handys zum Akzeptieren der
D
Tasten „Lautstärke+“ und „Lautstärke-„ anpassen.
Verbindung. Nach Auorderung geben Sie den Pairingode, 0000
Achtung: Die Lautstärke kann nur bei aktiver Audioverbindung
(viermal Null) ein. Ihr Handy zeigt jetzt eine Bestätigung, dass die
eingestellt werden.
Verbindung erfolgreich hergestellt wurde.
4. Das BTCity/BTEva verlässt automatisch den Einstellmodus (rote
Pairing (Verbinden) mit Bluetooth-Geräten
LED leuchtet) und begibt sich in den Verbindungsmodus (blaue
Ihr Midland BTCity/BTEva ist ein Bluetooth-Gerät, welches sich mit
LED blinkt).
anderen Bluetooth-Geräten verbinden kann, beispielsweise Handy
Anruf beantworten
oder anderen BTCity/BTEva Geräten zum Gegensprechen.
Wenn das Telefon klingelt, können Sie auf zwei Arten antworten:
Vor dem Pairing müssen Sie den Einstellmodus des BTCity/BTEva aufrufen.
Sprachgesteuert:
Einstellmodus (Pairing)
Einfach ein Wort sagen, um den Anruf anzunehmen, um das Gespräch zu
Schalten Sie das BTCity/BTEva aus. Halten Sie die mittlere Taste
starten.
„Steuerung“ für ca. 7 Sekunden gedrückt, bis die rote LED leuchtet.
Denken Sie daran, dass dies nur möglich ist, wenn Sie den Anruf
Das BTCity/BTEva bendet sich nun im Pairingmodus (Einstellung) und
nach dem dritten Klingelton annehmen (beachten Sie, dass
kann mit anderen Geräten verbunden werden.
einige Telefone eventuell keine Sprachsteuerung unterstützen).
Manuell:
Einstellmodus verlassen
Drücken Sie die Taste „Steuerung“ und sprechen Sie.
Zum Verlassen des Einstellmodus drücken Sie zweimal die
„Steuerung“. Die rote LED erlischt und die blaue LED blinkt. Ihr
Anruf ablehnen
BTCity/BTEva ist nun betriebsbereit.
Falls Sie den Anruf nicht annehmen möchten, können Sie das Handy
klingeln lassen oder drücken Sie die Taste „Steuerung“ für einige
Sekunden (Sie hören einen Bestätigungston).
5

Anruf tätigen
Mit „Lautstärke +“: springen Sie zum nächsten Musiktitel.
Es gibt verschiedene Möglichkeiten, einen Anruf zu tätigen.
Mit „Lautstärke –“: springen Sie zum vorherigen Musiktitel.
Über die Handytastatur:
Zur Aktivierung des angeschlossenen MP3-Players: halten Sie
Wählen Sie die Rufnummer auf der Tastatur des Handys.
„Lautstärke +“ und „Lautstärke –“ für 3 Sekunden gedrückt (diese
Drücken Sie die Sendetaste auf dem Handy.
Funktion ist im Lieferzustand aktiviert).
Wahlwiederholung letzte Rufnummer:
Zur Deaktivierung des MP3-Players: halten Sie „Lautstärke +“
Halten Sie die Taste „Steuerung“ für einige Sekunden gedrückt, um die
und „Lautstärke –“ gedrückt (2 Signaltöne werden zur Bestätigung
letzte Rufnummer zu wiederholen (Sie hören einen Bestätigungston).
abgegeben).
Sprachgesteuerten Anruf tätigen:
Drücken Sie kurz die Taste „Steuerung“. Falls Ihr Handy
Lautstärke -
Lautstärke +
sprachgesteuerte Anrufe unterstützt, werden Sie aufgefordert,
Zurück
Vorwärts
den Namen der Kontaktperson anzusagen.
Priorität: Anrufe haben eine hohe Priorität, was bedeutet, dass alle
sonstige Kommunikation vorübergehend deaktiviert wird, wenn ein
Anruf ankommt und automatisch wieder aktiviert wird, sobald der
Anruf beendet ist.
Achtung: Der Sprachwahlbefehl ist nur möglich, wenn das
Steuerung
BTCity/BTEva vorher noch nicht mit einem anderen
Pause/
BTCity/BTEva zum Gegensprechen verbunden war.
Wiedergabe
Telefonat beenden
Es gibt verschiedene Möglichkeiten, einen Anruf zu beenden:
Warten Sie, bis die angerufene Person den Anruf beendet.
Priorität: Der Musikmodus hat die niedrigste Prioritätsstufe, daher wird
Drücken Sie kurz die Taste „Steuerung“ (Sie hören einen
er durch Kommunikation deaktiviert.
Bestätigungston).
Drücken Sie „Beenden“ auf dem Handy.
Gerät mit GPS-Navigationsgerät verbinden
Allgemein ist es möglich, das BTCity/BTEva mit jedem
MP3-Player-Funktion des Handys
GPS-Navigationsgerät zu verbinden, das Bluetooth-Headsets unterstützt.
Viele Handys können heute als Stereo-MP3-Player genutzt werden.
Das Midland BTCity/BTEva wurde erfolgreich mit dem GPS ZUMO von
Das BTCity/BTEva unterstützt die Protokolle A2DP und AVRCP, die
Garmin sowie dem TOMTOM Rider 1 und 2 getestet.
es Ihnen ermöglichen, Stereomusik zu hören und den MP3-Player
1. Aktivieren Sie bei Ihrem GPS die Bluetooth Kopfhörer-
im Handy fernzusteuern. Sie können ebenfalls die Tasten auf dem
Suchfunktion. Diese Prozedur ist je nach Hersteller und Modell
BTCity/BTEva benutzen, um folgenden Abspielfunktionen zu steuern:
unterschiedlich, beziehen Sie sich auf die Bedienungsanleitung,
Wiedergabe, Pause, Vorlauf und Rücklauf.
die Ihrem GPS-Gerät beiliegt.
2. Vergewissern Sie sich, dass sich das BTCity/BTEva im Pairingmodus
Steuerungen:
bendet (rote LED leuchtet) und drücken Sie die Taste „Steuerung“
Zur Wiedergabe/Pause von Musik: drücken Sie zweimal die
auf dem BTCity/BTEva, bis die rote und blaue LED blinken.
„Steuertaste“.
3. Nach einigen Sekunden zeigt das Display des GPS „Midland
6

BTCity-BTEva“ an. Wählen Sie es und folgen Sie den Anweisungen
5. Zur Benutzung der beiden Geräte verlassen Sie den Einstellmodus.
in der Bedienungsanleitung des GPS-Gerätes zum Akzeptieren der
Drücken Sie zweimal die „Steuertaste“. Die rote LED erlischt und die
Verbindung. Nach Auorderung geben Sie den Pairingcode, 0000
blaue LED blinkt. Ihr BTCity/BTEva ist nun betriebsbereit.
(viermal Null) ein.
Gegensprechen
Ihr GPS-Gerät zeigt jetzt eine Bestätigung an, dass die Verbindung
Die Gegensprechfunktion kann auf zwei Arten aktiviert werden:
erfolgreich hergestellt wurde.
4. Das BTCity/BTEva wechselt in den Einstellmodus zurück (rote LED
Manuelle Aktivierung:
leuchtet) und zeigt an, dass es bereit ist, mit einem anderen Gerät
Drücken Sie die „Steuertaste“ auf einem der beiden Geräte. Die
verbunden zu werden.
Kommunikation ist aktiviert und bleibt aktiv, bis Sie nochmals
auf die „Steuertaste“ drücken. Sie hören 1 Ton, wenn die
Wenn Sie das BTCity/BTEva mit einem GPS verbinden, so können Sie
Gegensprechfunktion aktiviert ist und 2 Töne, wenn sie deaktiviert
es nicht mit einem Handy verbinden. Dieses Problem können Sie um-
ist.
gehen, indem Sie Ihr Handy direkt mit dem GPS-Gerät verbinden und
Sprachsteuerung (VOX):
dann das GPS mit Ihrem Midland BTCity/BTEva verbinden. In diesem
Dies ist der standardgemäß aktiviert. Um das Gegensprechen zu
Fall werden die Funktionen des Mobiltelefons vom GPS-Gerät über-
starten, beginnen Sie einfach zu sprechen. Die Verbindung bleibt
nommen.
aktiv, solange Sie sprechen.
D
Gegensprechfunktionen nutzen
Achtung: die erste Aktivierung der Gegensprechfunktion muss
manuell mit der Steuertaste erfolgen. Danach steht Ihnen die
Um die Gegensprechfunktionen zu nutzen, müssen beide Geräte
VOX-Aktivierung zur Verfügung.
eingeschaltet und korrekt verbunden sein.
Die beiden Geräte im Midland BTCity/BTEva TWIN Pack sind bereits
Wenn kein Gespräch stattndet, wird die Gegensprechfunktion
abgestimmt und betriebsbereit, dieser Vorgang muss daher nicht
nach 20 Sekunden automatisch wieder abgeschaltet.
durchgeführt werden.
Um diese neu zu starten, beginnen Sie wieder zu sprechen. Bei
Sind die Geräte nicht Teil des gleichen Sets oder wurde eines der
sprachgesteuertem Gegensprechen können Sie auch vor Ablauf
BTCity/BTEva Geräte getrennt gekauft, so müssen Sie das Pairing
der 20 Sekunden durch Druck auf die “Steuertaste” wieder ab-
durchführen, um die Gegensprechfunktion nutzen zu können.
schalten.
Pairing mit anderem BTCity/BTEva
Um die Sprachsteuerung zu sperren, folgen Sie den Anweisungen
im Abschnitt “besondere Kongurationen”
1. Rufen Sie auf beiden BTCity/BTEva Geräten den Einstellmodus auf
(rote LED leuchtet).
Gegensprechen und GPS
2. Drücken Sie auf dem ersten Gerät „Lautstärke +“, bis die ROTE und
Ist das BTCity/BTEva mit einem GPS verbunden, so wird die
BLAUE LED schnell abwechselnd blinken.
Gegensprechfunktion während der GPS Ansage nicht unterbrochen.
3. Drücken Sie nun „Lautstärke –“ auf dem zweiten Gerät, bis die
Gleiches gilt, wenn ein Telefonat über das GPS angenommen wird.
ROTE und BLAUE LED schnell abwechselnd blinken.
Je nach verwendetem Gerät kann es vorkommen, dass der
4. Beide BTCity/BTEva Geräte versuchen nun, sich miteinander zu ver-
gleichzeitige Betrieb zusammen mit dem Intercom nicht störungsfrei
binden. Nach erfolgreichem Pairing leuchtet die blaue LED jedes
möglich ist und Telefongespräche bzw. Durchsagen nicht korrekt
Geräts für 1 Sekunde auf und begibt sich dann in den Einstel-
weitergeleitet werden können. In solchen Fällen empfehlen wir,
lmodus zurück (rote LED leuchtet), um auf weitere Pairing- oder
dieses Feature abzuschalten. (siehe Abschnitt über spezielle
Einstellungsschritte zu warten.
Einstellungen).
7

Priorität:
iPod/MP3-Player
Mit Handy: Die Gegensprechfunktion ist während eines Telefonats
unterbrochen und wird nach Beendigung des Gesprächs wieder
Musik hören
automatisch eingeschaltet.
Um Musik über den Kabeleingang zu hören, verbinden Sie die
Mit Musik: Bluetooth-Musik ist bei geöneter Gegensprechfunktion
Audioquelle über das mitgelieferte Kabel mit dem BTCity/BTEva.
unterbrochen.
Die Lautstärke wird automatisch über das AGC-System eingestellt,
Mit GPS-Navigation: Bei GPS- Ansagen wird die Gegensprechfunktion
was bedeutet, dass Sie die Lautstärke am iPod/ MP3-Player nur so
nicht unterbrochen, Gespräche sind weiterhin möglich, gemeinsam mit den
einstellen müssen, dass Sie Musik bei normaler Geschwindigkeit
GPS-Ansagen im Hintergrund.
hören können.
Achtung: Stellen Sie nie die Lautstärke Ihres MP3-Players auf
Abstand
Maximum.
Zwei Midland BTCity/BTEva Geräte können im Freien bis zu
Hinweis: Wir empfehlen Ihnen, einige Tests durchzuführen, um
200 m miteinander kommunizieren. Die Reichweite ist von der
die Lautstärke Ihres iPod/MP3-Players so einzustellen, dass sie bei
Geländebeschaenheit und der Ausrichtung Ihres Kopfes abhängig.
Normalgeschwindigkeit Ihren Wünschen entspricht. Das AGC-System
regelt die Lautstärke bei höheren Geschwindigkeiten automatisch nach.
Alle verbundenen Geräte zurücksetzen
Merken Sie sich die Einstellung für zukünftige Fahrten.
Manchmal ist es notwendig, alle gespeicherten Pairingreferenzen im
Achtung: Die Lautstärkeeinstellung (Tasten „Lautstärke+“ und
BTCity/BTEva zu löschen (Rückstellung).
„Lautstärke-“) können nicht für die Einstellung der verkabelten
Hierzu schalten Sie das BTCity/BTEva aus und halten dabei die
Audioquelle (z. B. MP3-Player) verwendet werden.
„Steuertaste“ gedrückt. Die rote LED leuchtet auf.
Kabeleingang aktivieren/deaktivieren
Sie müssen gleichzeitig die Tasten „Lautstärke +“ und „Lautstärke –“
für 4Sekunden gedrückt halten. Die blaue LED leuchtet für 1 Sekunde
Der Kabeleingang kann aktiviert und deaktiviert werden.
auf.
Aktivierung: Drücken Sie zweimal die „Steuertaste“ (es wird ein
Signalton zur Bestätigung abgegeben).
Dieser Vorgang löscht alle gespeicherten verbundenen Geräte und
Deaktivierung: Drücken Sie zweimal die „Steuertaste“ (es werden
ermöglicht ein neues „sauberes“ Pairing.
zwei Signaltöne zur Bestätigung abgegeben).
Achtung: Diese Funktion haben Sie nur, wenn keine
Kabel-Audioeingang
Musikübertragung über Bluetooth stattndet.
Ihr Midland BTCity/BTEva ist ebenfalls mit einem verkabelten
Audioeingang (AUX) ausgestattet, an welchem Sie eine Audioquelle,
Funkgerät
beispielsweise einen iPod (oder jeden anderen MP3-Player) oder ein
Um ein PMR446 Funkgerät nutzen zu können, benötigen Sie ein
PMR446 Funkgerät für Gruppenkommunikation oder zur Erweiterung
spezielles Kabel (wird separat verkauft), um das Gerät an Ihr Midland
der Reichweite anschließen können.
BTCity/BTEva anzuschließen.
Priorität: Der Kabel-Audioeingang hat die niedrigste Priorität gegenüber
Bitte beachten Sie, dass einige Funkgeräte eine andere Pin-
anderen Bluetooth-Verbindungen (Gegensprechen eingeschlossen)
Konguration benutzen. Fragen Sie Ihren Fachhändler, welches Kabel
und wird deshalb immer deaktiviert, sobald eine andere Bluetooth-
am geeignetsten für Ihr Gerät ist.
Verbindung geönet wird.
8


