MTX Audio RoadThunder RT8PT 8 120W RMS Amplified Vented Enclosure: инструкция
Раздел: Бытовая, кухонная техника, электроника и оборудование
Тип: Акустика
Инструкция к Акустику MTX Audio RoadThunder RT8PT 8 120W RMS Amplified Vented Enclosure

RT8PT
20cm (8") Powered Tube Enclosure
120W
RMS
Designed in Phoenix - AZ, USA
www.mtx.eu.com
www.mtx.com
www.mtx.com - www.mtx.eu.com
Introduction
Thank you for purchasing an MTX Audio Hi-Performance powered tube. Proper installation matched with MTX
speakers and ampliers provide superior sound and performance for endless hours of waking the neighbors,
slammin' your friends or at out stomping wanna-be players. Congrats and enjoy the ultimate audio experience
with MTX !
Features
• Powered vented enclosure
• Subwoofer : 20cm (8")
• Amplier Max Power : 360W
• Amplier RMS Power : 120W
• EBC remote included
• High and low level inputs
• Dimensions : 25x25x54cm
Owner’s Manual - RT8PT
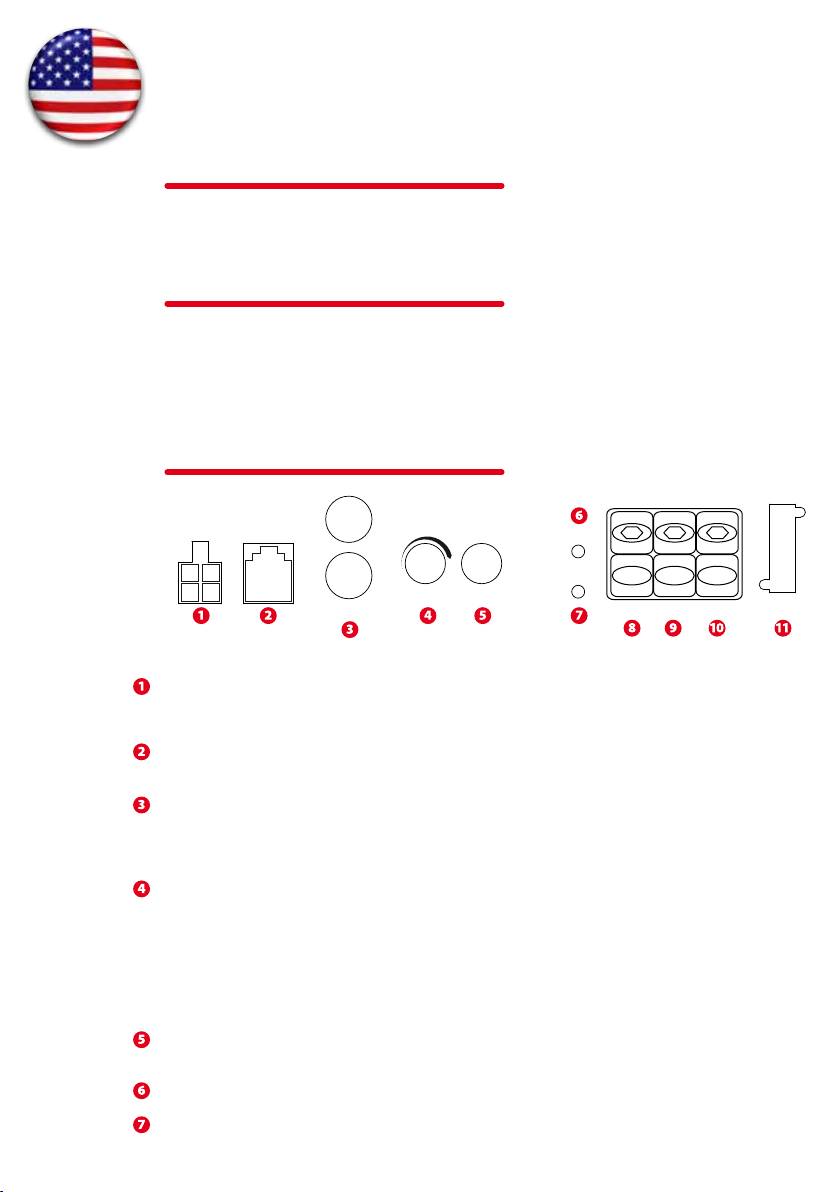
Control Panel on the Amplier
EBC PortHLI
Gain
LPF
Prot.
L
R
+
+
PWR
-
-
6V-0.1V 50Hz-200Hz
FUSE
Line In
Rem.
GND+12V
PWR
Speaker level inputs - This input will allow the amplier to operate from source units with speaker-level outputs.
Output speaker leads from the source unit should be tied directly to the wire harness provided with the amplier.
Note : When speaker level inputs are used, a remote turn on wire must used to switch the amplier on and o.
EBC Port (External Bass Control) - The Remote Subwoofer Level Control (EBC) plugs directly into this port, while
the EBC itself can be placed anywhere in the vehicle for on demand bass adjustments. EBC is included.
RCA Inputs - These RCA inputs are used with source units that have RCA or Line level outputs. (Source units need
a minimum level of 100mV output for proper operation of the amplier).
MTX recommends only high quality twisted pair cables (such as StreetWires) to decrease the possibility of radi-
ated noise entering the system.
Gain Control - The gain control matches the input sensitivity of the amplier to the source unit being used. The
operating range varies from 100mv to 6V.
Adjusting the gain
1. Turn the gain control on the amplier all the way down (counter clockwise).
2. Turn up the volume control on the source unit to approximately 3⁄4 of maximum.
3. Adjust the gain control on the amplier until audible distortion occurs.
4. Adjust the gain control down until audible distortion disappears.
5. The amplier is now calibrated to the output of the source unit.
Low Pass X-Over Frequency Control - Used to select the desired low-pass (LP) x-over frequency. The frequency is
adjustable from 50Hz to 200Hz..
Protection LED - When the amps is in thermal protection, the LED turns to red.
PowerOn LED - The LED illuminates red when the amp is switched on.

(+12V) Power Terminal - This is the main power input for the amplier and
must be connected directly to the positive terminal of the vehicles battery
for proper operation. Use caution when installing (+12V) power cable in
the vehicle. Avoid running this cable parallel with RCA cables, antennas, or
other sensitive equipment due to massive currents that can induce noise
into the audio system. It is also very important to have a tight, secure con-
nection for maximum performance. MTX recommends using a minimum of
6mm
2
full copper power wire with the MTX RT8PT powered tube.
Remote Terminal – The powered tube can be turned on by applying 12 volts to this terminal. Typically this voltage is
supplied by a wire from the source unit marked “remote” or “power antenna”.
Ground Terminal – A proper ground is required for your amplier to operate at peak performance. A short ground
cable the same diameter as the power cable should be used to attach the ground terminal directly to the chassis of the
vehicle. Always remove paint, dirt or debris to expose bare metal where the ground will be attached.
Fuses - When the fuse blows, replace it with the same value. The RT8PT uses a 20A fuse.
Caution : Never use a higher rated fuse !
Installation & Mounting
MTX recommends your new RoadTHUNDER powered tube to be installed by an Authorized MTX retailer. Any deviation
from specied installation instructions can cause serious damage to the amplier, speakers and/or vehicles electrical
system. Damage caused from improper installation is NOT covered under warranty. Please verify all connections prior
to turn on your system !
1. Disconnect the vehicle’s negative battery cable.
2. Determine the mounting place for your MTX powered enclosure. Hook it with the provided belts. Keep in mind there
should be sucient air ow for proper cooling.
3. Install a positive (+) power cable from the vehicle’s battery through the rewall using a grommet or rewall bushing
to avoid cable damage from sharp edges of the rewall. Run the cable through the interior of the vehicle and connect
it to the amplier’s (+12V) terminal (8). Do Not connect to the battery at this time.
Note : Use only proper gauge wire for both positive and negative connections.
4. Install a circuit breaker or fuse within 20cm of the battery. This eectively lowers the risk of severe damage to you
or your vehicle in case of a short circuit or accident. Make sure the circuitbreaker is switched o or the fuse is taken
out of the fuse holder untill all connections are made. Now connect your positive power cable to the positive battery
terminal of the battery.
5. Grounding - Locate a proper ground point on the vehicle’s chassis and remove all paint, dirt or debris to reveal a bare
metal surface. Attach the ground wire to that contact point. Connect the opposite end of the ground wire to the (GND)
terminal on the MTX amplier (10).
6. Connect a remote turn-on wire from the source unit to the powered tube remote terminal (9). If the source unit does
not have a dedicated Remote Turn-on lead, you may connect to the source unit’s Power Antenna lead.
7. Connecting signal cables to the amplier : There are two ways to supply the signal to your MTX powered tube.
• To get maximum performance, we suggest connecting a high quality RCA to the corresponding outputs at the source
unit and inputs of the amplier.
• If a source unit is being used without RCA outputs, use the included high-level amplier’s speaker terminals (1) using
the right gauge speaker wire.
8. Double check all previous installation steps, in particular, wiring and component connections. Once veried, recon-
nect the vehicle’s negative battery cable, turn the circuit breaker on or place the fuse in the fuse holder.
Note : Gain Levels on the amplier should be turned all the way down (counter clockwise) before proceeding with
adjustments.
www.mtx.com - www.mtx.eu.com
Introduction :
Merci d'avoir fait conance à MTX en achetant un tube amplié hautes performances de la série RoadTHUNDER.
Une bonne installation combinée à des haut-parleurs MTX adaptés donneront des résultats hallucinants. Ils vous
permettront de tenir éveillé vos voisins pendant des heures (des nuits), de couper le soue à vos amis et de
renvoyer dans leur bac à sable les petits joueurs...
Caractéristiques :
Caractéristiques :
• Caisson de grave amplié
• Subwoofer : 20cm (8")
• Ampli puissance Max : 360W
Manuel - RT8PT
• Ampli puissance RMS : 120W
• Commande EBC incluse
• Entrées haut et bas niveau
• Dimensions : 25x25x54cm
Connecteurs et réglages
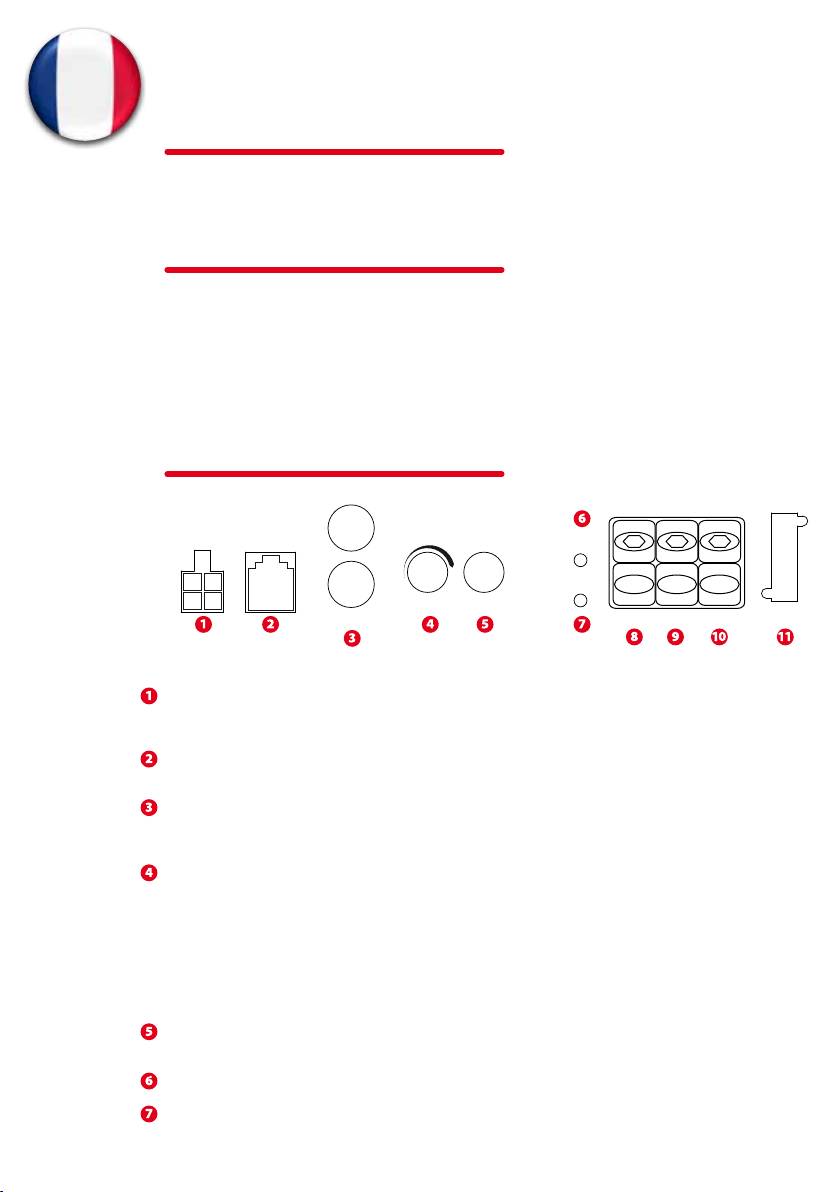
EBC PortHLI
Gain
LPF
Prot.
L
R
+
+
PWR
-
-
6V-0.1V 50Hz-200Hz
FUSE
Line In
Rem.
GND+12V
PWR
Entrées haut-niveau (HLI) : Votre tube amplié MTX accepte le signal provenant des câbles haut-parleur de votre
source (dans le cas ou votre source ne serait pas équipée de sorties RCA). Des adapteurs sont fournis à cet eet. Il
sut d'y brancher vos câbles haut-parleurs et de brancher les adaptateurs dans le connecteur "HLI".
Port EBC (External Bass Control - EBC Port) : Ce port permet la connexion de la commande déportée EBC livrée de
série. Elle vous permet de régler le niveau du subwoofer assis aux places avant.
Entrées RCA (LINE IN) : Ces entrées RCA se connectent à votre source si elle est équipée de sorties RCA. Le niveau
minimum est de 0,1 Volt, le niveau maximum est de 6 Volts. MTX recommande d'utiliser des câbles RCA "twistés"
de qualité (comme chez StreetWires par exemple) pour éliminer les problèmes de parasite.
Niveau de sensibilité (GAIN) – Ce réglage permet d'aligner la sensibilité de votre tube amplié avec celle de votre
source. Elle varie sur l'amplicateur de 0,1 à 6V. Cette commande n'est pas un volume ! Cela ne sert à rien de la
mettre à fond.
Ajuster le niveau de sensibilité (Gain)
1. Tourner le potentiomètre dans le sens contraire des aiguilles d'une montre (au minimum)
2. Avec une chanson bien dynamique, monter le volume de la source au 3/4 du volume maxi
3. Augmenter le potentiomètre "Gain" jusqu'à entendre de la distortion (son dégradé)
4. Diminuer le niveau d'une heure sur le potentiomètre
5. Votre amplicateur est calibré avec la source
Réglage de la fréquence de coupure passe-bas (LPF) :
Ce potentiomètre permet d'ajuster la fréquence de coupure passe-bas de 50 à 200Hz (12dB/oct)
LED de protection : Lorsque l’amplicateur est en protection thermique (trop chaud) ce LED s’allume en rouge
LED temoin d’allumage : Ce LED est allumé en rouge lorsque l’amplicateur est en fonction.

Connecteur d'alimentation (+12V) : C'est l'alimentation de l'amplicateur.
Ce bornier doit être connecté directement à la borne +12V de la batterie.
Pour éviter les parasites, il faut prendre soin de ne pas faire passer le câble
d'alimentation à moins de 15cm du système électrique de la voiture ou
des câbles RCA. MTX recommande l'utilsation de câble de 6mm
2
100% en
cuivre.
Connecteur "Remote" (Rem.) : C'est la commande d'allumage et d'extinc-
tion de l'amplicateur. Pour allumer l'ampli, il faut appliquer un +12V sur
cette borne. La commande "Remote" se trouve dans les câbles de votre source avec l'inscription "Remote" ou "Power
Antenna".
Connecteur de masse (GND) – C'est le bornier qui doit être relié à la masse de votre véhicule. Une masse de très bonne
qualité est indispensable. Il faut un contact de haute qualité avec vis et écrous sur la tôle à nu (enlever la peinture avec
une brosse métalique). Plus la masse est courte, meilleur sera le résultat. Il faut utiliser la même section de câble que
pour l'alimentation (6mm
2
).
Fusibles - Lorsque'un fusible fond, il faut le remplacer par un fusible de même valeur (20A sur le RT8PT).
Attention : ne jamais utiliser un fusible plus puissant.
Installation et montage
MTX vous recommande de faire appel à un installateur spécialisé pour le montage de votre tube amplié RoadTHUN-
DER. Tout mauvais branchement peut gravement endommager ce produit, vos haut-parleurs ou encore le système
électrique de votre véhicule. Veuillez à vérier deux fois les branchements avant de mettre en marche votre système
audio.
1. Déconnectez la masse de la batterie du véhicule.
2. Déterminez l'emplacement de votre tube amplié MTX. Fixez le avec les sangles fournies. pour un bon fonctionne-
ment, il faut laisser de l'air devant la section amplicateur (pour son refroidissement) et devant le subwoofer.
3. Faites passer un câble d'alimentation de la batterie jusqu'au connecteur marqué ”+12V” sur l'amplicateur. Ne pas
connecter ce câble pour le moment. Lors du passage à travers une tôle, il faut utiliser un caoutchouc de protection
pour que le câble ne s'endommage pas. Attention à bien utiliser la section de câble recommandée.
4. Il faut installer un fusible et un porte fusible à moins de 20cm de la batterie du véhicule. C'est une protection très
importante pour vous et votre véhicule en cas d'accident ou de court-circuit. Vous pouvez maintenant connecter le
câble d'alimentation +12V sur la borne positive (rouge) de la batterie.
5. Trouvez une très bonne masse, la plus courte possible (donc proche de l'amplicateur). Le point de contact doit être
décapé (plus de peinture) pour assurer un contact optimal et un transfert de courant maximum. Utiliser la même sec-
tion de câble que pour l'alimentation. Branchez la masse au connecteur marqué "GND" sur l'amplicateur puis visser
l'autre extrémité à la tôle du véhicule.
6. Connectez un câble de commande d'allumage (remote) et d'extinction de votre source au bornier marqué "Rem." sur
l'amplicateur. Ce câble est généralement de petite section et de couleur bleue. Il se trouve à l'arrière de votre source.
Il est parfois marqué "remote" ou "power antenna".
7. Connectez les câbles RCA de votre source aux borniers marqués "INPUT".
Si votre source n'est pas équipée de câbles RCA, vous pouvez utiliser les adaptateurs haut niveau fournis (HLI). Il faut
alors brancher les câbles haut-parleur de votre source à ces adaptateurs, puis brancher l'adaptateur dans le bornier
"HLI".
8. Vériez tous les points de montage précédents, en particulier le câblage et les connexions. Si tout est en ordre, vous
pouvez reconnecter la masse de la batterie. Puis placez le fusible dans son porte fusible.
Attention : pour commencer les réglages, la sensibilité "GAIN" sur l'amplicateur doit être en position minimum, dans
le sens contraire des aiguilles d'une montre. Le réglage de fréquence (LPF) doit être à midi.
www.mtx.com - www.mtx.eu.com
Introducción
Gracias por adquirir el tubo amplicado de altas prestaciones de MTX. El correcto emparejamiento del sistema
con altavoces y amplicadores MTX le proporcionará de un sonido y prestaciones superiores con interminables
audiciones que consigan despertar a sus vecinos, con tus amigos más guays o saciarse de los discos qué más
quieres. Enhorabuena y disfrute de la última experiencia en audio con MTX !!!
Características :
• Caja Reex Auto-amplicada
• Subwoofer : 20cm (8")
• Potencia Máxima del amplicador: 360W
• Potencia RMS del amplicador: 120W
• Control remoto EBC incluido
• Entradas de Alta y Baja señal
• Dimensiones : 25x25x54cm
Panel de control en el Amplicador
Manual de usuario - RT8PT
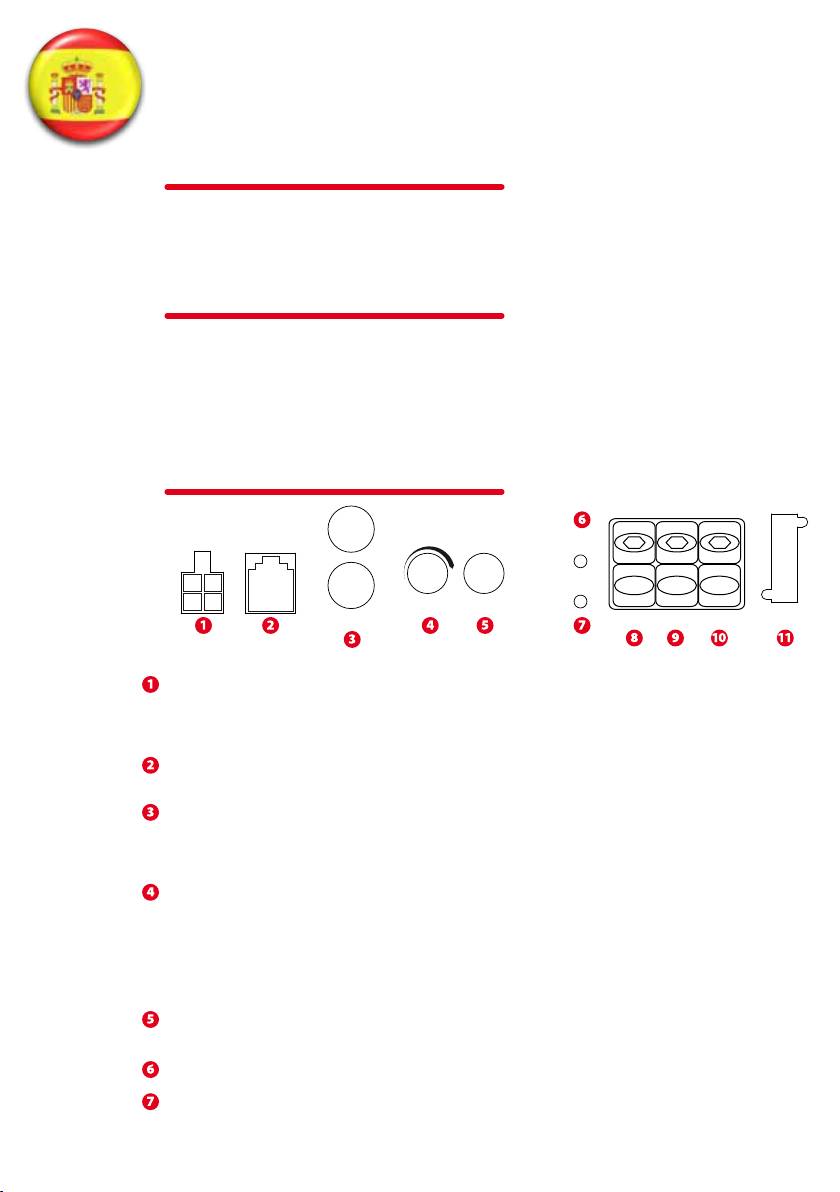
EBC PortHLI
Gain
LPF
Prot.
L
R
+
+
PWR
-
-
6V-0.1V 50Hz-200Hz
FUSE
Line In
Rem.
GND+12V
PWR
Entradas de señal de alta o altavoz : Estas entradas se conectarán a las salidas de altavoz del auto-radio mediante
cableado directo.
Nota: Cuando se utilicen las entradas de alta, se precisará de un cable de remoto para encender y apagar el
amplicador.
Puerto EBC (Control externo de graves) : El control remoto del nivel de subwoofer se conecta directamente a este
puerto. Así le permitirá disponer de este control en cualquier parte del vehículo. El EBC está incluido.
Entradas RCA : Estas entradas se usarán cuando la salida del auto-radio disponga de salidas RCA o salidas de línea
de voltaje, mínimo de 100mV.
MTX recomienda solo cables de alta calidad apantallados para reducir la posibilidad de intrusión de ruidos y
parásitos.
Control de Ganancia : Ajusta la sensibilidad de entrada, operando desde los 100mV a los 6V
Ajuste de ganancia :
1. Gire el ajuste de ganancia al mínimo.
2. Ajuste el volumen del auto-radio al 75% o 3/4 de recorrido máximo.
3. Suba el ajuste de sensibilidad del amplicador hasta que aprecie distorsión en la escucha
4. Baje la sensibilidad del amplicador hasta que desaparezca dicha distorsión.
5. 5. El amplicador ya está ajustado al auto-radio.
Control de Frecuencia Paso bajo : Use este ajuste para seleccionar la frecuencia de corte del ltro Crossover Paso
Bajo de 50Hz a 200Hz.
LED de protección : Cuando el amplicador está en protección térmica el diodo LED se encenderá en color rojo.
LED PowerOn : El LED se iluminará en color rojo cuando el amplicador se encuentre encendido.

Terminal Power (+12V) : Esta es la entrada principal de alimentación positi-
va, la cual se debe conectar directamente al terminal positivo de la batería.
Evite pasar el cable de alimentación junto a cableado RCA para evitar la in-
trusión de ruido. Es muy importante que asegure bien las conexiones para
unas máximas prestaciones. MTX recomienda el uso de cable mínimo de
6mm
2
para el MTX RT8PT tubo amplicado.
Remote Terminal : The powered tube can be turned on by applying 12 volts
to this terminal. Typically this voltage is supplied by a wire from the source
unit marked “remote” or “power antenna”.
Terminal de masa : Se precisa de una buena conexión de masa o negativo para un correcto funcionamiento. Utilice el
mismo diámetro de cable que con el positivo. Conéctelo a algún punto del chasis del vehículo, el cual habrá lijado para
retirar la pintura y limpiado de suciedad. Ha de garantizar una buena conductividad.
Fusibles : Cuando se fundan fusibles reemplácelos por otros del mismo valor de corriente que el reemplazado, nunca
de valores superiores.
Instalación & Montaje
MTX le recomienda que su nuevo tubo auto-amplicado RoadTHUNDER sea instalado por un instalador autorizado
MTX. Cualquier desviación en la instalación respecto de las especicadas en este manual de instrucciones puede cau-
sar serios daños serios al amplicador, altavoces incluso al sistema eléctrico del propio automóvil. Los daños causados
por una instalación inapropiada e indebida NO quedan cubiertas por la garantía. Por favor, verique todas las conexio-
nes antes de encender el equipo!
1. Disconnect the vehicle’s negative battery cable.
2. Determine un lugar para alojar su tubo auto-amplicado. Asegúrelo con las correas proporcionadas. Tenga en mente
que debería haber suciente espacio para asegurar el ujo necesario de aire para su correcta ventilación y disipación
del calor.
3. Instale un cable de positivo (+) desde el terminal positivo de la bacteria usando los correspondientes pasa-muros
para evitar cortes en los cables debido a los perles cortantes de las chapas metálicas. Pase el cable haciéndolo llegar
al terminal (+12V) o terminal (8) del amplicador. No conecte la bacteria al mismo tiempo.
Nota: Use la misma sección de cable tanto para positive como para negativo en la alimentación del amplicador.
4. Instale un fusible general a no más de 20cm de la bacteria en la línea positiva. Esto efectivamente reduce el riesgo
de daños severos en si vehículo en caso de corto-circuito o accidente. Asegúrese de no colocar el fusible en el porta-
fusibles hasta que todas las conexiones hayan sido realizadas correctamente en el sistema. Ahora conecte el cable de
positivo al terminal (+) de la bacteria.
5. Terminal de masa: Localice una buena conexión de masa o negativo para un correcto funcionamiento. Utilice el
mismo diámetro de cable que con el positivo. Conéctelo a algún punto del chasis del vehículo, el cual habrá lijado para
retirar la pintura y limpiado de suciedad. Ha de garantizar una buena conductividad. Conecte el correspondiente cable
de negativo al terminal (GND) del amplicador MTX (10).
6. Conecte un cable de encendido remoto desde la salida a tal efecto en su unidad principal al terminal de encendi-
do remoto de su tubo auto-amplicado, terminal (9). Si su unidad principal no dispone de esta salida de encendido
remoto puede conectar la entrada de encendido remoto a la salida de alimentación de antena activa de su unidad
principal.
7. Conecte los cables de señal al amplicador: Hay dos maneras de suministrar señal a su tubo auto-amplicado MTX.
• Para conseguir las máximas prestaciones, le sugerimos usar cableados RCA de alta calidad.
• Si el auto-radio no dispone de salidas RCA, use la entrada de alta del amplicador con un cable de la sección adecua-
da, use los terminales de entradas de alta del amplicador utilizando una sección de cable de altavoz adecuada.
8. Revise nuevamente todos los pasos realizados hasta este punto, en particular los que hacen referencia a inter-co-
nexionado. Una vez vericados conecte el cable de negativo, y reponga el fusible en el porta-fusibles.
Nota: Los niveles de ganancia del amplicador deberán ajustarse al mínimo antes de proceder con el ajuste mencio-
nado.
www.mtx.com - www.mtx.eu.com
Einleitung
Vielen Dank, dass Sie sich für eine MTX Aktivröhre entschieden haben. Richtig eingebaut werden sie viel Freude
an Ihrem neuen MTX System haben. Wir wünschen Ihnen viel Spass und das ultimative Musikerlebnis mit MTX!
Technische Daten
• Aktives Bassreexgehäuse
• Subwoofer : 20cm (8")
• Max. Verstärkerleistung : 360W
• RMS Verstärkerleistung : 120W
• EBC Fernbedienung im Lieferumfang
• Cinch und Hochpegeleingänge
• Abmessungen : 25x25x54cm
Einstellungen am Verstärker - Anschlussleiste
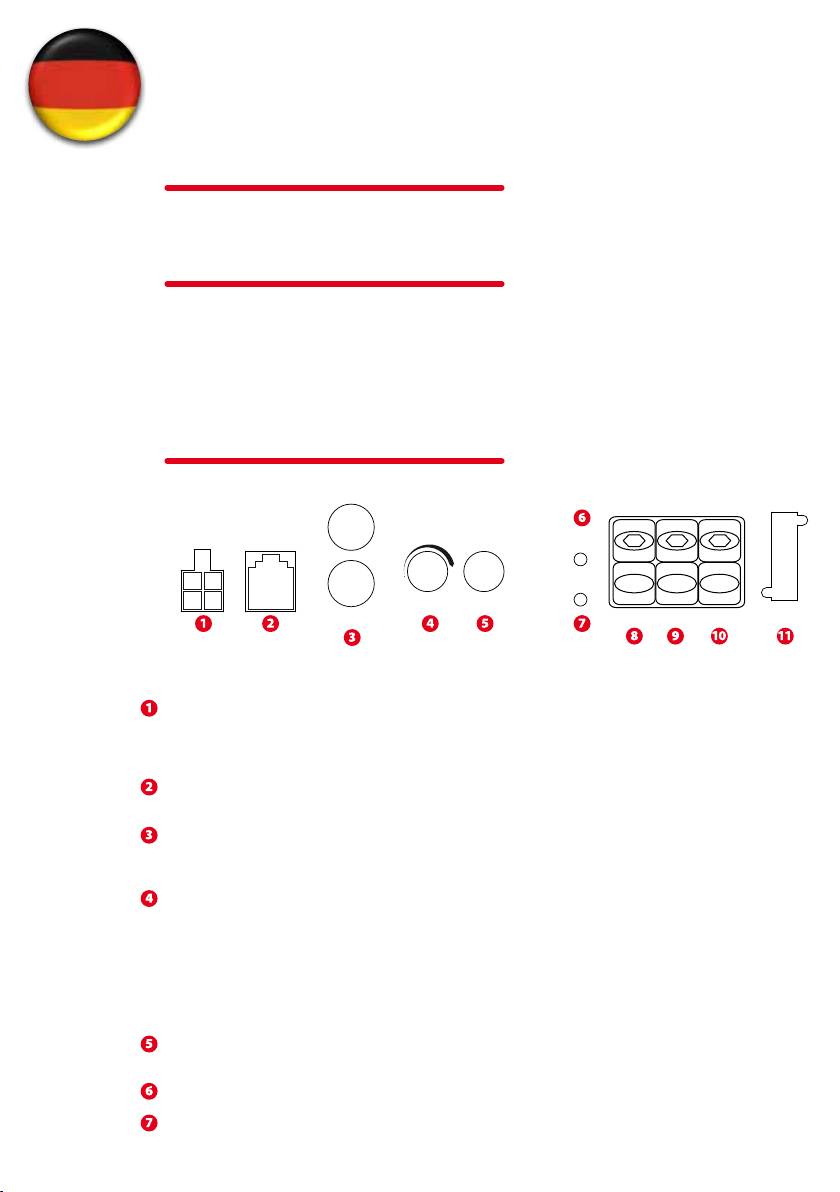
EBC PortHLI
Bedienungsanleitung - RT8PT
Gain
LPF
Prot.
L
R
+
+
PWR
-
-
6V-0.1V 50Hz-200Hz
FUSE
Line In
Rem.
GND+12V
PWR
Hochpegel-Eingänge : Sollte Ihr Radio nur über Lautsprecherausgänge verfügen, so nutzen Sie diese Eingänge.
Die Lautsprecherkabel des Radios sollten direkt mit dem Adapter der Endstufe verbunden werden. Sollte Ihr Ra-
dio nur über Lautsprecherausgänge verfügen, so nutzen Sie diese Eingänge. Die Lautsprecherkabel des Radios
sollten direkt mit dem Adapter der Endstufe verbunden werden.
EBC Anschluss : Zum Anschluss der mitgelieferten Bassfernbedienung. Mit dieser Fernbedienung können Sie
den Basspegel vom Fahrersitz aus einstellen.
Cincheingänge : Diese Eingänge sind für Radios vorgesehen, die über Cinchausgänge verfügen. Für einen ein-
wandfreien Betrieb sind mind. 100mV Spannung des Radios erforderlich. Um ungewünschte Störgeräusche zu
vermeiden, empfehlen wir ein hochwertiges Cinchkabel mit “Twisted Pair” Aufbau (z.B. StreetWires).
Pegelregler : Der Pegelregler ermöglicht es, die Eingangsempndlichkeit des Verstärkers an die Ausgangsspan-
nung Ihres Radios anzupassen. Die mögliche Empndlichkeit liegt zwischen 100mV und 6V.
Einstellung des Pegels :
1. Stellen Sie den Pegelregler des Verstärkers auf Null (gegen den Uhrzeigersinn)
2. Stellen Sie die Lautstärke des Radios auf 3/4 der Maximallautstärke
3. Drehen Sie den Pegel des Verstärkers auf, bis hörbare Verzerrungen auftreten
4. Nehmen Sie nun den Pegel zurück, bis keine Verzerrungen mehr hörbar sind.
5. Der Verstärker ist nun optimal auf Ihr Radio eingestellt.
Tiefpass Frequenzeinstellung : Dieser Regler stellt die gewünschte Trennfrequenz des Tiefpasslters ein. Die Fre-
quenz ist von 50Hz bis 200 Hz einstellbar.
Schutzschaltung LED : Bei Überhitzung des Verstärkers leuchtet die LED rot.
Betriebsanzeige LED : Die LED leuchtet bei eingeschaltetem Verstärker rot.

(+12V) Stromanschluss : Dies ist der Stromanschluss des Verstärkers. Dieser
muss – um einen optimalen Betrieb sicherzustellen – direkt mit dem Plus-
pol der Batterie verbunden werden. Seien Sie beim Verlegen des Kabels
vorsichtig und vermeiden Sie es, dass Kabel entlang der Cinch-, Antennen-
leitung oder anderer empndlicher Komponentenzu verlegen. Der beson-
ders starke Stromuss in diesem Kabel könnte zu Störgeräuschen im Au-
diosystem führen. Auch eine feste Verbindung des Kabels ist sehr wichtig,
um maximale Leistung zu erzielen. Wir empfehlen für die MTX RT8PT einen
Kabelquerschnitt von mindestens 6mm
2
aus reinem Kupfer.
Remote-Anschluss : Liegen hier 12 Volt an, so schaltet der Verstärker ein. Nutzen Sie hierzu den „Remote“-Ausgang
oder den Ausgang für die elektrische Antenne des Radios.
Masseanschluss : Ein guter Massepunkt ist für die maximale Leistung des Verstärkers sehr wichtig. Ein möglichst kurzes
Kabel mit dem gleichen Querschnitt, der auch für das Stromkabel verwendet wird, verbinden Sie direkt mit der Fahr-
zeugkarosserie. Entfernen Sie an dieser Stelle den Lack um das Massekabel mit dem blanken Metall zu verbinden.
Sicherungen : Sollte eine Sicherung durchbrennen so ersetzten Sie diese mit einer neuen Sicherung des gleichen
Wertes. Verwenden Sie niemals eine Sicherung mit einem höheren Wert.
Installation & Einbau
MTX empehlt den Einbau Ihrer RoadTHUNDER Endstufe durch einen authorisierten MTX Fachhändler. Etwaige Ab-
weichungen von den hier gezeigten Anschlussmöglichkeiten können zu ernsthaften Schäden an der Endstufe, den
Lautsprechern und/oder der Fahrzeugelektrik führen. Bitte prüfen Sie die Anschlüsse daher sehr genau, bevor Sie Ihr
System einschalten.
1. Klemmen Sie den Minuspol der Batterie ab.
2. Suchen Sie nach einem geeigneten Einbauort für Ihre MTX Aktivröhre und befestigen Sie diese mit den beigelegten
Gurten. Bedenken Sie hierbei, dass ausreichen de Luftzufuhr am Kühlkörper vorhanden ist, um eine entsprechende
Kühlung des Verstärkers sicherzustellen.
3. Verlegen Sie nun ein positives Stromkabel von der Batterie (noch nicht anschließen) durch den Innenraum des Fahr-
zeuges und schließen Sie dieses an das Terminal +12V (8) des Verstärkers an. Verwenden Sie an etwaigen scharfen
Kanten eine Gummihülle oder ähnliches um eine Beschädigung des Kabels zu vermeiden. Schließen Sie das Kabel
noch nicht an die Batterie an. Achten Sie unbedingt auf den richtigen Kabelquerschnitt sowohl für die Plus- als auch
für die Minusleitung.
4. Installieren Sie eine Sicherung mit einem max. Abstand von 20cm zur Batterie. Dies ist für Ihre und die Sicherheit
des Fahrzeuges sehr wichtig. Stellen Sie sicher, dass die Sicherung ausgeschaltet ist oder die Sicherung aus dem Halter
entfernt ist solange noch nicht alle Anschlüsse fertiggestellt sind. Schließen Sie nun das positive Stromkabel an das
positive Batterieterminal an.
5. Finden Sie nun eine gute Stelle für den Massepunkt an der Fahrzeugkarosserie und entfernen Sie an dieser Stelle den
Lack bis Sie an der Stelle blankes Metall sehen. Schließen Sie das Massekabel an diesem Punkt an und verbinden Sie
das andere Ende mit dem GND Terminal Ihres MTX Verstärkers (10).
6. Verbinden Sie ein Remote-Kabel von Ihrem Radio (Remoteausgang) mit dem Remote Terminal der MTX Aktivröhre
(9). Sollte Ihr Radio über keinen Remoteausgang verfügen, so können Sie auch den Anschluss für die elektrische An-
tenne verwenden.
7. Signalkabel an den Verstärker anschliessen. Es gibt zwei Möglichkeiten, Ihren MTX Verstärker mit einem Signal zu
versorgen. Um maximale Klangqualität und Leistung zu erreichen, empfehlen wir ein hochwertiges Cinchkabel zur
Verbindung zwischen Radio und Verstärker. Sollte Ihr Radio nur über Lautsprecherausgänge verfügen, so verwenden
Sie diese in Verbindung mit den mitgelieferten Lautsprecherterminals (1) der Endstufe. Verwenden Sie den richtigen
Kabelquerschnitt.
8. Prüfen Sie nun nochmals alle Installationsschritte auf korrekte Ausführung - insbesondere die Verkabelung und
den korrekten Anschluss der Komponenten. Wenn alles korrekt ist, schließen Sie den Minuspol der Batterie wieder an,
schalten Ihre Sicherung ein oder legen eine Sicherung in den Sicherungshalter.
Anmerkung : Bevor Sie mit den weiteren Einstellungen fortfahren stellen Sie sicher, dass der Pegelregler des Verstär-
kers auf Null steht (gegen den Uhrzeigersinn).
www.mtx.com - www.mtx.eu.com
Introductie
Bedankt voor het kiezen voor een MTX Hi-Performance powered tube. Door gebruik te maken van MTX verster-
kers, subwoofers en luidsprekers en Streetwires bekabeling ben je een stap dichterbij het beleven van de muziek
zoals de artiest bedoelde.
Specicaties
• Basreex behuizing met ingebouwde versterker
• Subwoofer : 20cm (8”)
• Max uitgangs vermogen versterker : 360W
• RMS uitgangs vermogen versterker : 120W
• Inclusief EBC
• High en Low level ingangen
• Afmetingen : 25x25x54cm
Instel paneel van de powered tube
EBC PortHLI
Gebruikers handleiding - RT8PT
Gain
LPF
Prot.
L
R
+
+
PWR
-
-
6V-0.1V 50Hz-200Hz
FUSE
Line In
Rem.
GND+12V
PWR
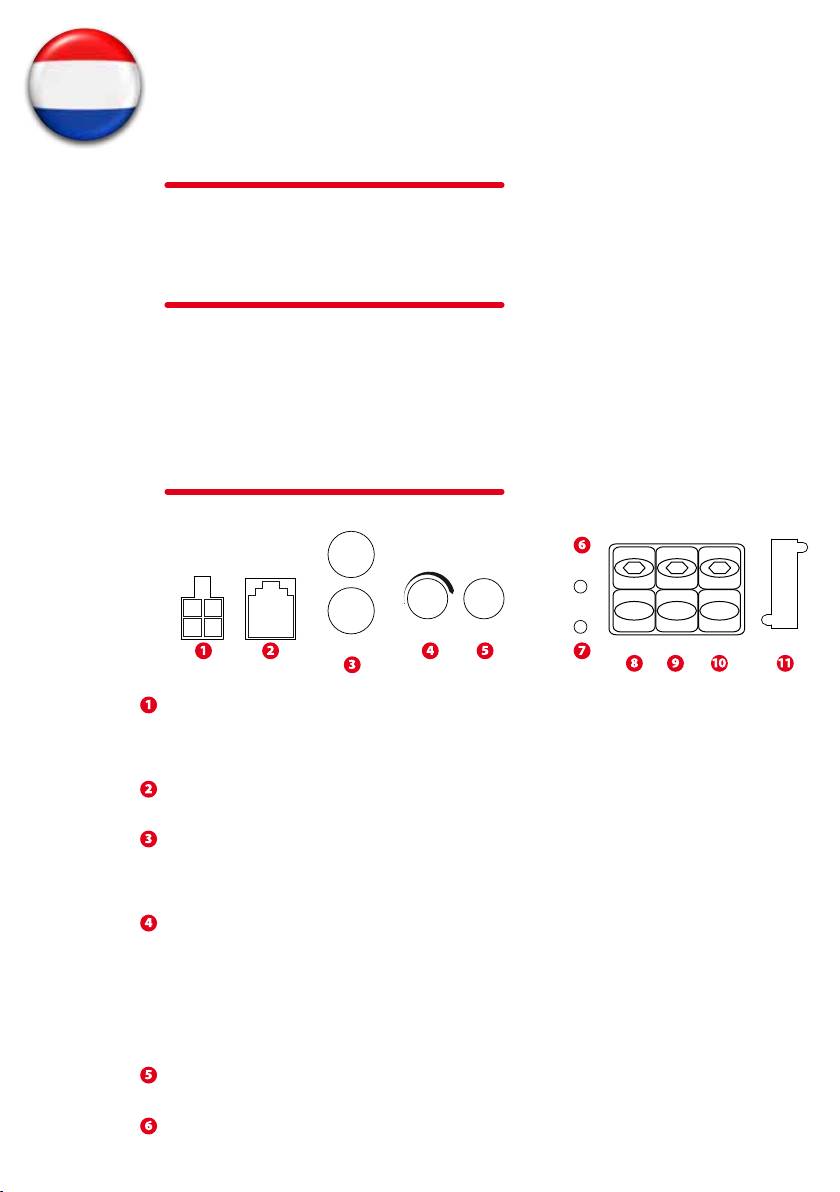
Luidspreker niveau ingangen : Deze ingangen dienen gebruikt te worden wanneer de source unit alleen luid-
spreker niveau uitgangen heeft. De luidspreker uitgangen van de source unit dienen direct aangesloten te wor-
den op de meegeleverde kabel. Let op : Wanneer luidspreker niveau ingangen gebruikt worden dient de Remote
ook aangesloten te worden om de powered tube in en uit te schakelen.
EBC ingang : Ingang voor het aansluiten van de mee geleverde External Bass Control. Een afstand bediening voor
de bass zodat het bass nivo kan worden geregeld vanaf de bestuurders stoel.
RCA ingangen : De RCA ingangen dienen gebruikt te worden wanneer de source unit RCA uitgangen heeft. Voor
een juiste werking dient de source unit een minimaal uitgangs voltage van 100mV uit te sturen via de RCA uit-
gangen. MTX adviseerd gebruik te maken van goede kwaliteit getwiste RCA kabels om de invloed van storingen
te minimaliseren tot een absoluut minimum. (bijv. Streetwires).
Gain : Hiermee wordt de ingangs gevoeligheid van de powered tube afgesteld op het uitgangs voltage van de
source unit. Het bereik ligt tussen 100mV Gain volledig open en 6V Gain volledig dicht..
Afstellen van de Gain
1. Draai de Gain op de powered tube helemaal dicht (tegen de klok in).
2. Zet het volume van de source unit op 3⁄4 volume (dit is het maximal volume met onvervormd signaal).
3. Draai de Gain van de powered tube open totdat je duidelijk vervorming hoort vanuit de speakers.
4. Draai nu de Gain van de powered tube zover dicht totdat je net geen vervorming meer hoort.
5. de powered tube is nu afgesteld aan het uitgangs voltage van de source unit.
Laag doorlaat lter frequentie : Hiermee kan de gewenste laag doorlaat frequentie worden ingesteld. De fre-
quentie kan worden ingesteld tussen 50Hz en 200Hz.
Protection LED - Deze LED zal rood oplichten wanneer de powered tube in beveiliging staat.

Power LED - Deze LED zal oplichten wanneer de powered tube ingeschakeld is.
Voeding aansluiting +12V : Dit is de hoofd aansluiting voor de +12V en dient
rechtstreeks aan gesloten te worden op de positieve accuklem. Let goed op bij
het trekken van de plus kabel door de auto, laat deze niet langs
RCA, antenne of andere kabels van gevoelige electronica lopen, de hoge stro-
men die door deze kabel lopen kunnen storingen in het systeem opwekken.
Gebruik bij de MTX RT8PT powered tube een kabel met een minimale dikte
van 6mm2.
Remote aansluiting : De powered tube kan worden ingeschakeld door +12V op deze aansluiting te zetten. Dit voltage
wordt normal gesproken aangeleverd door de “remote” of “power antenna” aansluiting vanaf de source unit.
Massa aansluiting : Een goede massa aansluiting is belangrijk voor maximale prestaties van de powered tube. Een korte
massa kabel met dezelfde dikte als de hoofd +12V aansluiting dient te worden gebruikt vanaf de powered tube direct naar
het chassis van de auto. Om een goede aansluiting op het chassis te maken dient de lak te worden weggeschuurd tot blank
metal zichtbaar is op de plaats waar de massa kabel wordt aangesloten.
Zekering : Wanneer een zekering is doorgebrand vervang deze dan door een zekering met dezelfde waarde. Gebruik nooit
een zekering met een hogere waarde. De RT8PT maakt gebruik van een 20A zekering.
Installatie en montage van de powered tube
MTX adviseerd om jou RoadTHUNDER powered tube in te laten bouwen door een authorized MTX Dealer. Wanneer de
powered tube niet volgens onderstaande gegevens wordt aangesloten kan dit schadelijke gevolgen hebben voor de po-
wered tube, luidsprekers en/of het electrische systeem van de auto. Kontroleer alle aansluitingen zorgvuldig alvorens het
systeem aan te schakelen.
1. Koppel de negatieve accuklem los
2. Bepaal waar de MTX powered tube geplaats gaat worden. Gebruik de meegeleverde banden om de powered tube goed
vast te zetten. Zorg ervoor dat er voldoende lucht circulatie is langs het koelproel van de powered tube zodat deze een
goede koeling heeft.
3. Trek een plus kabel vanaf de accu naar de MTX powered tube. Zorg ervoor dat je een rubber of kunstof doorvoer ge-
bruikt om de kabel veilig vanuit de motorruimte het interieur in te laten lopen. Laat de kabel door een bestaande kabel-
goot lopen door het interieur naar de MTX powered tube en sluit de kabel aan op de +12V aansluiting (8).
Sluit de kabel nog niet aan op de accu.
Let op : Zorg ervoor dat je de juiste dikte kabel voor zowel de plus als de min gebruikt.
4. Neem een zekering of circuit breaker op in de plus kabel binnen 20cm vanaf de accu. De zekering of circuit breaker zorgt
ervoor dat de schade aan de auto of de inzittenden beperkt blijft mocht er een kortsluiting ontstaan.
Zorg ervoor dat de zekering niet geplaatst is of de circuit breaker uitgeschakeld is totdat alle aansluitingen zijn gemaakt.
Sluit nu de plus kabel aan op de positive accu klem van de accu.
5. Zoek een goed massa punt op op het chassis van de auto, verwijder de lak laag totdat je blank metaal ziet. Bevestig nu
de massa kabel op het massa punt en aan de GND aansluiting op de MTX powered tube (10).
6. Sluit een remote draad aan vanaf de source unit naar de remote aansluiting van de MTX powered tube (9), deze draad is
voor het aan en uit schakelen. Wanneer de source unit geen remote aansluiting heeft kan je de remote ook aansluiten op
de power antenna aansluiting van de source unit.
7. Aansluiten van de ingangsignaal kabels : Er zijn twee manieren om de MTX powered tube van een ingangsignaal te
voorzien.
• Voor maximale prestaties van de powered tube adviseerd MTX om goede kwaliteit getwiste RCA kabels te gebruiken
tussen source unit en de powered tube (3).
• Wanneer er een source unit wordt gebruikt met alleen luidspreker niveau uitgangen, gebruik dan de meegeleverde
kabel om de powered tube aan te sluiten op de luidspreker uitgangen van de source unit via de High Level aansluiting (1).
8. Sluit de luidsprekers aan op de luidspreker uitgangen van de MTX powered tube, gebruik hiervoor luidsprekerkabel
met de juiste dikte. De MTX powered tube kan stereo een maximale belasting van 2 Ohm aan voor maximaal vermogen.
Let op : Zorg ervoor dat de Gain (4) van de powered tube helemaal dicht gedraaid is (tegen de klok in) voordat er met
afstellen begonnen wordt.
www.mtx.com - www.mtx.eu.com
Introdução
Obrigado por adquirir um Tubo Amplicado de Alta Performance MTX. Com uma instalação apropriada, acom-
panhada de colunas e amplicadores MTX vai usufruir de uma experiência sonora entusiasmante por muito
tempo. Parabéns e divirta-se com MTX !
Características :
• Tubo amplicado reex
• Subwoofer : 20cm (8”)
• Pot. Máx. Amplicador : 360W
• Pot. RMS Amplicador : 120W
• Controlo remoto EBC incluído
• Entradas alto e baixo nível
• Dimensões : 25x25x54cm
Painel de controlo no amplicador
Manual de Utilizador - RT8PT
EBC PortHLI
Gain
LPF
Prot.
L
R
+
+
PWR
-
-
6V-0.1V 50Hz-200Hz
FUSE
Line In
Rem.
GND+12V
PWR
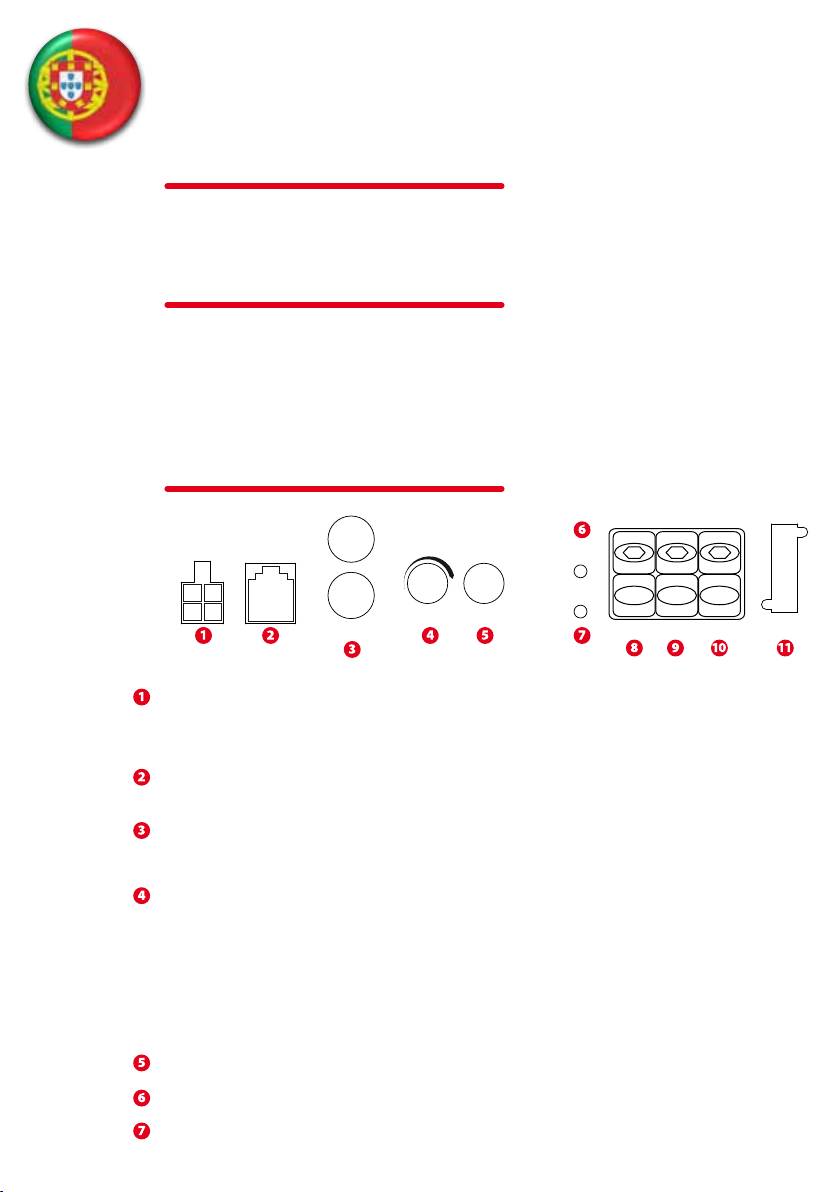
Entradas de altifalante (nível alto) – Esta entrada permite ao amplicador do tubo operar com qualquer fonte,
usando as saídas de altifalante. Os cabos de saída da fonte devem ser directamente ligados à cablagem do am-
plicador.
Note : Neste caso, um o de sinal remote deve ser usado para comutar o amplicador entre on e o.
EBC Port (External Bass Control) – O control remoto de nível de Subwoofer (EBC) incluído conecta-se directa-
mente a esta porta, enquanto o controlador EBC se pode colocar em qualquer posição que seja conveniente.
Entradas RCA - Estas entradas são usadas com fontes que possuam saídas RCA ou de linha, com um sinal minímo
de 100mV. A MTX recomenda o uso de cabos de par entrançado (tais como StreetWires) de forma a diminuir as
possibilidades de ruído radiado entrar do sistema.
Controlo de ganho – Este controlo equilibra a sensibilidade de entrada do amplicador com a fonte em uso. A
gama de operação varia de 100mv a 6V.
Ajustar o ganho
1. Rode o controlo de ganho do amplicador para o mínimo.
2. Rode o volume da unidade fonte para 3/4 do máximo, aproximadamente.
3. Ajuste o controlo de ganho do amplicador para cima até que oiça alguma distorção.
4. Ajuste o controlo de ganho do amplicador para baixo até que a distorção desapareça.
5. O amplicador está agora calibrado para a saída da unidade fonte.
Controlo do ltro X-Over passa baixos – Use para seleccionar a frequência de corte desejada, entre 50Hz e 200Hz.
LED Protecção – O LED acende a encarnado se o amplicador entrar em protecção térmica.
LED PowerOn - O LED acende a encarnado quando o amplicador estiver ligado.

Terminal de alimentação (+12V) – Esta é a entrada de alimentação para o
amplicador e deve ser ligada directamente ao terminal positivo da bateria
do veículo para operação correcta. Use de muito cuidado ao instalar o cabo
de alimentação (+12V) no veículo. Evite passar este cabo em paralelo com
cabos RCA, antenas, ou outro equipamento sensível devido à elevada cor-
rente que poderia induzir ruído no sistema audio.
É muito importante ter uma ligação rme e segura para garantir a máxima
performance. A MTX recomenda usar cabo de cobre com uma secção minima de 6mm2, para o tubo amplicado MTX
RT8PT.
Terminal Remote – Aplique 12 volts a este terminal para ligar (on) o tubo amplicado. Tipicamente, esta voltagem é
fornecida por um o conectado ao terminal da unidade fonte marcada “remote” ou “power antenna”.
Terminal Ground (massa) – Uma boa conexão de massa é requerida para o amplicador operar adequadamente. Um
cabo curto com o mesmo calibre do cabo de alimentação deve ser usado para ligar directamente este terminal ao
chassis do veículo. Deve remover tinta ou sujidade para expôr o metal nú.
Fusiveis – Se um fusível fundir, substitua-o com outro do mesmo valor. O RT8PT usa um fusível de 20A.
Cuidado : Nunca use fusível com valor mais alto !
Instalação & Montagem
MTX recomenda que o seu novo tubo activo RoadTHUNDER seja instalado por um agente autorizado MTX . Qual-
quer desvio das instruções de instalação especicadas pode causar problemas sérios no amplicador, altifalantes ou
sistema eléctrico do veículo. Avarias causadas por instalação incorrecta NÃO são abrangidas pela garantia. Por favor
verique todas as conexões antes de activar (ON) o seu sistema!
1. Desconecte o cabo negativo de bateria do veículo.
2. Determine o local de montagem do tubo MTX. Fixe com as cintas fornecidas. Não esqueça a necessidade de assegu-
rar um uxo de ar para arrefecimento do amplicador.
3. Instale um cabo de alimentação positivo (+) desde a bateria do veículo, mas sem conectar, por enquanto. Ao passar
do vão de motor, proteja contra abrasão. Ligue o cabo ao terminal 8 (+12V) do amplicador. Note : Use sempre cabo
de calibre adequado tanto para as conexões positiva como negativa.
4. Instale um corta circuito ou fusível até 20cm da bateria, am de evitar riscos de grandes problemas devidos a curto
circuito ou acidente. Assegure-se que o circuito está aberto até que todas as conexões estejam terminada. Agora,
pode conectar o cabo positivo ao terminal da bateria.
5. Massa – Localize um ponto do chassis que possa dar uma boa massa e raspe até revelar o metal nú. Aperte o terminal
do cabo de massa a este ponto. Conecte o outro extremo do cabo de massa ao terminal 10 (GND) do amplicador MTX.
6. Conecte um o remote turn-on da fonte até ao terminal 9 do amplicador do tubo. Se a fonte não tiver um terminal
remote dedicado, ligue ao terminal de antena activa.
7. Conectando os cabos de sinal ao amplicador. Pode fazer esta ligação de duas formas:
• Para obter a performance máxima, sugerimos que conecte cabos RCA de alta qualidade entre as correspondentes
saídas da fonte e as entradas do amplicador.
• Se a fonte em uso não tiver saídas RCA, use os terminais (1) de altifalante, através de cabos de coluna de calibre
adequado.
8. Faça uma vericação nal aos pontos anteriores, em particular, cablagens e conexões de componentes. Após veri-
car que tudo está bem, reconecte o cabo negativo da bateria do veículo , ligue o corta circuitos ou coloque o fusível
no lugar.
Nota : Os níveis de ganho do amplicador devem ser levados ao mínimo antes de fazer ajustes.
www.mtx.com - www.mtx.eu.com
Introduzione
Grazie per l’acquisto di questo subwoofer amplicato MTX Audio. Attraverso una corretta installazione questo
prodotto, realizzato con amplicatori ed altoparlanti MTX, assicura innite ore di grande qualità di ascolto con
bassi profondi e potenti. Vi preghiamo di seguire fedelmente le istruzioni di montaggio sotto riportate al ne di
godere delle massime prestazioni e della massima sicurezza.
Caratteristiche
• Subwoofer Attivo in Bass-Reex
• Altoparlante: 20cm (8”)
• Potenza Max amplicatore : 360W
• Potenza RMS Amplicatore : 120W
• Controllo remoto dei bassi
• Ingressi a basso ed alto livello
• Dimensioni : 25x25x54cm
Manuale Istruzioni - RT8PT
Pannello Controlli dell’Amplicatore
EBC PortHLI
Gain
LPF
Prot.
L
R
+
+
PWR
-
-
6V-0.1V 50Hz-200Hz
FUSE
Line In
Rem.
GND+12V
PWR
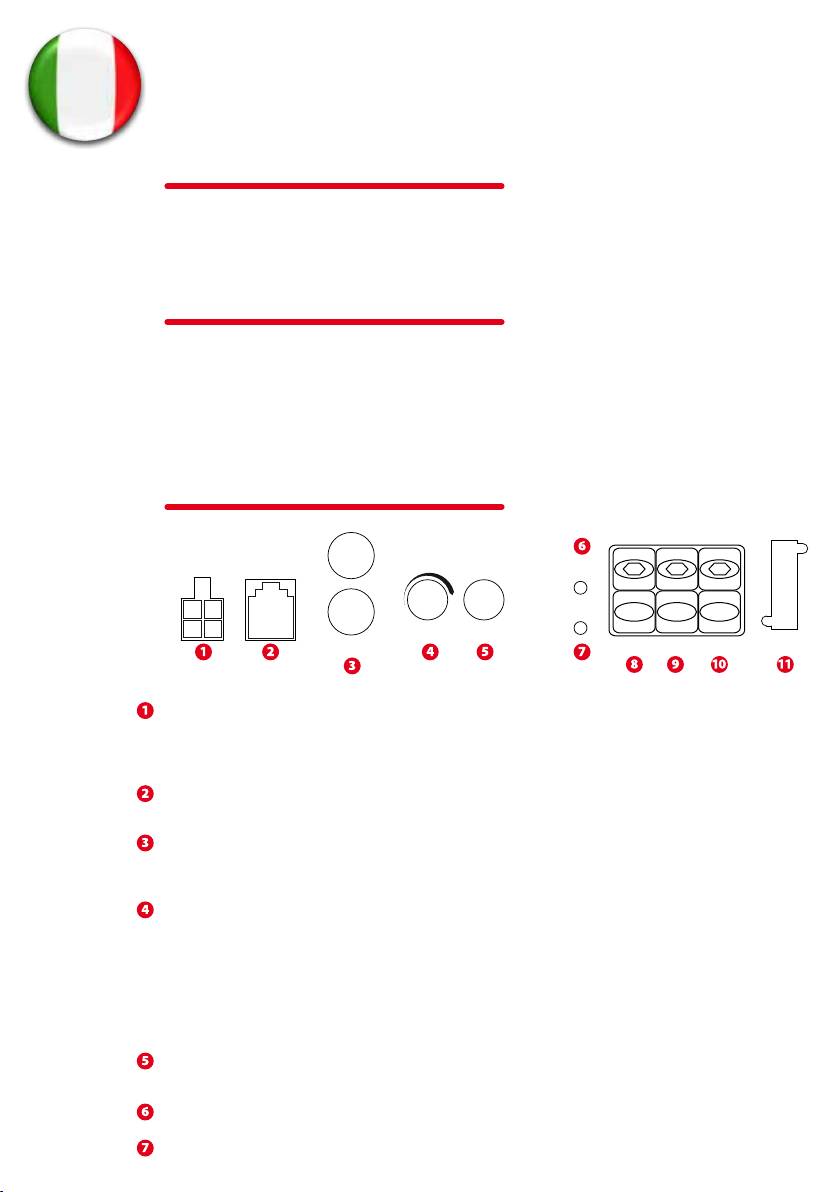
Ingressi ad alto livello – Si utilizzano per fornire il segnale audio all’amplicatore direttamente dai cavi altopar-
lanti in uscita dalla sorgente.
Nota: quando si collega il segnale in questo modo è indispensabile usare un cavo remote per l’accensione e lo
spegnimento dell’amplicatore.
Ingresso EBC (External Bass Control) – Il controllo remoto dei bassi, incluso nella confezione, va inserito diretta-
mente in questo ingresso.
Ingresso a basso livello – Questo ingresso di segnale audio si utilizza quando la sorgente è provvista di uscite
RCA. Per un funzionamento corretto del prodotto è necessario che la sensibilità di uscita della sorgente non sia
inferiore a 100mV. Questo tipo di collegamento è preferibile a quello del punto 1).
Controllo del guadagno (Gain) – Serve ad uniformare la sensibilità di ingresso dell’amplicatore a quella di uscita
della sorgente. La gamma operativa di questo controllo è 100mV-6V.
Come regolare il Gain :
1. Girare completamente in senso antiorario il controllo del Gain.
2. Fissare il volume della sorgente approssimativamente a ¾ del massimo.
3. Girare in senso orario il controllo del Gain no a che non avvertite distorsione.
4. Girare in senso antiorario il controllo del Gain no allo scomparire della distorsione.
5. Ora l’amplicatore è calibrato sull’uscita della sorgente.
Controllo della frequenza di taglio – Da utilizzarsi per ssare la frequenza del ltro passa basso incorporato
all’amplicatore. La frequenza è regolabile da 50Hz a 200Hz.
Led di protezione – Si illumina di rosso quando l’amplicatore entra in protezione termica.
Led di stato - Si illumina di rosso quando l’amplicatore è in funzione.

Terminale di alimentazione Positivo (+12V) - Va collegato direttamente al
terminale positivo della batteria. Utilizzate un cavo di adeguata sezione,
preferibilmente 20 mmq, e comunque mai inferiore a 6 mmq. Il cavo di
alimentazione va posizionato lontano dal cavo di segnale RCA e da qual-
siasi dispositivo elettrico sensibile che possa generare ronzii e rumore nel
sistema.
Terminale di Accensione – Applicando 12 Volts a questo terminale l’am-
plicatore si accende. Questo voltaggio si preleva dalla sorgente utilizzando l’apposito cavo marcato “remote” o
“power antenna”.
Terminale di Massa – Un corretto collegamento a massa è fondamentale per avere prestazioni ottimali. Utilizzate un
cavo dello stesso diametro di quello di alimentazione collegando questo terminale direttamente allo chassis della
vettura. Il punto dello chassis deve essere il più vicino possibile all’amplicatore, pulito da grassi e completamente
sverniciato.
Fusibile di protezione – Qualora il fusibile bruci, sostituitelo con uno del medesimo valore (20A). Non utilizzate fusibili
con valore superiore!!
Installazione e Montaggio
MTX consiglia di appoggiarvi, per l’installazione dei suoi prodotti, a rivenditori Autorizzati. Se decidete di eettuare
voi stessi l’installazione, seguite in modo rigoroso le istruzioni riportate di seguito. Una installazione non eettuata a
regola d’arte può causare danni, anche gravi, sia al prodotto che all’impianto elettrico della vettura.
1. Scollegate il cavo negativo della batteria.
2. Scegliete un spazio con una buona circolazione dell’aria per installare il prodotto e ssatelo con le cinghie fornite
in dotazione.
3. Posizionate un cavo di adeguata sezione (min. 6 mmq) atto a collegare il terminale positivo della batteria al ter-
minale (+12V) dell’amplicatore. NON CONNETTETELO AL TERMINALE DELLA BATTERIA in questa fase ma solo al
terminale dell’amplicatore.
4. Installate un interruttore di corrente od un fusibile sulla linea del cavo di alimentazione a non più di 20 cm. dalla
batteria. Assicuratevi che l’interruttore sia in posizione “OFF” o che il fusibile sia estratto dal portafusibile no che
tutte le connessioni non siano ultimate. Ora collegate il cavo al positivo della batteria.
5. Collegamento di massa – Utilizzate un cavo dello stesso diametro di quello impiegato per la connessione di ali-
mentazione e collegate il terminale (GND) dell’amplicatore allo chassis della vettura. Scegliete il punto dello chassis
più vicino possibile all’amplicatore avendo cura di sverniciarlo mettendo a nudo il metallo.
6. Collegate il cavo di accensione della sorgente al terminale remote (9) dell’amplicatore. Se la sorgente non ha un
cavo dedicato alla accensione utilizzate il cavo denominato “Power Antenna”.
7. Collegamento del segnale Audio- Ci sono due modi di eettuarlo :
• Per avere le massime prestazioni bisogna utilizzare un cavo con spine RCA e collegare le uscite RCA della sorgente
a quelle dell’amplicatore.
• Se la vostra sorgente è sprovvista di uscite RCA potete collegare il segnale dall’uscita altoparlanti della stessa all’in-
gresso (1) dell’amplicatore.
8. Controllate due volte tutti i passaggi della installazione appena elencati ed in particolare i cavi e le connessioni.
Dopo questa verica ricollegate il cavo negativo della batteria , posizionate su “ON” l’interruttore di circuito o inserite
il fusibile nel portafusibile di linea.
Note Bene: Il controllo del Gain dell’amplicatore deve essere posizionato al minimo (completamente in senso anti
orario) prima di procedere alle regolazioni.
www.mtx.com - www.mtx.eu.com
Introducere
Va multumim ca ati ales subwooferul activ in bass reex Hi-Performance. Cu o instalare corespunzatoare, armo-
nizand difuzoarele cu amplicatoarele MTX pentru a reda un sunet superior si o performanta ce cu siguranta va
deranja vecinii.
Felicitari si bucurati-va de cea mai noua experienta de la MTX!
Caracteristici :
• Subwoofer activ in bass reex
• Subwoofer: 20 cm (8”)
• Putere MAX amplicata: 360W
• Putere RMS amplicata: 120W
• Telecomanda EBC inclusa
• Intrare de nivel High/Low
• Dimensiuni: 25x25x54cm
Panoul Central al Amplicatorului
EBC PortHLI
Gain
LPF
Prot.
L
R
Manualul Utilizatorului - RT8PT
+
+
PWR
-
-
6V-0.1V 50Hz-200Hz
FUSE
Line In
Rem.
GND+12V
PWR
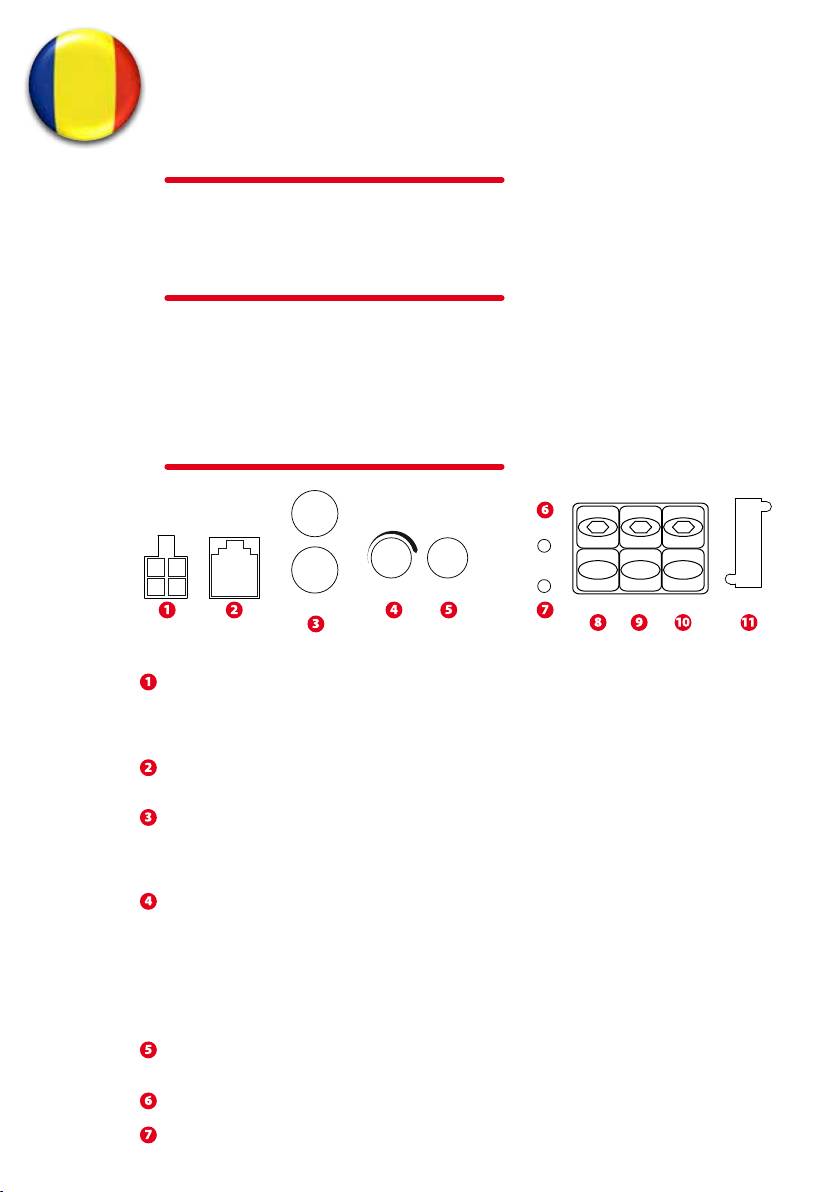
Intrari difuzoare - Aceasta intrare permite amplicatorului sa functioneze cu semnal preluat de la difuzoare. Firele
de iesire difuzoare trebuie legate direct la rele de la amplicatory
Nota: Cand este folosit nivelul de intrare al difuzoarelor trebuie utilizata telecomanda pentru a deschide sau
inchide amplicatorul.
EBC – Controlul Extern al Bass-ului – Telecomanda subwooferului pentru controlul nivelului (EBC) se conecteaza
direct, astfel poate plasata oriunde in masina fara a prejudicia reglajele bass-ului. EBC este inclusa.
Intrarile RCA - Jackul pentru intrare RCA - Aceasta intrare este folosita cu unitatea centrala care are RCA sau cu
iesirea de nivel de linie. Pentru aceasta operatie este nevoie de o unitate centrala cu nivel minim de 100mV.
MTX recomanda doar cabluri de foarte buna calitate cum sunt cele de la Street Wires pentru a scadea posibili-
tatea de a infecta sistemul cu paraziti.
Gain Control - Butonul gain control ajuta la armonizarea amplicatorului cu sursa. Se poate folosi o variatie intre
100mv si 6V.
Cum folosim butonul Gain Control ?
1. Rasuceste butonul gain control pana jos (invers sensului acelor de ceas)
2. Ridica volumul unitatii centrale cam la 3/4 din puterea maxima
3. Ajusteaza din butonul gain control sunetul pana apar distorsiuni ale sunetului
4. Rasuceste butonul gain control in jos pana dispar distorsiunile
5. Amplicatorul este acum calibrat
Controlul frecventei prin Filtru Low pass - Folositi-l pentru a selecta frecventa dorita pentru ltru prin low-pass
(LP). Frecventa este ajustabila pe intervalul 50Hz - 200Hz .
LED-ul de protetie – Cand amplicatorul intra in protectie termica se aprinde LED-ul in culoarea rosie.
LED-ul PowerOn – LED-ul este rosu cand amplicatorul este deschis.

(+12V) Terminalul de putere - Aceasta este cea mai puternica intrare a am-
plicatorului si trebuie conectata direct la terminalul pozitiv de la bateria
masinii. Atentie marita cand instalati cablul de putere in masina. Evitati
folosirea acestui cablu in paralel cu antene, cabluri RCA, sau orice alt echi-
pament sensibil la masa de curent care poate aduce distorsiuni in sistem.
Este de asemenea foarte important ca legatura sa e facuta foarte strans
si securizat pentru o performanta maxima. MTX recomanda folosirea cab-
lurilor de putere de 6mm2 cu MTX RT8PT subwooferul activ in bass reex.
Terminal de telecomanda - Amplicatorul poate deschis cand pe acest terminal se aplica 12 volti. De obicei acest
voltaj este furnizat de un r de la unitatea centrala marcat "remote" sau "power antenna".
Terminal masa - O masa buna este necesara pentru ca amplicatorul sa functioneze la putere maxima. Pentru masa tre-
buie folosit un cablu cat mai scurt de acelasi diametru ca si cablul de alimentare xat direct pe sasiul autovehiculului.
Intotdeauna indepartati vopseaua si murdaria inainte de xarea masei.
Siguranta - Cand se arde o siguranta inlocuiti-o cu una de aceasi valoare. RT8PT foloseste sigurante de 20A. Nu folositi
niciodata sigurante mai mari!
Instalare si Montare
MTX recomanda ca instalarea unui nou subwoofer activ in bass reex RT8PT sa e facuta de catre instalatorii autorizati
MTX. Orice abatere de la specicatiile de instalare recomandate poate cauza stricaciuni serioase amplicatorului Dvs.,
difuzoarelor sau sistemului electric al masinii. Va rugam vericati de mai multe ori conectarile inainte de a da drumul la
sistem. Stricaciunile cauzate de o instalare incorecta nu sunt acoperite de Garantie.
1. Scoateti rul de minus de la baterie.
2. Determinati locul de montare al subwooferului activ in Bass Reex RT8PT. Tineti cont de faptul ca trebuie sa circule
sucient aer in jurul lui pentru a avea o racire buna. Prindeti-l corespunzator si asigurati-va ca nu interfereaza cu nici o
instalatie a masinii (rezervor, re, conducte de frane, etc).
3. Trageti un r pe + de la bateria masinii. Trageti cablul prin interiorul masinii si conectati-l la terminalul amplicato-
rului (+12V). Bateria trebuie sa nu e conectata in tot acest timp.
Nota: Asigurativa ca folositi cabluri de grosime corespunzatoare atat pentru pozitiv cat si pentru negativ.
4. Instalati un intrerupator sau o siguranta fuzibila la distanta de 20cm de baterie. Acest lucru reduce riscul de avarie
grava in cazul unui scurtcircuit sau a unui accident atat al masinii cat si a pasagerilor sau soferului. Asigurativa ca intre-
rupatorul este in pozitia "inchis" sau ca siguranta nu este in portsiguranta inainte sa faceti conectarea. Acum conectati
cablul de putere + la terminalul + de baterie.
5. Impamantarea - Gasiti un loc bun pentru impamantare pe sasiul vehiculului si indepartati vopseaua sau impuritatile
de pe bara de metal la nivelul punctului de contact. Conectati celalalt terminal al cablului la terminalul GND al sub-
wooferului active in Bass-Reex .
6. Conectati rul pentru telecomanda de la unitatea centrala la terminalul remote de la subwooferul active in Bass-
Refelx. Daca unitatea centrala nu are intrare speciala pentru telecomanda, conectati cablul la mufa pentru Antena.
7. Conectarea cablurilor de semnal la amplicatory: Sunt 2 moduri de a alimenta semnalul pentru subwooferul active
in incita Bass-Reex.
• Pentru a obtine maximum de performanta, va sugeram sa folositi cabluri RCA
de foarte buna calitate corespunzatoare iesirilor din Unitatea Centrala si Intrarilor din subwooferul active in incinta
Bass-Reex.
• Daca Unitatea Centrala nu este dotata cu iesire RCA, folositi intrarile high-level ale amplicatorului si cablurile de
dimensiune corespunzatoare.
8. Vericati din nou instalarile facute. Daca totul este in regula, reconectati minusul la bateria masinii, puneti intrerupa-
torul pe deschis sau sigurantele la locul lor .
Nota: Asigurativa ca nivelul Gain al amplicatorului este rasucit in jos (invers sensului acelor de ceas) inainte de a
incepe reglajele.
www.mtx.com - www.mtx.eu.com
Wprowadzenie
Dziękujemy za wybór produktów MTX Audio. Połączenie wzmacniaczy i głośników MTX Audio z akcesoriami
StreetWires pozwoli slyszeć, czuć i doświadczać muzykę w sposób zamierzony przez artystę.
Cechy :
• Subwoofer aktywny
• Głośnik 20 cm (8”)
• Moc maksymalna : 360W
• Moc RMS : 120W
• Zdalne sterowanie EBC
• Wejście wysokopoziomowe lub RCA
• Wymiary: 25x25x54cm
Panel sterowania wzmacniacza
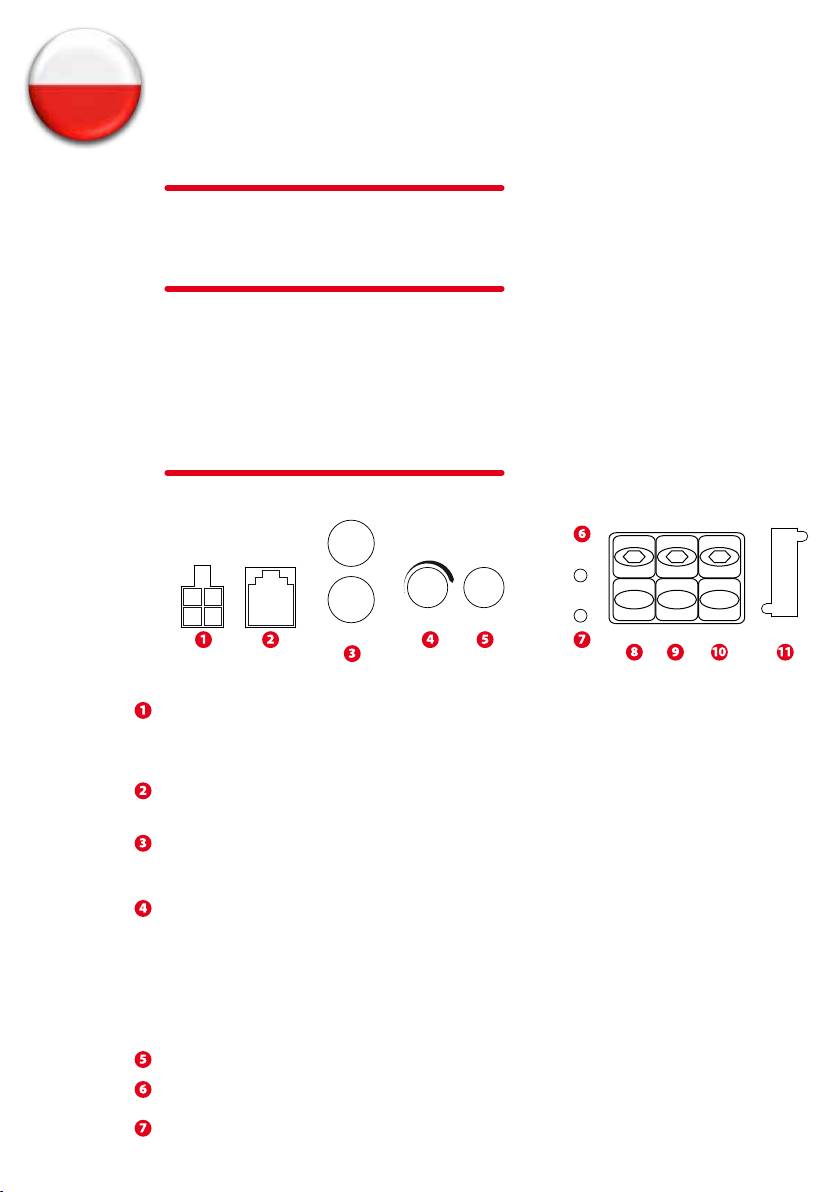
EBC PortHLI
Gain
LPF
Prot.
Podręcznik użytkownika - RT8PT
L
R
+
+
PWR
-
-
6V-0.1V 50Hz-200Hz
FUSE
Line In
Rem.
GND+12V
PWR
Wejścia High Level - Pozwala na podłączenie wzmacniacza bez konieczności stosowania przewodów
sygnałowych. Użyj dołączonych adapterów aby podłączyć jednostkę sterującą do wzmacniacza za pomocą
wejścia High Level.
Uwaga: W trybie High Level konieczne jest podłączenie przewodu wzbudzenia wzmacniacza (remote).
Port EBC - Regulator subwoofera EBC (External Bass Control) - regulator na 6 metrowym przewodzie pozwala na
sterowanie subwooferem z dowolnego miejsca w samochodzie.
Złącze RCA - podłącz jednostke sterująca do wzmacniacza za pomocą kabli sygnałowych RCA. Minimalna
wartość sygnału wyjściowego jednostki sterującej to 100mV
Zawsze używaj wysokiej jakości ekranowanych przewodów sygnałowych by wyeliminować zakłócenia.
Sterowanie podbiciem - stosowane jest do ustawienia poziomu czułości wzmacniacza do jednostki sterującej,
której używasz. Zakres regulacji: 100mV do 6V.
1. Ustaw regulacje podbicia (Gain) w pozycji minimum (kierunek przeciwny do kierunku obrotu wskazówek ze-
gara)
2. Ustaw głośność jednostki sterującej na mniej więcej 3/4 maksymalnej wartości.
3. Powoli zwiększaj podbicie do chwili pojawienia się zakłóceń.
4. Reguluj podbicie, zmniejszając napięcie tak by wyeliminować zakłócenia sygnału.
5. Wzmacniacz został skalibrowany z jednostką sterującą.
Regulacja ltra dolno-przepustowego - częstotliwość może być regulowana w zakresie od 50Hz do 200Hz
Dioda LED zabezpieczenia - jeśli nastąpiło zwarcie lub przegrzanie wzmacniacza - dioda LED miga.
Dioda LED zasilania - jeśli wzmacniacz jest włączony - dioda LED świeci na czerwono.

Złącze zasilania (+12V) - jest główne źródło zasilania wzmacniacza i musi być
bezpośrednio podłączone do dodatniej klemy akumulatora. Zwróć uwagę na
prawidłowe ułożenie przewodu zasilającego w samochodzie. Unikaj układa-
nia przewodu wraz z kablami sygnałowymi, antenowymi lub w pobliżu inne-
go sprzętu elektronicznego. Ważne jest również korzystanie z wysokiej jakości
przewodów o odpowiednim przekroju. Do zasialania wzmacniacza MTX RT8PT
zaleca się uzywanie przewodów o przekroju 6mm2
Terminal wzbudzenia wzmacniacza (Remote) - wzmacniacz może zostać uruchomiony przez ten terminal po zasileniu na-
pięciem 12V. Napięcie 12V dostarczne jest z gniazda "remote" bądź z przewodu sterowania anteną elektryczną jednostki
sterującej.
Złącze GND: do prawidłowego podłączenia masy użyj krótkiego przewodu o identycznym przekroju jak przewód zasilający.
Usuń lakier w miejscu podłączenia masy do elementu karoserii samochodu aby uzyskać optymalne przewodzenie. Właści-
wie wykonane uziemienie wpływa znacząco na wydajność wzmacniacza.
Bezpieczniki (FUSE) : spalony bezpiecznik zastąp nowym o tej samej wartości. Nigdy nie używaj bezpiecznika o większym
natężeniu.
Podłączanie:
Rekomendujemy instalacje wzmacniaczy RoadTHUNDER u autoryzowanego sprzedawcy produktów MTX Audio.
Nieprawidłowe podłączenie może spowodować poważne uszkodzenie wzmacniacza, głośnika lub instalacji elektrycznej w
samochodzie. Przed uruchomieniem systemu ponownie sprawdź poprawność wszystkich połączeń. Uszkodzenia spowo-
dowane nieprawidłowym podłączeniem nie są objęte gwarancją.
1. Rozłącz klemy akumulatora.
2. Wybierz miejsce instalacji wzmacniacza. Wybierając miejsce weź pod uwagę prawidłowy obieg powietrza wokół wzmac-
niacza tak by zapewnić mu optymalne chłodzenie. Upewnij się czy przy podłączaniu nie uszkodzisz przewodów instalacji
elektrycznej samochodu, przewodów paliwowych, hamulcowych czy zbiornika paliwa. Zamontuj wzmacniacz MTX.
3. Przeciągnij przewód zasilający przez grodź silnika używając specjalnych przepustów. Unikniesz przeciecia izolacji prze-
wodu na ostrych krawędziach. Następnie przeciagnij przewód przez wnętrze samochodu i podłącz do gniazda zasilającego
(+) we wzmacniaczu (+12V) – złącze 8.
Uwaga : Upewnij się że używasz przewodów zasilających o odpowiednim przekroju.
4. Zainstaluj oprawkę z bezpiecznikiem w odległości ok. 20 cm od akumulatora. Znacznie zmniejszy to ryzyko uszkodzeń
spowodowanych przez spięcie. Nie instaluj bezpiecznika w oprawce przed prawidłowym podłączeniem całej instalacji. Te-
raz podłącz przewód zasilający (+) do dodatniej klemy akumulatora.
5. Znajdź odpowednie miejsce do podłączenia masy. Przymocuj przewód do miejsca podłączenia masy a drugi koniec
podłącz do terminala GND we wzmacniaczu – złącze 10.
6. Podłącz przewód wzbudzenia wzmacniacza (Remote) do terminala we wzmacniaczu MTX (złącze 9). Jeżeli Twoja jed-
nostka sterująca nie ma dedykowanego wyjścia Remote możesz podłączyć przewód do przewodu sterowania elektryczna
anteną.
7. Podłączanie przewodów sygnałowych do wzmacniacza :
• Dla uzyskania najlepszego efektu zastosuj wysokiej jakości przewody sygnałowe.
• Jeżeli jednostka sterująca nie jest wyposażona w wyjścia RCA podłącz sygnał do odpowiednich wejść HighLevel we
wzmacniaczu (1). Użyj wysokiej jakości przewodów głośnikowych o właściwym przekroju !
8. Ponownie sprawdź poprawność podłączenia instalacji. Jeśli wszystko podłączone jest prawidłowo podłącz klemy akumu-
latora i umieść bezpiecznik w oprawce.
Uwaga : upewnij się iż podbicie sygnału we wzmacniaczu (Gain) jest ustawione w pozycji minimum przed rozpoczęciem
regulacji wzmacniacza.
www.mtx.com - www.mtx.eu.com
Введение
Благодарим вас за покупку первоклассного цилиндрического активного сабвуфера MTX Audio. Правильная
установка вместе с динамиками и усилителями МТХ обеспечит Вам превосходный звук, а Вашим соседям -
бессоные ночи надолго! Друзья могут критиковать, но захотят слушать еще и еще... Поздравляем!
Наслаждайтесь первоклассным звучанием с МТХ!
Технические характеристики :
• Корпус активного сабвуфера с фазоинвентером.
• Сабвуфер: 20 см (8 дюймов)
• Усилитель, максимальная мощность: 360W
• Усилитель, RMS мощность: 120 W
• Пульт дистанционного управления EBC
• Высоковольтные и линейные входы
• Габариты: 25x25x54cm
Панель управления усилителя
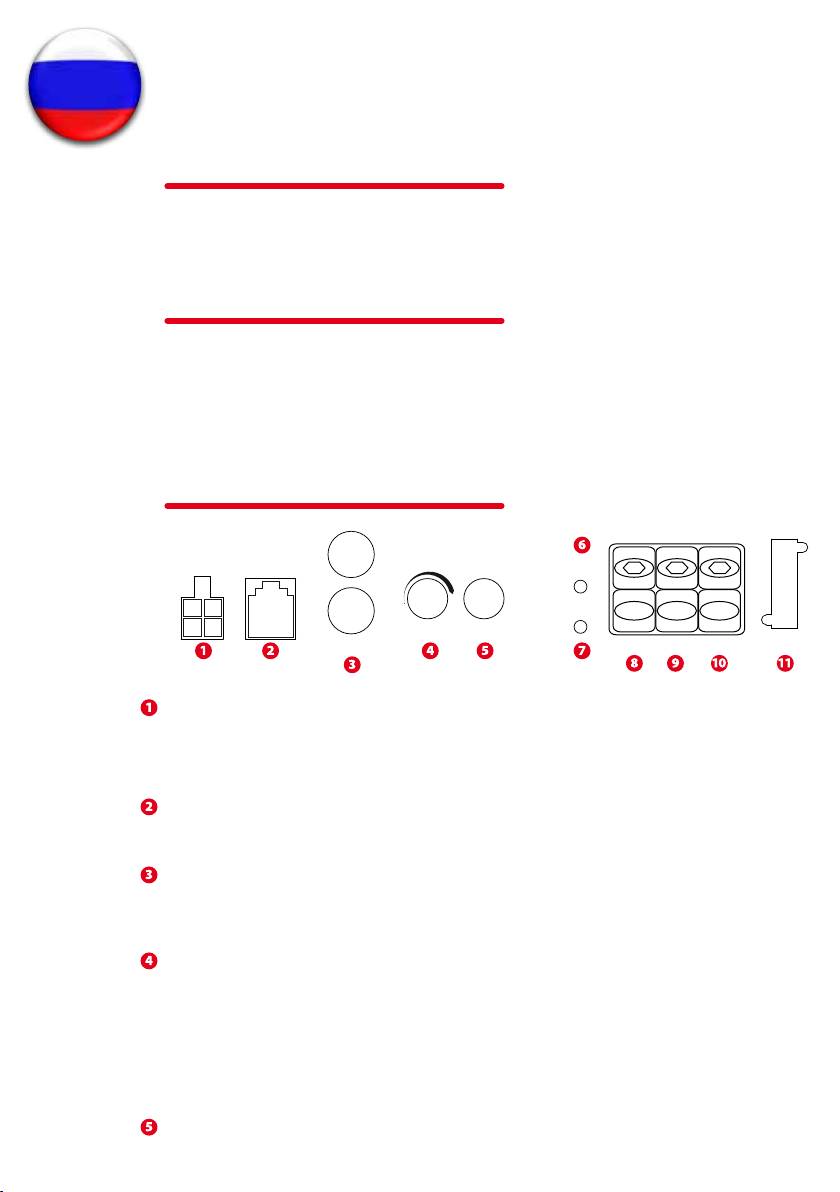
EBC PortHLI
Gain
LPF
Prot.
L
R
+
+
Инструкция пользователя - RT8PT
PWR
-
-
6V-0.1V 50Hz-200Hz
FUSE
Line In
Rem.
GND+12V
PWR
Speaker level inputs (высоковольтный вход) : Данный вход позволяет усилителю получать сигнал из
акустического выхода источника звука. Акустические кабели от источника сигнала должны быть
присоединены непосредственно к монтажному жгуту, прилагающемуся к усилителю.
ВНИМАНИЕ: При использовании высоковольтного входа, усилитель необходимо включать только с
помощью управляющего провода.
EBC Port (External Bass Control) : разъем для подключения проводного пульта дистанционной регулировки
уровня басов. Сам пульт ЕВС может быть установлен в любом удобном месте в салоне автомобиля. Пульт
ЕВС прилагается.
RCA Inputs (линейный вход) – RCA вход используется в случае, когда источник звука имеет линейный
выход (для нормальной работы усилителя минимальный выходной уровень источника сигнала должен
быть не менее 100мВ). MTX рекомендует использовать только высококачественные RCA кабели (такие как
StreetWires), чтобы уменьшить вероятность наведения шумов.
Gain Control (регулятор усиления) - Регулятор позволяет привести уровень входной чувствительности
усилителя в соответствие используемому источнику сигнала. Рабочий диапазон варьируется от 100мВ до
6В.
Регулировка уровня:
a) Поворачивая регулятор против часовой стрелки, уменьшите до минимума усиление.
b) Установите громкость источника звука на ¾ от максимально возможной.
c) Поворачивайте регулятор до появления звуковых искажений.
d) Проверните регулятор обратно до уровня, на котором звуковые искажения исчезают.
e) Теперь усилитель откалиброван под уровень выхода источника звука.
Low Pass X-Over Frequency Control (ФНЧ) - Используется для выбора желаемой частоты разделительного
фильтра нижних частот. Возможный диапазон частот от 50 до 200 Гц.

Protection LED (защитный светодиод) - При срабатывании термозащиты
усилителя светодиод светится красным.
PowerOn LED (светодиод включения) - При включении усилителя
светодиод светится красным.
(+12V) Разъем для подключения силового кабеля – Разъем питания
усилителя должен быть подключен к положительной клемме
аккумуляторной батареи автомобиля. Будьте осторожны при прокладке силового кабеля. Не прокладывайте
силовой кабель параллельно кабелям RCA, антеннам или другому чувствительному оборудованию т.к. это
может вызвать помехи в аудиосистеме. Также для более качественной эксплуатации важно прочное и надёжное
подсоединение. Для подключения RT8PT MTX рекомендует использовать медные силовые кабели сечением не
менее 6мм
2
.
Remote Terminal (Разъем дистанционного включения) - Усилитель может быть включен, если подвести
напряжение 12В к данному разъему. Обычно это напряжение подается при помощи управляющего провода
подключенного к разъему на источнике сигнала с маркировкой “remote" или “power antenna".
Ground Terminal (разъем заземления) - Качественное заземление необходимо для того, чтобы усилитель работал
на полную мощность. Следует использовать небольшой провод того же диаметра, что и провод питания для
подсоединения клеммы заземления непосредственно к шасси автомобиля. Всегда зачищайте поверхность, к
которой будет выполняться заземление.
Fuses (предохранители) - При сгорании предохранителей замените их на аналогичные. В RT8PT используются
предохранители на 20A.
Внимание: Никогда не используйте предохранители, рассчитанные на более высокие токи.
Установка и монтаж.
MTX рекомендует проводить работы по установке активного сабвуфера в специализированных инсталляционных
центрах MTX. Малейшее отклонение от инструкции может серьезно повредить усилитель, динамики и/или
электрическую систему автомобиля. Повреждения из-за неправильной инсталляции не подлежат гарантийному
обслуживанию. Перед включением системы, пожалуйста, проверьте все соединения.
1. Отсоедините минусовую клемму аккумуляторной батареи автомобиля.
2. Определите место монтирования активного сабвуфера MTX. Закрепите его ремнями, поставляемыми в
комплекте. Имейте в виду, что необходимо достаточное количество воздуха, чтобы обеспечить охлаждение
системы.
3. Протяните силовой кабель от аккумуляторной батареи транспортного средства через перегородку моторного
отсека, используя изолирующую втулку, чтобы уберечь кабель от возможных повреждений. Проложите кабель
через салон автомобиля и подсоедините к клемме (+12V) усилителя (8). НЕ подсоединяйте его к аккумуляторной
батарее на данном этапе.
ВНИМАНИЕ: используйте силовой кабель подходящего сечения.
4. Установите автоматический выключатель или предохранитель на расстоянии не более 20см от аккумуляторной
батареи. Это уменьшает риск серьезного повреждения в случае короткого замыкания или аварии. Убедитесь, что
автоматический выключатель отключен, а предохранитель вынут из держателя, до тех пор, пока все соединения
не будут установлены. Теперь подсоедините силовой кабель к плюсовой клемме аккумуляторной батареи.
5. Заземление. Определите подходящую точку заземления на корпусе автомобиля. Удалите частицы грязи
и краски, чтобы обнажить металлическую поверхность. Прикрепите провод заземления к этой точке.
Подсоедините противоположный конец провода заземления к разъему (GND) усилителя (10).
6. Подсоедините управляющий провод от источника к разъему Remote усилителя (9). Если устройство-источник
не имеет специального провода дистанционного включения, вы можете использовать провод для подключения
питания антенны.
7. Подсоединение сигнального кабеля к усилителю. Есть два способа передачи сигнала к усилителю.
- Для максимальной производительности мы предлагаем подсоединить высококачественный RCA кабель к
линейному выходу на устройстве-источнике и соответствующим входам усилителя.
- Если устройство-источник не имеет линейного выхода, используйте высоковольтный вход усилителя (1),
применив соответствующие акустические кабели.
8. Тщательно проверьте все предыдущие шаги инсталляции в частности соединения кабелей и подключение
всех компонентов. Проверив, заново подсоедините минусовую клемму аккумуляторной батареи, подключите
автоматический выключатель или вставьте предохранитель в держатель.
ВНИМАНИЕ: Перед началом настройки регулятор усиления должен быть переведен в минимальное положение
(для этого поверните регулятор против часовой стрелки).
www.mtx.com - www.mtx.eu.com
EBC PortHLI
Gain
LPF
Prot.
L
R
+
+
PWR
-
-
6V-0.1V 50Hz-200Hz
FUSE
Line In
Rem.
GND+12V
PWR

MTX is a proud member of Mitek Corp high quality
consumer audio product lines.
Designed and Engineered by Mitek in Phoenix - AZ, USA.
© 2009 Mitek. All rights reserved.
MTX, STREETWIRES and Road THUNDER
are registered trademarks of Mitek.
Due to continual product development, all
specications are subject to change without notice.
MTX Audio,
4545 East Baseline Rd.
Phoenix, AZ 85042
USA
