Benelli SuperNova Tactical Pump Shotgun – страница 7
Инструкция к Benelli SuperNova Tactical Pump Shotgun
120
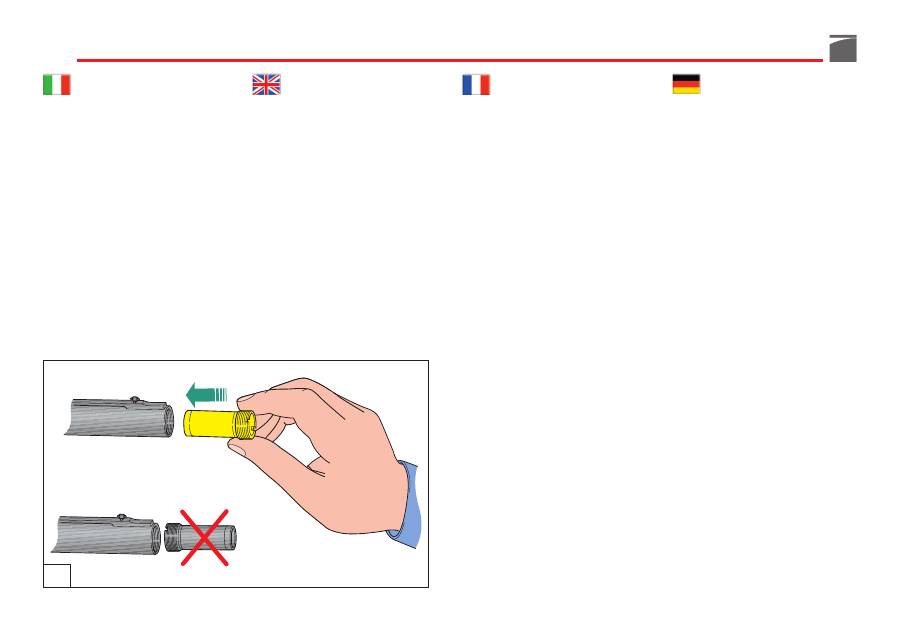
3) Rimontare nella sede canna il tipo
di strozzatore desiderato, avendo
cura di
inserirlo
all’interno della
canna dalla
parte non filettata
(fig.
51); avvitarlo poi sul filetto della
canna stessa.
ATTENZIONE:
lo strozzatore corretta-
mente montato
non deve sporgere
dalla volata della canna.
3) Lubricate the threads of the choke
tube, to be installed in the barrel,
with
a good quality
choke tube
lubricant (fig. 51).
NOTE:
when choke is correctly mount-
ed, it
must not protrude
from the bar-
rel’s muzzle.
3) Remonter sur le siège du canon le
type de choke désiré en ayant soin
d’introduire la partie non filetée
du choke
à l’intérieur du canon
avant de serrer le choke sur le filet
du canon (fig. 51).
ATTENTION:
un choke correctement
monté
ne doit pas dépasser
de la volée
du canon.
3) Den gewünschten Choke im Lauf-
sitz montieren, darauf achten, dass
er mit der Seite ohne Gewindesch-
nitt (Abb. 51) eingeführt wird, ihn
dann auf dem Gewinde des Laufs
selbst anschrauben.
ACHTUNG:
Bei ordnungsgemäßem
Einbau
darf der Choke nicht aus der
Laufmündung hervorstehen!
51

121
3) Vuelva a montar en el alojamiento
del cañón el tipo de choke desea-
do, procurando
introducir la parte
no fileteada del
choke en el inte-
rior del cañón antes de atornillarlo
en el filete del cañón (fig. 51).
ATENCIÓN:
el choke correctamente
montado
no debe sobresalir
de la
boca del cañón.
3) Torne a montar no cano o tipo de
choke escolhido, tendo cuidado
de
introduzi-lo
no interior do
cano pela
parte não roscada
(fig.
51). Aparafusá-lo depois na rosca
do próprio cano.
ATENÇÃO:
o choke correctamente
montado
não deve ultrapassar
a boca
do cano.
3) Снова установите в отверстие
ствола требуемый чок; при этом
убедитесь в том, что
вставляете
чок не стороной резьбы
(рис.
51); теперь заверните чок на
резьбе ствола.
ВНИМАНИЕ:
правильно установленный
внутренний чок не должен выступать
из дульного среза ствола.
3) ∆ÔÔıÂÙ‹ÛÙ ÛÙËÓ Î¿ÓÓË ÙÔ ÙÛÔÎ
Ô˘ ÂÈϤͷÙ ÊÚÔÓÙ›˙ÔÓÙ·˜ Ó·
ÂÈÛ¿ÁÂÙÂ
ÛÙÔ ÂÛˆÙÂÚÈÎfi Ù˘ οÓÓ˘
ÙÔ ÏÂ›Ô (ÌË ÛÂÈÚÔÂȉ¤˜)
̤ÚÔ˜ ÙÔ˘
ÙÛÔÎ (ÂÈÎ. 51). ™ÙË Û˘Ó¤¯ÂÈ·,
‚ȉÒÛÙ ÙÔ ÙÛÔÎ ÛÙËÓ ÂȉÈ΋
ÛÂÈÚÔÂȉ‹ ˘Ô‰Ô¯‹ Ù˘ οÓÓ˘.
¶ƒ√™√Ã∏:
∆Ô ÙÛÔÎ Ô˘ ¤¯ÂÈ ÙÔÔıÂÙËı›
ÛˆÛÙ¿
‰ÂÓ ÚÔÂͤ¯ÂÈ
·fi ÙÔ ÛÙfiÌÈÔ Ù˘
οÓÓ˘.
122
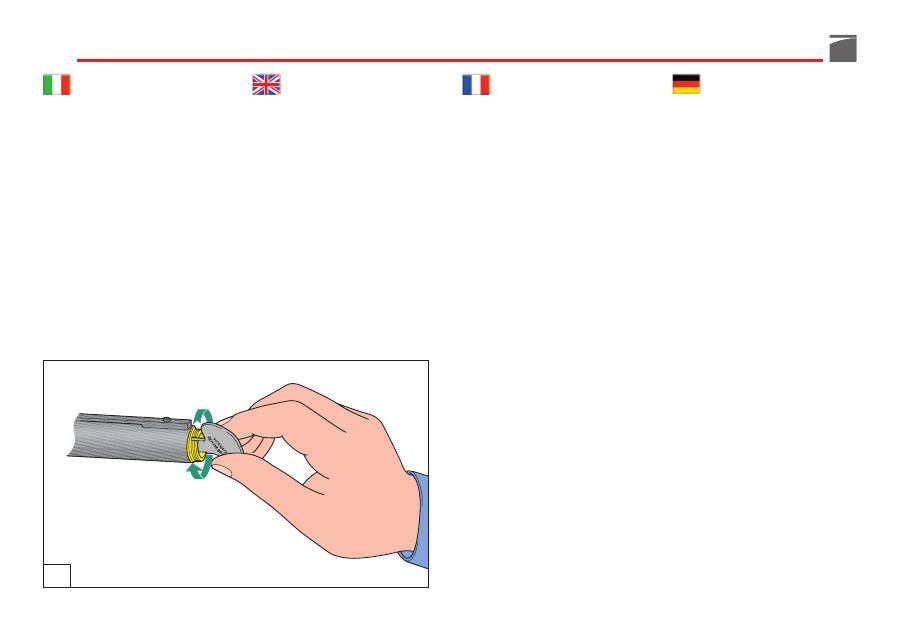
4) Completare il montaggio dello
strozzatore avvitandolo
con forza
con l’apposita chiave dentata (fig.
52).
ATTENZIONE:
prima di riutilizzare
l’arma
assicurarsi di aver tolto
la
chiave per strozzatore
dalla volata
della canna.
Prima di lasciare l’arma inutilizzata per
un lungo periodo, è consigliabile la
pulizia dello strozzatore interno e della
sua sede nella volata della canna.
4) Finish the assembly of the choke
by screwing it
firmly
using the
choke wrench (fig. 52).
NOTE:
before re-using the shotgun,
make sure that the choke wrench
has been removed
from the barrel’s
muzzle.
Before the shotgun is put away, clean-
ing the internal choke and relative
barrel thread is recommended.
4) Compléter le montage du choke
en le serrant
avec force
à l’aide de
la clé dentée spéciale (fig. 52).
ATTENTION:
avant d’utiliser de nou-
veau l’arme,
s’assurer d’avoir retiré
la
clé pour le choke
de la volée
du
canon.
Avant de laisser l’arme inutilisée pen-
dant une longue période il est conseil-
lé de nettoyer le choke intérieur ainsi
que son filetage dans la volée du ca-
non.
4) Den Choke mit Hilfe des gezahnten
Chokeschlüssels
fest
in den Lauf
einschrauben (Abb. 52).
ACHTUNG:
Vor der erneuten Verwen-
dung der Waffe überprüfen, ob der
Chokeschlüssel von der
Laufmündung
entfernt wurde.
Falls die Waffe längere Zeit nicht
benutzt wird, ist eine Reinigung des
Innen-Chokes und Laufgewindes
empfehlenswert.
52

4) Complete el montaje del choke
atornillándolo
con fuerza
utilizan-
do la llave dentada (fig. 52).
ATENCIÓN:
antes de volver a utilizar
el arma,
asegúrese de haber quitado
la llave para choke de
la boca
del
cañón.
Antes de dejar el arma inutilizada por
un largo período se aconseja limpiar
el choke interno y su alojamiento en
la boca del cañón.
4) Complete a montagem do choke
apertando-o
com força
utilizando
a chave dentada (fig. 52).
ATENÇÃO:
antes de reutilizar a arma
assegure-se de ter tirado
a chave para
choque
da boca
do cano.
Antes de deixar a arma sem utilização
por um longo período, recomenda-se
a limpeza do choke interior e do seu
alojamento na boca do cano.
4) В завершении операции прочно
затяните чок специальным
ключом (рис. 52).
ВНИМАНИЕ:
перед
тем,
как
использовать оружие,
убедитесь, что
ключ вынут из
ствола.
Перед тем, как поместить ружье на
хранение на долгий период времени,
рекомендуем провести очистку
сменного чока и внутренней резьбы
ствола.
4) √ÏÔÎÏËÚÒÛÙ ÙËÓ ÙÔÔı¤ÙËÛË ÙÔ˘
ÙÛÔÎ ‚ȉÒÓÔÓÙ·˜ ÙÔ
ÛÊÈÎÙ¿
ÌÂ ÙÔ
ÂȉÈÎfi Ô‰ÔÓÙˆÙfi ÎÏÂȉ› (ÂÈÎ. 52).
¶ƒ√™√Ã∏:
¶ÚÈÓ ¯ÚËÛÈÌÔÔÈ‹ÛÂÙ ηÈ
¿ÏÈ ÙÔ fiÏÔ,
‚‚·Èˆı›Ù fiÙÈ ‚Á¿Ï·ÙÂ
ÙÔ ÎÏÂȉ› ÙÔ˘ ÙÛÔÎ ·fi
ÙÔ ÛÙfiÌÈÔ
Ù˘
οÓÓ˘.
∞Ó ÚfiÎÂÈÙ·È Ó· ÌËÓ ¯ÚËÛÈÌÔÔÈ‹ÛÂÙÂ
ÙÔ fiÏÔ Û·˜ ÁÈ· ÌÂÁ¿ÏË ¯ÚÔÓÈ΋
ÂÚ›Ô‰Ô, Û·˜ Û˘Ì‚Ô˘Ï‡ԢÌ ӷ
Ú·ÁÌ·ÙÔÔÈ‹ÛÂÙ ¤Ó·Ó ηı·ÚÈÛÌfi ÙÔ˘
ÂÛˆÙÂÚÈÎÔ‡ ÙÛÔÎ Î·È Ù˘ ¤‰Ú·˜ ÙÔ˘ ÛÙÔ
ÛÙfiÌÈÔ Ù˘ οÓÓ˘.
123

124
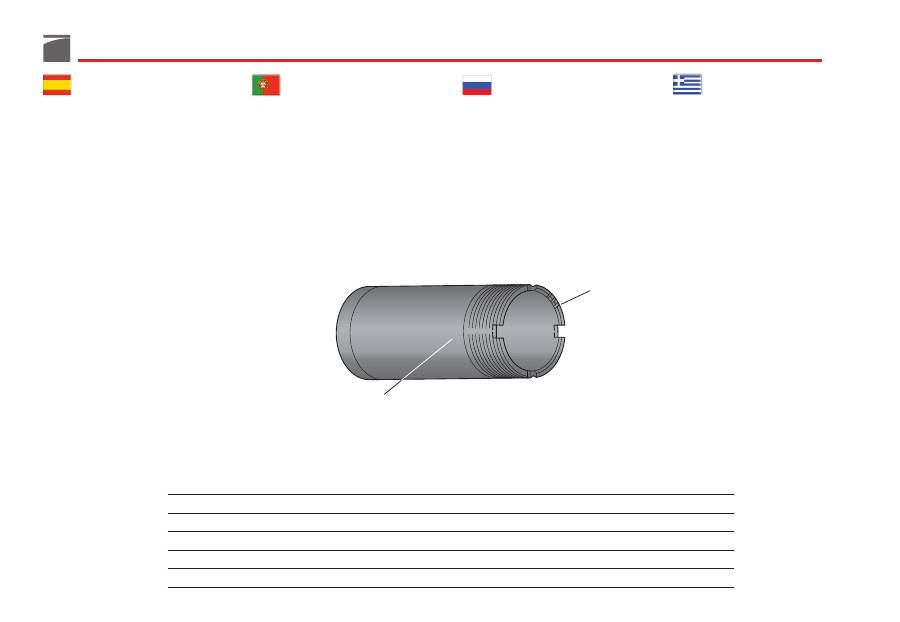
Gli strozzatori Benelli sono mar-
cati per una rapida identificazio-
ne. Le intacche sulla parte fron-
tale di ogni strozzatore permet-
tono un rapido riconoscimento
della strozzatura, anche quando
lo strozzatore è montato.
A
INTACCHE
B
SIMBOLO
Benelli chokes are marked for an
easy identification. Notches on
the frontal part of each choke
allow a quick recognition, even
when the choke is mounted on
the shotgun.
A
NOTCHES
B
SYMBOL
Les chokes Benelli sont marqués
pour une identification rapide.
Les encoches sur la partie fronta-
le de chaque choke permettent
une reconnaissance rapide de l’é-
tranglement même lorsque le
choke est monté.
A
ENCOCHES
B
SYMBOLE
Die Benelli-Chokes sind zur sch-
nellen Identifizierung markiert. An
den Kerben an der Vorderseite
jedes Chokes ist die Choke-Typ
leicht erkennbar - auch bei einge-
schraubtem Choke.
A
KERBEN
B
SYMBOL
A
B
STEEL SHOT -OK-M -
***
I
NTACCHE
S
TROZZATURA
S
IMBOLO
P
ALLINI D
’
ACCIAIO
N
OTCHES
C
HOKE
S
YMBOL
S
TEEL
S
HOT
E
NCOCHES
É
TRANGLEMENT
S
YMBOLE
B
ALLES D
’
ACIER
K
ERBEN
C
HOKE
-T
YP
S
YMBOL
S
TAHLSCHROT
I
Full
X
NO
II
Improved Modified
XX
NO
III
Modified
XXX
OK
IIII
Improved Cylinder
XXXX
OK
IIIII
Skeet
XXXXX
OK
Los chokes Benelli están marca-
dos para una rápida identifica-
ción. Las marcas en la parte fron-
tal de cada choke permiten una
rápida identificación de la estran-
gulación incluso cuando el choke
está montado.
A
MARCAS
B
SÍMBOLO
Todos os chokes Benelli estão
marcados de forma a facilitar a
sua identificação. Os entalhes na
parte frontal de cada choke per-
mitem um rápido reconhecimen-
to do estrangulamento mesmo
quando montados nos canos.
A
ENTALHES
B
SÍMBOLO
Сменные
чоки
Benelli
промаркированы для быстрой
идентификации. Насечки на
передней части каждого чока
позволяют быстро определить
величину сужения, не выкручивая
его.
A
НАСЕЧКИ
B
ОБОЗНАЧЕНИЕ
∆· ÙÛÔÎ Benelli Â›Ó·È ÂȉÈο
ηٷÛ΢·Ṳ̂ӷ ¤ÙÛÈ ÒÛÙ ӷ Ù·
·Ó·ÁÓˆÚ›˙ÂÙ ‡ÎÔÏ· Î·È ÁÚ‹ÁÔÚ·.
¶Ú¿ÁÌ·ÙÈ, ÔÈ ÂÁÎÔ¤˜ Ô˘ ʤÚÔ˘Ó
ÛÙÔ
ÂÌÚfiÛıÈÔ
̤ÚÔ˜
ÙÔ˘˜
ÂÈÙÚ¤Ô˘Ó ÙËÓ ·Ó·ÁÓÒÚÈÛË ÙÔ˘˜
·ÎfiÌ· ÎÈ ·Ó ‚Ú›ÛÎÔÓÙ·È ‹‰Ë
ÙÔÔıÂÙË̤ӷ ÛÙÔ ÂÛˆÙÂÚÈÎfi Ù˘
οÓÓ˘.
∞∂°∫√¶∂™
µ
™Àªµ√§√
125
A
B
STEEL SHOT -OK-M -
***
M
ARCAS
E
STRANGULACIÓN
S
ÍMBOLO
P
ERDIGONES DE ACERO
E
NTALHES
E
STRANGULAMENTO
S
ÍMBOLO
E
SFERAS DE AÇO
НАСЕЧКИ
ВЕЛИЧИНА СУЖЕНИЯ
ОБОЗНАЧЕНИЕ
ИСПОЛЬЗОВАНИЕ СТАЛЬНОЙ ДРОБИ
ÅÃÊϬÅÓ
ÔÓÏÊ
ÓÕÌÂÏËÏ
ÁÔÓÁËÉÍÁ ÓÊÁÃÉÁ
I
Full
X
NO
II
Improved Modified
XX
NO
III
Modified
XXX
OK
IIII
Improved Cylinder
XXXX
OK
IIIII
Skeet
XXXXX
OK
126
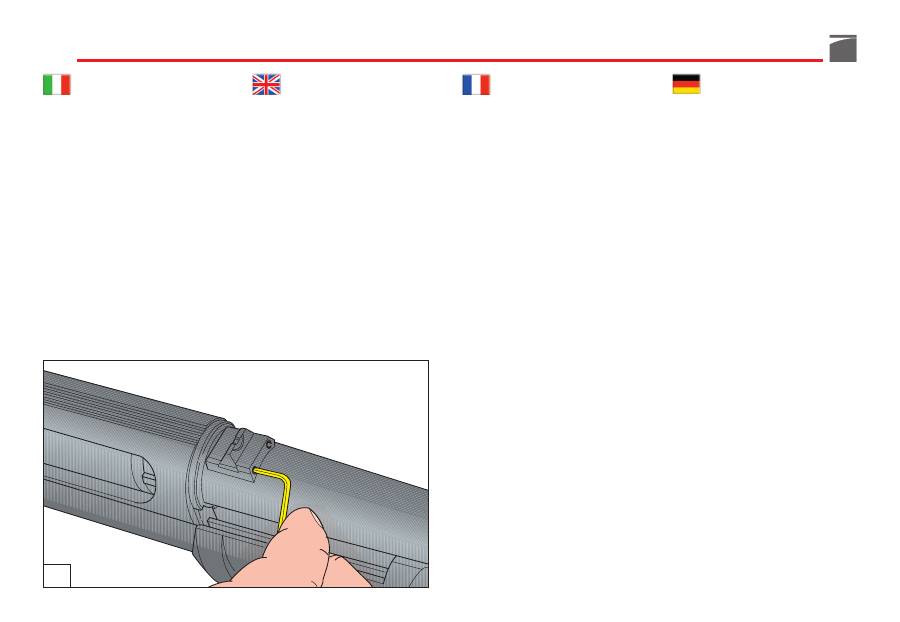
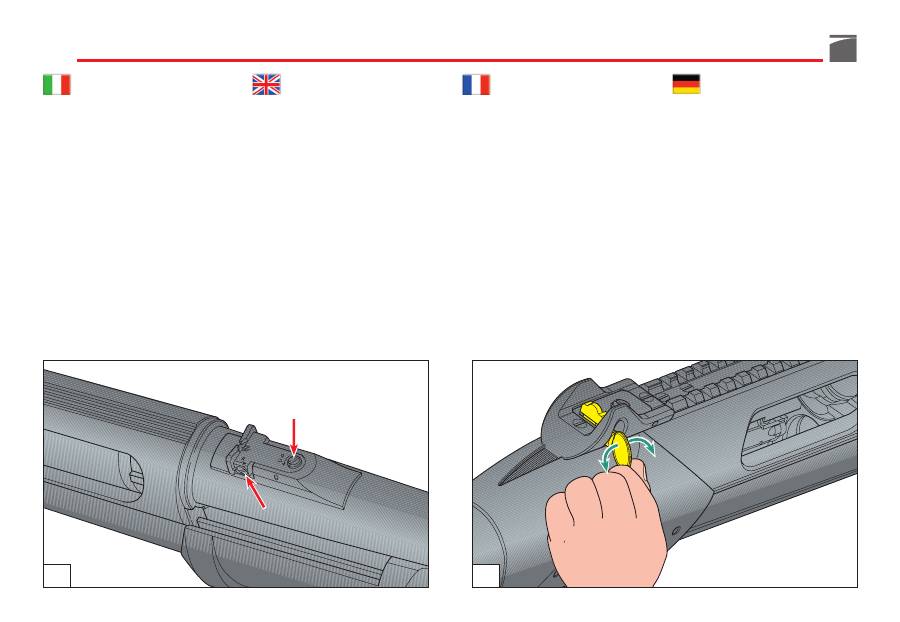
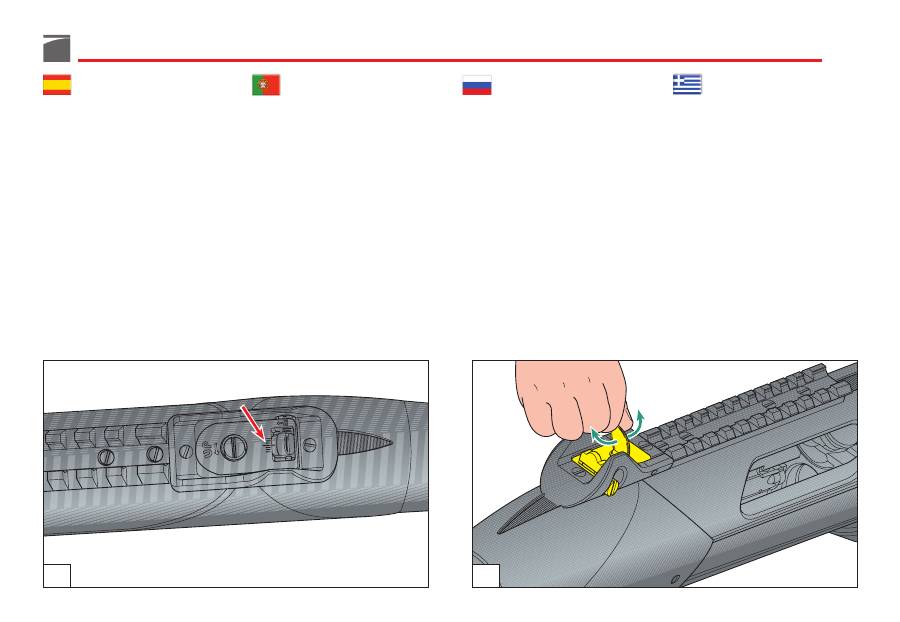
Regolazione tacca di mira
Per regolare
la tacca di mira
agire nel
seguente modo (fig. 53):
1) Allentare con
apposita chiave esa-
gonale
piegata le due viti di fissag-
gio tacca di mira.
2) Regolare la posizione della tacca
di mira nel senso desiderato e
bloccarla nuovamente
avvitando a
fondo
le viti di fissaggio.
Adjusting the back-sight
For the adjustment of the
back-sight
as illustrated in figure 53, proceed as
follows:
1) Using the
wrench provided
,
slacken the two sight screws.
2) Adjust the sight position as desired
(move it to the left if you want the
point of impact to move left or
move it to the right if you want the
point of impact to move right) and
fully tighten
the two screws.
Réglage du cran de mire
Pour régler
le cran de mire,
agir de la
manière suivante (fig. 53):
1) Desserrer au moyen de la
clé hexa-
gonale
pliée les deux vis de fixation
du cran de mire.
2) Régler la position du cran de mire
dans le sens désiré et l'immobiliser
à nouveau
en serrant
les vis de
fixation.
Kimme ausrichten
Die
Kimmeeinstellung
wird wie folgt
durchgeführt (Abb. 53):
1) Lösen Sie die zwei Befestigungs-
schrauben der Kimme mit dem
Inbusschlüssel
, der mit der Waffe
mitgeliefert wird.
2) Die Kimme Ihren Anforderungen
entsprechend einstellen und mit
den Schrauben
festziehen
.
53

Ajuste del punto de mira
Para ajustar
el punto de mira
actuar
de la siguiente manera (fig. 53):
1) Con
la llave hexagonal especial
suministrada, aflojar los dos torni-
llos de fijación del punto de mira.
2) Regule la posición del punto de
mira en el sentido deseado y fíjelo
nuevamente
atornillando a fondo
los tornillos de fijación.
Regulação da alça
Para regular
a alça
proceda do se-
guinte modo (fig. 53):
1) Desaperte com a
chave hexagonal
inclinada
os dois parafusos de
fixação da alça.
2) Regule a posição da alça no senti-
do pretendido após o que deverá
ser bloqueada
apertando bem
os
parafusos de fixação.
Регулировка целика
Для регулировки
целика
выполните
следующие действия (рис. 53):
1) При помощи
специального
изогнутого
шестигранного
ключа
ослабьте крепежные
винты целика.
2) Отрегулируйте положение целика
в требуемом направлении и
зафиксируйте его снова,
завинтив
до конца
крепежные винты.
ƒ‡ıÌÈÛË ÎÏÈÛÈÔÛÎÔ›Ô˘
°È· Ó· Ú˘ıÌ›ÛÂÙÂ
ÙÔ ÎÏÈÛÈÔÛÎfiÈÔ
ÂÓÂÚÁ‹ÛÙÂ
fiˆ˜
ÂÚÈÁÚ¿ÊÂÙ·È
·ÎÔÏÔ‡ıˆ˜ (ÂÈÎ. 53):
1) ÷ϷÚÒÛÙÂ, Ì ÙÔ
ÂȉÈÎfi ÎÏÂȉ›
, ÙȘ
‰‡Ô ‚›‰Â˜ ÙÔ˘ ÎÏÈÛÈÔÛÎÔ›Ô˘.
2) ƒ˘ıÌ›ÛÙ ÙË ı¤ÛË ÙÔ˘ ÎÏÈÛÈÔÛÎÔ›Ô˘
fiˆ˜ ÂÈı˘Ì›ÙÂ Î·È ÛÙÂÚÂÒÛÙ ÙÔ
Î·È ¿ÏÈ
ÛÊ›ÁÁÔÓÙ·˜ ηϿ
ÙȘ ‰‡Ô
‚›‰Â˜.
127
128
Per la regolazione laterale della linea
di mira, prevista
sulla tacca di mira
,
operare come segue (figg. 54-55-56-
57):
A - Regolazione laterale linea di mira
Agendo
sulla apposita vite
, regolare la
posizione della tacca di mira nel sen-
so desiderato (spostare la tacca verso
sinistra se si intende sparare più a sini-
stra; verso destra se si intende sparare
più a destra) facendo riferimento
alle
rispettive tacche
graduate di allinea-
mento.
Proceed as follows to carry out the
back-sight
adjustments as shown in
figures 54, 55, 56 and 57:
A - Lateral adjustment
By means of the
relative screw
, set
the sight position as desired (move it
to the left if you want the point of
impact to move left or move it to the
right if you want the point of impact
to move right) by adjusting it accord-
ing to the
graduated alignment not-
ches.
Pour régler latéralement la ligne de
mire, prévue
sur le cran de mire
,
procéder de la manière suivante (figs.
54-55-56-57):
A - Réglage latéral de ligne de mire
Par action
sur la vis adéquate,
régler
la position désirée (vers la gauche
pour déplacer le point d’impact vers
la gauche, ou vers la droite pour un
point d’impact plus à droite) en pre-
nant
repère sur les graduations.
54
55
Um die Seitenverstellung am
Visier
,
die auf der Kimme vorgesehen ist,
vorzunehmen, müssen Sie wie folgt
vorgehen (Abb. 54-55-56-57):
A - Seitenverstellung des Visiers
Indem man an der dafür
vorgesehenen
Schraube
dreht, kann man die Position
der Kimme in die gewünschte Rich-
tung verstellen (die Kimme mehr nach
links verstellen, wenn man mehr nach
links schießen will; nach rechts, wenn
man mehr nach rechts schießen will),
wobei man sich an den
angebrachten
Gradmarkierungen
orientieren kann.
Para regulação lateral da linha de
mira, prevista
na alça,
proceda como
segue (fig. 54-55-56-57).
A - Regulação lateral da linha de mira
Actuando no
respectivo parafuso,
regule a posição da alça no sentido
pretendido (desloque a alça para a
esquerda se pretender disparar mais à
esquerda; para a direita se pretender
disparar mais à direita) tomando
como referência
os respectivos
entalhes
graduados de alinhamento.
129
56
57
Para el ajuste lateral de la línea de mira,
actúe de la siguiente manera (figs. 54-
55-56-57):
A - Ajuste lateral de la mira
Mediante
el tornillo colocado a tal
efecto
, ajustar la posición del punto
de mira en el sentido deseado (despla-
zar el punto hacia la izquierda si se
desea disparar más hacia la izquierda;
hacia la derecha, si se desea disparar
más hacia la derecha) tomando como
referencia
las respectivas marcas
gra-
duadas de alineación.
Для регулировки боковой линии
прицела,
предусмотренной на
целике
, выполните следующие
действия (рис. 54-55-56-57):
A - Регулировка боковой
линии прицела
Поверните
специальный винт
и
отрегулируйте положение целика в
требуемом направлении (сместите
целик влево, если вы хотите стрелять
левее; сместите целик вправо, если вы
хотите стрелять правее), сверяясь с
соответствующими градуированными
метками
для выравнивания.
°È· Ó· Ú˘ıÌ›ÛÂÙ ÙË ÁÚ·ÌÌ‹ ÛÎÔ‡Ûˆ˜
ηٿ ‰È‡ı˘ÓÛË, ÂÓÂÚÁ‹ÛÙ ¿Óˆ
ÛÙÔ
ÎÏÈÛÈÔÛÎfiÈÔ
fiˆ˜ ÂÚÈÁÚ¿ÊÂÙ·È
·ÎÔÏÔ‡ıˆ˜ (ÂÈÎ. 54-55-56-57):
∞ - ƒ‡ıÌÈÛË Ù˘ ÁÚ·ÌÌ‹˜ ÛÎÔ‡Ûˆ˜
ηٿ ‰È‡ı˘ÓÛË
ƒ˘ıÌ›ÛÙÂ,
̤ۈ Ù˘ ÂȉÈ΋˜ ‚›‰·˜,
ÙË
ı¤ÛË ÙÔ˘ ÎÏÈÛÈÔÛÎÔ›Ô˘ ÚÔ˜ ÙËÓ
ηÙ‡ı˘ÓÛË Ô˘ ÂÈı˘Ì›Ù (ÌÂÙ·ÎÈÓ‹ÛÙÂ
ÙÔ ÎÏÈÛÈÔÛÎfiÈÔ ÚÔ˜ Ù· ·ÚÈÛÙÂÚ¿ ·Ó
ı¤ÏÂÙ ӷ ÛÎÔ‡ÛÂÙ ÈÔ ·ÚÈÛÙÂÚ¿ ‹
ÚÔ˜ Ù· ‰ÂÍÈ¿ ·Ó ı¤ÏÂÙ ӷ ÛÎÔ‡ÛÂÙÂ
ÈÔ ‰ÂÍÈ¿) ¤¯ÔÓÙ·˜ ¿ÓÙ· ˆ˜ ÛËÌ›Ô
·Ó·ÊÔÚ¿˜
ÙȘ ·ÓÙ›ÛÙÔȯ˜ ‰È·‚·ıÌÈṲ̂Ó˜
ÂÁÎÔ¤˜
¢ı˘ÁÚ¿ÌÌÈÛ˘.
130
B - Regolazione verticale
linea di mira
Agendo
sulla apposita vite
, regolare la
posizione della tacca di mira nel sen-
so desiderato (in senso antiorario “up”
se si intende sparare più in alto; al
contrario se si intende sparare più in
basso) facendo riferimento
alle rispet-
tive tacche
graduate di allineamento.
B - Vertical adjustment
By means of the
relative screw
, set
the sight position as desired (in the
“up” anticlockwise direction if you
want to raise the point of impact or in
the opposite direction if you want the
point of impact to be lower) by
adjusting it according to the
graduat-
ed alignment notches.
B - Réglage vertical de ligne de mire
Par action
sur la vis correspondante,
régler la position désirée (sens inverse
des aiguilles d’une montre "up" pour
un point d’impact plus haut ou sens
contraire pour baisser le point d’im-
pact) en prenant
repère sur les gra-
duations.
B - Höhenverstellung des Visiers
Indem man an der dafür
vorgesehe-
nen Schraube
dreht, kann man die
Position der Kimme in der gewünsch-
ten Höhe verstellen (gegen den Uhr-
zeigersinn "up", wenn man höher
schießen möchte, genau umgekehrt
drehen, wenn man mehr nach unten
schießen möchte), wobei man sich an
den
angebrachten Gradmarkierungen
orientieren kann.

B - Ajuste vertical de la mira
Mediante
el tornillo colocado a tal
efecto
, ajustar la posición del punto
de mira en el sentido deseado (en sen-
tido inverso al de las agujas del reloj
“up” si se desea disparar más hacia
arriba; en el sentido de las agujas del
reloj, si se desea disparar más hacia
abajo) tomando como referencia
las
respectivas marcas
graduadas de ali-
neación.
B - Regulação vertical
de linha de mira
Actuando
no respectivo parafuso,
regule a posição da alça no sentido
desejado (no sentido anti-horário “up”
- se pretender disparar mais alto; ao
contrário se pretender disparar mais
baixo), tomando como referência
os
respectivos entalhes
graduados de
alinhamento.como referência
os
respectivos entalhes
graduados de
alinhamento.
В - Регулировка линии
прицела по вертикали
Поверните
специальный винт
и
отрегулируйте положение целика в
требуемом
направлении
(в
направлении против часовой стрелки
“вверх”, если вы хотите стрелять
выше;
в
противоположном
направлении, если вы хотите стрелять
ниже), сверяясь с соответствующими
градуированными
метками
для
выравнивания.
µ - ƒ‡ıÌÈÛË Ù˘ ÁÚ·ÌÌ‹˜
ÛÎÔ‡Ûˆ˜ ηı’ ‡„Ô˜
ƒ˘ıÌ›ÛÙÂ,
̤ۈ Ù˘ ÂȉÈ΋˜ ‚›‰·˜
, ÙË
ı¤ÛË ÙÔ˘ ÎÏÈÛÈÔÛÎÔ›Ô˘ ÚÔ˜ ÙËÓ
ηÙ‡ı˘ÓÛË Ô˘ ÂÈı˘Ì›Ù (ÌÂÙ·ÎÈÓ‹ÛÙÂ
ÙÔ ÎÏÈÛÈÔÛÎfiÈÔ ÚÔ˜ ÙË Î·Ù‡ı˘ÓÛË “up”
·ÓÙ›ıÂÙ· ·fi ÙË ÊÔÚ¿ ÙˆÓ ‰ÂÈÎÙÒÓ ÙÔ˘
ÚÔÏÔÁÈÔ‡ ·Ó ÂÈı˘Ì›Ù ӷ ÛÎÔ‡ÛÂÙÂ
ÈÔ „ËÏ¿ ‹ ÌÂÙ·ÎÈÓ‹ÛÙ ÙÔ Î·Ù¿ ÙË ÊÔÚ¿
ÙˆÓ ‰ÂÈÎÙÒÓ ÙÔ˘ ÚÔÏÔÁÈÔ‡ ·Ó ÂÈı˘Ì›ÙÂ
Ó· ÛÎÔ‡ÛÂÙ ÈÔ ¯·ÌËÏ¿) ¤¯ÔÓÙ·˜
¿ÓÙ· ˆ˜ ÛËÌÂ›Ô ·Ó·ÊÔÚ¿˜
ÙȘ
·ÓÙ›ÛÙÔȯ˜ ‰È·‚·ıÌÈṲ̂Ó˜ ÂÁÎÔ¤˜
¢ı˘ÁÚ¿ÌÌÈÛ˘
.
131

132
G0282500
- 01/2011
Benelli Armi S.p.A.
Via della Stazione, 50
61029 URBINO
ITALY
Tel. ++39-0722-3071
Fax ++39-0722-307206
E-mail: marketing@benelli.it
http://www.benelli.it
(D)basic(auto) & SANbasic 40-100 flanges")