Archos 101XS: инструкция
Раздел: Компьютерная техника, комплектующие, аксессуары
Тип: Ноутбук
Инструкция к Ноутбуку Archos 101XS

1
ENEN
Table of contents
Package Content........................................................................................................
2
Getting started............................................................................................................
3
Description of the device........................................................................................
4
Through the Wizard...................................................................................................
6
Connecting to a WiFi network...............................................................................
7
TM
The Android
interface............................................................................................
8
TM
Getting familiar with Android
.............................................................................
12
Using your keyboard..................................................................................................
14
Troubleshooting..........................................................................................................
16
For more information, please consult the FAQs and the User manual of your product on
www.archos.com. Make sure to read them before considering any product return.
Your deal may be no big deal.
2
Warranty
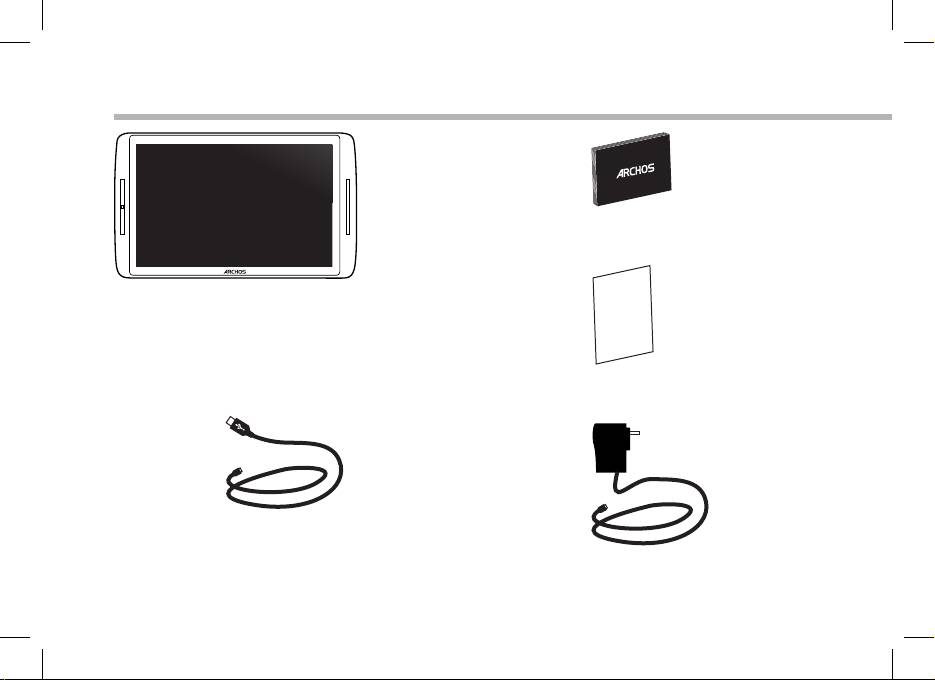
Package Content
QSG booklet
ARCHOS 101XS
Warranty,
legal & safety booklet
USB cable
Charger

3
EN
Getting Started
Charging
Charge your device by plugging your power cable into the micro-USB port.
The ARCHOS device will turn on and start charging.
The charging indicator light is on when the battery is charging.
It will blink when the battery is charged.
You can use your ARCHOS whilst it charges.
IMPORTANT: When the battery is completely empty and you plug in your device, the charging
indicator light will turn on then start to blink. The indicator light blinking rapidly means that the
device is charging but does not yet have enough power to start. This charging when o may
take some time. Once the device has charged enough to start, it will switch on and display the
ARCHOS boot logo.
TIPS:
To receive more complete service, please register your product. From your tablet, touch the Apps
button, then touch Online registration and follow the on-screen instructions. From a computer,
go to www.archos.com/register.
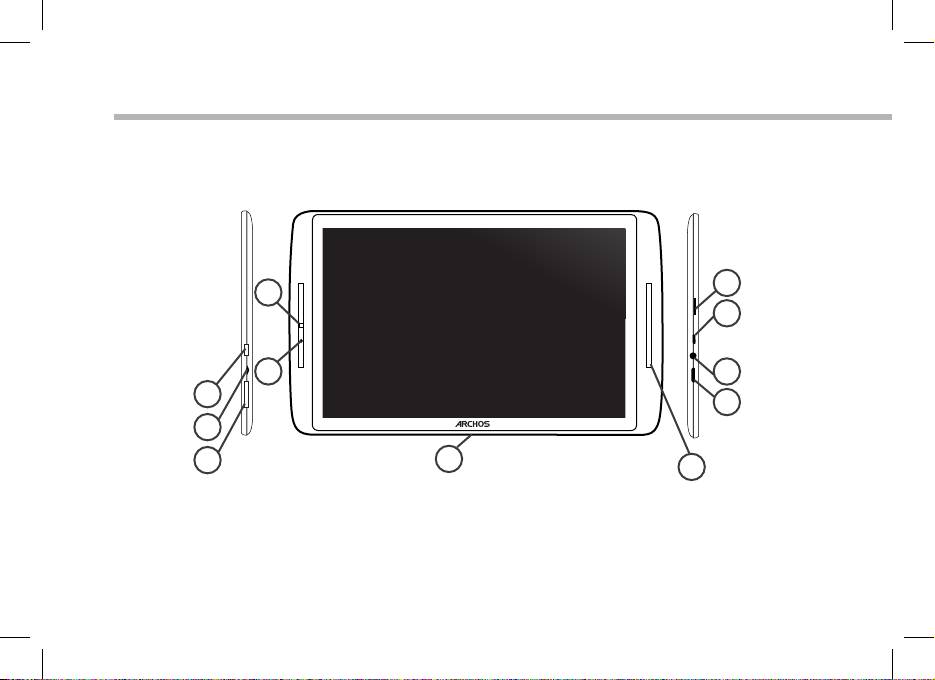
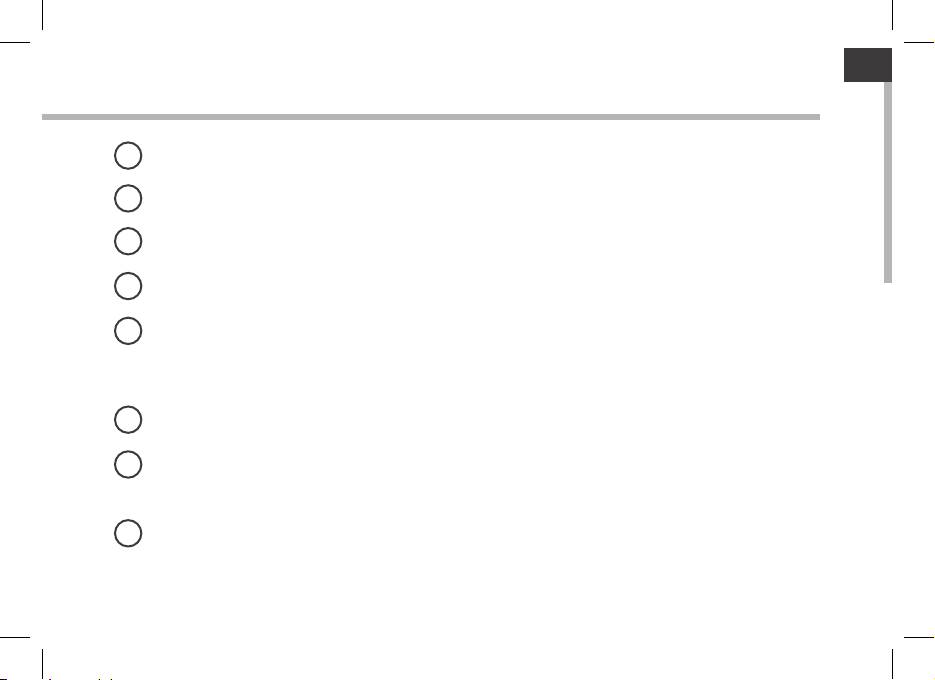
Description of the device
6
4
7
5
8
3
9
2
1
11
10
4
5
EN
1
Volume buttons
9
Mini-HDMI video output*
2
Charging indicator
10
Loudspeakers
3
ON/OFF button
11
Proprietary port
4
Camera
5
Microphone
6
Micro-SD card slot
7
Micro-USB port
8
Headphone jack
* With optional Mini-HDMI to HDMI cable.

Through the Wizard
The rst time you start up your ARCHOS, the installation wizard will help you
set up your device:
- Touch-screen calibration
- Language
- Date & time
- WiFi connection
- Location service options
- 3rd party apps
- Accelerometer calibration
TIPS:
We recommend that you set up your device in the WiFi zone of the network that you will regularly
be using.
6

7
EN
Connectivity to a WiFi Network
WARNING: Make sure that you are in a WiFi zone. You can access the WiFi
settings quickly from the status bar in the bottom right corner of the screen.
1. Touch the time in the status bar. The status dashboard is displayed.
2. Touch the time a second time in the status dashboard. The quick settings will be
displayed.
3. Touch WiFi to open the WiFi settings menu.
4. If the WiFi is o, slide the WiFi switch to the ON position. Once the WiFi is on, the
ARCHOS will scan for WiFi networks in range.
5. Touch the name of network you want to connect to.
Private networks are shown with a lock icon and will require you to enter your
password.
TIPS:
- When entering a WiFi password, we recommend that you select “Show password” so you can
see the characters you are typing.
- To get the correct WiFi password (or settings) for the network, contact the WiFi network provider.
- If your WiFi is on and you are in range of a network that you previously connected to, your
ARCHOS will automatically attempt to connect to it.
8
1
5
6
2
7
3
4
8
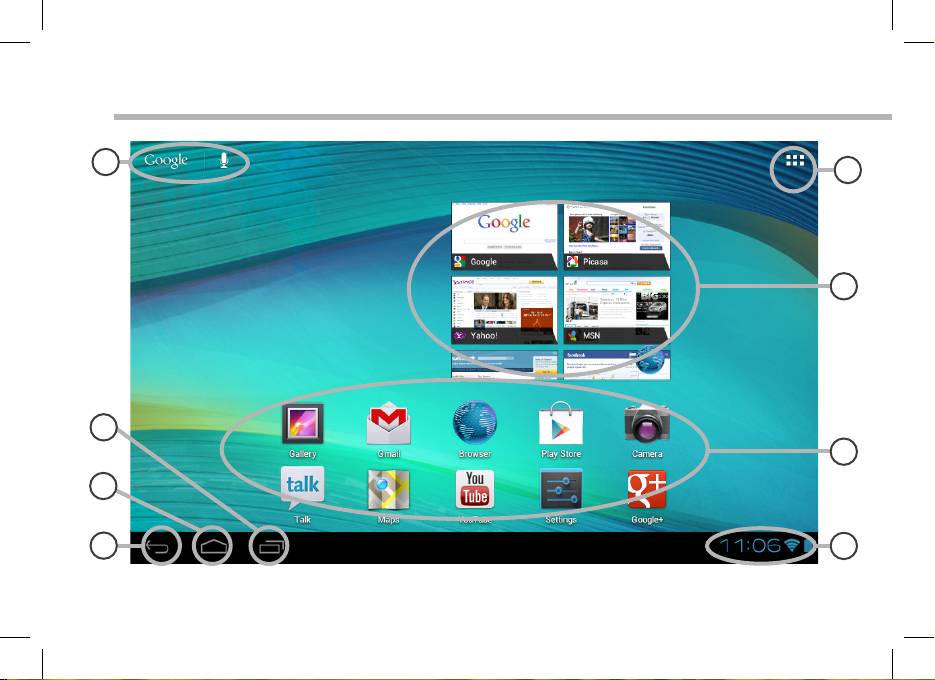
TM
The Android
Interface
9
EN
TM
1
Search
>Touch "Google" for text search or touch the microphone icon for voice search.
2
Recent apps buttons
3
Home button
4
Back button
5
All Apps button
> Touch this icon to show all the applications and widgets installed on your ARCHOS. All your downloaded
applications are here.
6
Widget
TM
7
Android
apps shortcuts
> Touch to start an application.
8
The status bar
> Displays notications and quick settings
TM
The Android
Interface
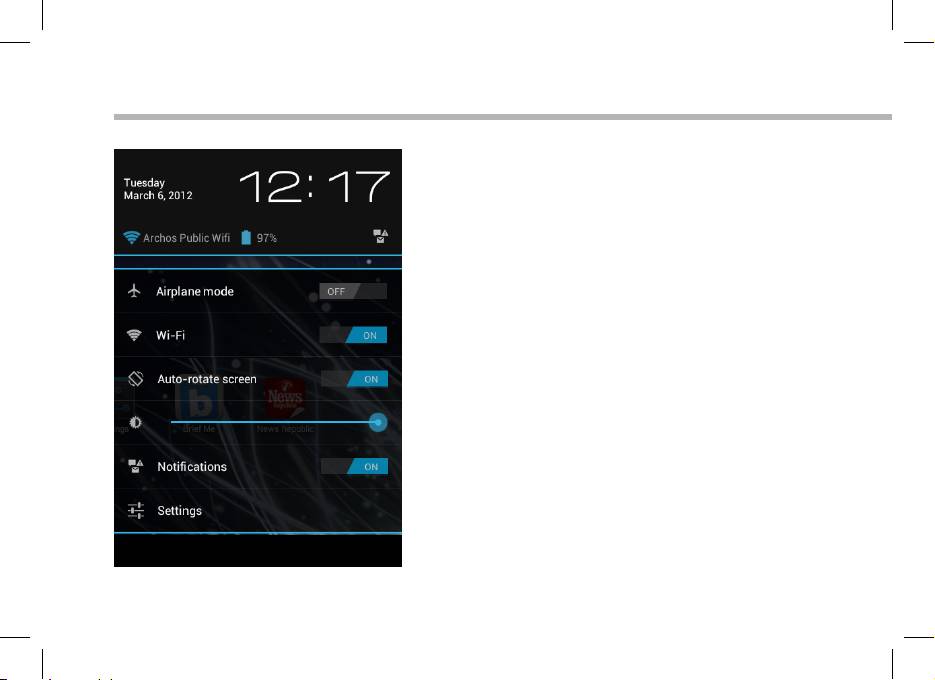
The Quick settings
- Airplane mode:
To activate/deactivate all wireless connections,
especially when ying.
- WiFi:
To turn on/o your WiFi connection.
- Auto-rotate screen:
To activate/deactivate automatic screen
orientation as you turn your ARCHOS.
- Brightness:
To adjust the screen brightness.
- Notications:
To activate/deactivate incoming notications.
- Settings:
To access all your settings.
10
11
EN
The Recent Apps
Opens a list of thumbnail images of apps you’ve
worked with recently:
- To open an app, touch it.
- To close an app, swipe it left or right.

TM
Getting familiar with Android
The extended home screen:
Navigate between dierent home screen panels by swiping left and right.
Moving a home screen item:
Touch and hold your nger onto it until the positioning gridlines appear, then slide it
to the desired location, and release your nger.
Removing a home screen item:
Touch and hold it, slide your nger towards the top of the screen and drop it over the
Remove icon.
Uninstalling an item:
From the All apps screens, touch and hold it, slide your nger towards the top of the
screen and drop it over Uninstall bin.
12

13
EN
Creating application folders:
Drop one app icon over another on a home screen and the two icons will be combined.
Widgets:
Touch the All Apps icon on your home screen. Touch Widgets at the top of the screen.
From the main Widgets screen, you can move around widgets just as you do for app
icons.
Changing your wallpaper:
Hold your nger on a home screen at an empty location, then choose from the list.
Locking the touchscreen:
From the quick settings dashboard in the status bar, touch settings. In Settings, scroll
down and touch security. Touch Screen lock. Touch the type of lock you would like to
use. After you set a lock, a lock screen is displayed whenever your screen wakes up,
requesting the pattern, PIN or other specied key.
14
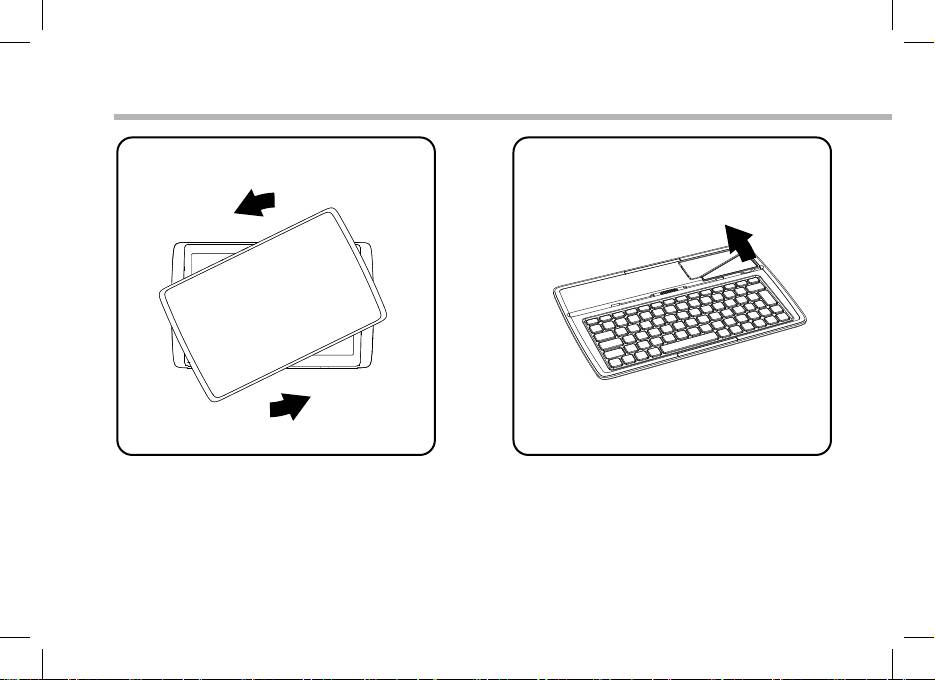
1 2 3 4
Using your keyboard (may be sold separately)
1. Twist and lift the tablet. 2. Lift and fold the tablet stand.
