Blomberg IWD 1004 XT: instruction
Class: Refrigerators and freezers
Type:
Manual for Blomberg IWD 1004 XT

Refrigerator
Холодильник
Kjøleskap
Réfrigérateur
Jääkaappi
Frigorífico
Chladnička
Kühlschrank
Хладилник
Frigorifero
Ψυγείο σας
Køleskab
لاچخی
Koelkast
Ledusskapis
Koelkast
Frigorifero
IWD 1004 ET
KWD 9440 X A+
IWD 1004 XT
KWD 9440 XA++
IWD 1007 XT
IWD 1008 ET
IWD 1006 XT
KWD 9330 X A+
KWD 9440 X
Bedienungsanleitung
Operating instructions

Please read this manual first!
Dear Customer,
We hope that your product, which has been produced in modern plants and
checked under the most meticulous quality control procedures, will provide you an
effective service.
For this, we recommend you to carefully read the entire manual of your product
before using it and keep it at hand for future references.
This manual
• Will help you use your appliance in a fast and safe way.
• Read the manual before installing and operating your product.
• Follow the instructions, especially those for safety.
• Keep the manual in an easily accessible place as you may need it later.
• Besides, read also the other documents provided with your product.
Please note that this manual may be valid for other models as well.
Symbols and their descriptions
This instruction manual contains the following symbols:
C Important information or useful usage tips.
A Warning against dangerous conditions for life and property.
B Warning against electric voltage.
This product is supplied with the selective sorting symbol for waste electrical
and electronic equipment (WEEE).
This means that this product must be handled pursuant to European Directive
2002/96/EC in order to be recycled or dismantled to minimise its impact on
the environment. For further information, please contact your local or regional
authorities.
Electronic products not included in the selective sorting process are potentially
dangerous for the environment and human health due to the presence of
hazardous substances.
Recycling
CONTENTS
1 Your Refrigerator 3
Water/Ice Type Selection .................... 23
Ice/Water Dispenser ........................... 23
1 Your Refrigerator 4
Using the Ice Dispenser ..................... 23
2 Important Safety Warnings 5
Ice Off ................................................ 24
Using the water spring ....................... 25
Intended use ........................................ 5
Spillage Tray ...................................... 25
For products with a water dispenser; .... 7
Sliding Body Shelves .......................... 25
Child safety .......................................... 7
Blue light ........................................... 26
HCA Warning ....................................... 7
Ion: ................................................... 26
Reccomendations for freshfood
compartment ....................................... 8
Egg tray ............................................. 26
Things to be done for energy saving ..... 8
Fresh Freeze Compartment ................ 26
Crisper humidity control sliders........... 26
3 Installation 9
Recommendations for preservation of
Points to be considered when re-
frozen food ........................................ 27
transporting your refrigerator ................ 9
Defrosting .......................................... 27
Before operating your refrigerator ......... 9
Replacing the Interior Light Bulb ......... 27
Electric connection............................. 10
6 Maintenance and cleaning 29
Disposing of the packaging ................ 10
Disposing of your old refrigerator ........ 10
Protection of plastic surfaces ............ 29
Placing and Installation ....................... 10
Chill compartment .............................. 30
Floor balance adjustment ................... 11
Icebox and Water Dispenser .............. 31
Adjusting the gap between the upper
Minibar .............................................. 32
door .................................................. 13
7 Recommended solutions for
Installing Water Filter ......................... 14
the problems 33
Connection of the Water Pipe to the
Refrigerator ........................................ 15
Connection of Water Hose to the Jug 17
Connection of the Water Pipe to the Cold
Water Mains Line .............................. 17
Prior to first use of Ice/Water Dispenser 18
4 Preparation 20
5 Using your refrigerator 21
Setting the fridge compartment
temperature ....................................... 22
Setting the freezer compartment
temperature ....................................... 22
Fresh Freeze Function ........................ 22
Quick Cool Function........................... 22
Vacation Button ................................. 23
Auto Eco Button (Special Economy
function) ............................................ 23
Ioniser ............................................... 23
Key Lock Button ................................ 23
Water Dispenser Illumination .............. 23
2
EN
3
EN
21
3
4
24
6*
5
23
7
22
21
25
8
*10
9
20
*12
11
*19
13
14
14
18
*17 *2616
5
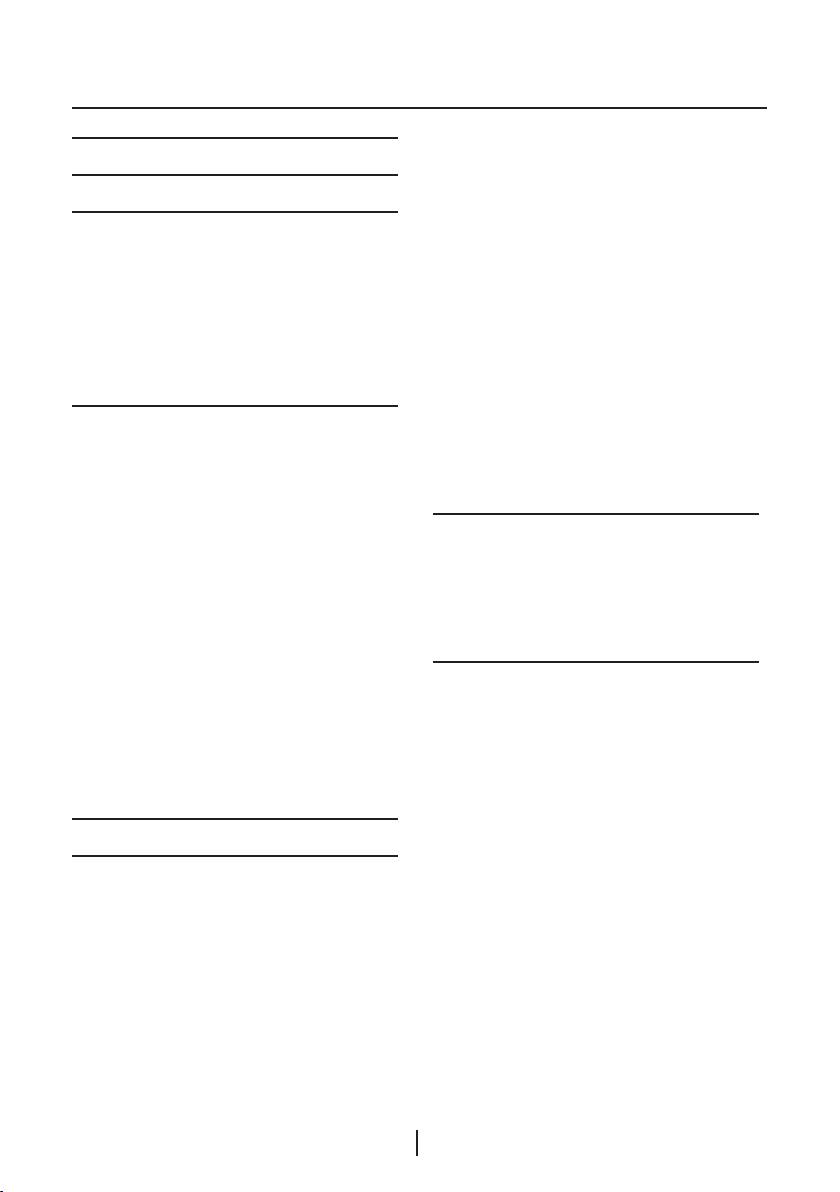
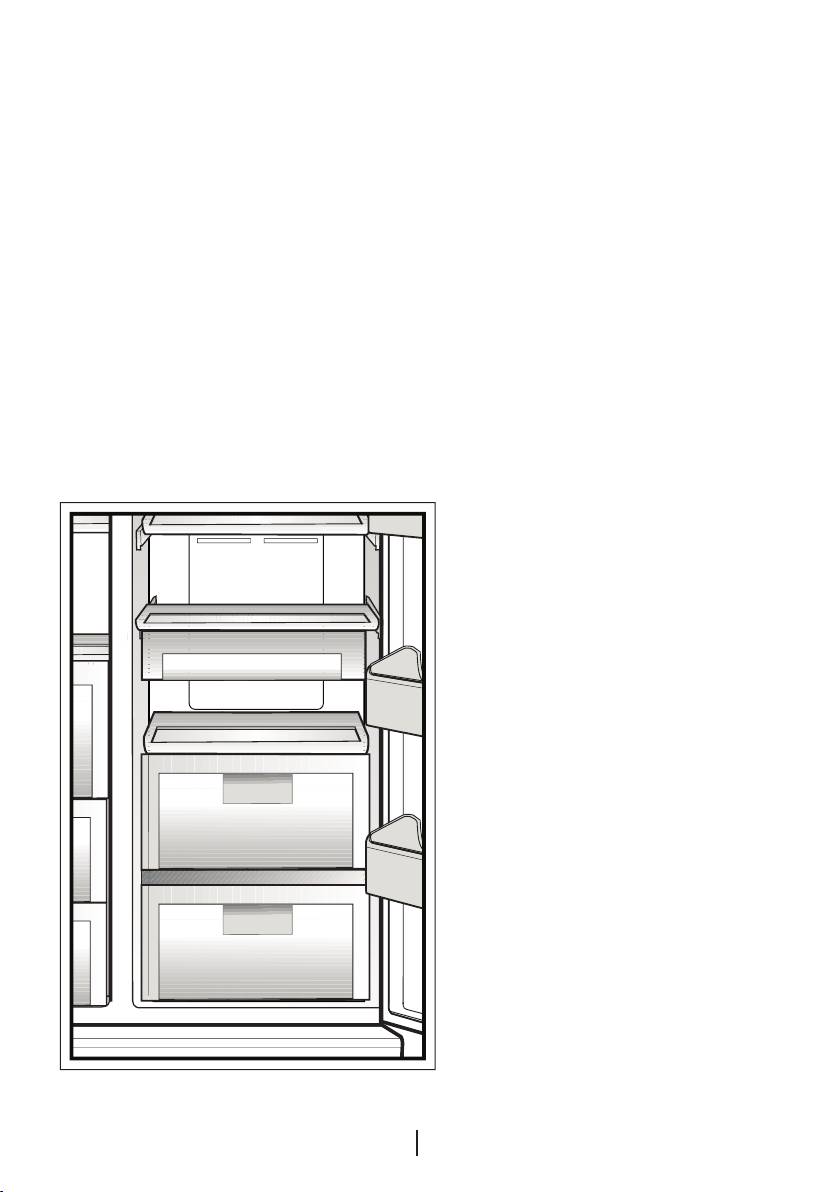
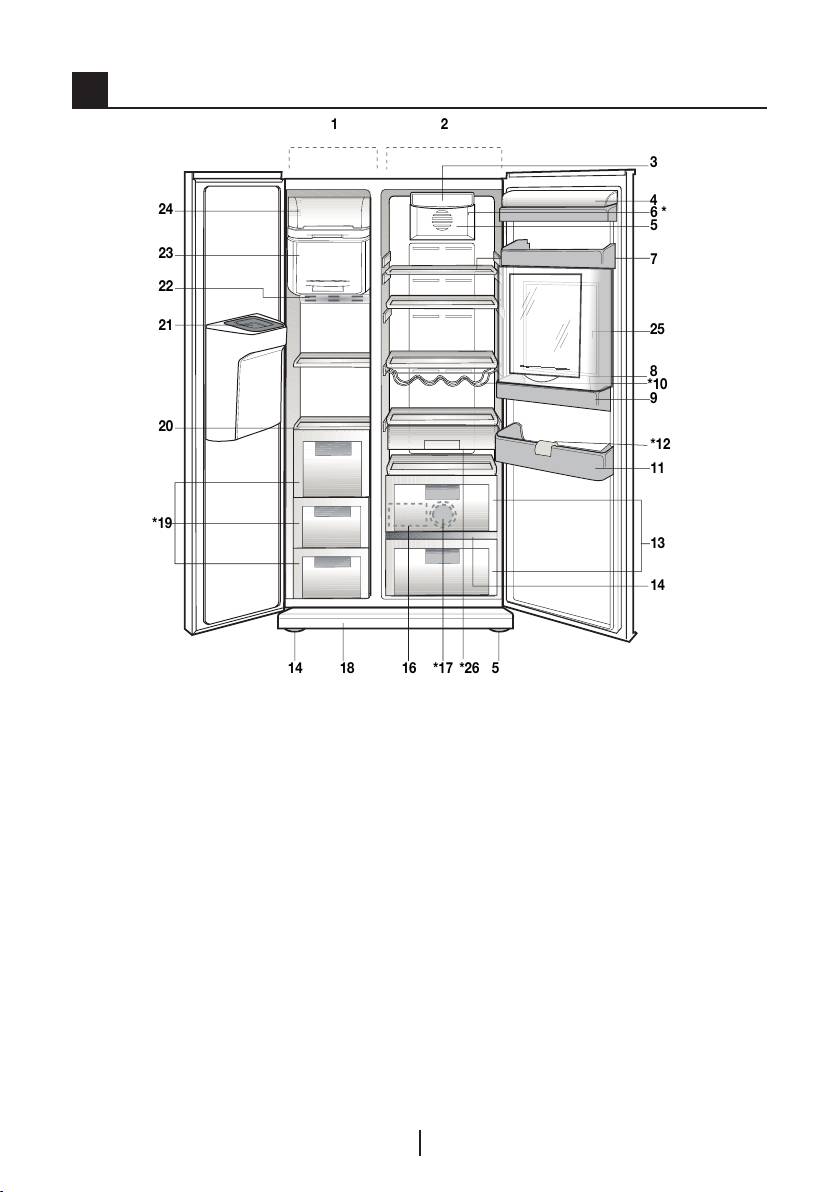
1 Your Refrigerator
1. Freezer compartment
14. Crisper cover
2. Fridge compartment
15. Adjustable front legs
3. Fridge compartment interior light
16. Blue light
4. Butter and cheese lid
17. Water reservoir
5. Fan
18. Ventilation lid
6. Ioniser
19. Freezer compartment drawers
7. Fridge compartment glass shelves
20. Freezer Compartment glass shelves
8. Egg tray
21. Ice duct lid
9. Fridge compartment door racks
22. Freezer compartment interior light
10. Wine cellar
23. Fresh Freeze compartment
11. Bottle shelves
24. Ice container
12. Bottle holder
25. Mini bar
13. Crisper compartments
26. Snack tray * OPTIONAL
C Figures that take place in this instruction manual are schematic and may not
correspond exactly with your product. If the subject parts are not included in the
product you have purchased, then it is valid for other models.
4
EN
21
3
*4
24
6
5
23
7
22
21
8
*10
9
20
*12
11
*19
13
14
14
18
*16 2617
5
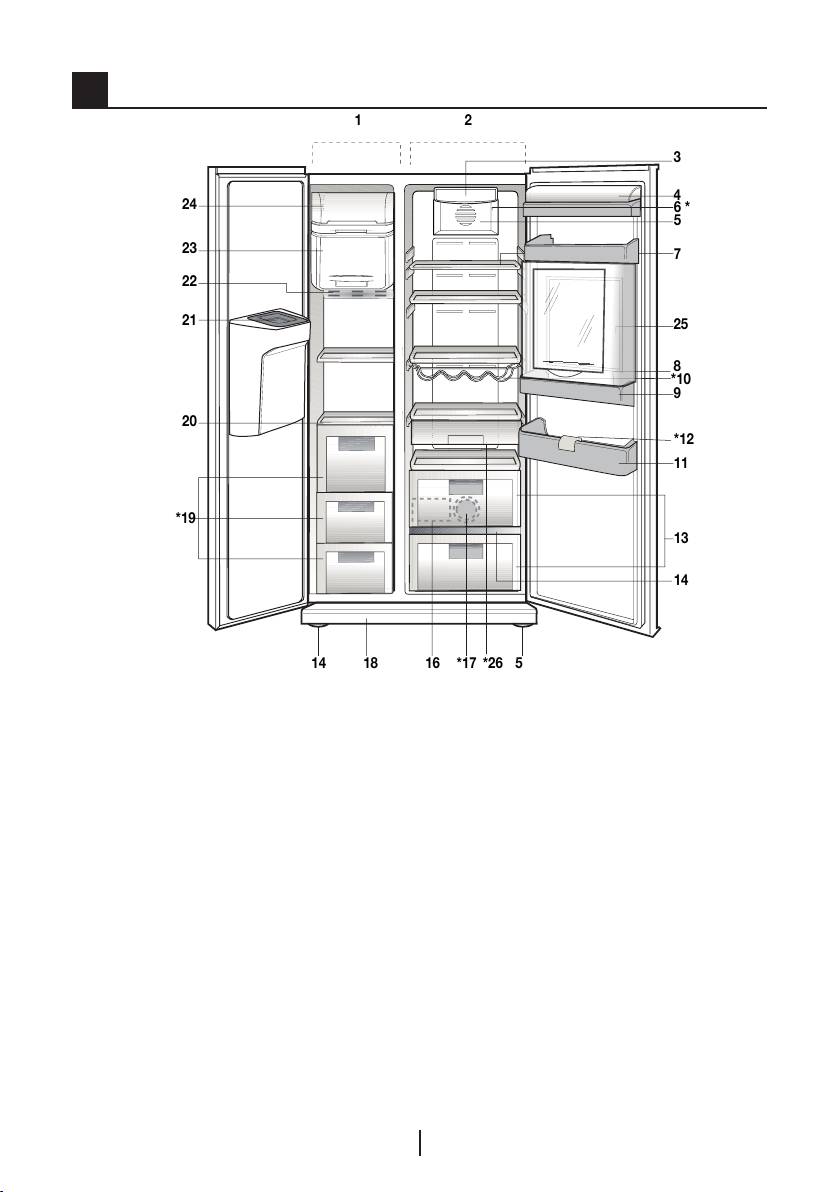
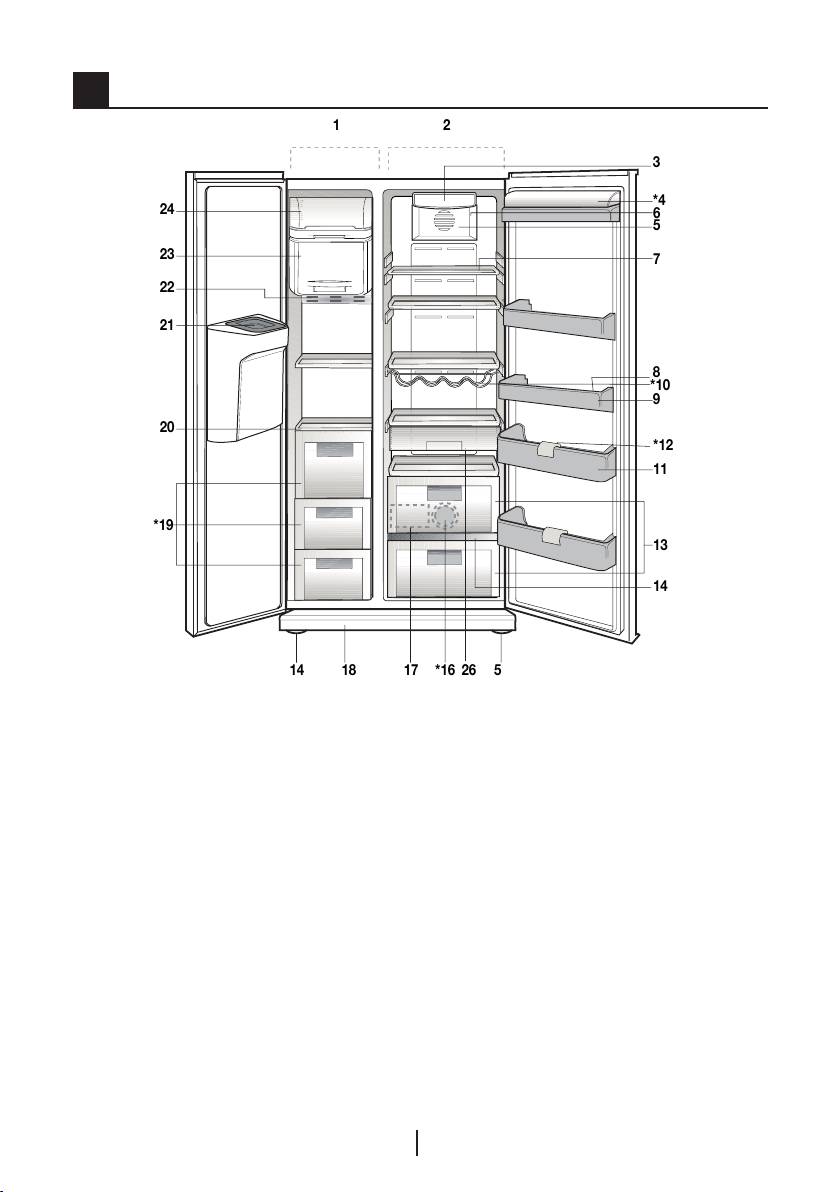
1 Your Refrigerator
1. Freezer compartment
14. Crisper cover
2. Fridge compartment
15. Adjustable front legs
3. Fridge compartment interior light
16. Blue light
4. Butter and cheese lid
17. Water reservoir
5. Fan
18. Ventilation lid
6. Ioniser
19. Freezer compartment drawers
7. Fridge compartment glass shelves
20. Freezer Compartment glass shelves
8. Egg tray
21. Ice duct lid
9. Fridge compartment door racks
22. Freezer compartment interior light
10. Wine cellar
23. Fresh Freeze compartment
11. Bottle shelves
24. Ice container
12. Bottle holder
25. Mini bar
13. Crisper compartments
26. Snack tray
* OPTIONAL
C
Figures that take place in this instruction manual are schematic and may not
correspond exactly with your product. If the subject parts are not included in the
product you have purchased, then it is valid for other models.

2 Important Safety Warnings
Please review the following information.
canned liquid beverages in the freezer
Failure to observe this information may
compartment. Otherwise, these may
cause injuries or material damage.
burst.
Otherwise, all warranty and reliability
• Do not touch frozen food by hand; they
commitments will become invalid.
may stick to your hand.
The usage life of the unit you purchased
• Unplug your refrigerator before cleaning
is 10 years. This is the period for keeping
or defrosting.
the spare parts required for the unit to
• Vapor and vaporized cleaning materials
operate as described.
should never be used in cleaning
and defrosting processes of your
Intended use
refrigerator. In such cases, the vapor
may get in contact with the electrical
This product is intended to be used
parts and cause short circuit or electric
– indoors and in closed areas such as
shock.
homes;
• Never use the parts on your refrigerator
– in closed working environments such
such as the door as a means of
as stores and offices;
support or step.
– in closed accommodation areas such
• Do not use electrical devices inside the
as farm houses, hotels, pensions.
refrigerator.
• This product should not be used
• Do not damage the parts, where the
outdoors.
refrigerant is circulating, with drilling or
cutting tools. The refrigerant that might
General safety
blow out when the gas channels of the
• When you want to dispose/scrap the
evaporator, pipe extensions or surface
product, we recommend you to consult
coatings are punctured causes skin
the authorized service in order to learn
irritations and eye injuries.
the required information and authorized
• Do not cover or block the ventilation
bodies.
holes on your refrigerator with any
• Consult your authorized service for all
material.
your questions and problems related to
• Electrical devices must be repaired
the refrigerator. Do not intervene or let
by only authorised persons. Repairs
someone intervene to the refrigerator
performed by incompetent persons
without notifying the authorised
create a risk for the user.
services.
• In case of any failure or during a
• For products with a freezer
maintenance or repair work, disconnect
compartment; Do not eat cone ice
your refrigerator’s mains supply by
cream and ice cubes immediately
either turning off the relevant fuse or
after you take them out of the freezer
unplugging your appliance.
compartment! (This may cause frostbite
• Do not pull by the cable when pulling
in your mouth.)
off the plug.
• For products with a freezer
compartment; Do not put bottled and
5
EN
• Place the beverage with higher proofs
• For manually controlled refrigerators,
tightly closed and vertically.
wait for at least 5 minutes to start the
• Never store spray cans containing
refrigerator after power failure.
flammable and explosive substances in
• This operation manual should be
the refrigerator.
handed in to the new owner of the
• Do not use mechanical devices
product when it is given to others.
or other means to accelerate the
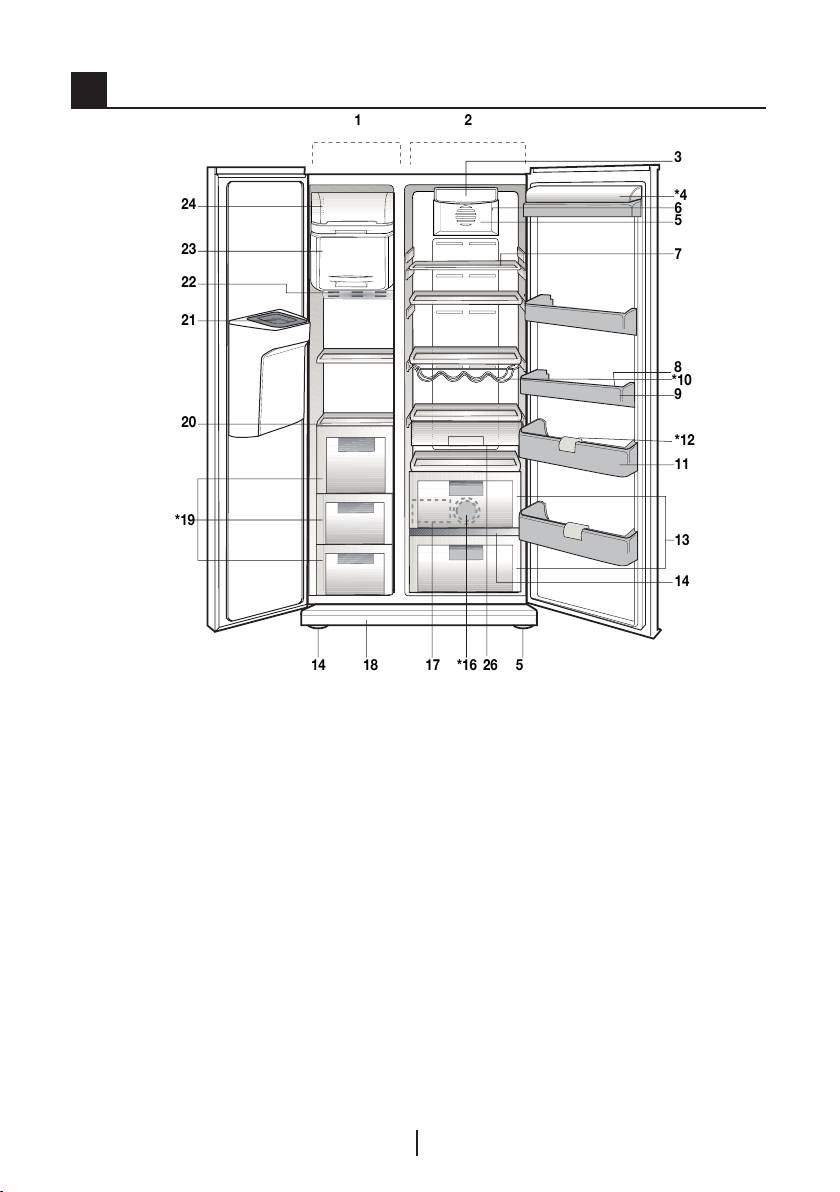
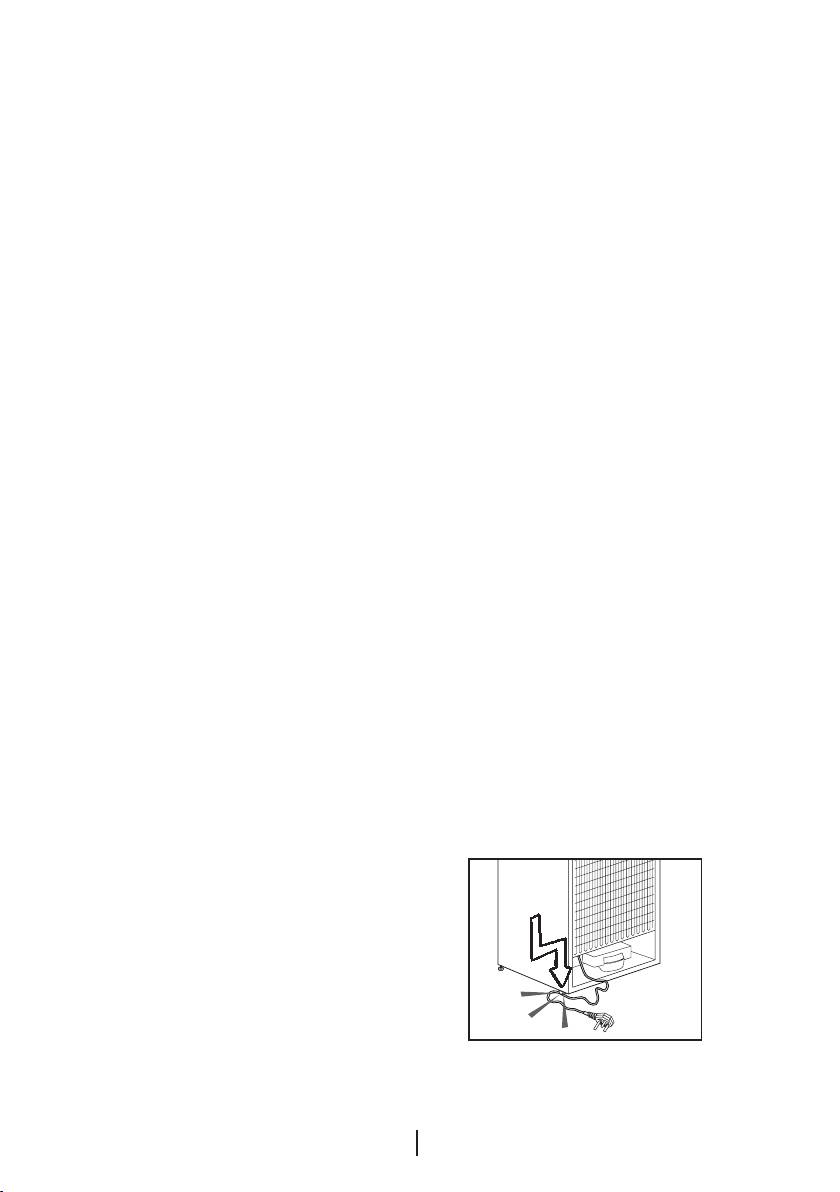
• Avoid causing damage on power
defrosting process, other than those
cable when transporting the
recommended by the manufacturer.
refrigerator. Bending cable may cause
• This product is not intended to be
fire. Never place heavy objects on
used by persons with physical, sensory
power cable. Do not touch the plug
or mental disorders or unlearned
with wet hands when plugging the
or inexperienced people (including
product.
children) unless they are attended by
a person who will be responsible for
their safety or who will instruct them
accordingly for use of the product
• Do not operate a damaged refrigerator.
Consult with the service agent if you
have any concerns.
• Electrical safety of your refrigerator shall
be guaranteed only if the earth system
in your house complies with standards.
• Do not plug the refrigerator if the wall
outlet is loose.
• Exposing the product to rain, snow, sun
and wind is dangerous with respect to
• Water should not be sprayed directly
electrical safety.
on inner or outer parts of the product
for safety purposes.
• Contact authorized service when there
is a power cable damage to avoid
• Do not spray substances containing
danger.
inflammable gases such as propane
gas near the refrigerator to avoid fire
• Never plug the refrigerator into the wall
and explosion risk.
outlet during installation. Otherwise, risk
of death or serious injury may arise.
• Never place containers filled with
water on top of the refrigerator,
• This refrigerator is intended for only
otherwise this may cause electric
storing food items. It must not be used
shock or fire.
for any other purpose.
• Do not overload your refrigerator
• Label of technical specifications is
with excessive amounts of food. If
located on the left wall inside the
overloaded, the food items may fall
refrigerator.
down and hurt you and damage
• Never connect your refrigerator to
refrigerator when you open the door.
electricity-saving systems; they may
Never place objects on top of the
damage the refrigerator.
refrigerator; otherwise, these objects
• If there is a blue light on the refrigerator,
may fall down when you open or close
do not look at the blue light with optical
the refrigerator's door.
tools.
6
EN

• As they require a precise temperature,
HCA Warning
vaccines, heat-sensitive medicine and
If your product's cooling system
scientific materials and etc. should not
contains R600a:
be kept in the refrigerator.
This gas is flammable. Therefore, pay
• If not to be used for a long time,
attention to not damaging the cooling
refrigerator should be unplugged. A
system and piping during usage and
possible problem in power cable may
transportation. In the event of damage,
cause fire.
keep your product away from potential
• The plug's tip should be regularly
fire sources that can cause the product
cleaned; otherwise, it may cause fire.
catch a fire and ventilate the room in
• The plug’s tip should be cleaned
which the unit is placed.
regularly with a dry cloth; otherwise, it
Ignore this warning if your product's
may cause fire.
cooling system contains R134a.
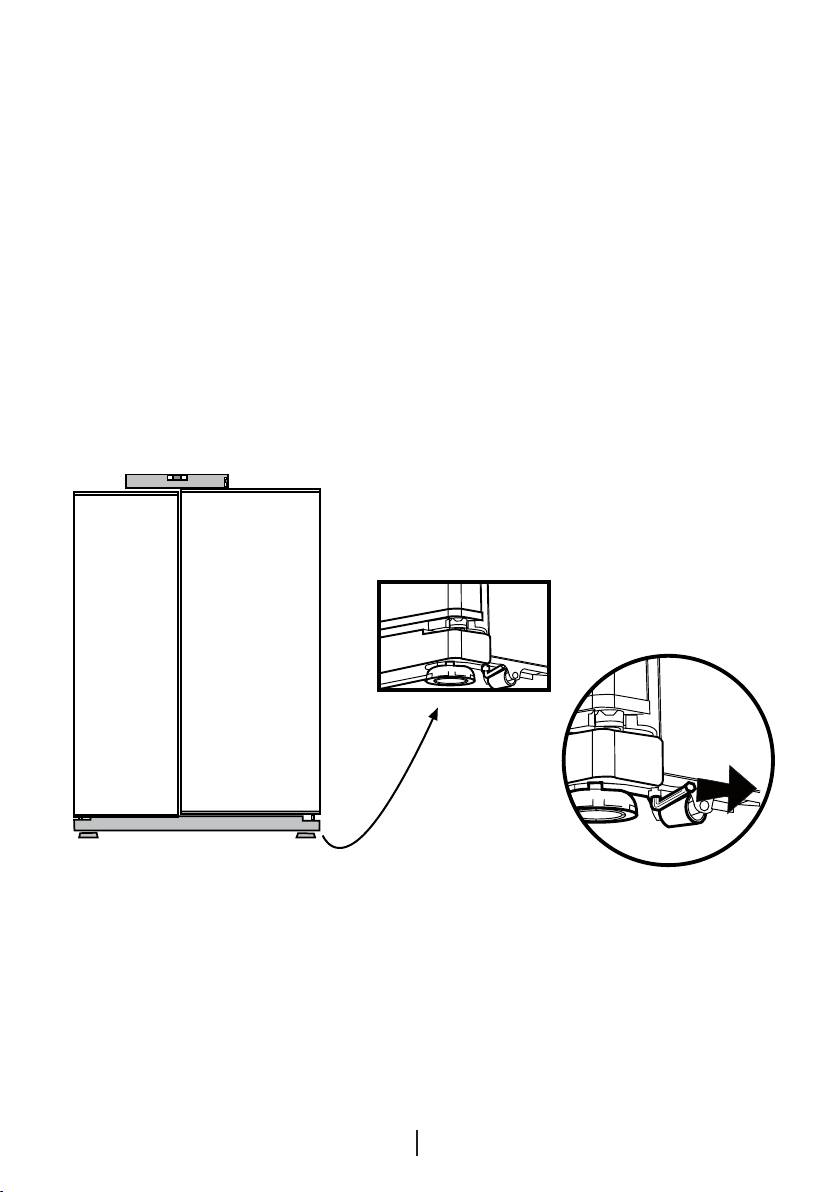
• Refrigerator may move if adjustable
Type of gas used in the product is stated
legs are not properly secured on the
in the type plate which is on the left wall
floor. Properly securing adjustable legs
inside the refrigerator.
on the floor can prevent the refrigerator
Never throw the product in fire for
to move.
disposal.
• When carrying the refrigerator, do not
hold it from door handle. Otherwise, it
may be snapped.
• When you have to place your product
next to another refrigerator or freezer,
the distance between devices should
be at least 8cm. Otherwise, adjacent
side walls may be humidified.
For products with a water
dispenser;
Pressure of water mains should be
minimum 1 bar. Pressure of water
mains should be maximum 8 bars.
• Use only potable water.
Child safety
• If the door has a lock, the key should
be kept away from reach of children.
• Children must be supervised to prevent
them from tampering with the product.
7
EN
Reccomendations for
Things to be done for energy
freshfood compartment
saving
* OPTIONAL
• Do not leave the doors of your
• Please do not let any foodstuff to come
refrigerator open for a long time.
to contact with the temperature sensor
• Do not put hot food or drinks in your
in freshfood compartment.In order to
refrigerator.
maintain freshfood compartment at ideal
• Do not overload your refrigerator so
storage temperature, the sensor must
that the air circulation inside of it is not
not be blocked by fodstuffs.
prevented.
• Do not place hot foodstuff in your
• Do not install your refrigerator under
appliance.
direct sunlight or near heat emitting
appliances such as ovens, dishwashers
or radiators.
• Pay attention to keep your food in
closed containers.
• For products with a freezer
compartment; You can store maximum
amount of food items in the freezer
when you remove the shelf or drawer
of the freezer. Energy consumption
value stated for your refrigerator has
been determined by removing freezer
shelf or drawer and under maximum
load. There is no harm to use a shelf or
drawer according to the shapes and
size of food to be frozen.
• Thawing frozen food in fridge
compartment will both provide energy
saving and preserve the food quality.
8
EN
MILK
temperature
juice
food
sensor
temperature
etc.
sensor
MILK
temperature
juice
sensor
food
temperature
etc.
sensor
3 Installation
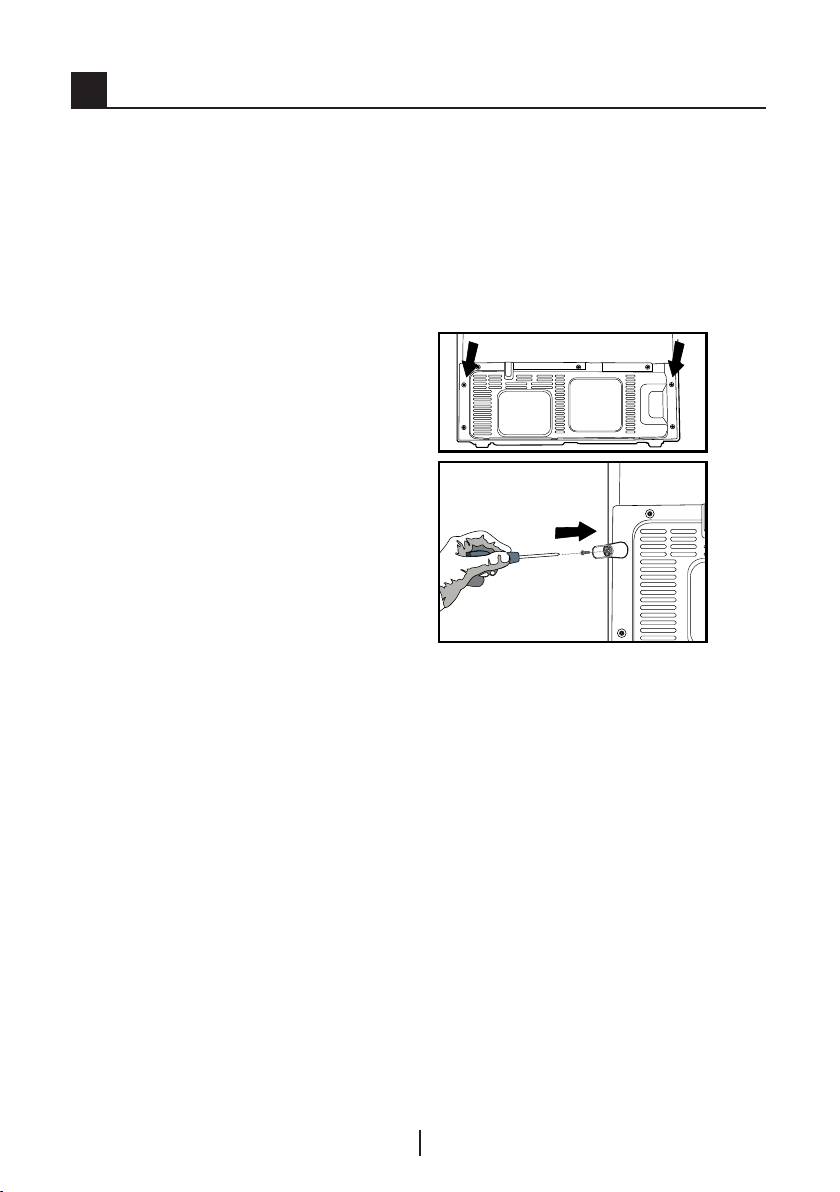
3. Insert the 2 plastic wedges onto the
C Please remember that the manufacturer
rear ventilation as illustrated in the
shall not be held liable if the information
following figure. Unscrew the existing
given in the instruction manual is not
ones and use the screws given in the
observed.
same bag of wedges. Plastic wedges
Points to be considered
will provide the required distance
when re-transporting your
between your refrigerator and the wall
refrigerator
in order to allow the air circulation.
1. Your refrigerator must be emptied and
cleaned prior to any transportation.
2. Shelves, accessories, crisper and etc.
in your refrigerator must be fastened
securely by adhesive tape against any
jolt before repackaging.
3. Packaging must be tied with thick
tapes and strong ropes and the rules of
transportation printed on the package
must be followed.
C Always remember...
Every recycled material is an
indispensable source for the nature and
for our national resources.
If you wish to contribute to recycling the
packaging materials, you can get further
information from the environmental
bodies or local authorities.
Before operating your
refrigerator
Before starting to use your refrigerator
check the following:
1. Is the interior of the refrigerator dry and
can the air circulate freely in the rear of
it?
2. Clean the interior of the refrigerator as
recommended in the “Maintenance and
cleaning” section.
9
EN

4. Plug the refrigerator into the wall outlet.
packing materials out of the reach of
When the door is open the respective
children or dispose them of by classifying
interior light will come on.
them in accordance with the waste
5. You will hear a noise as the compressor
instructions. Do not dispose them of
starts up. The liquid and gases sealed
along with the normal household waste.
within the refrigeration system may
The packing of your refrigerator is
also give rise to noise, even if the
produced from recyclable materials.
compressor is not running and this is
Disposing of your old
quite normal.
refrigerator
6. Front edges of the refrigerator may
Dispose of your old machine without
feel warm. This is normal. These areas
giving any harm to the environment.
are designed to be warm to avoid
A You may consult your authorized dealer
condensation.
or waste collection center of your
Electric connection
municipality about the disposal of your
Connect your refrigerator to a grounded
refrigerator
.
socket which is being protected by a
A
Before disposing of your refrigerator,
fuse with the appropriate capacity.
cut out the electric plug and, if there
Important:
are any locks on the door, make them
B The connection must be in compliance
inoperable in order to protect children
with national regulations.
against any danger.
B The power cable plug must be easily
Placing and Installation
accessible after installation
.
B
Caution: Never plug the refrigerator
B
The specified voltage must be equal to
into the wall outlet during installation.
your mains voltage.
Otherwise, risk of death or serious injury
B Extension cables and multiway plugs
may arise.
must not be used for connection.
A If the entrance door of the room
B A damaged power cable must be
where the refrigerator will be installed is
replaced by a qualified electrician.
not wide enough for the refrigerator to
B The appliance must not be operated
pass through, than call the authorised
before it is repaired! There is danger of
service to have them remove the doors
electric shock!
of your refrigerator and pass it sideways
through the door.
Disposing of the packaging
1. Install your refrigerator to a place that
A
The packing materials may be
allows ease of use.
dangerous for children. Keep the
2. Keep your refrigerator away from
heat sources, humid places and direct
sunlight.
3. There must be appropriate air
ventilation around your refrigerator in
order to achieve an efficient operation.
If the refrigerator is to be placed in a
recess in the wall, there must be at least
5 cm distance with the ceiling and at
10
EN
least 5 cm with the wall.
Ensure that door shelves are empty
If the floor is covered with a carpet, your
when adjusting the door height.
product must be elevated 2.5 cm from
1. Remove the lower ventilation cover by
the floor.
4. Place your refrigerator on an even
floor surface to prevent jolts.
5. Do not keep your refrigerator in
2
ambient temperatures under 10°C.
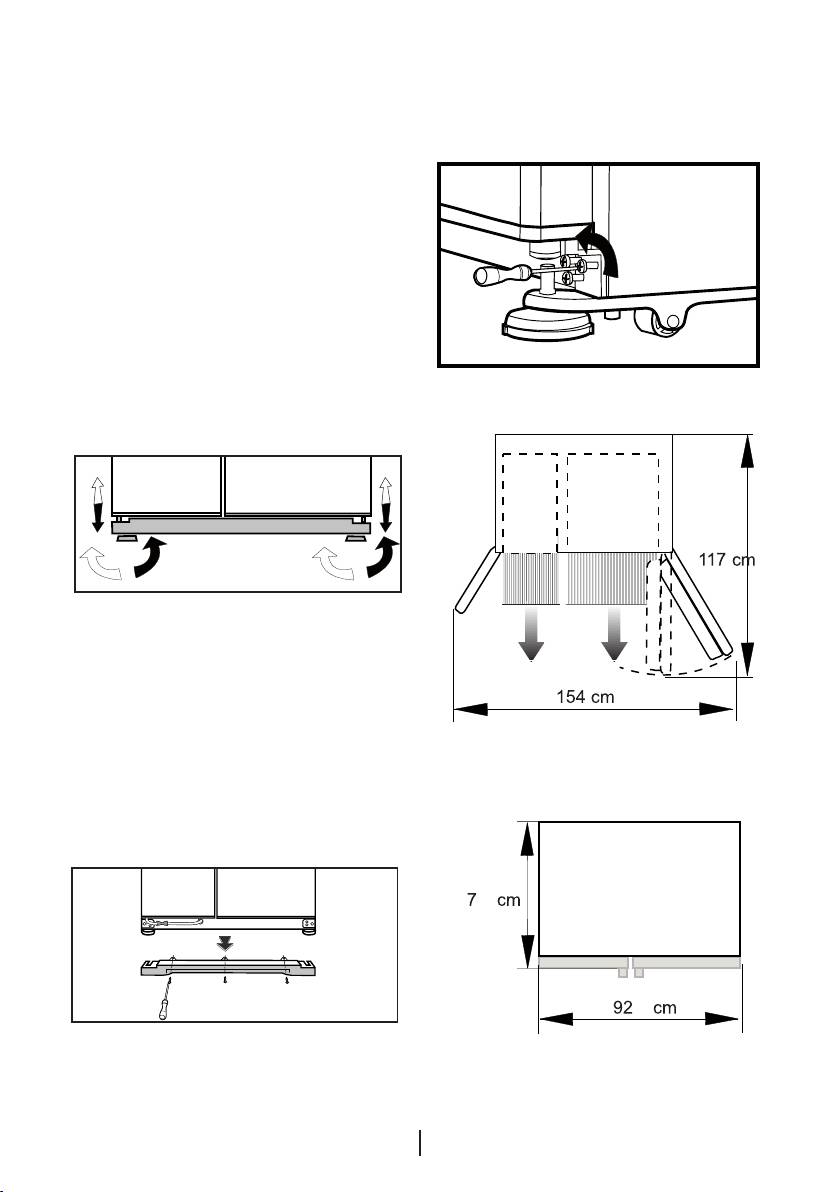
Floor balance adjustment
If your refrigerator is unbalanced;
You can balance your refrigerator by
turning the front legs of it as illustrated
in the figure. (See Figure A) The corner
(C)
where the leg exists is lowered when
(A)
you turn in the direction of black arrow
and raised when you turn in the opposite
direction. Taking help from someone to
slightly lift the refrigerator will facilitate
this process.
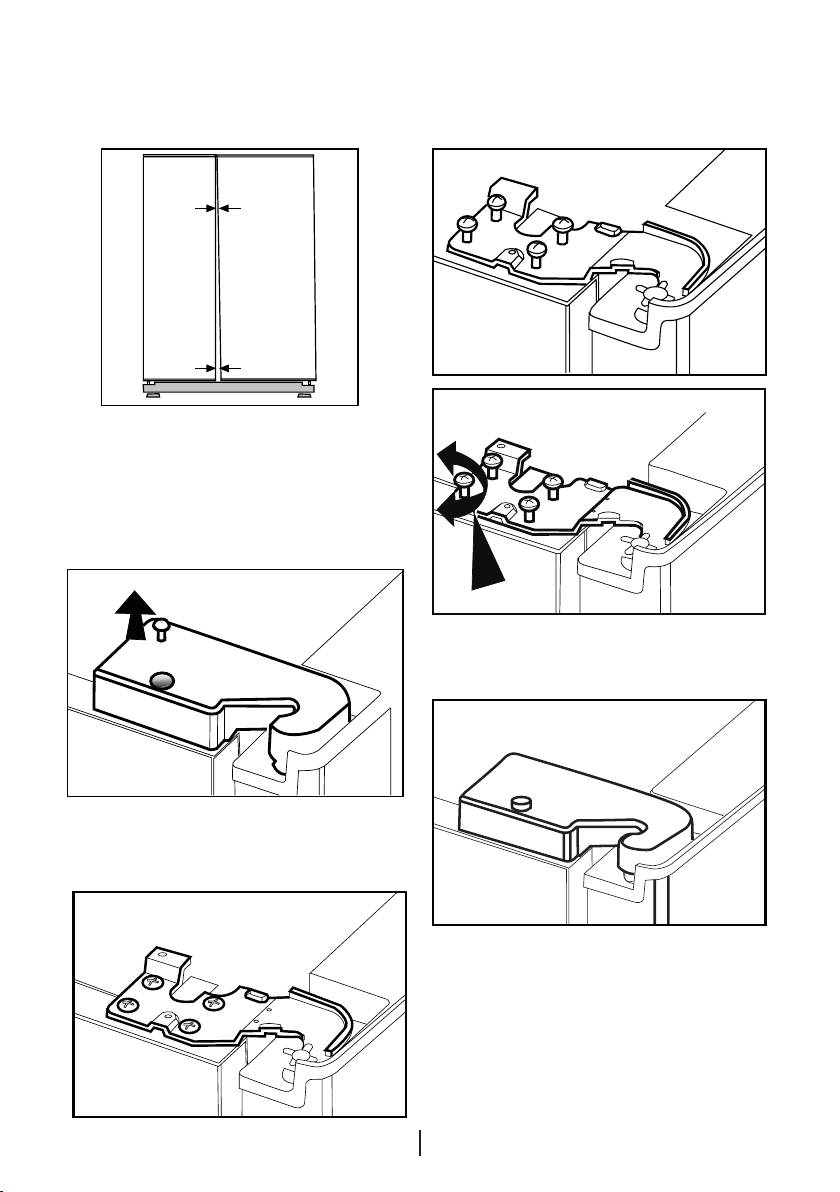
Door height adjustment
In case there is a problem with the
alignment of the doors with respect
to each other, they may be re-aligned
vertically in the order given below.
2
4
1 2 3
(B)
11
EN
unscrewing its screws as shown in the
• If the freezer compartment door is
figure below. (See Figure B)
higher than the fridge compartment
2. Loosen the three screws of the hinges
door, bring them to the same level
of the lower door, which you wish to
by turning the elevation screw on the
escalate, with the help of a screwdriver
freezer compartment side in the reverse
as shown in the figure below. (Do not
direction of arrow using a M6 Allen
remove completely)
wrench as illustrated in Figure D.
(See Figure C)
After bringing the doors to the same level
by elevating the front part with the aid of
• If the freezer compartment door is
the elevation screws,ensure the doors of
lower than the fridge compartment door,
the refrigerator shall close properly. If the
bring them to the same level by turning
doors do not close properly, this might
the turning the elevation screw on the
adversely affect the efficiency of the
freezer compartment side in the direction
refrigerator.
of arrow using a M6 Allen wrench as
illustrated in Figure D.
(D)
12
EN
Adjusting the gap between
removing hinge covers and this
situation should be made to take
the upper door
care.
C You can adjust the gap between the
fridge compartment doors as illustrated
in the figures.
Door shelves should be empty when
adjusting the door height.
C Using a screwdriver, remove the
screw of upper hinge cover of the door
you want to adjust.
Because of being wires in the hinge
cover of the freezer door, switch
off the refrigerator power before
C
Adjust the door appropriately as you
desire by loosing the screws.
C Fix the door you have adjusted by
tightening the screws without changing
the position of the door.
C Replace the hinge cover and fix with
the screw.
13
EN
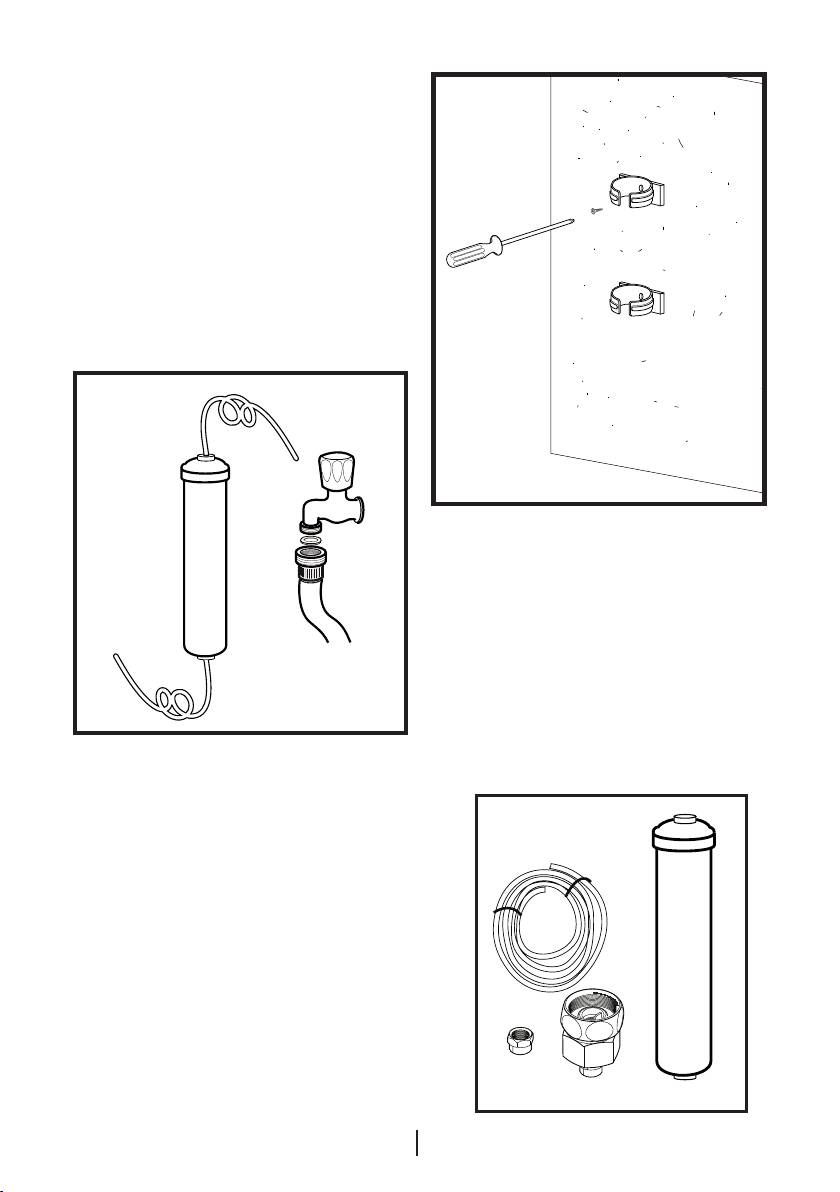
Installing Water Filter
(in some models)
Installation Requirements
Two different water sources may be
connected to the refrigerator for water
supply: the mains cold water supply and
water in a jug.
A pump should be used for jug water
usage.
3. 5 meter long water pipe (1/4 inch in
diameter)
4. Cold mains water valve with mesh filter
(Tap Adapter)
5. Water Filter to be fitted to the bracket
inside the fridge compartment.
Check that the parts stated below are
supplied with your appliance.
1. Union for connection of the water pipe
to the rear of the appliance
4
2. 3 pieces of pipe clips (In case required
2
to secure the water pipe)
C Note: Since the following parts are
not required in use with a jug, they
may not be found in the product you
3
purchased.
1
14
EN
a
a
b
c
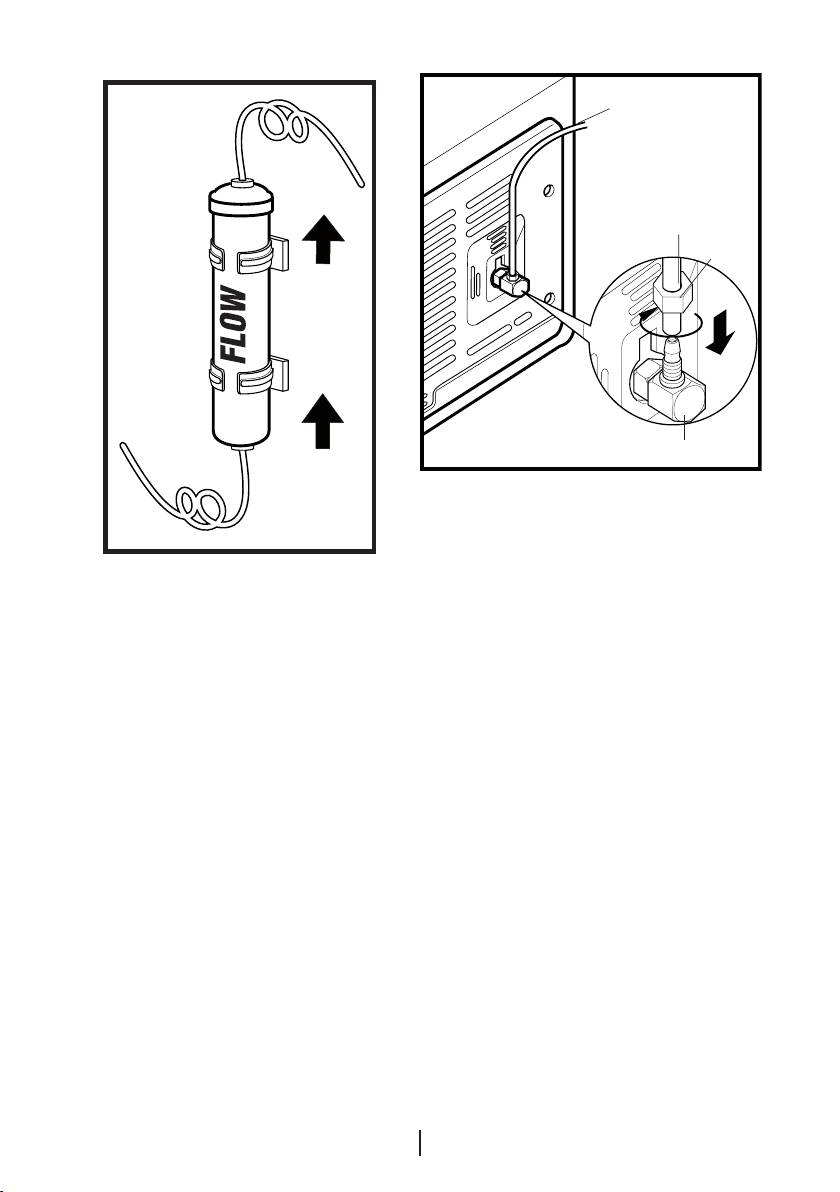
Water connection to the refrigerator
Please follow the instructions below.
Connection of the Water
Pipe to the Refrigerator
15
EN
2
1
1. After installing the union onto the
water pipe, insert the water pipe to
the refrigerator inlet valve by pressing
downwards firmly.
2. Fix union as seen in the opposite
figure, by squeezing by hand on the
refrigerator inlet valve.
(a- Water Pipe, b-Union, c-Valve)
C Note 1: You should not need to
tighten the union with a tool to achieve
water tight assembly. In case of a leak
use a spanner or a pair of pliers to
tighten the union.
To fit the water filter follow the
instructions below referring to figures
supplied:
1. Press ice cancel button on the display.
(Figure 1)
2. Remove the filter cover in the fridge
compartment by pulling it forward.
(Figure 2)
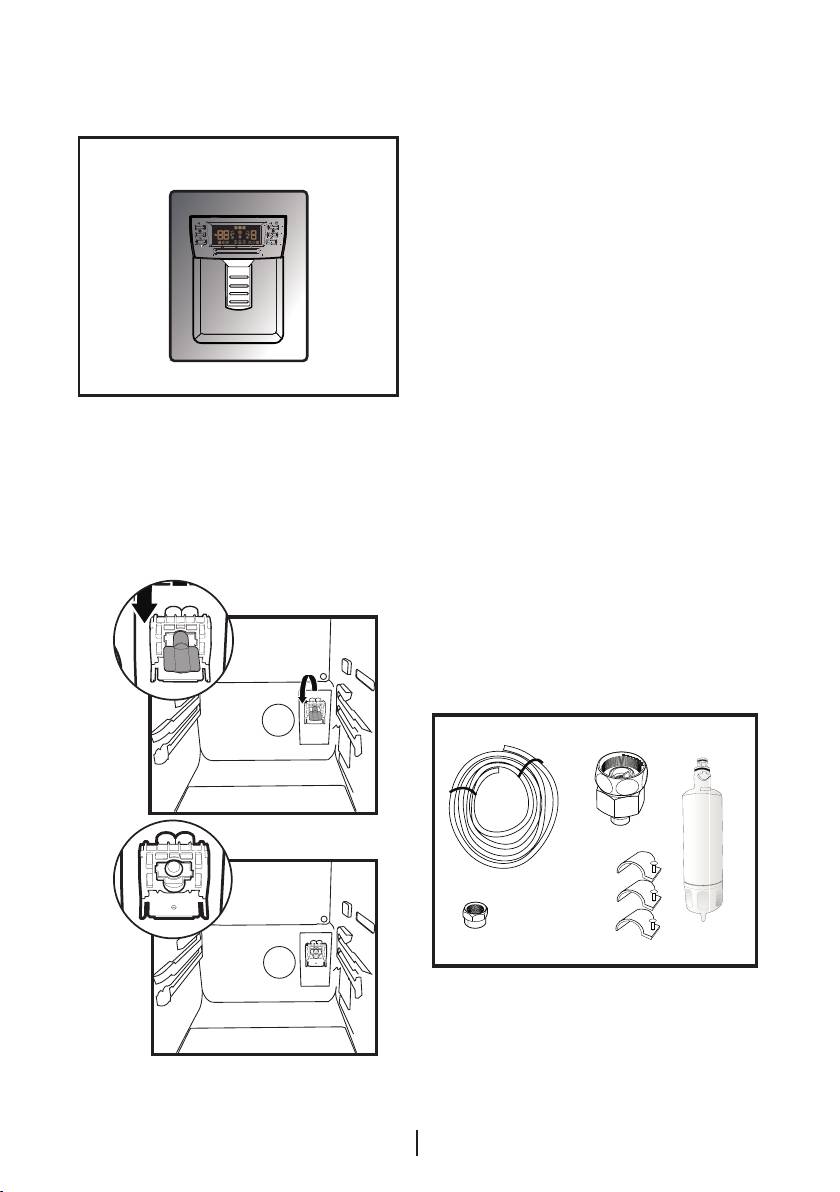
3. Take out the water filter by-pass cover
Note: It is normal that a few drops of
by rotating it downwards. (Figure 3-4)
water drip after the cover has been taken
out.
4. Remove the lid on top of the water filter
to place it as shown in the figure and
turn upwards to lock it. (Figure 5)
5. Press ice cancel button on the display
again to exit from this mode.
Water filter should be replaced every
6 months. The water filter must be
removed as shown in the figure when it
is going to be replaced or when it will no
longer be used and by-pass cover must
be attached. It must be made sure that
Ice Off mode is active before taking it
out.
A Warning: Make sure that the “Ice off”
A Warning: Water filter cleans some
mode is active before taking out the by-
foreign particles in the water. It does not
pass cover.
purify water from microorganisms.
A Warning: Ice Off button must always
be pressed during replacement of the
water filter or installing the by-pass
cover.
3
4
5
2
1
16
EN
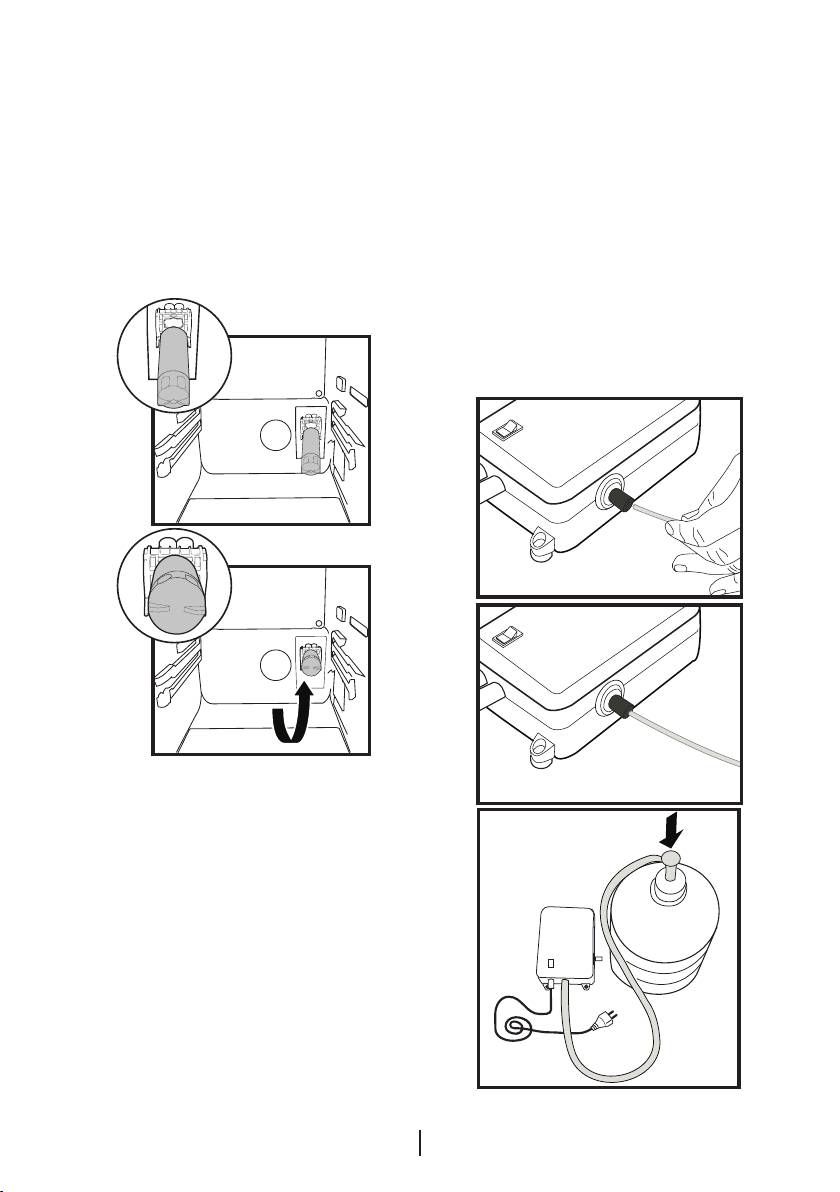
Connection of Water Hose to
the Jug
Connection of the Water
Pipe to the Cold Water Mains
(in some models)
Line
To connect water to the refrigerator from
a jug, a pump is needed. Follow the
(in some models)
instructions below after connecting one
If you want to use your refrigerator by
end of the water pipe coming out of the
connecting it to the cold water mains
pump to the refrigerator as described on
line,
the previous page.
you will have to connect a standard 1/2”
valve connection fitting to the cold water
supply in your house. In case this valve is
not present or in case you are not sure,
consult a qualified plumber.
1a
1b
1. Finish the connection by pushing the
other end of the water pipe into the
water pipe inlet of the pump as shown
in the figure.
2. Put and fix the pump hose into the jug
as shown in the figure.
3. After completing the connection, plug in
and run the pump.
To provide an efficient operation of the
pump, wait for 2-3 minutes after
starting the pump.
C Note: You may refer to the user
manual of the pump while making the
2
water connection.
17
EN
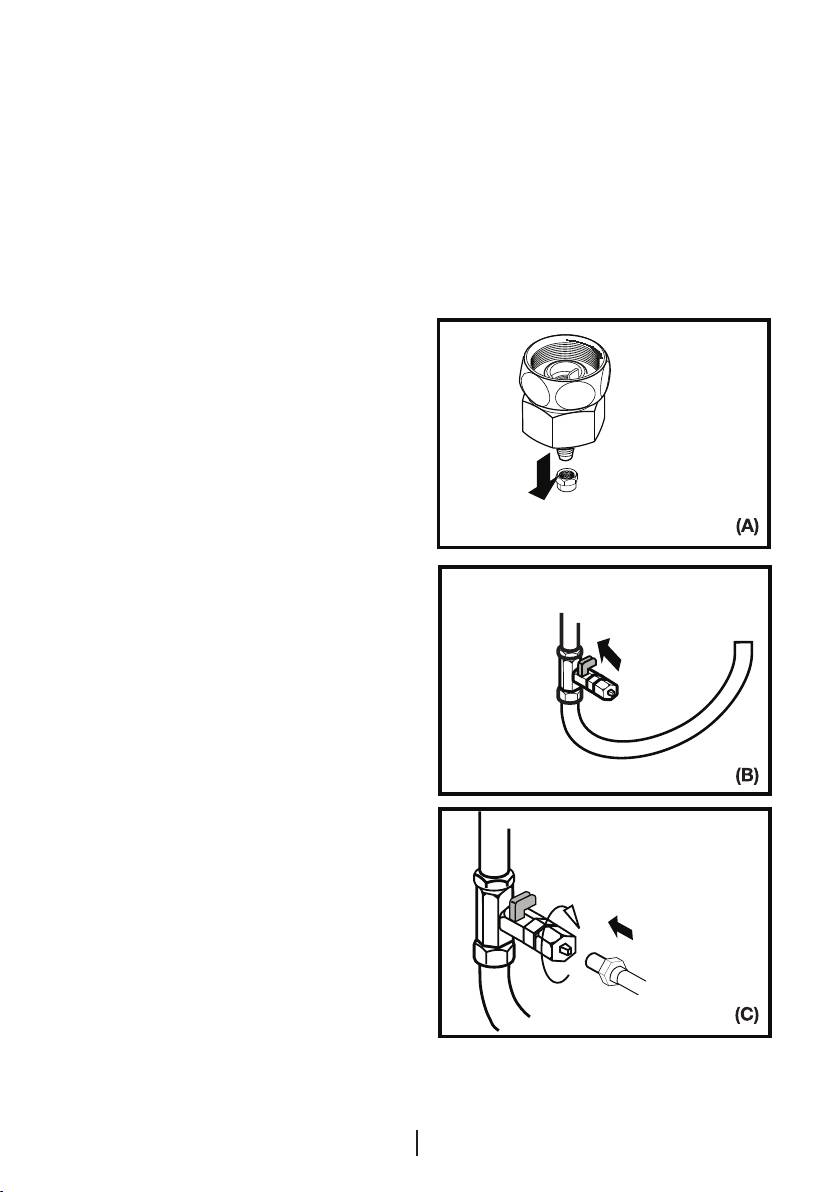
C Water mains pressure must not be
1. Separate the union from the tap
over 8 bars.
adaptor. (Figure A)
2. Install the tap adaptor to 1/2” valve
C Pumps must be used in case the
fitting as shown in the figure. (Figure B)
supply water pressure drops below 1 bar
3. After inserting the water pipe to the
or if a jug is going to be used.
union, install it to the tap adaptor and
insert to the tap as shown in the figure.
(Figure C)
4. Tighten the union manually. In case of a
leak use a spanner or a pair of pliers to
tighten the union.
A Warning: Secure the water pipe
to suitable points by means of the
pipe clips supplied to avoid any
damage or displacement or accidental
disconnection.
A Warning: After turning on the water
valve, make sure that there is no leakage
at both connection points of the water
pipe. In case of a leak, turn off the valve
immediately and tighten all joints again
using a spanner or a pair of pliers.
A Warning: Make sure that standard
1/2" valve fitting fed by cold mains water
supply is available and is turned off fully.
Note -1: There is no need to use water
filter in case a jug is used.
Note -2: Pump must be used when jug will
be used.
Prior to first use of Ice/Water
Dispenser
C Water mains pressure must not be
below 1 bar.
18
EN

C Water system of the refrigerator must
be connected to the cold water line. It
must not be connected to hot water line.
C No water may be obtained in the
initial startup of the refrigerator. This
is caused by the air in the system. To
discharge air from the system, press
Dispenser latch for periods of 1 minute
until water comes from the Dispenser.
Water flow may be irregular in the
beginning. Irregular water flow will be
normalized after the air in the system is
discharged.
C At the initial startup of the refrigerator
approx.12 hours must pass before cold
water can be obtained.
C Water mains pressure must be
between 1-8 bars for the operation of
Ice/Water Dispenser smoothly. For this,
check that 1 glass of water (100 cc) can
be filled in 10 seconds.
C The first 10 glasses of water should
not be consumed.
C 12 hours must pass to obtain ice
from the Ice Dispenser for the first time.
If there is not enough ice in the ice
dispenser, ice may not be obtained from
ice dispenser.
C Approximately the first 30 cubes
of ice to be obtained from the Ice
Dispenser must not be used.
C Always use the water filter when a jug
is not being used.
19
EN

4 Preparation
C Your refrigerator should be installed at
least 30 cm away from heat sources
such as hobs, ovens, central heater
and stoves and at least 5 cm away
from electrical ovens and should not be
located under direct sunlight.
C The ambient temperature of the room
where you install your refrigerator
should at least be 10°C. Operating your
refrigerator under cooler conditions
than this is not recommended with
regard to its efficiency.
C Please make sure that the interior of
your refrigerator is cleaned thoroughly.
C If two refrigerators are to be installed
side by side, there should be at least 2
cm distance between them.
C When you operate your refrigerator
for the first time, please observe the
following instructions during the initial
six hours.
- The door should not be opened
frequently.
- It must be operated empty without
any food in it.
- Do not unplug your refrigerator. If
a power failure occurs out of your
control, please see the warnings in
the “Recommended solutions for the
problems” section.
C Original packaging and foam
materials should be kept for future
transportations or moving.
20
EN
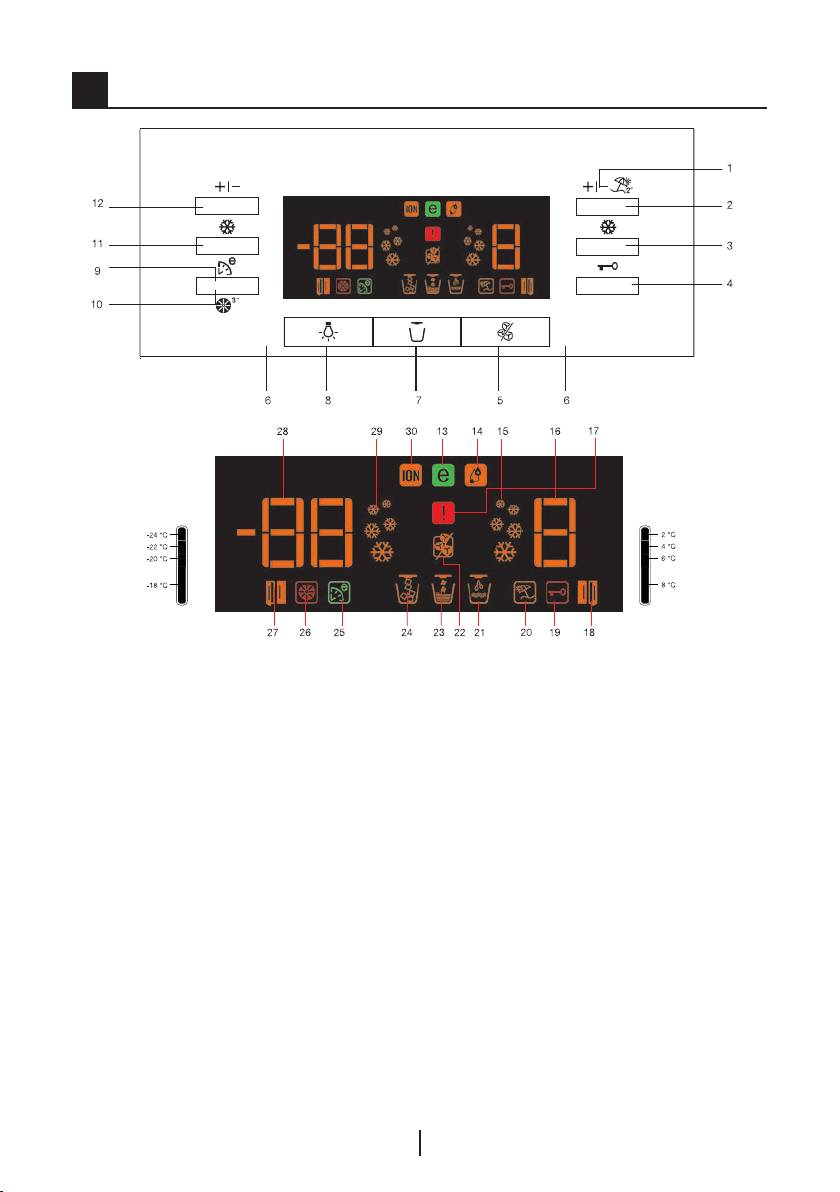
5 Using your refrigerator
18. Fridge door open indicator
1. Fridge Set button
19. Key Lock indicator
2. Vacation mode button
20. Vacation mode indicator
3. Quick fridge button
21. Water indicator
4. Key lock button
22. No ice indicator
5. Ice Off button
23. Crash Ice indicator
6. Water Dispenser Lights
7. Ice / Wate selection button
24. Cube Ice indicator
8. Water Dispenser light button
25. Auto Eco indicator
9. Filter Reset button
26. Filter reset indicator
10. Auto Eco button
27. Freezer door open indicator
11. Quick freeze button
28. Freezer Compartment Temperature Setting
12. Freezer Set button
indicator
13. Economy mode indicator
29. Fast Freeze indicator
14. High humidity indicator
30. Ioniser indicator
15. Quick cool indicator
OPTIONAL
16. Fridge temperature setting indicator
17. High temperature/error warning indicator
21
EN
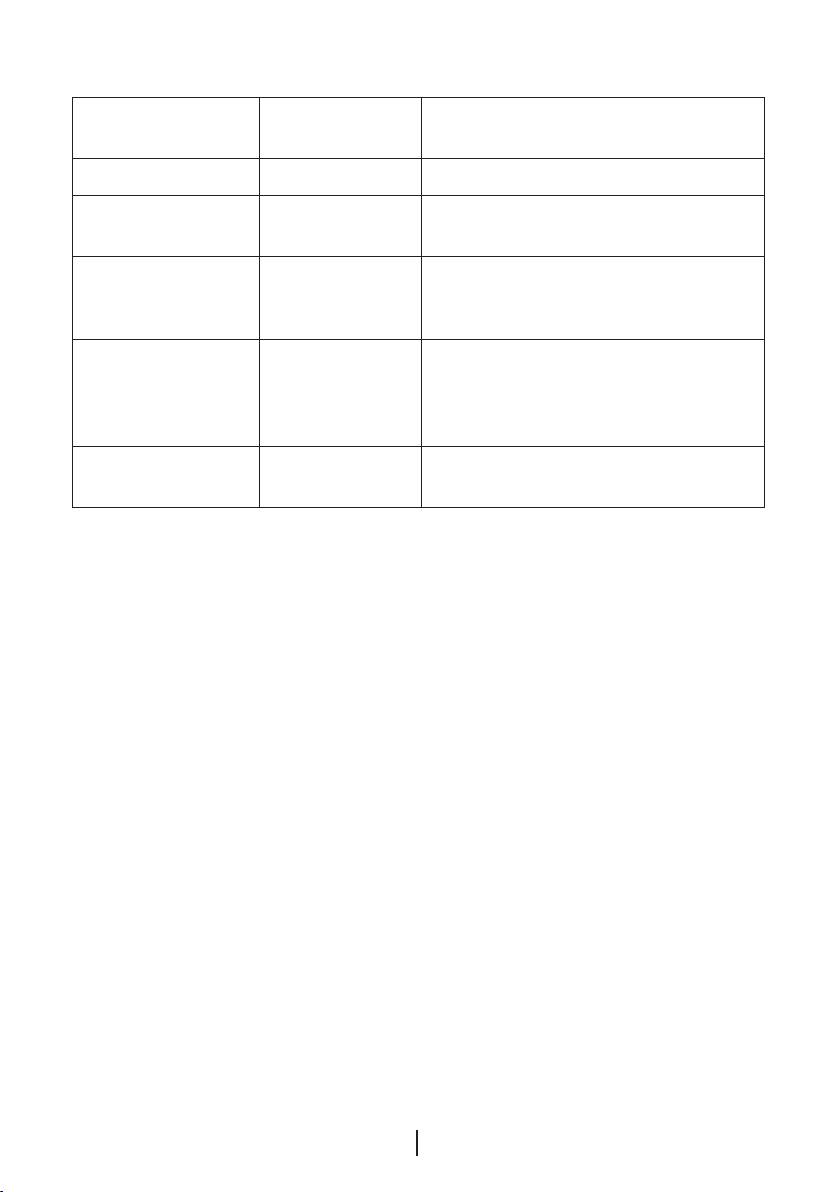
Freezer
Fridge
Explanations
Compartment
Compartment
Adjustment
Adjustment
-15°C 4°C This is the normal recommended
setting.
-18,-21 or -24°C 4°C These settings are recommended
when the ambient temperature
exceeds 30°C.
Fresh Freeze 4°C Use this when you wish to freeze your
food or make ice in a short time. Your
refrigerator will return to its previous
mode when the process is over.
-15°C or colder 2°C If you think that your fridge
compartment is not cold enough
because of the hot conditions or
frequent opening and closing of the
door.
-15°C or colder Quick Cool You can use it when your fridge
compartment is overloaded or if you
wish to cool down your food rapidly.
temperature will go down and then
Setting the fridge
return to the highest setting. Release at
compartment temperature
the desired temperature and the new set
temperature will be stored.
Fridge compartment temperature can be
set at one of the following temperatures:
Fresh Freeze Function
8,6,4 and 2°C
When you press “Fresh Freeze” button,
Press the Fridge Set button to change.
the compressor will run for about 14
The temperature will decrease by 2°C.
hours. Fresh Freeze indicator will glow.To
Every time you press the button, the
cancel this function press Fresh Freeze
temperature will go down and then
button again. Fresh Freeze indicator
return to the highest setting. Release at
will turn off and return to its normal
the desired temperature and the new set
settings. Fresh Freeze will cancel itself
temperature will be stored.
automatically after about 12 hours if you
do not cancel it.
If you think that your food is colder
than you desire, you can adjust
If you want to freeze large amounts
the temperature setting of fridge
of fresh food, press the Fresh Freeze
compartment to 6 or 8.
button 14 hours before putting the food
into the freezer compartment.
Setting the freezer
compartment temperature
Quick Cool Function
Freezer temperature can be set at one of
When you press Quick Cool button, the
the following temperatures : -15 / -18 /
temperature of the compartment will be
-21 / -24 and -24°C
colder than the adjusted values. This
function can be used for food placed in
Press the Freezer Set button to change.
the fridge compartment and required to
The temperature will decrease by 2°C.
be cooled down rapidly.
Every time you press the button, the
22
EN
After pressing the Quick Cool button,
water dispenser lamp will light up and
Quick Cool indicator will glow.To cancel
it will go off when the button is pressed
this function press Quick Cool button
again. This illumination will also light
again. Quick Cool indicator will turn
up when the water dispenser latch is
off and return to its normal settings.
pressed, and it will go off a short while
Quick Cool function will cancel itself
after the latch is released.
automatically in case you do not cancel
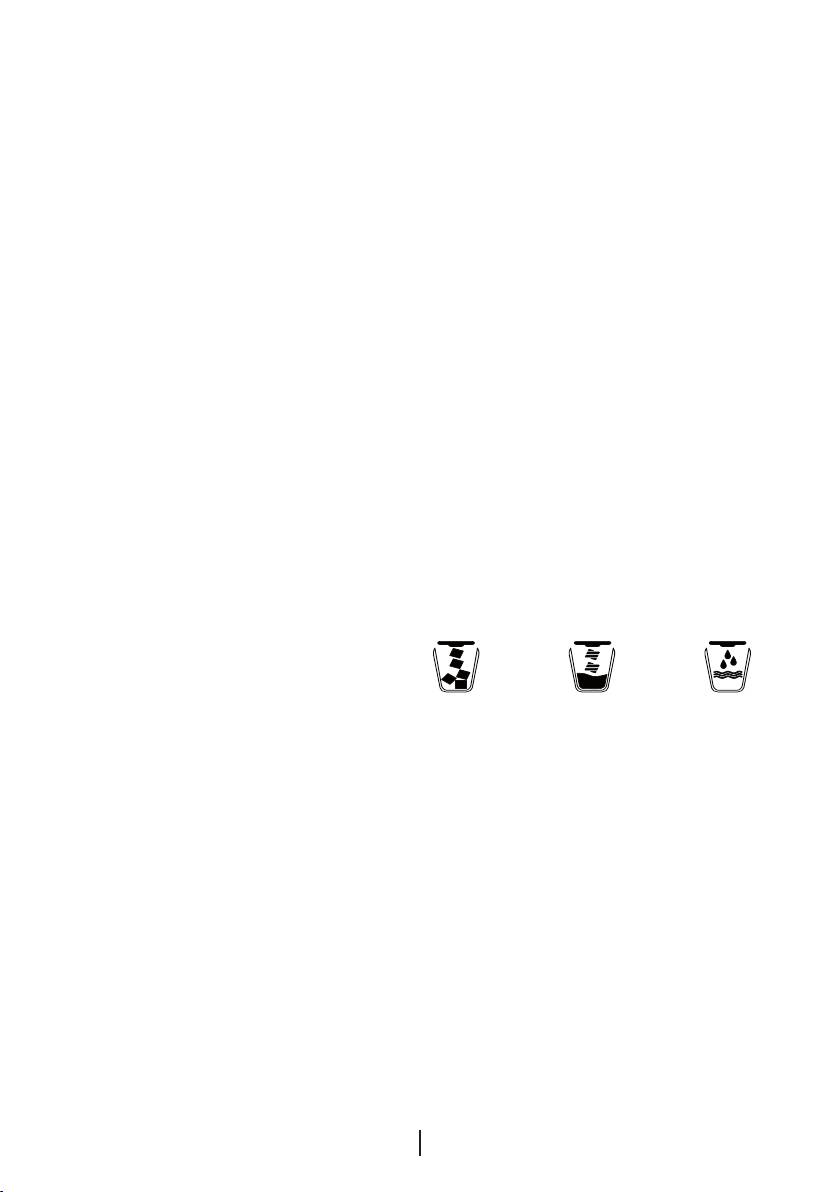
Water/Ice Type Selection
it.
With Dispenser Selection button, either
Vacation Button
one of “water”, “ice cube” or “crushed
In case the fridge compartment will not
ice” options is selected.
be used for a long time, the usage of the
Ice/Water Dispenser
fridge compartment may be cancelled by
With its three different functions, the
pressing on the Vacation Button. By this
dispenser efficiently meets your cold
way, the refrigerator may operate more
water, cube ice and crushed ice needs
economically. Press on Vacation Button
without having to open the door of the
for 3 seconds to activate this function.
refrigerator. It is a continuous cold water
When this function is active, the door of
and ice source without adding water.
the fridge compartment must be kept
User friendly control panel provides the
closed and no food must be left in the
following dispensing functions:
fridge compartment.
Note:
Auto Eco Button (Special
• Water or ice can be dispensed for a
Economy function)
maximum of 90 seconds at each use.
When “Auto Eco” button is pressed,
• When the freezer door is open, the
Auto Economy Function will be
dispenser will not work.
activated. If the door of the fridge
compartment is kept closed for a long
time when this function is selected,
Ice Cube Crushed Ice Cold
the fridge compartment will switch to
Water
a more economic operation mode to
save electricity automatically. When the
Auto Eco button is pressed again, this
Using the Ice Dispenser
function is deactivated.
C
Please note, first ice cubes will not be
Ioniser
ready before 12 hours after switching on
the appliance.
The ioniser helps purify the air in the
fridge and is carried out automatically
In case you do not need ice, such as
during winter or in case you are on
Key Lock Button
vacation, select the ice off function.
The key lock is activated when this
C Ice device produces approximately
button is pressed for 3 seconds and all
110 cubes of ice in 24 hours and this
buttons and the dispenser latch will not
amount may change according to
work. If you want to deactivite key lock
the frequency of opening of doors,
press again for 3 seconds.
refrigerator settings and power outage.
Water Dispenser Illumination
Produced ice may be obtained from the
When the Light button is pressed, the
dispenser as cube ice or crushed ice.
23
EN

It is normal to get crushed ice from the
FILTER Reset Button:
dispenser in a longer time than in getting
the ice cubes and also flowing of some
Water filter should be replaced every six
crushed ice before the ice cubes drop
months. Filter reset indicator lits if water
if crushed ice option had been selected
filter needs to be changed Press filter
before selecting ice cube option.
Reset Button for 3 seconds to remove
C If the ice dispenser hasn’t been used
filter reset indicator warning.
for a long time or after a power cut the
ice may form clumps or if the ice has
taken on a change in smell or taste then
the ice must be disposed of and the
icebox cleaned thoroughly.
Warnings
C No ice must be added to the ice
dispenser compartment. This may
adversely affect the ice supply or
crushing the ice.
A It is normal to have a couple of ice
cubes stuck together in the icebank.
A Moving parts such as blades in
a housing at the ice outlet of the
dispenser must not be touched to
avoid injury.
A Never use sharp objects to break
the ice in the icebox. This may cause
damage on the icebox.
A Food stuff should never be placed into
the icebox for quick cooling purposes.
A When the icebox is to be removed for
any reason, first of all Ice Off Button
must be pressed.
Ice Off
C
To stop ice formation, Ice Off button
is pressed. When Ice Off is selected, no
water will be taken into the Icematic.
However, already existing ice can be
taken from the dispenser. To restart
ice formation, Ice Off button must be
pressed again.
Warning: If you do not use the ice
dispenser, do not forget to put ice duct
cover into the ring inside of the freezer
door. (See. Your Refrigerator section)
24
EN
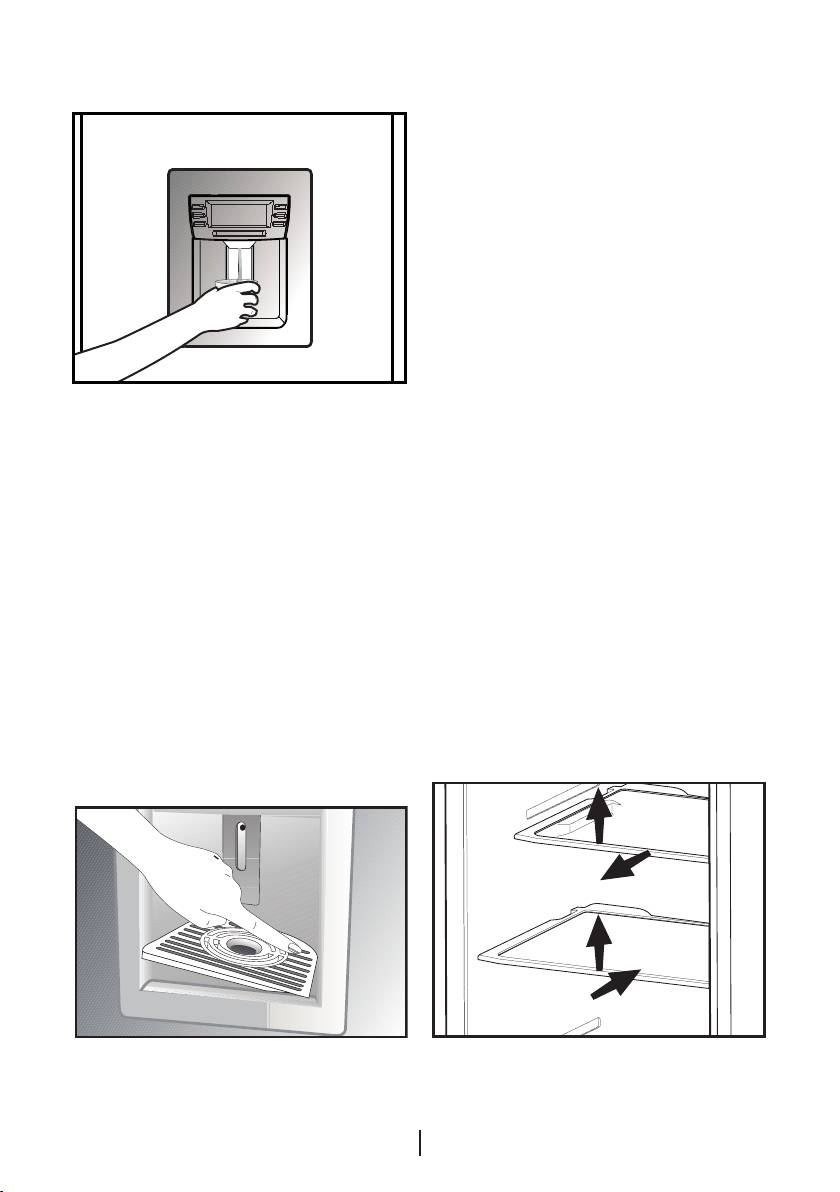
Using the water spring
Sliding Body Shelves
Sliding body shelves can be pulled by
slightly lifting up from the front and moved
back and forth. They come to a stop point
when pulled towards front to allow you
reach the foods placed at the back of the
shelf; when it is pulled after slightly lifting
upwards at the second stop point, the
body shelf will be released.
The shelf should be held tightly from the
bottom as well in order to prevent it from
tipping over. The body shelf is placed on
the rails at the sides of the refrigerator body
by bringing it to one lower or one upper
Warnings
level.
The body shelf should be pushed
It is normal for the first few glasses of
backwards to seat it completely.
water taken from the dispenser to be
warm.
In cases where the water dispenser
has not been used frequently, sufficient
amount of water must be drained from
the dispenser to get fresh water.
Spillage Tray
Water drops that drip during use,
accumulates in the spillage tray. You
can remove spillage tray by pulling it to
yourself. You can remove the water with
a sponge or a soft cloth.
1
2
3
4
25
EN
Blue light
Crisper humidity control
sliders
Foodstuff stored in the crispers that are
enlightened with a blue light continue
Using the crisper humidity control sliders
their photosynthesis by means of the
Crisper of your refrigerator is designed
wavelength effect of blue light and thus,
specially to keep your vegetables fresh
preserve their freshness and increase
without loosing their humidity. Cold air
their vitamin content.
circulates basically around the crisper
and the amount of the cold air passing
through the crisper is controlled by the
sliders on the front side of the crisper
cover.
You can adjust the humidity control
sliders to a suitable position according
to the humidity and cooling condition of
your food in the crisper.
If you want your food in the crisper
Ion:
to cool more, open the holes of the
Air is ionized by means of the ionizer
humidity control sliders and if you want
system in the fridge compartment air
them to cool less and keep their humidity
duct. Thanks to this system, air-borne
for a longer time, close the holes.
bacteria and particles that cause odor
are removed.
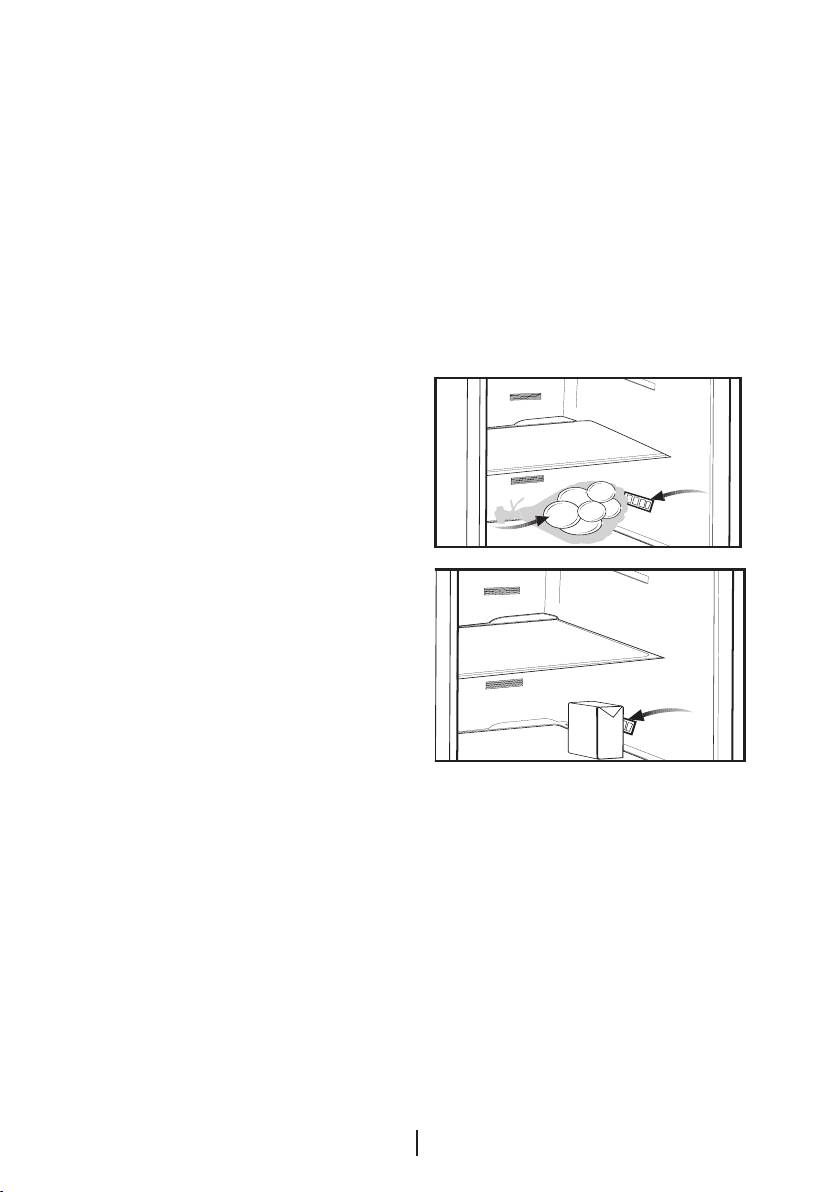
Egg tray
• You can install the egg holder to the
desired door or body shelf.
• Never store the egg holder in the
freezer compartment.
Fresh Freeze Compartment
This compartment freezes your food
quickly and preserves their tastes and
nutritional values.
26
EN

Recommendations for
Replacing the Interior Light
preservation of frozen food
Bulb
• Prepacked commercially frozen food
Should the light fail to work, proceed as
should be stored in accordance with the
follows:
frozen food manufacturer’s instructions
1. Switch off at the socket outlet and pull
for a
( 4 star) frozen food storage
out the mains plug.
compartment.
Remove all shelves and drawers for easy
• To ensure that the high quality
access.
achieved by the frozen food
2. Illumination covers in freezer and
manufacturer and the food retailer is
fridge sections are opened by pressing
maintained, the following should be
by hand; first release one side and then
remembered:
the other by pressing on the sides as
1.Put packets in the freezer as quickly as
shown in the figures.
possible after purchase.
3. First check that the bulb has not
2.Ensure that contents are labelled and
worked loose by ensuring that it
dated.
is screwed securely in the holder.
3.Do not exceed “Use By”, “Best Before”
Reinsert the plug and switch on. If the
dates on the packaging.
bulb works, reinstall the light cover by
If there is a power failure do not open
inserting the rear lug and pushing up to
the freezer door. Even if the power failure
locate the front two lugs.
lasts up to the time specified on Type
4. If the light still fails to work, switch
Label (inside left of the refrigerator),
off at the socket outlet and pull out the
frozen food will not be affected. In case
mains plug. Replace the bulb with a new
the failure lasts longer, the food must
15 watt (max) screw cap E14 (SES) bulb.
be checked and when necessary, must
5. Carefully dispose of the burnt-out light
be consumed immediately or must be
bulb immediately.
frozen after cooked.
Replacement light bulb can easily be
Defrosting
obtained from a good local electrical or
The fridge and freezer compartments
DIY store.
defrost automatically.
27
EN
28
EN

6 Maintenance and cleaning
A Never use gasoline, benzene or similar
Protection of plastic
substances for cleaning purposes.
surfaces
B We recommend that you unplug the
C
Do not put the liquid oils or oil-cooked
appliance before cleaning.
meals in your refrigerator in unsealed
C Never use any sharp abrasive
containers as they damage the plastic
instrument, soap, household cleaner,
surfaces of your refrigerator. In case of
detergent and wax polish for cleaning.
spilling or smearing oil on the plastic
C Use lukewarm water to clean the
surfaces, clean and rinse the relevant
cabinet of your refrigerator and wipe it
part of the surface at once with warm
dry.
water.
C Use a damp cloth wrung out in a
solution of one teaspoon of bicarbonate
of soda to one pint of water to clean
the interior and wipe it dry.
B Make sure that no water enters the
lamp housing and other electrical items.
B If your refrigerator is not going to be
used for a long period of time, unplug
the power cable, remove all food, clean
it and leave the door ajar.
C Check door seals regularly to ensure
they are clean and free from food
particles.
A To remove door racks, remove all the
contents and then simply push the
door rack upwards from the base.
29
EN
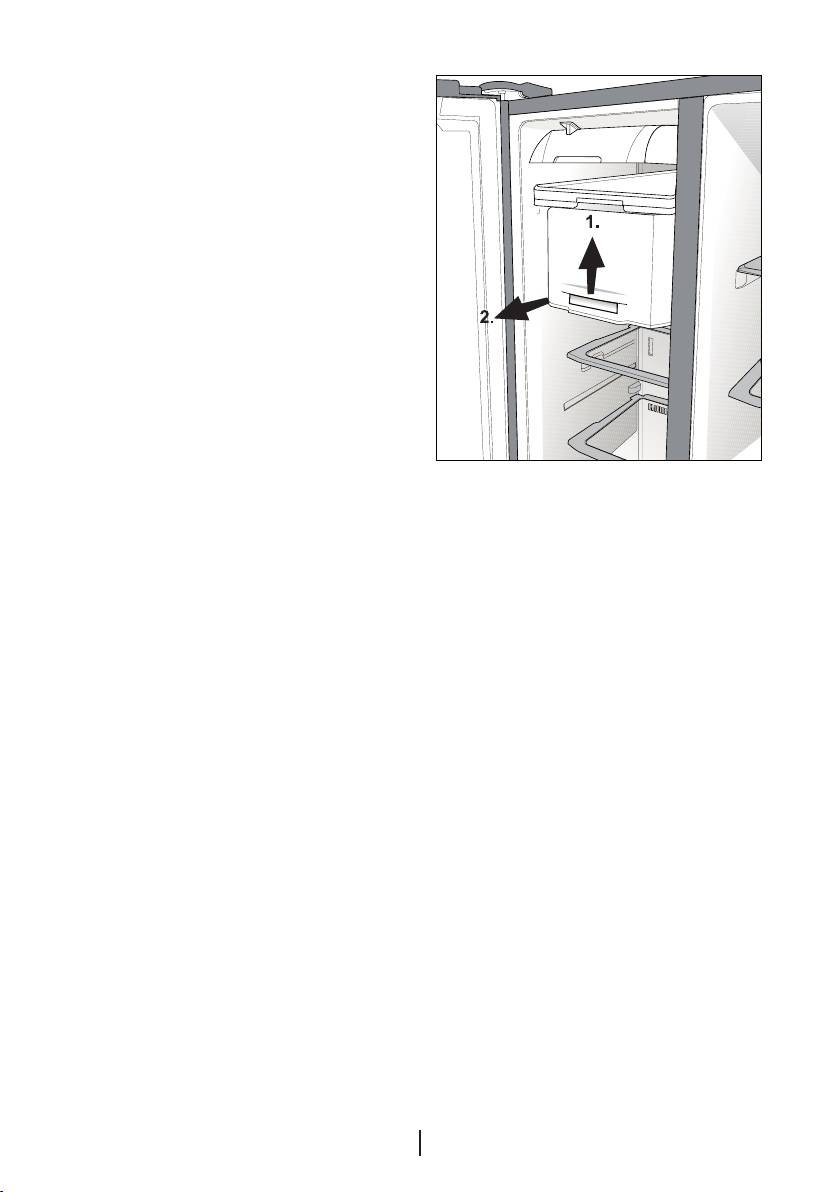
Chill compartment
You can increase the inner volume
of your refrigerator by removing the
desired chill compartment. Pull the
compartment towards yourself until it is
stopped by the stopper. Raise the front
part for approximately 1 cm and pull the
compartment towards yourself again to
remove it completely.
This compartment intended specifically
for the storage of highly perishable
foodstuffs. You can also use these
compartments if you want to store your
food at a temperature a few degrees
below the fridge compartment.
30
EN
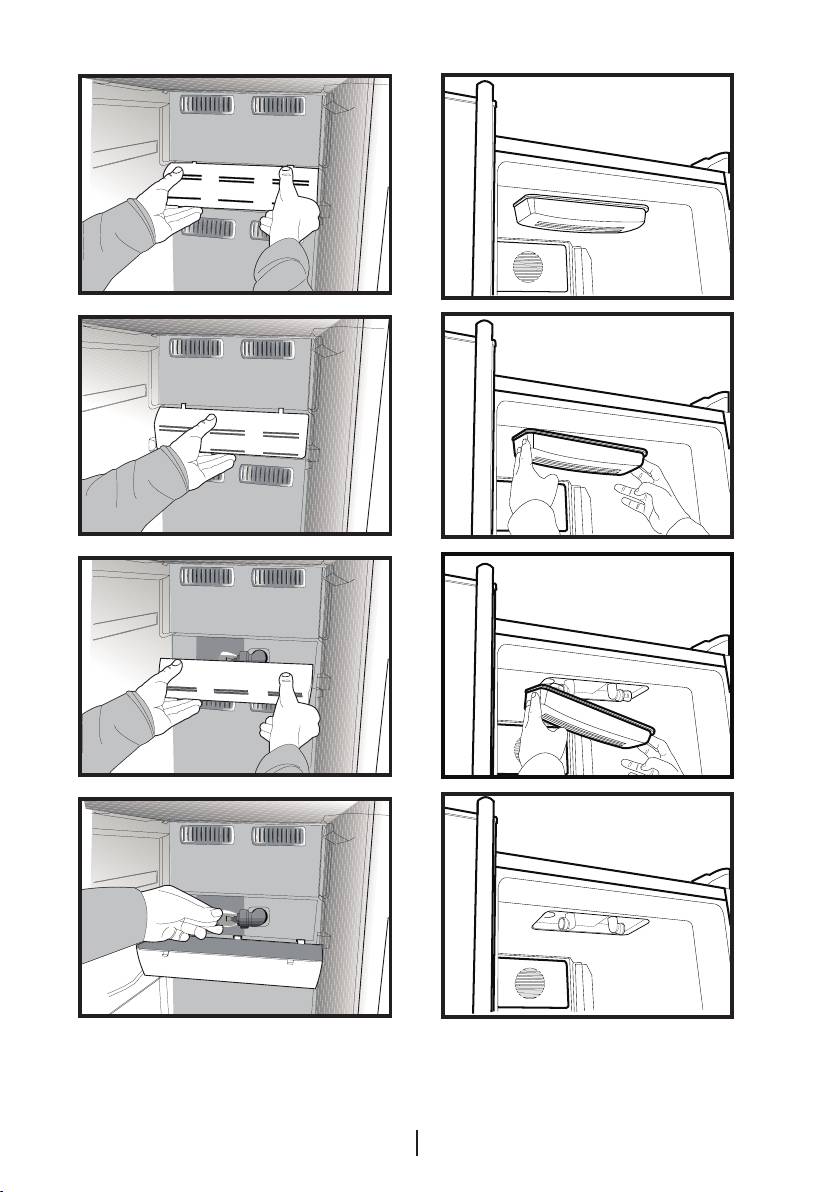
Icebox and Water Dispenser
C
Follow the procedure and warnings
below to clean the icebox:
A Remove the Icebox by lifting first and
then pulling towards yourself as shown
in the diagram.
A Empty the ice in the Icebox if any. To
take out the stuck ice, use objects that
are not sharp to avoid any damage on
the Icebox.
A Pay attention that the inside of the
Icebox is not wet/damp before placing
it back to its housing.
A If you want to get ice from the ice
dispenser after placing the Icebox
back to its housing and closing the
freezer door, exit from Ice Off mode by
pressing the Ice Off key again.
A Do not touch moving parts like
the knife in the Icebox.
C Leave the Water Reservoir empty
when you are not going to use for a
long time
31
EN
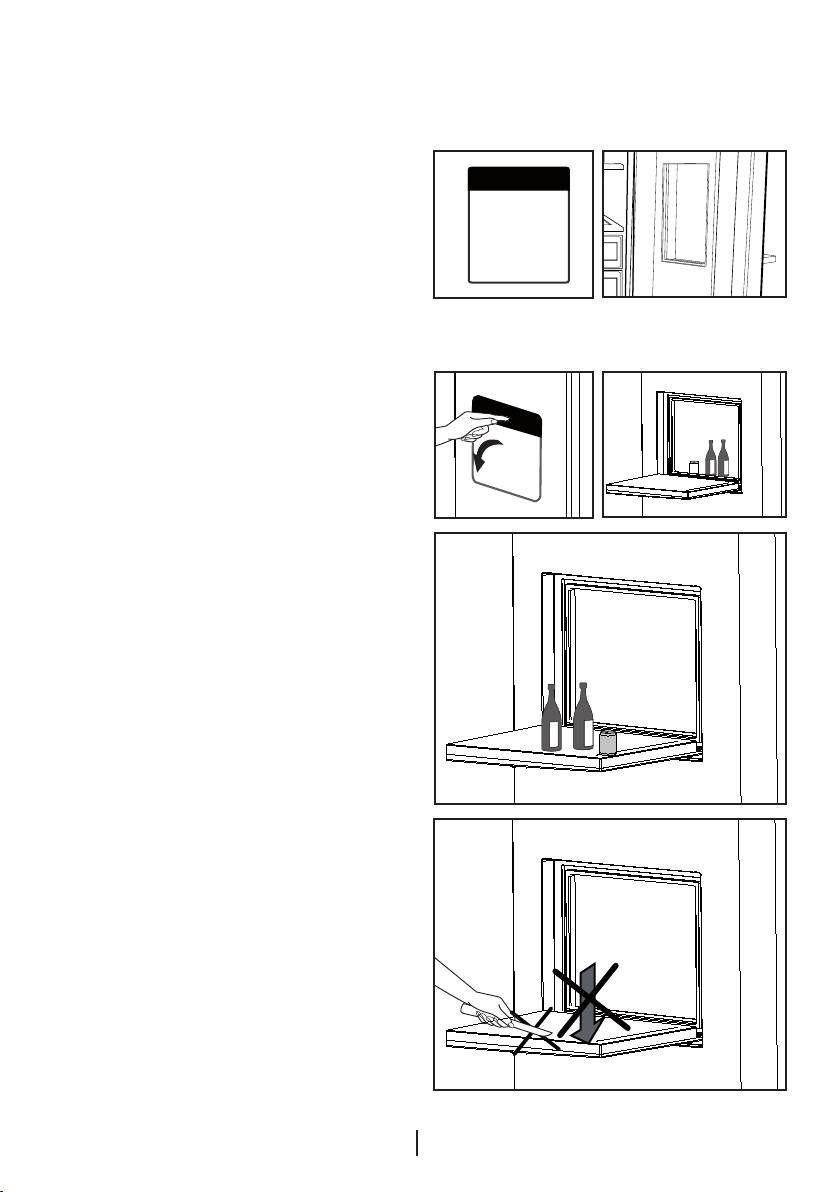
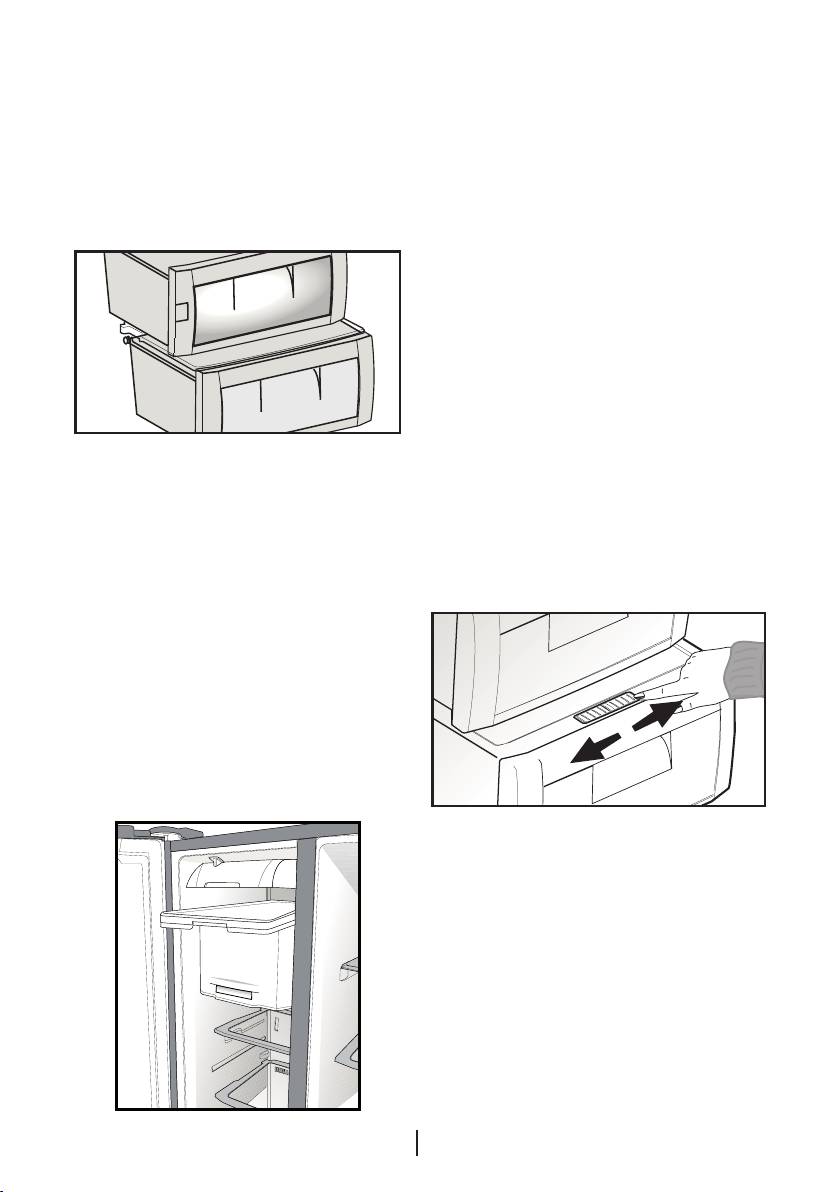
Minibar
Minibar door provides you extra comfort
when using your refrigerator. The door
shelf in the refrigerator can be accessed
without opening the refrigerator door;
thanks to this feature, you can easily pick
from the refrigerator the foods and drinks
which you frequently consume. Since
you do not have to open the refrigerator
door frequently, you will have decreased
the power consumption of refrigerator.
To open the minibar door, press by your
hand on the minibar and pull back to
open.
When the door of minibar is open, you
may use the inner face of the door as a
table on which you may put your bottles
and glasses for a short time as shown in
the figure.
A Warning: Never do things that may
may put pressure on the door such as
sitting on, climbing up or hanging to the
table and do not place heavy objects
on it. This may cause damage on the
refrigerator or personal injuries.
A Warning: Never perform cutting on
the Minibar door and be careful that the
door is not damaged by pointed objects.
32
EN
7 Recommended solutions for the problems
Please review this list before calling the service. It might save you time and money.
This list includes frequent complaints that are not arising from defective workmanship
or material usage. Some of the features described here may not exist in your
product.
The refrigerator does not operate.
• Is the refrigerator properly plugged in? Insert the plug to the wall socket.
• Is the fuse of the socket which your refrigerator is connected to or the main fuse
blown out? Check the fuse.
Condensation on the side wall of the fridge compartment (MULTIZONE, COOL
CONTROL and FLEXI ZONE).
• Very cold ambient conditions. Frequent opening and closing of the door. Highly
humid ambient conditions. Storage of food containing liquid in open containers.
Leaving the door ajar. Switching the thermostat to a colder degree.
• Decreasing the time the door left open or using it less frequently.
• Covering the food stored in open containers with a suitable material.
• Wipe the condensation using a dry cloth and check if it persists.
Compressor is not running
• Protective thermic of the compressor will blow out during sudden power failures or
plug-out plug-ins as the refrigerant pressure in the cooling system of the refrigerator
has not been balanced yet. Your refrigerator will start running approximately after 6
minutes. Please call the service if the refrigerator does not startup at the end of this
period.
• The fridge is in defrost cycle. This is normal for a full-automatically defrosting
refrigerator. Defrosting cycle occurs periodically.
• Your refrigerator is not plugged into the socket. Make sure that the plug is properly fit
into the socket.
• Are the temperature adjustments correctly made?
• Power might be cut off.
The fridge is running frequently or for a long time.
33
EN

• Your new product may be wider than the previous one. This is quite normal. Large
refrigerators operate for a longer period of time.
• The ambient room temperature may be high. This is quite normal.
• The refrigerator might have been plugged in recently or might have been loaded
with food. Cooling down of the refrigerator completely may last for a couple of hours
longer.
• Large amounts of hot food might have been put in the refrigerator recently. Hot
food causes longer running of the refrigerator until they reach the safe storage
temperature.
• Doors might have been opened frequently or left ajar for a long time. The warm air
that has entered into the refrigerator causes the refrigerator to run for longer periods.
Open the doors less frequently.
• Freezer or fridge compartment door might have been left ajar. Check if the doors are
tightly closed.
• The refrigerator is adjusted to a very low temperature. Adjust the refrigerator
temperature to a warmer degree and wait until the temperature is achieved.
• Door seal of the fridge or freezer may be soiled, worn out, broken or not properly
seated. Clean or replace the seal. Damaged/broken seal causes the refrigerator to
run for a longer period of time in order to maintain the current temperature.
Freezer temperature is very low while the fridge temperature is sufficient.
• The freezer temperature is adjusted to a very low temperature. Adjust the freezer
temperature to a warmer degree and check.
Fridge temperature is very low while the freezer temperature is sufficient.
• The fridge temperature might have been adjusted to a very low temperature. Adjust
the fridge temperature to a warmer degree and check.
Food kept in the fridge compartment drawers are freezing.
• The fridge temperature might have been adjusted to a very low temperature. Adjust
the fridge temperature to a warmer degree and check.
Temperature in the fridge or freezer is very high.
• The fridge temperature might have been adjusted to a very high degree. Fridge
adjustment has an effect on the temperature of the freezer. Change the temperature
of the fridge or freezer until the fridge or freezer temperature reaches to a sufficient
level.
• Doors might have been opened frequently or left ajar for a long time; open them less
frequently.
• Door might have been left ajar; close the door completely.
• Large amount of hot food might have been put in the refrigerator recently. Wait until
the fridge or freezer reaches the desired temperature.
• The refrigerator might have been plugged in recently. Cooling down of the refrigerator
completely takes time.
The operation noise increases when the refrigerator is running.
• The operating performance of the refrigerator may change due to the changes in the
ambient temperature. It is normal and not a fault.
34
EN
Vibrations or noise.
• The floor is not even or it is weak. The refrigerator rocks when moved slowly. Make
sure that the floor is strong enough to carry the refrigerator, and level.
• The noise may be caused by the items put onto the refrigerator. Items on top of the
refrigerator should be removed.
There are noises coming from the refrigerator like liquid spilling or spraying.
• Liquid and gas flows happen in accordance with the operating principles of your
refrigerator. It is normal and not a fault.
There is a noise like wind blowing.
• Fans are used in order to cool the refrigerator. It is normal and not a fault.
Condensation on the inner walls of refrigerator.
• Hot and humid weather increases icing and condensation. It is normal and not a
fault.
• Doors might have been left ajar; make sure that the doors are closed fully.
• Doors might have been opened frequently or left ajar for a long time; open them less
frequently.
Humidity occurs on the outside of the refrigerator or between the doors.
• There might be humidity in the air; this is quite normal in humid weather. When the
humidity is less, condensation will disappear.
Bad odour inside the refrigerator.
• Inside of the refrigerator must be cleaned. Clean the inside of the refrigerator with a
sponge, lukewarm water or carbonated water.
• Some containers or package materials might cause the smell. Use a different
container or different brand packaging material.
The door is not closing.
• Food packages may prevent the door's closing. Replace the packages that are
obstructing the door.
• The refrigerator is not completely upright on the floor and rocking when slightly
moved. Adjust the elevation screws.
• The floor is not level or strong. Make sure that the floor is level and capable to carry
the refrigerator.
Crispers are stuck.
• The food might be touching the ceiling of the drawer. Rearrange food in the drawer.
35
EN
Veuillez d’abord lire la notice d’utilisation !
Chère cliente, cher client,
Nous espérons que votre produit, qui a été fabriqué dans des usines modernes et
vérifié au terme des procédures de contrôle de qualité les plus méticuleuses, vous
aidera efficacement.
Pour cette raison, nous vous conseillons de lire attentivement tout le manuel
d’utilisation de votre produit avant de vous en servir, et de le conserver ensuite pour
une utilisation ultérieure.
Le présent manuel
• Vous aidera à utiliser votre produit avec rapidité et sécurité.
• Lisez le manuel avant d’installer et de faire fonctionner votre produit.
• Respectez les instructions, notamment celles relatives à la sécurité.
• Conservez ce manuel dans un endroit facilement accessible car vous pouvez en
avoir besoin ultérieurement.
• En plus, lisez également les autres documents fournis avec votre produit.
Veuillez noter que ce manuel peut également être valide pour d’autres modèles.
Symboles et descriptions
Vous retrouverez les symboles suivants dans le présent manuel :
C Informations importantes ou astuces.
A Avertissement relatif aux conditions dangereuses pour la vie et la propriété.
B Avertissement relatif à la tension électrique.

TABLE DES MATIÈRES
1 Votre réfrigérateur 3
4 Préparation 21
1 Votre réfrigérateur 4
5 Utilisation du réfrigérateur 22
Réglage de la température du
2 Précautions importantes
compartiment réfrigérateur ................. 23
pour votre sécurité 5
Réglage de la température du
Utilisation prévue .................................. 5
compartiment congélateur ................. 23
Pour les appareils dotés d'une fontaine à
Fonction Congélation rapide (Fast
eau ; .................................................... 7
Freeze) ............................................... 23
Sécurité enfants ................................... 7
Fonction de refroidissement rapide (Quick
Avertissement HCA .............................. 8
Cool) .................................................. 24
Mesures d’économie d’énergie ............ 8
Bouton Vacances ............................... 24
Recommandations pour le compartiment
Bouton Auto Eco (Fonction Economie
produits frais ........................................ 9
spéciale) ............................................ 24
Ioniseur ............................................. 24
3 Installation 10
Bouton Key Lock ............................... 24
Points à prendre en compte lorsque vous
Eclairage du distributeur ..................... 24
transportez à nouveau votre produit. .. 10
Sélection du type de glace/d’eau ....... 24
Avant de faire fonctionner votre
Distributeur d'eau et glace ................. 25
réfrigérateur ....................................... 10
Utilisation de l'appareil à glaçons ........ 25
Branchement électrique ..................... 11
Ice Off ................................................ 25
Mise au rebut de l’emballage .............. 11
Utilisation de la fontaine ..................... 27
Mise au rebut de votre ancien
réfrigérateur ....................................... 11
Socle du distributeur .......................... 27
Disposition et Installation .................... 11
Etagères coulissantes ........................ 27
Réglage de la stabilité au sol .............. 12
Éclairage bleu .................................... 28
Réglage du jeu entre les portes
Ion : .................................................. 28
supérieures ........................................ 14
Casier à œufs .................................... 28
Installation du filtre à eau ................... 15
Compartiment Ultra Congélation ........ 28
Raccordement du tuyau d'alimentation en
Manettes de contrôle d’humidité du bac à
eau au réfrigérateur ............................ 16
légumes ............................................. 28
Raccordement du tuyau de vidange à la
Recommandations concernant la
carafe ............................................... 18
conservation des aliments congelés ... 29
Raccordement du tuyau d'alimentation en
Dégivrage .......................................... 29
eau à l'arrivée d'eau .......................... 19
Remplacer l'ampoule intérieure .......... 29
(Dans certains modèles) ..................... 19
6 Entretien et nettoyage 31
Avant toute première utilisation de la
glace/du distributeur d'eau ................ 20
Protection des surfaces en plastique. 31
Compartiment Zone fraîche ................ 32
Appareil à glaçons et distributeur ....... 33
Minibar .............................................. 34
7 Solutions recommandées aux
problèmes 35
2
FR
1 Votre réfrigérateur
1. Compartiment congélateur
14. Couvercle du bac à légumes
2.
C
ompartiment réfrigérateur
15. Pieds avant réglables
3.
É
clairage intérieur du compartiment
16. Éclairage bleu
réfrigérateur
17. Réservoir d’eau
4.
C
ouvercle à Beurre et Fromages
18. Plinthe
5.
V
entilateur
19. Tiroirs du compartiment congélateur
6.
I
oniseur
7.
C
layettes en verre du compartiment de
20. Clayettes en verre du compartiment
réfrigération
congélation
8.
C
asier à œufs
21. Couvercle du conduit à glaçons
9.
B
alconnets de porte du compartiment
22. Éclairage intérieur du compartiment
réfrigérateur
congélateur
10.
C
layettes porte-bouteilles
23. Compartiment Ultra Congélation
11.
B
alconnets range-bouteilles
24. Appareil à glaçons
12.
Range-bouteilles
25. Minibar
13. Bacs à légumes
26 .Compartiment Fraîcheur
*EN OPTION
C Les illustrations présentées dans cette notice d’utilisation sont schématiques et peuvent ne pas
correspondre exactement à votre produit. Si des pièces présentées ne sont pas comprises dans
le produit que vous avez acheté, elles sont valables pour d’autres modèles.
3
FR
21
3
4
24
6*
5
23
7
22
21
25
8
*10
9
20
*12
11
*19
13
14
14
18
*17 *2616
5
1 Votre réfrigérateur
1. Compartiment congélateur
14. Couvercle du bac à légumes
2.
C
ompartiment réfrigérateur
15. Pieds avant réglables
3.
É
clairage intérieur du compartiment
16. Éclairage bleu
réfrigérateur
17. Réservoir d’eau
4.
C
ouvercle à Beurre et Fromages
18. Plinthe
5.
V
entilateur
19. Tiroirs du compartiment congélateur
6.
I
oniseur
7.
C
layettes en verre du compartiment de
20. Clayettes en verre du compartiment
réfrigération
congélation
8.
C
asier à œufs
21. Couvercle du conduit à glaçons
9.
B
alconnets de porte du compartiment
22. Éclairage intérieur du compartiment
réfrigérateur
congélateur
10.
C
layettes porte-bouteilles
23. Compartiment Ultra Congélation
11.
B
alconnets range-bouteilles
24. Appareil à glaçons
12.
Range-bouteilles
25. Minibar
13. Bacs à légumes
26 .Compartiment Fraîcheur
*EN OPTION
C Les illustrations présentées dans cette notice d’utilisation sont schématiques et peuvent ne pas
correspondre exactement à votre produit. Si des pièces présentées ne sont pas comprises dans
le produit que vous avez acheté, elles sont valables pour d’autres modèles.
4
FR
21
3
*4
24
6
5
23
7
22
21
8
*10
9
20
*12
11
*19
13
14
14
18
*16 2617
5

2 Précautions importantes pour votre sécurité
Veuillez examiner les informations
(Cela pourrait provoquer des engelures
suivantes : Le non respect de ces
dans votre bouche).
consignes peut entraîner des blessures
• Pour les produits équipés d'un
ou dommages matériels. Sinon, tout
compartiment congélateur : ne placez
engagement lié à la garantie et à la
pas de boissons en bouteille ou en
fiabilité du produit devient invalide.
cannette dans le compartiment de
La durée de vie du produit que vous
congélation. Cela peut entraîner leur
avez acheté est de 10 ans. Il s’agit ici
éclatement.
de la période au cours de laquelle vous
• Ne touchez pas des produits congelés
devez conserver les pièces de rechange
avec les mains, ils pourraient se coller à
nécessaires à son fonctionnement.
celles-ci.
• Débranchez votre réfrigérateur avant de
Utilisation prévue
le nettoyer ou de le dégivrer.
Ce produit est prévu pour une utilisation
• La vapeur et des matériaux de
nettoyage pulvérisés ne doivent
– en intérieur et dans des zones fermées
jamais être utilisés pour les processus
telles que les maisons ;
de nettoyage ou de dégivrage de
– dans les environnements de travail
votre réfrigérateur. La vapeur pourrait
fermées, tels que les magasins et les
pénétrer dans les pièces électriques et
bureaux ;
provoquer des courts-circuits ou des
– dans les lieux d'hébergement fermés,
électrocutions.
tels que les fermes, hôtels, pensions.
• Ne jamais utiliser les pièces de votre
• Cet appareil ne doit pas être utilisé en
réfrigérateur telles que la porte, comme
extérieur.
un support ou une marche.
• N’utilisez pas d’appareils électriques à
Sécurité générale
l’intérieur du réfrigérateur.
• Avant de vous débarrasser de votre
• N’endommagez pas les pièces où
appareil, veuillez consulter les autorités
circule le liquide réfrigérant avec des
locales ou votre revendeur pour
outils de forage ou coupants. Le liquide
connaître le mode opératoire et les
réfrigérant qui pourrait s’échapper si les
organismes de collecte agréés.
canalisations de gaz de l’évaporateur,
• Consultez le service après-vente
les rallonges de tuyau ou les
agréé concernant toutes questions
revêtements de surface étaient percés,
ou problèmes relatifs au réfrigérateur.
peut irriter la peau et provoquer des
N’intervenez pas ou ne laissez
blessures aux yeux.
personne intervenir sur le réfrigérateur
• Ne pas couvrir ou obstruer les orifices
sans le communiquer au service après-
de ventilation du réfrigérateur.
vente agréé.
• Les appareils électriques peuvent être
• Pour les produits équipés d'un
réparés seulement par des personnes
compartiment congélateur : ne mangez
autorisées. Les réparations réalisées
pas de cônes de crème glacée ou des
par des personnes ne présentant pas
glaçons immédiatement après les avoir
les compétences requises peuvent
sortis du compartiment de congélation !
5
FR
présenter un risque pour l’utilisateur.
• Ne branchez jamais le réfrigérateur à la
• En cas de dysfonctionnement ou
prise murale au cours de l’installation.
lors d'opérations d’entretien ou de
Vous vous exposeriez à un risque de
réparation, débranchez l’alimentation
mort ou à de blessures graves.
électrique du réfrigérateur soit en
• Ce réfrigérateur est conçu seulement
désactivant le fusible correspondant,
pour conserver des aliments. Par
soit en débranchant l’appareil.
conséquent, il ne doit pas être utilisé à
• Ne tirez pas sur le câble lorsque vous
d'autres fins.
débranchez la prise.
• L'étiquette avec les caractéristiques
• Placez les boissons alcoolisées
techniques est située sur le mur gauche
verticalement, dans des récipients
à l'intérieur du réfrigérateur.
convenablement fermés.
• Ne branchez jamais votre réfrigérateur
• Ne conservez jamais des aérosols
à des systèmes d'économie d'énergie,
contenant des substances
cela peut l'endommager.
inflammables et explosives dans le
• S'il y a une lumière bleue sur le
réfrigérateur.
réfrigérateur, ne la regardez pas avec
• N’utilisez pas d'outils mécaniques ou
des outils optiques.
autres dispositifs pour accélérer le
• Pour les réfrigérateurs contrôlés
processus de décongélation autres
manuellement, attendez au moins 5
que ceux qui sont recommandés par le
minutes pour allumer le réfrigérateur
fabricant.
après une coupure de courant.
• Ce produit n'est pas conçu pour être
• Si cet appareil venait à changer de
utilisé par des personnes (enfants
propriétaire, n'oubliez pas de remettre
compris) souffrant de déficience
la présente notice d’utilisation au
physique, sensorielle, mentale, ou
nouveau bénéficiaire.
inexpérimentées, à moins d’avoir
• Evitez d'endommager le câble
obtenu une autorisation auprès des
d'alimentation quand vous transportez
personnes responsables de leur
le réfrigérateur. Tordre le câble peut
sécurité.
entraîner un incendie. Ne placez
• Ne faites pas fonctionner un
jamais d'objets lourds sur le câble
réfrigérateur endommagé. Consultez le
d'alimentation. Évitez de toucher à
service agréé en cas de problème.
la prise avec des mains mouillées au
• La sécurité électrique du réfrigérateur
moment de brancher l'appareil.
n’est assurée que si le système de
mise à la terre de votre domicile est
conforme aux normes en vigueur.
• L’exposition du produit à la pluie, la
neige, au soleil ou au vent présente
des risques concernant la sécurité
électrique.
• Contactez le service agréé quand un
câble d'alimentation est endommagé
pour éviter tout danger.
6
FR

• Évitez de brancher le réfrigérateur
• Le réfrigérateur peut bouger si ses
lorsque la prise de courant électrique a
pieds réglables ne sont pas bien fixés
lâché.
sur le sol. Bien fixer les pieds réglables
• Pour des raisons d'ordre sécuritaire,
sur le sol peut empêcher le réfrigérateur
évitez de vaporiser directement de l'eau
de bouger.
sur les parties externes et internes du
• Quand vous transportez le réfrigérateur,
réfrigérateur.
ne le tenez pas par la poignée de la
• Ne pulvérisez pas de substances
porte. Cela peut le casser.
contenant des gaz inflammables
• Quand vous devez placer votre
comme du propane près du
produit près d'un autre réfrigérateur
réfrigérateur pour éviter tout risque
ou congélateur, la distance entre les
d'incendie et d'explosion.
appareils doit être d'au moins 8 cm.
• Ne placez jamais de récipients
Sinon, les murs adjacents peuvent être
pleins d'eau en haut du réfrigérateur,
humidifiés.
ils pourraient causer des chocs
électriques ou incendie.
Pour les appareils dotés
• Ne surchargez pas votre réfrigérateur
d'une fontaine à eau ;
avec des quantités de nourriture
La pression de l'alimentation en eau
excessives. S'il est surchargé, les
doit être au minimum de 1 bar. La
aliments peuvent tomber, vous blesser
pression de l'alimentation en eau doit
et endommager le réfrigérateur quand
être au maximum de 8 bars.
vous ouvrez la porte. Ne placez jamais
• Utilisez uniquement de l’eau potable.
d'objets au-dessus du réfrigérateur, ils
pourraient tomber quand vous ouvrez
Sécurité enfants
ou fermez la porte du réfrigérateur.
• Les produits qui nécessitent un
• Si la porte a un verrouillage, la clé doit
contrôle de température précis (vaccin,
rester hors de portée des enfants.
médicament sensible à la chaleur,
• Les enfants doivent être surveillés et
matériels scientifiques, etc.) ne doivent
empêchés de s'amuser avec le produit.
pas être conservés dans le réfrigérateur.
• Si le réfrigérateur n'est pas utilisé
pendant longtemps, il doit être
débranché. Un problème avec le câble
d'alimentation pourrait causer un
incendie.
• Le bout de la prise électrique doit être
nettoyé régulièrement, sinon il peut
provoquer un incendie.
• Le bout de la prise électrique doit être
nettoyé régulièrement à l’aide d’un
chiffon sec, sinon il peut provoquer un
incendie.
7
FR

Avertissement HCA
Mesures d’économie
Si le système de refroidissement de
d’énergie
votre appareil contient R600a:
Ce gaz est inflammable. Par
• Ne laissez pas les portes du
conséquent, veuillez prendre garde à
réfrigérateur ouvertes pendant une
ne pas endommager le système de
durée prolongée.
refroidissement et les tuyauteries lors
• N’introduisez pas de denrées ou de
de son utilisation ou de son transport.
boissons chaudes dans le réfrigérateur.
En cas de dommages, éloignez votre
• Ne surchargez pas le réfrigérateur pour
produit de toute source potentielle de
ne pas obstruer pas la circulation d'air à
flammes susceptible de provoquer
l’intérieur.
l’incendie de l’appareil. De même, placez
• N’installez pas le réfrigérateur à la
le produit dans une pièce aérée.
lumière directe du soleil ou près
Ne tenez pas compte de cet
d’appareil émettant de la chaleur tels
avertissement si le système de
qu’un four, un lave-vaisselle ou un
refroidissement de votre appareil
radiateur.
contient R134a.
• Veillez à conserver vos denrées dans
Le type de gaz utilisé dans l'appareil est
des récipients fermés.
mentionné sur la plaque signalétique
• Pour les produits équipés d'un
située sur le mur gauche à l'intérieur du
compartiment congélateur : vous
réfrigérateur.
pouvez conserver une quantité
Ne jetez jamais l'appareil au feu pour
maximale d'aliments dans le
vous en débarrasser.
congélateur quand vous enlevez
l'étagère ou le tiroir du congélateur. La
consommation d'énergie précisée pour
votre réfrigérateur a été déterminée
en enlevant l'étagère ou le tiroir
du congélateur et avec la charge
maximale. Il n'y aucun risque à utiliser
une étagère ou un tiroir en fonction
des formes et tailles des denrées à
congeler.
• La décongélation des aliments dans le
compartiment réfrigérateur permet de
faire des économies d'énergie et de
préserver la qualité des aliments.
8
FR
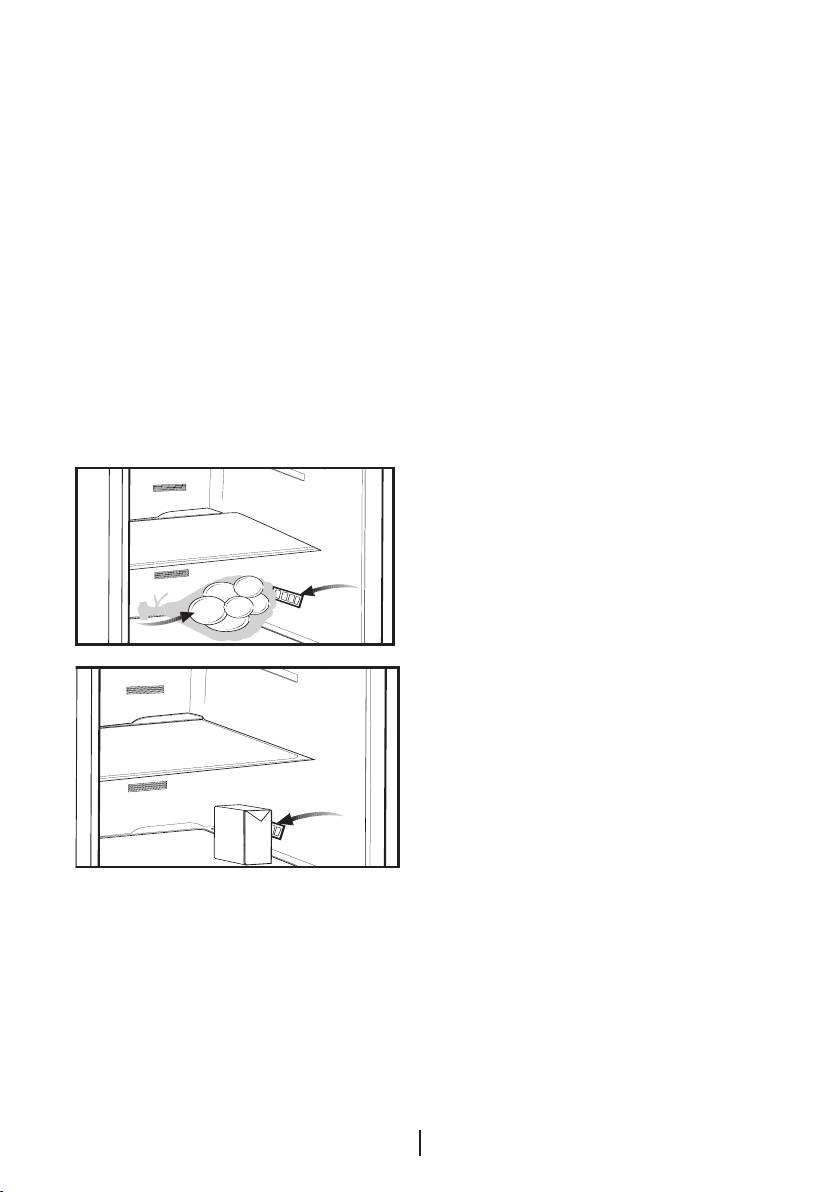
Recommandations pour le
compartiment produits frais
*EN OPTION
• Ne laissez aucun aliment entrer en
contact avec le capteur de température
dans le compartiment produits frais. Afin
de conserver le compartiment produits
frais à la température de conservation
idéale, le capteur ne doit pas être
encombré par des aliments.
• Ne placez pas de denrées chaudes
dans votre appareil.
9
FR
MILK
temperature
juice
food
sensor
temperature
etc.
sensor
MILK
temperature
juice
sensor
food
temperature
etc.
sensor
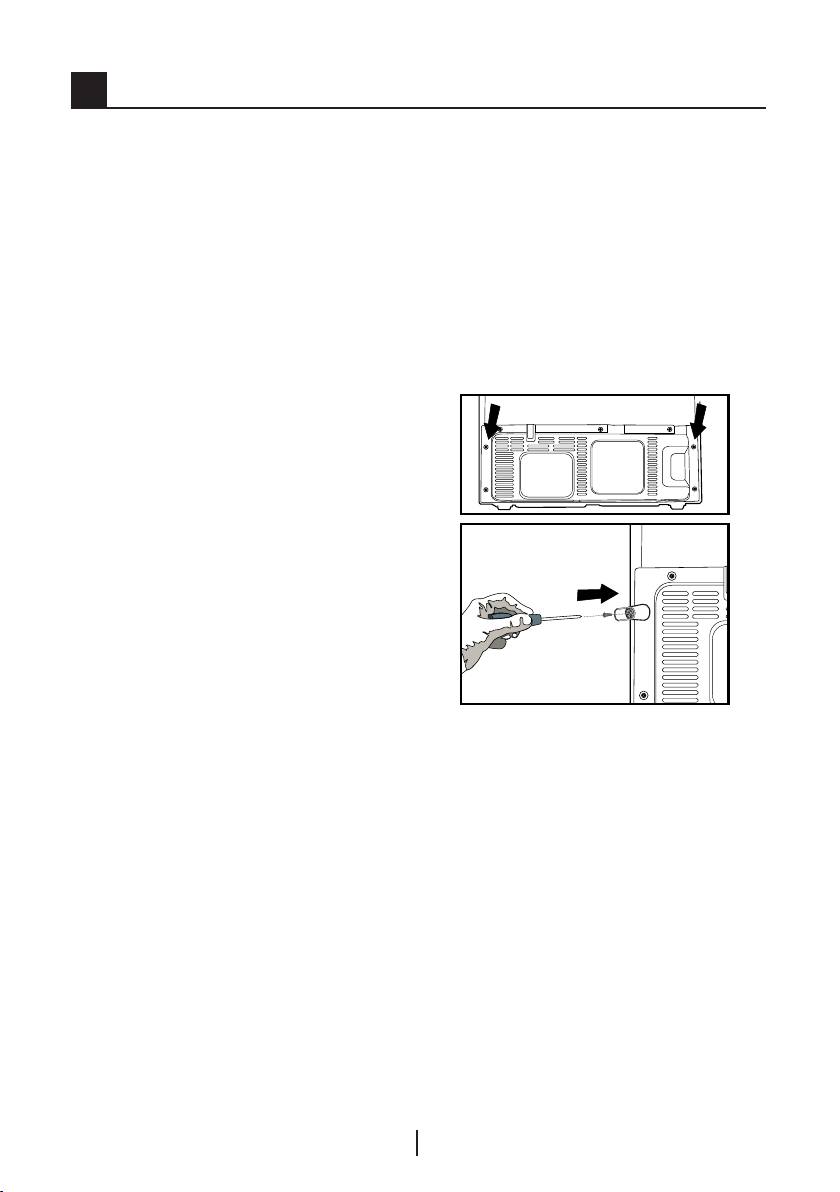
3 Installation
2. Nettoyez l’intérieur du réfrigérateur tel
C Veuillez noter que le fabricant ne
qu’indiqué dans la section « Entretien et
pourra être tenu responsable si les
nettoyage ».
informations fournies dans cette notice
d’utilisation ne sont pas respectées.
3. Insérez les 2 cales en plastique entre
les câbles du condenseur, tel qu’illustré
Points à prendre en compte
dans la figure suivante. Les cales en
lorsque vous transportez à
plastique maintiendront la distance
nouveau votre produit.
nécessaire entre votre réfrigérateur
1. Le réfrigérateur doit être vidé et nettoyé
et le mur pour permettre une bonne
avant tout transport.
circulation de l’air. (Le schéma présenté
2. Les clayettes, accessoires, bac à
est fourni à titre indicatif et peut ne pas
légumes, etc. de votre réfrigérateur
doivent être fixés solidement avec de
la bande adhésive avant de remballer
l’appareil, pour le protéger en cas de
chocs.
3. L’emballage doit être fixé avec une
bande adhésive forte et des cordes
solides, et les normes de transport
indiquées sur l’emballage doivent être
appliquées.
C N'oubliez jamais...
Chaque matériau recyclé est une
participation indispensable à la
préservation de la nature et conservation
de nos ressources nationales.
correspondre exactement avec votre
Si vous souhaitez contribuer à recycler
produit).
les matériaux d’emballage, vous
4. Branchez le réfrigérateur dans la prise
pouvez obtenir des informations
murale. Lorsque la porte est ouverte,
supplémentaires auprès des organismes
l'éclairage intérieur correspondant
environnementaux ou des autorités
s'allumera.
locales.
5. Vous remarquerez un bruit lorsque le
Avant de faire fonctionner
compresseur se met en marche. Le
votre réfrigérateur
liquide et les gaz intégrés au système
Avant de commencer à faire fonctionner
du réfrigérateur peuvent également
votre réfrigérateur, vérifier les points
faire du bruit, que le compresseur soit
suivants :
en marche ou non. Ceci est tout à fait
1. L’intérieur du réfrigérateur est sec et l’air
normal.
peut circuler librement à l’arrière?
10
FR

6. Les parties antérieures du réfrigérateur
Mise au rebut de votre
peuvent chauffer. Ce phénomène est
ancien réfrigérateur
normal. Ces zones doivent en principe
Débarrassez-vous de votre
être chaudes pour éviter tout risque de
ancien réfrigérateur sans nuire à
condensation.
l’environnement.
Branchement électrique
A Vous pouvez consulter le service après-
Branchez votre réfrigérateur à une prise de
vente agrée ou le centre chargé de la
mise à la terre protégée par un fusible
mise au rebut dans votre municipalité
ayant une capacité appropriée.
pour en savoir plus sur la mise au rebut
Important :
de votre produit.
B Le branchement doit être conforme
A Avant de procéder à la mise au rebut
aux normes en vigueur sur le territoire
de votre machine, coupez la prise
national.
électrique et, le cas échéant, tout
B La fiche de câble d’alimentation doit
verrouillage susceptible de se trouver
être facilement accessible après
sur la porte. Rendez-les inopérants
installation.
afin de ne pas exposer les enfants à
d’éventuels dangers.
B La tension et la protection du fusible
autorisées sont spécifiées dans la
Disposition et Installation
section « Caractéristiques techniques ».
B
Attention: Ne branchez jamais le
B La tension spécifiée doit être égale à
réfrigérateur à la prise murale au cours
votre tension de secteur.
de l’installation. Vous vous exposeriez
B Les rallonges et prises multivoies ne
à un risque de mort ou à de blessures
doivent pas être utilisés pour brancher
graves.
l’appareil.
A Si la porte d’entrée de la pièce
B Un câble d’alimentation endommagé
où sera installé le réfrigérateur n’est
doit être remplacé par un électricien
pas assez large pour laisser passer le
qualifié.
réfrigérateur, appelez alors le service
après-vente pour faire retirer les portes
B L’appareil ne doit pas être mis en
du réfrigérateur et le faire passer
service avant d’être réparé ! Un risque
latéralement.
de choc électrique existe!
1. Installez le réfrigérateur dans un
Mise au rebut de l’emballage
emplacement qui permette une utilisation
A
Les matériaux d’emballage peuvent
pratique.
être dangereux pour les enfants. Tenez
2. Maintenez le réfrigérateur éloigné de
les matériaux d’emballage hors de
toutes sources de chaleur, des endroits
portée des enfants ou débarrassez-
humides et de la lumière directe du
vous-en conformément aux consignes
soleil.
sur les déchets. Ne les jetez pas aux
3. Une ventilation d’air autour du
côtés des ordures ménagères ordinaires.
réfrigérateur doit être aménagée pour
L’emballage de votre appareil est produit
obtenir un fonctionnement efficace.
à partir des matériaux recyclables.
Si le réfrigérateur est placé dans un
enfoncement du mur, il doit y avoir un
espace d’au moins 5 cm avec le plafond
et d’au moins 5 cm avec le mur.
11
FR
