Supra stv-lc40t900fl: ПУЛЬТ ДИСТАНЦИОННОГО УПРАВЛЕНИЯ
ПУЛЬТ ДИСТАНЦИОННОГО УПРАВЛЕНИЯ: Supra stv-lc40t900fl
ПУЛЬТ ДИСТАНЦИОННОГО УПРАВЛЕНИЯ
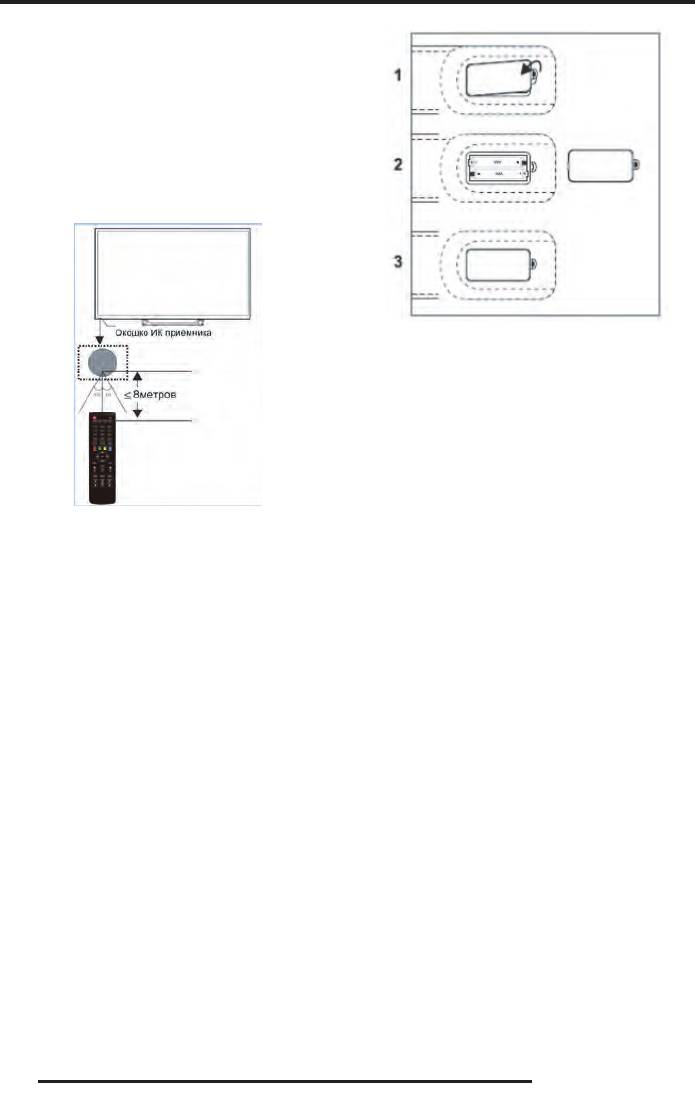
ИСПОЛЬЗОВАНИЕ ПУЛЬТА
ДИСТАНЦИОННОГО УПРАВЛЕНИЯ
При использовании пульта дистанционного управ-
ления (ПДУ) направляйте его непосредственно на
приемник инфракрасных сигналов на передней
панели телевизора.
Предметы, находящиеся между пультом дистан-
,акинмеирп мокшоко и яинелварпу огонноиц
могут мешать правильной работе.
1. Откройте крышку отсека для батареек.
2. Установите в отсек две батарейки ААА в соот-
ветствии с обозначениями (+) и (-), имеющими-
ся внутри отсека.
3. Закройте отсек.
Меры безопасности при использовании элемен-
тов питания
Когда вы нажимаете кнопки на ПДУ, соблюдайте
интервал между нажатиями на кнопки как мини-
Неправильное использование элементов питания
мум в одну секунду.
может привести к утечке электролита и/или взры-
ву. Выполняйте нижеследующие инструкции.
Не подвергайте ПДУ ударам, не погружайте его в
жидкости и не оставляйте в местах с высокой
Устанавливайте элементы питания в строгом соот-
влажностью.
ветствии с полярностью (+) и (–).
Не оставляйте ПДУ под прямыми солнечными лу-
Различные типы элементов питания имеют раз-
чами, так как чрезмерный нагрев может деформи-
личные характеристики. Не используйте вместе
ровать корпус.
элементы питания разных типов.
ПДУ может работать некорректно, если окошко
Не используйте вместе старые и новые элементы
приемника сигналов на корпусе телевизора нахо-
питания. Одновременное использование старых и
дится под прямыми солнечными лучами или силь-
новых элементов питания снижает срок службы
ным освещением. В этом случае измените направ-
нового элемента питания или ведет к утечкам
ление освещения или положение телевизора, либо
электролита из старого элемента питания.
приблизьте ПДУ к окошку приемника сигналов.
Выньте элементы питания сразу же, как только они
разрядились. Химикаты, вытекшие из элементов
питания, вызывают коррозию. Если обнаружены
ПИТАНИЕ ПУЛЬТА ДИСТАНЦИОННОГО
следы утечки химикатов, удалите их тканью.
УПРАВЛЕНИЯ
Элементы питания, которые поставляются с теле-
Перед началом использования пульта дистанцион-
визором, могут иметь более короткий срок службы
ного управления (далее пульт ДУ) необходимо
из-за условий хранения.
ончыбО .ААА икйератаб евд оген в ьтивонатсу
батареек хватает на один год работы пульта ДУ.
Выньте элементы питания из пульта ДУ, если он не
используется в течение длительного времени.
14

РУКОВОДСТВО ПО ЭКСПЛУАТАЦИИ
из-за условий хранения.
ПУЛЬТ ДИСТАНЦИОННОГО
ен но илсе ,УДП зи яинатип ытнемелэ етьныВ
УПРАВЛЕНИЯ
используется в течение длительного времени.
При использовании ПДУ направляйте его непосред-
КНОПКИ ПУЛЬТА ДИСТАНЦИОННОГО
ан волангис хынсаркарфни кинмеирп ан онневтс
УПРАВЛЕНИЯ И ИХ ФУНКЦИИ
передней панели телевизора.
Предметы, находящиеся между пультом дистанцион-
тугом ,акинмеирп мокшоко и яинелварпу огон
мешать правильной работе.
етйадюлбос ,УДП ан икпонк етеамижан ыв адгоК
интервал между нажатиями на кнопки как минимум
в одну секунду.
Не подвергайте ПДУ ударам, не погружайте его в жид-
кости и не оставляйте в местах с высокой влажностью.
Не оставляйте ПДУ под прямыми солнечными луча-
ми, так как чрезмерный нагрев может деформиро-
вать корпус.
ПДУ может работать некорректно, если окошко при-
емника сигналов на корпусе телевизора находится
под прямыми солнечными лучами или сильным осве-
щением. В этом случае измените направление осве-
щения или положение телевизора, либо приблизьте
ПДУ к окошку приемника сигналов.
МЕРЫ БЕЗОПАСНОСТИ ПРИ ИСПОЛЬЗОВАНИИ
ЭЛЕМЕНТОВ ПИТАНИЯ
Неправильное использование элементов питания
может привести к утечке электролита и/или взры-
ву. Выполняйте нижеследующие инструкции.
Устанавливайте элементы питания в строгом соот-
ветствии с полярностью (+) и (–).
Различные типы элементов питания имеют раз-
личные характеристики. Не используйте вместе
элементы питания разных типов.
Не используйте вместе старые и новые элементы
питания. Одновременное использование старых и
новых элементов питания снижает срок службы
Кнопка включения телевизора / перехода в
нового элемента питания или ведет к утечкам
режим ожидания.
электролита из старого элемента питания.
Кнопка блокировки звука. Чтобы отключить
Выньте элементы питания сразу же, как только они
блокировку, нажмите кнопку еще раз.
разрядились. Химикаты, вытекшие из элементов
NICAM/A2 Кнопка выбора стерео звука в режиме
питания, вызывают коррозию. Если обнаружены
ТВ.
следы утечки химикатов, удалите их тканью.
ASPECT Кнопка выбора формата экрана.
Элементы питания, которые поставляются с теле-
визором, могут иметь более короткий срок службы
15

РУКОВОДСТВО ПО ЭКСПЛУАТАЦИИ
PMODE Кнопка выбора режима изображения.
REVEAL Кнопка показа скрытого текста в режиме
телетекста. Чтобы спрятать текст, нажмите эту
SMODE Кнопка выбора режима звука.
кнопку еще раз.
0-9 Цифровые кнопки для ввода номеров телека-
SIZE Кнопка размера окна телетекста (обычный,
налов.
увеличенная верхняя часть, увеличенная нижняя
-/-- Кнопка выбора поля для переключения теле-
часть).
каналов, номера которых состоят из 2 или 3 цифр.
TS
Кнопки быстрой перемотки в обратном/пря-
Кнопка переключения между текущим
мом направлении в режиме MEDIA.
телеканалом и предыдущим просматриваемым /
INDEX Кнопка перехода к основной странице теле-
выбора режима повтора в режиме MEDIA.
текста (страница 100 - меню телетекста).
DISPLAY Кнопка вызова текущей информации.
H
Кнопка остановки воспроизведения в режиме
FREEZE Кнопка фиксации изображения в режиме
MEDIA.
ТВ.
S .PAGE Кнопка перехода к подстраницам телетек-
/AUTO Кнопка начала видеозаписи (видеозапись
ста.
сохраняется на подключенный к телевизору нако-
PO
Кнопки перехода к предыдущему/следую-
питель USB)/ автоподстройки параметров изобра-
щему файлу в режиме MEDIA.
жения в режиме ПК.
TEXT Кнопка перехода в режим телетекста или вы-
Цветные кнопки соответствуют соответственно
хода из него.
окрашенным объектам телетекста или меню.
FAV Кнопка перехода к списку избранных телекана-
SLEEP Кнопка установки времени выключения те-
лов.
левизора.
AUDIO Кнопка выбора режима звука в режиме
SOURCE Кнопка переключения между источниками
цифрового телевидения DTV и в режиме MEDIA.
сигнала.
DTV Кнопка перехода в режим цифрового телеви-
DEF G Кнопки навигации по меню настроек.
дения D
TV / просмотра списка видеозаписей теле-
ENTER Кнопка ввода/подтверждения.
передач.
MENU Кнопка перехода в меню настроек телевизо-
EPG Кнопка перехода в электронное расписание
ра.
телепередач в режиме цифрового телевидения
DTV.
EXIT Кнопка выхода из меню.
TV/RADIO Кнопка переключения режима телевиде-
C H F
/ C H G
Кнопки переключения на
ния/радио.
следующий /предыдущий канал.
VOL
F
/ VOL G Кнопки повышения/понижения
уровня громкости.
SUBTITLE Кнопка активации/выбора субтитров в
режиме цифрового телевидения DTV и в режиме
MEDIA.
T.SHIFT Кнопка включения функции сдвига во
времени (только для режима цифрового телевиде-
ния DTV).
HOLD Кнопка удержания текущей страницы теле-
текста.
DU Кнопка начала воспроизведения/паузы в режи-
ме воспроизведения в режиме MEDIA.
16
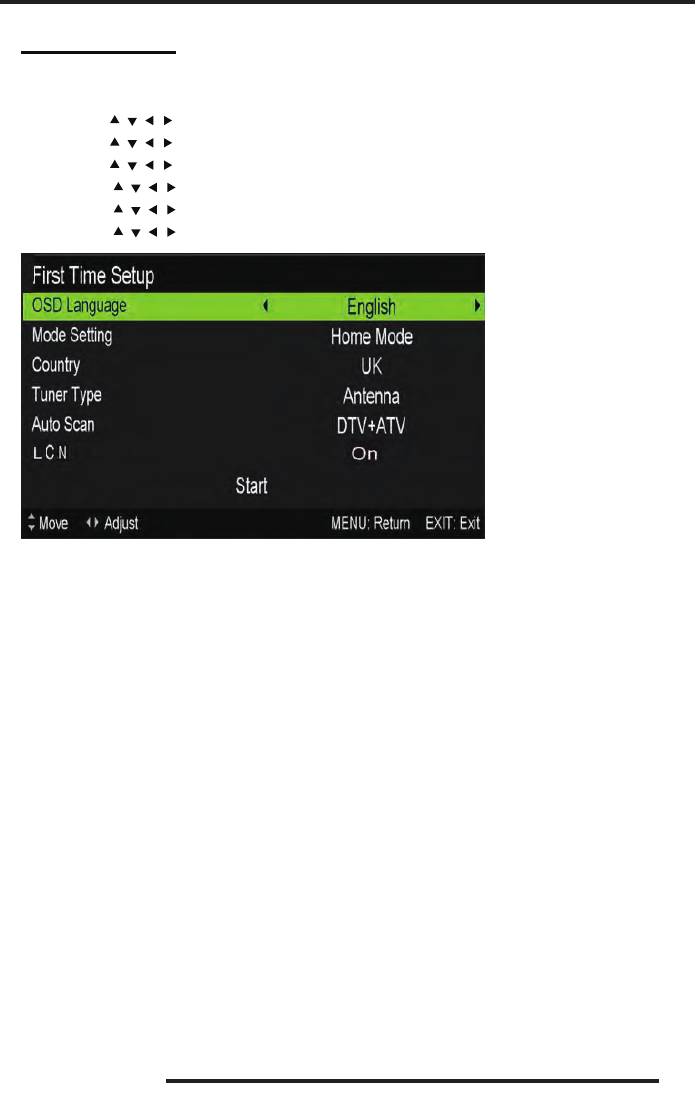
OSD basic adjustment
Installation Guide
If this is the first time you are turning on the TV and there are no programs in the TV
memory, the installation Guide menu will appear on the screen.
1. Press the “
/ / / ” button to select the local language.
2. Press the “
/ / / ” button to select mode.
3. Press the “
/ / / ” button to select the local country you want to
4. Press the “
/ / / ” button to select Air or cable.
5. Press the “
/ / / ” button to select mode :DTV+ATV,DTV,ATV.
6. Press the “
/ / / ” button to select “ON” or “OFF”.
Note: Searching for platform will take a long time, please be patient!
17
OSD bas ic adjustment
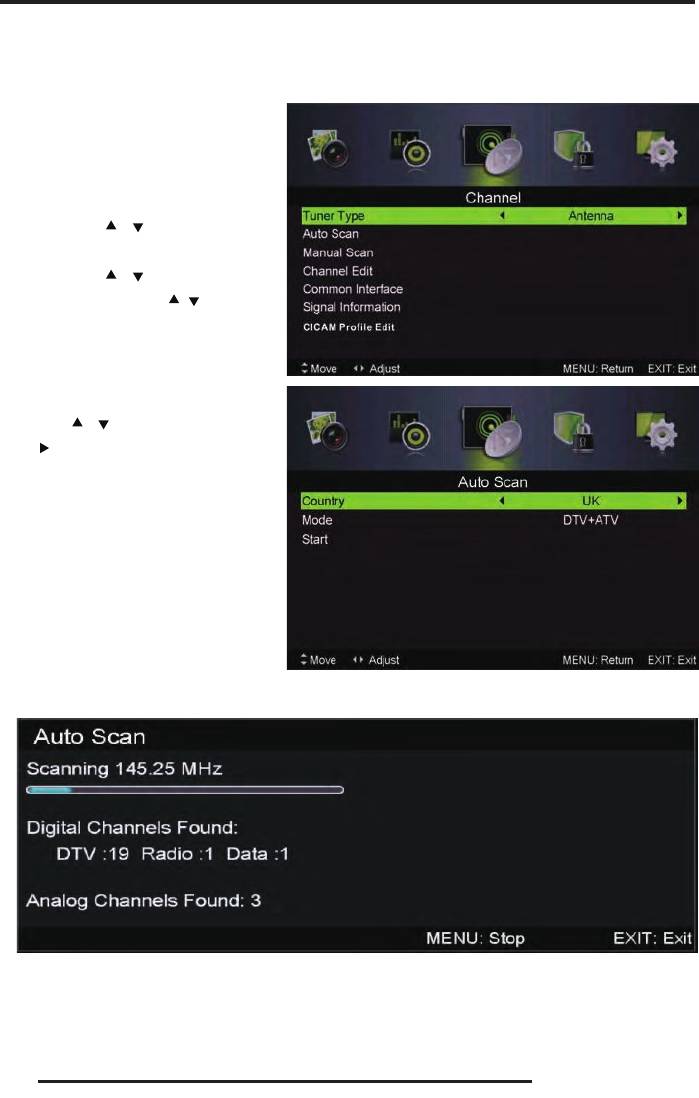
Channel
Press MENU button to display the main menu. Press ◄ / ► button to select CHANNEL in the
main menu
1.Auto Scan
Press “ / ” button to select
“Auto Scan”
Press “
/ ” button to select
country and press the“
/ ” button to
select mode.
Press “
/ ”button and then press
“
”button to start scanning. Press
“MENU” or “EXIT”button to stop
Note: Search ing for platform will take a long time. Please be patient!
18
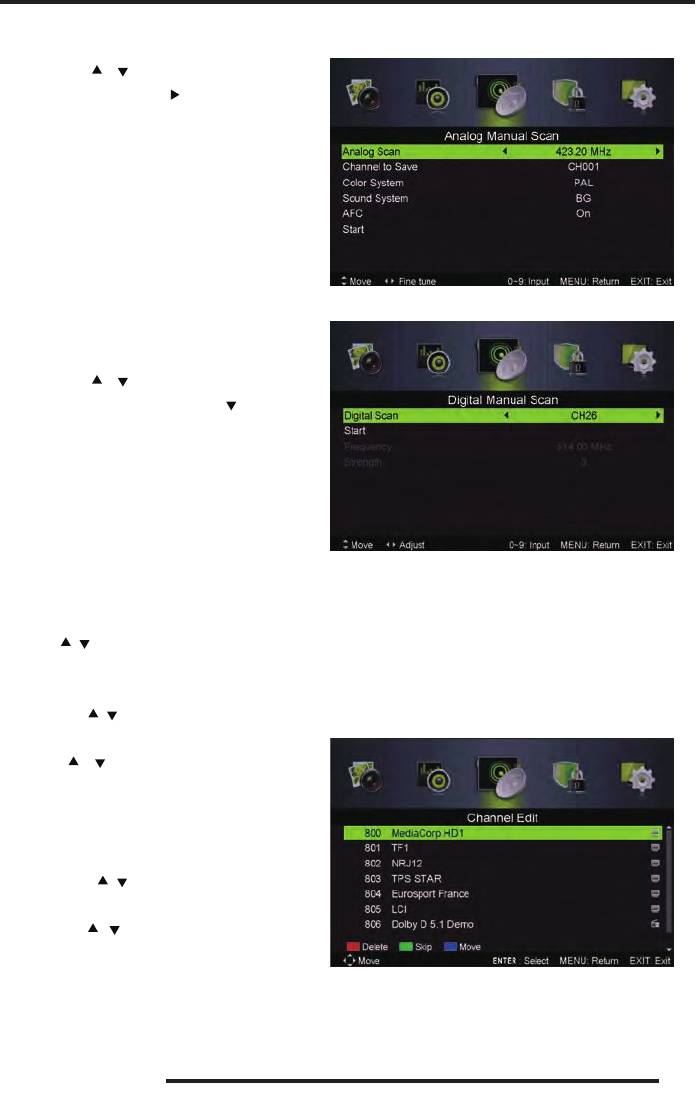
OSD bas ic adjustment
2.Analog Manual Scan
Press “ / ” button to select “Manual
scan” and press the “
” button to Analog
manual scan.
Press “MENU” button to return the
previous menu. Press “EXIT” butto n to exit
the menu.
3
.Digital Manual Tuning
Press “ / ” button to select “Diigital
Manual Scan” and press the “
” button to
start.
Press “MENU” button to return the
previous menu.
Press “EXIT ” button to exit the menu.
4. Channel Edit
Press “ / ” button to select “Channel Edit” an d press the “ENTER” button to enter.
a. DELETE
Press “ / ” b utton to select the pro gram and press “RED” button once to delete the program.
b. SKIP
Press “ / ” button to select the channel
which you want to skip and press the
“GREEN” button to skip . Press “GREEN”
button again to cancel the setting.
c. MOVE
Press “ / ” button to select the channel
and press the “BLUE” button to move . Then
press the “
/ ” butto n to select the ch annel
with which you want to move. Press “BLUE”
button again to confirm.
19
OSD bas ic adjustment
5. Signal information (only u se in DTV)
Press “ / ” button to select “Signa
20
l
information” and press the “ENTER
”
button . Press “MENU” button to return th
e
previous menu. Press “EXIT” button to exi
t
the menu.
PICTURE
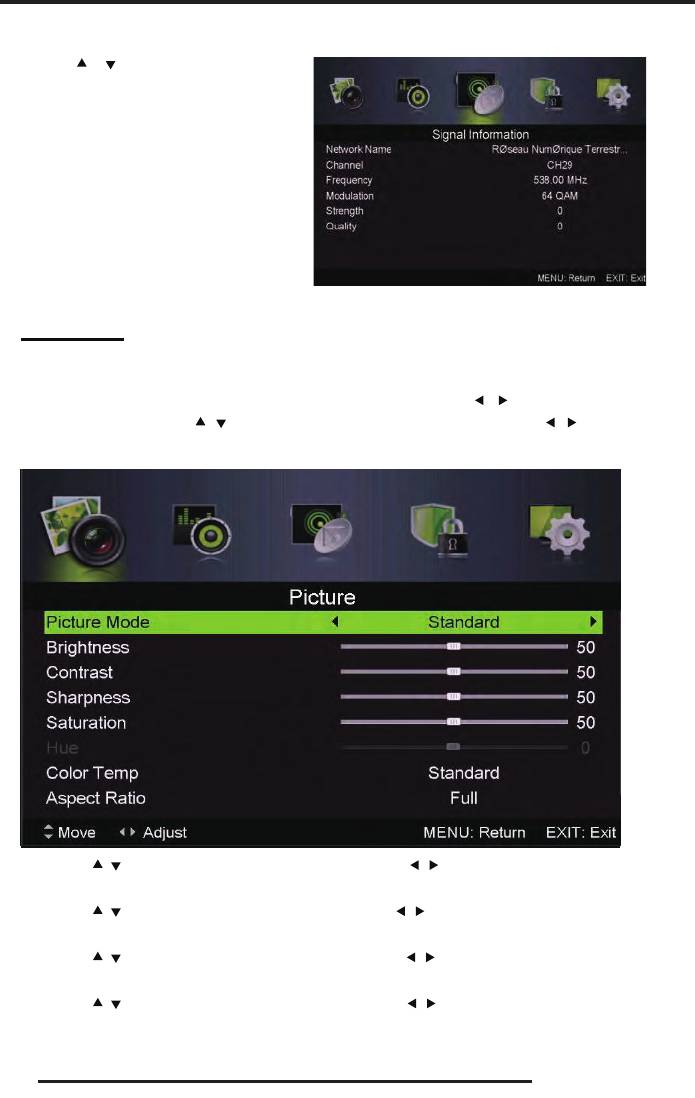
You can select the type of picture, which best corresponds to your viewing.
Press the “MENU” button to enter the OSD menu. Then press “
/ ” button to select the
“PICTURE” menu. Press “
/ ” button to select “Picture Mode” and press th e “ / ” button to
select.
1. Press “ / ” button to select “Brightness” and press the “ / ” button to enter brightness
adjustment menu to adjust brightness.
2. Press “
/ ” button to select “Contrast” and press the “ / ” button to enter contrast
adjustment menu to adjust contra s t.
3. Press “
/ ” button to select “Sha rpness” and press the “ / ” button to enter sharpness
adjustment menu to adjust sharpness.
4. Press “
/ ” button to select “Saturation” and press t he “ / ” button to enter Saturation
adjustment menu to adjust sa turation.

OSD bas ic adjustment
5. Press “ / ” button to select “Hue’’ and press the “ / ” button to enter hue adjus tment menu
to adjust hue.
Note:
The 'hue' item is used in NTSC mode only.
6. Press “ / ” button to select “Sharpnes s” and press the “ / ” button to ente r sharpnes s
adjustment menu to adjust sharpness.
7. Press “
/ ” button to select “Color Temp” and press the “ / ” button to select mode:
Standard,Cool,Warm..
8. Press “
/ ” button to select “Aspect Ratio” and press the “ / ” button to select.
9. Press “
/ ” button to select “Advanceed Settings ” and press the “ ” button to enter
Advanceed Settings adjustment menu to adjust.
SOUND
You can select the type of sound, which best corresponds to your listening.
Press the “MENU” button to enter the OSD me nu. Then press “
/ ” button to select the
“SOUND” menu.
1. Press “ / ” button to select “Sound Mode” and press the “ / ” button to select mode.
2. Press “
/ ” button to select “Treble” and press the “ / ” button to adjust.
3. Press “
/ ” button to select “Bass” and press the “ / ” button to adjust.
4. Press “
/ ” button to select “Balance” and press the “ / ” button to adjust.
5. Press “
/ ” button to select “Surround sound’’and“ / ” button to select“ON”or “OFF”.
6. Press “
/ ” button to select “EQ Setting’’and“ / ” button to enter EQ Setting adjustment
menu to adjust EQ..
7. Press “
/ ” button to select “AVL” and press the “ / ” button to select “On” or “Off”.
8. Press “
/ ” button to select “Sound Type” and press the “ / ” button to select.
21
OSD bas ic adjustment
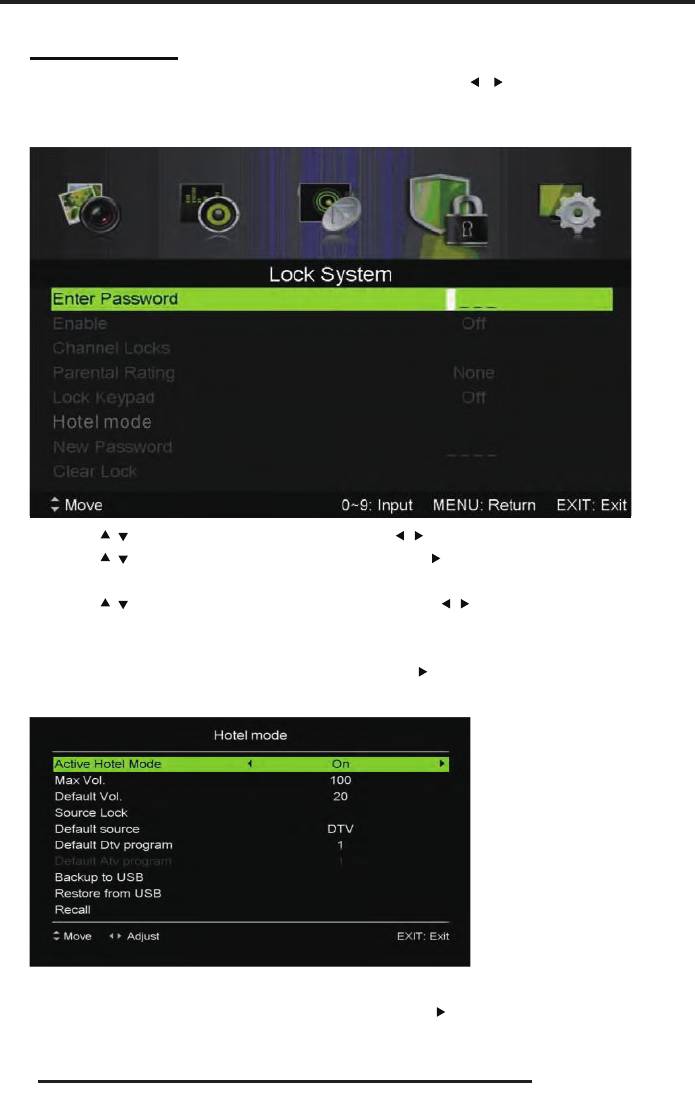
LOCK SYSTEM
Press th e “MENU” button to enter the OSD menu. Then press “ / ” button to select the
“Lock System” menu. The default password is “0000”.
Note: The administrator password is “8899’’.
1. Press “ / ” button to select “Enable’’and then press “ / ” button to select “On” or “Off”
2. Press “
/ ” button to se le ct “channel locks” and press the “ ” butto n to select channel(s)to
lock .
3. Press “
/ ” button to se le ct “Parental Rating” and press the “ / ” button to set.
4. Press ▼ / ▲ button to select “Lock Keypad”, the n press bu tto n to select “On” or “Off”, The
key boa rd will be invalid if you set Loc k Keypad “On”.
5. Press ▼ / ▲ button to select “Hotel Mode” an d press the “
” button to enter the sub-menu to
set.
6. Press ▼ / ▲ button to select “New Password ” and set your n ew password.
7. Press ▼ / ▲ button to select“Clear Lock”and then press the “
” button to clear.
22
OSD bas ic adjustment
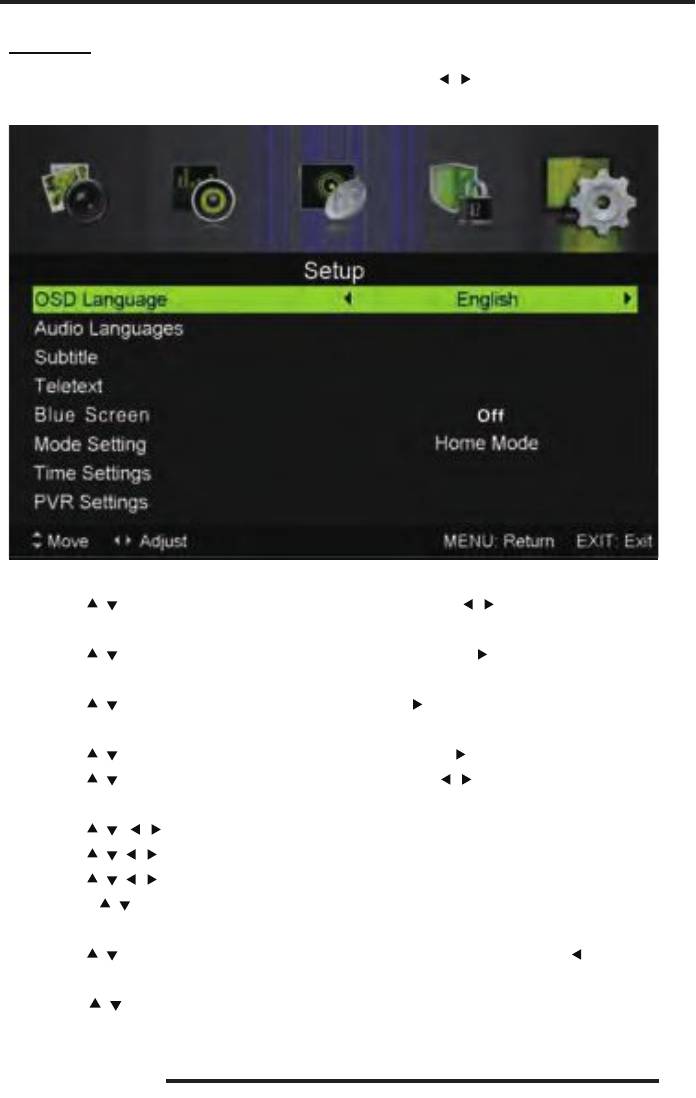
SETUP
Press the “MENU” button to enter the OSD menu. Then press“ / ” button to select the “SETUP”
menu.
1. Press “ / ” button to select “OSD Language” and press the “ / ” button to select the OSD
language which you desire.
2. Press “
/ /” button to select “Audio Language” a nd press the “ ” button to enter the Audio
language adjustment menu to select the Audio language which you desire.
3. Press “
/ ” button to select “Subtitle” and press the “ ” button to select “On” or “Off”.
Note: This function is only used for DTV source.
4. Press “
/ ” button to select “Teletext” menu and press the “ ” button to e nter sub-menu.
5. Press “
/ ” button to select “Blue Screen” and press the “ / ’’ button to select “On” o r
“Off”.
6. Press “
/ / / ”button to select Mode Setting.
7. Press “
/ / / ” button to select “Time Settin g”.
8. Press “
/ / / ” button to select “PVR Settings”.
9. Press “
/ ” button to select “First Time Installation”, then press “ENTER” button to set
relevant options including OSD language, country and tuning.
10. Press “
/ ” button to select “Reset”, then press “ENTER” a dialogue. Press “ ” button
selecting “Yes” to restore all setting to default setting.
11. Press “ / ” button to select “Software Update (USB)”, then press “ENTER” button to
update software using USB.
23
OSD bas ic adjustment
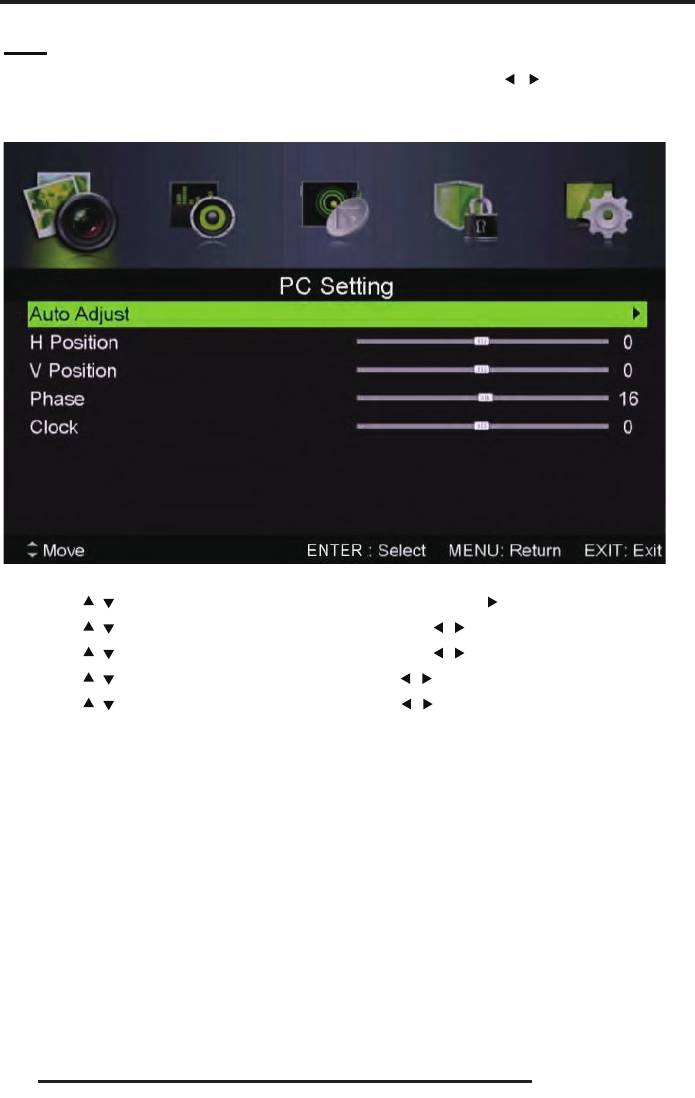
PC
Press the “MENU” button to enter the OSD menu. Then press “ / ’’ button to select the
“PC Setting” menu. (Only avail able in PC mode).
1. Press “
/ ” button to select “Auto Adjust” menu and press the “ ”button to auto adjustment.
2. Press “
/ ” button to select “H Position” and press the “ / ” button to adjust.
3. Press “
/ ” button to select “V-Position” and press the “ / ” button to adjust.
4. Press “
/ ” button to select “Phase” and press the “ / ” button to adjust.
5. Press “
/ ” button to select “Clock” and press the “ / ” button to adjust.
24
DTV Features
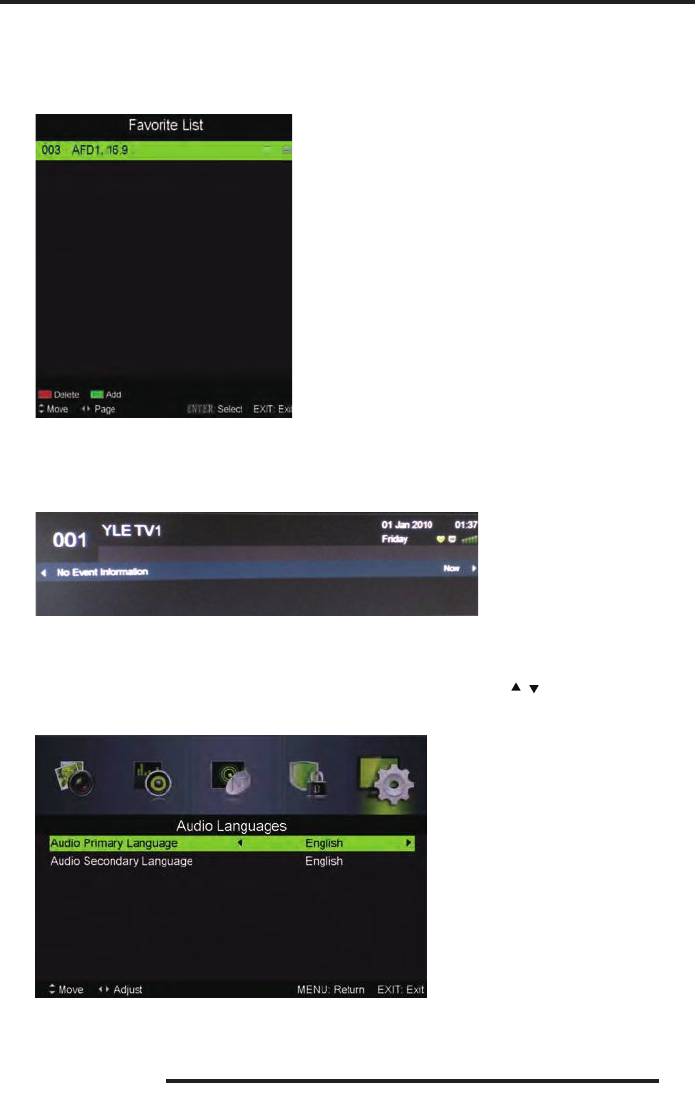
Favorite List
When the source is selected as DTV, users can enter Favorite List by pressing “FAV” button.
The “Favorite List” window is illustrated as follows:
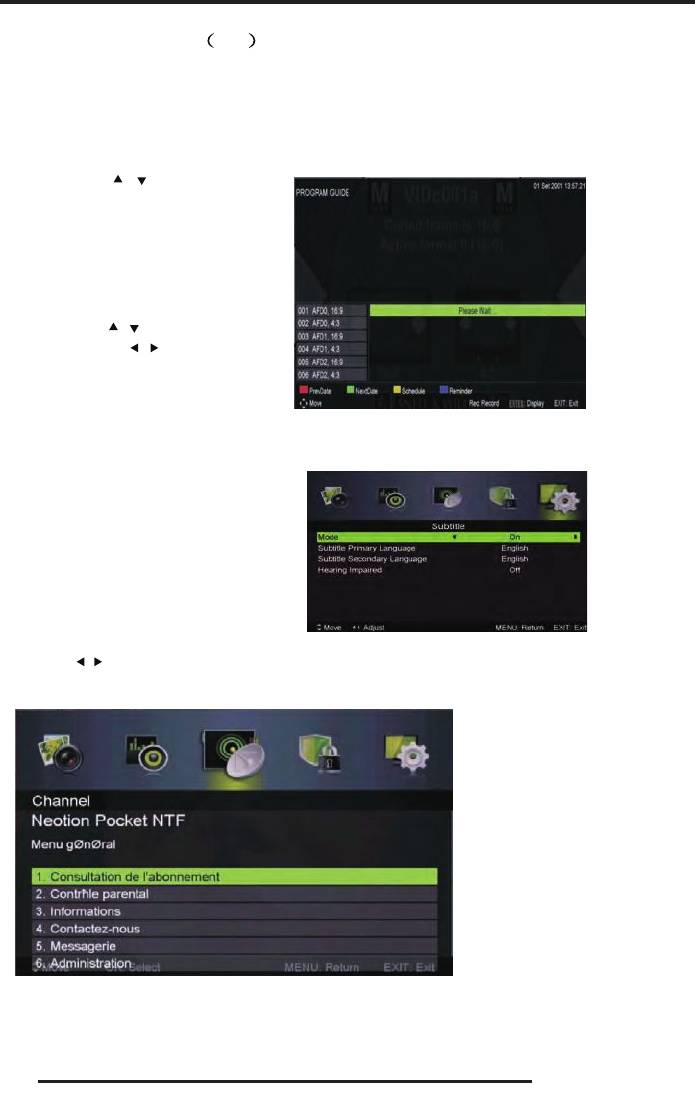
Program Information
When the source is selected as DTV, you can press “displa y” button to display the channel’s
information. The program information window is illustrated as follows:
Audio
When the source is selected as DTV, users can enter the Setup menu to enter the “Audio
Language” menu . The “audio language” window is illustrated, and press “
/
” button to select the
“audio language” menu .
25
Electronic Program Guide(EPG)
Electronic Program Guide (EPG) provides program informatio n which will be broadcasted
now or in the future. The system will display EPG window by pressing “EPG” button. DATE a nd
TIME information is displayed on the right of the window. The left side shows all channels. The
right side shows the programs in the channel. The selected program is also displayed on the top of
the screen.
26
1. Press the “
/ ” button to select the
“program”. You can press “RED” button
to enter record mode. Press “GREEN”
button to display the program’s detail.
Press “YELLOW” button to Check details
at PVR’s Schedule List introduction. Press
“Blue” button to enter remind setting.
2. Press the “
/ ” button to select “CH”
and press the “
/ ” button to select the
channel number to see the curre nt
channel’s program forecast.
Note: The U disk will be formatted when in burning, please do not store important files in the U dis k.
Subtitle
When the source is selected as DTV, users
can go to the menu to set.
Note: The pictures in regard to func tion are
provided for reference purposes only.
DTV Features
Common interface
Press the “ / ” button to select Common interface,then p ress ENTER button to enter sub menu.
Only available when there is CI card under DTV.
USB Features
Press the “SOURCE” button to change to the “MED IA” source.
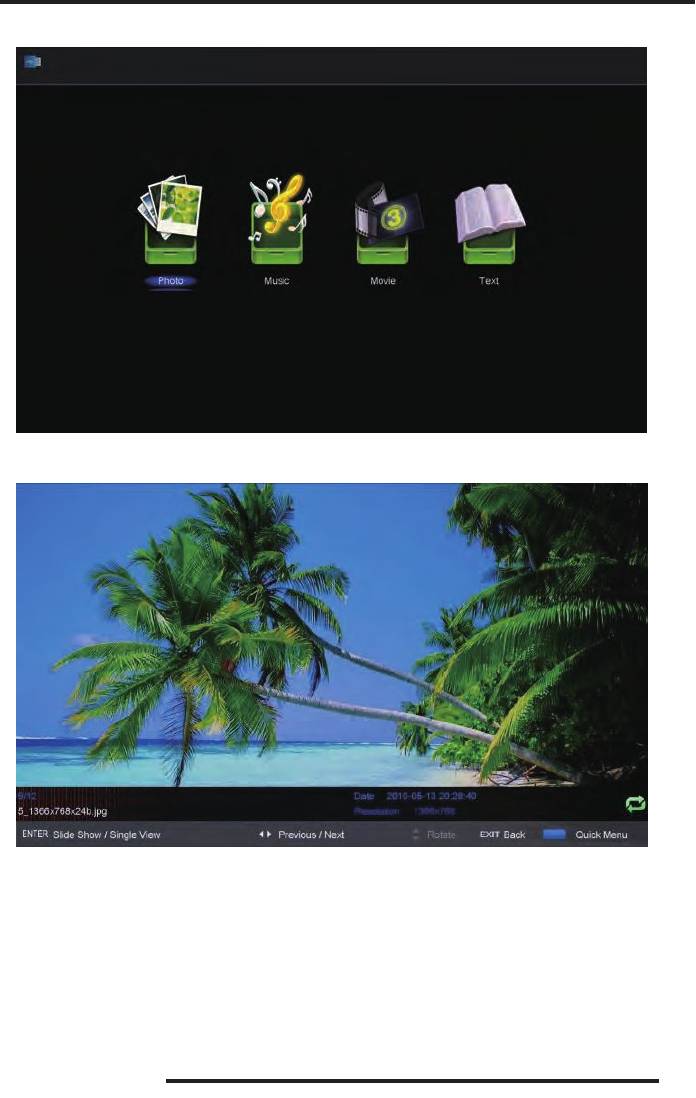
Photo
1. Press the “◄ / ►” button enter the “PHOTO” option, and press enter button to enter
2.Press ◄ / ► button to s elect drive disk you want to watch, then press enter button to enter.
3.Press “BLUE” button to enter the sub menu to s et.
4. Press the “EXIT” button to back to the previous menu.
27
USB Features
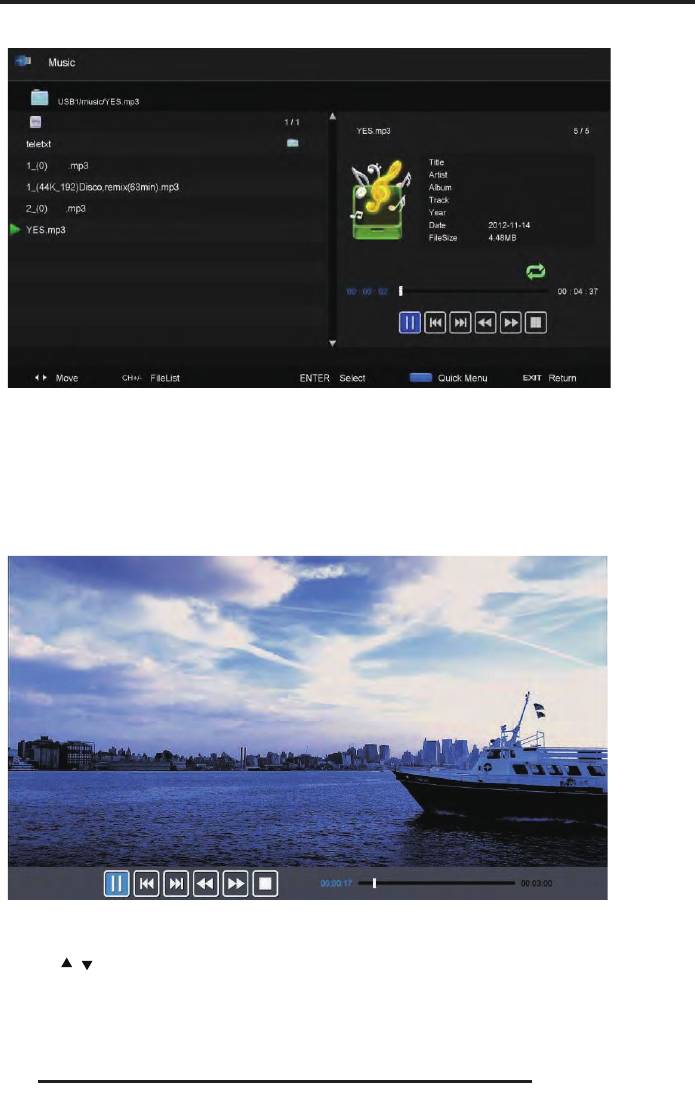
Music
1. Press ◄ / ► button to select MUSIC in the main menu, then pres s enter button to enter
2. Press ◄ / ► button to select drive disk you want to wa tc h, then press enter button to enter
3. Press “BLUE” button to enter the sub menu to set.
4. Press the “exit” button to back to the pre vious menu
Movie
1.Press ◄ / ► button to select MOVIE in the main menu, then press enter button to enter
2. Press
/ button to select drive disk you want to watch, then press enter button to enter
3. Press “BLUE” button to enter the sub menu to set.
4. Press the “exit” button to back to the pre vious menu.
28
USB Features
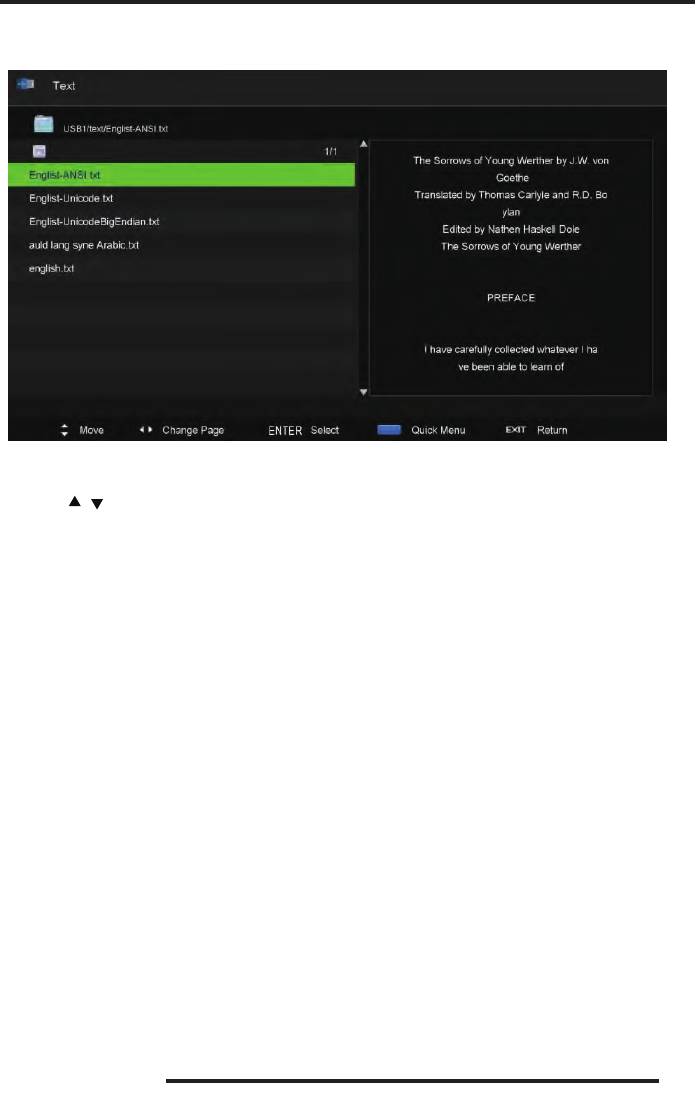
Text
1. Press ◄ / ► button to select TEXT in the main menu, then press enter button to ente r.
2. Press
/ button to select drive disk you want to watch, then press enter button to enter
3. Press “BLUE” button to enter the su b menu to set.
4. Press th e “EXIT” button to back to the previous menu.
29
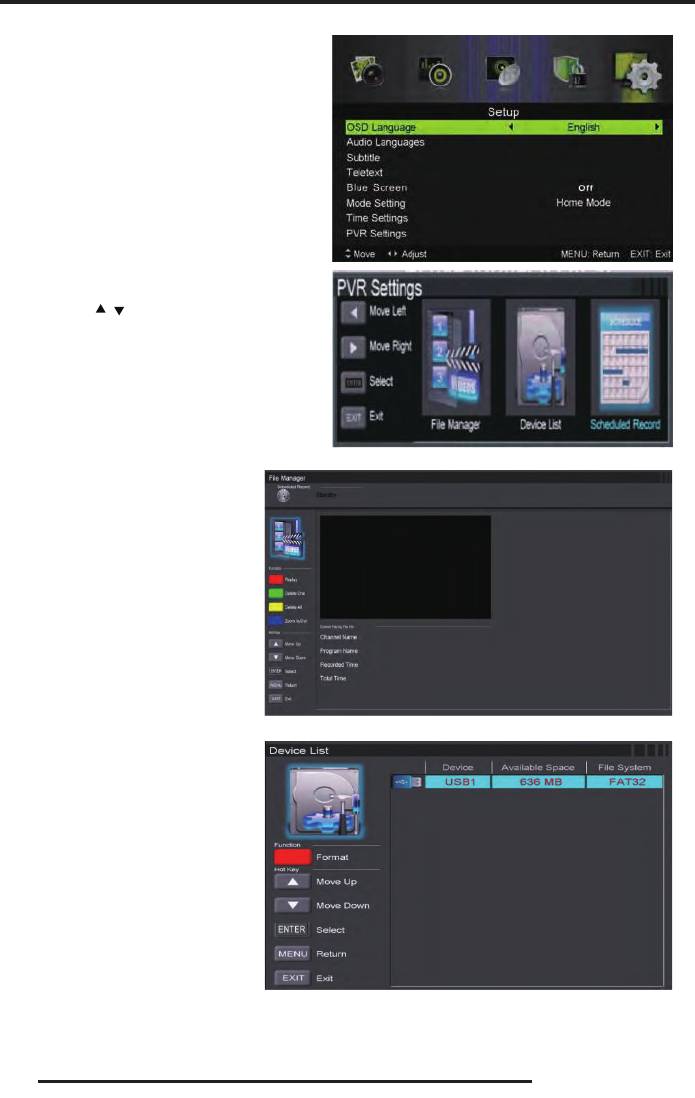
PVR Operation
In DTV source, press the “MEN U ” button
to enter the OSD menu. Then press“◄ / ►”
button to select the “Setup ” menu.
1. Press “
/ ” button to select “PVR
Settings” and press the “ENTER”or “►”
button to enter.
a) Press “◄ / ►” button to
select “File Manager” and press
the “ENTER” button to check
PVR file system.
b) Press “◄ / ►” button to
select “Device List” and press th e
“ENTER” button to the s ub
menu.
30
PVR Operation
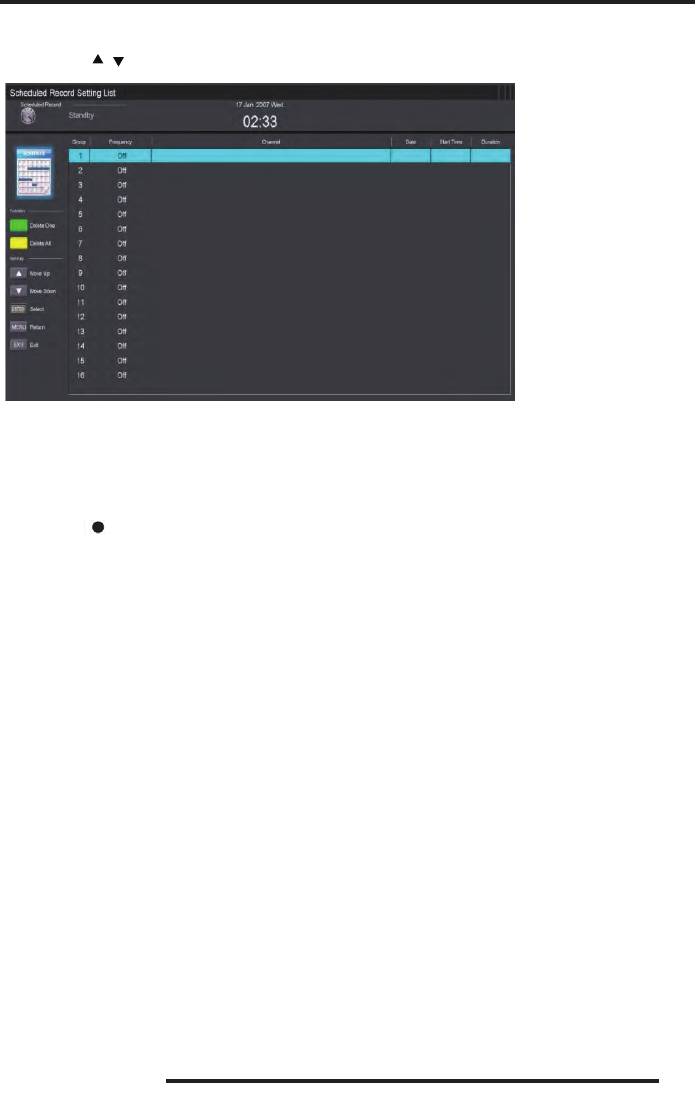
c ) Press “ / ” button to select “Scheduled Record” and press the “ENTER” button to set.
Note:
1. The U disk will be formatted when in format, please do not store important files in the U
disk.
2. Press “
” button for the firs t time to start recording, for the second time, the sign o f
recorder will be slimmed down, but it's still under recording.
31


