Maxtor 20302300: инструкция
Раздел: Профоборудование
Тип: Аппарат
Инструкция к Аппарату Maxtor 20302300
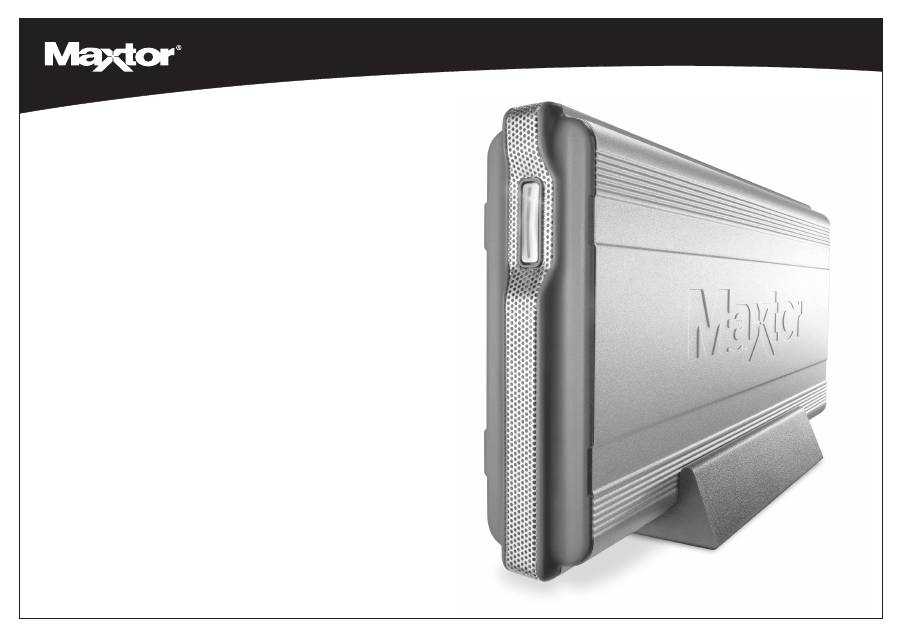
Shared Storage Plus+
Quick Start Guide
33
in
1
Network Drive
P/N: 20302300

Shared Storage Plus+
Quick Start Guide
33
in
1
Network Drive
Contents
English . . . . . . . . . . . . . . . . . . . . . . . . . . . . .2
Français . . . . . . . . . . . . . . . . . . . . . . . . . . . . .3
Deutsch . . . . . . . . . . . . . . . . . . . . . . . . . . . . .4
Italiano . . . . . . . . . . . . . . . . . . . . . . . . . . . . . .5
Español . . . . . . . . . . . . . . . . . . . . . . . . . . . . .6
Nederlands . . . . . . . . . . . . . . . . . . . . . . . . . .7
Dansk . . . . . . . . . . . . . . . . . . . . . . . . . . . . . .8
Portugues . . . . . . . . . . . . . . . . . . . . . . . . . . .9
Suomi . . . . . . . . . . . . . . . . . . . . . . . . . . . . .10
Polski . . . . . . . . . . . . . . . . . . . . . . . . . . . . . .11
усский
. . . . . . . . . . . . . . . . . . . . . . . . . . . . .12
Shared Storage Plus+
Quick Start Guide
For more detailed information, please refer to the Maxtor Shared Storage Plus User’s Guide located on the Documentation CD.
33
in
1
Network Drive
2
2
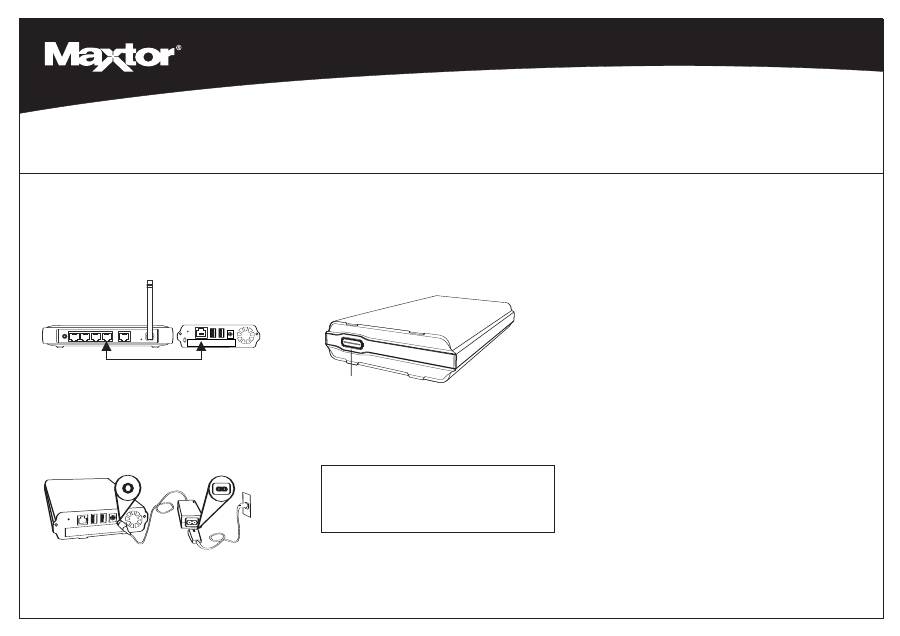
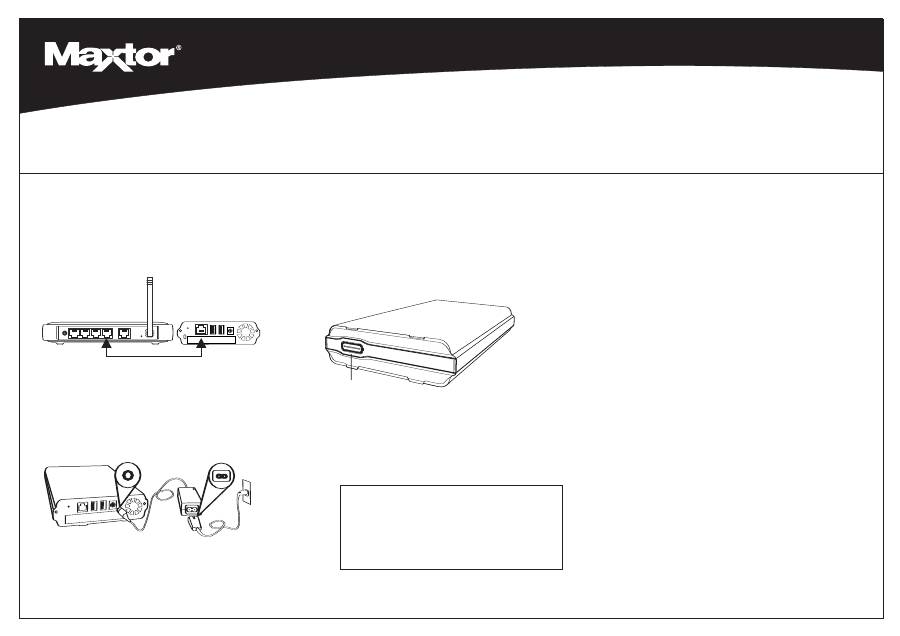
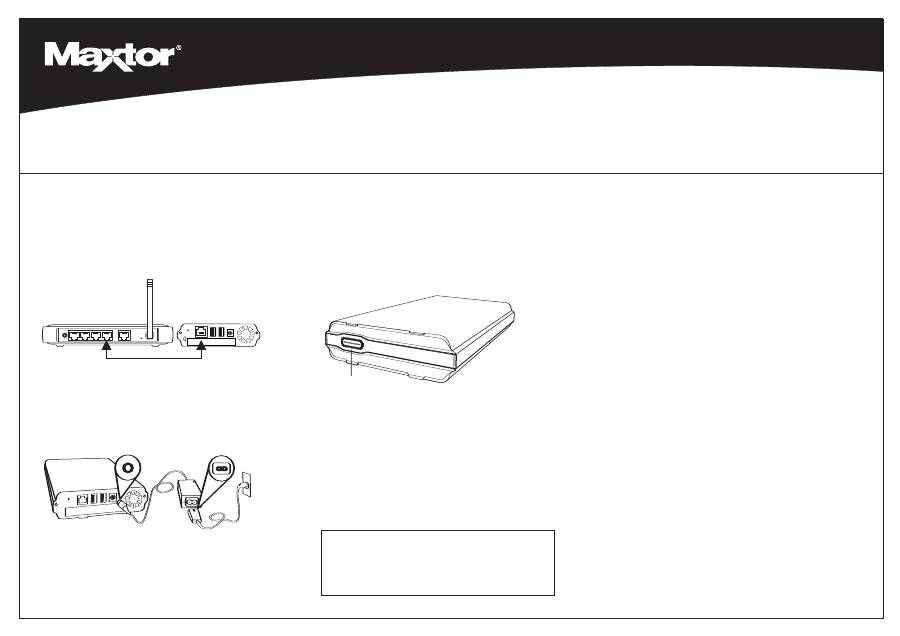
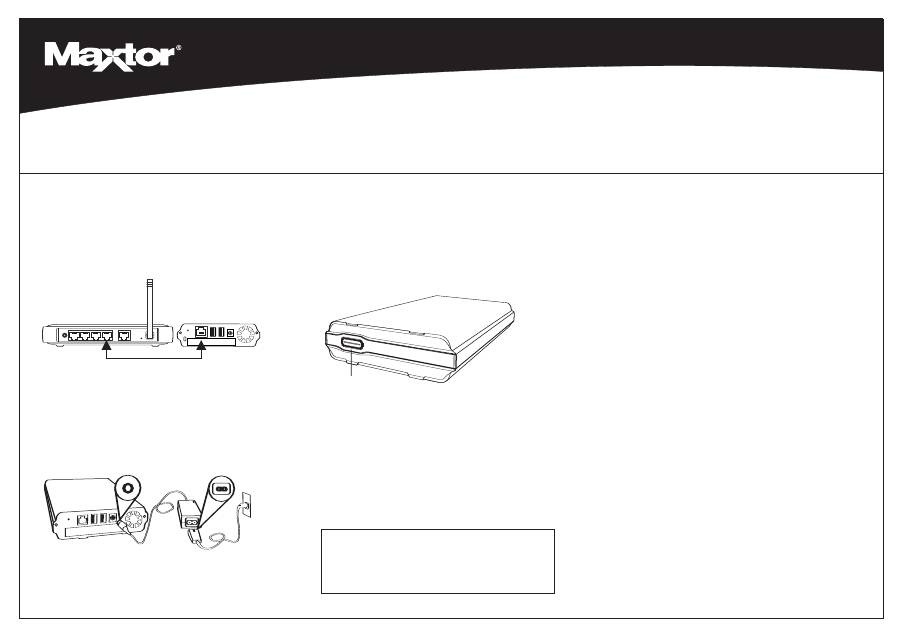
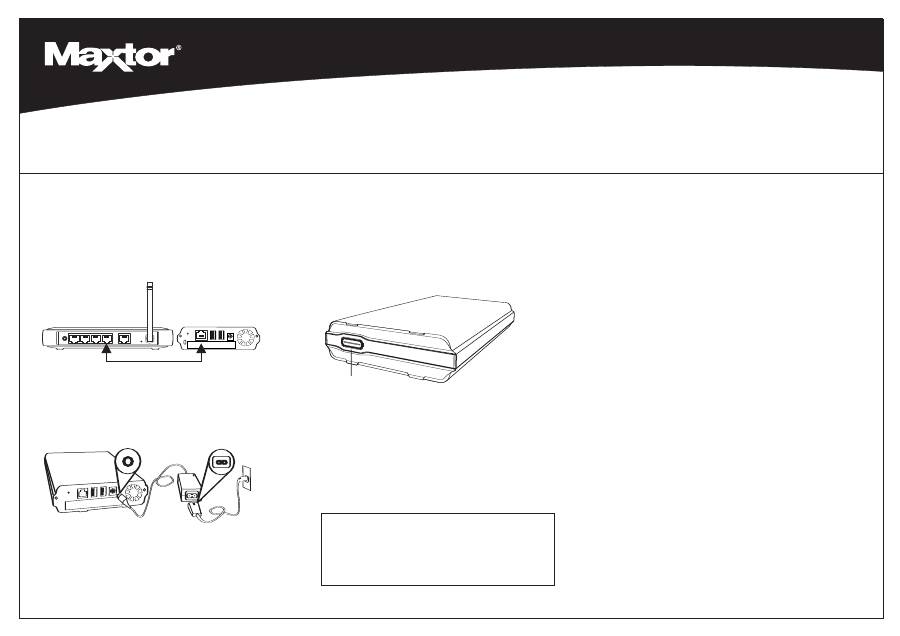
Power up your drive
Press the power button on the front of your new Maxtor Shared
Storage Plus drive.
Your drive will now start. The start up process can take up to one
minute to complete.
• The light inside of the button will turn yellow.
• When the light pulses green, your drive is ready and you can go to
step 3.
3
Set up your drive
1
Connect your drive
Connect the Ethernet cable
1.
Plug one end of the supplied Ethernet cable into your network,
router or switch.
2.
Plug the other end of the Ethernet cable into the Ethernet port on
your Shared Storage Plus drive.
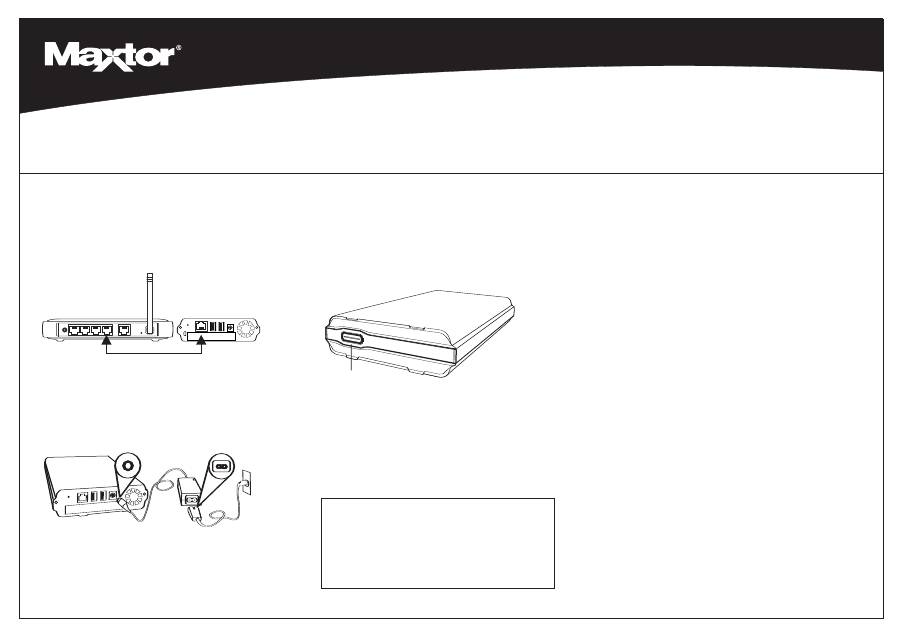
Connecting the power
1.
Plug the round female connector from the power adapter into the
drive’s power connector.
2.
Plug the two-pin female connector on the power cord into the
power adapter.
3.
Plug the standard electrical plug from the power adapter into your
power source.
Power
Button
1.
Insert the
Maxtor Quick Start
CD.
2.
Select your language and click
OK
.
3.
The
InstallShield Wizard
screen will appear, followed by the
Welcome
screen. Click
Next
.
4.
When the
License Agreement
appears, click
Yes
.
5.
The
Choose Destination Location
screen will appear. To change the
installation location, click
Browse
and select a new location. Click
Next
.
6.
The
Setup Status
will appear as the software is installed, followed by
the
InstallShield Wizard Complete
screen. Click
Finish
to restart your
system.
7.
When the system is ready, double-click on the
Maxtor Quick Start
icon
on your Desktop.
8.
The
Quick Start
software will open with the message: “Locating Shared
Storage drives on Network.” When found, you will see the Network ID
number and IP address for your drive in a drop-down menu. For
example: MSS-000335 (192.168.0.5)
9.
Click
Next
. The next screen will show the Network ID of your drive. Click
Manage
to set an administrative password, and then click
Next
to
Set
up Shared Storage
on this computer. When the Main Menu appears,
click on the
Shared Storage Setup
icon. Choose an account type
(
Public Account
or
Private Account
) and click
Next
.
10.
Enter a
Name
for the new account and click
Next
.
11.
Select your account type (
Home
or
Business
use) and click
Finish
. The
Quick Start software will now create your new user account and the
appropriate folders for the account.
Note:
Maxtor Quick Start software must be installed on each Windows
2000/XP system in order for each user to take advantage of a Personal
folder.
Ethernet Ports
Router/Switch
Using the Backup & Restore Feature
See page 15 of the Shared Storage Plus User’s Guide, located on
the Documentation CD, for more information.
Media Serving
See page 66 of the Shared Storage Plus User’s Guide, located on
the Documentation CD, for more information.

Shared Storage Plus+
Guide de démarrage rapide
Pour de plus amples informations, veuillez consulter le guide de l’utilisateur du disque Maxtor Shared Storage Plus disponible sur le CD-ROM de documentation.
3
2
Mise sous tension du disque
Appuyez sur l’interrupteur de mise en marche situé à l’avant de
votre nouveau disque Maxtor Shared Storage Plus.
Le cycle de démarrage de votre disque commence. Ce cycle peut
prendre jusqu’à une minute.
• Le voyant lumineux du bouton devient jaune.
• Quand le voyant est de couleur verte et qu’il clignote, votre disque
est prêt à être utilisé : vous pouvez passer à l’étape 3.
3
Configuration du disque
1
Connexion du disque
Connexion du câble Ethernet
1.
Branchez une extrémité du câble Ethernet fourni sur le
commutateur ou le routeur de votre réseau.
2.
Branchez l’autre extrémité du câble au port Ethernet de votre
disque Shared Storage Plus.
Connexion de l’alimentation
1.
Branchez le connecteur rond de type femelle du transformateur à
la prise d’alimentation du disque.
2.
Branchez le connecteur femelle à deux broches du câble
d’alimentation au transformateur.
3.
Branchez la prise électrique standard du transformateur à une
source d’alimentation.
Interrupteur de mise
en marche
1.
Insérez le CD-ROM de
démarrage rapide de Maxtor
.
2.
Choisissez votre langue et cliquez sur
OK
.
3.
L’
assistant InstallShield
apparaît, suivi de l’écran
Bienvenue
. Cliquez
sur
Suivant
.
4.
Lorsque l’
Accord de licence
apparaît, cliquez sur
Oui
.
5.
L’écran
Choisir l’emplacement de destination
apparaît. Si vous
souhaitez modifier l’emplacement de l’installation, cliquez sur le bouton
Parcourir
et sélectionnez un nouvel emplacement. Cliquez sur
Suivant
.
6.
L’écran
État de la configuration
apparaît une fois l’installation du logi-
ciel terminée, suivi de l’écran
Fin de l’assistant InstallShield
. Cliquez
sur
Terminer
pour redémarrer votre système.
7.
Quand le système est prêt, double-cliquez sur l’icône
Démarrage rapide
de Maxtor
sur le bureau.
8.
Le logiciel de
démarrage rapide
affiche le message ci-dessous :
“Locating Shared Storage drives on Network” (localisation des disques
Shared Storage sur le réseau). Une fois que le disque est localisé, vous
verrez apparaître son identifiant réseau et son adresse IP dans un menu
déroulant. Par exemple : MSS-000335 (192.168.0.5).
9.
Cliquez sur
Suivant
. L’écran suivant vous indique l’identifiant réseau de
votre disque. Cliquez sur
Gestion
pour configurer le mot de passe
d’administration, puis sur
Suivant
afin de
configurer le disque Shared
Storage
sur cet ordinateur. Lorsque le menu principal apparaît, cliquez
sur l’icône
Configuration du disque Shared Storage
. Sélectionnez un
type de compte (
Compte public
ou
Compte privé
) et cliquez sur
Suivant
.
10.
Saisissez un
Nom
pour le nouveau compte et cliquez sur
Suivant
.
11.
Sélectionnez votre type de compte (utilisation
Personnelle
ou
Professionnelle
) et cliquez sur
Terminer
. Le logiciel de démarrage rapide
crée alors votre nouveau compte utilisateur ainsi que les dossiers
appropriés.
Remarque :
Le logiciel de démarrage rapide de Maxtor doit être installé
sur chaque système Windows 2000/XP afin que chaque utilisateur puisse
profiter d’un dossier personnel.
Ports Ethernet
Routeur/Commutateur
Utilisation de la fonction de sauvegarde et de restauration
Pour plus d’informations, voir la page 15 du guide de l’utilisateur
Shared Storage Plus sur le CD-ROM de documentation.
Fonctions multimédia
Pour plus d’informations, voir la page 66 du guide de l’utilisateur
Shared Storage Plus sur le CD-ROM de documentation.
Disque dur en réseau 3 en 1
Shared Storage Plus+
Schnellstartanleitung
Nähere Informationen finden Sie im Maxtor Shared Storage Plus-Benutzerhandbuch auf der Dokumentations-CD-ROM.
4
2
Einschalten der Festplatte
Drücken Sie die Ein-/Ausschalttaste an der Vorderseite Ihrer
neuen Maxtor Shared Storage Plus-Festplatte.
Die Festplatte wird nun hochgefahren. Das Hochfahren kann bis zu
einer Minute dauern.
• Die Leuchtanzeige in der Taste leuchtet gelb.
• Sobald die Anzeige grün blinkt, ist die Festplatte einsatzbereit und
Sie können mit Schritt 3 fortfahren.
3
Einrichten der Festplatte
1
Anschließen der Festplatte
Anschließen des Ethernetkabels
1.
Schließen Sie ein Ende des mitgelieferten Ethernetkabels an
Ihren Netzwerk-Router oder Switch an.
2.
Stecken Sie das andere Ende des Ethernetkabels in den
Ethernetanschluss Ihrer Shared Storage Plus-Festplatte.
Anschließen der Stromversorgung
1.
Stecken Sie den runden Stecker des Netzadapters in den
Netzanschluss der Festplatte.
2.
Verbinden Sie den 2-Stift-Stecker am Stromkabel mit dem
Netzadapter.
3.
Schließen Sie den Netzstecker des Netzadapters an die
Stromversorgung an.
Ein-/Ausschalttaste
1.
Legen Sie die
Maxtor Schnellstart
-CD-ROM ein.
2.
Wählen Sie Ihre Sprache und klicken Sie auf
OK
.
3.
Der
InstallShield Wizard
wird geladen und ein
Begrüßungsbildschirm
wird angezeigt. Klicken Sie auf
Weiter
.
4.
Wenn die
Lizenzvereinbarung
angezeigt wird, klicken Sie auf
Ja
.
5.
Der Bildschirm
Zielpfad wählen
erscheint. Um ein anderes
Installationsverzeichnis anzugeben, klicken Sie auf die Schaltfläche
Durchsuchen
und wählen einen anderen Pfad aus. Klicken Sie auf
Weiter
.
6.
Während der Installation wird zuerst der
Installationsstatus
eingeblendet
und dann das Fenster
InstallShield Wizard abgeschlossen
. Klicken
Sie auf
Fertig stellen
, um das System neu zu starten.
7.
Wenn das System bereit ist, doppelklicken Sie auf das
Maxtor-
Schnellstartsymbol
auf Ihrem Desktop.
8.
Die
Schnellstart-
Software wird geladen und folgende Meldung wird
eingeblendet: „Suche Shared Storage-Festplatten im Netzwerk“. Nachdem
die Festplatte gefunden wurde, werden ihre Netzwerkerkennung und IP-
Adresse in einem Dropdown-Menü angezeigt. Zum Beispiel: MSS-000335
(192.168.0.5).
9.
Klicken Sie auf
Weiter
. Im nächsten Fenster wird die Netzwerkkennung
Ihrer Festplatte angezeigt. Klicken Sie auf
Verwalten
, um ein Administrator-
kennwort festzulegen und anschließend auf
Weiter
, um die
Shared
Storage-Festplatte einzurichten
. Wenn das Hauptmenü eingeblendet
wird, klicken Sie auf das Symbol
Shared Storage einrichten
. Wählen
Sie eine Kontoart (
Öffentliches Konto
oder
Privates Konto
) und klicken
Sie auf
Weiter
.
10.
Erstellen Sie einen
Namen
für das neue Konto und klicken Sie auf
Weiter
.
11.
Wählen Sie die Kontoart (
private
oder
geschäftliche
Nutzung) und klicken
Sie auf
Fertig stellen
. Die Schnellstart-Software erstellt daraufhin Ihr
neues Benutzerkonto sowie die entsprechenden Ordner für das Konto.
Hinweis:
Die Maxtor Schnellstart-Software muss auf jedes Windows
2000/XP-System im Netzwerk installiert werden, damit jeder Benutzer
einen privaten Ordner erhält.
Ethernetanschlüsse
Router/Switch
Verwendung der Funktion „Sichern und Wiederherstellen“
Nähere Informationen hierzu finden Sie auf Seite 15 des
Benutzerhandbuchs der Shared Storage Plus-Festplatte, das auf
der Dokumentations-CD-ROM enthalten ist.
Media Serving
Nähere Informationen hierzu finden Sie auf Seite 66 des
Benutzerhandbuchs der Shared Storage Plus-Festplatte, das auf
der Dokumentations-CD-ROM enthalten ist.
3-in-1-Netzwerkfestplatte

Shared Storage Plus+
Guida di avvio rapido Quick Start
Per ulteriori informazioni, consultare la Guida utente Maxtor Shared Storage Plus all’interno del CD di documentazione.
5
2
Accensione dell’unità
Premere il pulsante di accensione che si trova sulla parte anteriore
della nuova unità Maxtor Shared Storage Plus.
L’unità verrà avviata. Il processo di avviamento dell’unità può
richiedere fino ad un minuto.
• La spia all’interno del pulsante diventerà gialla.
• Quando la spia diventa verde, l’unità è pronta per passare alla fase 3.
3
Configurazione dell’unità
1
Collegamento dell’unità
Collegamento del cavo Ethernet
1.
Inserire un’estremità del cavo Ethernet fornito nel router o nello
switch della rete.
2.
Inserire l’altra estremità nella porta Ethernet dell’unità Shared
Storage Plus.
Alimentazione
1.
Collegare il connettore femmina rotondo dell’alimentatore al
connettore di alimentazione dell’unità.
2.
Inserire il connettore femmina a due pin del cavo di alimentazione
nell’alimentatore.
3.
Inserire la spina standard dell’alimentatore nella presa di
alimentazione.
Pulsante di
accensione
1.
Inserire il CD di
avvio rapido di Maxtor
.
2.
Selezionare la lingua desiderata e fare clic su
OK
.
3.
Apparirà la schermata
Installazione guidata InstallShield
, seguita dalla
schermata di Benvenuto. Fare clic su
Avanti
.
4.
Quando viene visualizzata la schermata
License Agreement
(Contratto
di licenza) fare clic su
Sì
.
5.
Viene poi visualizzata la schermata
Choose Destination Location
(Scegli
percorso di destinazione). Per modificare il percorso di installazione, fare
clic su
Sfoglia
e selezionare un percorso alternativo. Fare clic su
Avanti
.
6.
Verrà visualizzata la schermata
Setup Status
(Stato dell’installazione),
seguita dalla finestra
InstallShield Wizard Complete
(Installazione guidata
InstallShield completata). Fare clic su
Fine
.
7.
Una volta che il sistema è pronto, fare doppio clic sull’icona
Maxtor
Quick Start
(Avvio rapido di Maxtor) sul desktop.
8.
Il software
Quick Start
(Avvio rapido) visualizzerà il messaggio: “Locating
Shared Storage drives on Network” (Individuazione delle unità di archivi-
azione condivisa in rete). Una volta che l’unità viene individuata, un menu
a discesa indicherà codice ID di rete e indirizzo IP dell’unità. Ad esempio:
MSS-000335 (192.168.0.5).
9.
Fare clic su
Avanti
. Comparirà una schermata indicante codice ID di rete
dell’unità. Fare clic su
Manage
(Gestisci) per impostare una password di
gestione e poi su
Avanti
per eseguire la funzione
Set up Shared Storage
(Impostare l’archiviazione condivisa) sul computer. Quando compare il Menu
principale, fare clic sull’icona
Shared Storage Setup
(Impostazione
dell’archiviazione condivisa). Scegliere il tipo di account,
Public Account
o
Private Account
(Account pubblico o personale), e fare clic su Avanti.
10.
Inserire il
Nome
del nuovo account e fare clic su
Avanti
.
11.
Selezionare il tipo di account a seconda dell’uso,
Home
(da casa) o
Business
(aziendale), e fare clic su
Fine
. Il software di avvio rapido
genera quindi il nuovo account utente e le relative cartelle.
Nota:
affinché tutti gli utenti della rete possano disporre di una cartella
personale, il software di avvio rapido Quick Start di Maxtor deve essere
installato su tutti i sistemi Windows 2000 o XP.
Porte Ethernet
Router/switch
Utilizzo della funzione di backup e ripristino
Per maggiori informazioni consultare la Guida utente Shared
Storage Plus, sul CD di documentazione, a pagina 15.
Funzioni multimediali
Per maggiori informazioni consultare la Guida utente Shared
Storage Plus, sul CD di documentazione, a pagina 66.
Unità di rete 3 in 1

Shared Storage Plus+
Guía de inicio rápido
Para obtener información detallada, consulte la Guía del usuario de Shared Storage Plus de Maxtor incluida en el CD-ROM de documentación.
6
2
Encendido de la unidad
Pulse el botón de encendido situado en la parte frontal de su
nueva unidad Shared Storage Plus de Maxtor.
A continuación se iniciará la unidad. El proceso de inicio puede tardar
hasta un minuto en completarse.
• La luz del botón se volverá amarilla.
• Cuando la luz parpadea en color verde, la unidad está lista para
utilizarse y puede continuar con el paso 3.
3
Configuración de la unidad
1
Conexión de la unidad
Conectar el cable Ethernet
1.
Enchufe un extremo del cable Ethernet suministrado al enrutador
o conmutador de red.
2.
Enchufe el otro extremo del cable Ethernet al puerto Ethernet de
su unidad Shared Storage Plus.
Conexión del suministro eléctrico
1.
Enchufe el conector hembra redondeado del adaptador de
corriente al conector de alimentación de la unidad.
2.
Conecte el conector hembra de dos clavijas del cable de
alimentación al adaptador de corriente.
3.
Conecte el enchufe eléctrico estándar del adaptador de corriente
a la red eléctrica.
Botón de
conexión
1.
Introduzca el CD-ROM de
inicio rápido de Maxtor
.
2.
Seleccione el idioma y haga clic en
OK
(Aceptar).
3.
Aparecerá el
asistente InstallShield
, seguido por la pantalla de
bienvenida
.
Haga clic en
Next
(Siguiente).
4.
Cuando aparezca
License Agreement
(Contrato de licencia), haga clic en
Yes
(Sí).
5.
A continuación, aparecerá la pantalla
Choose Destination Location
(Elegir la ubicación de destino). Para cambiar el lugar de instalación, haga
clic en
Browse
(Examinar) y seleccione la nueva ubicación. Haga clic en
Next
(Siguiente).
6.
Aparecerá la ventana
Setup Status
(Estado de la instalación) mientras
se procede a la instalación del software y, a continuación, aparecerá la
pantalla
InstallShield Wizard Complete
(Completado el asistente
InstallShield). Haga clic en
Finish
(Finalizar) para reiniciar el sistema.
7.
Cuando el sistema esté listo, haga doble clic en el icono
Maxtor Quick
Start
(Inicio rápido de Maxtor) de su escritorio.
8.
El software
Quick Start
(Inicio rápido) se abrirá con el mensaje:
“Locating Shared Storage drives on Network” (Localizando las unidades
de almacenamiento compartido en la red). Cuando esté localizada, verá
el número de identificación en la red y la dirección IP de su unidad en un
menú desplegable. Por ejemplo: MSS-000335 (192.168.0.5).
9.
Haga clic en
Next
(Siguiente). La siguiente pantalla mostrará el número
de identificación en la red de su unidad. Haga clic en
Manage
(Gestionar) para configurar la contraseña administrativa y, a continuación,
haga clic en
Next
(Siguiente) para
Set up Shared Storage
(instalar
Shared Storage) en el ordenador. Cuando aparezca el menú principal,
haga clic en el icono Shared Storage Setup (Instalación de Shared
Storage). Seleccione un tipo de cuenta (
Public Account
o
Private
Account
, pública o privada) y haga clic en
Next
(Siguiente).
10.
Introduzca un nombre (
Name
) para la nueva cuenta y haga clic en
Next
(Siguiente).
11.
Seleccione un tipo de cuenta (
Home
o
Business
, uso doméstico o
profesional) y haga clic en
Finish
(Finalizar). El software de Inicio rápido
creará su nueva cuenta de usuario y las carpetas apropiadas para la cuenta.
Nota:
El software de Inicio rápido de Maxtor se debe instalar en cada
sistema Windows 2000/XP de tal forma que permita disfrutar a cada
usuario de una carpeta personal.
Puertos Ethernet
Enrutador/Conmutador
Empleo de la función Backup & Restore (Realizar copia de
seguridad y restaurar)
Si desea obtener más información, consulte la página 15 de la
Guía del usuario de Shared Storage Plus incluida en el CD-ROM
de documentación.
Soluciones multimedia
Si desea obtener más información, consulte la página 66 de la
Guía del usuario de Shared Storage Plus incluida en el CD-ROM
de documentación.
Unidad de red 3 en 1
Shared Storage Plus+
Beknopte handleiding
Uitvoerige informatie vindt u in de Gebruikershandleiding van de Maxtor Shared Storage Plus op de documentatie-cd.
7
2
Het station inschakelen
Druk op de aan/uit-knop aan de voorzijde van het nieuwe
Maxtor Shared Storage Plus-station.
Het station wordt nu ingeschakeld. Het starten kan een minuut in
beslag nemen.
• Het lampje in de knop wordt geel.
• Als het lampje groen wordt, is het station gereed en kunt u
verdergaan met stap 3.
3
Het station instellen
1
Het station aansluiten
De ethernetkabel aansluiten
1.
Steek één uiteinde van de bijgeleverde ethernetkabel in de router
of switch van het netwerk.
2.
Sluit het andere uiteinde van de ethernetkabel aan op de ether-
netpoort van de Shared Storage Plus-schijf.
Stroom aansluiten
1.
Steek de ronde vrouwelijke connector van de stroomadapter in de
stroomaansluiting op het station.
2.
Steek de 2-pin vrouwelijke connector van het netsnoer in de
stroomadapter.
3.
Steek de stroomstekker van de stroomadapter in het stopcontact.
Aan/uit-knop
1.
Plaats de
Maxtor snelstart
-cd.
2.
Selecteer de gewenste taal en klik op
OK
.
3.
Het scherm
InstallShield Wizard
wordt weergegeven en vervolgens
verschijnt het
welkomstscherm
. Klik op
Next
[Volgende].
4.
Wanneer de
License Agreement
[Licentieovereenkomst] verschijnt, klikt
u op
Yes
[Ja].
5.
Het scherm
Choose Destination Location
[Doellocatie kiezen] verschijnt.
Wilt u de locatie voor installatie wijzigen, klik dan op
Browse
[Bladeren]
en selecteer een nieuwe locatie. Klik op
Next
[Volgende].
6.
De
Setup Status
[Setup-status] wordt weergegeven zodra de installatie
is voltooid, gevolgd door het scherm
InstallShield Wizard Complete
[Installshield Wizard voltooid]. Klik op
Finish
[Voltooien] om het systeem
opnieuw op te starten.
7.
Als het systeem gereed is, dubbelklikt u op het pictogram
Maxtor Quick
Start
[Maxtor Snelstart] op het bureaublad.
8.
De
Quick Start
[Snelstart]-software wordt geopend met het bericht:
“Locating Shared Storage drives on Network” [Bezig met zoeken naar
Shared Storage-schijven op het netwerk]. Eenmaal gevonden worden
het netwerk-ID-nummer en IP-adres van de schijf in een vervolgkeuzelijst
weergegeven. Bijvoorbeeld: MSS-000335 (192.168.0.5).
9.
Klik op
Next
[Volgende]. In het volgende scherm wordt het netwerk-ID
van uw station weergegeven. Klik op
Manage
[Beheren] om een
beheerderwachtwoord in te stellen en klik vervolgens op Next [Volgende]
om
Shared Storage
op deze computer in te
stellen
. Zodra het hoofdmenu
is geopend, klikt u op het pictogram
Shared Storage Setup
. Kies een
accounttype (
Public Account
[Openbaar account] of
Private Account
[Privé-account]) en klik op
Next
[Volgende].
10.
Voer een
Name
[Naam] voor de nieuwe account in en klik op
Next
[Volgende].
11.
Selecteer het accounttype (
Home
[Thuis]- of
Business
[Bedrijf]-gebruik)
en klik op
Finish
[Voltooien]. De Quick Start [Snelstart]-software maakt
nu uw nieuwe gebruikersaccount en de bijbehorende mappen voor de
account aan.
Opmerking:
Uitsluitend als de Maxtor Quick Start [Snelstart]-software op
ieder Windows 2000/XP-systeem is geïnstalleerd, kan iedere gebruiker
gebruikmaken van een Persoonlijke map.
Ethernetpoorten
Router/Switch
De functie Backup & Restore gebruiken
Kijk voor meer informatie op pagina 15 van de gebruikershandleiding
van Shared Storage Plus, die op de documentatie-cd staat.
De media bedienen
Kijk voor meer informatie op pagina 66 van de gebruikershandleiding
van Shared Storage Plus, die op de documentatie-cd staat.
3 in 1 Network Drive

Shared Storage Plus+
Startvejledning
Der er flere oplysninger i brugervejledningen til Maxtor Shared Storage Plus, som findes på cd'en med dokumentation.
8
2
Tænd for strømmen til drevet
Tryk på afbryderen på forsiden af det nye Maxtor Shared
Storage Plus-drev.
Drevet starter. Det kan tage op til ét minut at gennemføre
startprocessen.
• Lampen i knappen lyser gult.
• Drevet er klar, og du kan fortsætte til trin 3, når lampen blinker
grønt.
3
Konfigurer drevet
1
Tilslut drevet
Tilslut Ethernet-kablet
1.
Sæt den ene ende af det medfølgende Ethernet-kabel
i netværksrouteren eller -switchen.
2.
Sæt den anden ende af Ethernet-kablet i Shared Storage Plus-
drevets Ethernet-port.
Tilslutning af strøm
1.
Sæt det runde hunstik fra strømadapteren i drevets strømstik.
2.
Sæt netledningens tobenede hunstik i strømadapteren.
3.
Sæt strømadapterens normale hanstik i strømkilden.
Afbryder
1.
Isæt cd'en
Maxtor Quick Start
.
2.
Vælg dit sprog, og klik på
OK
.
3.
Skærmbilledet
InstallShield Wizard
vises efterfulgt af
velkomst-
skærmbilledet
. Klik på
Next
.
4.
Klik på
Yes
, når
licensaftalen
vises.
5.
Skærmbilledet
Choose Destination Location
vises. Klik på
Browse
, og
vælg en ny placering, hvis du vil ændre installationsdestination. Klik på
Next
.
6.
Når softwaren er installeret, vises skærmbilledet
Setup Status
efterfulgt
af
InstallShield Wizard Complete
. Klik på
Finish
for at genstarte
systemet.
7.
Dobbeltklik på ikonet
Maxtor Quick Start
på skrivebordet, når systemet
er klar.
8.
Programmet
Quick Start
åbnes med meddelelsen: “Locating Shared
Storage drives on Network.” Når drevet er fundet vises drevets
netværks-id og IP-adresse i en rullemenu, f.eks.: MSS-000335
(192.168.0.5).
9.
Klik på
Next
. Det næste skærmbillede viser drevets netværks-id. Klik på
Manage
for at angive en administratoradgangskode, og klik derefter på
Next
for at
konfigurere Shared Storage
på denne computer. Klik på
ikonet
Shared Storage Setup
, når hovedmenuen vises. Vælg en
kontotype (
Public Account
eller
Private Account
), og klik på
Next
.
10. Indtast et
navn
på den nye konto, og klik på
Next
.
11. Vælg din kontotype (
Home
eller
Business
), og klik på
Finish
.
Programmet Quick Start opretter ny din nye brugerkonto med tilhørende
mapper.
Bemærk!
Programmet Maxtor Quick Start skal installeres på alle
Windows 2000/XP-systemer, hvis alle brugerne skal kunne udnytte en
personlig mappe.
Ethernet-porte
Router/Switch
Brug af funktionen Backup & Restore
Der er flere oplysninger på side 15 i brugervejledningen til Shared
Storage Plus, som findes på cd'en med dokumentation.
Media Serving
Der er flere oplysninger på side 66 i brugervejledningen til Shared
Storage Plus, som findes på cd'en med dokumentation.
3 - 1-netværksdrev
Shared Storage Plus+
Guia de Início Rápido
Para informações mais detalhadas, consulte a Guia do Utilizador do Maxtor Shared Storage Plus que se encontra no CD de documentação.
9
2
Ligar a alimentação da unidade
Prima o botão de alimentação na parte frontal da sua nova
unidade Maxtor Shared Storage Plus.
A unidade inicia-se então. O processo de iniciação poderá demorar
até um minuto a ser concluído.
• A luz no interior do botão passa a amarelo.
• Quando a luz pulsar a verde, a unidade está pronta e pode
continuar no passo 3.
3
Configurar a unidade
1
Ligar a unidade
Ligar o cabo Ethernet
1.
Ligue uma extremidade do cabo Ethernet fornecido ao router ou
switch da sua rede.
2.
Ligue a outra extremidade do cabo Ethernet à porta Ethernet da
sua unidade Shared Storage Plus.
Ligar à fonte de alimentação
1.
Ligue o conector fêmea redondo do transformador de corrente ao
conector de alimentação da unidade.
2.
Ligue o conector fêmea de dois pinos do cabo de alimentação ao
transformador.
3.
Ligue a ficha eléctrica standard do cabo do transformador a uma
tomada de energia eléctrica.
Botão de alimentação
1.
Insira o CD
Maxtor Quick Start
(Início Rápido Maxtor).
2.
Seleccione o seu idioma e faça clique em
OK
.
3.
Aparece o ecrã
InstallShield Wizard
(Assistente de instalação), seguido
pelo ecrã de
Welcome
(Boas-vindas). Faça clique em
Next
(Seguinte).
4.
Quando aparecer o
License Agreement
(Acordo de Licença), faça clique
em
Yes
(Sim).
5.
Aparece o ecrã
Choose Destination Location
(Escolher Localização de
Destino). Para alterar a localização da instalação, faça clique em
Browse
(Procurar) e seleccione uma nova localização. Faça clique em
Next
(Seguinte).
6.
Enquanto o software está a ser instalado aparece o ecrã
Setup Status
(Estado da instalação), que é seguido pelo ecrã
InstallShield Wizard
Complete
(Assistente de instalação concluído). Faça clique em
Finish
(Concluir) para reiniciar o sistema.
7.
Quando o sistema estiver pronto, faça duplo clique no ícone do
Maxtor
Quick Start
(Início Rápido Maxtor) no ambiente de trabalho.
8.
O software
Quick Start
(Início Rápido) abre-se, com a mensagem:
“Locating Shared Storage drives on Network” (A localizar unidades
Shared Storage na rede). Quando encontrar a sua unidade, poderá ver os
respectivos Número de ID de rede e Endereço IP num menu de lista
pendente. Por exemplo: MSS-000335 (192.168.0.5).
9.
Faça clique em
Next
(Seguinte). O ecrã seguinte apresenta a ID de rede
da sua unidade. Faça clique em
Manage
(Gerir) para definir a palavra-passe
administrativa, e em seguida faça clique em
Next
(Seguinte) para
Set up
Shared Storage
(Definir Shared Storage) neste computador. Quando
aparecer o Main Menu (Menu principal), faça clique no ícone de
Shared
Storage Setup
(Configuração da Shared Storage). Escolha um tipo de
conta (
Public Account
[Conta pública] ou
Private Account
[Conta privada])
e faça clique em
Next
(Seguinte).
10.
Introduza um
Name
(Nome) para a nova conta e faça clique em
Next
(Seguinte).
11.
Seleccione o seu tipo de conta (utilização doméstica [
Home
] ou profis-
sional (
Business
]) e faça clique em
Finish
(Concluir). O software Quick
Start cria agora a sua nova conta de utilizador e as pastas apropriadas
para a conta.
Nota:
Para que cada utilizador possa tirar partido de uma pasta Pessoal, o
software Maxtor Quick Start deve ser instalado em cada um dos sistemas
Windows 2000/XP.
Portas Ethernet
Router/Switch
Utilizar a funcionalidade de Fazer cópias de segurança e Restaurar
Para mais informações, veja a página 15 do Guia do Utilizador do
Shared Storage Plus, que se encontra no CD de documentação.
Reprodução de multimédia
Para mais informações, veja a página 66 do Guia do Utilizador do
Shared Storage Plus, que se encontra no CD de documentação.
Unidade de Rede 3 em 1
Shared Storage Plus+
Pikaopas
Tarkat tiedot ovat käyttöoppaiden CD-levyllä olevassa Maxtor Shared Storage Plus -käyttöoppaassa.
10
2
Kytke asemaan virta
Paina Maxtor Shared Storage Plus -aseman etuosassa olevaa
virtapainiketta.
Asema käynnistyy. Käynnistyminen voi kestää jopa minuutin.
• Painikkeen sisällä oleva merkkivalo muuttuu keltaiseksi.
• Kun merkkivalo vilkkuu vihreänä, asema on valmis ja voit siirtyä
kohtaan 3.
3
Ota asema käyttöön
1
Liitä asema
Kiinnitä Ethernet-kaapeli
1.
Kiinnitä laitteen mukana toimitettu Ethernet-kaapeli verkon
reitittimeen tai kytkimeen.
2.
Kiinnitä Ethernet-kaapelin toinen pää Shared Storage Plus
-aseman Ethernet-liitäntään.
Kytke virta
1.
Kiinnitä verkkolaitteen pyöreä naarasliitin kiintolevyn virtaliitäntään.
2.
Kiinnitä virtajohdon kaksipiikkinen naarasliitin verkkolaitteeseen.
3.
Kiinnitä verkkolaitteen sähköpistoke virtalähteeseen.
Virtapainike
1.
Pane
Maxtor Quick Start
(Maxtorin pika-aloitus) -levy CD-asemaan.
2.
Valitse kieli ja napsauta sitten
OK
-painiketta.
3.
InstallShield Wizard
(Ohjattu InstallShield-asennus) -ikkuna tulee näyttöön,
minkä jälkeen näkyviin tulee
Welcome
(Tervetuloa) -ikkuna. Valitse
Next
(Seuraava).
4.
Kun
License Agreement
(Käyttöoikeussopimus) tulee näyttöön, valitse
Yes
(Kyllä).
5.
Näyttöön tulee
Choose Destination Location
(Valitse kohdesijainti) -ikkuna.
Voit muuttaa asennuskansion valitsemalla
Browse
(Selaa) ja valitsemalla
sitten uuden sijainnin. Valitse
Next
(Seuraava).
6.
Setup Status
(Asennuksen tila) -ikkuna tulee näyttöön asennuksen
edetessä. Kun asennus on valmis, näyttöön tulee
InstallShield Wizard
Complete
(Ohjattu InstallShield-asennus on valmis) -ikkuna. Käynnistä
järjestelmä uudelleen valitsemalla
Finish
(Valmis).
7.
Kun järjestelmä on valmis, kaksoisnapsauta työpöydällä olevaa
Maxtor
Quick Start
(Maxtorin pika-aloitus) -kuvaketta.
8.
Quick Start
(Pika-aloitus) -ohjelmisto avautuu, ja näyttöön tulee seuraava
sanoma: "Locating Shared Storage drives on Network" (Etsitään Shared
Storage -asemia verkosta). Kun asemat ovat löytyneet, asemasi verkko-
tunnus ja IP-osoite näkyvät avattavassa luetteloruudussa. Esimerkki:
MSS-000335 (192.168.0.5).
9.
Valitse
Next
(Seuraava). Aseman verkkotunnus näkyy seuraavassa ikkunassa.
Määritä järjestelmänvalvojan salasana valitsemalla
Manage
(Hallitse).
Avaa sitten
Set up Shared Storage
(Asenna Shared Storage -asema) -ikkuna
ja ota asema käyttöön tietokoneessa valitsemalla
Next
(Seuraava). Kun
päävalikko tulee näkyviin, napsauta
Shared Storage Setup
(Shared
Storage -aseman asennus) -kuvaketta. Valitse tilin tyypiksi
Public Account
(Julkinen tili) tai
Private Account
(Yksityinen tili). Valitse sitten
Next
(Seuraava).
10.
Kirjoita uuden tilin nimi
Name
(Nimi) -kohtaan. Valitse sitten
Next
(Seuraava).
11.
Valitse tilin tyypiksi
Home
(Koti) tai
Business
(Yritys) ja valitse
Finish
(Valmis).
Quick Start
(Pika-aloitus) -ohjelmisto luo uuden käyttäjätilin ja
tilin edellyttämät kansiot.
Huomautus:
Jotta jokainen käyttäjä voisi käyttää henkilökohtaista kansiota,
Maxtor Quick Start (Maxtorin pika-aloitus) -ohjelmisto on asennettava
jokaiseen Windows 2000- ja Windows XP -järjestelmään.
Ethernet-liitännät
Reititin/kytkin
Backup & Restore (Varmuuskopiointi- ja palautus) -toiminnon
käyttäminen
Lisätietoja on käyttöoppaiden CD-levyllä olevan Shared Storage
Plus -käyttöoppaan sivulla 15.
Mediajakelu
Lisätietoja on käyttöoppaiden CD-levyllä olevan Shared Storage
Plus -käyttöoppaan sivulla 66.
UKolmitoiminen verkkoasema

Shared Storage Plus+
Szybkie wprowadzenie
Szczegółowe informacje zawiera Podręcznik użytkownika dysku Maxtor Shared Storage Plus, znajdujący się na dysku CD z dokumentacją.
11
2
Włącz dysk
Naciśnij przycisk zasilania z przodu nowego dysku Maxtor Shared
Storage Plus.
Dysk zostanie uruchomiony. Proces uruchamiania może potrwać około
jednej minuty.
• Lampka wewnątrz przycisku będzie świecić na żółto.
• Jeśli lampka miga na zielono, dysk jest gotowy i można przejść do
kroku 3.
3
Skonfiguruj dysk
1
Podłącz dysk
Podłączanie kabla Ethernet
1. Jeden koniec dostarczonego kabla Ethernet podłącz do routera lub
przełącznika sieciowego.
2. Drugi koniec kabla Ethernet podłącz do portu Ethernet w dysku
Shared Storage Plus.
Podłączanie zasilania
1. Podłącz okrągłe żeńskie złącze zasilacza do złącza zasilania dysku.
2. Podłącz do zasilacza dwupinowe żeńskie złącze przewodu zasilania.
3. Podłącz do gniazda zasilania standardową wtyczkę kabla zasilania.
Przycisk zasilania
1. Włóż dysk CD Maxtor Quick Start (Szybkie wprowadzenie).
2. Wybierz język i kliknij przycisk OK.
3. Wyświetlony zostanie ekran InstallShield Wizard (Kreator InstallShield),
a następnie ekran Welcome (Zapraszamy). Kliknij przycisk Next (Dalej).
4. Gdy pojawi się ekran License Agreement (Umowa licencyjna), kliknij przycisk
Yes (Tak).
5. Wyświetlony zostanie ekran Choose Destination Location (Wybór lokalizacji
docelowej). Aby zmienić miejsce instalacji, kliknij przycisk Browse (Przeglądaj)
i wybierz nową lokalizację. Kliknij przycisk Next (Dalej).
6. Po zainstalowaniu oprogramowania pojawi się ekran Setup Status (Stan
instalacji), a następnie ekran InstallShield Wizard Complete (Działanie
Kreatora InstallShield zostało ukończone). Kliknij przycisk Finish (Zakończ),
aby ponownie uruchomić system.
7. Gdy system będzie gotowy, kliknij dwukrotnie ikonę Maxtor Quick Start
(Szybkie wprowadzenie) na pulpicie.
8. Zostanie uruchomione oprogramowanie Quick Start i pojawi się komunikat:
„Locating Shared Storage drives on Network” (Lokalizowanie dysków Shared
Storage w sieci). Po znalezieniu dysku w menu rozwijanym widoczny będzie
jego identyfikator sieciowy oraz adres IP. Na przykład: MSS-000335
(192.168.0.5).
9. Kliknij przycisk Next (Dalej). Na następnym ekranie wyświetlony zostanie
identyfikator sieciowy dysku. Kliknij opcję Manage (Zarządzanie), aby ustawić
hasło administratora, a następnie kliknij przycisk Next (Dalej), aby użyć
funkcji Set up Shared Storage (Skonfiguruj dysk Shared Storage) na tym
komputerze. Gdy wyświetlone zostanie menu główne, kliknij ikonę Shared
Storage Setup (Konfiguracja dysku Shared Storage). Wybierz typ konta —
Public Account (Konto publiczne) lub Private Account (Konto prywatne),
a następnie kliknij przycisk Next (Dalej).
10. W polu Name (Nazwa) wprowadź nazwę nowego konta i kliknij przycisk
Next (Dalej).
11. Wybierz typ konta — Home (Domowe) lub Business (Służbowe) i kliknij
przycisk Finish (Zakończ). Oprogramowanie Quick Start utworzy nowe konto
użytkownika i odpowiednie foldery dla konta.
Uwaga: Oprogramowanie Maxtor Quick Start należy zainstalować na każdym
komputerze z systemem Windows 2000/XP, aby każdy użytkownik mógł
korzystać z folderu osobistego.
Porty Ethernet
Router/Przełącznik
Korzystanie z funkcji Backup & Restore (Tworzenie i
przywracanie kopii zapasowych)
Więcej informacji znajduje się na stronie 15 w Podręczniku użytkownika
dysku Shared Storage Plus dostępnym na dysku CD z dokumentacją.
Udostępnianie multimediów
Więcej informacji znajduje się na stronie 66 w Podręczniku użytkownika
urządzenia Shared Storage Plus dostępnym na dysku CD z dokumentacją.
Dysk sieciowy 3 in 1
акопитель Shared Storage Plus+
уководство по быстрому запуску
олее подробная информация приведена в руководстве пользователя Maxtor Shared Storage Plus на компакт-диске с документацией.
12
2
ключение питания накопителя
ажмите кнопку включения питания на передней панели накопителя Maxtor
Shared Storage Plus.
акопитель включен. роцедура запуска накопителя занимает не более минуты.
• а кнопке загорается желтый индикатор.
• огда индикатор сменит цвет на зеленый, накопитель готов к работе и можно
переходить к п. 3.
3
астройка накопителя
1
одключение накопителя
одключение кабеля Ethernet
1.
одключите один конец прилагаемого к накопителю кабеля Ethernet к
коммутатору или маршрутизатору локальной сети.
2.
одключите другой конец кабеля Ethernet к порту Ethernet накопителя
Shared Storage Plus.
одключение источника питания
1.
одключите гнездовой разъем блока питания к разъему питания накопителя.
2.
одключите гнездовой разъем шнура питания с двумя контактами к блоку
питания.
3.
одключите стандартный электрический штепсель блока питания к
сетевой розетке.
нопка питания
1.
ставьте в дисковод компакт-диск с программным обеспечением
Maxtor Quick Start
(ыстрый запуск
Maxtor
).
2.
ыберите язык и нажмите
OK
.
3.
а экране появится окно
InstallShield Wizard
(астер установки InstallShield), затем
окно
Welcome
(риветствие). ажмите кнопку
Next
(алее).
4.
осле появления текста
License Agreement
(ицензионное соглашение) нажмите
Yes
(а).
5.
а экране появится окно
Choose Destination Location
(ыберите место установки).
ля изменения места установки нажмите
Browse
(Обзор) и выберите новое место.
ажмите кнопку
Next
(алее).
6.
а экране появится окно
Setup Status
(остояние установки), отображающее
процесс установки программного обеспечения, затем, после завершения установки,
окно
InstallShield Wizard Complete
(Установка завершена). ажмите
Finish
(отово)
для перезапуска системы.
7.
осле завершения перезагрузки дважды щелкните мышью на значке программного
обеспечения
Maxtor Quick Start
(ыстрый запуск Maxtor), расположенном на рабочем
столе.
8.
а экране появится окно программы
Quick Start
(ыстрый запуск) с сообщением
"Locating Shared Storage drives on Network" (оиск накопителей Shared Storage в сети).
ля обнаруженных накопителей в ниспадающем списке будут показаны сетевой
идентификатор и IP-адрес. апример: MSS-000335 (192.168.0.5).
9.
ажмите
Next
(алее). следующем окне будет показан сетевой идентификатор
накопителя. ля установки пароля администратора нажмите
Manage
(Управление),
затем нажмите
Next
(алее), чтобы настроить параметры накопителя на данном
компьютере (
Set up Shared Storage
). осле появления главного меню щелкните
мышью на значке
Shared Storage Setup
(астройка накопителей). ыберите тип
учетной записи -
Public Account
(Общая) или
Private Account
(астная) и нажмите
Next
(алее).
10.
ведите имя новой учетной записи в поле
Name
(мя) и нажмите
Next
(алее).
11.
ыберите тип ашей учетной записи -
Home
(ом) или
Business
(Офис) и нажмите
Finish
(отово). рограммное обеспечение Quick Start (ыстрый запуск) создаст
учетную запись нового пользователя и соответствующие папки для этой учетной
записи.
римечание.
тобы каждый пользователь смог воспользоваться преимуществами
персональной папки, программное обеспечение Quick Start (ыстрый запуск) Maxtor
необходимо установить на каждом компьютере с О Windows 2000/XP.
орты Ethernet
аршрутизатор/коммутатор
спользование функции Backup & Restore (езервное копирование и
восстановление)
ля получения дополнительной информации смотри страницу 15 уководства
пользователя Shared Storage Plus, находящегося на компакт-диске с
документацией.
Обеспечение доступа к данным мультимедиа
ля получения дополнительной информации смотри страницу 66 уководства
пользователя Shared Storage Plus, находящегося на компакт-диске с
документацией.
етевой накопитель 3 в 1
