Kiev Camera CT1-7462-000 – страница 3
Инструкция к Kiev Camera CT1-7462-000
41
Ø Ê
• Если батареи были установлены после зарядки пленки,
включите выключатель питания и один раз нажмите на кнопку
спуска затвора. Пленка автоматически перемещается на
первый кадр.
• Эта фотокамера рассчитана только на негативную пленку.
Поэтому пленку для слайдов использовать нельзя.
Â
• Wenn Sie die Batterien einsetzen, nachdem ein Film
eingelegt wurde, schalten Sie die Kamera ein und drücken
dann den Auslöser einmal. Der Film wird hierdurch
automatisch bis zum ersten Bild transportiert.
• Diese Kamera ist nur für den Gebrauch mit Negativfilm
vorgesehen. Diafilm kann daher nicht verwendet werden.
• Se si inseriscono le pile dopo aver inserito la
pellicola, attivare l’interruttore principale e premere
una volta il pulsante di scatto. La pellicola avanza
automaticamente fino al primo fotogramma.
• Questa macchina è stata realizzata per l’uso solo con
pellicole negative. Non è quindi possibile usare
pellicole per diapositive.
02-K129AmeEuro (p.26~).qxd 01.08.00 15:04 Page 41
c
Prise en main de l’appareil/Viseur
Voici quelques conseils qui vous permettront d’obtenir des photos
nettes.
• Tenez l’appareil des deux mains et maintenez vos coudes
légèrement contre le corps.
• Appuyez l’appareil contre votre front, regardez à travers le viseur
et appuyez lentement et doucement sur le déclencheur.
42
Ó À
c
Sosteniendo la cámara/Visor
Para obtener fotos nítidas, sujete la cámara firmemente, de
tal forma que no se mueva.
• Sujete la cámara con ambas manos y mantenga sus codos
ligeramente apoyados contra su cuerpo.
• Apoye la cámara contra su frente, mire a través del visor y
luego oprima el disparador lenta y suavemente.
Û
c
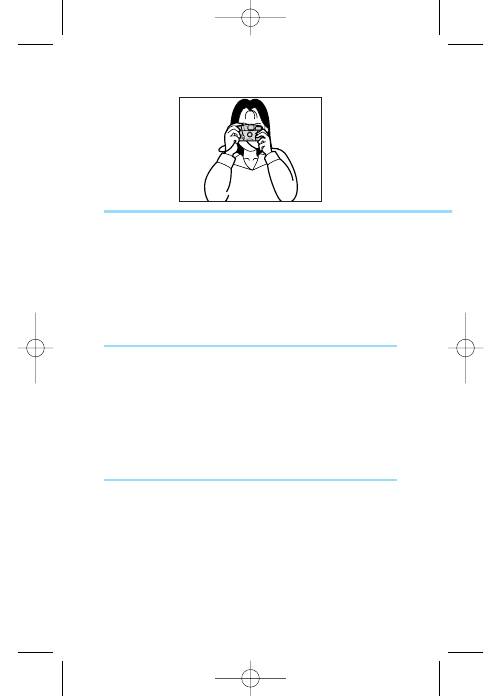
Holding the Camera/Viewfinder
To take sharp pictures, hold the camera firmly so that it does
not move.
• Hold the camera with both hands and brace your elbows
lightly against your body.
• Rest the camera against your forehead, look through the
viewfinder and then slowly and gently press the shutter
button.
02-K129AmeEuro (p.26~).qxd 01.08.00 15:04 Page 42

43
c
Come tenere la macchina fotografica/Mirino
Per ottenere fotografie ben nitide tenere saldamente la
macchina fotografica, in modo che non si muova.
• Tenere la fotocamera con entrambe le mani e appoggiare
leggermente i gomiti contro il corpo.
• Appoggiare la fotocamera contro la fronte, guardare nel
mirino e quindi premere lentamente e dolcemente il pulsante
di scatto.
Ø
c
Как держать фотокамеру/Видоискатель
Для получения резких фотографий крепко держите фотокамеру, не
допуская тряски.
• Возьмите фотокамеру обеими руками и слегка прижмите локти к
туловищу.
• Прислонив фотокамеру ко лбу, посмотрите в видоискатель, затем
медленно и плавно нажмите на кнопку спуска затвора.
Ê
c
Halten der Kamera/Sucher
Halten Sie die Kamera ruhig, um ein Verwackeln der Aufnahmen zu
vermeiden.
• Halten Sie die Kamera mit beiden Händen und mit leicht an den
Oberkörper angedrückten Ellbogen.
• Lassen Sie die Kamera an der Stirn anliegen, blicken Sie durch
den Sucher, und betätigen Sie den Auslöser dann ruhig und sanft.
Â
02-K129AmeEuro (p.26~).qxd 01.08.00 15:04 Page 43
44
À Û Ó
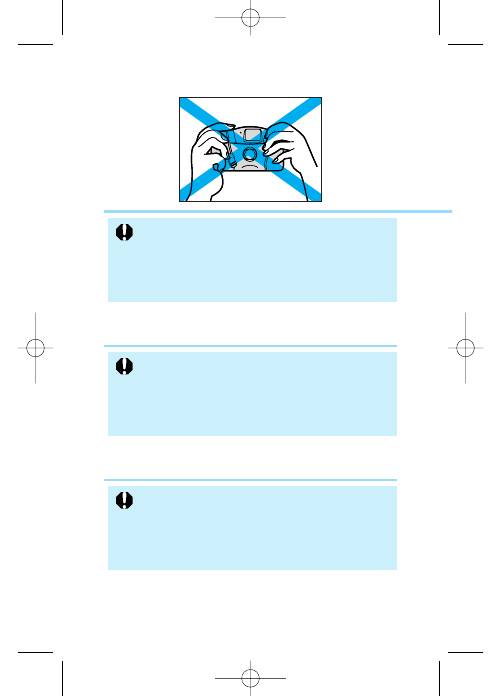
• When you hold the camera, take care to keep your
fingers, your hair and the strap away from the lens,
light-metering sensor and flash.
• Hold the camera still until you hear the sound of the
film winding on, indicating that the camera has
finished taking the picture.
• Quand vous tenez l’appareil, faites attention à ce que vos
doigts, vos cheveux et la dragonne n’obstruent pas
l’objectif, le capteur de posemètre et le flash.
• Ne faites pas bouger l’appareil tant que vous n’entendez
pas le bruit d’avance du film, qui indique que la photo a
été prise.
• Al sujetar la cámara, preste atención para que sus
dedos, sus cabellos y la correa no tapen el objetivo,
el sensor de medición de luz y el flash.
• Mantenga la cámara inmóvil hasta que escuche el
ruido de avance de la película, indicando que se ha
terminado de tomar la foto.
02-K129AmeEuro (p.26~).qxd 01.08.00 15:04 Page 44
45
Ø Ê
• Удерживая фотокамеру, следите за тем, чтобы не заслонять
объектив, экспонометрический датчик и вспышку пальцами,
волосами или наручным ремнем.
• Держите камеру неподвижно до тех пор, пока не услышите
звук перемотки пленки, свидетельствующий о том, что
процесс съемки завершен.
Â
• Quando si tiene la fotocamera, fare attenzione a
tenere i capelli, le dita e la cinghia lontani da
obiettivo, sensore dell’esposimetro e flash.
• Tenere ferma la fotocamera fino a quando si sente il
suono di avanzamento della pellicola, che indica che
la fotocamera ha finito di scattare l’immagine.
• Achten Sie beim Halten der Kamera darauf, daß das
Objektiv, die Lichtmeßzelle und der Blitz nicht durch
Haare, Finger oder die Trageschlaufe verdeckt werden.
• Halten Sie die Kamera nach dem Betätigen des Auslösers
ruhig, bis Sie den Filmtransport arbeiten hören. Dies zeigt
an, daß die Aufnahme gemacht wurde.
02-K129AmeEuro (p.26~).qxd 01.08.00 15:04 Page 45
v
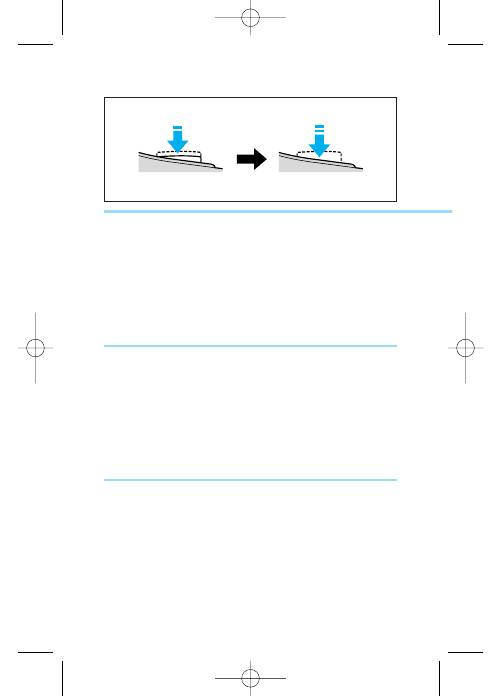
Déclencheur
Le déclencheur procède en deux temps.
Premièrement, il règle l’exposition et deuxièment, l’obturateur est
libéré. Appuyez lentement et doucement sur le déclencheur.
46
À
v
Acción del disparador
El disparador tiene una acción de dos posiciones.
La primera posición ajusta la exposición, mientras que la
segunda posición libera el obturador. Asegúrese de oprimir el
disparador lenta y suavemente.
Û
v
Shutter Button Action
The shutter button has a two-step action.
The first step sets the exposure, while the second step
releases the shutter. Be sure to press the shutter button
slowly and gently.
Ó
02-K129AmeEuro (p.26~).qxd 01.08.00 15:04 Page 46

47
v
Funzionamento del pulsante di scatto
Il pulsante di scatto agisce in due fasi.
La prima fase imposta l’esposizione, mentre la seconda fase
fa scattare l’otturatore. Assicurarsi di premere il pulsante di
scatto lentamente e dolcemente.
Ø
v
Работа кнопки спуска затвора
Срабатывание кнопки спуска затвора производится в два этапа.
На первом этапе устанавливается экспозиция, на втором этапе
срабатывает затвор. Нажимать на кнопку следует медленно и
осторожно.
Ê
v
Auslöserfunktionen
Der Auslöser weist zwei Stufen auf.
Die erste Stufe aktiviert die Belichtungseinstellung, die zweite löst
den Verschluß aus. Drücken Sie den Auslöser langsam und sanft
ganz durch.
Â
02-K129AmeEuro (p.26~).qxd 01.08.00 15:04 Page 47
48
À Û Ó
• Check that the lens cover is fully open before
pressing the shutter button. The shutter does not
operate unless the lens cover is fully open.
• There is a very short delay between the shutter
button being pressed and the shutter releasing. In
general, you should continue to hold the camera still
until you hear the sound of the film winding on, which
indicates that the shot has been taken.
• Avant de déclencher, vérifiez que le volet de protection de
l’objectif est complètement ouvert. Le déclencheur ne
fonctionne pas si le volet de protection de l’objectif n’est
pas complètement ouvert.
• Il existe un bref délai entre la pression sur le déclencheur
et la libération de l’obturation. Il est généralement
recommandé de tenir l’appareil immobile jusqu’à ce que
vous entendiez le bruit d’avance du film, indiquant que la
photo a été prise.
• Compruebe que la tapa del objetivo esté abierta
antes de oprimir el disparador. El obturador no
funcionará a menos que la tapa del objetivo esté
completamente abierta.
• Transcurre un intervalo de tiempo sumamente corto
desde que se oprime el disparador hasta que se libera
el obturador. Por lo general, mantenga la cámara
inmóvil hasta que escuche el ruido de avance de la
película indicando que se ha terminado de tomar la foto.
02-K129AmeEuro (p.26~).qxd 01.08.00 15:04 Page 48
49
Ø Ê
• Перед нажатием кнопки спуска затвора убедитесь в том, что
крышка объектива полностью открыта. Затвор срабатывает
только при полностью открытой крышке объектива.
• Между нажатием кнопки спуска затвора и срабатыванием
затвора предусмотрена очень короткая задержка. Обычно
следует держать камеру неподвижно до тех пор, пока не
будет слышен звук перемотки пленки, свидетельствующий
о том, что камера закончила съемку.
Â
• Vergewissern Sie sich vor Betätigen des Auslösers, daß der
Objektivdeckel geöffnet ist. Der Verschluß arbeitet nur,
wenn der Objektivdeckel vollständig offen ist.
• Es vergeht eine mimimale Zeit zwischen dem Moment, wo
Sie den Auslöser betätigen, und dem Moment, wo der
Verschluß ausgelöst wird. Es empfiehlt sich im Normalfall,
die Kamera ruhig zu halten, bis der Film hörbar
weitergespult wird; die Aufnahme ist dann vollständig
getätigt.
• Controllare che il copriobiettivo sia completamente
aperto prima di premere il pulsante di scatto.
L’otturatore non funziona se il copriobiettivo non è
completamente aperto.
• Esiste un brevissimo ritardo tra la pressione del
pulsante di scatto e lo scatto dell’otturatore. In
generale, continuare a tenere ferma la fotocamera
fino a che si sente il suono di avvolgimento della
pellicola, che indica che la foto è stata scattata.
02-K129AmeEuro (p.26~).qxd 01.08.00 15:04 Page 49

50
À Û Ó
Green Indicator
When you press the shutter button down halfway, the
indicator lights to show whether the camera is ready to
shoot.
Témoin vert
Lorsque vous appuyez à mi-course sur le déclencheur, le
témoin s’allume pour indiquer si l’appareil photo est prêt à la
prise de vue.
Indicador verde
Al oprimir el disparador hasta la mitad, el indicador se
enciende para indicar si la cámara está o no preparada
para tomar la foto.
02-K129AmeEuro (p.26~).qxd 01.08.00 15:04 Page 50
51
Ø Ê Â
Grüne Anzeigelampe
Wenn Sie den Auslöser halb durchdrücken, zeigt Leuchten
der Anzeige an, daß die Kamera aufnahmebereit ist.
Indicatore verde
Quando si preme a metà corsa il pulsante di scatto,
l’indicatore si illumina per indicare se la fotocamera è
pronta a scattare.
Зеленый индикатор
При нажатии кнопки спуска затвора на половину хода этот
индикатор горит, указывая, готова ли фотокамера к съемке.
02-K129AmeEuro (p.26~).qxd 01.08.00 15:04 Page 51
b
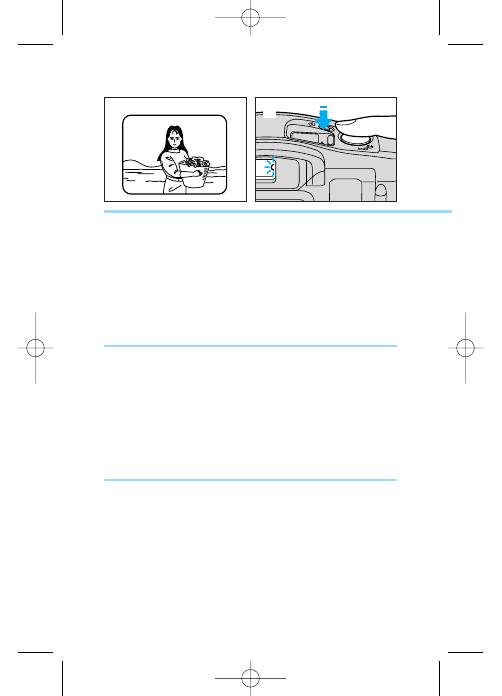
Taking Pictures (Fully Automatic)
Sliding the main switch to the ON position turns the camera
on and sets the mode to fully automatic (Auto Flash).
Stand at least 1.5 m (4.9 ft.) from the subject to be taken.
1. Look in the viewfinder to compose your picture.
2. Press the shutter button halfway and check that
the green indicator lights up.
b
Photographie (entièrement automatique)
Déplacez le interrupteur principal sur ON (Marche) pour mettre
l’appareil sous tension et le régler en mode entièrement automatique
(flash auto).
Placez-vous au moins à 1.5 m du sujet.
1. Regardez dans le viseur pour composer votre photo.
2. Enclenchez légèrement et vérifiez que le témoin vert
est allumé.
52
Ó À
1 2
b
Toma de fotografías (completamente automática)
Al deslizar el interruptor principal a la posición ON, la cámara
se enciende y se ajusta al modo completamente automático
(Flash automático).
Aléjese por lo menos 1,5 m del sujeto a ser tomado.
1. Mire el visor para componer su imagen.
2. Oprima el disparador hasta la mitad y
compruebe que se encienda el indicador verde.
Û
02-K129AmeEuro (p.26~).qxd 01.08.00 15:04 Page 52

53
b
Fotografieren (vollautomatisch)
Wenn Sie den Ein/Aus-Schalter auf ON stellen, wird die Kamera
eingeschaltet und auf vollautomatischen Betrieb (Blitzautomatik) eingestellt.
Halten Sie eine Aufnahmeentfernung von mindestens 1,5 m ein.
1. Blicken Sie in den Sucher und wählen Sie den
gewünschten Bildausschnitt.
2. Drücken Sie den Auslöser halb an, und vergewissern
Sie sich, daß die grüne Anzeigelampe leuchtet.
b
Scatto di fotografie (completamente automatica)
Spostando l’interruttore principale sulla posizione ON si accende la
macchina fotografica e si imposta la modalità completamente
automatica (flash automatico).
Collocarsi ad una distanza minima di 1,5 m dal soggetto da fotografare.
1. Guardare nel mirino per inquadrare l’immagine.
2. Premere a metà il pulsante di scatto e controllare
che l’indicatore verde si illumini.
Ø
b
Съемка (полностью автоматический режим)
При установке выключателя питания в положение ON включается фото-
камера и устанавливается полностью автоматический режим (автома-
тическая вспышка). Расстояние до объекта должно быть не менее 1,5 м.
1. Посмотрите в видоискатель и выберите композицию
кадра.
2. Нажмите кнопку спуска затвора на половину хода и
убедитесь в том, что загорелся зеленый индикатор.
Ê Â
02-K129AmeEuro (p.26~).qxd 01.08.00 15:04 Page 53
54
Ó À
3
Û
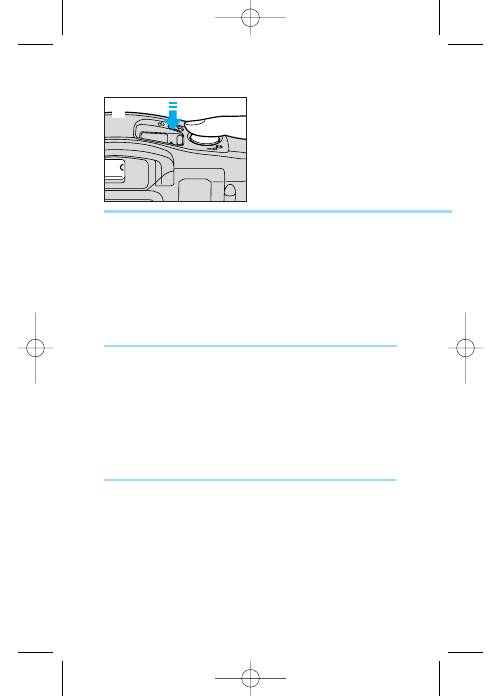
3. Press the shutter button fully.
• In low light conditions, the flash operates automatically.
3. Appuyez complètement sur le déclencheur.
• Le flash se déclenche automatiquement quand l’éclairement est
insuffisant.
3. Oprima el disparador a fondo.
• En condiciones de poca iluminación, el flash acciona
automáticamente.
02-K129AmeEuro (p.26~).qxd 01.08.00 15:04 Page 54

55
Ø Ê
3. Полностью нажмите кнопку спуска затвора.
• В условиях низкой освещенности автоматически срабатывает
вспышка.
Â
3. Premere a fondo il pulsante di scatto.
• In condizioni di illuminazione scarsa, il flash si attiva
automaticamente.
3. Drücken Sie den Auslöser schließlich ganz durch.
• Bei schwachem Licht wird der Blitz automatisch gezündet.
02-K129AmeEuro (p.26~).qxd 01.08.00 15:04 Page 55

56
Ó À Û
When the camera is not being used, always turn off
the main switch and close the lens cover to protect the
lens against dirt and dust.
Lorsque l’appareil n’est pas utilisé, mettez toujours le
interrupteur principal sur arrêt et fermez le cache d’objectif
pour protéger l’objectif contre la saleté et la poussière.
Cuando no se está usando la cámara, desconecte siempre
el interruptor de alimentación y cierre la tapa del objetivo
para proteger el objetivo contra el polvo y la suciedad.
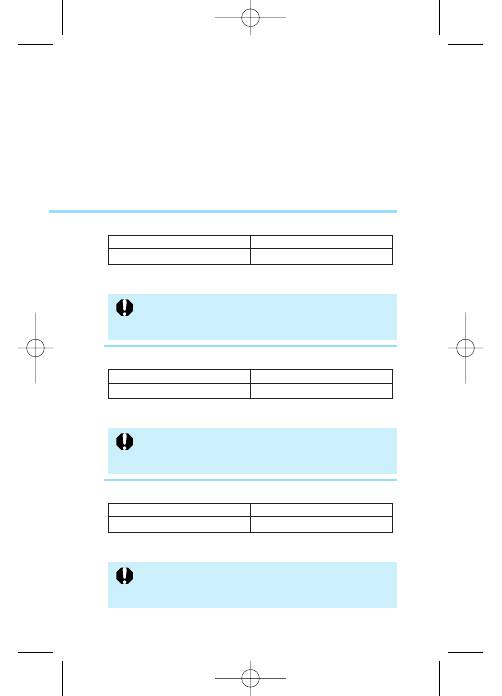
ISO 100
ISO 400
1.5 to 3.0 m (4.9 to 9.8 ft.)
1.5 to 6.0 m (4.9 to 19.6 ft.)
Flash Distance Range
(with color print film)
ISO 100
ISO 400
1,5 a 3,0 m
1,5 a 6,0 m
Alcance de distancias para las tomas con flash
(Con película en color)
100 ISO
400 ISO
1,5 à 3,0 m
1,5 à 6,0 m
Plage de distance de flash
(film couleur)
02-K129AmeEuro (p.26~).qxd 01.08.00 15:04 Page 56
57
Â Ø Ê
Когда фотокамера не используется, обязательно выключайте
выключатель питания и закрывайте крышку объектива для
защиты объектива от грязи и пыли.
Wenn die Kamera nicht benutzt wird, schalten Sie sie mit dem
Ein/Aus-Schalter aus und schließen die Objektivabdeckung,
um das Objektiv vor Schmutz und Staub zu schützen.
Quando non si usa la macchina fotografica, disattivare
sempre l’interruttore principale e chiudere il copriobiettivo
in modo da proteggere l’obiettivo da sporco e polvere.
ISO 100
ISO 400
от 1,5 до 3,0 м
от 1,5 до 6,0 м
Радиус действия вспышки
(с цветной негативной пленкой)
ISO 100
ISO 400
1,5 bis 3,0 m
1,5 bis 6,0 m
Blitzreichweite
(mit Farbnegativfilm)
ISO 100
ISO 400
da 1,5 a 3,0 m
da 1,5 a 6,0 m
Distanza utile per l’uso del flash
(Con pellicole a colori)
02-K129AmeEuro (p.26~).qxd 01.08.00 15:04 Page 57
Red-eye Reduction Function
People in photographs taken with a flash in dark, or low light
conditions often appear to have glowing red eyes. This
phenomenon is called “red-eye” and occurs when the light of
the flash is reflected off the subject’s retina.
For flash photography, in dark, or low light conditions where
the red-eye effect is likely to occur, light the red-eye reduction
lamp before using the flash to cause the subject’s pupil to
contract and reduce the likelihood of red-eye.
Fonction atténuateur d’yeux rouges
Les personnes, sur les photos au flash quand il fait sombre ou que
l’éclairement est insuffisant, ont souvent les yeux rouges brillants. Ce
phénomène est appelé “yeux rouges” et se produit quand la lumière du
flash se réfléchie sur la rétine du sujet.
Pour photographier au flash quand il fait sombre ou que l’éclairage est
insuffisant et que l’effet des yeux rouges risque de se produire, allumez
la lampe d’atténuateur d’yeux rouges avant d’utiliser le flash pour
contracter la pupille du sujet et atténuer ainsi l’effet “yeux rouges”.
58
Ó À
Función de reducción de ojos rojos
Cuando se usa el flash para fotografiar personas en la oscuridad
o en condiciones de poca luz, los ojos aparecen frecuentemente
rojos en las fotos. Este fenómeno se denomina “ojos rojos” y
ocurre cuando la luz del flash se refleja en la retina del sujeto.
Al fotografiar con flash en la oscuridad o en condiciones de poca
luz propensas a ocurrir el efecto de ojos rojos, encienda la luz
de reducción de ojos rojos antes de usar el flash para que las
pupilas del sujeto se contraigan y se reduzca la posibilidad de
ojos rojos.
Û
02-K129AmeEuro (p.26~).qxd 01.08.00 15:04 Page 58
59
Funktion zur Reduzierung des “Rote-Augen” Effekts
Die Augen von Personen, die in dunkler Umgebung oder bei schwachem
Licht mit Blitzlicht fotografiert werden, erscheinen oft als grellrote
Punkte auf dem Bild. Dieses Phänomen wird “Rote-Augen” Effekt
genannt und beruht auf Blitzlicht, das durch die weit geöffneten Pupillen
in die Augen eintritt und von der Netzhaut reflektiert wird.
Bei Blitzaufnahmen, in dunkler Umgebung oder bei schwachem Licht,
also in Situationen, in denen ein Auftreten des “Rote-Augen” Effekts
wahrscheinlich ist, leuchten Sie mit der Lampe für “Rote-Augen”
Effektreduzierung vor dem Zünden des Blitzes etwa eine Sekunde lang
vor, damit die Pupillen der Personen sich zusammenziehen und der
“Rote-Augen”-Effekt weniger stark in Erscheinung tritt.
Funzione di riduzione del fenomeno “occhi rossi”
Le persone presenti in fotografie scattate con il flash al buio o in
condizioni di luce scarsa spesso sembrano avere occhi rossi luminosi.
Questo fenomeno è detto “occhi rossi” e si verifica quando la luce del
flash viene riflessa dalla retina del soggetto.
Per le fotografie con il flash al buio o in condizioni di luce scarsa,
quando cioè esiste la possibilità che si verifichi il fenomeno degli occhi
rossi, far illuminare la spia di riduzione del fenomeno occhi rossi prima
di usare il flash in modo da far contrarre le pupille del soggetto e
quindi ridurre la possibilità che si verifichi il fenomeno degli occhi rossi.
 Ø
Функция уменьшения эффекта «красных глаз»
При портретной съемке со вспышкой в темноте или при низкой
освещенности на снимке часто получаются красные светящиеся глаза.
Это явление называется эффектом «красных глаз» и связано с отраже-
нием света вспышки от сетчатки глаз фотографируемого. При съемке
со вспышкой в темноте или в условиях плохой освещенности, когда
существует опасность проявления эффекта «красных глаз», перед
съемкой со вспышкой включайте лампу уменьшения эффекта «красных
глаз», которая вызывает сужение зрачков фотографируемого, снижая
вероятность появления эффекта «красных глаз».
Ê
02-K129AmeEuro (p.26~).qxd 01.08.00 15:04 Page 59
60
Ó À Û
• To reduce the likelihood of red-eye when taking pictures of
people in low light conditions, press the shutter button
halfway. Press the button fully to release the shutter about
one second after the green indicator lights.
• Para reducir la posibilidad de que los ojos salgan rojos al
fotografiar personas en condiciones de poca iluminación,
oprima el disparador hasta la mitad. Oprima el disparador a
fondo para liberar el obturador aproximadamente un
segundo después de iluminarse el indicador verde.
• Lorsque vous prenez des photos de personnes en éclairement
insuffisant, enfoncez légèrement le déclencheur. Enfoncez le
déclencheur à fond une seconde environ après que le témoin vert
s’est allumé.
If you press the shutter button fully before the green
indicator lights up, the shutter will release, but the red-
eye reduction function will not operate.
Si vous appuyez complètement sur le déclencheur avant que
le témoin vert ne s’allume, l’obturateur déclenchera mais la
fonction atténuateur d’yeux rouges sera désactivée.
Si oprime el disparador a fondo antes que se ilumine
el indicador verde, el obturador se libera, pero la
función de reducción de ojos rojos no operará.
02-K129AmeEuro (p.26~).qxd 01.08.00 15:04 Page 60
