ZyXEL Communications ZyXEL ZyWALL 70: 10 Troubleshooting
10 Troubleshooting: ZyXEL Communications ZyXEL ZyWALL 70
ENGLISH
16
You can also use the anti-spam whitelist and blacklist to identify legitimate e-mail and spam. See the anti-
spam chapter in the User’s Guide for details.
10 Troubleshooting
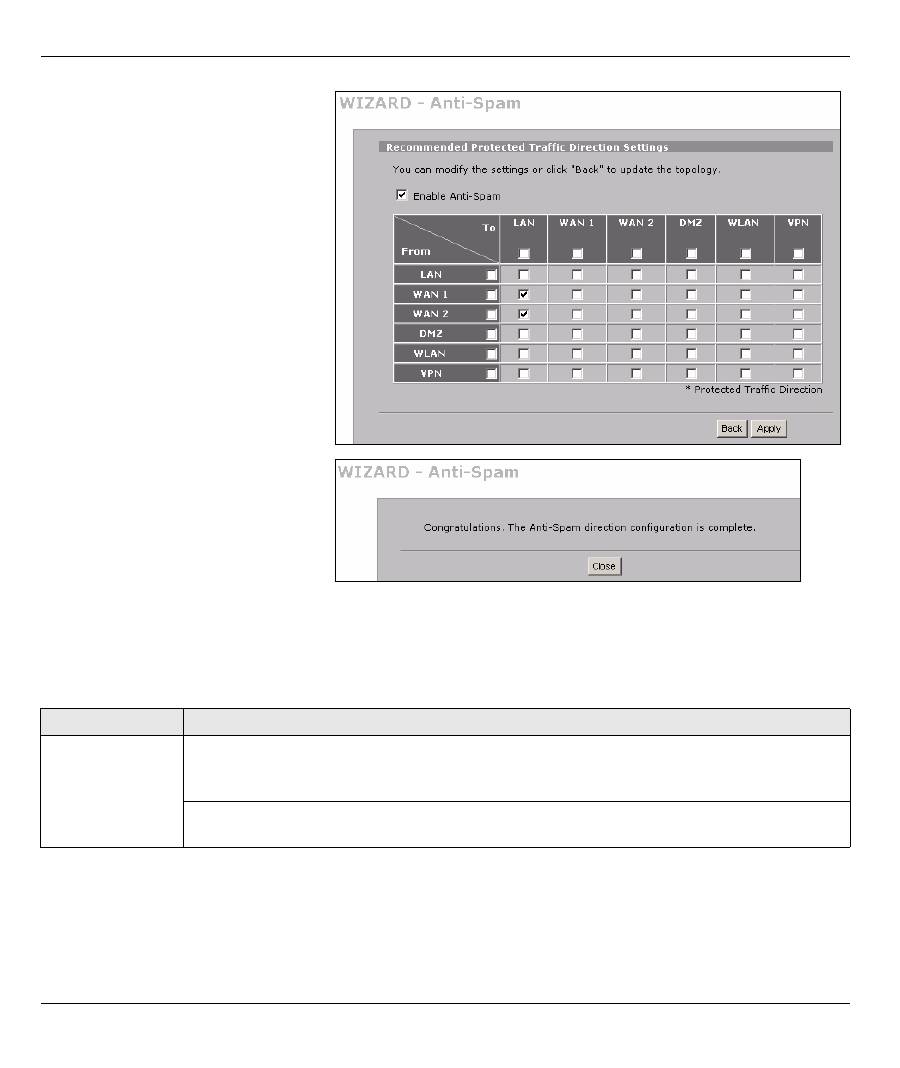
4
Use this screen to enable anti-
spam and select which traffic flows
the ZyWALL scans for spam. The
recommended traffic flows are
already selected. You generally
only need to select traffic directions
that have incoming e-mail from
outside e-mail servers.
5
Click
Apply
.
6
Click
Close
in the final screen to
complete the anti-spam wizard
setup.
7
Congratulations, you have
configured the ZyWALL to scan for
spam e-mail.
Problem
Corrective Action
None of the LEDs
turn on.
Make sure that you have the power cord connected to the ZyWALL and plugged in to an
appropriate power source. Make sure you have the ZyWALL turned on. Check all cable
connections.
If the LEDs still do not turn on, you may have a hardware problem. In this case, you should
contact your local vendor.
ENGLISH
17
10.1 Set Up Your Computer’s IP Address
This section shows you how to set up your computer to receive an IP address in Windows 2000, Windows NT
and Windows XP. This is ensures that your computer can communicate with your ZyWALL.
1
In Windows XP, click
Start
,
Control Panel
.
In Windows 2000/NT, click
Start
,
Settings
,
Control Panel
.
2
In Windows XP, click
Network Connections
.
In Windows 2000/NT, click
Network and Dial-up Connections
.
Cannot access
the ZyWALL from
the LAN.
Check the cable connection between the ZyWALL and your computer or hub. Refer to
Section 1
for details.
Ping the ZyWALL from a LAN computer. Make sure your computer’s Ethernet card is
installed and functioning properly.
In the computer, click
Start
, (
All) Programs
,
Accessories
and then
Command Prompt
. In
the
Command Prompt
window, type "ping" followed by the ZyWALL’s LAN IP address
(192.168.1.1 is the default) and then press [ENTER]. The ZyWALL should reply. Otherwise,
refer to
Section 10.1
.
If you’ve forgotten the ZyWALL’s password, use the
RESET
button. Press the button in for
about 10 seconds (or until the
PWR
LED starts to blink), then release it. It returns the
ZyWALL to the factory defaults (password is 1234, LAN IP address 192.168.1.1 etc.; see
your User’s Guide for details).
If you’ve forgotten the ZyWALL’s LAN or WAN IP address, you can check the IP address in
the SMT via the console port. Connect your computer to the
CONSOLE
port using a console
cable. Your computer should have a terminal emulation communications program (such as
HyperTerminal) set to VT100 terminal emulation, no parity, 8 data bits, 1 stop bit, no flow
control and 9600 bps port speed.
Cannot access
the Internet.
Check the ZyWALL’s connection to the Ethernet jack with Internet access. Make sure the
Internet gateway device (such as a DSL modem) is working properly.
Click
WAN
in the navigation panel to verify your settings.
Cannot establish
a VPN connection
Make sure the ZyWALL and the remote IPSec router use the same VPN settings. Click
VPN
in the navigation panel to configure advanced settings.
Access a web site to check that you have a successful Internet connection.
Problem
Corrective Action
Table of contents
- Overview
- 2 Accessing the Web Configurator
- 3 Bridge Mode
- 4 Internet Access Setup and Product Registration
- 5 DMZ
- 6 NAT
- 7 Firewall
- 9 Anti-Spam Setup
- 10 Troubleshooting
- Procedure to View a Product’s Certification(s)
- Übersicht
- 2 Zugriff auf den Web-Konfigurator
- 3 Bridge Modus
- 4 Einrichten des Internetzugriffs und Produktregistrierung
- 5 DMZ
- 6 NAT
- 7 Firewall
- 9 Anti-Spam Setup (Anti-Spam einrichten)
- 10 Problembeseitigung
- Schritte zum Ansehen der Produktzertifizierung(en)
- Vista previa
- 2 Acceso al configurador Web
- 3 Modo puente (bridge)
- 4 Configuración del acceso a Internet y registro del producto
- 5 DMZ
- 6 NAT
- 7 Cortafuegos
- 9 Configuración Anti-Spam
- 10 Solución de problemas
- Procedimiento para ver la(s) certificación(es) del producto
- Présentation
- 2 Accéder au Configurateur Web
- 3 Mode Pont
- 4 Installation de l'accès à Internet et inscription du produit
- 5 DMZ
- 6 NAT
- 7 Pare-feu
- 9 Paramétrage de l’Anti-Spam
- 10 Dépannage
- Procédure pour Afficher la (les) certification(s) d'un produit
- Cenni generali
- 2 Accesso allo strumento di configurazione Web
- 3 Modalità Bridge
- 4 Configurazione dell'accesso a Internet e Registrazione del prodotto
- 5 DMZ
- 6 NAT
- 7 Firewall
- 9 Configurazione della funzione Anti-Spam
- 10 Risoluzione dei problemi
- Procedura per visualizzare le certificazioni di un prodotto
- Обзор
- 1 Подключение оборудования
- 2 Доступ к Web- конфигуратору
- 3 Режим межсетевого моста
- 4 Настройка доступа в Интернет и регистрация изделия
- 5 DMZ
- 6 NAT
- 7 Межсетевой экран
- 9 Настройка Анти - Спама
- 10 Поиск и устранение неисправностей
- Порядок просмотра сертификата ( ов ) на изделие
- 概述
- 2 访问网络状态设置程序
- 3 桥接模式
- 4 互联网访问设置以及产品注册
- 5 DMZ
- 7 防火墙
- 9 防垃圾邮件设置
- 10 故障排除
- 概觀
- 2 存取網路組態設定程式
- 3 橋接模式
- 4 網際網路存取設定以及產品註冊
- 5 DMZ
- 7 防火牆
- 9 防垃圾郵件設定
- 10 疑難排解
