Tritton S.T.R.I.K.E. 5: instruction
Class: Gaming consoles
Type:
Manual for Tritton S.T.R.I.K.E. 5
USER MANUAL
BEDIENUNGSANLEITUNG
GUIDE D’UTILISATION
MANUALE D’USO
MANUAL DEL USUARIO
5
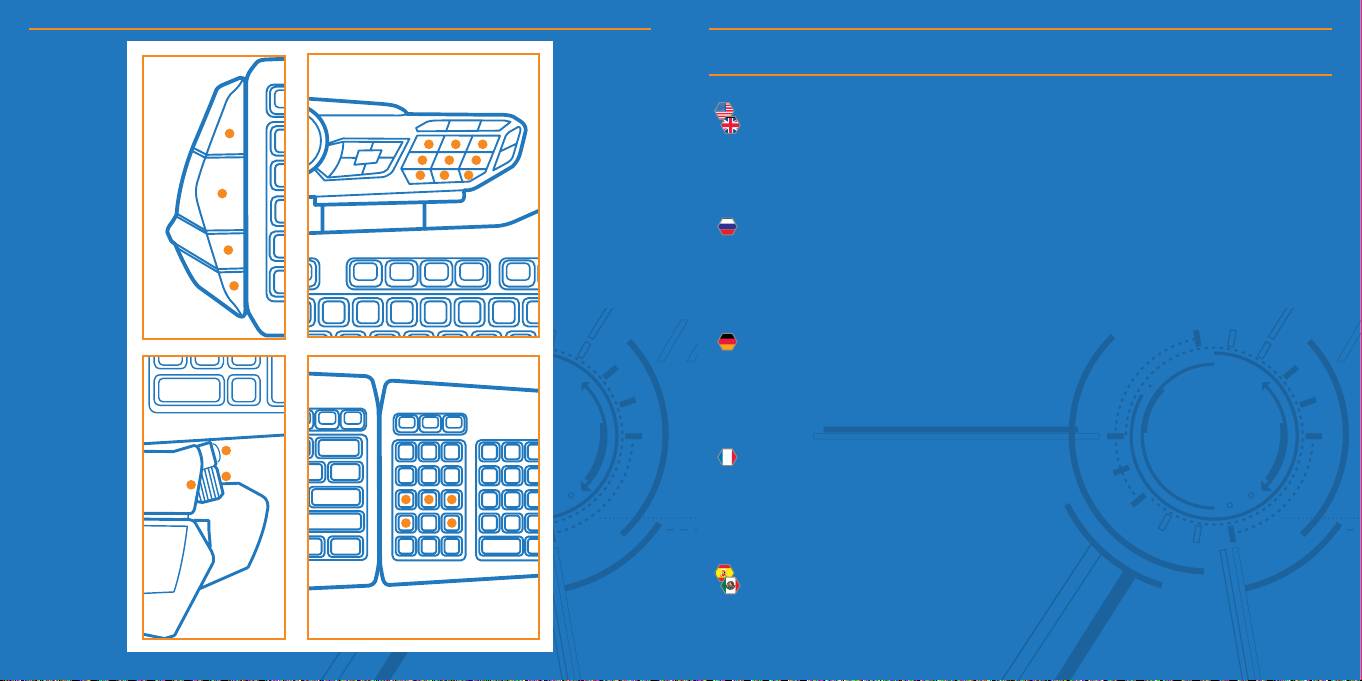
Programmable Buttons
There are 21 programmable buttons on your S.T.R.I.K.E.5 Keyboard:
4 on the Side module
3 on the thumb rest
5 on around the arrow keys
9 on the Command Module
На вашей клавиатуре
S.T.R.I.K.E.5
доступна
21
программируемая кнопка:
4 на боковом модуле;
3 на упоре для большого пальца;
5 вокруг клавиш стрелок;
9 на командном модуле.
Ihre S.T.R.I.K.E.5-Tastatur bietet 21 programmierbare Tasten:
4 auf dem Seitenmodul
3 auf der Handballenauflage
5 um die Pfeiltasten
9 auf dem Befehlsmodul
Le clavier S.T.R.I.K.E.5 comporte 21 boutons programmables.
4 sur le module latéral
3 sur le repose-poignet
5 autour des flèches directionnelles
9 sur le module de commande
En el teclado de S.T.R.I.K.E.5 hay 21 botones programables:
4 en el módulo lateral
3 en el apoyo para pulgar
5 alrededor de las teclas de dirección
9 en el Módulo del comando
5
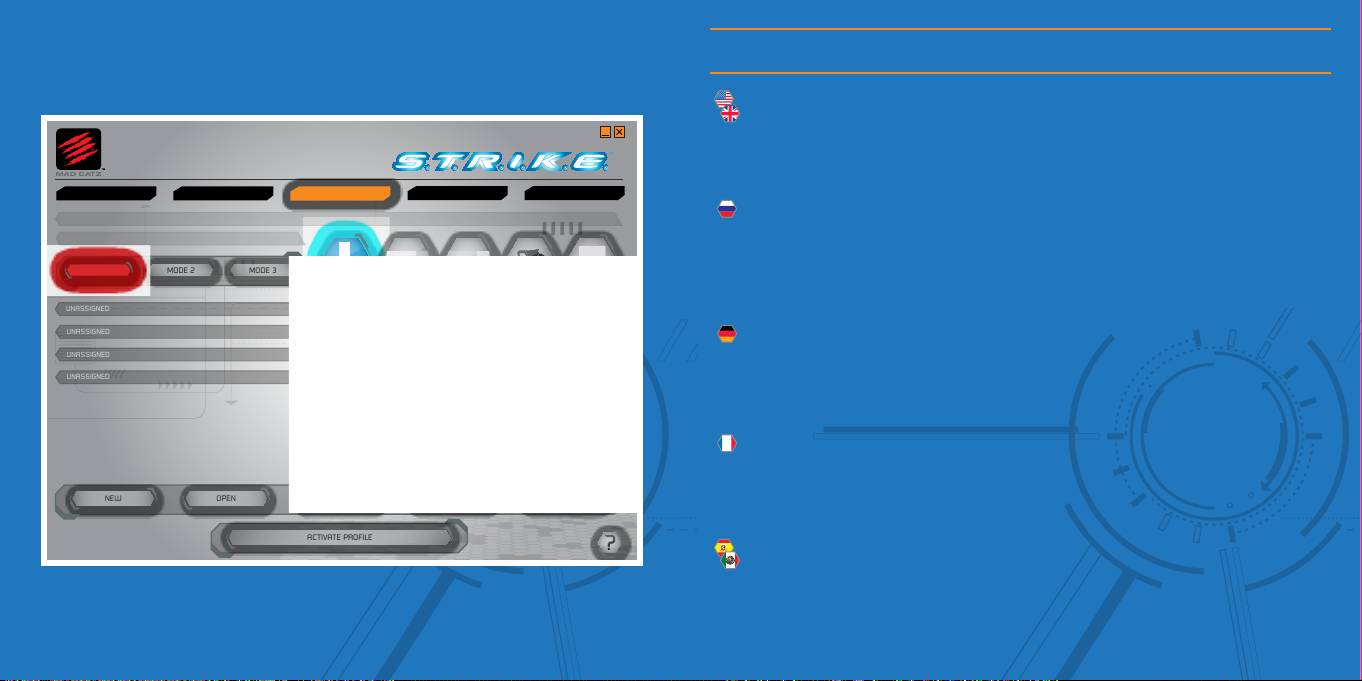
PRODUCT SETTINGS
PROGRAMMING
SUPPORTLAUNCHER
PROGRAM TWENTY ONE BUTTONS ACROSS THREE MODES, WITHIN A PROFILE.
?
OPEN
SAVE
SAVE AS
TEST
NEW
ACTIVATE PROFILE
MODE 2
PROFILE: UNTITLED
MODE 1
MODE 3
UNASSIGNED
UNASSIGNED
UNASSIGNED
UNASSIGNED
Smart Technology – Programming Page
This page allows you to assign keyboard macro commands to any of the 21 programmable
buttons on your S.T.R.I.K.E.5. Each programmable button can have up to three commands
assigned to it (enabled by the three modes on the keyboard), giving a total of 63 commands
per profile. The different commands are accessed by pressing one of the mode buttons on
the command module. Further information on programming can be found via the Support
Page of the ST software and from the Mad Catz website.
На этой странице вы можете назначить
21
программируемой кнопке на клавиатуре
S.T.R.I.K.E.5.
определенные макрокоманды. На каждой программируемой кнопке можно
установить до трех команд (активируемых одним из трех режимов на клавиатуре), что в
сумме составляет 63 команды на каждый профиль. Доступ к различным командам можно
получить, нажав кнопку одного из режимов на командном модуле. Дополнительную
информацию относительно программирования можно найти на странице поддержки
программного обеспечения
ST
и на веб-сайте
Mad Catz
.
Auf dieser Seite können Sie allen 21 programmierbaren Tasten Ihrer S.T.R.I.K.E.5
Tastaturmakrobefehle zuweisen. Jeder programmierbaren Taste können bis zu drei Befehle
zugewiesen werden (die durch die drei Modi der Tastatur aktiviert werden), was pro Profil
insgesamt 63 Befehle ergibt. Der Zugriff auf die einzelnen Befehle erfolgt durch Drücken
einer der Modustasten auf dem Befehlsmodul. Weitere Informationen zur Programmierung
finden Sie auf der Supportseite zur ST-Software und auf der Website von Mad Catz .
Cette page vous permet d’affecter des commandes clavier à l’un des 21 boutons
programmables du S.T.R.I.K.E.5. Vous pouvez associer jusqu’à trois commandes à un
seul bouton programmable (activées par les trois modes sur le clavier), soit définir 63
commandes par profil au total. Pour accéder aux différentes commandes, appuyez sur
l’un des boutons de mode du module de commande. Pour plus d’informations sur la
programmation, consultez la page de support du logiciel ST et le site web de Mad Catz.
Esta página le permite asignar comandos de macro del teclado a cualquiera de los 21
botones programables en su S.T.R.I.K.E.5. Cada botón programable puede tener hasta tres
comandos asignados (activados por los tres modos en el teclado), lo que resulta en un
total de 63 comandos por perfil. Se accede a los diferentes comandos presionando uno de
los botones de modo en el módulo del comando. Se puede obtener más información sobre
programación a través de la Página de soporte del software de tecnología Smart y del sitio
web de Mad Catz .
5
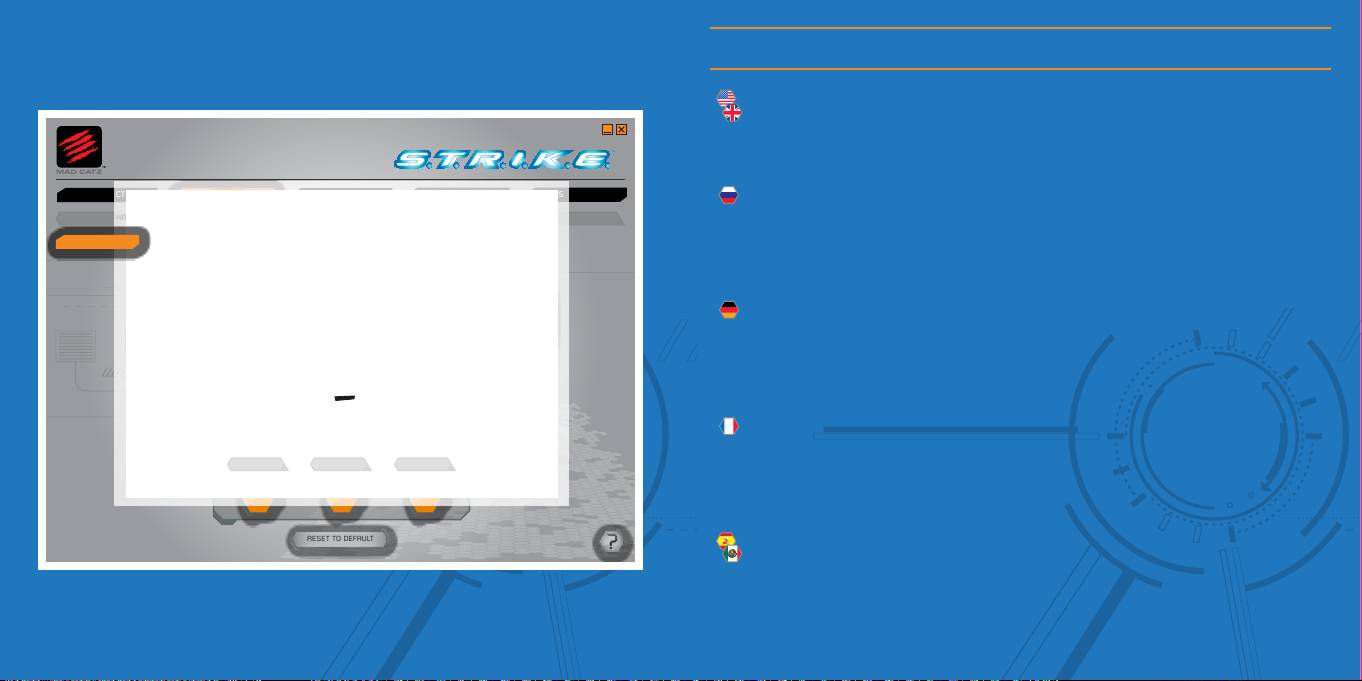
PRODUCT SETTINGS
PROGRAMMING
SUPPORTLAUNCHER
CONFIGURE THREE COLOUR MODES
?
RESET TO DEFAULT
Smart Technology – Settings Page
The settings page allows you to customize the RGB backlight colour for each of the three
keyboard modes. Click one of the mode colour indicators to bring up a colour swatch.
Click the Sliders tab to alter the RGB values independently. Click the apply button to
confirm your choice.
На странице настроек можно отрегулировать цвет подсветки
RGB
для каждого из трех
режимов клавиатуры. Чтобы открыть палитру цветов, коснитесь цветовых индикаторов
одного из режимов.
LIGHTING
Щелкните вкладку “Ползунки”, чтобы отдельно изменить значения
RGB
. Щелкните
кнопку применения, чтобы подтвердить свой выбор.
Auf der Seite „Einstellungen“ können Sie für alle drei Tastaturmodi die Farbe der RGB-
Hintergrundbeleuchtung anpassen. Klicken Sie auf eine der Farbanzeigen für den Modus,
um ein Farbmuster anzuzeigen. Klicken Sie auf die Registerkarte mit den Schiebereglern,
um die RGB-Werte unabhängig voneinander zu ändern. Klicken Sie auf die Schaltfläche
„Übernehmen“, um Ihre Auswahl zu bestätigen.
La page dédiée aux paramètres vous permet de personnaliser la couleur du
rétroéclairage RVB de votre clavier dans chacun de ses trois modes. Cliquez sur l’un des
MODE 1 MODE 2 MODE 3
indicateurs de couleur des modes afin d’afficher une palette de couleurs. Cliquez sur
l’onglet Curseurs pour modifier les valeurs RVB indépendamment les unes des autres.
Cliquez sur le bouton Appliquer pour confirmer votre choix.
La página de ajustes le permite adaptar el color RGB (Rojo, verde, azul; por sus siglas
en inglés) de la retroiluminación para cada uno de los tres modos del teclado. Haga clic
sobre uno de los indicadores de color de modo para hacer aparecer una muestra de
colores. Haga clic sobre la pestaña Controles deslizables para alterar los valores RGB por
separado.
5
PRODUCT SETTINGS
PROGRAMMING
SUPPORTLAUNCHER
SET GAMES, PROGRAMS, AND WEBSITES TO BE LAUNCHED FROM THE STRIKE DISPLAY.
APPLY
DRAG AND DROP YOUR PROGRAMS TO THE E.Y.E DISPLAY
SPOTIFY
STEAM
ITUNES
SAFARI
MSN
SPOTIFY
SPOTIFY
STEAM
ITUNES
SAFARI
MSN
SPOTIFY
BROWSE FOR APPLICATIONS
BROWSE THEN, DRAG AND DROP YOUR APPLICATIONS TO THE E.Y.E
ICON ROOT...
?
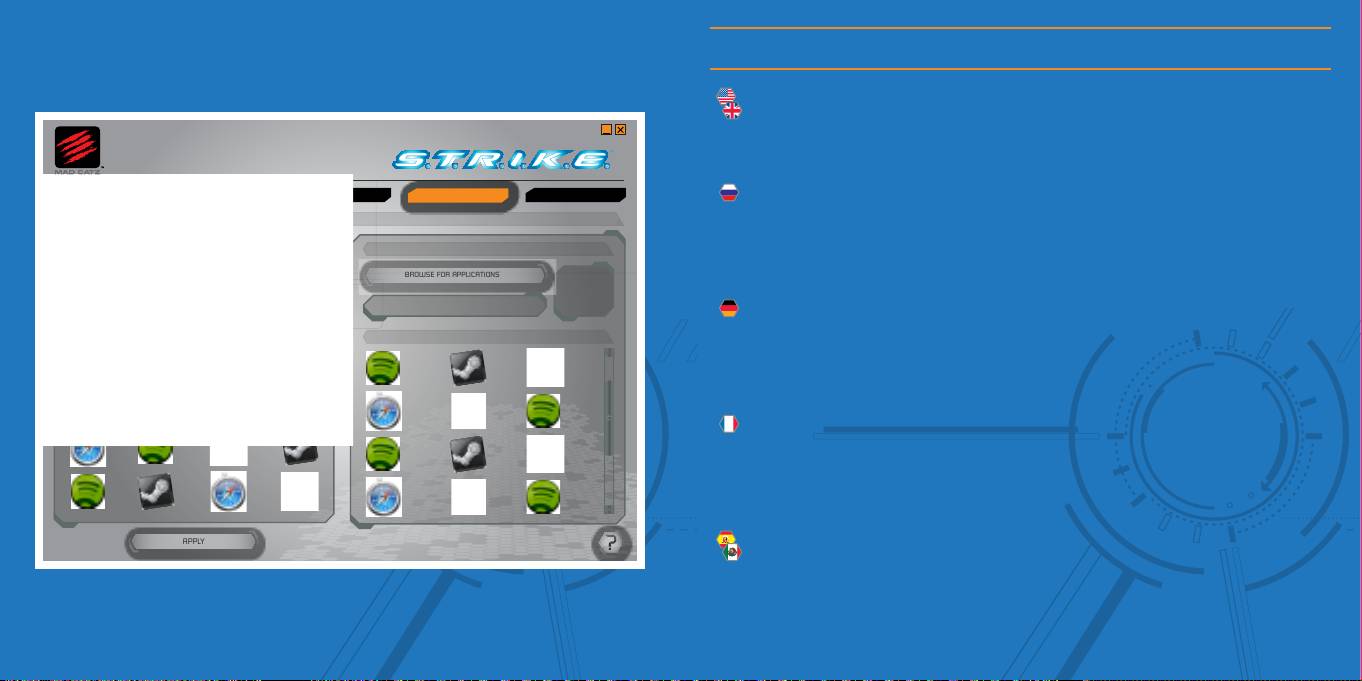
Smart Technology - Launcher Page
Games, Programs and Websites can be launched from the Launcher App on the E.Y.E
display. To add a game, click an available icon slot, then click an icon from the list. Click
the apply button to confirm your choice. In addition you can browse your computer for
other games and programs that are not listed.
Игры, программы и веб-сайты можно запускать из приложения запуска на
дисплее E.Y.E. Для того чтобы добавить игру, щелкните свободное место для значка,
затем щелкните значок из списка. Щелкните кнопку применения, чтобы подтвердить
свой выбор. Можно также выполнить поиск не указанных в списке игр и программ на
компьютере.
Spiele, Programme und Websites können über die Starter-App auf dem E.Y.E-Display
gestartet werden. Wenn Sie ein Spiel hinzufügen möchten, klicken Sie auf einen freien
Symbolplatz, und klicken Sie dann in der Liste auf ein Symbol. Klicken Sie auf die
Schaltfläche „Übernehmen“, um Ihre Auswahl zu bestätigen. Zudem können Sie Ihren
PROGRAMS ASSIGNED TO YOUR E.Y.E
Computer nach weiteren Spielen und Programmen durchsuchen, die nicht aufgelistet sind.
Vous pouvez lancer les jeux, les programmes et les sites Web à partir de l’application Zone
d’exécution présente sur l’affichage E.Y.E. Pour ajouter un jeu, cliquez sur un emplacement
d’icône disponible, puis sur une icône dans la liste. Cliquez sur le bouton Appliquer pour
confirmer votre choix. Vous avez également la possibilité de rechercher d’autres jeux et
programmes non répertoriés sur votre ordinateur.
Se pueden iniciar juegos, programas y sitios web desde la Aplicación del Iniciador que
aparece en la pantalla de E.Y.E. Para agregar un juego, haga clic sobre un espacio de
icono disponible y luego haga clic sobre un icono de la lista. Haga clic en el botón Aplicar
para confirmar su elección. Además, puede buscar en su ordenador otros juegos y
programas que no están en la lista.
Smart Technology – Support Page
The support page, allows you to access the software manual, drivers and software and
profiles. You can also change the language by clicking the appropriate flag.
На странице поддержки можно получить доступ к руководству по программному
обеспечению, драйверам и программному обеспечению, а также к профилям. Щелкнув
соответствующий флажок, можно также изменить язык.
Auf der Supportseite haben Sie Zugriff auf das Softwarehandbuch, auf Treiber und
Software sowie auf Profile. Sie können die Sprache durch Anklicken der entsprechenden
Flagge ändern.
La page d’assistance vous permet d’accéder au manuel du logiciel ainsi qu’aux pilotes,
aux profils et au logiciel lui-même. Vous pouvez également sélectionner votre langue en
cliquant sur le drapeau correspondant.
La página de soporte le permite acceder al manual del software, los controladores, el
software y los perfiles. También puede cambiar el idioma haciendo clic en la bandera
correspondiente.
SELECT LANGUAGE
5
PRODUCT SETTINGS
PROGRAMMING
SUPPORTLAUNCHER
DOWNLOAD DRIVERS AND SOFTWARE
SHOW STARTUP TIPS PAGE
DOWNLOAD GAME PROFILES
READ PROGRAMMING MANUAL
CONTACT US
BLOG
Get your F.R.E.Q. on
Driver Version - 7.0.14.21
Software Version - 9.9.9.9
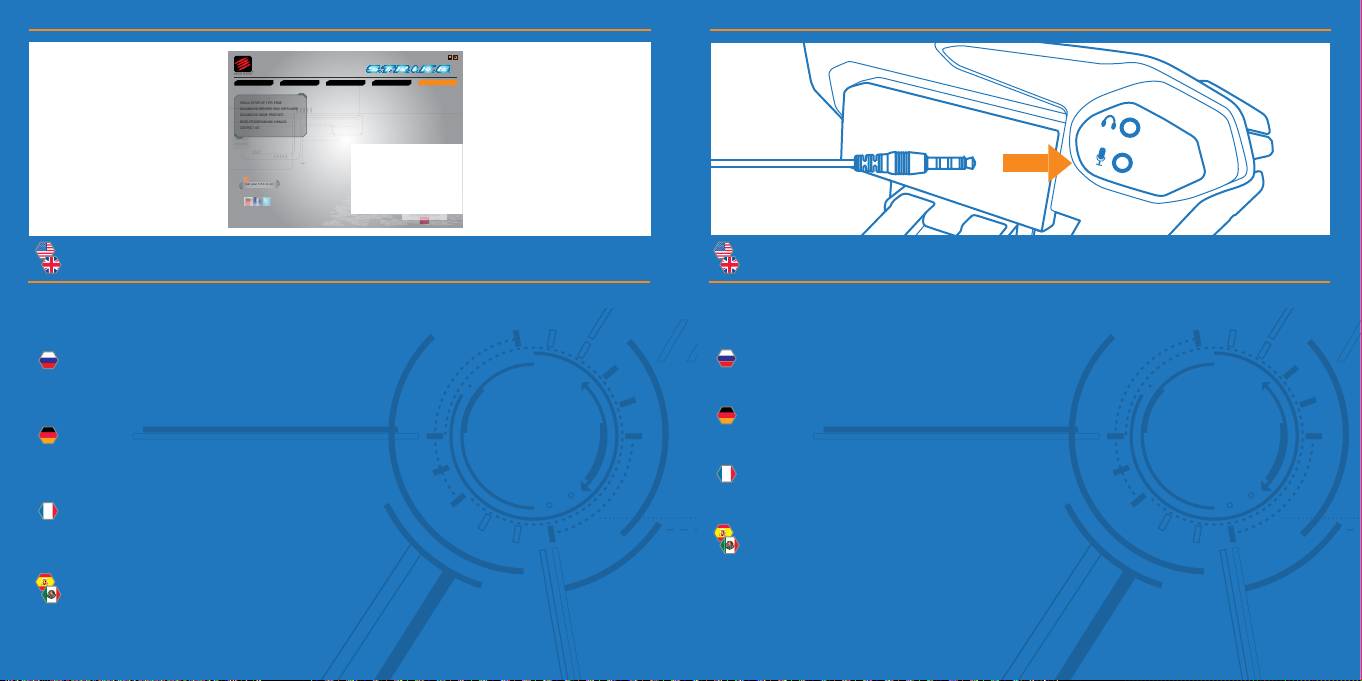
Audio Connections
Plug the additional audio pass through jacks to your soundcard in order to connect a
stereo headset and mic to the back of the command module.
Подключите дополнительный кабель через разъем к звуковой карте, чтобы подключить
стереонаушники и микрофон к обратной стороне командного модуля.
Schließen Sie die Audio-Pass-Through-Stecker an Ihre Soundkarte an, dann können Sie
Headset und Mikrofon auf der Rückseite des Befehlsmoduls anschließen.
Pour connecter un micro-casque stéréo à l’arrière du module de commande, reliez
directement les jacks audio supplémentaires à la carte son.
Enchufe el conector jack de audio adicional a su tarjeta de sonido para conectar un
micrófono y auricular estéreo a la parte trasera del módulo del comando.
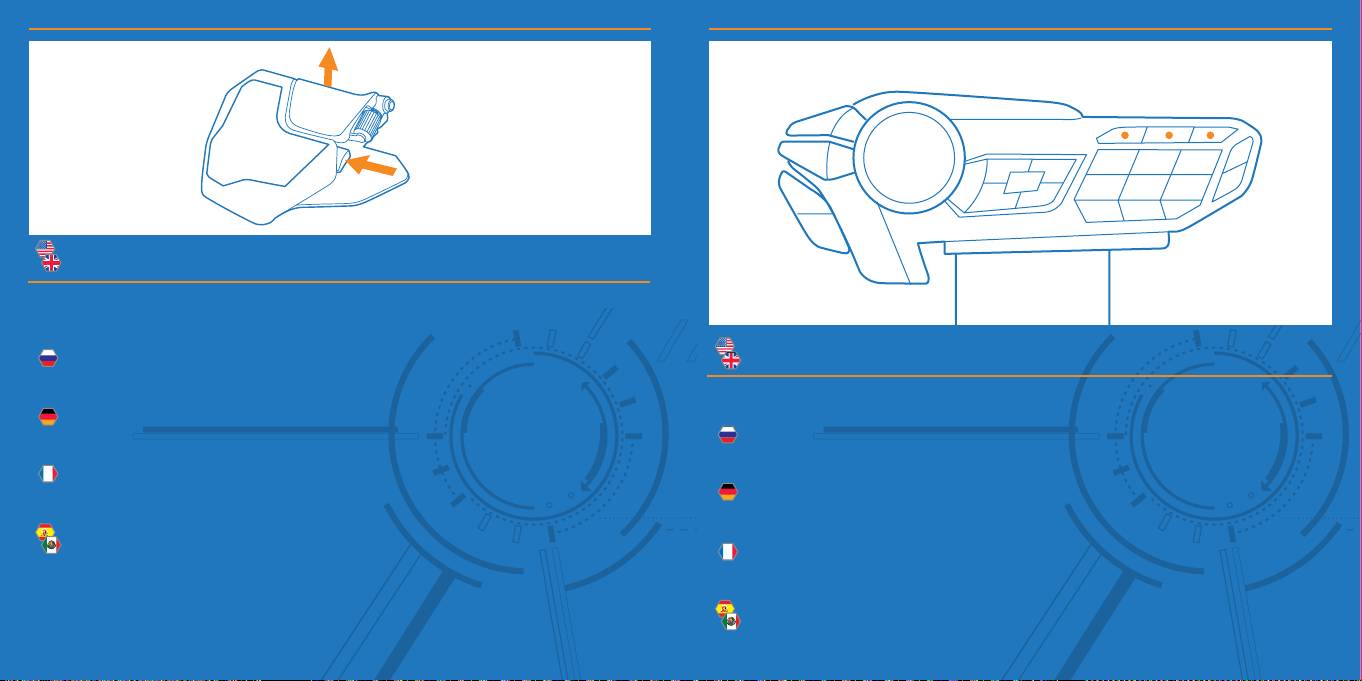
Palm Rest
The palm rest has two height settings. Squeeze the retaining clip to move the rest from
flat to elevated.
Упор для ладони имеет две настройки высоты. Сожмите фиксатор, чтобы изменить
Profile Modes
положение упора с ровного на приподнятое.
Use the Mode buttons to select one of three modes per programming profile.
Die Höhe der Handballenauflage ist einstellbar. Drücken Sie den Halteclip und schieben
Sie die Handballenauflage in die gewünschte Höhe.
C
помощью кнопок режимов можно выбирать один из трех режимов в соответствии с
программируемыми профилями.
Vous pouvez régler la hauteur du repose-poignet. Pincez l’attache et réglez le repose-
poignet à la hauteur souhaitée.
Mit den Modustasten kann für jedes Programmierprofil einer von drei Modi ausgewählt
werden.
La altura del apoyamanos se puede regular. Apriete el clip de retención y mueva el
apoyamanos a la altura deseada.
Trois modes sont disponibles pour chaque profil de programmation. Pour en sélectionner
un, appuyez sur l’un des boutons de mode.
Use los botones de modo (Mode) para seleccionar uno de los tres modos para programar
el perfil.
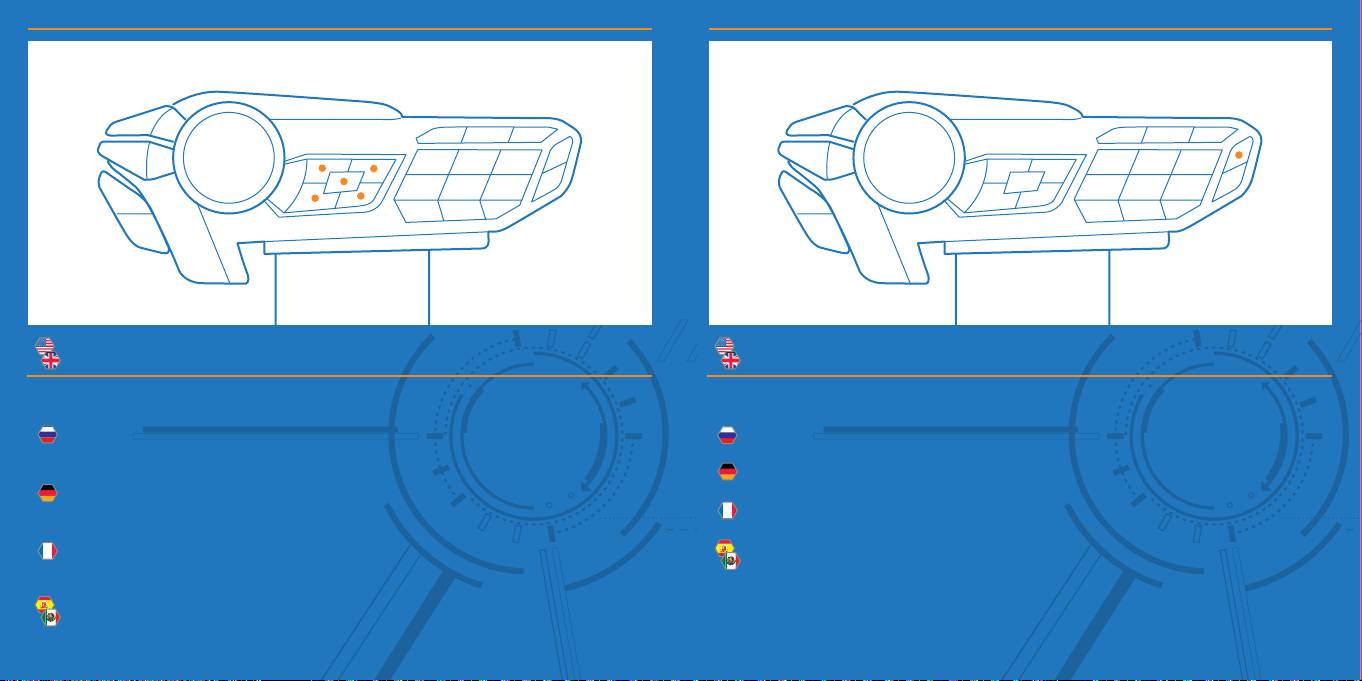
Media Buttons
Master Illumination Button
Quick access buttons allow you to mute main system volume and control media playback.
Pressing this button will toggle backlighting on and off.
C
помощью горячих кнопок можно выключать основной звук системы и управлять
Нажмите эту кнопку, чтобы включить или выключить подсветку.
воспроизведением мультимедиа.
Mit dieser Taste wird die Hintergrundbeleuchtung ein- und ausgeschaltet.
Schnellzugrifftasten für das Stummschalten der Lautstärke des Hauptsystems und die
Regelung der Medienwiedergabe.
Appuyez sur ce bouton pour activer et désactiver le rétroéclairage.
Ces boutons d’accès rapide vous permettent de couper le son principal du système et de
Con este botón se activa y se desactiva la retroiluminación.
contrôler la lecture multimédia.
Los botones de acceso rápido le permiten quitar el volumen del sistema principal y
controlar las reproducciones multimedia.
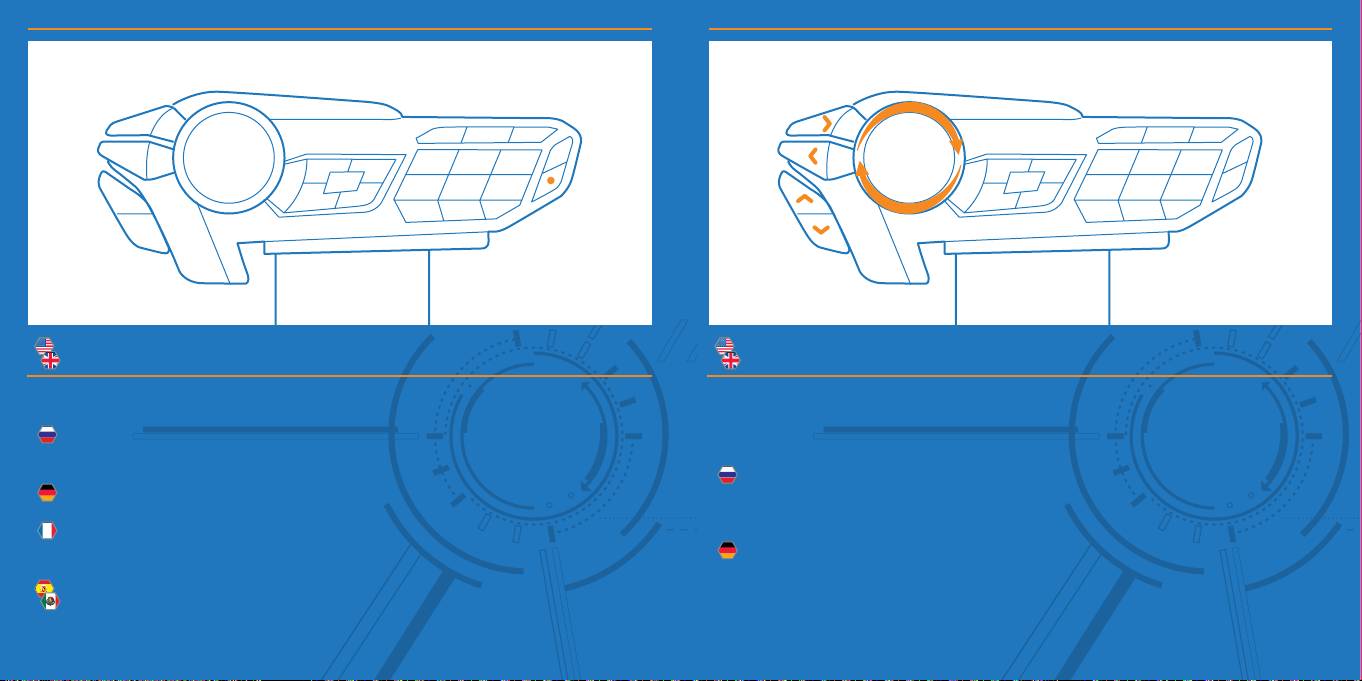
Windows Key Lock Button
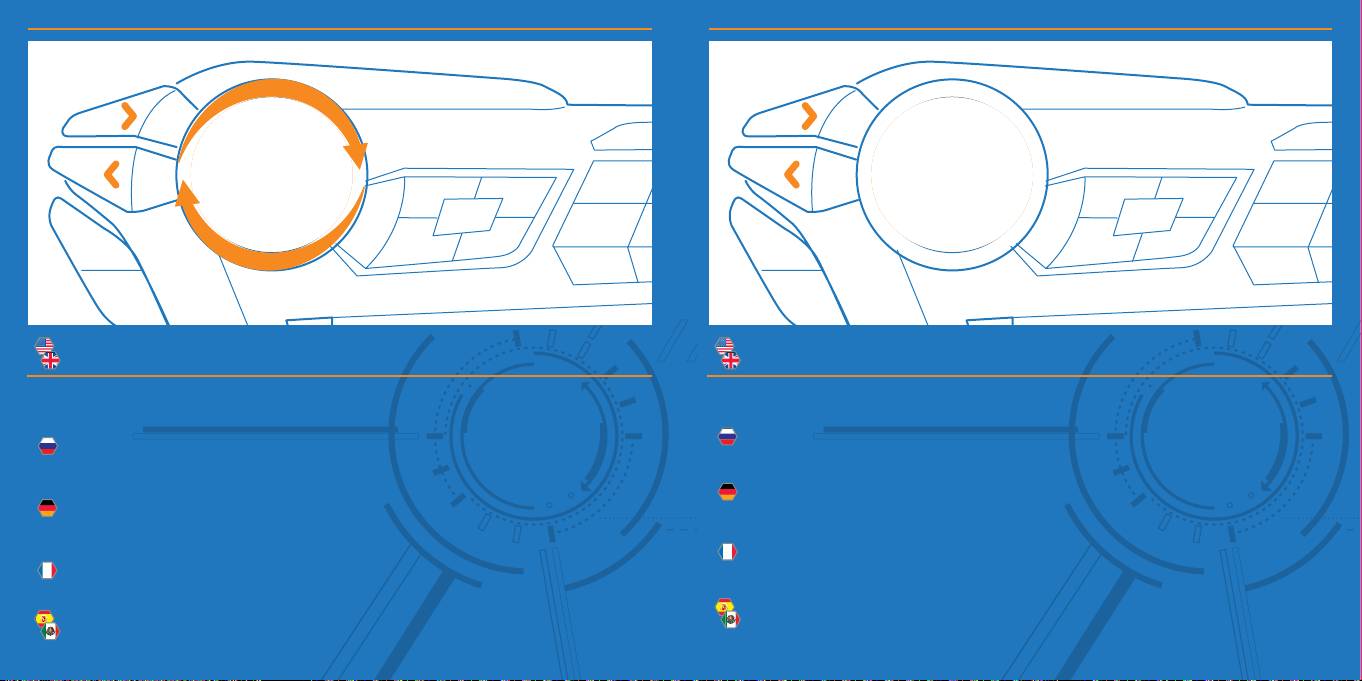
E.Y.E Operation
This button will toggle the Windows key functionality on and off. Green = On, Red = Off.
Press the up and down arrows to cycle the functions of the E.Y.E display. Rotate the bezel
to alter details on the current function. Press the left and right arrow buttons to activate a
C
помощью этой кнопки можно включать и отключать функциональность клавиш
feature on the current function.
Windows. Зеленый = включена, красный = выключена.
Функции дисплея E.Y.E. можно прокрутить с помощью стрелок вверх и вниз.
Diese Taste schaltet die Windows-Tastenfunktion ein und aus. Grün = Ein, Rot = Aus.
Поворачивайте кольцо, чтобы изменить детали текущей функции. Чтобы активировать
компонент текущей функции, нажмите кнопки стрелок влево и вправо.
Ce bouton permet d’activer et de désactiver la fonction de la touche Windows. Vert =
activée, rouge = désactivée.
Mit der Pfeil nach oben- und der Pfeil nach unten-Taste durchlaufen Sie die Funktionen
des E.Y.E.-Displays. Durch Drehen der Blende werden die Details der aktuellen Funktion
Este botón activa y desactiva la funcionalidad de la tecla de Windows. Verde =
angepasst. Durch Drücken der Pfeil nach links- bzw. Pfeil nach rechts-Taste wird ein
Encendido, Rojo = Apagado.
Merkmal der aktuellen Funktion aktiviert.
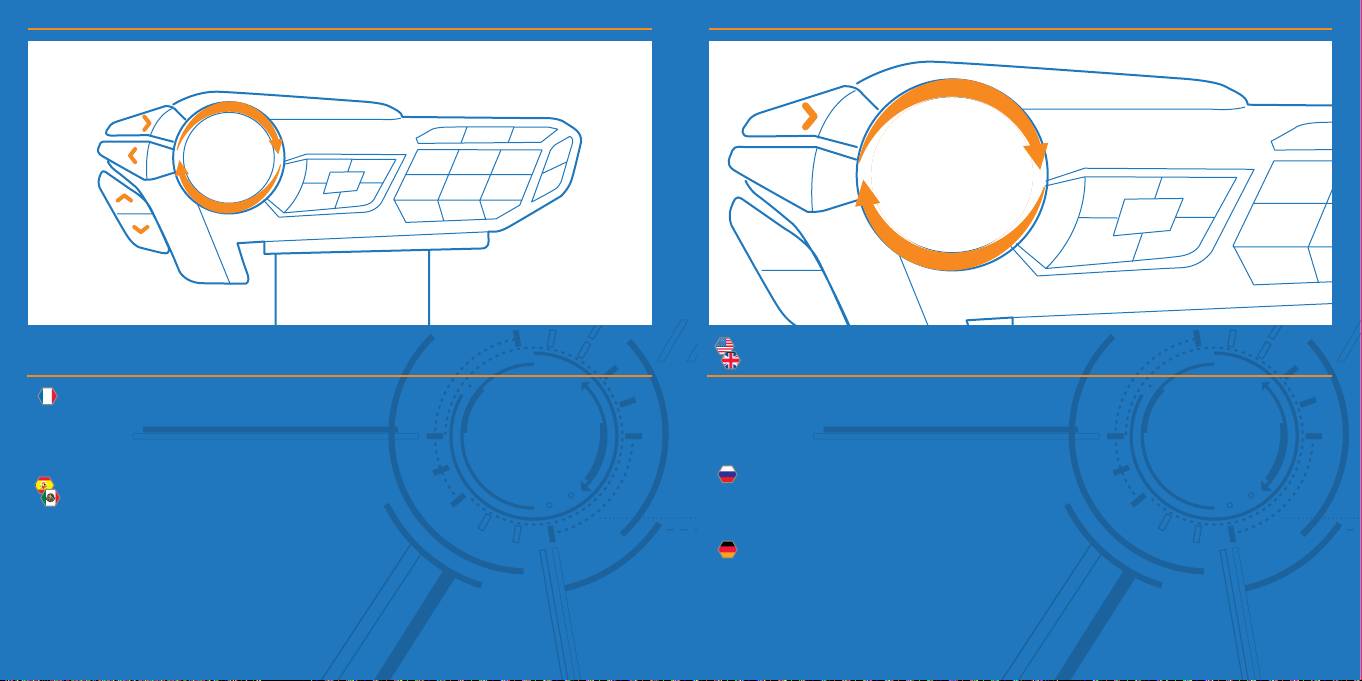
E.Y.E Operation
Program Launcher
Les flèches vers le haut et vers le bas vous permettent de parcourir les fonctions de
Use Smart Technology (ST) to assign up to 12 program or website icons to be launched
l’affichage E.Y.E. Vous pouvez modifier les informations sur la fonction actuelle en
from the E.Y.E. Rotate the bezel to select the desired icon and then press the right arrow
tournant le cadran. Pour également activer une fonctionnalité de la fonction actuelle,
button to launch.
appuyez sur les flèches vers la gauche et vers la droite.
C
помощью
Smart Technology (ST)
можно назначить запуск до
12
программ или веб-
Presione las flechas hacia arriba y hacia abajo para recorrer las funciones de la pantalla
сайтов с дисплея E.Y.E. Поворачивайте кольцо, чтобы выбрать необходимый значок, а
de E.Y.E. Gire el bisel para cambiar detalles en la función actual. Presione los botones
затем нажмите кнопку стрелки вправо, чтобы запустить его.
con las flechas hacia la izquierda y hacia la derecha para activar una característica de la
función actual.
Mithilfe der Smart Technology (ST) können Sie für bis zu 12 Programm- oder
Websitesymbole den Start über E.Y.E. zuweisen. Drehen Sie den Ring, um das gewünschte
Symbol auszuwählen, und drücken Sie zum Starten die Pfeil-nach-rechts-Taste.
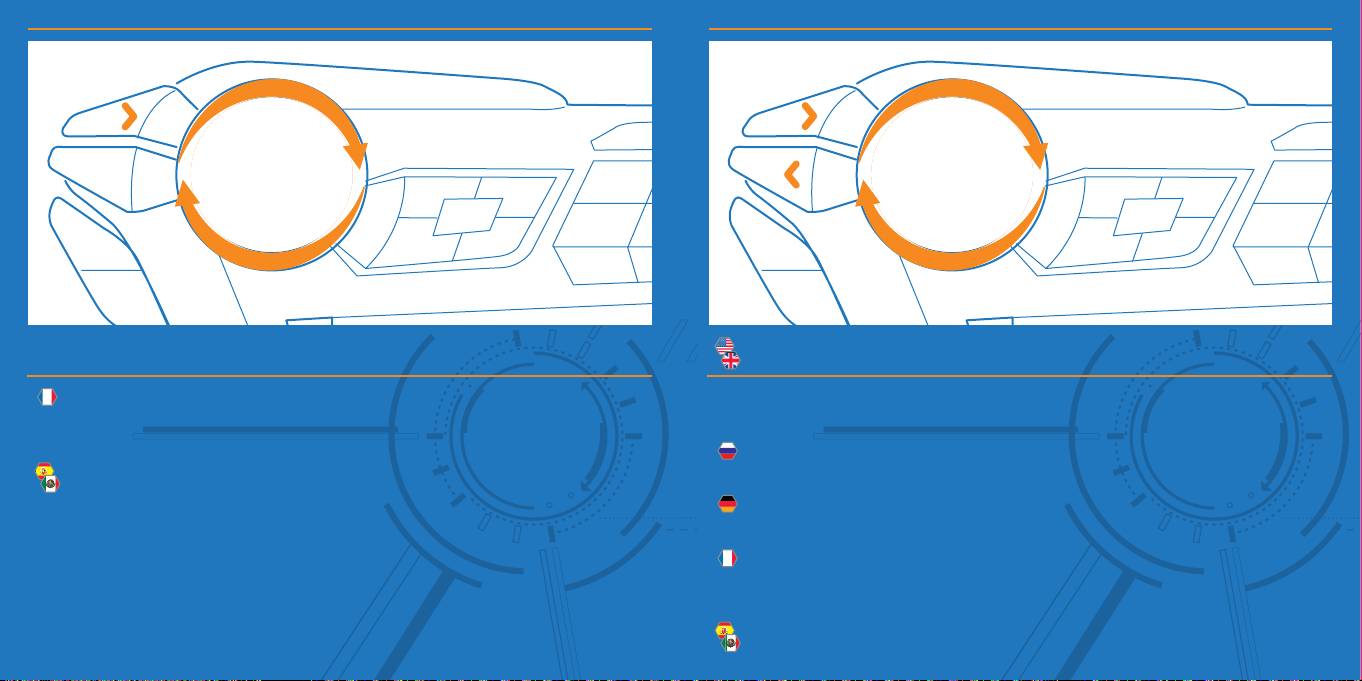
Program Launcher
System Volume
Smart Technology (ST) vous permet d’affecter 12 icônes de programmes ou de sites Web
Rotate the bezel to adjust volume level in increments of 5. Press the left and right arrows
afin de pouvoir les lancer à partir du E.Y.E. Tournez le cadran afin de sélectionner l’icône
to fine tune the volume in increments of 1.
correspondante, puis appuyez sur la flèche vers la droite pour confirmer.
Поворачивайте кольцо, чтобы отрегулировать уровень громкости с шагом 5. Точную
настройку громкости с шагом 1 можно произвести с помощью стрелок влево и вправо.
Utilice la Tecnología Smart (ST, por sus siglas en inglés) para asignar hasta 12 iconos
de programas o de sitios web que puedan iniciarse desde el E.Y.E. Gire el bisel para
Drücken Sie die Pfeil nach links- bzw. Pfeil nach rechts-Taste, um die Lautstärke in 1er-
seleccionar el icono deseado y luego presione el botón con la flecha hacia la derecha
Schritten anzupassen.
para iniciar.
Pour régler le volume, faites tourner le cadran. Le réglage se fait par incréments de 5.
Pour un paramétrage plus précis, par incréments de 1, appuyez sur les flèches vers la
gauche et vers la droite.
Gire el bisel para regular el nivel de volumen en incrementos de 5. Presione las flechas
hacia la derecha y hacia la izquierda para regular con precisión en incrementos de 1.
Microphone Volume
Backlight Brightness
Rotate the bezel to adjust volume level in increments of 5. Press the left and right arrows
Rotate the bezel to adjust keyboard backlight brightness. Press the left and right arrows to
to fine tune the volume in increments of 1.
fine tune the brightness in increments of 1.
Поворачивайте кольцо, чтобы отрегулировать яркость подсветки клавиатуры. Точную
Поворачивайте кольцо, чтобы отрегулировать уровень громкости с шагом 5. Точную
настройку яркости с шагом 1 можно произвести с помощью стрелок влево и вправо.
настройку громкости с шагом 1 можно произвести с помощью стрелок влево и вправо.
Drehen Sie den Ring, um die Helligkeit der Hintergrundbeleuchtung der Tastatur
Drücken Sie die Pfeil nach links- bzw. Pfeil nach rechts-Taste, um die Lautstärke in 1er-
einzustellen. Drücken Sie die Pfeil nach links- bzw. Pfeil nach rechts-Taste, um die
Schritten anzupassen.
Helligkeit in 1er-Schritten anzupassen.
Pour régler le volume, faites tourner le cadran. Le réglage se fait par incréments de 5.
Pour régler la luminosité du rétroéclairage du clavier, faites tourner le cadran. Pour un
réglage plus précis, par incréments de 1, appuyez sur les flèches vers la gauche et vers
Pour un paramétrage plus précis, par incréments de 1, appuyez sur les flèches vers la
la droite.
gauche et vers la droite.
Gire el bisel para regular la intensidad de brillo de la retroiluminación del teclado.
Gire el bisel para regular el nivel de volumen en incrementos de 5. Presione las flechas
Presione las flechas hacia la derecha y hacia la izquierda para regular con precisión la
hacia la derecha y hacia la izquierda para regular con precisión en incrementos de 1.
intensidad de brillo en incrementos de 1.
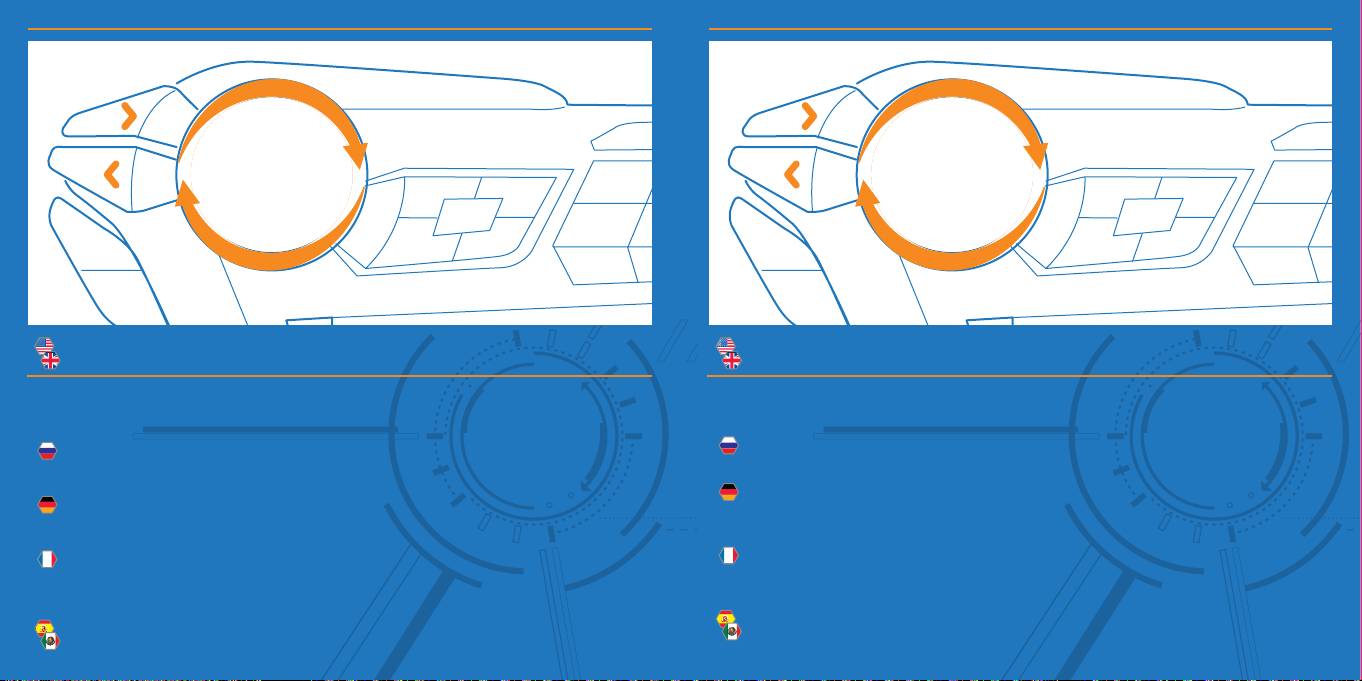
Timers
Stopwatch
Rotate the bezel to adjust countdown time. Press the right arrow to start and stop a timer.
Press the right arrow to start and stop a timer. Press the left arrow to reset the timer.
Press the left arrow to reset the timer.
Чтобы остановить или запустить таймер, нажмите стрелку вправо. Чтобы сбросить
Поворачивайте кольцо, чтобы отрегулировать время обратного отсчета. Чтобы
таймер, нажмите стрелку влево.
остановить или запустить таймер, нажмите стрелку вправо.Чтобы сбросить таймер,
нажмите стрелку влево.
Drücken Sie die Pfeil nach rechts-Taste, um einen Timer zu starten oder zu stoppen.
Drehen Sie den Ring, um die Countdown-Zeit einzustellen. Drücken Sie die Pfeil nach
Drücken Sie die Pfeil nach links-Taste, um den Timer zurückzusetzen.
rechts-Taste, um einen Timer zu starten oder zu stoppen. Drücken Sie die Pfeil nach links-
Taste, um den Timer zurückzusetzen.
Pour lancer le minuteur ou l’arrêter, appuyez sur la flèche vers la droite. Appuyez sur la
flèche vers la gauche pour le réinitialiser.
Pour régler le décompte, faites tourner le cadran. Pour lancer le minuteur ou l’arrêter, appuyez
sur la flèche vers la droite. Appuyez sur la flèche vers la gauche pour le réinitialiser.
Presione la flecha hacia la derecha para iniciar y detener el temporizador. Presione la
Gire el bisel para regular la cuenta regresiva. Presione la flecha hacia la derecha para
tecla hacia la izquierda para reiniciar el temporizador.
iniciar y detener el temporizador. Presione la tecla hacia la izquierda para reiniciar el
temporizador.
Clock
This function shows the system time of your computer.
Эта функция отображает системное время вашего компьютера.
Mithilfe dieser Funktion wird die Systemzeit Ihres Computers angezeigt.
Cette fonction affiche l’heure du système de votre ordinateur.
Esta función muestra la hora del sistema de su equipo.

©2013 Mad Catz, Inc. 7480 Mission Valley Road, Suite 101, San Diego, CA 92108 U.S.A. Mad Catz, S.T.R.I.K.E. and the Mad Catz logo
are trademarks or registered trademarks of Mad Catz Interactive, Inc., its subsidiaries and affiliates. The shape and design of this
product are a trade dress of Mad Catz Interactive, Inc., its subsidiaries and affiliates. Microsoft, Windows, and the Windows logos
are trademarks of the Microsoft group of companies. This product is not sponsored, endorsed or approved by Microsoft. All other
trademarks or registered trademarks are the property of their respective owners. Made in China. All rights reserved. Product fea-
tures, appearance and specifications may be subject to change without notice. Please retain this information for future reference.
©2013 Mad Catz Europe, Ltd. 1-2 Shenley Pavilions, Chalkdell Drive. Shenley Woods, Milton Keynes, Buckinghamshire MK5 6LB,
Royaume-Uni (UK). Mad Catz, S.T.R.I.K.E. et le logo Mad Catz sont des marques de commerce ou des marques déposées de Mad
Catz Interactive, Inc., de ses filiales et sociétés affiliées. La forme et le design de ce produit sont caractéristiques de la marque
Mad Catz Interactive, Inc., de ses filiales et sociétés affiliées. Microsoft, Windows, et les logos Windows sont des marques de
commerce du groupe Microsoft. Ce produit n’est ni garanti, ni homologué, ni approuvé par Microsoft. Toutes les autres marques
ou marques déposées sont la propriété de leurs propriétaires respectifs. Fabriqué en Chine. Tous droits réservés. L’aspect, les
fonctionnalités et les spécifications du produit peuvent changer sans préavis. Veuillez conserver cette notice pour référence
ultérieure.
©2013 Mad Catz Europe, Ltd. 1-2 Shenley Pavilions, Chalkdell Drive. Shenley Woods, Milton Keynes, Buckinghamshire MK5 6LB,
Reino Unido (UK). Mad Catz, S.T.R.I.K.E. y el logotipo de Mad Catz son marcas comerciales o marcas comerciales registradas
de Mad Catz Interactive, Inc., sus subsidiarias y afiliados. La forma y el diseño de este producto es la imagen de marca de Mad
Catz Interactive, Inc., sus subsidiarias y afiliados. Microsoft, Windows, y los logotipos de Windows son marcas comerciales del
grupo de empresas de Microsoft. Este producto no está patrocinado, recomendado o no se autorizado por Microsoft. El resto de
nombres y de las imágenes del producto son marcas registradas o marcas registradas de sus dueños respectivos. Fabricado en
China. Reservados todos los derechos. Las características, el aspecto y las especificaciones del producto pueden ser objeto de
modificación sin previo aviso. Por favor guarde esta información para su consulta en el futuro.
Mad Catz is a publicly traded company on the TSX/NYSE MKT, symbol MCZ.
Mad Catz ist ein börsennotiertes Unternehmen (TSX, NYSE MKT: MCZ).
Les actions de Mad Catz sont cotées en bourse sur le TSX/NYSE MKT sous le symbole MCZ
www.madcatz.com
M91-MCB43108
