Sulky Tramline GC – page 2
Manual for Sulky Tramline GC

20
A
Suivre les indications de
réglage.
Follow the setting
indications.
Réglages
Settings
1
0
2
1
1)
2)
2
3
Íàñòðîéêè
Ñëåäóéòå óêàçàíèÿì ïî
íàñòðîéêå.
21
Íàñòðîéêà íîðìû âûñåâà
a)
Íàñòðîéêà ðàñïðåäåëåíèÿ ñåìÿí
(ïàðàìåòðû
íàñòðîéêè ñì. ðàçäåë 5)
1)
Ðàñïðåäåëèòåëüíàÿ çàñëîíêà
* Ïîäíèìèòå èëè îïóñòèòå çàñëîíêó ñîãëàñíî
ðåêîìåíäàöèÿì. Âñòàâüòå ïðóæèíó â
ñîîòâåòñòâóþùèé ôèêñàòîð.
* â ñîîòâåòñòâóþùèé ôèêñàòîð.
* Ïàðàìåòðû íàñòðîéêè 0. Çàêðûòî (íàïðèìåð, âûñåâàíèå
îäíîãî ðÿäà â äâà)
1. Ìåëêîå çåðíî < 8 êã/ãà
2. Êðóïíîå çåðíî
2) Îòðàæàòåëüíàÿ çàñëîíêà
* Ïåðåäâèíüòå ðóêîÿòêó íåìíîãî âïðàâî è óñòàíîâèòå
íà ñîîòâåòñòâóþùóþ îòìåòêó.
* Ïàðàìåòðû íàñòðîéêè 1. Çåðíîâûå
2. Êðóïíûå çåðíîâûå
3.
4. Çåëåíûé ãîðîøåê äëÿ
êîíñåðâèðîâàíèÿ
5. Ãîðîõ
6. Êîðìîâîé áîá
Ìàêñ. Íèæíåå ïîëîæåíèå, Îïîðîæíåíèå
* Çàäà÷à - îòìåðÿòü çåðíà ïîäàþùèì ðîëèêîì ïóòåì
óäåðæàíèÿ çàñëîíêè êàê ìîæíî ïëîòíåå (íàïðèìåð,
íàñòðîéêà 1 äëÿ ïøåíèöû è ÿ÷ìåíÿ). Îäíàêî åñëè âû
çàìåòèòå ïîñòîÿííîå âûáðàñûâàíèå ñåìÿí èç ñèñòåìû
ðàñïðåäåëåíèÿ, óñòàíîâèòå ðóêîÿòêó íà îäíó îòìåòêó
âûøå, ÷åì ðåêîìåíäîâàíî (íàïðèìåð, íàñòðîéêà 2 äëÿ
ïøåíèöû è ÿ÷ìåíÿ).
GB
Setting the flow
a) Setting the distribution
(see section 5 for the setting
values)
1) Distribution shutter
• Raise or lower the shutter
as recommended. Insert the
spring
into the corresponding catch.
• into the corresponding catch.
• Setting 0 . Closed (sowing one row in two, for instance)
1 . Small grain < 8 kg/ha
2 . Large grain.
2) Baffle plate
• Move lever
slightly to the right and set to the appro-
priate mark.
• Setting
1 . Cereal
2 . Large cereal
3 .
4 . Canning peas
5 . Peas
6 . Field beans
Max . Bottom position, Emptying
• The aim is to have the grain metered out by the feeding
roller by keeping the baffle plate as tightly closed as
possible (e.g. setting 1 for wheat and barley).
However, if you notice a constant projection of grain from the
distribution system, set the lever one mark higher than the
recommendation (e.g. setting 2 for wheat and barley)..
Réglage du débit
a) Réglage de la distribution
(voir chapitre 5 pour les
valeurs de réglage)
1) Trappe de distribution
• Lever ou baisser la trappe
en fonction des
recommandations. Encliqueter le ressort
dans
l’encoche correspondante.
• La trappe dispose de 3 positions
• Repère
0 . Fermé (semi 1 rang sur 2 par exemple)
1 . Petites graines < 8 kg/ha
2 . Grosses graines
2) Clapet de fond
• Déplacer légèrement le levier
sur la droite et mettre au
cran correspondant.
• Repère
1 . Céréales
2 . Céréales de gros diamètre
3 .
4 . Pois de conserve
5 . Pois
6 . Féverole
Maxi . Position basse, Vidange
• Il faut rechercher à accompagner la graine avec l'ergot en
resserrant le plus possible le clapet de fond (ex: repère 1
pour blé, orge).
Toutefois, si vous observez des projections de graines de la
distribution en permanence, placer le levier au cran supérieur
par rapport à la préconisation (ex: repère 2 pour blé, orge)
Réglages
Settings
F
A
A
A
2
Íàñòðîéêè
RUS

22
Réglages
Settings
Suivre les indications de
réglage.
Follow the setting
indications.
3)
4)
2
1
a
b
4
5
3
Íàñòðîéêè
Ñëåäóéòå óêàçàíèÿì ïî
íàñòðîéêå.

23
3) Âûáîð âûñåâàþùåé êàòóøêè
Ñòàíäàðòíàÿ êàòóøêà äëÿ çåðíîâûõ è êðóïíûõ çåðíîâûõ
Íåáîëüøàÿ êàòóøêà äëÿ ìåëêîãî çåðíà
* Âîñïîëüçóéòåñü øòèôòîì íà çàñëîíêå ïåðâîãî
âûñåâàþùåãî àïïàðàòà ñïðàâà
- Âîñïîëüçóéòåñü øòèôòîì íà çàñëîíêå ïåðâîãî
àãðåãàòà ñïðàâà
à. Ïðèæàòü
b. Ïîâåðíóòü
!
4) Âàðèàòîð
* Èñïîëüçóÿ ôèêñàòîð è ðóêîÿòêó , óñòàíîâèòå íà
îòìåòêó, îïðåäåëåííóþ âî âðåìÿ ïðîâåäåíèÿ
êàëèáðîâî÷íîãî èñïûòàíèÿ.
* Ñäåëàéòå îòñ÷åò íàä ïëîñêîé ÷àñòüþ .
* Ëþáîå èçìåíåíèå â ðåãóëèðîâêå äîëæíî
ñîïðîâîæäàòüñÿ êîíòðîëüíîé òàðèðîâêîé. Ê
ñâåäåíèþ, òðè äåëåíèÿ íà ðåãóëèðîâî÷íîé øêàëå
ñîîòâåòñòâóþò îòêëîíåíèþ ïðèáëèçèòåëüíî 10 êã/ãà
çåðíîâûõ.
* Äâèãàéòå ñòðåëêó ïî øêàëå îò 0 äî 90.
GB
3) Selecting the feeding roller
Standard wheel for cereal and large grain.
Fine wheel for small grain.
• Take hold of the pin on the shutter of the first unit to the
right.
- Take hold of the pin on the shutter of the first unit to
the right.
a . Press
b . Turn
4) Variator
• Using the knob
, and lever
,
set to the mark
determined during the calibration test..
• Read off above the flat part
!
.
• Each change to the setting must be followed by a
calibration check. For your information, three graduations
on the adjustment scale correspond to a deviation of
around 10 kg/ha with cereal.
• Scale from 0 to 90.
3) Sélection de l'ergot
Roue standard pour céréales et grosses graines.
Roue fine pour petites graines.
• Prendre la goupille sur la trappe du 1er boîtier à droite.
- Pour sélectionner la roue de distribution:
a . Appuyer
b . Tourner
4) Variateur
• Mettre le repère déterminé à l’essai de débit à l’aide de la
molette
, et du levier
.
• La lecture se fait au dessus de la partie plane
!
.
• Chaque changement de repère doit être suivie d’un
contrôle de débit. Pour information, 3 graduations de vernier
correspondent à un écart d’environ 10 Kg/ha avec des
céréales.
• Repère de 0 à 90.
Réglages
Settings
F
Íàñòðîéêè
RUS

24
Pour un semis très précis,
il est nécessaire de réaliser
un essai de débit.
Attention à la précision de
votre balane.
A calibration test is
necessary for accurate
sowing.
Make sure that your scales
are accurate
Réglages
Settings
1
a
2
b
Íàñòðîéêè
Êàëèáðîâî÷íîå èñïûòàíèå
íåîáõîäèìî äëÿ òî÷íîãî
âûñåâà.
Óáåäèòåñü â òî÷íîñòè âåñîâ.

25
b) Óñòàíîâêà êàëèáðîâî÷íîãî èñïûòàíèÿ
* Ïîëüçóéòåñü òîëüêî òî÷íûìè âåñàìè è êîíòåéíåðîì.
* Ïåðåä âûïîëíåíèåì èñïûòàíèÿ, ïðîâåðüòå, ÷òîáû
íèêîãî íå áûëî îêîëî ðÿäîâîé ñåÿëêè.
* Ïîðÿäîê äåéñòâèÿ:
à. Îòêðîéòå ëîòîê è òîëêíèòå åãî âíèç,
÷òîáû îí ïðîñêîëüçíóë ïîä äîçàòîðû.
b. Óñòàíîâèòå ðóêîÿòêó ðåãóëÿòîðà çàãëóáëåíèÿ
íà âàë âàðèàòîðà.
* Ïðîâåðüòå, ÷òîáû èñïîëüçóåìûå äîçàòîðû âîøëè â
çàöåïëåíèå.
* Âûïîëíèòå êàëèáðîâî÷íîå èñïûòàíèå â ñîîòâåòñòâèè
ñ ðåêîìåíäàöèÿìè, äàííûìè íà ñëåäóþùèõ
ñòðàíèöàõ.
* Ïðèâåäèòå ëîòîê îáðàòíî â çàùèòíîå ïîëîæåíèå.
GB
b) Setting up the calibration test
• Use accurate scales and a container.
• Before carrying out the test, check that there is no-one
around the seed drill.
• Procedure:
a . Open the tray
and push it downwards so that
it slides beneath the metering device.
b . Fit the depth control crank
on to the variator
shaft.
• Check that the metering devices used are engaged.
• Carry out the calibration check in line with the
recommendations on the following pages.
• Bring the tray back to the guard position.
b) Mise en place de l’essai de débit
• Procurez-vous une balance précise et un récipient.
• Avant d’effectuer votre essai, vérifier qu’il n’y a personne
près du semoir.
• Démarche
a . Ouvrir les augets
et les pousser vers le bas
pour les faire basculer sous les distributions.
b . Prendre la manivelle de terrage
et l'engager
sur l'arbre du variateur.
• Vérifier que les distributions utilisées soient enclenchées.
• Effectuer votre essai de débit suivant les recommandations
des pages suivantes.
• Remettre l’auget en position carter
Réglages
Settings
F
Íàñòðîéêè
RUS

26
Réglages
Settings
1
Mini 5 Kg
Mini 150 Kg
2
3
4
Mini 100 tr
Mini 25 tr
1 tr / s
6
7
8
5
9
10
ha = 0
+
+
5
6
7
15
40
30
20
10
5
4
2
3
90
1
50
400
350
300
250
200
150
1
0
0
90
80
70
60
50
30
20
15
10
5
4
3
40
2
0,0
5
0,2
0
0
,1
5
0,
10
0,30
0,4
0
0,50
1,50
5,0
0
10,
00
1,00
2,0
0
3
,0
0
4,00
7
0
80
6
0
4
3
2
1
m
2,50
3,00
3,50
4,00
4,50
4,80
5,00
6,00
6,66
tr
60
50
43
37,5
33,3
31,25
30
25
22,5
1
2
1
1
2
1
1
1
1
1
1
2
1
1
2
1
1
2
5
1
12 13 14 15 16 17
Kg/ha
71
80
90
100
110
120
130
140
150
160
170
180
190
200
210
220
240
250
260
20
23
27
30
33
36
39
42
45
48
51
53
56
58
61
63
67
69
71
22
25
29
33
36
39
43
46
49
52
54
57
60
62
65
67
71
73
75
24
28
32
35
39
42
46
49
52
55
58
61
63
66
68
71
75
77
79
26
30
34
38
42
45
49
52
55
58
61
64
67
69
72
74
78
80
82
28
32
36
40
44
48
52
55
58
62
64
67
70
72
75
77
81
83
84
30
34
39
43
47
51
54
58
61
64
67
70
73
75
78
80
83
85
86
y
y
y
Blé / Wheat / Weizen
x 40 = Kg / ha
ou - or - oder
0
1
2
Íàñòðîéêè
Colza
Rape
Ðàïñ
Luzerne
Lucern
Ëþöåðíà
Ray grass
Rye grass
Ðàéãðàñ
Blé
Wheat
Ïøåíèöà
Orge
Barley
ß÷ìåíü
Pois
Peas
Ãîðîõ

27
c) Réalisation de l’essai de débit
1) Essai en poste fixe
Procéder au réglage de la distribution comme l’indique
la notice (clapet de fond, trappes etc...).
Mettre la graine dans la trémie
le jour même du
semis
(5 Kg en colza / 150 Kg en céréales) et réaliser
l’essai à suivre.
Régler
le variateur suivant le repère indicatif du
tableau (voir chapitre 5).
Amorcer
la distribution :
25 tours
de manivelle
minimum
(l’auget peut être rempli), sauf pour le
colza
100 tours
.
Faire
l’essai en effectuant le nombre de tours en
fonction de la largeur du semoir.
Nota : tourner régulièrement à
1 tour/seconde
.
Peser
la quantité recueillie dans les deux augets avec une
balance précise.
Multiplier par 40
pour obtenir la quantité par ha
ou
utiliser la réglette
(voir page suivante).
Corriger
le réglage du variateur (baisser complétement le
levier pour le ramener ensuite à la valeur souhaitée).
Ramener
le compteur d’hectares à zéro, après l’essai de
débit.
L’essai en condition réelle est le plus représentatif.
Après un hectare de semis, refaire un essai de véri-
fication (procéder comme ci-dessus à partir de ).
6
6
GB
Réglages
Settings
F
2
2
1
1
3
3
5
5
4
4
7
7
10
10
8
8
9
9
c) Carrying out the calibration test
1) Fixed unit test
Set the distribution as indicated in the manual (baffle
plate, shutters, etc.).
Put the grain in the seed box
on the day of
sowing
(5 kg of rape, 150 kg of cereal) and carry
out the following test.
Set
the variator to the mark indicated in the table
(see section 5).
Start
distribution: a
minimum
of
25 turns
of the
crank (the trough may be filled), or
100 turns
for
rape.
Carry out
the test by completing the appropriate
number of turns for the width of the seed drill.
N.B. Turn steadily at
1 turn per second
.
Weigh
the quantity collected in the two troughs using
accurate scales.
Multiply by 40
to obtain the quantity per hectare or
use
the calculator
(see next page).
Correct
the variator setting (lower the lever completely
then bring it back up to the required value).
Reset
the area meter to zero after the calibration test.
The most representative test is one carried out under
real working conditions.
After sowing a hectare, carry out a further check
(proceed as above from step ).
6
6
2
2
1
1
3
3
5
5
4
4
7
7
10
10
8
8
auf null
ñ) Âûïîëíåíèå êàëèáðîâî÷íîãî èñïûòàíèÿ
Ñäåëàéòå ïðåäóñòàíîâêè ñåÿëêè, êàê ýòî
óêàçàíî â èíñòðóêöèÿõ (îòðàæàòåëüíàÿ
çàñëîíêà, íèæíèé êëàïàí è ò.ä.)
Çàñûïüòå çåðíî â âûñåâàþùèé àïïàðàò
â äåíü
çàñåâà
(5êã ðàïñà, 150êã çåðíîâûõ) è
âûïîëíèòå ñëåäóþùåå èñïûòàíèå.
Óñòàíîâèòå âàðèàòîð íà îòìåòêó, óêàçàííóþ â
òàáëèöå (ñì. ðàçäåë 5).
Ïðîêðóòèòå âûñåâàþùèå àïïàðàòû:
ìèíèìóì
25 îáîðîòîâ
ðóêîÿòêè (ïîñëå çàïîëíåíèÿ
ëîòêà, âûñûïèòå ñåìåíà îáðàòíî â áóíêåð),
èëè
100 îáîðîòîâ
äëÿ ðàïñà.
Âûïîëíèòå
èñïûòàíèå, ïðîäåëàéòå óêàçàííîå
êîëè÷åñòâî îáîðîòîâ â ñîîòâåòñòâèè ñ
øèðèíîé ðÿäîâîé ñåÿëêè.
×àñòîòà âðàùåíèÿ ðóêîÿòêè -
1 îáîðîò â
ñåêóíäó.
Âçâåñüòå
ñåìåíà, âûñûïàâøèåñÿ â äâà ëîòêà, èñïîëüçóÿ
òî÷íûå âåñû.
Óìíîæüòå íà 40
, ÷òîáû ïîëó÷èòü êîëè÷åñòâî íà ãåêòàð
èëè
èñïîëüçóéòå âû÷èñëèòåëüíîå óñòðîéñòâî
(ñì.
ñëåäóþùóþ ñòðàíèöó)
Îòêîððåêòèðóéòå
óñòàíîâêó âàðèàòîðà (îïóñòèòå
ðóêîÿòêó âíèç äî ïðåäåëà, çàòåì âåðíèòå åå â èñõîäíîå
ïîëîæåíèå íà òðåáóåìóþ âåëè÷èíó).
Óñòàíîâèòå
ñ÷åò÷èê ãåêòàðîâ íà íîëü ïîñëå ïðîâåäåíèÿ
êàëèáðîâî÷íîãî èñïûòàíèÿ.
Íàèáîëåå òî÷íîå èñïûòàíèå - ýòî òî, êîòîðîå
ïðîâîäèòñÿ â ðàáî÷èõ óñëîâèÿõ.
Ïîñëå çàñåâà îäíîãî ãåêòàðà âûïîëíèòå ñëåäóþùóþ
ïðîâåðêó (ïðîäîëæàòü, êàê óêàçàíî âûøå, íà÷èíàÿ ñ
ýòàïà ).
6
6
2
2
1
1
3
3
5
5
4
4
7
7
10
10
8
8
9
9
5
5
5
5
5
5
Íàñòðîéêè
RUS
9
9
1) Òåñò íà ñòàöèîíàðíîé óñòàíîâêå

28
15
40
30
20
10
5
4
2
3
90
1
50
400
350
300
250
200
150
100
90
80
70
60
50
30
20
15
10
5
4
3
40
2
0,05
0,20
0,15
0,10
0,30
0,40
0,50
1,50
5,00
10,00
1,00
2,00
3,00
4,00
70
80
60
4
3
2
1
Réglages
Settings
4
3
1
2
Íàñòðîéêè

GB
2) Testing with the calculator
• This calculator enables you to determine the new variator
setting after your first calibration test.
• Set the distribution and carry out a test in line with the
recommendations given on the previous pages.
• Use:
- Match line
, the variator setting used for your
first calibration test, up to line
which
corresponds to the quantity collected in the
trough in kg during this test.
- Without moving the discs on the calculator,
identify your required seeding rate in kg/ha on line
.
- On line
, read off the new variator setting
corresponding to your seed and conditions.
• After sowing a hectare, carry out a further check.
• If you wish to change the seeding rate per hectare with
the same seed on another plot, you can use the calculator
again to determine the new variator setting by keeping the
weighed quantity obtained in the first calibration test.
2) Essai avec la réglette
• Cette réglette vous permet de déterminer le nouveau
repère de variateur après votre 1er essai de débit.
• Effectuer les réglages de la distribution et un essai suivant
les recommandations données dans les pages
précédentes.
• Utilisation :
- Faire coïncider la ligne
du repère du variateur
qui a servi à votre 1
er
essai de débit avec la ligne
qui correspond à la quantité recueillie à cet
essai dans l’auget en Kg.
- Sans bouger les disques de la réglette, repérer sur
la ligne
votre débit souhaité sur la ligne Kg/ha.
- Lire sur la ligne
le nouveau repère de variateur
correspondant à votre semence suivant vos
conditions.
• Après un hectare de semis, refaire un essai de vérification.
• Si vous désirez changer le débit/ha avec la même
semence sur une autre parcelle, vous pouvez réutiliser la
réglette pour déterminer le nouveau repère du variateur
en gardant la valeur de pesée du 1
er
essai de débit.
Réglages
Settings
F
29
2) Ïðîâåäåíèå èñïûòàíèÿ ñ ïîìîùüþ âû÷èñëèòåëüíîãî
óñòðîéñòâà (ñïåöèàëüíàÿ ëèíåéêà).
* Ýòî âû÷èñëèòåëüíîå óñòðîéñòâî äàñò Âàì âîçìîæíîñòü
îïðåäåëèòü íîâóþ íàñòðîéêó âàðèàòîðà ïîñëå ïåðâîãî
êàëèáðîâî÷íîãî èñïûòàíèÿ.
* Óñòàíîâèòå âûñåâ è âûïîëíèòå èñïûòàíèå â ñîîòâåòñòâèè
ñ ðåêîìåíäàöèÿìè, äàííûìè íà ïðåäûäóùèõ ñòðàíèöàõ.
* Èñïîëüçóéòå:
- Ñîâìåñòèòå ëèíèþ , íàñòðîéêó âàðèàòîðà,
èñïîëüçîâàííóþ äëÿ ïåðâè÷íîãî òåñòèðîâàíèÿ, ñ
ëèíèåé , êîòîðàÿ ñîîòâåòñòâóåò êîëè÷åñòâó
çåðíà â êã, ñîáðàâøåìóñÿ â ëîòêå âî âðåìÿ
ïðîâåäåíèÿ ýòîãî èñïûòàíèÿ.
- Íå ïîâîðà÷èâàÿ äèñêè íà âû÷èñëèòåëüíîì
óñòðîéñòâå, îïðåäåëèòå Âàøó òðåáóåìóþ
ïîñåâíóþ íîðìó â êã/ãà ïî ëèíèè .
- Íà ëèíèè , ñ÷èòàéòå íîâóþ íàñòðîéêó
âàðèàòîðà, ñîîòâåòñòâóþùóþ Âàøèì çåðíó è
óñëîâèÿì.
* Ïîñëå òîãî êàê çàñåÿí îäèí ãåêòàð, âûïîëíèòå
ñëåäóþùóþ ïðîâåðêó.
* Åñëè Âû ðåøèëè èçìåíèòü íîðìó âûñåâà íà ãåêòàð
òåì æå ñàìûì çåðíîì íà äðóãîì ó÷àñòêå, Âû ìîæåòå
âíîâü èñïîëüçîâàòü âû÷èñëèòåëüíîå óñòðîéñòâî,
÷òîáû îïðåäåëèòü íîâóþ íàñòðîéêó âàðèàòîðà äëÿ
òîãî æå âçâåøåííîãî êîëè÷åñòâà çåðíà, êîòîðîå áûëî
îïðåäåëåíî âî âðåìÿ ïðîâåäåíèÿ ïåðâîãî
êàëèáðîâî÷íîãî èñïûòàíèÿ.
Íàñòðîéêè
RUS

30
Réglages
Settings
Utiliser uniquement une
prise simple effet.
Avant la manœuvre des
traceurs, vérifier qu'il n'y
ait personne autour de la
machine.
Use a single-acting valve
only.
Before shifting the
markers, check that there
is no-one around the
machine
B
1
2
3
Íàñòðîéêè
Èñïîëüçóéòå îäíó ñåêöèþ
ðàñïðåäåëèòåëÿ.
Ïåðåä ïîäúåìîì
ìàðêåðîâ, ïðîâåðüòå,
÷òîáû íèêîãî íå áûëî
îêîëî àãðåãàòà.

31
Ìàðê¸ð ãðàíèö ïðîãîíà
Îäíîâðåìåííî ñ ýòèì ìîæíî âûâåðèòü óãîë äèñêà äëÿ
óìåíüøåíèÿ ãëóáèíû ìàðêèðîâêè.
b) Ãèäðàâëè÷åñêîå ñîåäèíåíèå
- ñîåäèíèòå ãèäðàâëè÷åñêèé öèëèíäð ñ ñåêöèåé
ðàñïðåäåëèòåëÿ îäíîñòîðîííåãî äåéñòâèÿ ñî ñâîáîäíûì
âîçâðàòîì.
Ñèñòåìà ðåãóëèðîâàíèÿ ðàñõîäà âñòðîåíà â ãèäðàâëè÷åñêóþ
ñèñòåìó âî èçáåæàíèå ïîäúåìà ìàðêåðîâ.
à) Óñòàíîâêà ìàðêåðîâ â ðàáî÷åå ïîëîæåíèå
Ìàðêåðû îñòàâëÿþò îòìåòêó äëÿ âîæäåíèÿ ïåðåäíèì êîëåñîì
òðàêòîðà.
* Ïåðåñòàâüòå ìàëåíüêèé øòèôò è âûòàùèòå øòûðü ,
ïðèäåðæèâàÿ ìàðêåðíûé íàêîíå÷íèê äðóãîé ðóêîé.
* Âñòàâüòå øòèôò îáðàòíî â ïîëîæåíèå , ÷òîáû
çàôèêñèðîâàòü øòûðü.
* Îïóñòèòå íàêîíå÷íèê è ïðîâåðüòå êàáåëüíóþ ðàçâîäêó.
* Óñòàíîâèòå âòîðè÷íóþ òðóáêó â âûäâèíóòîå è âåðòèêàëüíîå
ïîëîæåíèå.
* Ïîñëå óñòàíîâêè òðóáêè â ïðàâèëüíîì ïîëîæåíèè
(îñòàíîâëåííîé îêîëî áîëòà ) çàæìèòå îáà áîëòà.
* Äëÿ òîãî, ÷òîáû âûâåðèòü óñòàíîâêó äèñêà ïî îòíîøåíèþ ê
êîëåå, ñäâèíüòå ðóêîÿòêó ïî íàïðàâëåíèþ ê íàêîíå÷íèêó.
GB
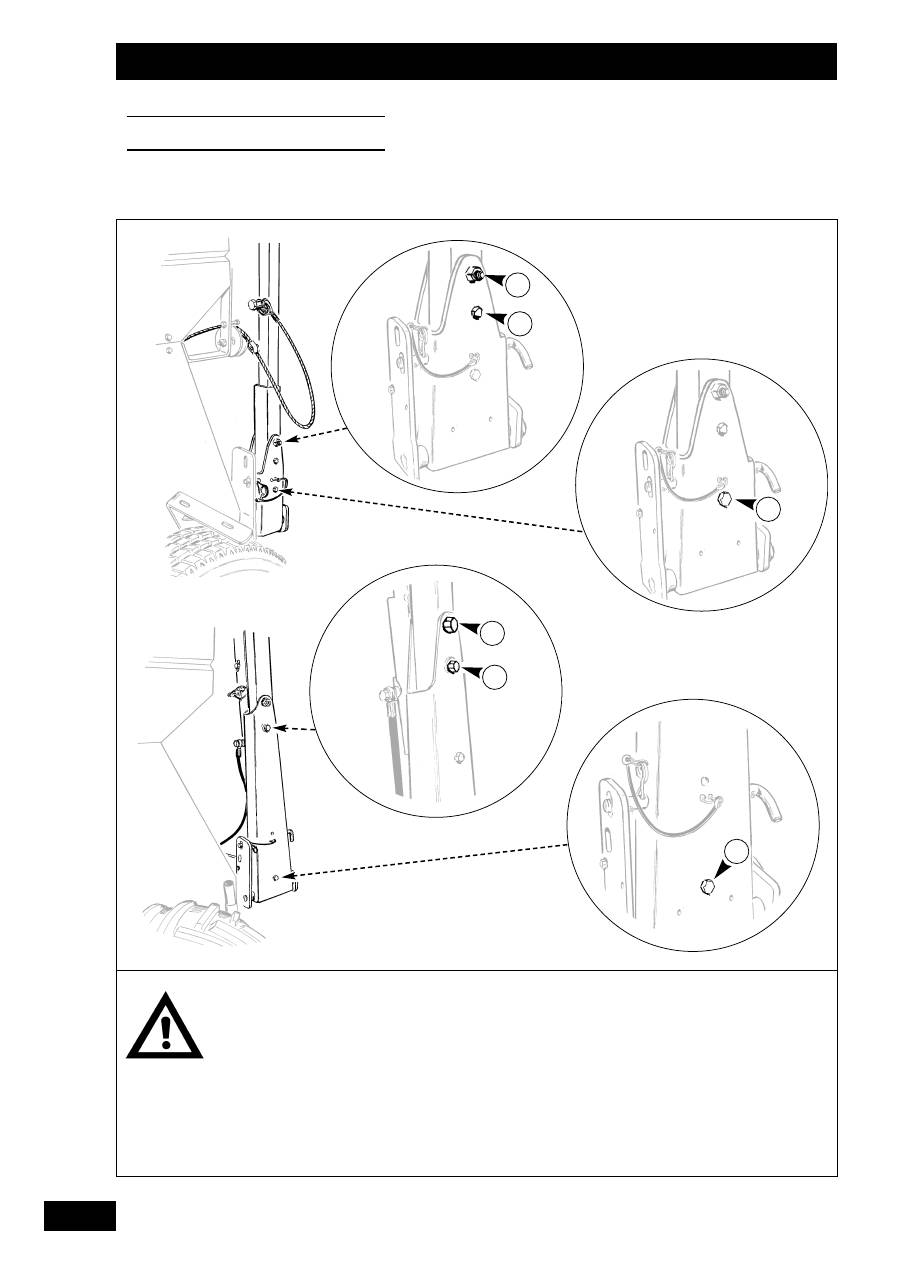
Bout markers
a) Setting the markers to the working position
The markers put a mark by the front wheel of the tractor.
• Remove the small pin
and pull out the spindle
while
holding the marker arm with the other hand.
• Put the pin back into position
to secure the spindle.
• Lower the arm and check cable routing.
• Set the secondary tube in extended and vertical position.
• After setting the tube in position (stopped against the
bolt
), tighten both screws.
• To adjust the disc in relation to the track, slide the shaft
along the arm.
You can adjust the disc angle simultaneously to reduce
marking depth.
b) Hydraulic connection
- connect the hydraulic line to the tractor's single-acting
valve with free return.
A flow control system is incorporated into the hydraulic
circuit to avoid sudden lifting of the markers.
Traceurs latéraux
a) Mécanique
Les traceurs sont conçus pour un marquage à la roue avant
du tracteur
• Retirer la goupille
et dégager la broche
en tenant le
bras de traceur avec l'autre main.
• Remettre la goupille en position
pour bloquer la broche.
• Baisser le bras et vérifier le passage du câble.
• Pour le réglage du disque par rapport à la voie, déplacer
l'axe sur le bras.
Vous pouvez aussi en même temps régler l'inclinaison du
disque pour avoir un réglage au sol plus ou moins important.
b) Branchement hydraulique
- brancher le flexible hydraulique sur la prise simple effet
du tracteur avec retour libre.
Afin d'éviter la montée brutale des traceurs, un limiteur de
débit est fixé sur le circuit hydraulique.
Réglages
Settings
F
B
B
B
Íàñòðîéêè
RUS

32
Réglages
Settings
Utiliser uniquement une
prise simple effet.
Avant la manœuvre des
traceurs, vérifier qu'il n'y
ait personne autour de la
machine.
Use a single-acting valve
only.
Before shifting the
markers, check that there
is no-one around the
machine.
B
3
1
2
5
5
3
4
1
2
7
8
6
4
Íàñòðîéêè
Èñïîëüçóéòå îäíó ñåêöèþ
ðàñïðåäåëèòåëÿ.
Ïåðåä ïîäúåìîì
ìàðêåðîâ, ïðîâåðüòå,
÷òîáû íèêîãî íå áûëî
îêîëî àãðåãàòà.
33
GB
Réglages
Settings
F
c) Hydraulique
Les traceurs sont conçus pour un marquage au centre du
tracteur. Ils sont pré-réglés usine.
• Mettre la pression hydraulique.
• Retirer la goupille
et dégager la broche
en tenant le
bras de traceur avec l'autre main.
Remettre la goupille
en position
pour bloquer la broche.
• Baisser le premier traceur.
• Mettre le tube secondaire en position allongée.
• Retirer la broche
et dévisser les vis
!
avec l'aide de la
manivelle de terrage
$
.
• Aprés avoir positionné ce tube (la position de la broche
sert de référence), bien bloquer les vis
!
.
• Les traceurs sont pré réglés d'usine.
Toutefois, si vous désirez ajuster ce réglage, déplacer le
support
"
du disque sur le tube.
• La distance de la dernière ligne de semis au disque de
traceur est égale à une 1/2 largeur de travail plus un 1/2
écartement.
• Il est possible de régler l'inclinaison du disque pour avoir un
marquage au sol plus ou moins important. Quatre réglages
sont disponibles en changeant la position de la cale
d'orientation
#
.
c) Hydraulic
Markers are designed for tractor centreline marking. They
were pre-adjusted in the factory.
• Build up hydraulic pressure.
• Remove the clip
and pull out the pin
while holding
the marker arm with the other hand.
Put the clip
back in position
To secure the pin.
• Lower the first marker.
• Set the secondary tube to the extended position.
• Remove the pin
and loosen the screws
!
with the crank
$
.
• After positioning that tube (by reference to the pin
position), lock the screws tight
!
.
• Markers were pre-adjusted in the factory.
However, if you want to refine that adjustment, move the
disc bracket
"
on the tube.
• The distance between the last seed row and the marker disc
is equal to 1/2 working width + 1/2 spacing.
• The slanting of the disc can be adjusted to obtain a more or
less visible marking. Four settings are possible by changing
the position of orientation key
#
.
!
$
!
"
#
....
* Ïîñëå òî÷íîé óñòàíîâêè ýòîé òðóáêè (ïî ñîîòíåñåíèþ ê
ïîëîæåíèþ øòèôòà ), çàôèêñèðóéòå ïëîòíî áîëòû .
* Ìàðêåðû áûëè îòðåãóëèðîâàíû â çàâîäñêèõ óñëîâèÿõ. Îäíàêî
åñëè Âû æåëàåòå èçìåíèòü ýòó óñòàíîâêó, ñäâèíüòå äèñêîâûé
êðîíøòåéí íà òðóáå.
* Ðàññòîÿíèå ìåæäó ïîñëåäíèì ðÿäîì è äèñêîì ìàðêåðà ðàâíî
1/2 ðàáî÷åé øèðèíå + 1/2 ðàññòîÿíèÿ ìåæäó ðÿäàìè.
* Íàêëîí äèñêà ìîæåò áûòü îòðåãóëèðîâàí òàê, ÷òîáû ïîëó÷èòü
áîëåå èëè ìåíåå âèäèìóþ ìàðêèðîâêó. Âîçìîæíû ÷åòûðå
óñòàíîâêè ïóòåì èçìåíåíèÿ ïîëîæåíèÿ íàïðàâëÿþùåãî
êëþ÷à .
ñ) Ãèäðàâëèêà
Ìàðêåðû íàñòðîåíû äëÿ ìàðêèðîâêè ñëåäà ïðè âîæäåíèè ïî
îñåâîé ëèíè òðàêòîðà. Îíè áûëè îòðåãóëèðîâàíû åùå íà
ôàáðèêå.
* Ïîñòåïåííî ñîçäàéòå ãèäðàâëè÷åñêîå äàâëåíèå.
* Ñíèìèòå ôèêñàòîð è âûòàùèòå øòèôò â òî âðåìÿ,
êàê äåðæèòå ìàðêåðíûé íàêîíå÷íèê äðóãîé ðóêîé.
Âñòàâüòå ôèêñàòîð îáðàòíî â ïîëîæåíèå .
Çàôèêñèðîâàòü øòèôò.
* Îïóñòèòå ïåðâûé ìàðêåð
* Óñòàíîâèòå âòîðè÷íóþ òðóáêó â âûäâèíóòîå ïîëîæåíèå
* Ñíèìèòå øòèôò è îñëàáüòå áîëòû ñ ðóêîÿòêîé .
Íàñòðîéêè
RUS
34
Réglages
Settings
La levée des traceurs ne doit
pas être brutale.
Réaliser les manœuvres de
demi-tour en bout de champ
traceurs relevés.
Pour le transport : raccourcir
le bras si la hauteur hors tout
est un handicap.
Les supports de disques
peuvent être retournés afin de
correspondre au gabarit du
semoir.
Markers should be raised
slowly.
Carry out end-of-field
manoeuvres with the markers
raised.
Shorten the arm for transport
if the overall height is too
great.
The disc supports may be
turned around in order to
match the seed drill gauge.
2
1
3
2
1
3
Íàñòðîéêè
Ìàðêåðû äîëæíû
ïîäíèìàòüñÿ ìåäëåííî.
Âûïîëíÿéòå
ìàíåâðèðîâàíèå ïî êðàÿì
ïîëÿ ñ ïîäíÿòûìè
ìàðêåðàìè. Ïðè
òðàíñïîðòèðîâêå
óêîðîòèòå íàêîíå÷íèêè
ìàðêåðîâ, åñëè
ãàáàðèòíàÿ âûñîòà
ñëèøêîì áîëüøàÿ.
Äèñêè ìîãóò áûòü
ïîâåðíóòû, ÷òîáû
ñîîòâåòñòâîâàòü ðàçìåðó
ðÿäîâîé ñåÿëêè.

«
«
«
«
35
å) Îáñëóæèâàíèå
- Ïîäàòü äàâëåíèå îáà ìàðêåðà ïîäíÿòû
- Ñáðîñèòü äàâëåíèå îäèí ìàðêåð îïóùåí
- Ïîäàòü äàâëåíèå îïóùåííûé ìàðêåð ïîäíÿò
- Ñáðîñèòü äàâëåíèå âòîðîé ìàðêåð îïóùåí
f) Ïðèìå÷àíèå
* Ðåãóëÿðíî ïðîâåðÿéòå êðåïëåíèå áîëòà (4ì äà Í)
* Èñïîëüçóéòå ñîîòâåòñòâóþùèé ñðåçíîé áîëò
d) Áåçîïàñíîñòü
Ïðåäîõðàíèòåëüíîå ïðèñïîñîáëåíèå ìàðêåðà äåéñòâóåò
òîëüêî â ðàáî÷åì ïîëîæåíèè.
- Àêòèâíàÿ áåçîïàñíîñòü: Óïðóãèé áóôåðíûé çóáåö ìåæäó
íàêîíå÷íèêîì è äèñêîì.
- Ïàññèâíàÿ áåçîïàñíîñòü: êàòåãîðèÿ HM 10õ90,
ñðåçíîé áîëò .
Ðåìîíòíûé áîëò
ïðåäóñìîòðåí íà íàêîíå÷íèêå.
GB
d) Safety
The marker safety device only operates in the working
position.
- Active safety:
Flexible tooth buffer between the
arm and the disc.
- Passive safety:
HM 10X90 class 6.8 safety bolt
.
A replacement bolt
is provided
on the arm.
e) Operation
- Apply pressure
«
both markers are raised
- Release pressure
«
one marker is lowered
- Apply pressure
«
the lowered marker is raised
- Release pressure
«
the other marker is lowered
f) Notes
• Regularly check the tightening of the screw
(4m da N).
• Use the correct safety screw type.
d) Sécurité
La sécurité du traceur fonctionne uniquement en posi-
tion travail.
- Sécurité active :
Dent souple amortisseur entre le
bras et le disque.
- Sécurité passive : Boulon de sécurité
type HM 10 x 90 classe 6.8.
Un boulon de remplacement
est
prévu sur le bras.
e) Fonctionnement
- Mettre la pression
«
les 2 traceurs se lèvent
- Relâcher la pression
«
un traceur se baisse
- Mettre la pression
«
le traceur baissé se lève
- Relâcher la pression
«
l'autre traceur se baisse
f) Remarques
• Vérifier régulièrement le serrage de la vis
(4m da N).
• Respecter le type de vis de sécurité.
Réglages
Settings
F
Íàñòðîéêè
RUS
36
Réglages
Settings
Pour des tracteurs équipés
de pneus larges avant, la
voie V peut se prendre à
l'intérieur des pneus, dans
ce cas, le guidage se fera à
l'intérieur de ce pneu.
On tractors equipped with
wide front tyres, the track
V may be measured from
the inside of the tyres. In
this case, the inside of the
tyre is to be used for
guiding.
e
D
V
Íàñòðîéêè
Íà òðàêòîðàõ,
îáîðóäîâàííûõ øèðîêèìè
ïåðåäíèìè øèíàìè, ñëåä
ïðîòåêòîðà øèíû V ìîæåò
áûòü èçìåðåí ñ
âíóòðåííåé ñòîðîíû øèí.
 ýòîì ñëó÷àå, âíóòðåííÿÿ
ñòîðîíà øèíû ìîæåò áûòü
èñïîëüçîâàíà â êà÷åñòâå
îðèåíòèðà.

37
•
Óñòàíîâêà
Êîððåêòèðîâêà ìàðêåðà
e x (n+1)
V
D =
-
2
2
D
Ðàññòîÿíèå îò ñëåäà ìàðêåðà äî ïåðâîãî ñîøíèêà â ñì
n
Êîëè÷åñòâî ñîøíèêîâ ðÿäîâîé ñåÿëêè
V
Êîëåÿ ïåðåäíèõ êîëåñ òðàêòîðà â ñì
e
Ñòûêîâîå ìåæäóðÿäüå â ñì
D:
Èçìåðåíèÿ ñäåëàíû îò âíåøíåãî ñîøíèêà
Íàïðèìåð: 21-ðÿäíàÿ ñåÿëêà ñ ðàññòîÿíèåì ìåæäó ðÿäàìè â 14,3 ñì,
ðàññòîÿíèå ìåæäó ïåðåäíèìè êîë¸ñàìè òðàêòîðà 160 ñì.
<
14,3 x 22
160
D = - = 77,3 cm
2
2
Ðåãóëèðîâêà
- îñëàáüòå áîëò ñ ïîìîùüþ ðóêîÿòêè
- âûòÿíèòå íàêîíå÷íèê, îäíîâðåìåííî
ðåãóëèðóÿ äèñê.
Îáñëóæèâàíèå
- Ïîäàéòå äàâëåíèå - ìàðêåð ïîäíÿò.
- Ïîâåðíèòå òðàêòîð ñ îáîèìè ïîäíÿòûìè ìàðêåðàìè
- Ñáðîñüòå äàâëåíèå - ìàðêåð íà âíåøíåé ñòîðîíå
ïîñåâíîé ïëîùàäè îïóùåí.
GB
•
Settings
Marker adjustment
e x (n+1)
V
D =
-
2
2
D Distance from the marker to the 1st coulter in cm
n
Number of seed drill rows
V Tractor front track in cm
e
Coulter spacing in cm
D: Measurement to be made from outer coulter unit
e.g. 21 row drill with 14.3 cm spacing, tractor front track =
160 cm
<
14.3 x 22
160
D = - = 77.3 cm
2
2
Adjustment
- loosen the screw with the crank
- extend the arm while adjusting the disc at the same
time.
Operation
- Apply pressure - the marker is raised.
- Turn the tractor around with both markers raised.
- Release pressure - the marker on the outside of the
sowing area is lowered.
• Réglages
Méthode d'ajustement
e x (n+1)
V
D =
-
2
2
D Distance du traceur à la 1ère botte en cm
n Nombre de rangs du semoir
V Voie avant du tracteur en cm
e Ecartement des bottes en cm
D : Cote à prendre à partir de l'élément semeur extérieur
Exemple : semoir 21 rangs écartement 14,3 cm, voie avant
du tracteur 160 cm
<
14,3 x 22
160
D =
- = 77,3 cm
2
2
Réglage
- A l'aide de la manivelle, desserer la vis.
- Allonger le bras en réglant en même temps l'inclinaison
du disque.
Fonctionnement
- Mettre la pression - le traceur se lève.
- Faire demi tour avec les deux traceurs levés.
- Retirer la pression - le traceur côté extérieur au semis se
baisse.
Réglages
Settings
F
Íàñòðîéêè
RUS
38
Réglages
Settings
Faire attention à bien régler
l'aplomb du semoir.
Bien effectuer l'entretien.
Soigner les réglages de la
herse de recouvrement.
Make sure that the vertical
setting is correctly
adjusted.
Carry out maintenance
thoroughly.
Take care with covering
harrow adjustments.
C
a)
b)
1
3
2
c)
1
2
1
Íàñòðîéêè
Óáåäèòåñü, ÷òî
âåðòèêàëüíàÿ íàñòðîéêà
âûïîëíåíà ïðàâèëüíî.
Òùàòåëüíî ïðîâîäèòå
òåõíè÷åñêîå
îáñëóæèâàíèå.
Ïðîâîäèòå ðåãóëèðîâêè
çàïàõèâàþùåé áîðîíû ñ
îñòîðîæíîñòüþ.

39
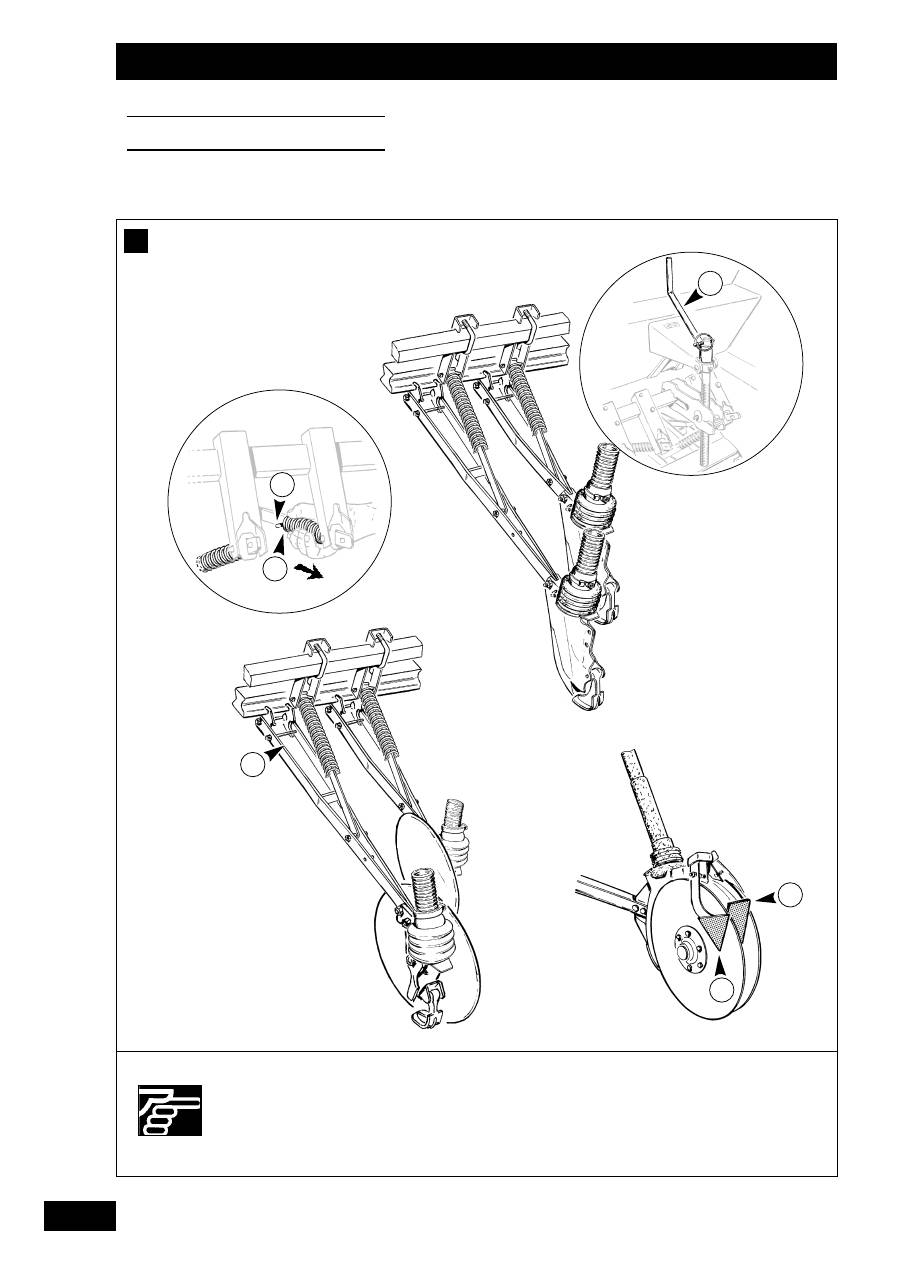
Êîíòðîëü ãëóáèíû
a) Ñîøíèê êèëåâèäíûé
* Îáùàÿ ðåãóëèðîâêà - ðû÷àã .
* Íåçàâèñèìàÿ ðåãóëèðîâêà óñòàíîâêè äëÿ óâåëè÷åíèÿ
äàâëåíèÿ îòäåëüíûõ ñîøíèêîâ, îñîáåííî çà êîëåñàìè
òðàêòîðà:
- ïðèëàãàéòå ìèíèìàëüíîå äàâëåíèå,
- îäíîé ðóêîé íàòÿíèòå ïðóæèíó ,
- äðóãîé ðóêîé ïîäâèíüòå øòèôò .
b) Þíèäèñê
* Þíèäèñê áûë ðàçðàáîòàí äëÿ ðàáîòû íà ïî÷âå,
ïðîøåäøåé ñòàíäàðòíóþ îáðàáîòêó, èëè íà ïî÷âå ïîñëå
ìèíèìàëüíîé îáðàáîòêè.
* Îáùàÿ ðåãóëèðîâêà ðû÷àãà (Ñìîòðè Ñîøíèê
êèëåâèäíûé).
* Íåçàâèñèìàÿ ðåãóëèðîâêà îòäåëüíûõ ñîøíèêîâ (Ñìîòðè
Ñîøíèê êèëåâèäíûé).
c) Äâóõäèñêîâûé ñîøíèê
* Ñåÿëêè ìîäåëè GC ìîãóò áûòü îáîðóäîâàíû
äâóõäèñêîâûìè ñîøíèêàìè, ïîñòàâëÿåìûìè ïî çàêàçó.
* Íàñòðîéêè ãëóáèíû âûïîëíÿþòñÿ òåì æå ñïîñîáîì, ÷òî è
äëÿ êèëåâèäíûõ ñîøíèêîâ.
* Ïðîôèëàêòè÷åñêèå ìåðû
- Äëÿ îáåñïå÷åíèÿ ïðàâèëüíîé ðàáîòû ñêðåáêè êîëåñ è
äîëæíû áûòü â õîðîøåì ñîñòîÿíèè.
- Ðåãóëÿðíî íàñòðàèâàéòå èõ, ÷òîáû äèñê î÷èùàëñÿ ïðè
ñâîáîäíîì âðàùåíèè.
- Çàìåíÿéòå äåòàëè, åñëè ýòî íåîáõîäèìî.
GB
Depth control
a) Suffolk coulter
• Simultaneous handle adjustment
.
• Independent unit adjustment to increase the pressure of
certain shares, particularly behind the tractor wheels:
- apply minimum pressure,
- pull the spring
with one hand,
- move the pin
with the other hand.
b) Unidisc
• The Unidisc has been designed for work on simply
prepared soil or in trashy conditions.
• Centralised handle adjustment
(cf. Suffolk coulter).
• Independent coulter unit adjustment (cf. Suffolk coulter).
c) Double discs
• The GC may be equipped with a double disc assembly as
an option.
• The depth settings are carried out in the same way as with
Suffolk coulters.
•
Precautions
- For correct operation, the wheel scrapers
and
are
to be in good condition.
- Adjust them regularly so that the disc is cleaned while
rotating freely.
- Change the parts if required.
Réglage du terrage
a) Soc trainant
• Réglage centralisé par une manivelle
.
• Réglage indépendant par élément pour augmenter la
pression de certains socs, notamment derrière les roues
du tracteur :
- mettre la pression minimum,
- tirer sur le ressort
avec votre main,
- déplacer la goupille
avec l'autre main.
b) Soc Unidisc
• L'Unidisc a été conçu pour travailler avec des sols
recouvert de résidus ou en préparation de sol simplifié.
• Réglage centralisé par les manivelles
(idem soc).
• Réglage indépendant par élément semeur (idem soc).
c) Double disques
• Le GC peut être équipé en option d'un ensemble double
disques.
• Les réglages de profondeur s'effectuent de la même façon
que les socs traînants.
•
Précautions
- Pour un bon fonctionnement, les décrottoirs
et
doivent être dans un état correct.
- Les régler régulièrement de manière à avoir un nettoya-
ge du disque sans freinage de sa rotation.
- Changer les pièces si nécessaire.
Réglages
Settings
F
C
C
C
Íàñòðîéêè
RUS
