Interlogix UltraView IP PTZ 36X Camera Quick Start: instruction
Class: Security Surveillance Systems
Type:
Manual for Interlogix UltraView IP PTZ 36X Camera Quick Start

UltraView IP PTZ 36X
Camera Quick Start
Guide
EN
UltraView IP PTZ 36X Camera Quick Start Guide
DE
UltraView IP PTZ 36X-Kamera - Kurzanleitung
ES
Guía de inicio rápido de la cámara UltraView IP PTZ 36X
FR
Guide de démarrage rapide de la caméra UltraView IP PTZ
36X
IT
Guida di avvio rapido telecamera UltraView IP PTZ 36X
NL
UltraView IP PTZ 36X‑camera Beknopte handleiding
PL
Skrócona instrukcja obsługi kamery UltraView IP PTZ 36X
PT
Guia Rápido da Câmara UltraView IP PTZ 36X
RU
Краткое руководство по началу работы с камерой
UltraView
IP PTZ 36X
TR
UltraView IP PTZ 36X Kamera Hızlı Başlangıç Kılavuzu
P/N 1071694D-Multilingual • ISS 07DEC12

Copyright
© 2012 UTC Fire & Security Americas
Corporation, Inc.
Interlogix is part of UTC Climate Controls &
Security, a unit of United Technologies
Corporation. All rights reserved.
Contact
www.interlogix.com
information
www.utcfssecurityproducts.eu
EN
Introduction
This pocket guide provides basic information on setting up and using
the UltraView IP PTZ 36X camera. Detailed information on the
cameras can be found in the user manual.
Before you begin
Unpack everything. Check the items for damage, and verify that all
items are included. The camera is shipped with the following items:
Dome camera
User manual
Quick Start Guide
Installation environment
When installing your camera, consider these factors:
• Place the camera in a secure location.
• Ensure that the camera is in a well-ventilated area.
• Do not expose the camera to rain or moisture.
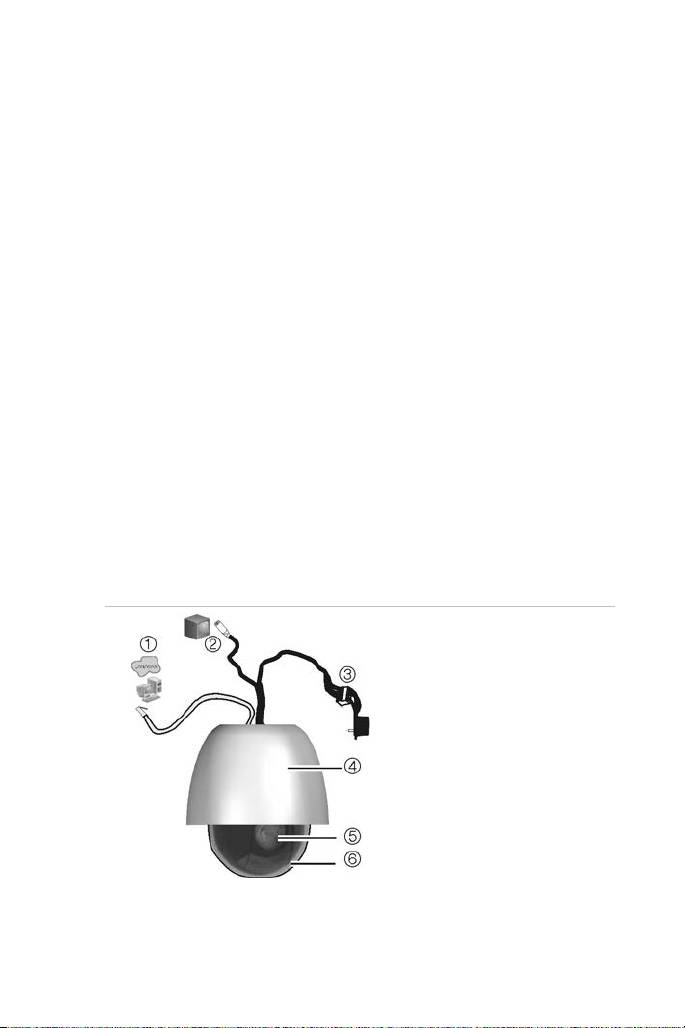
Camera description
Figure 1: Overview of the dome camera (pendant-mount shown)
1. Ethernet RJ45 connector.
Connect to the network
devices.
2. Video output.
Connect the BNC connector to
a CCTV monitor.
3. Power supply cord.
Connect +24 VAC power
supply.
4. Housing.
5. PTZ module.
6. Bubble.
UltraView IP PTZ 36X Camera 1 EN
Installing a camera
1. Prepare the mounting surface and install the camera bracket.
2. Unscrew the bubble from the camera and remove the protective
tape from the PTZ module.
3. Press the two tabs on either side of the PTZ module and remove it
from the camera housing. Ensure the module cables still exit from
the cable entry hole in the top of the housing.
Note: If alarm and audio input/output relays are to be used,
connect them to the PCB of the module and route their cables
through the cable entry hole on tom of the housing. See the user
manual for further information on the alarm connections.
4. Install the housing.
Pendant-mount camera:
Attach the camera housing to the bracket using the screws
enclosed with the bracket.
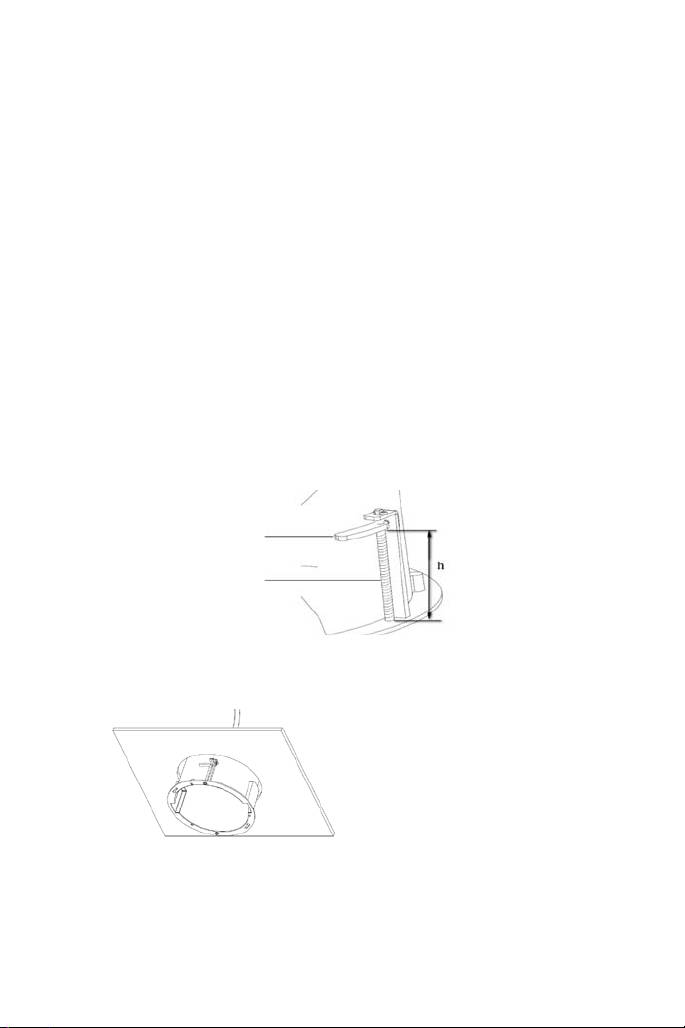
Flush-mount camera:
Adjust the height of the two housing tabs by turning the screw on
which they are attached. The distance (h) of the tabs from the
housing ring must be greater than the thickness of the ceiling.
Housing tab
Screw
EN 2 UltraView IP PTZ 36X Camera
Make sure the housing tab is closed and then PUSH the housing
into the pass-through hole. Hold the housing and fix it by screwing
the housing tabs down to the mounting surface
5. Insert the PTZ module into the housing:
Table of contents
- EN Introduction
- Installing a camera
- Accessing the camera over the internet
- Configuring the camera over the internet
- Specifications
- DE Einführung
- Kamerabeschreibung
- Zugriff auf die Kamera über das Internet
- Konfigurieren der Kamera über das Internet
- Technische Daten
- ES Introducción
- Descripción de la cámara
- Acceso a la cámara a través de internet
- Configuración de la cámara a través de internet
- Especificaciones
- FR Introduction
- Description de la caméra
- Accès à la caméra par l’Internet
- Configuration de la caméra sur Internet
- Spécifications
- IT Introduzione
- Descrizione Telecamera
- Accesso alla telecamera via Internet
- Configurazione della telecamera via Internet
- Specifiche tecniche
- NL Inleiding
- Camerabeschrijving
- De camera bedienen via het internet
- De camera configureren via internet
- Specificaties
- PL Wstęp
- Opis kamery
- Dostęp do kamery przez Internet
- Konfigurowanie kamery przez Internet
- Dane techniczne
- PT Introdução
- Descrição das câmaras
- Acesso à câmara pela internet
- Configurar a câmara pela Internet
- Especificações
- RU Введение
- Описание камеры
- Доступ к камере через Интернет
- Настройка камеры через Интернет
- Характеристики
- TR Giriş
- Kamera açıklaması
- Kameraya internet üzerinden erişme
- Kamerayı internet üzerinden yapılandırma
- Teknik özellikler
