Havener MJ3000: instruction
Class: Gardening equipment
Type:
Manual for Havener MJ3000
EN
User Manual and Spare Parts
C
atalogue
FR
Notice d’Utilisation
et
Catalogue de Pièces de
R
echange
DE
Gebrauchsanweisung und
Ersatzt
eillist
e
SV
Bruksanvisning och
reservdelsförteckning
RU
Руководство пользователя
и
каталог запасных час
т
ей
NL
Handleiding en catalogus van de
reserveonderdelen
PT
Manual de utilização e catálogo de peças de
substituição
ES
Manual de utilización y catálogo de piezas de
recambio
BG
Инструкции за експлоатация
и
каталог на резервните час
т
и
HR
Upute za uporabu
i
katalog zamjenskih
dijelova
HU
Használati utasítás és
pótalkatr
ész-k
atalógus
IT
Manuale
di
istruzioni e Catalogo
ricambi
LT
Naudotojo vadovas ir atsarginių dalių
katalogas
RO
I
nstruc
ţiuni
de utilizare şi catalog de piese de
schimb
SR
Uputstva za
upotrebu
i
katalog rezervnih
delova
SL
Navodila za uporabo
in
katalog nadomestnih
delov
TR
Kullanma Kılavuzu Ve Yedek Parça
K
atalogu
CS
Návod k použití a katalog náhradních
dílů
DA
Brugsvejledning
og reservedelskatalog
ET
K
asutusjuhend
ja Varuosade
K
ataloog
FI
K
ä
ytt
öohje
ja
varaosaluettelo
EL
Εγχειρίδιο Χρήστη και Κατάλογος
αν
τ
α
λλ
ακτικών
LV
Lietošanas pamācība un rezerves daļu
katalogs
NO
Bruksanvisning
og reservedelskatalog
PL
Instrukcja obsługi
i
katalog części
zapasowych
SK
Návod na použitie a katalóg náhradných
dielov
A
10
0
0
0
0
0
0
0
T
CLIPLIFT
-
User
M
anual
and
Spar
e
P
ar
ts
C
atalogue
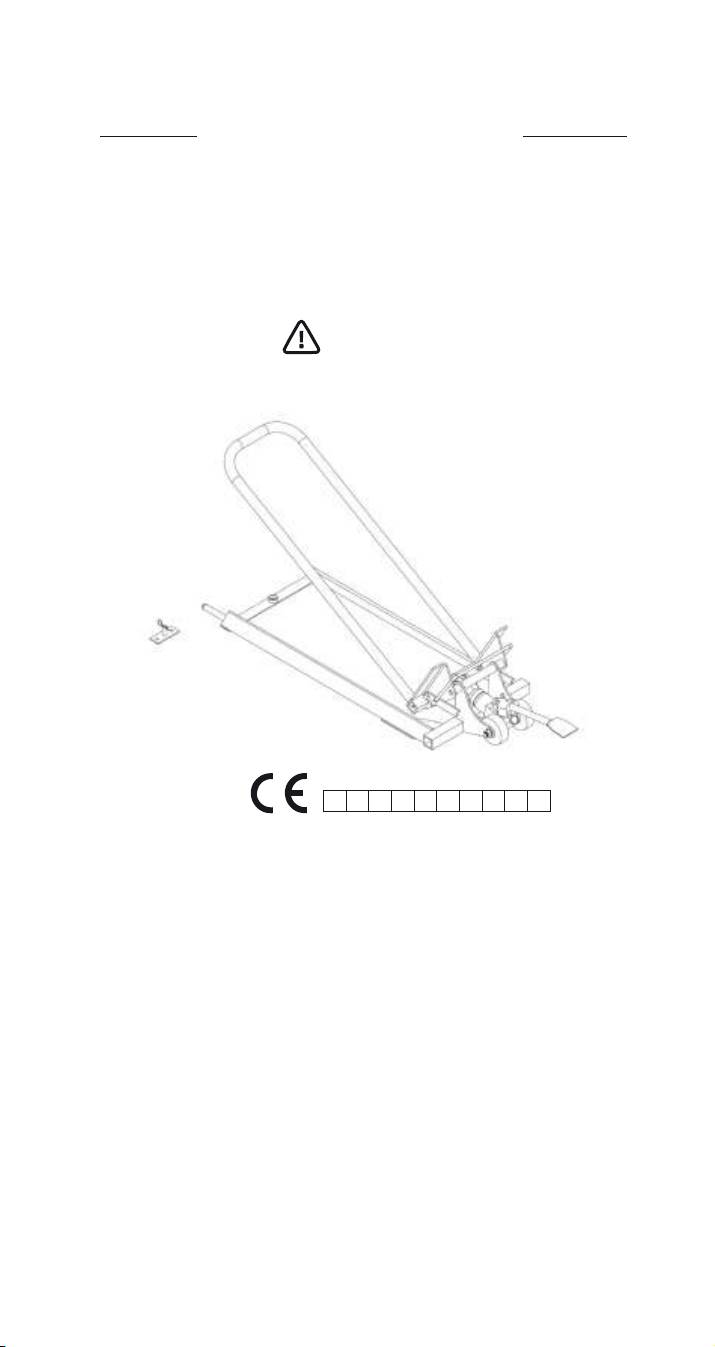
CLIPLIFT™
is
a
lifting system
designed
exclusively
to
simplify
the
cleaning
and
maint
enanc
e
of
tractor mowers
with
a
maximum weight of
300
kg -
660
Lb
.
Any
use
of
CLIPLIFT™
for
purposes
other
than
those
described
in
this
user
manual will b
e
entirely
the
user's
responsibility
and
the
distributor
will
not
accept liability under
an
y
circumstanc
es
.
CLIPLIFT™
may
be used
after
each
mowing to
clean
very quickly
the
housings
of
tr
ac
t
or
mowers
in
order to avoid rapid
rusting
due
to
the
acid
in
the
crushed
gr
ass
.
IMPORTANT
NEVER WORK DIRECTLY UNDERNEATH
A
TRACTOR
MO
WER
Serial
n°
CLIPLIFT
B
e
f
o
r
e
u
s
e
:
•
T
he
manoeuvre can
be
done by
a
single user
.
•
Ensure you secure
the
area by keeping children and animals
at a
safe
distance
.
• Always
lif
t
CLIPLIFT™
on a
stable
,
plane and horizontal surface
.
• Place
the
CLIPLIFT™
on the
side opposite
the
air filter
on
your tractor
mo
wer
.
s
e
t
-
u
p
•
Switch off
the
ignition in order
to
shut down
the
engine of your tractor mower completely and
r
emo
v
e
the
k
e
y
.
•
R
emo
v
e
the
grass box from your tractor
mo
wer
.
•
Position
the
CLIPLIFT™
behind
the
rear wheels of
the
tractor
mo
wer
.
•
Move
the
tractor mower into
the
lif
ting
cradle (10) by
hand
.
•
Put
the
tractor mower parking brake
on.
•
T
he
front wheels should
be
pointing towards
the
inside (hydraulic jack side) (1).
T
ilti
ng
:
• Press
the
pedal (2 and 3)
on the
hydraulic jack pump (1).
•
Move
the
mechanism with your
f
oot
some 10
to
15 times in order
to
tilt
the
tractor mower
to mid-
height.
• Place
the
safety strap (14) around
the
rear wheel and
the
lif
ting
cradle (10).
•
R
epeat
the
lif
ting
operation until
the
safety device activates (5).
• Place
the
safety support (11)
between
the
lif
ting
cradle (10) and
the
base frame (9).
• Carry
out any cleaning and maintenance
tasks
.
-
2 -
EN
CLIPLIFT
-
User
M
anual
and
Spar
e
P
ar
ts
C
atalogue
L
o
w
e
r
I
ng
:
•
Check that there are
no
tools near
the
tractor
mo
wer
.
• Press
the
pedal 2
to
3 times (2 and 3).
•
R
emo
v
e
the
safety support (11).
•
With one
hand
,
turn
the
safety knob upwards
(6)
and
,
simultaneously
,
with
the
other hand
,
disengage
the
knurled hydraulic jack wheel
to
return
the
tractor mower
to the
g
r
ound
.
• Unlock
the
safety strap (14) and release
the
tractor mower from
the
CLIPLIFT™.
S
t
o
r
a
g
e
:
•
Store
the
CLIPLIFT™
tools (pedal and support) in
the
housings provided for this
purpose
.
•
Take
the
CLIPLIFT™
by
the
handle and move it
to
its storage
location.
• Hook
the
CLIPLIFT™
on to
its support
(12),
without
f
or
getting
to
engage
the
safety pin (13).
• CLIPLIFT™
should preferably
be
stored under cover
to
prolong its working
lif
e
.
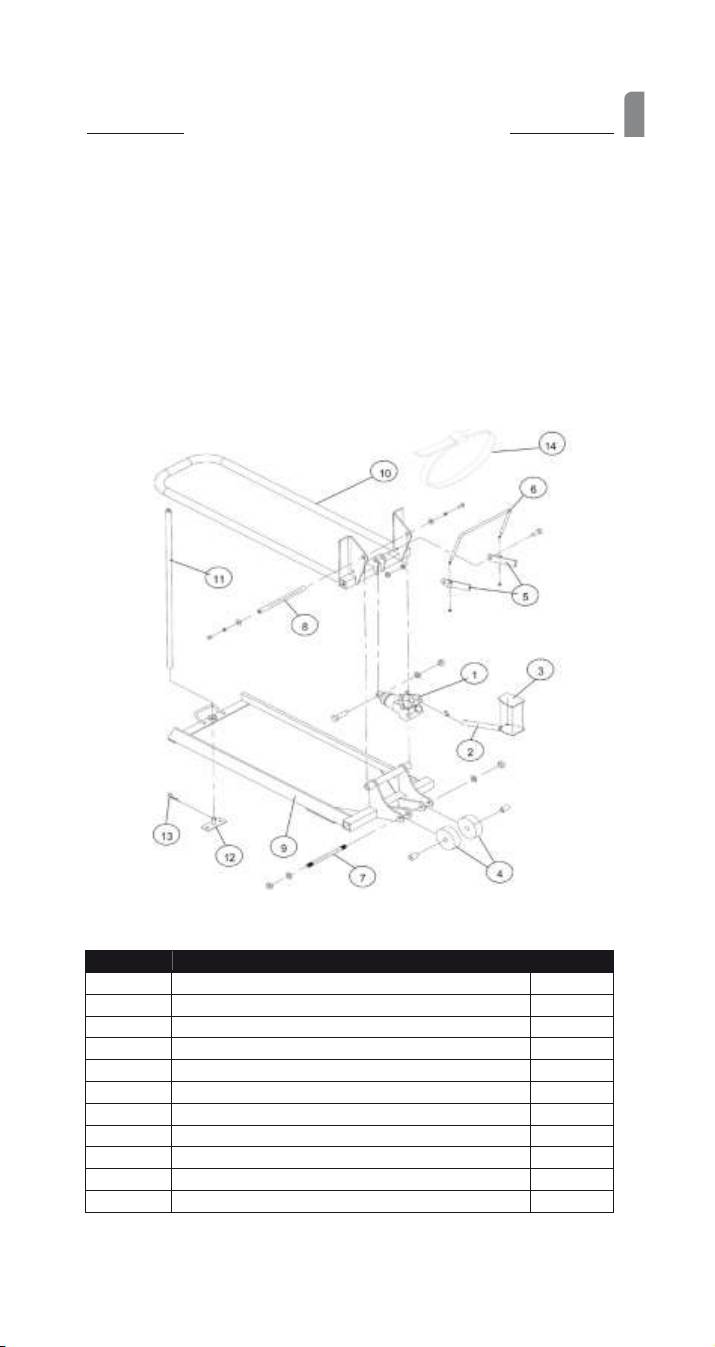
Ref
.
n
r
D
e
s
c
r
ipti
o
n
r
e
f
e
r
e
n
c
e
1
Hydraulic jack
1015001
2 and
3
Jack
pedal
5012001
4
Handling rollers with spacers
5015001
5 and
6
Active safety
k
it
5012002
7
Jack
shaft with nuts and washers
4116001
8
R
otating
shaft with
screws and washers
4116002
9
Base
frame
5013001
10
Lifting cradle
5013002
11
Safety
suppor
t
4012001
12 and
13
Hook and
pin
4122001
14
Safety
strap
5014001
- 3
-
A
10
0
0
0
0
0
0
0
T
CLIPLIFT
-
Notice
d
’U
tilisation
et
C
atalogue
de
P
ièces
de
R
echange
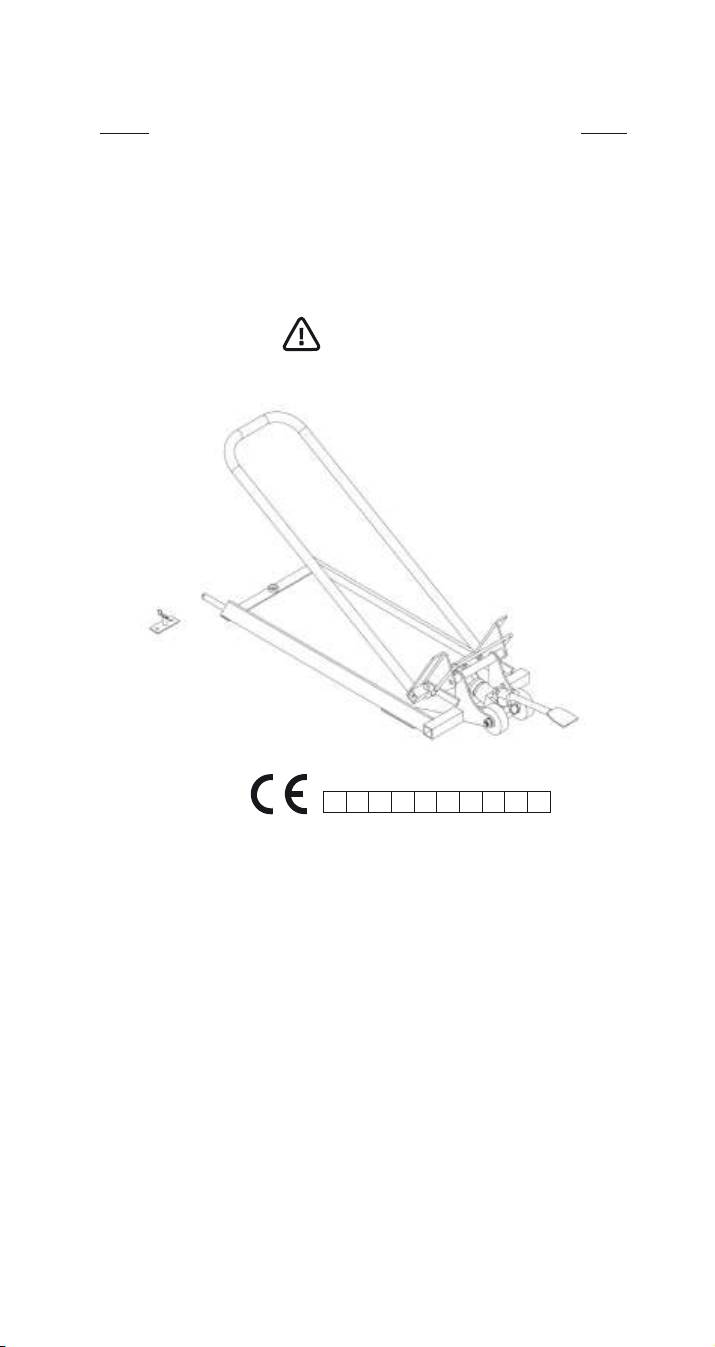
CLIPLIFT™
est
un
équipement
de
levage
destiné
exclusivement
à
faciliter
le
nettoyage et
l’entretien
des
t
ondeuses
autoportées
d’un
poids
maximal
de
300
K
gs
.
Tout
usage
du
CLIPLIFT™
à
d’autres fins
en
dehors
des
opérations décrites
dans
ce
man
uel
d’utilisation,
engage
la
responsabilité
de
l’utilisateur
et
ne
pourra
absolument
pas
mettre en
cause
le
distribut
eur
.
Le
CLIPLIFT™
permet
de
nettoyer très rapidement, après
chaque
t
ont
e
,
les
c
ar
t
ers
de
c
oup
e
des
t
ondeuses
autoportées afin d’éviter une
oxydation rapide
par
l’acidité
de
l’herbe
bro
y
ée
.
IMPORTANT
NE JAMAIS INTERVENIR DIRECTEMENT SOUS
L
A
TONDEUSE
AUT
OPORTEE
N°
de série
CLIPLIFT
Avant utilisation :
• La
manœuvre
ne
nécessite qu’un seul
utilisat
eur
.
• V
eiller
à
sécuriser le périmètre d’utilisation
en
tenant les enfants
et
les animaux
à
l
’
écar
t.
•
T
oujours
effectuer les opérations
de
levage
du
CLIPLIFT™
sur
un
sol
stable
,
plan
et
hor
iz
ontal
.
• Placer le
CLIPLIFT™
du
côté opposé au
filtre
à
air
de
votre tondeuse autopor
t
ée
.
Mise en
place :
•
Couper le contact pour
un
arrêt total
du
moteur
de
votre tondeuse autoportée
et
retirer la
clé
.
•
R
etirer
le bac
de
ramassage
de
la tondeuse
autopor
t
ée
.
•
Positionner le
CLIPLIFT™
derrière les roues arrière
de
la tondeuse
autopor
t
ée
.
•
Faire
rouler manuellement la tondeuse autoportée dans le berceau
de
levage (repère 10).
•
Enclencher le frein parking
de
la tondeuse
autopor
t
ée
.
•
Braquer
de
préférence les roues avant vers
l
’
intérieur
(
côt
é
vérin hydraulique ) (repère 1).
B
a
s
c
u
l
e
m
e
n
t
:
•
Enclencher la pédale (repères 2
et
3) sur la pompe
du
vérin hydraulique (repère 1).
•
A
c
tionner
le mécanisme avec le pied 10
à
15 fois afin
de
basculer la tondeuse autoportée jusqu
’
à
mi-
hauteur
.
•
Placer la sangle
de
sécurité (repère 14) autour
de
la roue arrière
et du
berceau
de
levage (repère 10).
•
R
eprendr
e
l
’
opération
d
’
élévation
jusqu
’
à
enclenchement
du
dispositif
de
sécur
it
é
.
(repère 5).
•
Placer la béquille
de
sécurité (repère 11) entre le berceau
de
levage (repère 10)
et
le cadre
de base
(repère 9).
•
E
ff
ectuer
les travaux
de
nettoyage
et
d
’
entretien
- 4
-

FR
CLIPLIFT
-
Notice
d
’U
tilisation
et
C
atalogue
de
P
ièces
de
R
echange
D
e
s
c
e
n
t
e
:
• V
ér
ifier
qu
’
aucun
outil
n
’
est
dans le périmètre
de
la tondeuse
autopor
t
ée
.
•
A
c
tionner
2
à
3 fois la pédale (repères 2
et
3).
•
R
etirer
la béquille
de
sécurité (repère 11).
•
D’une main, faire basculer vers le haut la poignée
de
sécurité (repère 6),
et, simultanément,
de
l
’
autr
e
main, débrayer la molette
du
vérin hydraulique pour ramener la tondeuse autoportée au
sol
.
•
Déverrouiller la sangle
de
sécurité (repère 14),
et
libérer la tondeuse autoportée
du
CLIPLIFT™.
R
a
ng
e
m
e
n
t
:
•
R
anger
les outils
du
CLIPLIFT™
(pédale
et
béquille) dans les logements prévus
à
cet
eff
et.
• Saisir le CLIPLIFT™par la
poig
née
,
et
le faire rouler
jusqu
’
à
son lieu
de rangement.
•
A
ccr
ocher
le
CLIPLIFT™
à
son support (repère 12) sans oublier
de
d
’
enclencher
la goupille
de
sécur
it
é
(repère 13).
• CLIPLIFT™
doit être
de
préférence stocké
à
l
’
abr
i
afin
de
prolonger sa durée
de vie
R
e
p
è
r
es
D
é
s
i
g
n
a
t
i
o
ns
R
é
f
é
r
e
n
c
es
1
V
ér
in
h
y
draulique
1015001
2
et 3
Pédale de
v
ér
in
5012001
4
R
oulett
es
de manutention
avec
entr
et
oises
5015001
5
et 6
Kit de sécurité
ac
tiv
e
5012002
7
Axe
de
vérins avec écrous
et
r
ondelles
4116001
8
Axe
de
rotation avec vis
et
r
ondelles
4116002
9
Cadre de base
5013001
10
Berceau de levage
5013002
11
Béquille
de
sécur
it
é
4012001
12
et 13
Support
d
’
accr
ochage
4122001
14
Sangle de
S
écur
it
é
5014001
- 5
-
