Fein RS 12-70E: instruction

Fein
RS 12-70E

Class: Tools, power tools and power equipment

Type: Grinding machine

Manual for Fein RS 12-70E
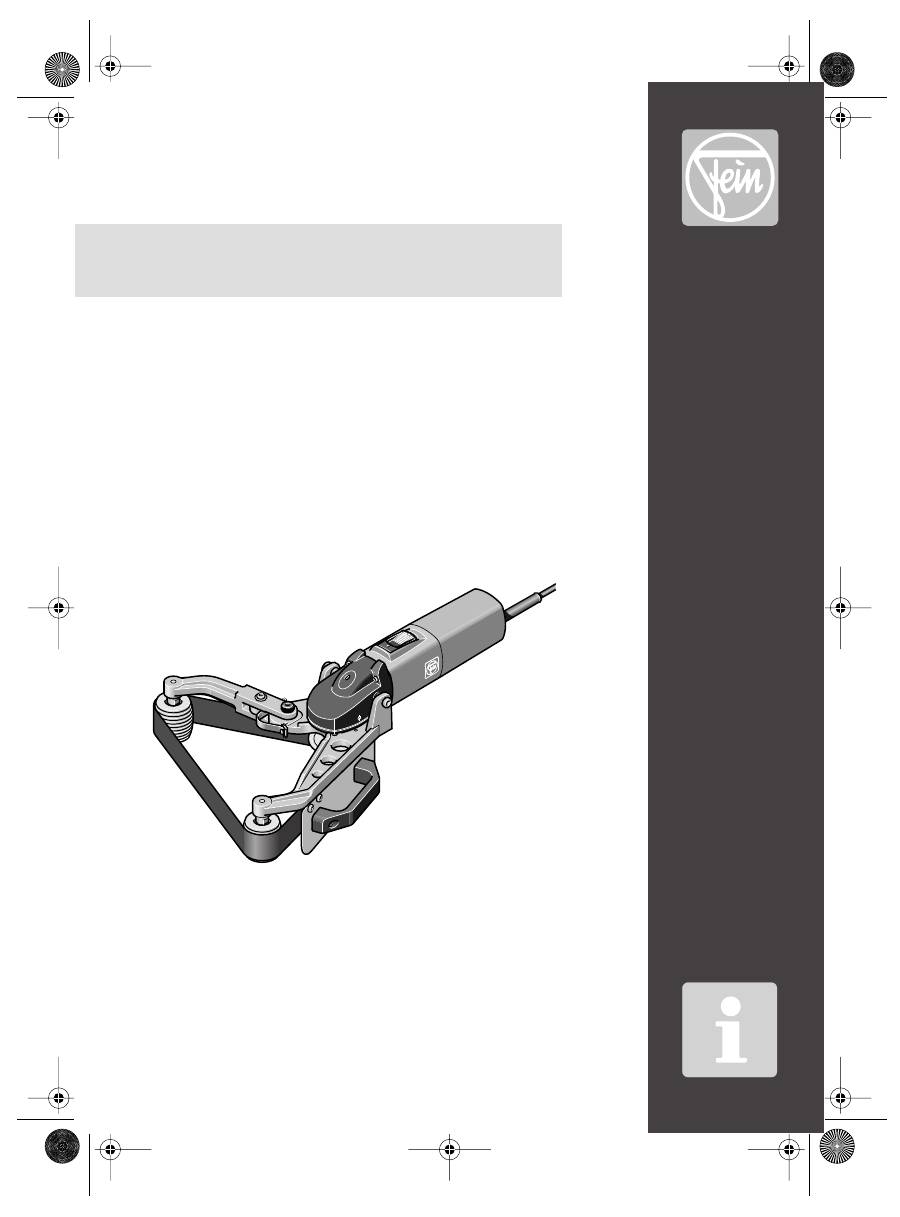
background image

RS 12-70 E

7 221 13

3 41 01 043 06 7

Printed in Germany 02.04 Z

3 41 01 043 06 7 - Titel  Seite 1  Dienstag, 11. September 2007  10:50 10

background image

2

Deutsch English Français Italiano Nederlands Español Português EÏÏËÓÈο Dansk Norsk Svenska Suomi Magyar âesky Slovensky Polski

На русском

языке

5

9

13

17

21

25

29

33

37

41

45

49

53

57

61

65

74

77

69

3 41 01 043 06 7 - Buch  Seite 2  Mittwoch, 4. Februar 2004  11:07 11

background image

3

1

2

3

4

a

b

3 41 01 043 06 7 - Buch  Seite 3  Mittwoch, 4. Februar 2004  11:07 11

background image

d

3 41 01 043 06 7 - Buch  Seite 4  Mittwoch, 4. Februar 2004  11:07 11

background image

RS 12-70 E

5

DE

Bedienungsanleitung Rohrschleifer.
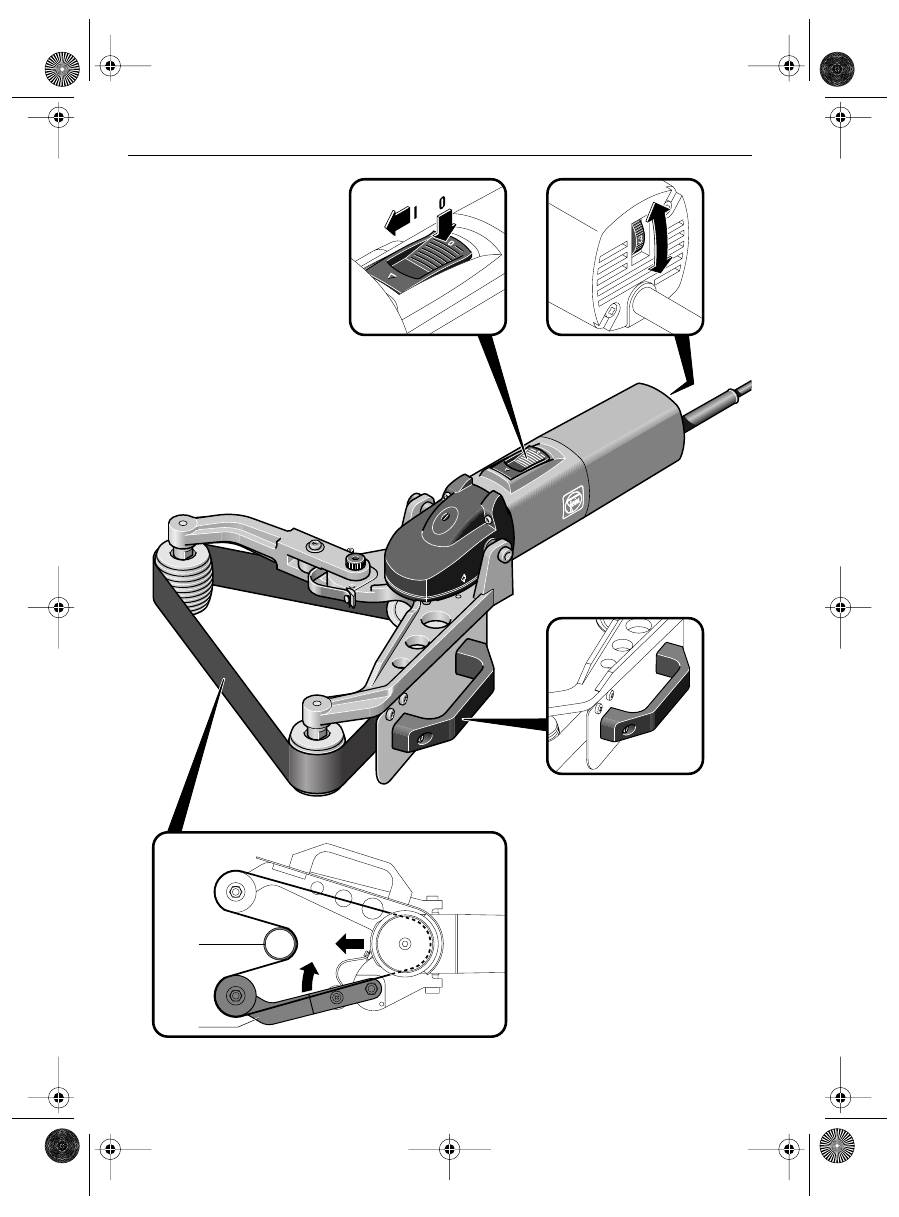
Auf einen Blick.

1 Stellrad Drehzahlvorwahl

Drehzahlvorwahl mit elektronischem 

Drehzahlsteller.

2 Schalter

Ein- und Ausschalten.

3 Zusatz-Handgriff

Immer mit Zusatz-Handgriff arbeiten.

4 Schleifband

Schleifband auf 3 Rollen gelagert.

Das in dieser Bedienungsanleitung 

beschriebene oder abgebildete Zubehör 

muss nicht zum Lieferumfang Ihres Gerätes 

gehören.

Zu Ihrer Sicherheit.

Vor Gebrauch dieses Gerätes lesen 

und danach handeln:

diese Bedienungsanleitung,

die beiliegenden Sicherheitshinweise 

(Schriftennummer 3 41 30 054 06 1),

die einschlägigen nationalen Arbeits-

schutzbestimmungen.

Diese Bedienungsanleitung und die beilie-

genden Sicherheitshinweise sind zum spä-

teren Gebrauch aufzubewahren und bei 

einer Weitergabe oder Veräußerung dem 

Gerät beizulegen.

Bestimmungsgemäße Verwendung.

Dieses Gerät ist bestimmt:

für den gewerblichen Einsatz in Industrie 

und Handwerk,

zum Schleifen und Polieren von Edelstahl-

rohren sowie NE-Metallen im Tro-

ckenschliff,

zum Entfernen von Lack, Rost und Oxid-

schichten,

zum Einsatz mit Schleifwerkzeug und 

Zubehör, die in dieser Bedienungsanlei-

tung angegeben sind oder die von FEIN 

empfohlen werden.

Bei Bearbeitung von Metall kann sich ein 

leitfähiger Staub im Inneren des Gerätes 

absetzen. In diesen Fällen öfter den 

Motorraum von außen mit trockener 

Druckluft ausblasen und Gerät über einen 

FI-Schutzschalter (Auslösestrom 30 mA) 

betreiben.

Sicherheitshinweise.

Verletzungsgefahr

Immer mit Zusatz-Handgriff arbeiten.

Für sicheren Stand sorgen, zu bearbeiten-

des Material fest einspannen.

Gerät nur eingeschaltet an das Werkstück 

ansetzen.

Nach Abschluss der Arbeiten das Gerät 

zuerst vom Werkstück abheben und dann 

ausschalten.

Vorsicht! Nicht das laufende Schleifband 

berühren.

Nur mit einem unbeschädigten Schleif-

band arbeiten. Verschlissene oder einge-

rissene Schleifbänder nicht verwenden.

Personen oder brennbare Gegenstände 

vor Funkenflug schützen.

Keine Materialien bearbeiten, bei welchen 

gesundheitsgefährdende Stoffe freigesetzt 

werden (z. B. Asbest).

!

3 41 01 043 06 7 - Buch  Seite 5  Mittwoch, 4. Februar 2004  11:07 11

background image

6

RS 12-70 E

DE

Keine Schilder und Zeichen auf das Gerät 

nieten oder schrauben. Die Schutzisolie-

rung kann dadurch unwirksam werden. 

Empfohlen werden Klebeschilder.

Nur unbeschädigte Stecker und Kabel 

verwenden.

Sachbeschädigung

Netzspannung und Spannungsangabe am 

Gerät müssen übereinstimmen.

Persönliche Schutzausrüstung.

Bei Bearbeitung von bleihaltigem Anstrich, 

einigen Holzarten oder Metall entstehen 

schädliche/giftige Stäube. Die Berührung 

oder Einatmung dieser Stäube kann eine 

Gefährdung für die Bedienperson oder für 

die sich in der Nähe befindlichen Perso-

nen darstellen.

Dauerhafte Einwirkung von intensivem 

Schall kann zu Gehörverlust führen.

Verwenden Sie persönliche Schutzausrüs-

tung. Zum Schutz gegen Staub benutzen 

Sie eine Staubmaske oder einen Respira-

tor, die fähig sein müssen die bei der 

Arbeit entstehenden Partikel zu filtern. 

Abhängig von der Anwendung benutzen 

Sie Gesichtsschutz oder Schutzbrille, 

Handschuhe, Haarnetz (bei langen Haa-

ren). 

Der Gebrauch eines Gehörschutzes wird 

beim Betrieb von Bandschleifern empfoh-

len.

Bedienen.

Ein- und Ausschalten (2).

Zuerst Kabel und Stecker auf Beschädi-

gungen prüfen.

Einschalten:

Schalter (2) nach vorne schieben (I).

Ausschalten:

Schalter (2) hinten drücken (0).

Beim Einschalten läuft der Motor nach 

kurzer Verzögerung sanft an.

Wenn bei eingeschaltetem Gerät die 

Stromzufuhr unterbrochen oder das 

Gerät in eingeschaltetem Zustand einge-

steckt wird, verhindert eine Schutzschal-

tung das selbsttätige Anlaufen. Zur 

Inbetriebnahme das Gerät kurz ausschal-

ten und wieder einschalten.

Einstellung Drehzahl (1).

Am Drehzahlsteller (1) kann die optimale 

Schleifbandgeschwindigkeit je nach 

Werkstück und verwendetem Zubehör 

eingestellt werden.

Arbeitshinweise (5).

Das Gerät mit dem Schleifband recht-

winklig an das zu schleifende Rohr (a) her-

anführen, bis das Rohr gut zur Hälfte vom 

Schleifband umschlungen ist.

Das Rohr gleichmäßig bei stetiger Längs-

bewegung schleifen.

Das Gerät immer rechtwinklig zum Rohr 

halten, auch in Rohrbögen.

Das Gerät stets mit beiden Händen halten.

Schleifwerkzeug befestigen  oder wechseln (5).

Verletzungsgefahr

durch unbeabsichtigtes Einschalten. 

Vor dem Wechseln Stecker ziehen.

Das Schleifband auf die Antriebsrolle und 

die Umlenkrolle am feststehenden Ausle-

gearm legen. Den schwenkbaren Auslege-

arm (b) nach innen drücken und das 

Schleifband auf dessen Umlenkrolle legen.

Mit einem neuen Schleifband einen Pro-

belauf von ca. 20 Sekunden durchführen. 

Den schwenkbaren Auslegearm (b) kräftig 

nach außen drücken, um das Schleifband 

zu spannen und einsatzfähig zu machen.

!

!

3 41 01 043 06 7 - Buch  Seite 6  Mittwoch, 4. Februar 2004  11:07 11

background image

RS 12-70 E

7

DE

Reinigen und Pflegen.

Verletzungsgefahr

durch unbeabsichtigtes Einschalten.

Vor Pflegearbeiten Stecker ziehen.

Einmal pro Woche, bei häufigem 

Gebrauch öfter durchführen:

Gelenk und Federgleitfläche am 

schwenkbaren Auslegearm reinigen 

und schmieren.

Kühlluftöffnungen reinigen.

Motorraum von außen mit trockener 

Druckluft ausblasen.

Warten und Reparieren.

Verletzungsgefahr

Warten, prüfen und reparieren dürfen nur 

Elektrofachkräfte nach den im jeweiligen 

Land gültigen Vorschriften.

Zum Warten und Reparieren.

Wir empfehlen unsere Kundendienstab-

teilung (Zentralreparatur), FEIN-Vertrags-

werkstätten und -Vertretungen. Adressen 

am Ende dieser Bedienungsanleitung und 

in den beiliegenden Sicherheitshinweisen.

Diese Bedienungsanleitung der Reparatur-

werkstatt mitgeben. Ersatzteilübersicht 

am Ende dieser Bedienungsanleitung.

Nur Original-FEIN-Ersatzteile verwen-

den.

Ersatzteile.

Ersatzteilübersicht am Ende dieser 

Bedienungsanleitung. Teile-Nr. (1), 

Bestellnummer (2) sowie Anzahl der 

Ersatzteile (3) erleichtern das Bestellen.

Zubehör.

Bildliche Darstellung und Bestellnummern 

am Ende dieser Anleitung.

Erläuterungen zum Zubehör:

A Schleifband, Packung mit 10 Stück.

B Vliesband, Packung mit 5 Stück.

C Vorpoliercreme, 200 ml.

D Abglänzcreme, 200 ml.

E Polierband, Packung mit 3 Stück.

F Umlenkrollen, Ø 35 mm für Arbeiten 

an schwer zugänglichen Stellen.

G Basis-Set, bestehend je 10 Stück 

Schleifbänder 20 x 815 mm, Kör-

nung 120, 20 x 815 mm, Körnung 

180, 40 x 815 mm, Körnung 120, 

40 x 815 mm, Körnung 180 sowie 

5 Vliesbänder 20 x 815 mm, Körnung 

280.

H Polier-Set, bestehend aus je 10 Stück 

Schleifbänder 20 x 815 mm, Kör-

nung 320 und 20 x 815 mm, Kör-

nung 400 sowie je 1 Tube 

Vorpoliercreme und Abglänzcreme 

und 3 Polierbänder 20 x 815 mm.

I

Werkzeugkoffer, Metall

(690 x 240 x 160 mm).

Beim Einsatz anderer als hier aufgeführter 

Einsatzwerkzeuge hat der Verwender zu 

prüfen, ob zusätzliche Schutzmaßnahmen 

zu ergreifen sind.

!

!

3 41 01 043 06 7 - Buch  Seite 7  Mittwoch, 4. Februar 2004  11:07 11

background image

8

RS 12-70 E

DE

Garantie.

Jedes FEIN-Elektrowerkzeug wird sorgfäl-

tig geprüft und unterliegt den strengen 

Maßstäben der FEIN-Qualitätssicherung.

Über die gesetzlichen Gewährleistungs-

pflichten hinaus leisten wir Garantie ent-

sprechend der FEIN Hersteller-

Garantieerklärung. Details darüber erfah-

ren Sie bei Ihrem Fachhändler, der FEIN-

Vertretung im Land oder beim FEIN-Kun-

dendienst.

Schäden, die durch unsachgemäße 

Behandlung, Überlastung oder gebrauchs-

bedingten Verschleiß entstanden sind, 

sind generell ausgeschlossen.

Umweltschutz.

Verpackungen, ausgediente Geräte und 

Zubehör einer umweltgerechten Wieder-

verwertung zuführen.

Weitere Informationen erhalten Sie bei 

Ihrem Fachhändler.

Technische Daten.

Der A-bewertete Geräuschpegel des 

Gerätes beträgt typischerweise: Schall-

druckpegel 87 dB (A); Schallleistungs-

pegel 100 dB (A). 

Gehörschutz tragen!

Die bewertete Beschleunigung beträgt 

typischerweise 4,0 m/s

2

.

Messwerte ermittelt nach EN 50 144.

CE-Konformität.

Wir erklären in alleiniger Verantwortung, 

dass dieses Produkt mit den folgenden 

Normen oder normativen Dokumenten 

übereinstimmt: EN 50 144, EN 55 014, 

EN 61 000-3-2/-3-3 gemäß den Bestim-

mungen der Richtlinien 98/37/EG und 

89/336/EWG.

C. & E. FEIN GmbH, 

Postfach 10 14 44 • 70013 Stuttgart

Bei Veränderung des Gerätes verliert 

diese Erklärung ihre Gültigkeit und die 

Garantie erlischt.

Bestellnummer

7 221 13

Bauart

RS 12-70 E

Leerlaufdrehzahl

2 700

7 000/min

Nennaufnahme

1 200 W

Leistungsabgabe

750 W

Stromart

1 ~

Gewicht

3,8 kg

Schutzklasse

II 

geeignet für 

Rohrdurchmesser

8

80 mm

Abmessungen 

Schleifbänder

20 x 815 mm

40 x 815 mm

Bender

Moini

3 41 01 043 06 7 - Buch  Seite 8  Mittwoch, 4. Februar 2004  11:07 11

background image

RS 12-70 E

9

EN

Operating instructions for pipe sander.

Overview.

1 Adjusting knob for speed selection

Gear setting using the electronic speed 

controller.

2 Switch

For switching ON/OFF.

3 Auxiliary handle

Always work using the additional 

handle.

4 Sanding belt

The sanding belt has three bearings.

The accessories described or illustrated in 

these operating instructions are not neces-

sarily included in the delivery of your power 

tool.

For your safety.

Before using this power tool, 

read and comply with:

these operating instructions,

the enclosed safety instructions 

(document number 3 41 30 054 06 1),

the relevant national industrial safety 

regulations.

These operating instructions and the 

enclosed safety information should be 

kept carefully for later use and enclosed 

with the power tool, should it be passed 

on or sold.

Intended use.

This power tool is intended for:

commercial use in industry and trade,

for sanding and polishing special steel 

pipes and nonferrous metals, using 

dry-sanding,

to removing paint, rust and oxide film,

for applications using the sanding tool 

and accessories given in these operating 

instructions, or those recommended 

by FEIN.

When treating metal, conductive dust can 

accumulate inside the machine. In such 

cases, blow out the motor space fre-

quently from outside using dry com-

pressed air and operate the power tool via 

a fault-current circuit breaker (actuating 

current 30 mA).

Safety instructions.

Risk of injury

Always work using the additional handle.

Provide for a secure stance; clamp the 

material to be worked firmly.

Only set the power tool onto the work-

piece when it is switched on.

After completing the work, first raise the 

power tool from the work piece and then 

switch it off.

Caution! Do not touch the sanding belt 

while it is running.

Only work with a sanding belt that is com-

pletely intact. Do not use any sanding belts 

that are worn-out or torn.

Protect persons and combustible objects 

from flying sparks.

Do not treat any materials that produce 

any particles that are detrimental to health 

(e. g. asbestos).

!

3 41 01 043 06 7 - Buch  Seite 9  Mittwoch, 4. Februar 2004  11:07 11

background image

10

RS 12-70 E

EN

Do not rivet or screw any name-plates or 

signs onto the power tool. The protective 

insulation can thereby be rendered inef-

fective. Adhesive labels are recom-

mended.

Only use an undamaged plug and cable.

Damage to property/material

Mains voltage must correspond with the 

voltage specifications on the power tool.

Personal protective equipment.

When treating coatings that contain lead, 

or some types of wood or metal, injuri-

ous/poisonous dust is produced. Touch-

ing or breathing in this dust could prove 

dangerous for the operator or anyone 

who happens to be in the vicinity.

Permanent exposure to intensive sound 

can lead to deafness.

Use your personal protective equipment. 

For protection against dust, use a dust 

mask or a respirator that must be capable 

of filtering the particles produced during 

operation. Irrespective of the application, 

wear a protective face mask or glasses, 

protective gloves and a hairnet (for long 

hair).

Ear protection is recommended when 

operating belt sanding machines.

Handling.

Switching ON/OFF (2).

First check that the cable and plug are 

not damaged.

Switching the power tool ON:

Slide switch (2) forwards (I).

Switching the power tool OFF:

Press the switch (2) down at the 

back (0).

When switching on, the motor starts run-

ning gently after a short delay.

If the power supply is interrupted while 

the power tool is switched on, or the 

power tool is plugged in when it is in 

switched-on mode, a residual current 

protective device prevents it from starting 

to run automatically. To put the power 

tool into operation, briefly switch it off 

and on again.

Setting the speed (1).

Using the speed controller (1), the opti-

mum speed for the sanding belt can be set 

according to the work piece and the 

accessories used.

Operating instructions (5).

The power tool with the sanding belt 

should be brought towards the pipe (a) to 

be sanded at a right-angle, until at least half 

of the pipe is surrounded by the sanding 

belt.

Sand the pipe evenly, constantly using a 

lengthways movement.

Always hold the power tool at right-

angles to the pipe, even where the pipe is 

curved.

Always hold the power tool in both 

hands.

Securing or changing the  sanding belt (5).

Risk of injury

by switching the tool ON unintentionally.

Before changing the belt, pull out the mains 

plug.

Position the sanding belt on the driving 

roller and the idler on the fixed extension 

arm. Press the swiveling extension 

arm (b) inwards and position the sanding 

belt on its idler.

!

!

3 41 01 043 06 7 - Buch  Seite 10  Mittwoch, 4. Februar 2004  11:07 11

background image

RS 12-70 E

11

EN

Carry out a test run for approx. 20 sec-

onds when using a new sanding belt. Push 

the swiveling extension arm (b) firmly 

outwards to tension the sanding belt 

ready for use.

Cleaning and care.

Risk of injury

by switching the tool ON unintentionally.

Before cleaning, pull out the mains plug.

Carry out the following once a week, or 

more often if the power tool is used more 

frequently:

Clean and lubricate the joint and the 

surface of the tension spring on the 

swiveling extension arm.

Clean the venting openings.

Blow out the motor space from outside 

with dry compressed air.

Maintenance and repairs.

Risk of injury

Service, testing and repairs may only be car-

ried out by electrical engineers in conformity 

with the regulations valid in the respective 

country.

Maintenance and repairs.

We recommend our customer service 

department (repair centre), FEIN author-

ised service centres and agencies. 

Addresses can be found at the end of 

these operating instructions and in the 

enclosed safety instructions.

Please hand these operating instructions 

to the repair centre. An overview of spare 

parts can be found at the end of these 

operating instructions.

Only use original FEIN spare parts.

Spare parts.

The overview of spare parts is at the end 

of these operating instructions. Quoting 

the parts no. (1), reference no. (2) as well 

as the number of spare parts (3) facilitates 

the ordering procedure.

Accessories.

Illustrations and reference numbers can be 

found at the end of these instructions.

Description of the accessories:

A Sanding belt, pack of 10.

B Fleece belt, pack of 5.

C Pre-polishing cream, 200 ml.

D Final polishing cream, 200 ml.

E Polishing belt, pack of 3.

F Idlers of Ø 35 mm, for working in 

places difficult to access.

G Basic set, each consisting of 10 sanding 

belts 20 x 815 mm, grain 120, 

20 x 815 mm, grain 180, 

40 x 815 mm, grain 120, 

40 x 815 mm, grain 180 and 5 fleece 

belts 20 x 815 mm, grain 280.

H Polishing set, each consisting of 

10 sanding belts 20 x 815 mm, 

grain 320 and 20 x 815 mm, 

grain 400, and each with 1 tube of 

pre-polishing cream and final polishing 

cream and 3 polishing belts 

20 x 815 mm.

I

Metal carry case

(690 x 240 x 160 mm).

When using application tools other than 

those listed here, the user must check 

whether additional protective measures 

have to be taken.

!

!

3 41 01 043 06 7 - Buch  Seite 11  Mittwoch, 4. Februar 2004  11:07 11

background image

12

RS 12-70 E

EN

Guarantee.

All the FEIN electric power tools are 

tested carefully and are subject to the 

stringent requirements of the quality con-

trol at FEIN.

In addition to the legal warranty we also 

provide the FEIN manufacturer’s guaran-

tee. For further details on this, please con-

tact your specialist dealer, your national 

FEIN representative, or the FEIN cus-

tomer service centre.

Damage due to improper handling, over-

loading or normal wear are generally not 

covered by the guarantee.

Environmental protection.

Packaging, worn out power tools and 

accessories should be recycled.

Further information is available from your 

dealer.

Specifications.

The A-weighted sound level of the power 

tool in the typical case is: sound pressure 

level 87 dB (A); sound power level 

100 dB (A).

Wear ear protection!

The weighted acceleration is 4.0 m/s

2

 in 

the typical case.

Measured values are determined accord-

ing to EN 50 144.

CE conformity.

We declare ourselves solely responsible 

for this product conforming with the 

following standards or standardised docu-

ments: EN 50 144, EN 55 014, 

EN 61 000-3-2/-3-3 in accordance with 

the regulations in the recommendations 

98/37/EC and 89/336/EEC.

C. & E. FEIN GmbH, 

Postfach 10 14 44 • 70013 Stuttgart

Any alterations made to the power tool 

will render this declaration invalid and the 

guarantee will become ineffective.

Reference number

7 221 13

Type

RS 12-70 E

No-load speed

2 700

7 000 rpm

Rated input

1 200 W

Output

750 W

Current type

1 ~

Weight

3.8 kg

Class of protection

II 

suitable for pipe 

diameters

8

80 mm

Sanding belt

dimensions

20 x 815 mm

40 x 815 mm

Bender

Moini

3 41 01 043 06 7 - Buch  Seite 12  Mittwoch, 4. Februar 2004  11:07 11

background image

RS 12-70 E

13

FR

Instructions d’utilisation, polisseuse à 

tubes.

Vue générale.

1 Molette de réglage de la vitesse de 

rotation

Présélection de la vitesse de rotation 

avec réglage électronique de la vitesse 

de rotation.

2 Interrupteur Marche/Arrêt

Mise en marche et arrêt.

3 Poignée supplémentaire

Toujours travailler avec la poignée 

supplémentaire.

4 Bande abrasive

La bande abrasive repose sur 3 rou-

leaux.

Les accessoires décrits ou représentés 

dans la présente notice d’utilisation ne sont 

pas forcément fournis avec l’appareil.

Pour votre sécurité.

Avant d’utiliser cet appareil, lire et 

respecter scrupuleusement :

la présente notice d’utilisation,

les conseils de sécurité ci-joints 

(réf. documents 3 41 30 054 06 1),

les dispositions concernant la prévention 

des accidents du travail en vigueur dans le 

pays en question.

Bien garder ces instructions d’utilisation 

ainsi que les conseils de sécurité ci-joints 

en vue d’une utilisation ultérieure ; ils 

doivent être joints à l’appareil en cas de 

transmission ou de vente à une tierce 

personne.

Utilisation conforme à la 

destination.

Cet appareil est conçu :

comme outillage professionnel à usage 

industriel et artisanal,

pour les travaux de ponçage et de polis-

sage à sec des tubes en acier inox et en 

métaux non ferreux,

pour enlever la peinture, la rouille et les 

couches d’oxyde,

pour travailler avec des outils de polissage 

et des accessoires indiqués dans la pré-

sente notice d’utilisation ou recommandés 

par FEIN.

Lorsqu’on travaille des matériaux métalli-

ques, il est possible que des poussières 

conductrices se déposent à l’intérieur de 

l’appareil. Dans ce cas-là, nettoyer le com-

partiment moteur de l’extérieur en y 

soufflant de l’air comprimé sec et bran-

cher l’appareil sur un réseau muni d’un 

disjoncteur différentiel (courant de 

déclenchement 30 mA).

Consignes de sécurité.

Risques de blessures

Toujours travailler avec la poignée supplé-

mentaire.

Veiller à garder une position stable et 

équilibrée, bien serrer les pièces à tra-

vailler.

Ne poser l’appareil contre la pièce à 

travailler que lorsqu’il est en position 

« Marche ».

Une fois le travail terminé, éloigner 

d’abord l’appareil en le soulevant de la 

pièce à travailler et l’arrêter seulement 

après.

Attention ! Ne pas toucher la bande abra-

sive en rotation.

Travailler seulement avec une bande abra-

sive en parfait état. Ne pas utiliser de ban-

des abrasives usées ou fendues sur les 

bords.

!

3 41 01 043 06 7 - Buch  Seite 13  Mittwoch, 4. Februar 2004  11:07 11

background image

14

RS 12-70 E

FR

Prendre des mesures adéquates pour que 

la projection d’étincelles ne puisse ni nuire 

à des personnes ni atteindre des objets 

inflammables.

Ne pas travailler de matériaux dégageant 

des poussières nuisibles à la santé (p. ex. 

de l’amiante).

Ne pas riveter ni visser de plaques ou de 

repères sur l’appareil. Vous risqueriez 

sinon de rendre inopérante la double iso-

lation de l’appareil. Il est recommandé 

d’utiliser des autocollants.

Utiliser uniquement une fiche et un câble 

en bon état.

Détérioration du matériel

La tension du secteur doit correspondre à 

celle mentionnée sur l’appareil.

Equipements de protection 

individuelle.

Des poussières nocives / toxiques sont 

générées lorsqu’on travaille des peintures 

contenant du plomb, certains bois ou 

métaux. Le fait de toucher ces poussières 

ou de les aspirer peut constituer un risque 

pour la personne travaillant avec l’appareil 

ou pour les personnes se trouvant à 

proximité.

Une exposition permanente au bruit intense 

peut provoquer une perte d’audition.

Porter des équipements de protection 

personnels. Pour se protéger contre la 

poussière, porter un masque anti-poussiè-

res ou un appareil de respiration filtrant 

les particules générées lors du travail. 

Selon l’utilisation, utiliser un masque pro-

tecteur pour le visage ou des lunettes de 

protection, des gants et un filet à cheveux 

(pour cheveux longs).

Pendant le travail avec des ponceuses à 

bande, il est recommandé de porter une 

protection acoustique.

Utilisation.

Mise en marche et arrêt (2).

Vérifier d’abord que le câble d’alimen-

tation et la fiche sont en parfait état.

Mise en marche :

Pousser vers l’avant l’interrupteur 

Marche/Arrêt (2) (I).

Arrêt :

Appuyer sur la partie arrière (0) de 

l’interrupteur Marche/Arrêt (2).

Une fois mis en marche, le moteur 

démarre en douceur après un court retar-

dement.

Lorsque l’alimentation en courant électri-

que est interrompue alors que l’appareil 

est en position de marche, ou que l’appa-

reil est branché sur le réseau en étant en 

position de marche, un dispositif de rup-

ture de protection empêche le redémar-

rage automatique. Pour mettre l’appareil 

en fonctionnement, arrêter brièvement 

l’appareil et le remettre en marche.

Réglage de la vitesse de 

rotation (1).

A l’aide de la molette de réglage (1), il est 

possible de régler la vitesse de la bande 

abrasive optimale en fonction de la pièce à 

travailler et des accessoires utilisés.

Indications pour le travail (5).

Approcher perpendiculairement l’appareil 

avec la bande abrasive du tube à polir (a) 

jusqu’à ce que le tube soit enserré d’une 

bonne moitié par la bande abrasive.

Polir le tube en effectuant un mouvement 

longitudinal régulier.

Toujours tenir l’appareil perpendiculaire-

ment au tube, même dans les coudes.

Toujours tenir l’appareil des deux mains.

!

3 41 01 043 06 7 - Buch  Seite 14  Mittwoch, 4. Februar 2004  11:07 11

background image

RS 12-70 E

15

FR

Fixation ou remplacement de la  bande abrasive (5).

Risques de blessures

pouvant survenir en cas de mise en marche 

non intentionnée.

Avant tout changement d’outil, débrancher la 

fiche de la prise de courant.

Poser la bande abrasive sur la poulie 

d’entraînement et sur la poulie conduc-

trice se trouvant sur le bras fixe. Presser le 

bras mobile (b) vers l’intérieur et poser la 

bande abrasive sur la poulie conductrice 

de celui-ci.

Effectuer un essai de 20 secondes env. 

avec une nouvelle bande abrasive. Presser 

fortement le bras mobile (b) vers l’exté-

rieur afin de tendre la bande abrasive et de 

la rendre opérationnelle.

Nettoyage et entretien.

Risques de blessures

pouvant survenir en cas de mise en marche 

non intentionnée.

Avant tous travaux d’entretien et de nettoya-

ge, débrancher la fiche de la prise de courant.

A effectuer une fois par semaine, ou plus 

souvent en cas d’utilisation fréquente :

Nettoyer et graisser l’articulation et la 

face de glisse se trouvant sur le bras 

mobile.

Nettoyer les ouïes de ventilation.

Nettoyer le compartiment moteur de 

l’extérieur en y soufflant de l’air com-

primé sec.

Entretien et réparation.

Risques de blessures

Faire effectuer l’entretien, le contrôle et les 

réparations de l’appareil uniquement par un 

électricien respectant les prescriptions en vi-

gueur dans le pays en question.

Consignes d’entretien et de 

réparation.

Nous vous recommandons de vous adres-

ser à notre service après-vente (centre de 

réparation), aux ateliers agréés FEIN ainsi 

qu’aux représentants FEIN. Vous trouve-

rez leur adresse à la fin de la présente 

notice d’utilisation et dans les consignes 

de sécurité ci-jointes.

Remettre la présente notice d’utilisation à 

l’atelier chargé des réparations. Vous trou-

verez un récapitulatif des pièces de rechange 

à la fin de cette notice d’utilisation.

Utiliser uniquement des pièces de 

rechange FEIN d’origine.

Pièces de rechange.

Vous trouverez un récapitulatif des pièces 

de rechange à la fin de cette notice d’utili-

sation. Indiquer le numéro de la pièce (1), 

la référence (2) ainsi que le nombre de 

pièces (3) facilite la commande.

Accessoires.

Les illustrations et les numéros de réfé-

rence figurent à la fin de la présente notice 

d’utilisation.

Note explicative sur les accessoires :

A Bande abrasive, paquet de 10 pièces.

B Bande fibre, paquet de 5 pièces.

C Pâte de prépolissage, 200 ml.

D Pâte à fourbir, 200 ml.

E Bande de polissage, paquet de 3 pièces.

F Poulies conductrices, Ø 35 mm, pour 

travailler dans des endroits difficile-

ment accessibles.

G Set de base, comprenant : 10 bandes 

abrasives 20 x 815 mm, grains 120, 

10 bandes abrasives 20 x 815 mm, 

grains 180, 10 bandes abrasives 

40 x 815 mm, grains 120, 10 bandes 

abrasives 40 x 815 mm, grains 180, 

ainsi que 5 bandes fibres 

20 x 815 mm, grains 280.

!

!

!

3 41 01 043 06 7 - Buch  Seite 15  Mittwoch, 4. Februar 2004  11:07 11

background image

16

RS 12-70 E

FR

H Set de polissage, comprenant : 10 ban-

des abrasives 20 x 815 mm, grains 320 

et 10 bandes abrasives 20 x 815 mm, 

grains 400, ainsi que 1 pâte de prépo-

lissage et 1 pâte à fourbir et 3 bandes 

de polissage 20 x 815 mm.

I

Coffret à outils, métal

(690 x 240 x 160 mm).

Lorsqu’on utilise d’autres accessoires que 

ceux mentionnés ici, l’utilisateur doit con-

trôler si des mesures de protection supplé-

mentaires doivent être prises.

Garantie.

Chaque outil électroportatif FEIN a été 

soigneusement contrôlé ; il est soumis à 

des critères stricts établis par le départe-

ment « FEIN-Assurance de qualité ».

Outre les obligations de garantie légales, 

les appareils FEIN sont garantis conformé-

ment à notre déclaration de garantie de 

fabricant. Pour plus de précisions, veuillez 

vous adresser à votre revendeur spécia-

lisé, à votre représentant FEIN dans votre 

pays ou auprès du service après-vente 

FEIN.

De manière générale, les dommages résul-

tant d’une usure naturelle, d’une sur-

charge ou d’un maniement non conforme 

ne sont pas couverts par la garantie.

Respect de l’environnement.

Rapporter les emballages, les appareils 

hors d’usage et les accessoires à un centre 

de recyclage respectant les directives con-

cernant la protection de l’environnement.

Pour plus de précisions, veuillez vous 

adresser à votre revendeur spécialisé.

Caractéristiques techniques.

Les mesures réelles (A) des niveaux sono-

res de l’appareil sont : niveau de pression 

acoustique 87 dB (A) ; niveau d’intensité 

acoustique 100 dB (A).

Porter une protection acoustique !

L’accélération réelle mesurée est de 4,0 m/s

2

.

Les valeurs de mesure ont été détermi-

nées conformément à la norme euro-

péenne EN 50 144.

Déclaration de conformité CE.

Nous déclarons sous notre propre res-

ponsabilité que ce produit est en confor-

mité avec les normes ou documents 

normatifs suivants : EN 50 144, 

EN 55 014, EN 61 000-3-2/-3-3 confor-

mément aux dispositions figurant dans les 

directives 98/37/CE et 89/336/CEE.

C. & E. FEIN GmbH, 

Postfach 10 14 44 • 70013 Stuttgart

Toute modification apportée à l’appareil 

fait perdre toute validité à la présente décla-

ration ainsi que le bénéfice de la garantie.

Référence

7 221 13

Type

RS 12-70 E

Vitesse à vide

2 700

7 000 tr/min

Puissance absorbée

1 200 W

Puissance débitée

750 W

Type de courant

1 ~

Poids

3,8 kg

Classe de protection

II 

approprié pour 

diamètres de tube

8

80 mm

Dimensions bandes 

abrasives

20 x 815 mm

40 x 815 mm

Bender

Moini

3 41 01 043 06 7 - Buch  Seite 16  Mittwoch, 4. Februar 2004  11:07 11

background image

RS 12-70 E

17

IT

Istruzioni per l’uso satinatrice per tubi.

Guida rapida.

1 Rotellina di selezione numero giri

Preselezione della velocità con regola-

tore elettronico del numero di giri.

2 Interruttore

Avviare ed arrestare.

3 Impugnatura supplementare

Lavorare sempre utilizzando l’impu-

gnatura supplementare.

4 Nastro di levigatura

Nastro di levigatura alloggiato su 3 rulli 

portanti.

Gli accessori descritti oppure illustrati nel 

presente libretto d’istruzioni per l’uso non 

fanno necessariamente parte della forni-

tura della Vostra macchina.

Per la Vostra sicurezza.

Utilizzare la macchina solo dopo 

avere letto:

questo libretto d’istruzioni per l’uso,

le accluse istruzioni di sicurezza 

(codice pubblicazione 3 41 30 054 06 1),

le norme nazionali in vigore concernenti 

la sicurezza sul lavoro.

Le presenti Istruzioni per l’uso e le accluse 

Istruzioni per la sicurezza devono essere 

conservate sia per tenerle disponibili anche 

in un successivo periodo che per conse-

gnarle insieme alla macchina in caso questa 

dovesse essere ceduta ad altre persone.

Uso regolare.

Questa macchina è destinata:

all’uso professionale nell’industria e 

nell’artigianato,

per levigare e lucidare tubi in acciaio inos-

sidabile come pure metalli non ferrosi,

per la rimozione di vernice, ruggine e 

strati di ossido,

per l’utilizzo con utensili abrasivi ed acces-

sori indicati in questo libretto d’istruzioni, 

oppure consigliati da FEIN.

Nel corso della lavorazione del metallo 

all’interno della macchina può depositarsi 

della polvere conduttrice. In questi casi, 

soffiare spesso dell’aria compressa asciutta 

dentro il vano motore, lavorare con il 

dispositivo d’aspirazione ed utilizzare la 

macchina con un interruttore differenziale 

di sicurezza (corrente di spunto 30 mA).

Raccomandazioni per la sicurezza.

Pericolo di ferirsi

Lavorare sempre utilizzando l’impugna-

tura supplementare.

Prendere una sicura posizione di lavoro e 

fissare bene il materiale da sottoporre a 

lavorazione.

Accostare la macchina al pezzo in lavora-

zione soltanto se accesa.

Una volta terminata la lavorazione, allon-

tanare prima la macchina dal pezzo e poi 

spegnerla.

Attenzione! Non toccare mai il nastro 

abrasivo quando è ancora in movimento.

Lavorare esclusivamente utilizzando nastri 

abrasivi che siano in perfetto stato. Mai 

utilizzare nastri abrasivi eccessivamente 

consumati o che abbiano strappi.

Proteggere persone oppure oggetti 

infiammabili dalla scia di scintille.

Non lavorare materiali da cui potrebbero 

fuoriuscire particelle dannose per la salute 

(ad esempio amianto).

Non applicare alla macchina targhette e 

simboli utilizzando rivetti o viti. Ciò 

potrebbe rendere inefficace l’isolamento di 

sicurezza. Si consigliano targhette adesive.

Controllare che cavo e spina non siano 

danneggiati.

!

3 41 01 043 06 7 - Buch  Seite 17  Mittwoch, 4. Februar 2004  11:07 11

background image

18

RS 12-70 E

IT

Pericolo di danneggiare la macchina

La tensione di rete deve coincidere con 

quanto indicato sui dati di targa riportati 

sulla macchina.

Abbigliamento protettivo.

Lavorando su verniciature contenenti 

piombo, su alcuni tipi di legname oppure 

su metallo si producono polveri dannose/

velenosi. Il contatto oppure l'aspirazione 

di queste polveri può provocare lo svi-

luppo di situazioni pericolose per l'opera-

tore oppure per le persone che si trovano 

nelle vicinanze.

Esponendosi continuamente all'azione del 

rumore intenso può implicare la perdita 

dell'udito.

Utilizzare abbigliamento di protezione 

personale. Per preservarsi contro la pol-

vere utilizzare una maschera per polveri 

oppure un respiratore che siano in grado 

di filtrare le particelle provocate durante il 

lavoro. A seconda dell'applicazione in 

corso, utilizzare la visiera di protezione 

oppure occhiali di sicurezza, guanti di pro-

tezione, reticella per i capelli (in caso di 

capelli lunghi).

Quando si lavora con le levigatrici a nastro 

si consiglia l'utilizzo di una protezione 

acustica. 

Uso.

Avviare ed arrestare la macchina (2).

Prima dell’avviamento controllare 

l’integrità del cavo e della spina.

Avvio:

Spingere l’interruttore (2) in avanti (I).

Arresto:

Premere l’interruttore (2) sulla parte 

posteriore (0).

Durante la fase della messa in esercizio, il 

motore si mette in moto lentamente dopo 

un breve ritardo.

Quando si verifica un’interruzione dell’ali-

mentazione della corrente mentre la mac-

china è in funzione oppure quando si 

inserisce la spina nella presa della corrente 

a macchina accesa, un interruttore auto-

matico impedisce che la macchina possa 

avviarsi incontrollatamente. Per mettere 

in esercizio la macchina, spegnerla breve-

mente e riaccenderla di nuovo.

Regolazione del numero di giri (1).

Con il regolatore del numero di giri (1) è 

possibile regolare la velocità ottimale del 

nastro abrasivo a seconda del pezzo in 

lavorazione e a seconda degli accessori 

impiegati.

Indicazioni operative (5).

Tenendo il nastro abrasivo ad angolo retto 

rispetto al tubo da levigare, avvicinare la 

macchina al tubo (a) fino a quando il 

nastro abrasivo ne avrà avvolto la metà.

Levigare il tubo in modo uniforme ese-

guendo costanti movimenti longitudinali.

Tenere la macchina sempre in posizione 

ad angolo retto rispetto al tubo, anche nel 

caso di tubi curvati.

Operare sempre tenendo la macchina con 

entrambe le mani.

Fissare oppure sostituire  l’utensile abrasivo (5).

Pericolo di ferirsi

Pericolo di infortuni a causa di un’accensione 

accidentale.

Estrarre la spina dalla presa di corrente pri-

ma di sostituire l’utensile.

Posizionare il nastro abrasivo sul rullo di 

trasmissione ed il rullo di rinvio al braccio 

fisso. Premere il braccio orientabile (b) 

verso l’interno e sistemare il nastro abra-

sivo sul rispettivo rullo di rinvio.

!

!

3 41 01 043 06 7 - Buch  Seite 18  Mittwoch, 4. Februar 2004  11:07 11

background image

RS 12-70 E

19

IT

In caso di utilizzo di un nuovo nastro abra-

sivo, eseguire una prova di ca. 20 secondi. 

Per tendere il nastro abrasivo e prepararlo 

all’impiego, premere il braccio orienta-

bile (b) con forza verso l’esterno.

Pulizia e cura.

Pericolo di ferirsi

Pericolo di infortuni a causa di un’accensione 

accidentale.

Estrarre la spina dalla presa di corrente pri-

ma di procedere alle pulizia.

Una volta la settimana, o più spesso in 

caso di uso frequente:

Pulire e lubrificare lo snodo e la super-

ficie di scorrimento sul braccio orienta-

bile.

Pulire le aperture per l’aria di raffredda-

mento.

Soffiare dall’esterno il vano motore con 

aria compressa asciutta.

Manutenzione e riparazione.

Pericolo di ferirsi

La manutenzione, il controllo e la riparazione 

devono essere eseguiti solo da personale elet-

tricista specializzato, secondo le rispettive 

norme nazionali vigenti.

Manutenzione e riparazione.

Raccomandiamo di rivolgersi sempre 

presso le officine autorizzate FEIN e gli 

uffici di rappresentanza FEIN. Gli indirizzi 

sono riportati alla fine di questo libretto 

d’istruzioni e nelle accluse istruzioni di 

sicurezza.

Consegnare queste istruzioni per l’uso 

all’officina di riparazione unitamente alla 

macchina. L’elenco delle parti di ricambio 

è riportato alla fine di questo libretto 

d’istruzioni.

Utilizzare esclusivamente pezzi di ricam-

bio originali FEIN.

Parti di ricambio.

L’elenco delle parti di ricambio riportato 

alla fine di questo libretto d’istruzioni, il 

numero di posizione del pezzo (1), il 

numero d’ordine (2) ed il numero dei 

ricambi (3) necessari rendono più sem-

plice l’esecuzione dell’ordine.

Accessori.

Disegni d’insieme e codici d’ordine si pos-

sono trovare alla fine di questo libretto 

d’istruzioni per l’uso.

Descrizione degli accessori:

A Nastro abrasivo, confezione con 

10 pezzi.

B Nastro vlies, confezione con 5 pezzi.

C Crema di prefinitura, 200 ml.

D Crema per lucidatura, 200 ml.

E Nastro per lucidatura, confezione con 

3 pezzi.

F Rulli di rinvio, Ø 35 mm per lavora-

zioni in punti di difficile accesso.

G Set base formato rispettivamente da 

10 nastri abrasivi 20 x 815 mm, 

grana 120, 20 x 815 mm, grana 180, 

40 x 815 mm, grana 120, 

40 x 815 mm, grana 180 ed inoltre 

5 nastri vlies 20 x 815 mm, grana 280.

H Set base formato rispettivamente da 

10 nastri abrasivi 20 x 815 mm, 

grana 320 e 20 x 815 mm, grana 400 

ed inoltre 1 tubetto di crema di prefi-

nitura e crema per lucidatura e 3 nastri 

per lucidatura 20 x 815 mm.

I

Valigetta portautensili, metallica

(690 x 240 x 160 mm).

In caso di applicazione di utensili ad inne-

sto diversi da quelli riportati in questo con-

testo, l’utilizzatore è tenuto ad accertarsi se 

è necessario adottare ulteriori misure pro-

tettive.

!

!

3 41 01 043 06 7 - Buch  Seite 19  Mittwoch, 4. Februar 2004  11:07 11

background image

20

RS 12-70 E

IT

Garanzia.

Ogni elettroutensile FEIN è sottoposto ad 

un accurato controllo e deve rispondere ai 

rigorosi requisiti richiesti dalla garanzia 

della qualità FEIN.

Oltre agli obblighi di garanzia previsti dalla 

Legge, assicuriamo prestazioni conforme-

mente alla dichiarazione di garanzia della 

casa produttrice FEIN. Per ulteriori detta-

gli a proposito, rivolgersi al proprio Riven-

ditore di fiducia, alla Rappresentanza FEIN 

nel Vostro Paese oppure al Centro di 

Assistenza Clienti FEIN.

In linea generale si esclude dalla presta-

zione di garanzia qualsiasi danno dovuto a 

trattamento non appropriato, a sovracca-

rico oppure ad usura.

Tutela dell’ambiente.

Avviare ad un riciclaggio rispettoso 

dell’ambiente gli imballaggi, le macchine e 

gli accessori dismessi.

Il nostro rivenditore specializzato potrà 

fornirVi informazioni più precise a questo 

proposito.

Dati tecnici.

La misurazione A del livello di pressione 

acustica della macchina è solitamente di 

pressione acustica 87 dB (A); livello della 

potenza sonora 100 dB (A).

Usare la protezione acustica!

L’accelerazione misurata raggiunge di 

solito il valore di 4,0 m/s

2

.

Valori misurati secondo norma 

EN 50 144.

Conformità con la norma CE.

Dichiariamo sotto la nostra esclusiva 

responsabilità, che questo prodotto è 

conforme alle norme o ai documenti nor-

mativi seguenti: EN 50 144, EN 55 014, 

EN 61 000-3-2/-3-3 secondo le 

disposizioni delle direttive CE 98/37 e 

CEE 89/336.

C. & E. FEIN GmbH, 

Postfach 10 14 44 • 70013 Stuttgart

Nel caso di modifiche alla macchina questa 

dichiarazione perde la sua validità e la 

garanzia si estingue.

Numero d’ordine

7 221 13

Modello

RS 12-70 E

Numero di giri 

a vuoto

2 700

7 000 g/min

Potenza nominale

1 200 W

Potenza resa

750 W

Tipo di corrente

1 ~

Peso

3,8 kg

Classe di sicurezza

II 

adatto per diametro 

di tubo

8

80 mm

Dimensioni nastri 

abrasivi

20 x 815 mm

40 x 815 mm

Bender

Moini

3 41 01 043 06 7 - Buch  Seite 20  Mittwoch, 4. Februar 2004  11:07 11

Table of contents

    Annotation for Fein RS 12-70E in format PDF