Benelli M3 Convertible Semi-Auto Pump Shotgun – page 8
Manual for Benelli M3 Convertible Semi-Auto Pump Shotgun
140
75
76
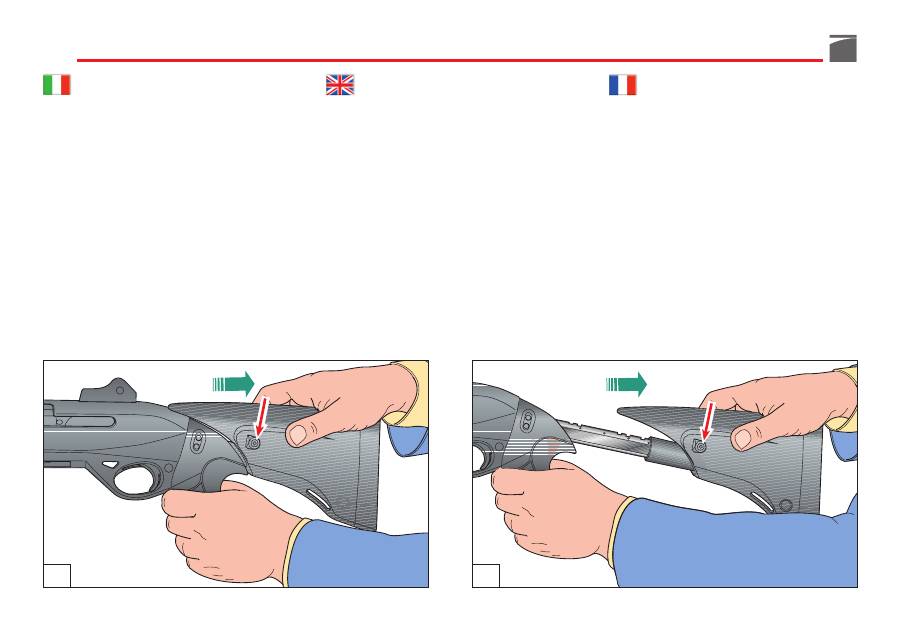
Calcio telescopico
Regolazione
1) Premere
il pulsante di blocco
(fig. 75) ed
arretrare il calcio fino alla massima estra-
zione (fig. 76).
2) Premere
il pulsante di blocco
con forza
maggiore per smontare il calcio comple-
tamente (fig. 77).
Telescoping stock
Adjusting
1) Press
the lock button
(fig. 75) and move
the stock back as far out as it will go (fig.
76).
2) Press
the lock button
using more force
to remove the stock completely (fig. 77).
Crosse télescopique
Réglage
1) Frapper
le poussoir de blocage
(fig. 75) et
reculer la crosse jusqu’à l’extraction maxi-
mum (fig. 76).
2) Frapper
le poussoir de blocage
avec force
majeure pour démonter la crosse entière-
ment (fig. 77).
141
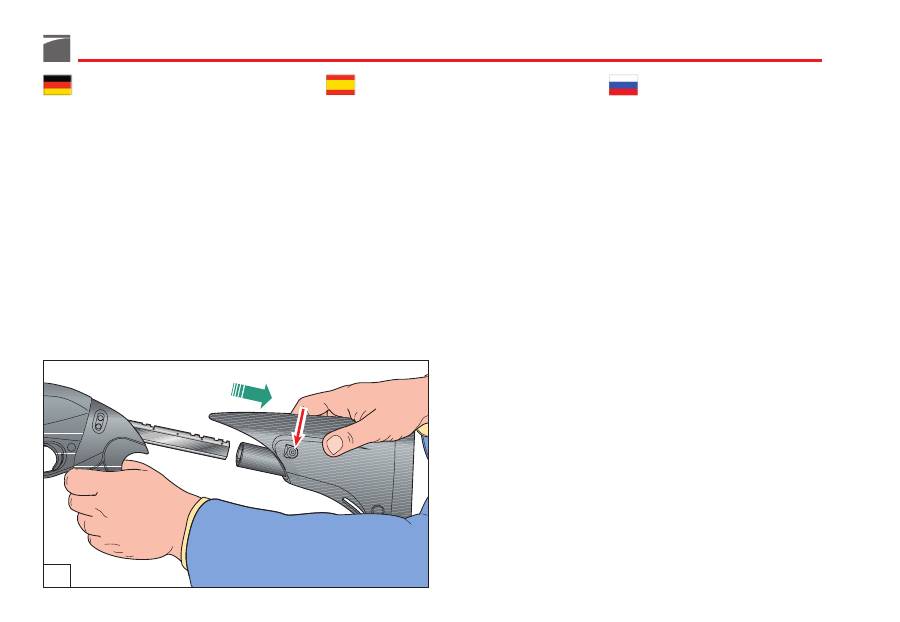
Teleskop-Schaft
Einstellung
1) Den
Verriegelungskopf
(Abb. 75) drücken
und den Schaft bis zum maximalen Aus-
zug ausfahren (Abb. 76).
2) Den
Verriegelungsknopf
noch stärker
drücken, um den Schaft vollständig abzu-
montieren (Abb. 77).
Culata telescópica
Regulación
1) Presionar
el botón de bloqueo
(fig. 75) y
retraer la culata hasta su máximo punto
de extracción (fig. 76).
2) Presionar
el botón de bloqueo
con
mayor fuerza para desmontar completa-
mente la culata (fig. 77).
Телескопический приклад
Регулировка
1) Нажмите на
кнопку блокировки
(рис.
75) и максимально отведите приклад
назад (рис. 76).
2) Нажмите на
кнопку блокировки
с еще
большей силой и полностью отсоедините
приклад (рис. 77).
77
142
Regolazione tacca di mira
Qualora la taratura standard effettuata in fab-
brica non risponda alle esigenze di tiro indi-
viduali, è possibile regolare la linea di mira
sia lateralmente che verticalmente.
Prima di effettuare qualunque tipo di inter-
vento sul vostro fucile, accertatevi sempre
che camera di scoppio e serbatoio siano
completamente vuoti!
(Leggere attentamente
le istruzioni di caricamento e scaricamento
dell'arma).
Regolazione laterale
linea di mira
Per la regolazione laterale della linea di mira,
prevista
sul mirino
, agire nel seguente modo:
Rear sight adjustment
The rear sight can be adjusted for both wind-
age and elevation if the standard factory set-
ting does not meet shooter requirements.
Before starting any operation on your shot-
gun, make sure that the chamber and the
magazine are unloaded!
(Carefully read the
instructions on gun loading and unloading).
Windage (lateral)
sight adjustment
In order to adjust the
front sight
for windage
proceed as follows:
Réglage du cran de mire
Au cas où l’étalonnage standard effectué d’o-
rigine ne répondrait pas aux exigences de tir
de chacun, la ligne de mire peut être réglée
aussi bien latéralement que verticalement.
Avant d’effectuer n’importe quel type d’in-
tervention sur votre fusil, toujours vérifier
que la chambre d’explosion et le magasin
sont complètement vides!
(Lire attentivement
les instructions de chargement et de déchar-
gement).
Réglage latéral de ligne de mire
Pour régler latéralement la ligne de mire, pré-
vue
sur le guidon
, agir de la manière suivante:
143
Kimme ausrichten
Sollte die werksmäßige Standard-Einstellung
den individuellen Anforderungen des Schüt-
zen nicht genügen, kann das Visier sowohl
seitlich als auch vertikal eingestellt werden.
Vor jeder Waffenhandhabung sollten Sie
sicherstellen, dass die Patronenlager und das
Magazin ihres Gewehrs völlig leer sind!
(Bitte
lesen Sie aufmerksam die Anweisungen für
das Laden und das Entladen der Waffe).
Seitliche Visier-Einstellung
Um eine seitliche Visier-Einstellung auf dem
Korn
vorzunehmen, müssen Sie folgender-
maßen verfahren:
Ajuste alza
En caso de que el ajuste estándar realizado
en la fábrica no corresponda con las exigen-
cias de tiro individuales, es posible ajustar la
línea de puntería tanto lateral como vertical-
mente.
Antes de realizar cualquier tipo de opera-
ción en su fusil, compruebe siempre que la
cámara de explosión y el almacén estén
completamente vacíos.
(Lea atentamente las
instrucciones para la carga y la descarga).
Ajuste lateral línea de mira
Para la regulación lateral de la línea de mira,
prevista en
la mira
, regular de la siguiente
manera:
Регулировка целика
В случае если стандартная калибровка,
произведенная на заводе, не соответствует
индивидуальным требованиям стрельбы,
имеется возможность выполнить как
боковую, так и вертикальную регулировку
линии прицела.
Перед тем, как выполнять любые
операции с Вашим ружьем, убедитесь, что
патронник и магазин совершенно пустые!
(внимательно прочитайте инструкции по
заряжанию и разряжанию оружия).
Боковая регулировка линии
прицела
Для того чтобы выполнить боковую
регулировку линии прицела
по мушке
,
необходимо действовать следующим образом:
144
78
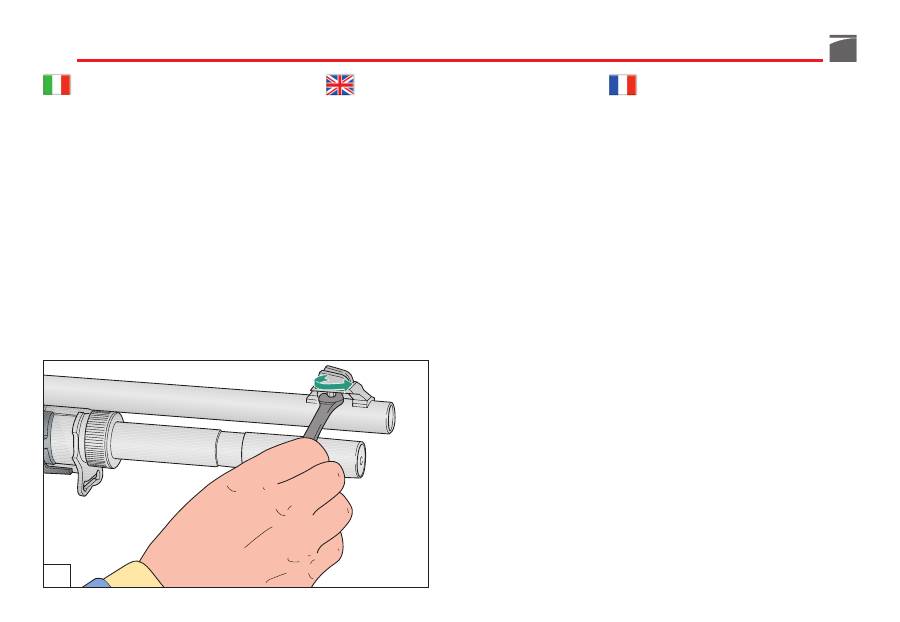
1) Con una normale chiave per dado svitare
leggermente
il dado fissaggio mirino
(fig.
78).
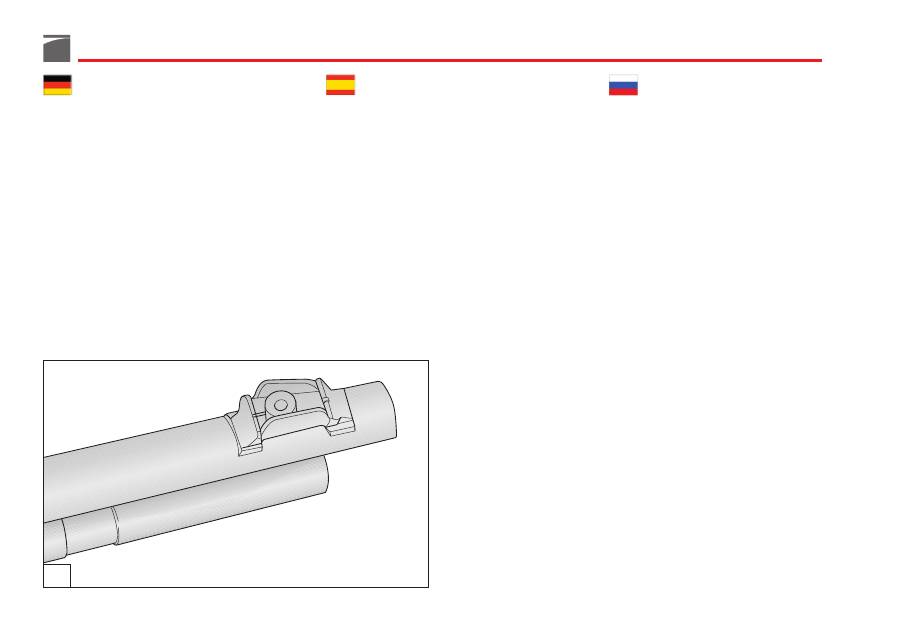
2) Regolare la posizione del
mirino
nel sen-
so desiderato (verso sinistra della linea di
riferimento (fig. 79) se si intende sparare
più a destra; verso destra della linea di ri-
ferimento se si intende sparare più a sini-
stra) e bloccarlo nuovamente avvitando il
suo dado di fissaggio.
3) Ripetere l’operazione qualora la nuova
posizione data al mirino non risponda
alle esigenze di tiro ricercate.
1) Using a regular nut wrench, loosen
the
front sight retaining nut
(fig. 78).
2) Shift the
front sight
as necessary. Shift to
the left of the reference line (fig. 79) to
move the aiming point to the right or shift
to the right to move the aiming point to
the left. Secure the front sight by tighten-
ing the retaining nut.
3) If the new front sight setting does not
meet your shooting requirements, repeat
the process.
1) A’ l'aide d'une clé pour écrous normale
desserrer légèrement
l'écrou de fixation
du guidon
(fig. 78).
2) Régler la position du
guidon
dans le sens
désiré (à gauche de la ligne de référence
(fig. 79) si l'on désire tirer plus à droite; à
droite de la ligne de référence si l'on
désire tirer plus à gauche) et l'immobili-
ser à nouveau en serrant l'écrou de fixa-
tion.
3) Répéter l'opération au cas où la nouvelle
position prise par le guidon ne correspon-
drait pas aux exigences de tir.
145
1) Lockern Sie die Korn-
Sicherungsmutter
mit einem gewöhnlichen Schrauben-
schlüssel (Abb. 78).
2) Schieben Sie das
Korn
in die gewünschte
Richtung (nach links von der Bezugslinie
aus (Abb. 79), wenn man den Zielpunkt
nach rechts verlegen möchte oder nach
rechts, um den Zielpunkt nach links zu
bewegen). Sichern Sie das Korn durch An-
ziehen der Sicherungsmutter.
3) Sollte die neue Einstellung nicht Ihren
Ansprüchen entsprechen, wiederholen Sie
das Verfahren.
1) Con una llave normal para tuercas des-
tornillar ligeramente
la tuerca de fijación
de la mira
(fig. 78).
2) Regular la posición de la
mira
en el senti-
do deseado (hacia la izquierda de la línea
de referencia (fig. 79) si se piensa disparar
más a la derecha, hacia la derecha de la
línea de referencia si se desea disparar
más a la izquierda) y bloquearla nueva-
mente atornillando su tuerca de fijación.
3) Repetir la operación en caso de que la
nueva posición dada a la mira no respon-
da con las exigencias de tiro deseadas.
1) При помощи обычного гаечного ключа
слегка отвернуть
гайку крепления
мушки
(рис. 78).
2) Отрегулировать положение
мушки
в
требуемом
направлении
(налево
относительно опорной линии (рис. 79) при
стрельбе правее и направо относительно
опорной линии при стрельбе левее),
после чего повторно заблокировать
мушку, завернув крепежную гайку.
3) Повторить операцию в случае, если новое
положение
мушки
не
отвечает
требованиям стрельбы.
79
146
Accessori e regolazioni
(Tutte le versioni)
Riduttore tubo serbatoio ............................ 148
Strozzatore interno .................................... 156
Prolunga tubo serbatoio ............................ 164
Regolazione tacca di mira (ghost sight) ...... 168
Regolazione laterale linea di mira ............. 170
Regolazione verticale linea di mira ........... 172
Regolazione tacca di mira (open sight) ...... 174
Accessories and adjustments
(All versions)
Magazine tube limiter ............................... 148
Internal choke ........................................... 156
Magazine tube extension ........................... 164
Rear sight adjustment (ghost sight) ............. 168
Windage sight adjustment ......................... 170
Elevation sight adjustment ......................... 172
Rear sight adjustment (open sight) ............. 174
Accessoires et réglages
(Toutes les versions)
Réducteur tube magasin ............................ 148
Choke intérieur ......................................... 156
Prolongement du tube de magasin ............. 164
Réglage du cran de mire (ghost sight) ........ 168
Réglage latéral de ligne de mire ................ 170
Réglage vertical de ligne de mire .............. 172
Réglage du cran de mire (open sight) ......... 174
147
Zubehör und
Einstellmöglichkeiten
(Alle Versionen)
Reduzierstück des Magazinrohrs ............... 149
Innen-Choke ............................................. 157
Verlängerung des Magazinrohrs ................. 165
Kimme ausrichten (ghost sight) .................. 169
Seitenverstellung des Visiers ...................... 171
Höheneinstellung des Visiers ..................... 173
Kimme ausrichten (open sight) .................. 175
Accesorios y regulaciones
(Todas las versiones)
Reductor tubo almacén .............................. 149
Choke interno ............................................ 157
Prolongación tubo almacén ........................ 165
Ajuste alza (ghost sight) ............................. 169
Ajuste lateral línea de mira ........................ 171
Ajuste vertical línea de mira ....................... 173
Ajuste alza (open sight) .............................. 175
Принадлежности и
регулировки
(Все версии)
Ограничитель трубки магазина
...................... 149
Сменный чок
............................................... 157
Удлинитель трубки магазина
......................... 165
Регулировка целика (ghost sight)
.................... 169
Регулировка боковой линии прицела
.............. 171
Регулировка линии прицела по вертикали
...... 173
Регулировка целика (open sight)
..................... 175
148
Riduttore tubo serbatoio
Prima di effettuare qualunque tipo di inter-
vento sul vostro fucile, accertatevi sempre
che camera di scoppio e serbatoio siano
completamente vuoti!
(Leggere attentamente
le istruzioni di caricamento e scaricamento
dell'arma).
ATTENZIONE
Le operazioni di seguito descritte devono
essere effettuate con cautela per evitare che
la molla del serbatoio sfugga ad alta velocità.
Mettere sempre occhiali protettivi durante
questa operazione.
Se la molla del serbatoio sfugge ad alta velo-
cità può colpire gli occhi od altre parti del
viso arrecando gravi danni.
Usare la stessa cautela nel rimontaggio.
Magazine tube limiter
Before starting any operation on your shot-
gun, make sure that the chamber and the
magazine are unloaded!
(Carefully read the
instructions on gun loading and unloading).
WARNING
The following operations must be carried out
carefully in order to prevent the magazine
spring from escaping at high speed.
When carrying these operations out, always
wear eye protection.
If the magazine spring escapes at high velo-
city severe eye injury or other injuries with
serious consequences can occur.
The same care must be taken during assem-
bly.
Réducteur tube magasin
Avant d’effectuer n’importe quel type d’in-
tervention sur votre fusil, toujours vérifier
que la chambre d’explosion et le magasin
sont complètement vides!
(Lire attentivement
les instructions de chargement et de déchar-
gement de l’arme).
ATTENTION
Les opérations suivantes décrites doivent être
effectuées avec grande précaution pour évi-
ter que le ressort du magasin ne s’éjecte à
haute vitesse.
Mettre toujours des lunettes de protection
avant d’effectuer cette opération.
Le ressort du magasin s’éjectant à haute vi-
tesse risquerait de blesser vos yeux ou d’au-
tres parties du corps.
Toujours agir avec la même précaution du-
rant le montage.
149
Reduzierstück des Magazinrohrs
Vor jeder Waffenhandhabung sollten Sie
sicherstellen, dass die Patronenlager und das
Magazin ihres Gewehrs völlig leer sind!
(Bitte
lesen Sie aufmerksam die Anweisungen für
das Laden und das Entladen der Waffe).
ACHTUNG
Die im Folgenden beschriebenen Arbeits-
schritte müssen mit größter Vorsicht durch-
geführt werden, um zu vermeiden, dass sich
die Magazinfeder mit großer Geschwindig-
keit löst.
Tragen Sie bei dieser Arbeit immer einen
Augenschutz.
Sollte die Magazinfeder sich plötzlich lösen,
kann dies zu schweren Verletzungen der
Augen und des Gesichts führen.
Gehen Sie beim Zusammenbau mit dersel-
ben Vorsicht vor.
Reductor tubo almacén
Antes de realizar cualquier tipo de opera-
ción en su fusil, compruebe siempre que la
cámara de explosión y el almacén estén
completamente vacíos.
(Lea atentamente las
instrucciones para la carga y la descarga).
ATENCIÓN
Las operaciones descritas a continuación se
deben realizar cuidadosamente para evitar
que el resorte del almacén escape a alta
velocidad.
Use siempre gafas protectoras durante esta
operación.
Si el resorte del almacén escapa a alta velo-
cidad puede golpear los ojos u otras partes
de la cara causando graves daños.
Ponga el mismo cuidado durante el reensam-
blaje.
Ограничитель трубки магазина
Перед тем, как выполнять любые операции
с Вашим ружьем, убедитесь, что патронник,
механизм подачи и магазин совершенно
пустые!
(внимательно прочитайте инструкции
по заряжанию и разряжанию оружия).
ВНИМАНИЕ
Описанные далее операции должны
выполняться с особой осторожностью,
чтобы избежать резкого выброса
пружины магазина.
Во время этой операции всегда следует
надевать защитные очки.
В случае резкого выброса пружины из
магазина, она может попасть в глаза или в
другие части лица, причинив серьезные
травмы.
При повторной сборке соблюдать те же
меры предосторожности.
150
Per smontare il riduttore dall’arma procedere
nel seguente modo:
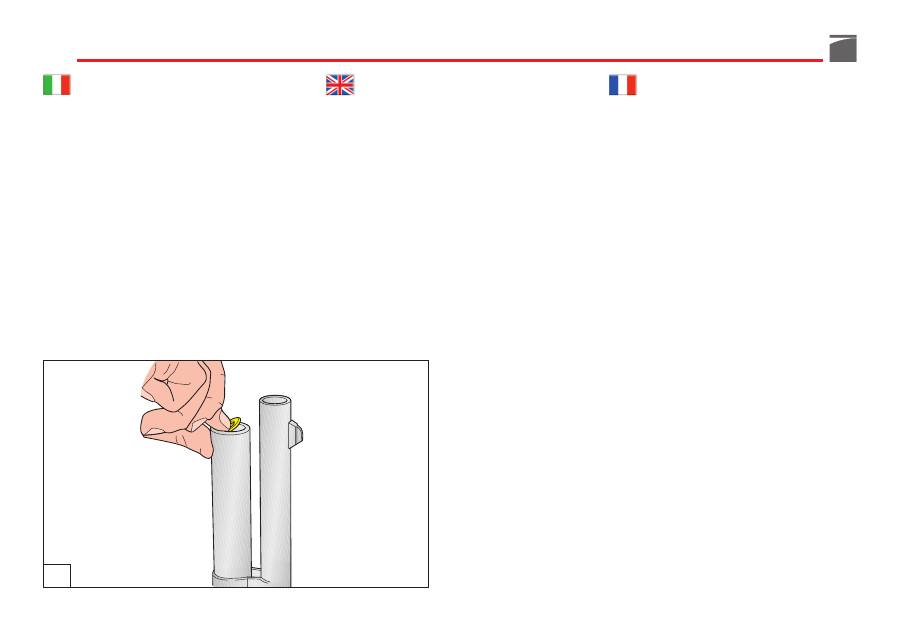
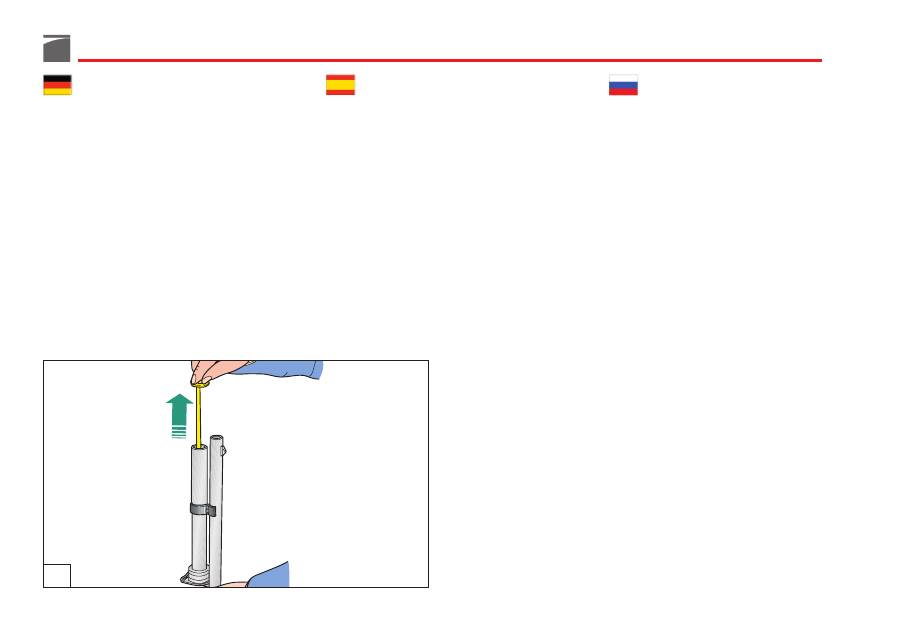
1)
A fucile scarico,
con canna rivolta verso
l’alto, prendere con l’indice della mano
l’anello fissaggio riduttore
e sfilarlo dal
tubo serbatoio (fig. 80); per facilitare l’o-
perazione appoggiare il pollice destro sul
tubo serbatoio e
far ruotare leggermente
l’anello fissaggio riduttore in maniera che
un suo settore di presa superi la bordatu-
ra del tubo serbatoio stesso (fig. 81).
2)
Trattenere
il riduttore con il suo anello di
fissaggio lasciando che fuoriescano com-
pletamente dal serbatoio per effetto della
spinta che ricevono dalla molla del ser-
batoio.
To remove the limiter proceed as follows:
1)
With the gun unloaded,
point the barrel
upwards. Using the index finger of your
hand, remove the
limiter retaining
from
the magazine tube (fig. 80). To facilitate
removal, rest your right thumb on the
magazine tube and
turn
the retaining ring
until one of the tabs passes the magazine
tube spigot (fig. 81).
2)
Hold
the limiter and retaining ring and
allow them to be forced out of the maga-
zine by the magazine spring.
Pour démonter le réducteur de l’arme, procé-
der de la manière suivante:
1)
Fusil déchargé,
canon orienté vers le
haut, prendre de l’index de la main
l’an-
neau de fixation du réducteur
et la déga-
ger du tube magasin (fig. 80). Pour facili-
ter l’opération, appuyer le pouce droit sur
le tube magasin et
faire tourner légère-
ment
l’anneau de fixation du réducteur
de façon à ce qu’un secteur de prise de
celui-ci dépasse le bord du tube magasin
même (fig. 81).
2)
Retenir
le réducteur et son anneau de
fixation en les laissant complètement en
dehors du magasin du fait de la poussée
qu’ils reçoivent du ressort du magasin.
80
81
151
Um das Reduzierstück auszubauen, müssen
Sie folgendermaßen verfahren:
1)
Das völlig entladene Gewehr
aufwärts
richten und den
Sicherungsring
mit dem
Zeigefinger aus dem Magazinrohr ziehen
(Abb. 80). Zur Vereinfachung legen Sie
den rechten Daumen auf das Magazin-
rohr und
drehen
den Sicherungsring des
Reduzierstücks mit dem Daumen, so dass
einer seiner Ansatzbereiche über die Kan-
te des Rohrmagazins reicht (Abb. 81).
2)
Halten
Sie das Reduzierstück und den
Sicherungsring und lassen Sie ihn durch
die Feder des Magazins aus dem Rohr-
magazin stoßen.
Para desmontar el reductor del arma proceda
de la siguiente manera:
1)
Con el fusil descargado
y con el cañón
dirigido hacía arriba, coja, con el dedo
índice
el anillo de fijación del reductor
y
quítelo del tubo almacén (fig. 80); para
facilitar la operación apoye el dedo pul-
gar derecho en el tubo almacén y
gire
ligeramente
el anillo de fijación del re-
ductor de modo que uno de sus sectores
de toma supere el borde del mismo tubo
almacén (fig. 81).
2)
Retenga
el reductor con su anillo de fija-
ción dejando que salgan completamente
del almacén por efecto del empuje del
resorte del almacén.
Для снятия ограничителя с ружья
действовать следующим образом:
1)
При разряженной винтовке
, со стволом,
направленным вверх, указательным
пальцем руки взять
кольцо фиксации
ограничителя
и снять его с трубки
магазина (рис. 80); для облегчения
операции положить большой палец правой
руки на трубку магазин и
слегка
повернуть
кольцо
фиксации
ограничителя так, чтобы один сектор
захвата перешел раструб трубки магазина
(рис. 81).
2)
Удерживать
ограничитель с кольцом
фиксации, дав им полностью выйти из
магазина вследствие воздействия
толчка, получаемого ими от пружины
магазина.
152
3) Togliere
completamente
il riduttore dal ser-
batoio assieme al suo anello di fissaggio.
Per montare il riduttore sull’arma procedere
nel seguente modo:
1)
A fucile scarico,
con canna rivolta verso
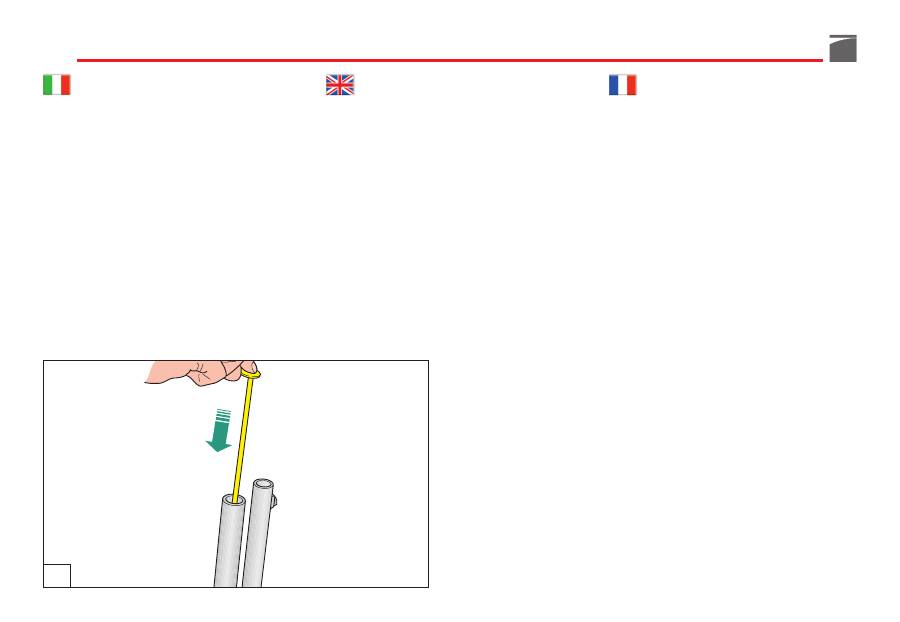
l’alto, infilare il riduttore sul suo foro di
sede (fig. 82).
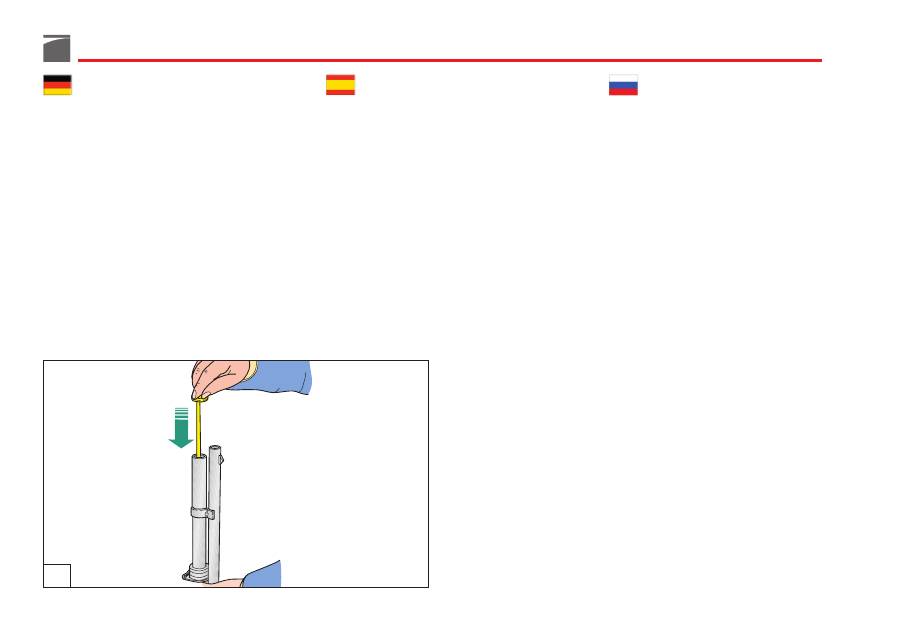
2) Prendere con la mano l’anello fissaggio
riduttore ed appoggiarlo
in posizione leg-
germente inclinata
, sul riduttore (fig. 83).
3)
Completely
remove limiter and retaining
ring from magazine.
To install the limiter, proceed as follows:
1)
With the gun unloaded
, point barrel up-
wards and insert the limiter into the
appropriate fitting hole (fig. 82).
2) Take the limiter retaining ring in your
hand and position it on the limiter. Ring
should be
positioned at a slight angle
(fig. 83).
3) Retirer
complètement
le réducteur et
l’anneau de fixation du magasin.
Pour monter le réducteur sur l’arme procéder
de la manière suivante:
1)
Fusil déchargé
, canon retourné vers le
haut, introduire le réducteur dans l’orifice
du logement prévu (fig. 82).
2) Prendre de la main, l’anneau de fixation
du réducteur et l’appuyer
dans une posi-
tion légèrement inclinée
sur le réducteur
(fig. 83).
82
83
153
3) Das Reduzierstück zusammen mit dem
Sicherungsring
ganz
aus dem Magazin
herausziehen.
Um das Reduzierstück in dem Gewehr zu
installieren, beachten Sie bitte folgende Schritte:
1)
Das völlig entladene Gewehr
aufwärts
richten und das Reduzierstück in das Rohr-
magazin einsetzen (Abb. 82).
2) Den Sicherungsring des Reduzierstücks
mit der Hand in einer Schräglage auf das
Reduzierstück auflegen (Abb. 83).
3) Quite
completamente
el reductor del al-
macén junto con su anillo de fijación.
Para montar el reductor en el arma proceda
de la siguiente manera:
1)
Con el fusil descargado
y con el cañón
dirigido hacía arriba, introduzca el reduc-
tor en su alojamiento (fig. 82).
2) Coja con una mano el anillo de fijación
del reductor y apóyelo
en posición lige-
ramente inclinada
, sobre el reductor (fig.
83).
3)
Полностью
снять ограничитель с
магазина вместе с его кольцом фиксации.
Для установки ограничителя на ружье
действовать, как указано ниже:
1)
При разряженном ружье,
со стволом,
направленным
вверх,
надеть
ограничитель на отверстие гнезда (рис.
82).
2) Взять
рукой
кольцо
фиксации
ограничителя и поместить его
в слегка
наклонном положении
на ограничитель
(рис. 83).
154
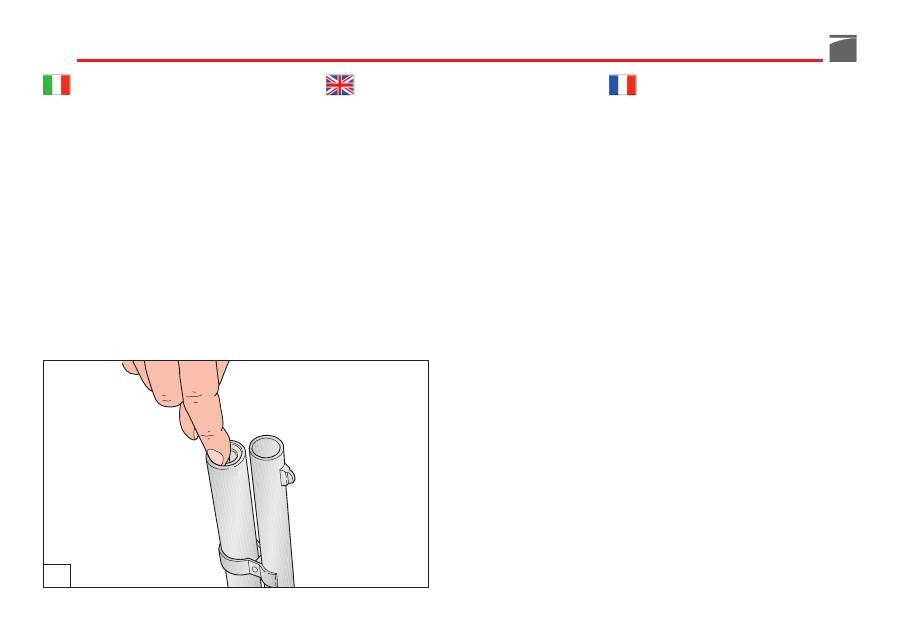
3)
Premere
all’interno del tubo serbatoio
tutto il riduttore, facendo entrare comple-
tamente anche l’anello fissaggio riduttore
(fig. 84).
La posizione leggermente inclinata in cui
si tiene l’anello fissaggio riduttore
con-
sente
il completo inserimento all’interno
del tubo serbatoio anche se il pezzo, in
un verso, è più largo del foro di passag-
gio.
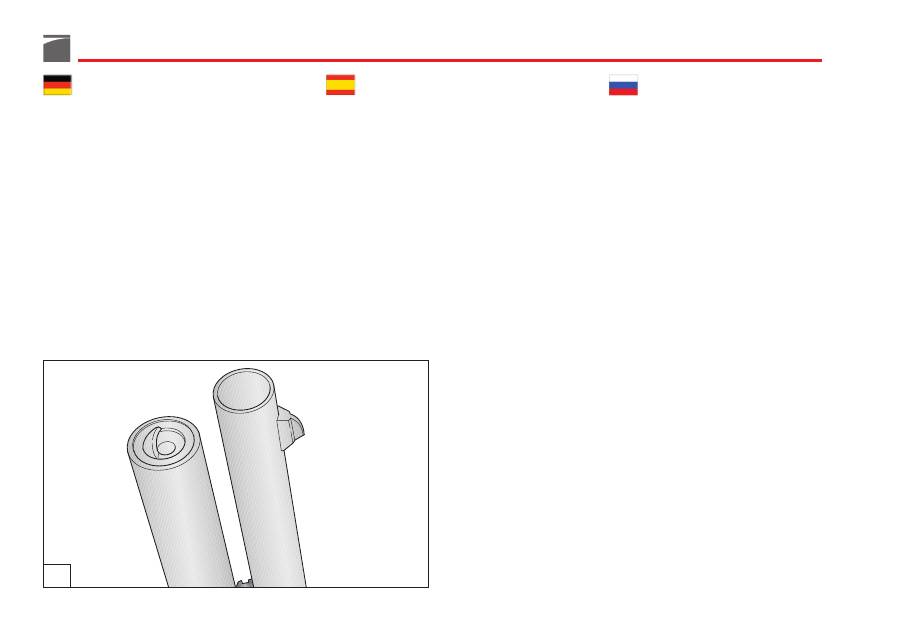
4)
Diminuire
la pressione del dito fino a
quando il riduttore non resterà bloccato
contro la bordatura del tubo serbatoio
stesso (fig. 85).
3)
Push
the limiter into the magazine tube,
ensuring that the retaining ring enters pro-
perly (fig. 84).
Keeping the ring positioned at a slight
angle will
enable
it to slip into the maga-
zine tube entirely, even though it is wider
than the tube bore.
4)
Reduce
finger pressure until the limiter is
tight against the tube spigot (fig. 85).
3)
Pousser
à l’intérieur du tube magasin tout
le réducteur, en faisant entrer entièrement
l’anneau de fixation du réducteur égale-
ment (fig. 84).
La position légèrement inclinée dans la-
quelle on tient l’anneau de fixation ré-
ducteur
permet
de l’introduire complète-
ment à l’intérieur du tube magasin même
si dans un certain sens la pièce est plus
large que l’orifice de passage.
4)
Diminuer
la pression du doigt jusqu’à ce
que le réducteur ne reste pas bloqué con-
tre le bord du tube magasin (fig. 85).
84
85
155
3) Das Reduzierstück ganz in das Rohrma-
gazin
einschieben
, bis der Sicherungsring
auch innerhalb des Magazins ist (Abb.
84).
Die leichte Schrägstellung des Rings er-
möglicht es, dass er in das Rohrmagazin
eingefügt werden kann, auch wenn das
Stück breiter ist als die Öffnung des Maga-
zins.
4) Langsam den Druck des Fingers auf den
Sicherungsring
lösen
bis er fest an der Öff-
nung des Rohrmagazins (Abb. 85) anliegt.
3)
Empuje
hacia el interior del tubo al-
macén todo el reductor haciendo entrar
completamente también el anillo de fija-
ción del reductor (fig. 84).
La posición ligeramente inclinada del
anillo de fijación del reductor
permite
su
completa introducción en el interior del
tubo almacén aunque la pieza sea más
larga por un lado que el hoyo de pasaje.
4)
Disminuya
la presión del dedo hasta que
el reductor no quede fijado en el borde
del mismo tubo almacén (fig. 85).
3)
Вдавить
внутрь трубки магазина весь
ограничитель, также дав полностью
войти кольцу фиксации ограничителя
(рис. 84).
Слегка наклонное положение, в котором
находится кольцо фиксации ограничителя,
обеспечивает
полное введение внутрь
трубки магазина, даже если деталь в
одном направлении шире, чем отверстие
входа.
4)
Уменьшить
давление пальца до тех пор,
пока ограничитель не останется
заблокированным относительно раструба
трубки магазина (рис. 85).
156
Strozzatore interno
Prima di effettuare qualunque tipo di inter-
vento sul vostro fucile, accertatevi sempre
che camera di scoppio e serbatoio siano
completamente vuoti!
(Leggere attentamente
le istruzioni di caricamento e scaricamento
dell’arma).
Le canne con strozzatori interni hanno in
dotazione vari tipi di strozzatori.
ATTENZIONE:
prima di utilizzare l’arma,
assicurarsi sempre che la canna abbia uno
strozzatore correttamente montato.
ATTENZIONE:
lo strozzatore interno corret-
tamente montato non deve sporgere dalla
volata della canna. Utilizzare solo strozzato-
ri Benelli della lunghezza adeguata alla sede
della canna.
Internal choke
Before starting any operation on your shot-
gun, make sure that the chamber and the
magazine are unloaded!
(Carefully read the
instructions on gun loading and unloading).
The barrels with internal chokes are equip-
ped with various types of choke tubes.
WARNING:
before using the shotgun, make
sure that the barrel has a choke correctly
installed.
WARNING:
the internal choke correctly
mounted must not stick out of the barrel’s
muzzle. Use only the Benelli internal choke
with length which correctly fits the barrel.
Choke intérieur
Avant d’effectuer n’importe quel type d’in-
tervention sur votre fusil, toujours vérifier
que la chambre d’explosion et le magasin
sont complètement vides!
(Lire attentivement
les instructions de chargement et de déchar-
gement de l’arme).
Les canons avec choke interne ont en dota-
tion différents types de chokes.
ATTENTION:
avant d’utiliser l’arme, s’assu-
rer toujours que le canon a un choke correc-
tement monté.
ATTENTION:
le choke interne correctement
installé ne doit pas dépasser de la volée du
canon. Utilisez uniquement des chokes
Benelli d’une longueur appropriée au loge-
ment du canon.
157
Innen-Choke
Vor jeder Waffenhandhabung sollten Sie
sicherstellen, dass die Patronenlager und das
Magazin ihres Gewehrs völlig leer sind!
(Bitte
lesen Sie aufmerksam die Anweisungen für
das Laden und das Entladen der Waffe).
Bei den Läufen mit Innenchokes steht eine
Auswahl von unterschiedlichen Chokeeinsät-
zen zur Verfügung.
ACHTUNG:
Achten Sie vor dem Gebrauch
der Waffe immer darauf, dass der Choke kor-
rekt in den Lauf eingeschraubt ist.
ACHTUNG:
Bei ordnungsgemäßem Einbau
darf der Innenchoke weder aus der Laufmün-
dung hervorstehen. Verwenden Sie stets die
Benelli passenden Innenchokes, welche für
den entsprechenden Lauf auch vorgesehen
sind.
Choke interno
Antes de realizar cualquier tipo de interven-
ción en su fusil, asegúrese siempre de que la
cámara de explosión y el almacén estén
completamente vacíos.
(Lea atentamente las
instrucciones para la carga y descarga del
arma).
Los cañones con chokes internos tienen en
dotación varios tipos de chokes.
ATENCIÓN:
antes de utilizar el arma, asegú-
rese siempre de que el choke del cañón está
correctamente montado.
ATENCIÓN:
el choke interno correctamente
montado no debe sobresalir de la voladura
del cañón. Utilice solo estranguladores Benel-
li con la longitud adecuada al alojamiento del
cañón.
Сменные чоки
Перед тем, как выполнять любые операции
с Вашим ружьем, убедитесь, что патронник
и магазин совершенно пустые!
(внимательно
прочитайте инструкции по заряжанию и
разряжанию оружия).
Стволы со сменными чоками имеют в
комплекте чоки с различными сужениями.
ВНИМАНИЕ:
перед стрельбой необходимо
убедиться, что в стволе установлен
соответствующий чок.
ВНИМАНИЕ:
правильно установленный
внутренний чок не должен выступать из
дульного среза ствола. Используйте
только оригинальные дульные устройства
Бенелли, длина которых равна длине
соответствующего посадочного места.
158
Per cambiare o pulire lo strozzatore interno
agire nel seguente modo:
1)
Svitare
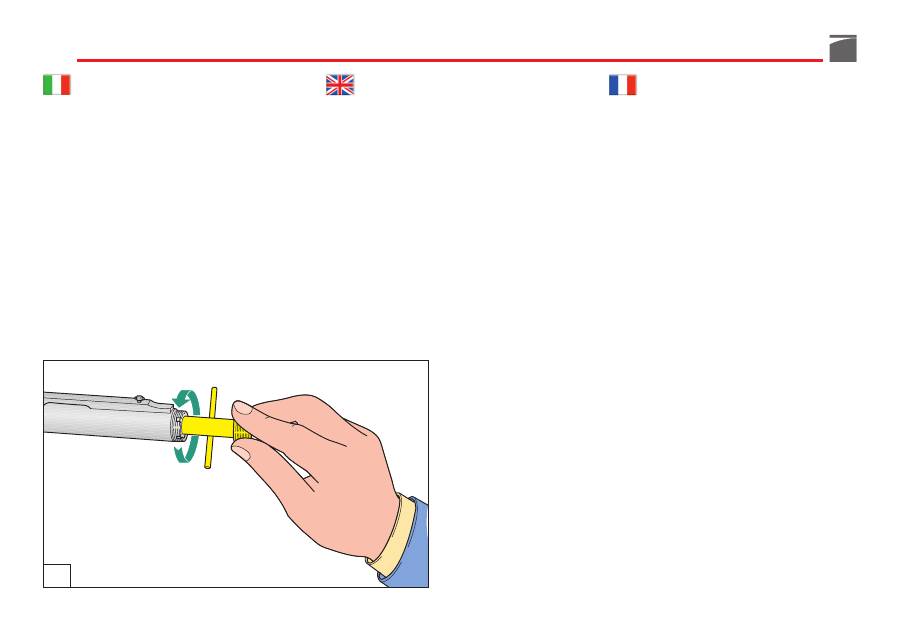
lo strozzatore interno utilizzando
la speciale
chiave dentata
in dotazione
all’arma e sfilarlo completamente dalla
sede della canna (fig. 86).
2) Qualora la sede filettata dello strozzatore
sulla canna
sia molto sporca
, pulirla.
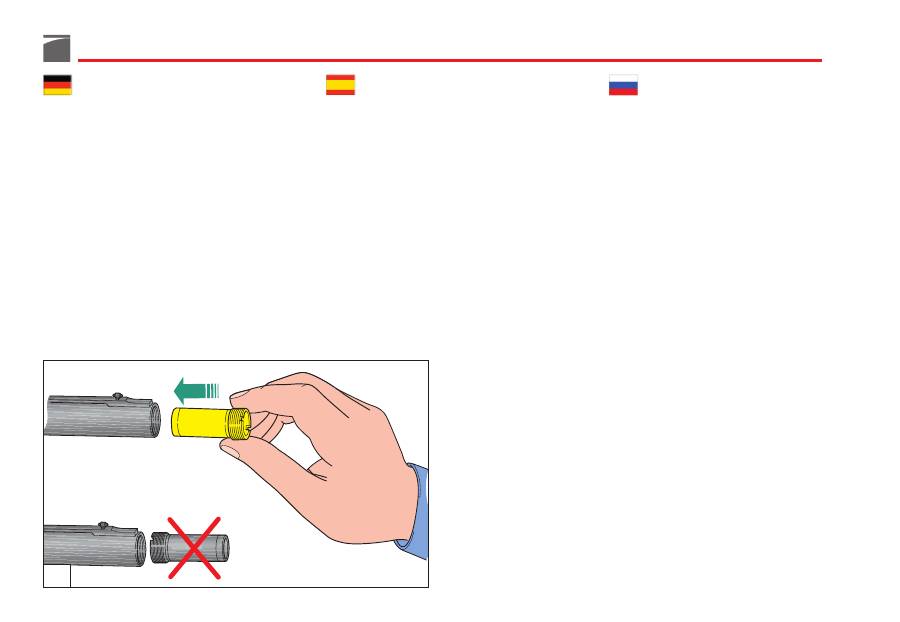
3) Rimontare sulla sede canna il tipo di
strozzatore desiderato, avendo cura di
inserire
la
parte non filettata dello stroz-
zatore
all’interno della canna prima di
avvitarlo sul filetto della canna stessa (fig.
87).
To change or clean the internal choke, pro-
ceed as follows:
1)
Unscrew
the internal choke using the
special
choke wrench
supplied with the
shotgun and extract it completely from
the barrel seat (fig. 86).
2) If the threaded seat of the choke on the
barrel
is too dirty
, clean it.
3) Reassemble on the barrel seat the kind of
choke required, taking care to
insert the
non-threaded part
inside the barrel,
before screwing the choke on the barrel’s
thread (fig. 87).
Pour remplacer ou nettoyer le choke intérieur
intervenir de la manière suivante:
1)
Dévisser
le choke intérieur en utilisant la
clé dentée
spéciale fournie avec l’arme et
le dégager complètement du siège du
canon (fig. 86).
2) Au cas où le siège fileté du choke sur le
canon
serait très encrassé
, le nettoyer.
3) Remonter sur le canon le type de choke
désiré en ayant soin
d’introduire la partie
non filetée du choke
à l’intérieur du ca-
non avant de serrer le choke sur le filet
du canon (fig. 87).
86
87
159
Zum Auswechseln oder Reinigen der Innen-
chokes muss wie folgt vorgegangen werden:
1) Den Innenchoke mit dem mitgelieferten
gezahnten
Spezial-Chokeschlüssel
aus
dem Lauf
herausschrauben
und heraus-
ziehen (Abb. 86).
2) Bei
Verschmutzung
des Lauf- und Choke-
gewinde, sind diese zu Reinigen.
3) Den gewünschten Choke-Typ in den Lauf
einsetzen und dabei darauf achten, dass
der Innenchoke mit dem
gewindelosen
Teil zuerst
in die Laufmündung einge-
steckt wird, bevor der Innenchoke voll-
ständig in das Laufgewinde eingeschraubt
wird (Abb. 87).
Para cambiar o limpiar el choke interno actúe
como se explica a continuación:
1)
Destornille
el choke interno utilizando la
llave dentada
en dotación con el arma y
quítelo completamente de su alojamiento
en el cañón (fig. 86).
2) Si el alojamiento fileteado del choke del
cañón
está muy sucio
, límpielo.
3) Vuelva a montar en el alojamiento del
cañón el tipo del choke deseado, procu-
rando
introducir la parte no fileteada del
choke
en el interior del cañón antes de
atornillarlo en el filete del cañón (fig. 87).
Для того чтобы заменить или очистить
сменный чок, выполните следующее:
1)
Выверните
чок, используя специальный
ключ, имеющийся
в комплекте ружья, и
полностью извлеките его из ствола (рис.
86).
2) Если резьба в стволе
засорена
, очистите
ее.
3) Вновь установите в посадочное место
ствола требуемый тип сменного чока,
вставляя его
внутрь ствола
не с
резьбовой стороны
(рис. 87), и плотно
затяните его.

