chiliGREEN MS1733: CHAPTER 3
CHAPTER 3: chiliGREEN MS1733

CHAPTER 3
Getting Started

3-2
Getting Started
Power Management
Connecting the AC power
It is strongly recommended to connect the AC/DC adapter to the notebook and use the AC power
while using this notebook for the first time. When the AC power is connected, recharging the
battery will start immediately.
Note that the AC/DC adapter included in the package is approved for your notebook; using other
adapter model may damage either the notebook or other devices attached to it.
Do not cover the AC/DC adapter since it may produce a certain heat while in use. Always be
aware of heat coming from the AC/DC adapter in use.
3-3
Getting Started
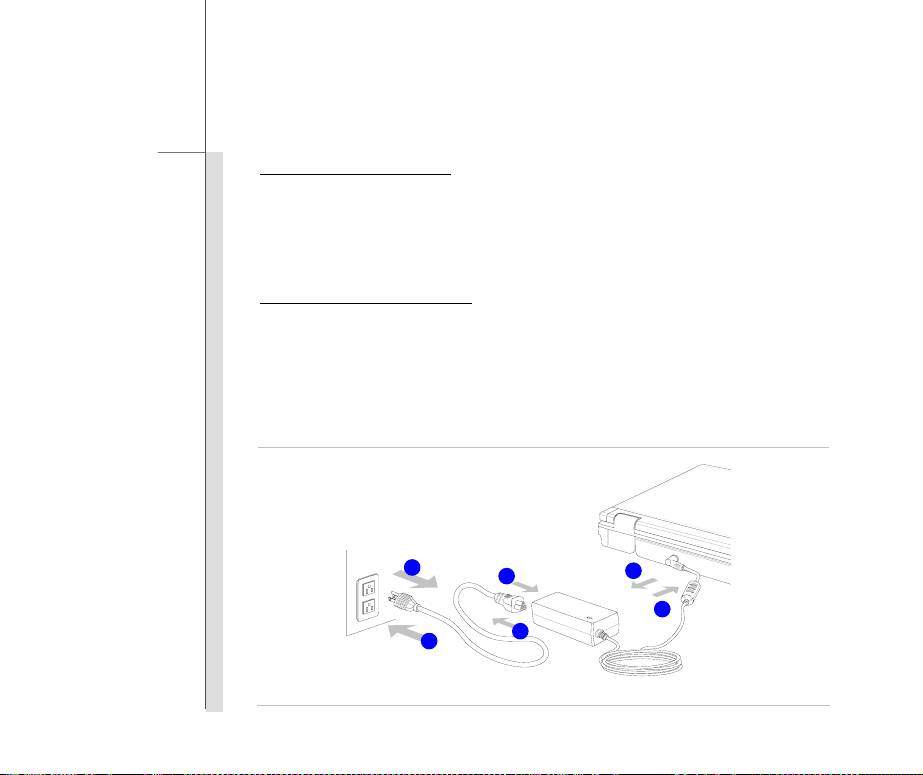
Connecting the AC Power
1. Unpack the package to find the AC/DC adapter and power cord.
2. Attach the power cord to the connector of the AC/DC adapter.
3. Plug the DC end of the adapter to the notebook, and the male end of the power cord to the
electrical outlet.
Disconnecting the AC Power
When you disconnect the AC/DC adapter, you should:
4. Unplug the power cord from the electrical outlet first.
5. Unplug the connector from the notebook.
6. Disconnect the power cord and the connector of AC/DC adapter.
7. When unplugging the power cord, always hold the connector part of the cord. Never pull the
cord directly!
4
5
2
3
6
3

3-4
Getting Started
Using the Battery Power
This notebook is equipped with a high-capacity Li-ion battery pack. The rechargeable Li-ion battery
pack is an internal power source of the notebook.
Be aware of that this battery pack may be damaged if users try to disassemble the battery pack on
their own. Also, note that the limited warranty to the battery pack may also lose its efficacy when
this battery pack is disassembled not by an authorized machinist.
To prevent explosion caused by improper battery replacement, use the same or equivalent type of
battery recommended by the manufacturer only.
Always keep the battery which is not in use in a safe place.
Please follow your local laws and regulations to recycle the unused battery pack.

3-5
Getting Started
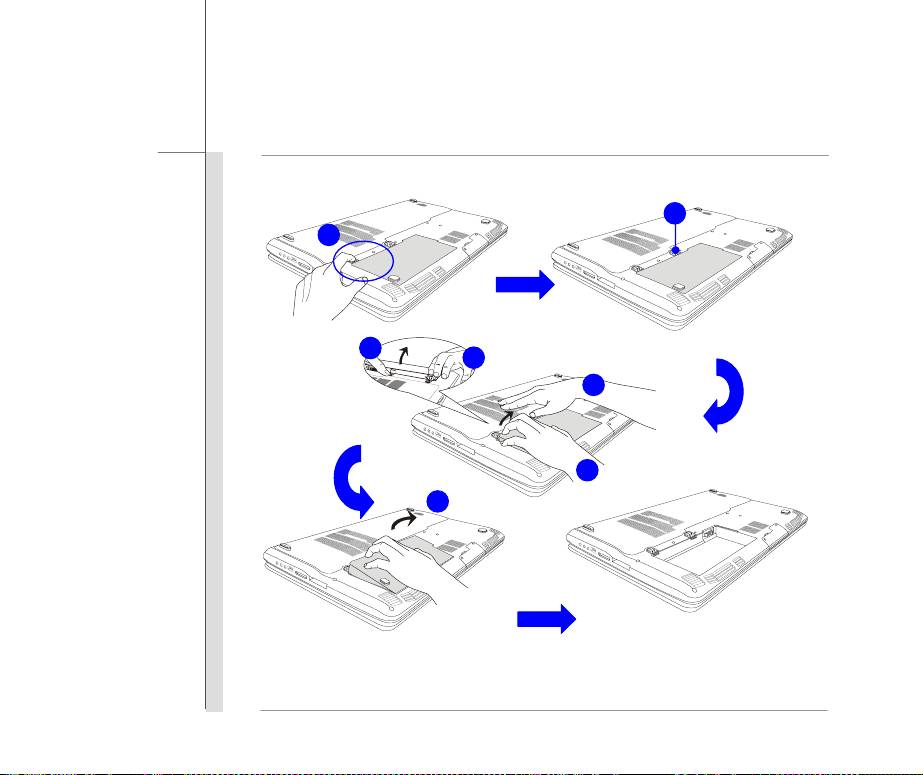
Installing the Battery Pack
It is always recommended to have another battery pack in reserve for enough power supply.
Please contact your local dealer to purchase a battery pack that is compliant to your notebook.
To insert the battery pack, following the steps below:
1
1. Align and place the battery to the
battery tray with correct orientation.
2
2. Press down the battery pack to fasten
the battery pack in the battery tray.
3. Press the lock/unlock button to the
3
Lock position to make sure the battery
pack is securely fastened.
The figures show here are
for reference only.

3-6
Getting Started
Releasing the Battery Pack
To install the battery pack, following the steps below:
1. Make sure the notebook is turned off, and the AC power is disconnected.
2. Press the lock/unlock button to the unlocked position.
3. Locate the battery release button on the bottom side.
4. Push and hold the release button to the battery releasing direction as shown on the bottom
side.
5. Dig the edge of battery pack out of the battery tray with your finger tip. Be careful with your
finger while trying to take out the battery pack.
6. And then pull the battery pack out.
3-7
Getting Started
3
2
4
5
4
5
6

3-8
Getting Started
Battery Safety Tips
Replacing or handling the battery incorrectly may present a risk of fire or explosion, which could
cause serious injury.
Only replace the main battery pack with the same or equivalent type of battery.
Do not disassemble, short-circuit or incinerate batteries or store them to temperatures above
+60° C (+140° F).
Do not temper with batteries. Keep away from the reach of children.
Do not use rusty or damaged batteries.
Dispose of batteries according to local regulations. Check with your local solid waste
officials for details about recycling options or for proper disposal in your area.
Conserving Battery Power
Efficient battery power is critical to maintain a normal operation. If the battery power is not
managed well, the saved data and customized settings may be lost.
To optimize battery life and avoid a sudden power loss, read the tips below:
Suspend system operation if the system will be idle for a while or shorten the suspend timer’s
time period.
Turn off the system if you won’t be using it for a period of time.
Disable unnecessary settings or remove idle peripherals.
Connect an AC/DC adapter to the system whenever possible.

3-9
Getting Started
Charging the Battery Pack
The battery pack can be recharged while it is installed in the notebook. Please pay attention to the
following tips before recharging the battery:
If a charged battery pack is not available, save your work and close all running programs and
shut down the system or Save-to-Disk.
Plug in an external AC/DC adapter.
You can use the system, suspend system operation or shut down and turn off the system
without interrupting the charging process.
The battery pack uses Lithium-ion battery cells that have no “memory effect.” It is
unnecessary to discharge the battery before recharging. However, to optimize the life of
battery, we suggest that consuming the battery power completely once a month is necessary.
If you do not use the notebook for a long time, it is suggested to remove the battery pack from
your notebook. This may be helpful to extend your battery life.
The actual charging time will be determined by the applications in use.

3-10
Getting Started
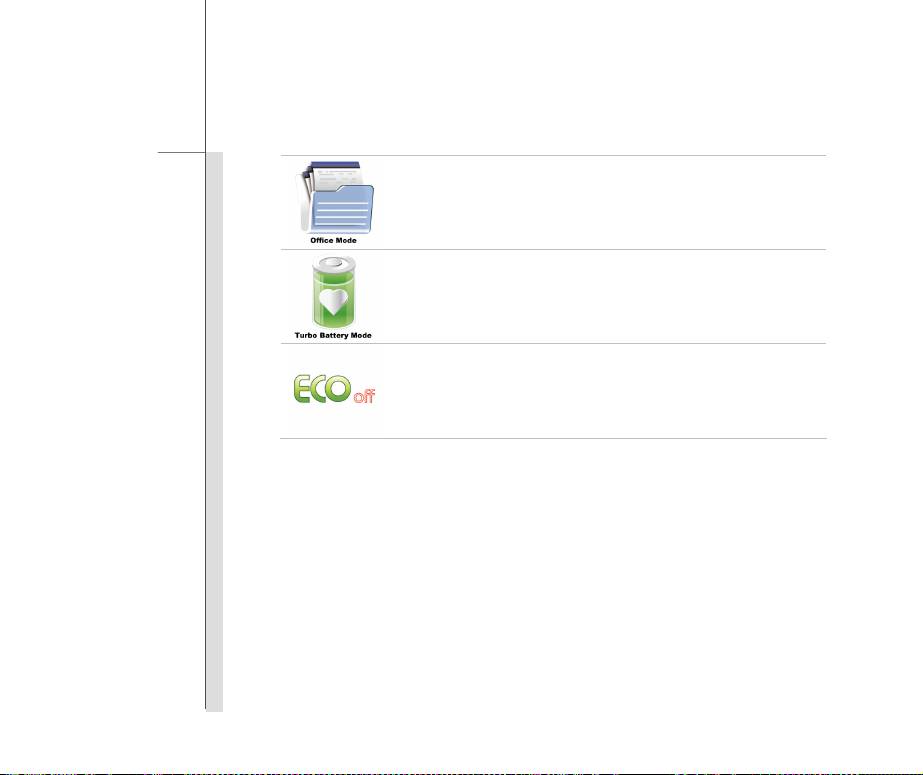
ECO Engine -- Power Saving Function (Optionally Supported)
ECO Engine
, the outstanding and unique power saving function, provides various power saving
modes – Gaming mode, Movie mode, Presentation mode, Office mode, and Turbo Battery
mode, to extend the battery running time while performing different tasks with this notebook.
Read the instructions bellow to activate the ECO Engine power saving function:
1. Press the ECO quick launch button repeatedly to switch among the different modes of ECO
Engine, or to turn this ECO Engine off recurrently.
2. To learn which power saving mode is activated presently, read the icon on behalf of each mode
appearing on the display when selected.
Gaming Mode
Select this mode while performing game applications.
Movie Mode
Select this mode while playing multimedia applications
Presentation Mode
Select this mode while performing presentation applications.
3-11
Getting Started
Office Mode
Select this mode while dealing with office documentation tasks.
Turbo B attery Mode
Select this mode to maximize the battery running time.
ECO Off
Selected to disable ECO Engine.

3-12
Getting Started
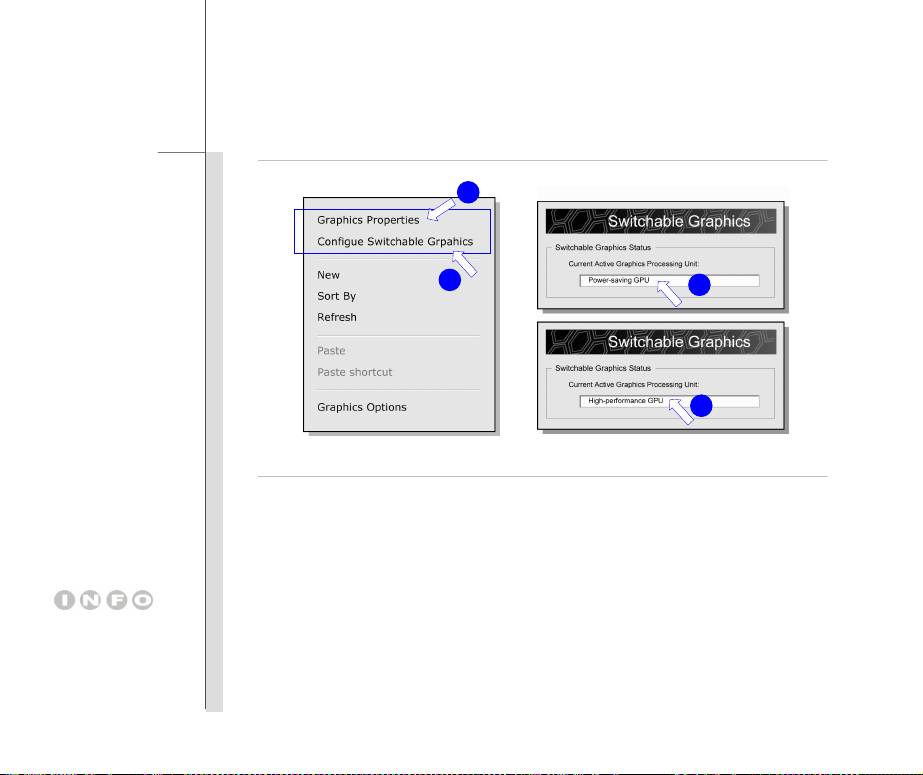
Switchable Graphics Function (Optionally Supported)
Switchable Graphics Function allows users to choose between using the discrete and the internal
graphic card depending on the tasks users are currently performing. With this function, users can
easily and quickly select either to maximizing the graphic performance or extending the battery
running time.
1. Bringing up the Switchable Graphics
dialogue, by right clicking the mouse on the desktop, and
select [Configure Switchable Graphics.]
2. In the Switchable Graphics
dialogue, users can read the status of graphics mode and also be
able to choose a proper graphics processing unit here.
3. For more settings on graphics, please select [Graphics Properties] to bring up the
sub-dialogue of the graphics.
4. It is recommended to close all programs when switching graphics mode. Screen will blink while
switching modes, which is a normal behavior.
5. It is recommended to close all programs when switching graphics mode. Screen will blink while
switching modes, which is a normal behavior.
3-13
Getting Started
3
1
2
2
The figures show here are
for reference only.

3-14
Getting Started
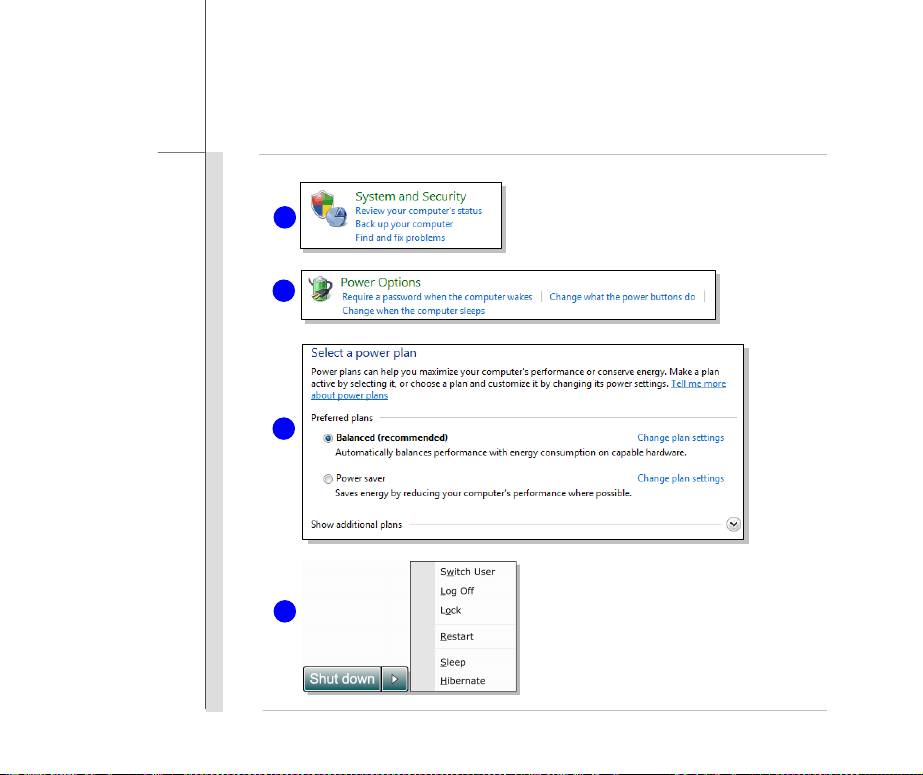
Power Management in Windows OS
Power management of personal computers (PCs) and monitors has the potential to save significant
amounts of electricity as well as deliver environmental benefits. To be energy efficient, turn off your
display or set your PC to standby/hibernate mode after a period of user inactivity.
Follow the instructions below to adjust the power management settings in Windows OS:
1. Power Options in Windows OS allow you to control the power management features of your
display, hard drive, and battery. Go to the Start menu and click on the Control Panel. Click on
the System and Security.
2. Then click on the Power Options.
3. Then select a power plan that meets your personal needs
4. The Shut Down Computer menu will present the options to Sleep (S3/S4), Shut Down (S5), or
Restart your computer.
5. The computer should be able to wake up from power saving mode in response to a command
from any of following:
the power button,
the mouse,
the keyboard.
3-15
Getting Started
1
2
3
4

3-16
Getting Started
Energy Saving Tips
Activate the ECO power saving function to manage the computer’s energy consumption.
Turn off the monitor after a period of user inactivity.
Utilize the Fn and F12 sleep mode keys to turn into power saving mode.
Tune the settings in Power Options under Windows OS to optimize the computer’s power
management.
Always disconnect the AC power cord or uninstall the battery pack or switch off the wall socket if
the computer would be left unused for a certain time to achieve zero energy consumption.

3-17
Getting Started
Basic Operations
If you are a beginner to the notebook, please read the following instructions to assure your own
safety, and make yourself comfortable during the operations.
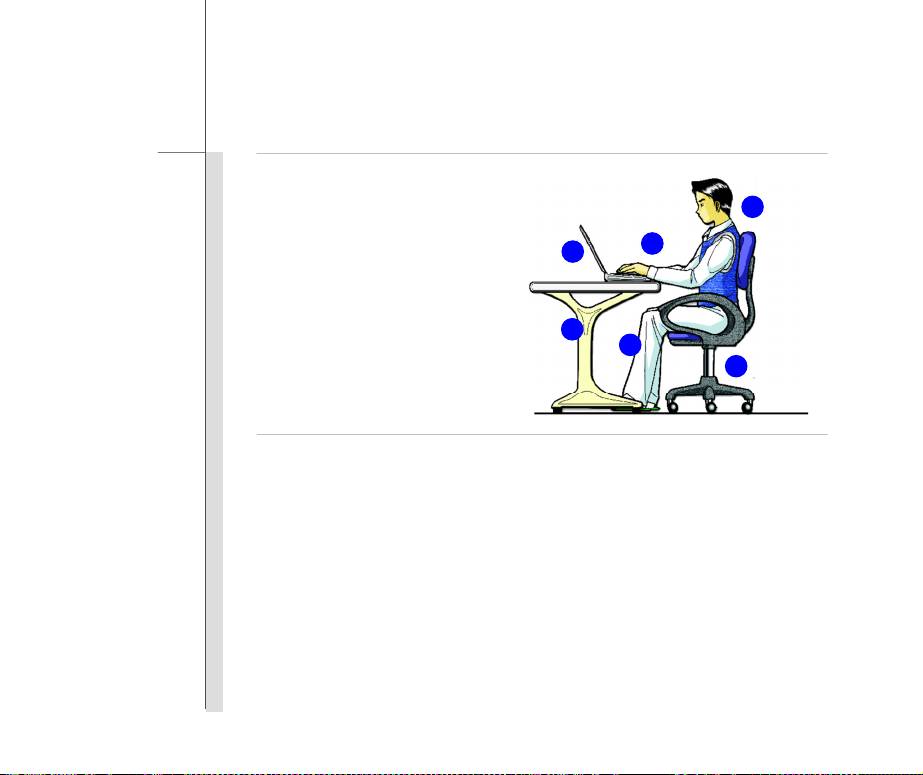
Safety and Comfort Tips
The notebook is a portable platform that allows you to work anywhere. However, choosing a good
workspace is important if you have to work with your notebook for a long period of time.
Your work area should have enough illumination.
Choose the proper desk and chair and adjust their height to fit your posture when operating.
When sitting on the chair, adjust the chair’s back (if available) to support your back
comfortably.
Place you feet flat and naturally on the floor, so that your knees and elbows have the proper
position (about 90-degree) when operating.
Put your hands on the desk naturally to support your wrists.
Adjust the angle/position of the LCD panel to have an optimal view.
Avoid using your notebook in the space where may cause you discomfort (such as on the
bed).
The notebook is an electrical device, please treat it with great care to avoid personal injury
3-18
Getting Started
4
1. Keep your hands and feet with
optimal comfort.
1
2
2. Adjust the angle and position of LCD
panel.
3. Adjust the desk’s height.
4. Sit straight and keep a good posture.
3
1
5. Adjust the chair’s height.
5
Having a Good Work Habit
Have a good work habit is important if you have to work with your notebook for long periods of time;
otherwise, it may cause discomfort or injury to you. Please keep the following tips in mind when
operating.
Change your posture frequently.
Stretch and exercise you body regularly.
Remember to take a break after working for a period of time.
3-19
Getting Started
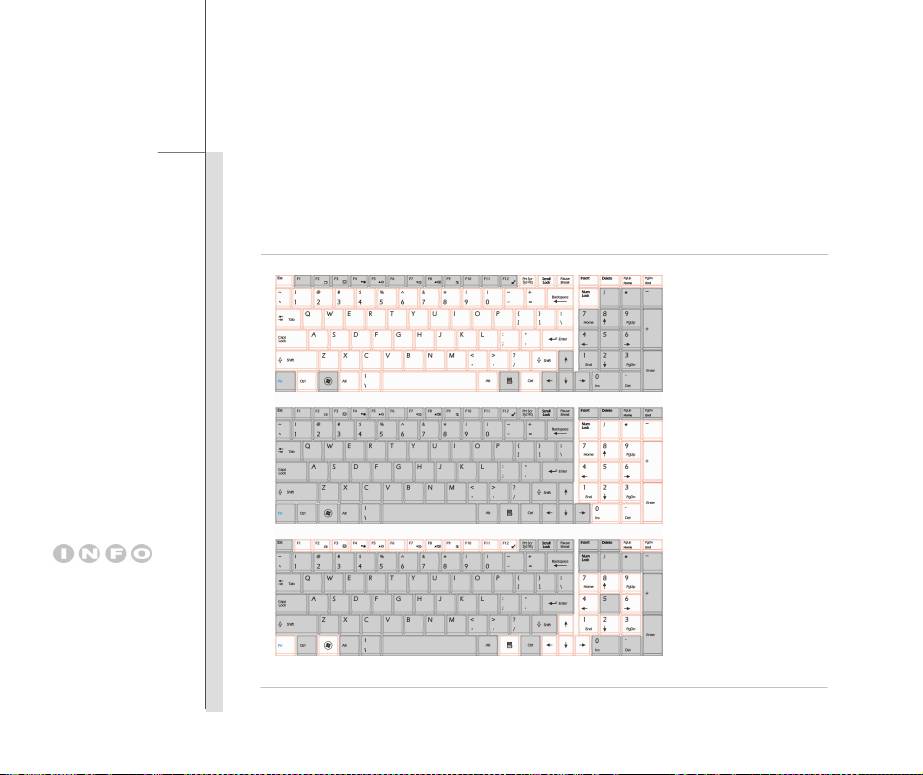
Knowing the Keyboard
This notebook provides a full-functioned keyboard. This keyboard can be divided into four
categories: Typ ew riter ke ys, Cursor keys, Numeric keys and Function keys.
The keyboard shown here
may vary from the actual
one, depending on which
county users purchase the
noteboo
k
Typewriter keys
Numeric keys
Cursor keys /
Function keys
.

3-20
Getting Started
Typewriter Keys
In addition to providing the major function of the keyboard, these typewrite keys also provide several
keys for special purposes, such as [Ctrl,] [Alt,] and [Esc] key.
When the lock keys are pressed, the corresponding LEDs will light up to indicate their status:
Num Lock: Press this key to toggle the Num Lock on and off. When this function is activated,
you can use the numeric keys that are embedded in the typewriter keys.
Caps Lock: Press this key to toggle the Caps Lock on and off. When this function is activated,
the letters you type are kept in uppercase.
Scroll Lock: Press this key to toggle the Scroll Lock on and off. This function is defined by
individual programs, and is usually used under DOS.
Numeric Keys
Find the numeric keys among the keyboard, and activate the Num Lock function to use these
numeric keys to enter numbers and calculations.

3-21
Getting Started
Cursor Keys
The four cursor (arrow) keys and [Home], [PgUp], [PgDn], [End] keys are used to control the cursor
movement.
Move the cursor left for one space.
Move the cursor right for one space.
Move the cursor up for one line.
Move the cursor down for one line.
Move to the previous page.
+
Move to the next page.
+
3-22
Getting Started
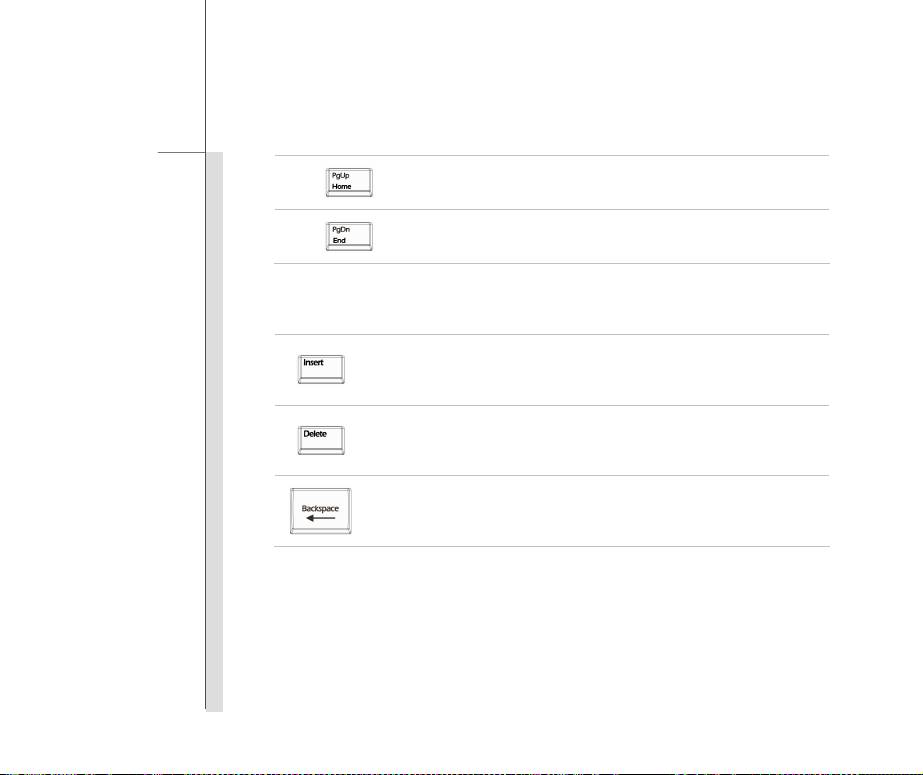
Move to the beginning of the line (or document).
Move to the end of the line (or document).
The Backspace key, [Ins] and [Del] keys at upper right corner are use for editing purpose.
This key is used to switch the typing mode between “insert” and “overtype”
modes.
Press this key to delete one character to the right of the cursor and move the
following text left for one space.
Press this key to delete one character to the left of the cursor and move the
following text left for one space.
3-23
Getting Started
Function Keys
Windows Keys
You can find the Windows Logo key (
) and one Application Logo key ( ) on the keyboard,
which are used to perform Windows-specific functions, such as opening the Start menu and
launching the shortcut menu. For more information of the two keys, please refer to your
Windows manual or online help.
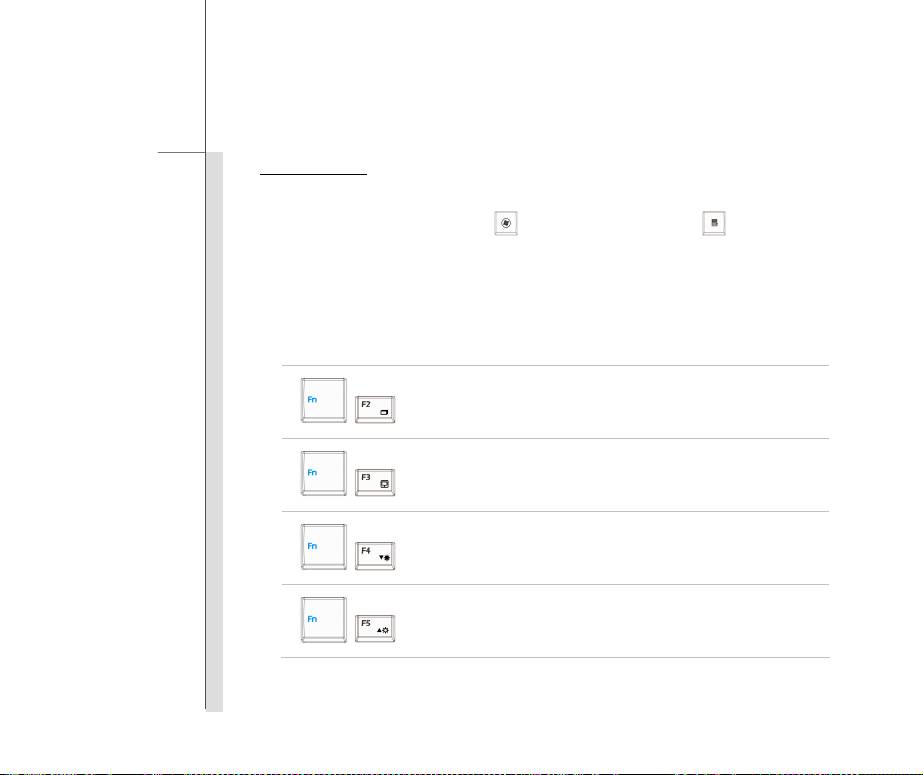
[Fn] Key
Switch the display output mode between the LCD, external monitor and
both.
+
Enable or disable the touchpad function.
+
Decrease the LCD brightness.
+
Increase the LCD brightness.
+
3-24
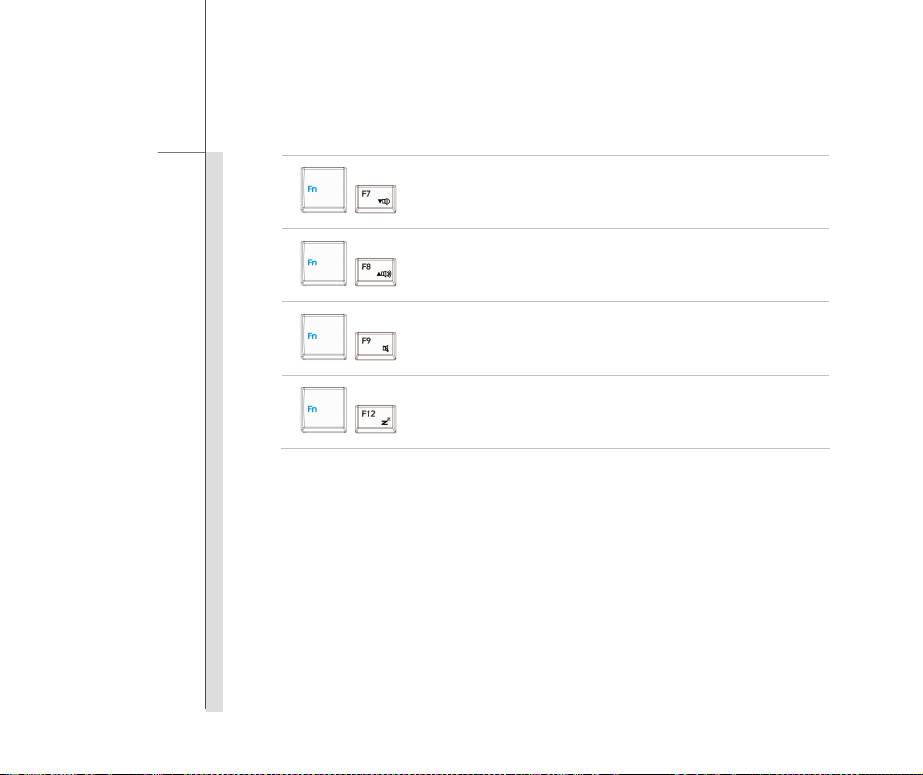
Getting Started
Decrease the built-in speaker’s volume.
+
Increase the built-in speaker’s volume.
+
Disable the computer’s audio function.
+
Force the computer into sleep state (depending on the system
configuration).
+
3-25
Getting Started
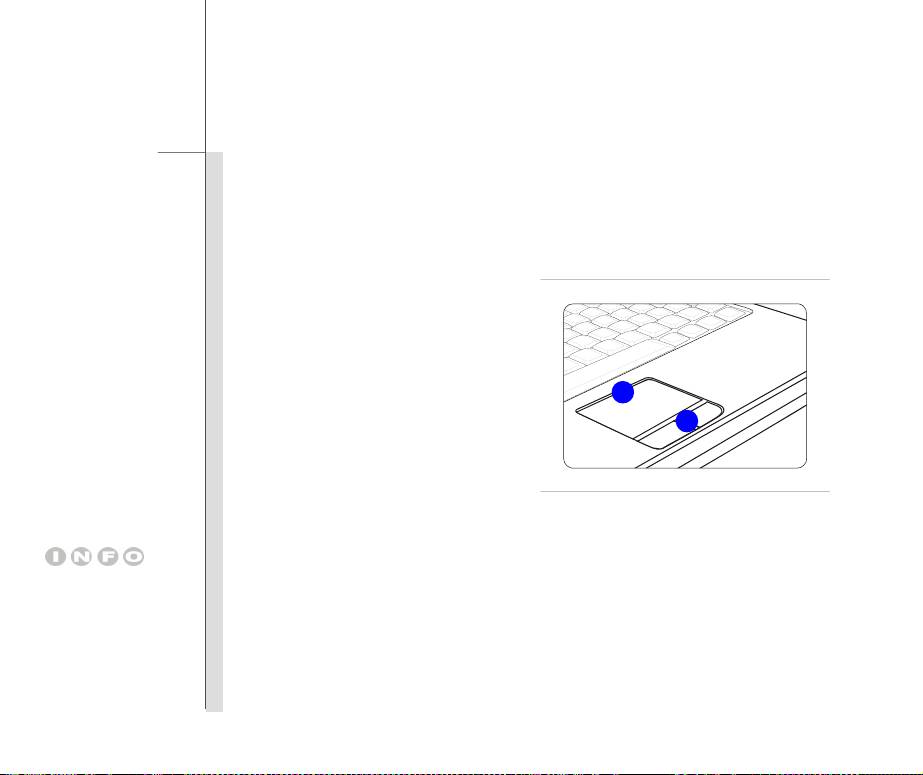
Knowing the Touchpad
The touchpad integrated in your notebook is a pointing device that is compatible with standard
mouse, allowing you to control the notebook by pointing the location of the cursor on the screen and
making selection with its two buttons.
1. Cursor Movement Area
This pressure-sensitive area of the touchpad,
allows you to place your finger on and
control the cursor on the screen by moving
one of your finger.
1
2
2. Enter Buttons
Acts as the Enter button of the keyboard.
The touchpad figures shown
here are for reference only,
and may be different from
the notebook that users
purchased

3-26
Getting Started
Using the Touchpad
Read the following description to learn how to use the touchpad:
Configuring the Touchpad
You can customize the pointing device to meet your personal needs. For example, if you are a
left-handed user, you may want to swap the functions of the two buttons. In addition, you can
change the size, shape, moving speed and other advanced features of the cursor on the screen.
To configure the touchpad, you can use the standard Microsoft or IBM PS/2 driver in your
Windows operating system. The Mouse Properties in Control Panel allows you to change
the configuration.
Positioning and Moving
Place your finger on the touchpad (usually using the forefinger), and the rectangular pad will act
as a miniature duplicate of your display. When you move your fingertip across the pad, the
cursor on the screen will move simultaneously to the same direction. When your finger
reaches the edge of the pad, lift your finger and place it on a proper location of the touchpad to
continue the movement.
Point and Click
When you have moved and placed the cursor over an icon, a menu item or a command that you
want to execute, simply tap slightly on the touchpad or press the left button to select. This
procedure, called as point and click is the basics of operating your notebook. Unlike the
traditional pointing device such as the mouse, the whole touchpad can act as a left button, so
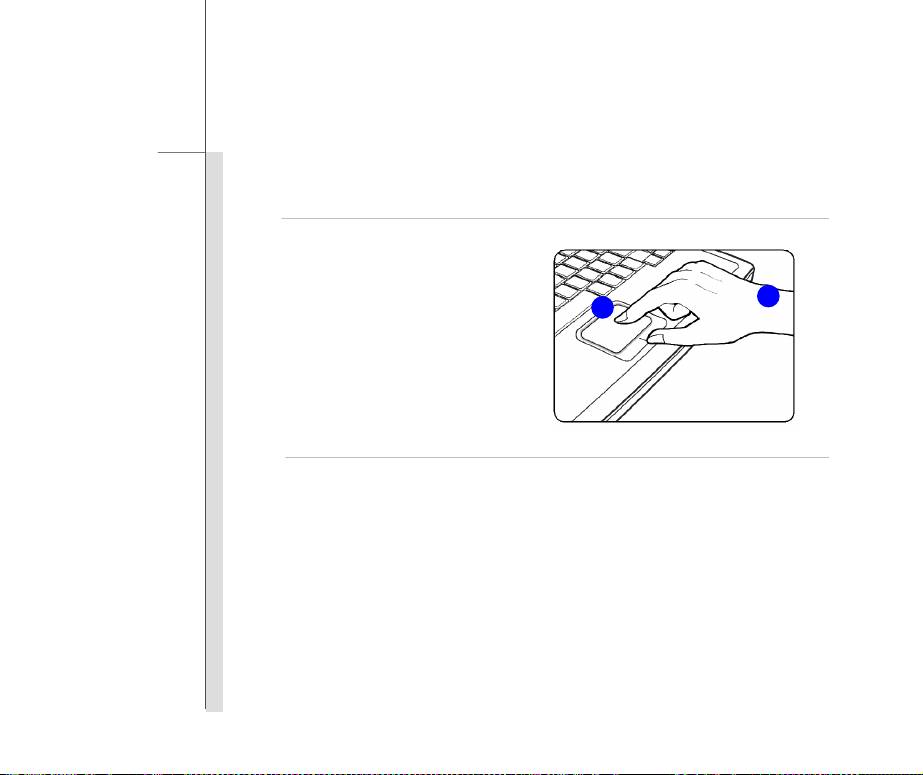
3-27
Getting Started
that your each tap on the touchpad is equivalent to pressing the left button. Tapping twice
more rapidly on the touchpad is to execute a double-click.
1. Move the cursor by sliding
2
your fingertip.
1
2. Put your wrist on the desk
comfortably.

3-28
Getting Started
About Hard Disk Drive
Your notebook is equipped with a 2.5-inch hard disk drive. The hard disk drive is a storage device
with much higher speed and larger capacity than other storage devices, such as the floppy disk drive
and optical storage device. Therefore, it is usually used to install the operating system and
software applications.
To avoid unexpected data loss in your system, please backup your critical files regularly.
Do not turn off the notebook when the hard disk In-use LED is on.
Do not remove or install the hard disk drive when the notebook is turned on. The replacement of
hard disk drive should be done by an authorized retailer or service representative.

3-29
Getting Started
Using the Optical Storage Device
Your notebook is equipped with an optical storage device. The actual device preinstalled in your
notebook depends on the model you purchased.
Blu-ray Combo: This device works not only as a Blu-ray Disc reader but also a DVD Writer,
which provides users an all-in-one solution to playback high definition content, and record data
onto CD or DVD.
Blu-ray is a high-capacity optical disc that holds the high-definition video (HD) on a single-sided
disk, and supports the more advanced H.264 and VC-1 video encoding algorithms (codecs) as
well as MPEG-2, which is used for DVD. It also supports the highest HDTV resolution.
DVD Super Multi: Works as a multi-functional DVD Dual Drive and a DVD RAM Drive. It is
capable to write CD-R, CD-RW, DVD-R/DVD-RW, or DVD+R/DVD+RW formats, and so on.
3-30
Getting Started
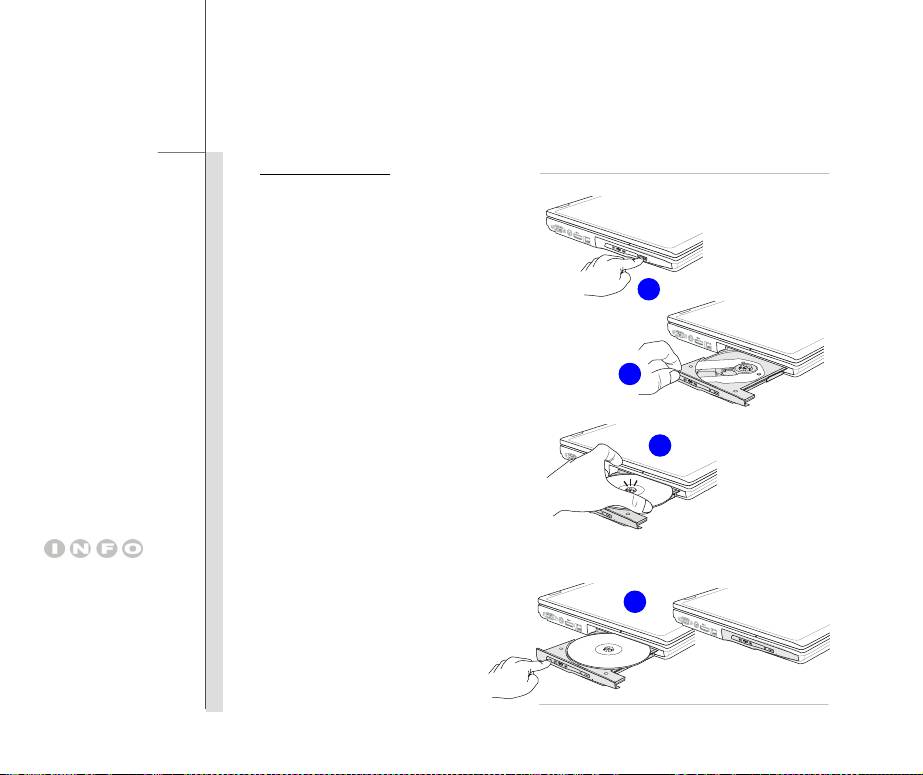
Inserting the Disk
The following instructions describe the
general procedure when operating the
optical storage device:
1. Confirm that the notebook is turned on.
2
2. Press the eject button on the panel and
the disk tray will slide out partially.
3
3. Gently pull the tray out until fully
4
extended.
4. Place your disk in the tray with its label
facing up. Slightly press the center of
1. Confirm that the disk is
the disk to secure it into place.
placed correctly and
5
securely in the tray
before closing the tray.
5. Push the tray back into the drive.
2. Do not leave the disk
tray open.
3-31
Getting Started
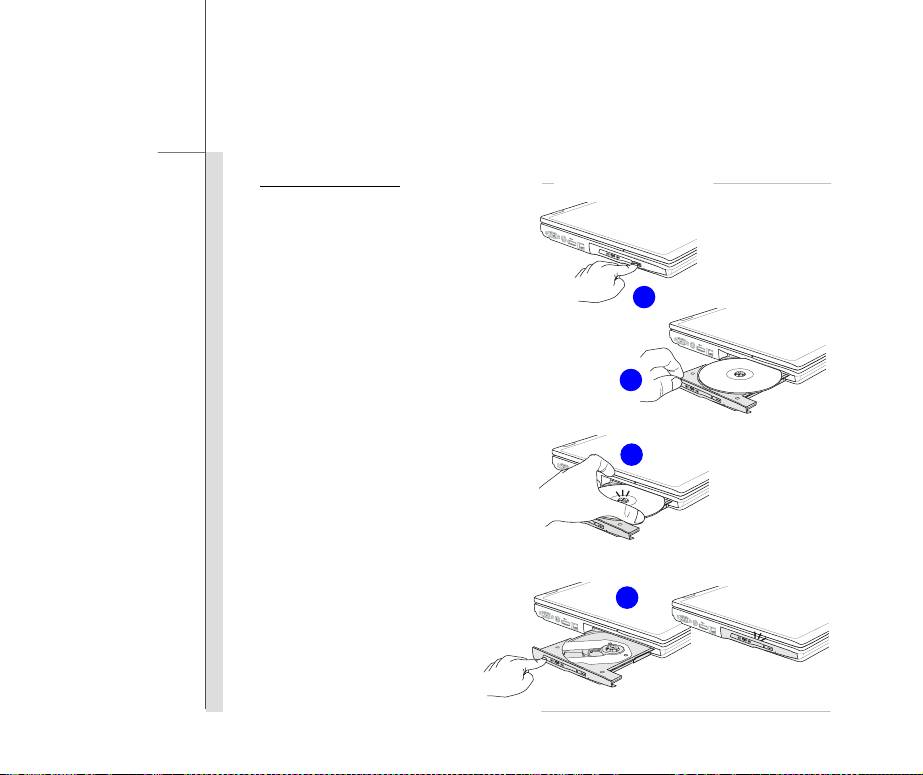
Removing the Disk
Follow the instructions below to remove the
disk that is placed in the optical storage
device:
6. Press the eject button on the drive’s
6
panel and the disk tray will slide out
partially.
7
7. Gently pull the tray out until fully
extended.
8
8. Hold the disk by its edge with your
fingers and lift it up from the tray.
9
9. Push the tray back into the drive.
3-32
Getting Started
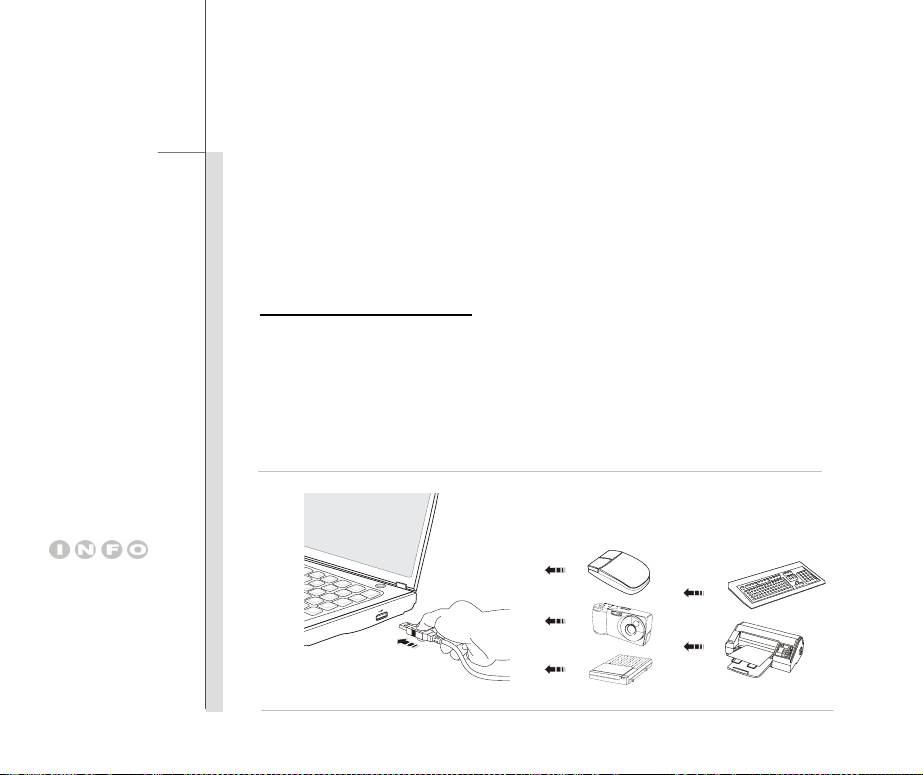
Connecting the External Devices
The I/O (input/output) ports on the notebook allow you to connect peripheral devices. All devices
listed here are for reference only.
Connecting the Peripheral Devices
Connecting the USB devices
This notebook provides USB ports for connecting various USB devices, such as mouse, keyboard,
digital camera, webcam, printer, and external optical storage device, ete.. To connect these
devices, install the drivers for each device first if necessary, and then connect the device to the
notebook. This notebook is capable to auto detect the USB devices installed, and if there is no
detection of the devices, please manually enable the USB devices by going to Start Menu / Control
Panel / Add Hardware to add the new device.
The devices shown in the
reference figures here may
be different from the devices
users have.
3-33
Getting Started
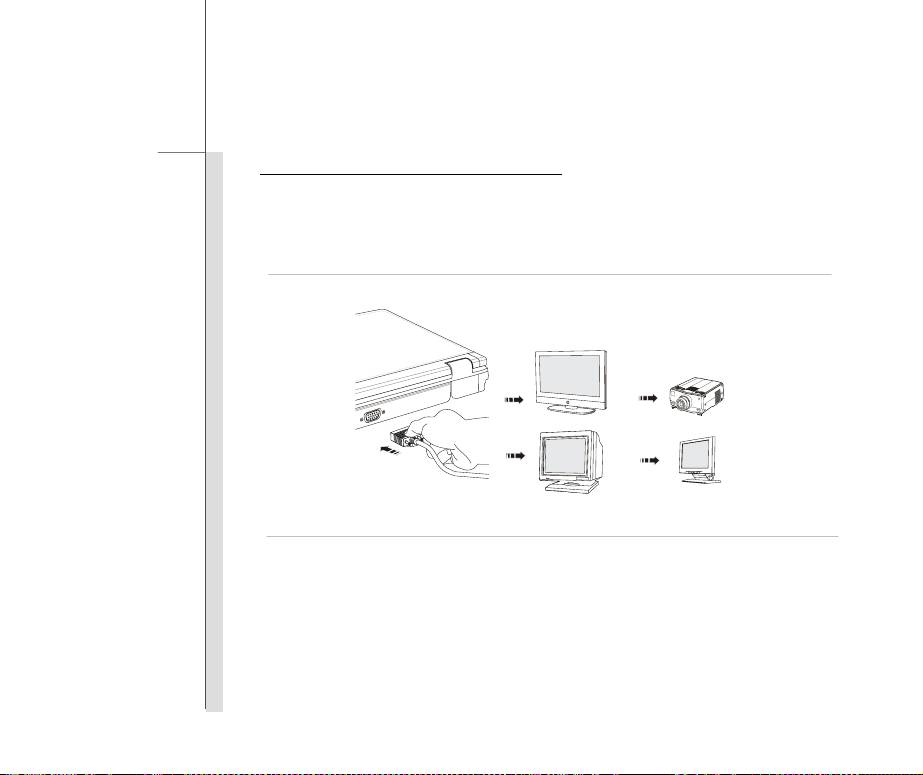
Connecting the External Display Devices
This notebook provides a VGA port for connecting a larger display with higher resolution. The
15-pin D-Sub VGA port allows users to connect an external monitor or other standard
VGA-compatible device (such as a projector) for a great view of the notebook display.
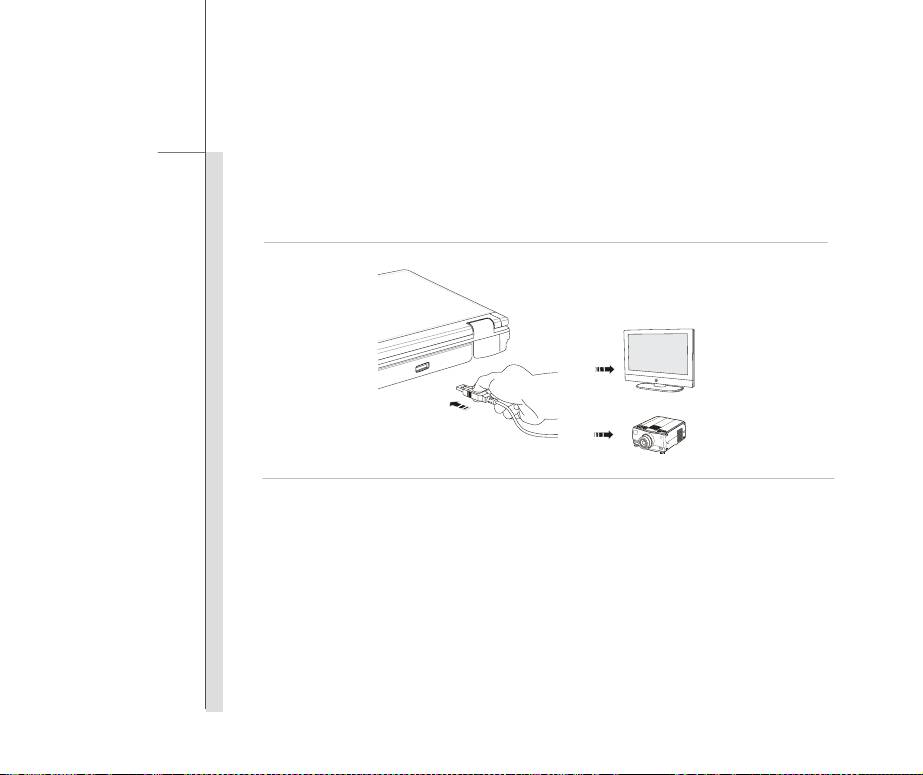
3-34
Getting Started
HDMI (High Definition Multimedia Interface Support) is a new interface standard for PCs, displays
and consumer electronics devices that supports standard, enhanced and high-definition video, plus
multi-channel digital audio on a single cable.
Once the display is connected to the notebook, power on the notebook and the external display
should respond by default. If not, you can switch the display mode by pressing [Fn]+[F2].
Alternately, you can change the display mode by configuring the settings in Display Properties of
Windows operating system.
3-35
Getting Started
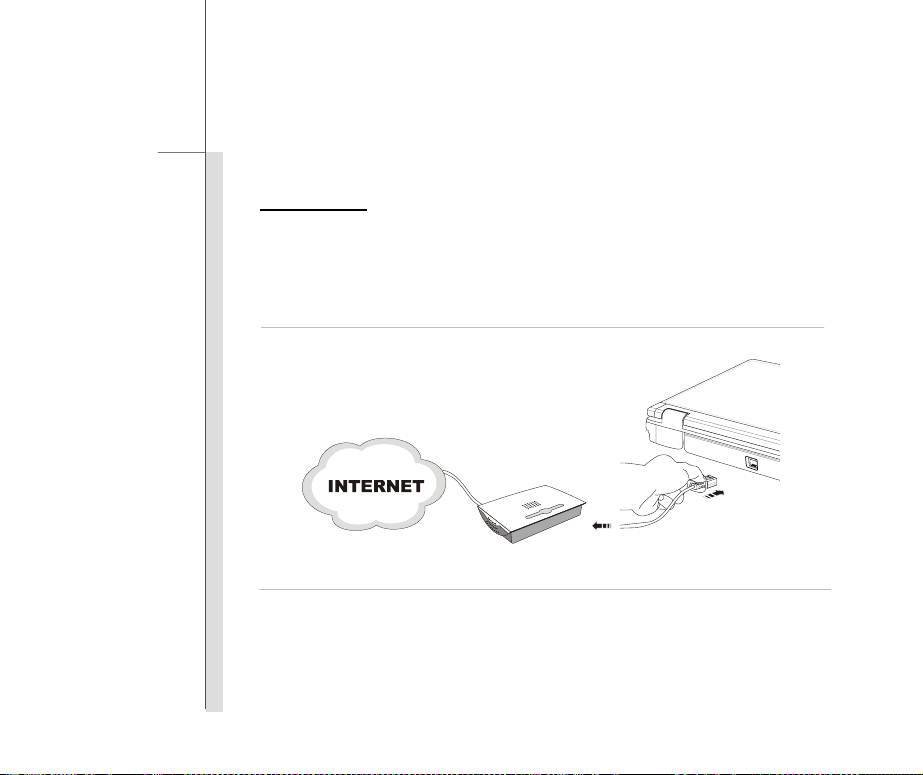
Connecting the Communication Devices
Using the LAN
The RJ-45 connector of the notebook allows you to connect the LAN (local area network) devices,
such as a hub, switch and gateway, to build a network connection.
For more instructions or detailed steps on connecting to the LAN, please ask your MIS staff or
network manager for help.
3-36
Getting Started
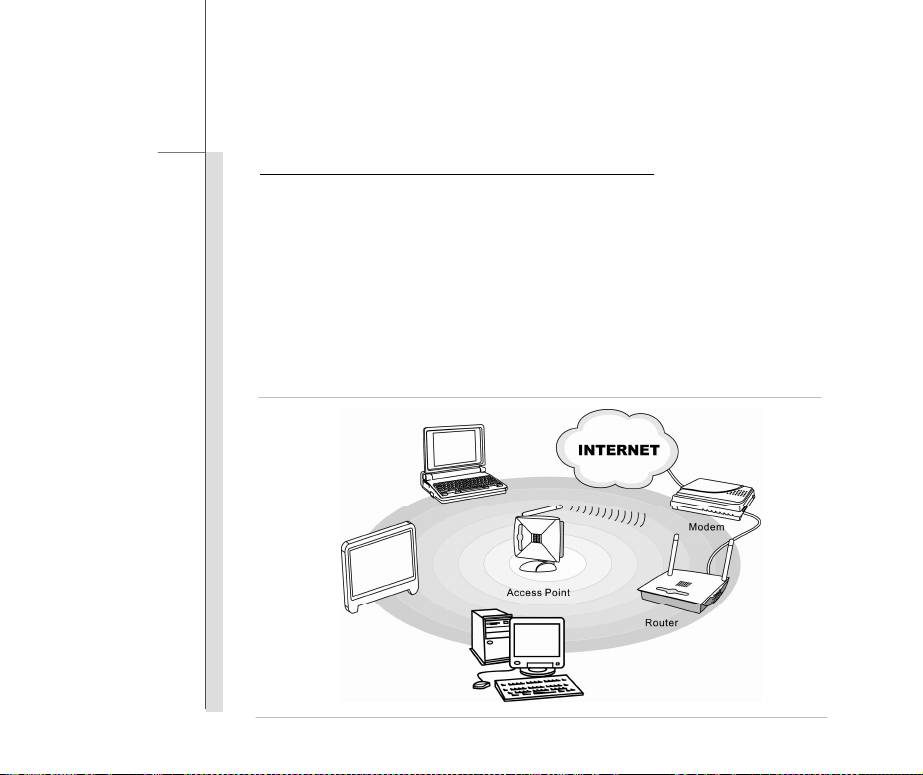
Using Wireless LAN Connection (optional supported)
This notebook is equipped with wireless LAN module which allows users to perform fast data
transmission with the standard IEEE 802.11 for wireless LAN. This gives users the mobility to
move around within a broad coverage area and still be connected to the network.
By using the 64-bit/128-bit Wired Equivalent Privacy (WEP) encryption technology and Wi-Fi
Protected Access feature, the optional built-in wirelesses LAN is capable to achieve a more efficient
and a more secure solution to the wireless communication.
For more instructions or detailed steps on connecting to the Wireless LAN, please ask your MIS staff
or network manager for help.
3-37
Getting Started
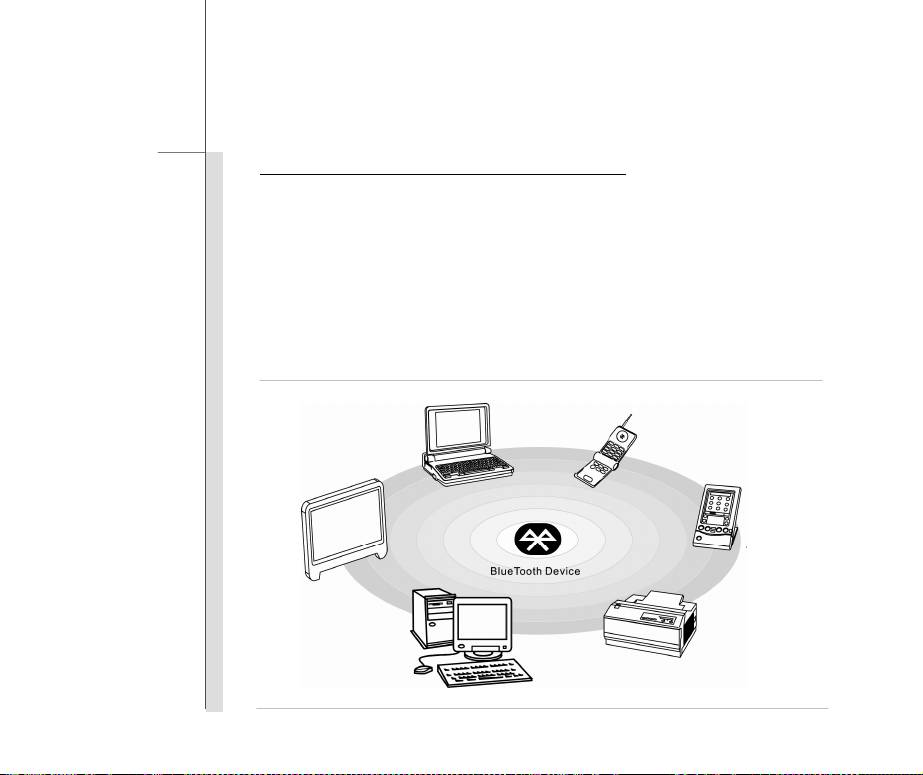
Using Bluetooth Connection (optional supported)
This notebook is equipped with Bluetooth module which allows users to connect various
Bluetooth-enabled devices to the notebook. Bluetooth provides a way to connect and exchange
information between devices such as mobile phones, personal computers, printers, GPS receivers,
PDAs, digital cameras, and video game consoles through a secure, globally unlicensed Industrial,
Scientific and Medical (ISM) 2.4 GHz short-range radio frequency bandwidth.
For more instructions or detailed steps on using the Bluetooth function, please ask your MIS staff or
network manager for help.

3-38
Getting Started
ExpressCard Installation
This computer provides an ExpressCard slot. The new ExpressCard interface is smaller and faster
than PC Card interface. The ExpressCard technology takes advantage of the scalable,
high-bandwidth serial PCI Express and USB 2.0 interfaces.
The following instruction provides you with a basic installation for the ExpressCard, including how to
install and remove it. For more information, please refer to the manual of your ExpressCard.
Removing the ExpressCard
1. Locate the ExpressCard slot on your notebook. There might be a dummy card inserted in the
slot, remove the ExpressCard or dummy card with the same steps below.
2. Press the card to make the card stretch out first.
3. Pull the card out of the slot
4. Empty Slot
Installing the ExpressCard
5. Insert the card into the slot (usually with its label facing up)
6. Push the card into the slot until it is firmly seated.

3-39
Getting Started
Removing the ExpressCard
1 2
2
4
3
3
Installing the ExpressCard
4
5
5
6
3-40
Getting Started
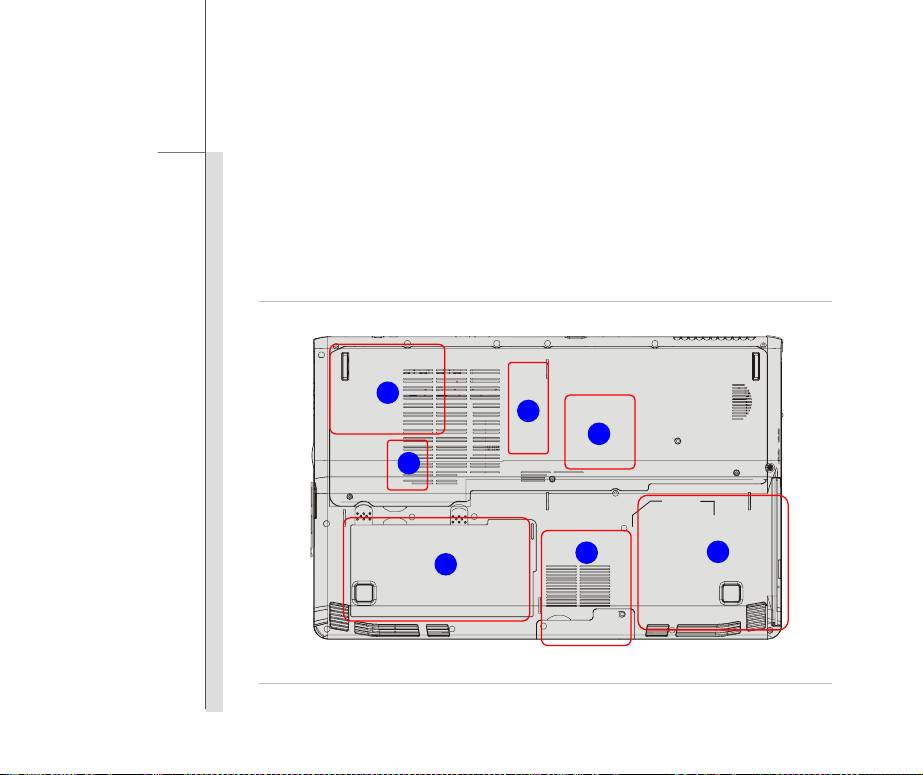
Components Replacement and Upgrade
Please be noticed that the memory, hard disk drive, wireless LAN / Bluetooth module and battery
pack preinstalled in the product users purchased may be upgradable or replaceable by user’s
request depending on the models users purchased.
3
4
6
2
3
5
1
3-41
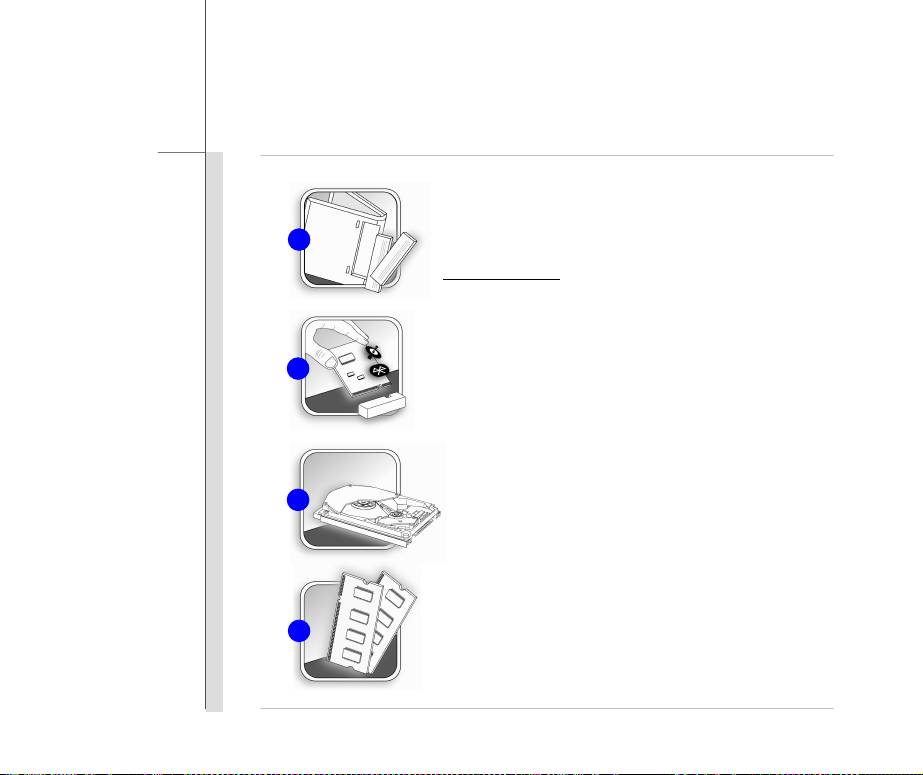
Getting Started
This notebook is equipped with a high-capacity Li-ion battery
pack, and the battery pack is replaceable by users.
1
To replace the battery pack, please refer to the section of
Using Battery power
for details.
This notebook is equipped with a wireless LAN/ Bluetooth
2
module, and the module may be upgradable and replaceable
by authorized dealer or service center.
This notebook is equipped with a hard disk drive, and this
3
storage device may be upgradable and replaceable by the
authorized dealer or service center.
Additional memory module may be installed, by the authorized
4
dealer or service center, to increase the performance of this
notebook, depending on the specification limitation.
3-42
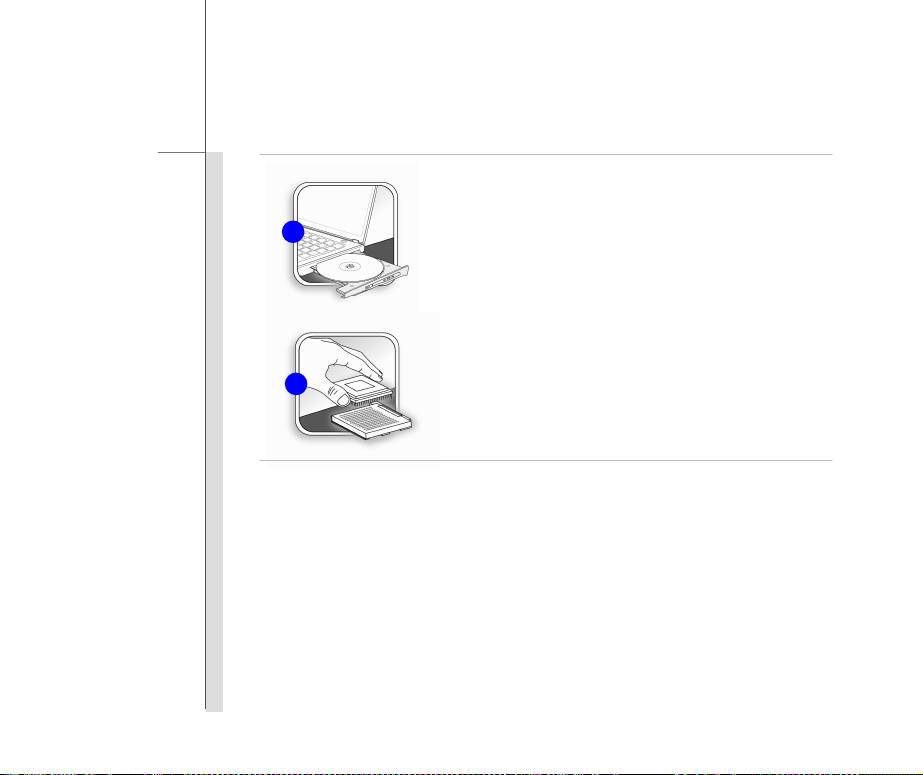
Getting Started
This notebook is equipped with an optical drive device, and
5
this device may be upgradable and replaceable by the
authorized dealer or service center.
The CPU preinstalled in this notebook may be upgradable and
6
replaceable by the authorized dealer or service center.
To learn more about upgrade limitation, please refer to the specification in the User’s Manual
provided. For any further information about the product users purchased, please contact the local
dealer.
Do not attempt to upgrade or replace any component of the product, if you are not an authorized
dealer or service center, since it may cause the warranty void. It is strongly recommended to contact
the authorized dealer or service center for any upgrade or replace service.
