ZyXEL Communications 3G Wireless Router NBG410W3G: V If the login screen does not display, make sure your computer is set to
V If the login screen does not display, make sure your computer is set to : ZyXEL Communications 3G Wireless Router NBG410W3G
ENGLISH
V If the login screen does not display, make sure your computer is set to
receive an IP address dynamically. If that doesn’t help, check your web
browser’s security settings (see the User’s Guide for information on both
suggestions)
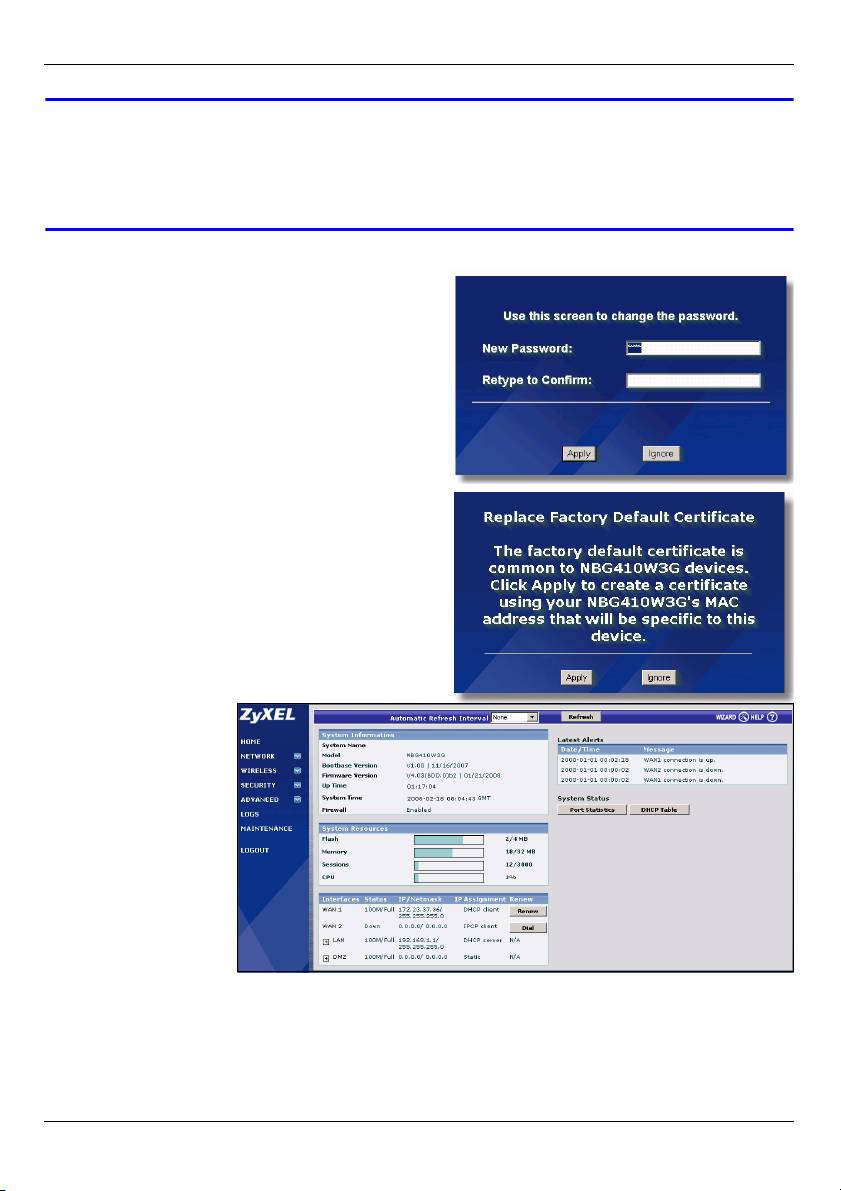
3 Change the login password by entering a
new password and clicking Apply. Then log
in again with your new password..
4 A unique certificate is important for
network security. Click Apply to replace
the NBG41xW3G’s default certificate..
5 The HOME screen
appears.
Congratulations, you have connected the NBG41xW3G to your computer. You are now
ready to configure 3G (page 7), Wi-Fi settings (page 8) or wired Internet access settings
(page 11) on the NBG41xW3G.
6
ENGLISH
3 Set Up a 3G Connection
This section shows you how to quickly configure and set up a 3G connection on the
NBG41xW3G. Leave any settings not mentioned at their default values or see the User’s
Guide for more information.
You should have ready the Internet access information for your activated 3G user account.
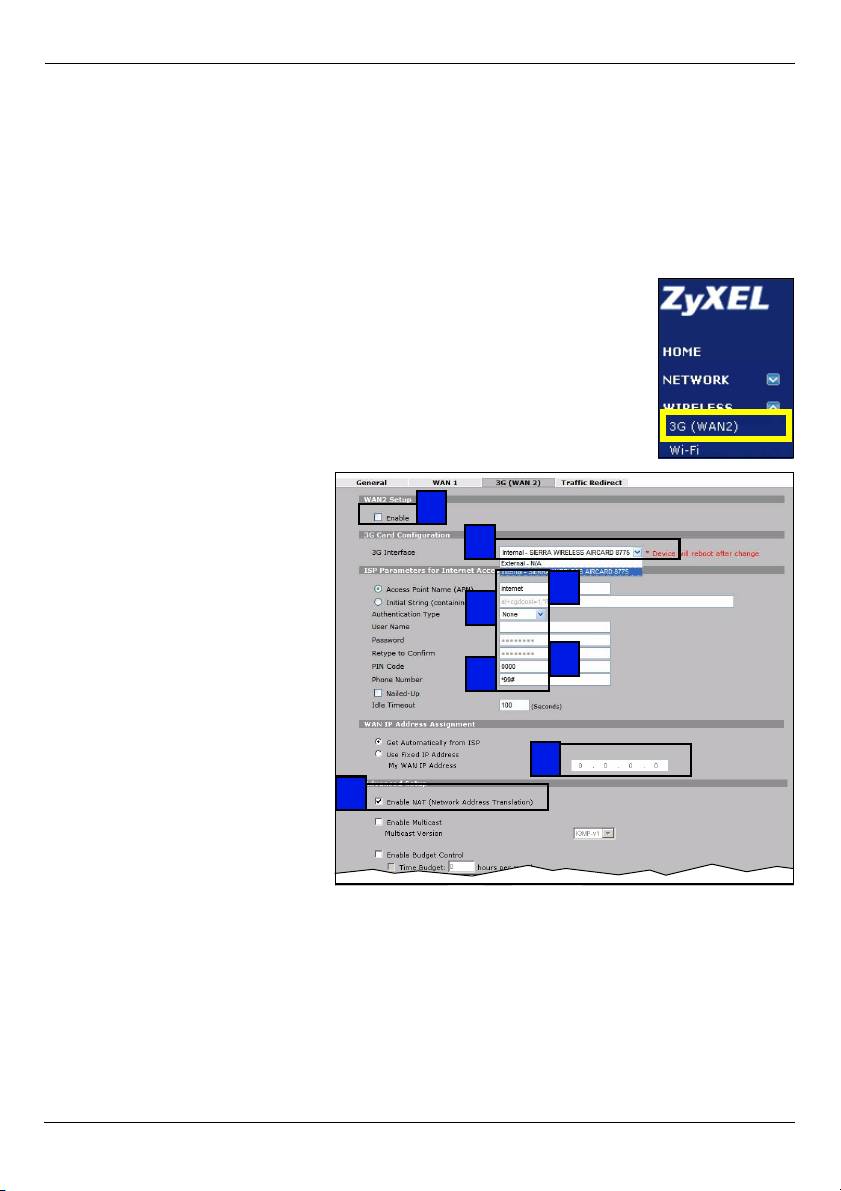
1 Click WIRELESS > 3G (WAN 2) in the NBG41xW3G’s navigation
menu.
2 Select Enable.
3 Check your device is set to the
2
correct 3G Interface.
3
4 Type the access point name
given to you by your 3G service
4
provider in the Access Point
5
Name (APN) field.
5 If your 3G service provider
6
gave you a user name and
7
password, select CHAP/PAP in
the Authentication Type field
and enter the user name and
password in the fields below.
8
Otherwise, set the
9
Authentication Type to None.
6 If your 3G service provider
gave you a PIN code, type it in
the PIN Code field.
7 Type the phone number given to you by your 3G service provider in the Phone Number
field.
8 If your service provider gave you an IP address for a 3G connection, select Use Fixed
IP Address and enter it in the My WAN IP Address field. Otherwise, select Get
Automatically from ISP.
9 Ensure Enable NAT is selected and click Apply.
7
Table of contents
- V Check your connections if the power () or LAN () light does not
- V If the login screen does not display, make sure your computer is set to
- V If you cannot connect to the Internet with your 3G connection, check your
- V If you cannot connect wirelessly to the NBG41xW3G, check you have
- V If you cannot access the Internet when your computer is connected to one
- V Prüfen Sie die Anschlüsse, wenn die Betriebsanzeige-LED ( ) oder LAN-
- V Wenn das Login-Fenster nicht angezeigt wird, stellen Sie sicher, dass der
- V Wenn Sie über Ihre 3G-Verbindung keine Verbindung zum Internet
- V Wenn Sie drahtlos keine Verbindung zum NBG41xW3G herstellen können,
- V Wenn Sie keine Verbindung zum Internet herstellen können, während der
- V Compruebe las conexiones si la luz de alimentación () o LAN
- V Si la pantalla de inicio de sesión no aparece, asegúrese de que su
- V Si no puede conectarse a Internet con su conexión 3G, compruebe el
- V Si no puede conectarse de forma inalámbrica al NBG41xW3G, compruebe
- V Si no puede acceder a Internet cuando su ordenador está conectado a uno
- V Vérifiez vos connexions si le voyant d'alimentation () ou du LAN
- V Si l'écran de connexion ne s'affiche pas, vérifiez que votre ordinateur est
- V Si vous n'arrivez pas à vous connecter à Internet avec votre connexion 3G,
- V Si vous ne pouvez pas vous connecter sans fil au NBG41xW3G, vérifiez
- V Si vous n'arrivez pas à accéder à Internet quand votre ordinateur est
- V Se le spie di alimentazione () o LAN () non si accendono,
- V Se la schermata di login non viene visualizzata, verificare che il computer
- V Se non è possibile connettersi a Internet con la connessione 3G, controllare
- V Se non è possibile connettersi wireless all'NBG41xW3G, controllare di aver
- V Se non è possibile accedere a Internet quando il computer è connesso a
- V Проверьте проводные подключения если индикатор(ы) POWER ()
- V Если окно входа не систему не появляется, то проверьте установку
- V Если 3G-подключение к Интернет не работает, проверьте его
- V В случае если подключение к NBG41xW3G не удается установить,
- V Если вы не можете войти в Интернет с вашего компьютера,
- V 如果電源 () 或 LAN ( ) 指示燈沒有亮,請檢查連線情況。如
- V 如果無法利用 3G 連線連接網際網路,請在 HOME ( 首頁 ) 畫面中檢查 3G 連
- V 如果無法無線連接 NBG41xW3G,請檢查 SSID 是否選取正確以及安全密鑰是
- V 如果電腦連接至 NBG41xW3G 任一個 LAN 埠時無法存取網際網路,請檢查連
