Zelmer 619 – page 5
Manual for Zelmer 619
Table of contents
- 57
- 61
- IMPORTANT SAFETY INSTRUCTIONS TECHNICAL DATA
- 85
- 86
- A – FOR VACUUMING WITH PAPER BAG WITHOUT WATER. B – FOR VACUUMING WITH PAPER BAG WITH 1.5 L OF WATER AS ADDITIONAL FILTER. C – FOR VACUUMING WITHOUT PAPER BAG, DIRECTLY TO THE FILTER CUP USING “FIZELINA” FILTRATION PAD, OR WITHOUT IT.
- ATTENTION!!! In case of difficulties in a/m elements connection lubricate the sealing with i.e. ATTENTION!!! Be careful during pulling the cord out, the yellow mark on the ATTENTION!!! The vacuum cleaner is equipped with a float, which shall In such situation: ATTENTION!!! The float can also operate during sudden movements, sharp pulling, hitting, or crossing the doorsteps.
- 89
- CLEANING CARPETS
- PLAIN FLOORS CLEANING AFTER OPERATION
- FILTERS REPLACEMENT ECOLOGY
1
80
Всмоктувальний
шланг
(
для
функції
прання
) –
є
основним
елементом
осна
-
щення
порохотягу
.
Його
гнучкість
дозволяє
легко
маневрувати
іншими
елеме
-
нтами
і
видаляти
пил
поблизу
порохотягу
.
У
ручці
шланга
розташовані
:
1.
Кнопка
,
що
виконує
дві
функції
:
−
Відкриває
подачу
води
в
насадку
-
кнопку
треба
натиснути
у
відповідності
зі
стрілкою
.
−
Відкриває
подачу
води
в
насадку
з
блокадою
кнопки
-
кнопку
треба
натиснути
і
пересунути
у
відповідності
зі
стрілкою
.
2.
Отвір
з
регулятором
сили
всмоктування
.
Під
час
усмоктування
води
і
мокрого
очищення
цей
отвір
повинен
бути
закритий
.
Підготовка
порохотягу
до
мокрого
очищення
Перед
мокрим
очищенням
поверхні
з
неї
слід
старанно
зібрати
пил
порохотягом
.
−
Виключіть
порохотяг
кнопкою
головного
вимикача
і
вийміть
вилку
з
розетки
.
−
Поверніть
наконечник
шланга
так
,
щоб
співпали
знаки
▼
на
наконечнику
шланга
і
на
корпусі
,
і
вийміть
шланг
із
контейнера
.
−
Відкрийте
верхню
кришку
і
витягніть
передній
контейнер
.
−
Витягніть
водяний
фільтр
із
контейнера
.
−
Звільніть
контейнер
від
бруду
або
вийміть
паперовий
мішок
.
−
Брудну
воду
вилийте
разом
із
сміттям
,
а
контейнер
обполощіть
.
−
Вкладіть
в
контейнер
водяний
фільтр
без
паперового
мішка
і
фільтраційного
вкладиша
.
−
Поставте
контейнер
на
основу
і
закрийте
кришку
.
−
Зніміть
насадку
або
щітку
,
що
використовувалася
раніше
,
і
надіньте
на
всмоктувальну
трубу
насадку
для
мокрого
очищення
.
−
Зніміть
задній
контейнер
:
−
відкрийте
кришку
і
встановіть
її
у
вертикальне
положення
1,
−
підніміть
контейнер
нагору
і
висуньте
його
назад
2
.
−
Відкрийте
ковпачок
заливного
отвору
і
залийте
в
контейнер
засіб
для
чищення
(
розчин
порошку
або
рідину
)
у
кількості
,
зазначеній
на
упаковці
.
1.
Для
підготування
миючого
розчину
з
порошку
необхідно
в
окремій
ємності
розчинити
вміст
пакетика
в
2,5 – 3
л
теплої
води
при
темп
.
до
45°C.
2.
Для
підготовки
миючого
розчину
залийте
в
задній
контейнер
відмірену
кількість
рідини
в
пропорції
1
ковпачок
на
3,5
л
води
.
−
У
залежності
від
використовуваного
засобу
для
чищення
наповніть
задній
контейнер
приготовленим
розчином
або
теплою
водою
при
темп
.
до
45°C.
−
Закрийте
заливний
отвір
ковпачком
.
УВАГА
!!!
Стандартно
порохотяг
оснащується
тільки
одним
з
в
/
в
засобів
для
ищення
.
Z
ELMER S. A.
гарантує
високоефективне
очищення
і
справну
роботу
порохотягу
винятково
за
умови
використання
засобів
для
чищення
,
допущених
ZELMER S. A. ,
у
кількості
,
зазначеній
на
етикетці
засобу
для
чищення
:
−
Порошок
«DYWANOPUC»
виробництва
фірми
OKTIMA,
Польща
.
−
Рідина
«CARPEX»
виробництва
фірми
ASTRA POLLENA,
Польща
.
−
Рідина
«FOUNTAINHEAD»
виробництва
фірми
Butcher's,
США
.
−
Поставте
контейнер
на
колишнє
місце
і
притисніть
,
щоб
щільно
встановити
його
в
корпусі
порохотягу
.
−
Закрийте
верхню
кришку
.
Кнопка
Регулятор
Всмоктувальний
шланг
Ручц
a
81
ЧИЩЕННЯ
КИЛИМІВ
Перед
мокрим
чищенням
килимів
перевірте
міцність
забарвлення
ворсу
.
Білу
тканину
змочіть
розчином
для
чищення
і
протріть
цією
тканиною
невелику
ділянку
килима
в
малопомітному
місці
.
Якщо
тканина
не
обарвиться
,
можна
приступити
до
чищення
всього
килима
.
У
іншому
випадку
користуватися
препаратом
не
можна
.
Якщо
у
воді
утвориться
занадто
багато
піни
або
піна
утвориться
під
час
чищення
,
необхідно
додати
у
воду
антипінний
препарат
,
рекомендований
ZELMER S. A.
у
кількості
,
зазначеній
на
упаковці
:
−
«ANTYPIENIACZ III»
виробництва
фірми
OKTIMA,
Польща
.
−
«FOAM-FREE»
виробництва
фірми
Butcher's,
США
.
УВАГА
!!!
Стандартно
порохотяг
оснащується
тільки
одним
з
в
/
в
антипінних
препаратів
.
−
Зніміть
з
насадки
щітку
-
накладку
.
−
Пересуваючи
насадкою
по
поверхні
визначте
напрямок
,
у
якому
відчувається
найменший
опір
.
−
Натисніть
на
кнопку
вимикача
насоса
і
включіть
порохотяг
.
УВАГА
!!!
Насос
можна
включати
тільки
в
тому
випадку
,
якщо
в
задньому
контейнері
є
вода
.
Відсутність
води
сигналізу
-
ється
підвищеним
рівнем
шуму
насоса
.
−
Натисніть
на
рукоятці
шланга
кнопку
подачі
води
в
насадку
.
−
Пересувайте
насадку
по
килиму
зворотно
-
поступальними
рухами
.
Якщо
виявиться
,
що
незважаючи
на
включений
насос
насадка
не
розпилює
воду
,
перевірте
правильність
установки
заднього
контейнера
(
необхідно
його
сильно
притиснути
)
і
закріплення
штуцера
трубки
в
основі
порохотягу
.
Якщо
з
'
являться
трудності
при
під
’
єднанні
в
/
в
елементів
,
зволожте
ущільнюючі
прокладки
.
−
Намагайтеся
не
ходити
по
килиму
під
час
чищення
і
безпосередньо
після
прибирання
.
УВАГА
!!!
Не
розпилюйте
миючий
розчин
занадто
довго
в
одному
місці
.
Не
можна
допускати
,
щоб
промокла
основа
килима
.
−
Насадки
зворотно
-
поступальними
рухами
.
Повторюйте
цю
операцію
,
поки
вся
поверхня
килима
не
буде
сухою
.
Закінчивши
розпилення
,
Після
очищення
фрагменту
килима
,
перервіть
розпилення
засобу
для
чищення
і
осушіть
це
місце
за
допомогою
всмоктувальної
виключіть
насос
і
коротко
натисніть
на
кнопку
регулювання
подачі
води
в
насадку
з
метою
«
розрядки
тиску
».
Старий
бруд
і
плями
,
що
важко
видаляються
,
змочіть
миючим
засобом
,
рекомендованим
ZELMER S. A. ,
поки
не
утвориться
піна
.
Залишіть
на
якийсь
час
,
а
потім
зберіть
порохотягом
.
УВАГА
!!!
Не
можна
допускати
,
щоб
промокла
основа
килима
.
Це
може
призвести
до
його
деформації
(
появи
хвиль
).
ОЧИЩЕННЯ
ГЛАДКИХ
ПІДЛОГ
−
Надіньте
на
насадку
щітку
-
накладку
.
−
Натисніть
на
кнопку
вимикача
насоса
і
включіть
порохотяг
(
як
при
чищенні
килимів
).
−
Натисніть
на
рукоятці
шланга
кнопку
подачі
води
в
насадку
.
УВАГА
!!!
У
випадку
,
якщо
заблокуються
сопла
розпилювача
,
варто
від
’
єднати
насадку
від
труби
й
очистити
(
продути
)
всмоктувальний
канал
або
замінити
сопло
новим
.
82
Порохотяг
оснащується
одним
комплектом
сопел
.
Заміна
сопла
1.
З
розпилюючої
насадки
(
великої
або
малої
)
вийміть
сопло
разом
із
гумовим
ущільненням
o 5,6 x 1
і
натисніть
сопло
вниз
великим
пальцем
відповідно
до
позначення
на
корпусі
насадки
.
2.
Зволожте
нове
сопло
разом
з
ущільненням
і
втисніть
в
отвір
насадки
,
поки
захвати
не
закриються
до
характерного
клацання
.
−
Пересувайте
насадку
по
килиму
зворотно
-
поступальними
рухами
.
−
Після
очищення
фрагменту
килима
,
перервіть
розпилення
й
осушіть
це
місце
,
пересуваючи
насадку
в
напрямку
до
себе
,
поки
з
підлоги
не
буде
зібраний
весь
розчин
.
−
Повторюйте
цю
операцію
,
поки
вся
поверхня
килима
не
буде
сухою
.
−
Закінчивши
розпилення
,
виключіть
насос
і
коротко
натисніть
на
кнопку
регулювання
подачі
води
в
насадку
з
метою
«
розрядки
тиску
».
УВАГА
!!!
Якщо
Ви
робили
мокре
очищення
(
збирали
мокрий
бруд
),
перед
тим
,
як
закінчити
прибирання
,
у
його
кінцевій
фазі
засмокчіть
бл
. 1-2
л
истої
води
для
промивання
шланга
і
труб
,
а
потім
якийсь
час
всмоктуйте
повітря
,
щоб
їх
просушити
.
ЗАКІНЧЕННЯ
ПРИБИРАННЯ
−
Виключіть
порохотяг
кнопкою
головного
вимикача
і
вийміть
вилку
електропроводу
з
розетки
.
−
Змотайте
провід
живлення
.
Виконуючи
цю
операцію
,
необхідно
стежити
за
тим
,
щоб
провід
не
сплутався
і
щоб
вилка
не
вдарилася
різко
об
корпус
порохотягу
.
−
Поверніть
наконечник
шланга
так
,
щоб
співпали
знаки
▼
на
наконечнику
шланга
і
на
корпусі
,
і
вийміть
шланг
із
контейнера
.
−
Вийміть
наконечник
трубки
з
основи
.
−
Роз
'
єднаєте
всмоктувальні
труби
,
а
також
від
’
єднайте
насадку
від
шланга
.
−
Вийміть
водяний
фільтр
із
контейнера
.
−
З
модуля
водяного
фільтра
витягніть
сепараторну
пінку
і
промийте
її
під
проточною
водою
,
направляючи
струмінь
води
зсередини
назовні
.
УВАГА
!!!
Забороняється
прати
сепараторну
пінку
в
пральних
машинах
,
а
також
викручувати
при
ручному
пранні
.
Не
зминайте
і
не
розтягуйте
пінку
,
не
допускайте
до
її
деформування
.
Очищену
пінку
просушіть
при
кімнатній
температурі
.
Не
сушіть
пінку
на
радіаторах
,
обігрівачах
,
грубках
і
інших
джерелах
тепла
і
т
.
п
.
−
Вилийте
воду
з
контейнера
через
отвір
для
під
’
єднання
шланга
.
−
Контейнер
і
фільтр
необхідно
старанно
промити
,
змінюючи
декілька
разів
воду
.
−
Після
прання
старанно
промийте
усі
використовувані
в
цьому
процесі
елементи
(
шланг
труби
,
аксесуари
).
Якщо
після
прибирання
в
/
в
елементи
не
будуть
вимиті
або
будуть
вимиті
неретельно
,
то
це
може
призвести
до
втрати
фільтраційних
властивостей
вкладишів
і
пінки
,
а
також
стати
причиною
розвитку
бактерій
і
порохових
кліщів
.
−
Всі
вимиті
елементи
повинні
бути
старанно
висушені
.
УВАГА
!!!
Не
збирайте
порохотяг
,
поки
не
будуть
осушені
всі
його
елементи
.
−
Вкладіть
водяний
фільтр
,
поставте
контейнер
на
основу
і
закрийте
верхню
кришку
83
ЗАМІНА
ФІЛЬТРІВ
Під
час
експлуатації
забруднюються
також
повітряні
фільтри
:
вхідний
і
вихідний
.
Для
правильної
роботи
порохотягу
рекомендується
часто
мити
вхідний
фільтр
.
Сильно
забруднений
або
ушкоджений
фільтр
необхіднозамінити
новим
.
Вхідний
фільтр
−
Відкрийте
верхню
кришку
і
встановіть
її
вертикально
.
−
Візьміться
пальцями
за
верхній
край
решітки
фільтра
(
із
передньої
сторони
порохотягу
),
легко
потягніть
до
себе
,
поки
вона
не
вийде
з
ахватів
.
−
Поверніть
рамку
,
витягніть
фільтр
і
промийте
його
під
проточною
водою
.
Злегка
відіжміть
,
просушіть
і
вставте
на
колишнє
місце
(
або
замініть
новим
).
−
Встановіть
новий
фільтр
так
,
щоб
краї
закритої
рамки
щільно
притискали
крайку
фільтра
.
−
Закрийте
рамку
фільтра
.
Вихідний
фільтр
Вихідний
повітряний
фільтр
необхідно
заміняти
після
бл
. 30
годин
роботи
(6
місяців
)
або
раніш
,
у
випадку
сильного
забруднення
.
−
Звільніть
блокаду
і
відкрийте
вихідний
отвір
.
−
Замініть
фільтраційний
вкладиш
:
T
ип
619. 5*E -
мал
. A;
T
ип
619. 5*S -
мал
.
Б
Електростатичний
фільтр
Касета
з
фільтром
HEPA
−
Старанно
встановіть
новий
фільтр
(
мал
.
А
)
так
,
щоб
закрита
кришка
щільно
притискала
краї
фільтра
.
Якщо
на
вихідному
фільтрі
з
'
явиться
вода
,
то
це
означає
,
що
в
передньому
контейнері
утворилася
піна
,
яка
при
проходженні
через
турбіни
конденсується
на
вихідному
фільтрі
.
Щоб
не
допустити
до
такого
явища
,
у
воду
в
передньому
контейнері
необхідно
додати
антипінний
препарат
,
рекомендований
ZELMER S. A. , a
порохотяг
включити
на
декілька
хвилин
(
без
переднього
контейнера
)
для
осушення
всмоктувальної
системи
Вихідний
повітряний
фільтр
завжди
необхідно
заміняти
новим
,
оригінальним
.
ЕКОЛОГІЯ
–
ТУРБОТА
ПРО
ДОВКІЛЛЯ
Кожен
користувач
може
внести
свій
внесок
в
охорону
довкілля
.
Це
не
потребує
особливих
зусиль
.
З
цією
ціллю
:
Картонної
упаковки
здавайте
в
макулатуру
.
Поліетиленові
мішки
(PE)
викидайте
в
контейнер
,
призначений
для
пластика
.
Непридатний
прилад
віддайте
у
відповідний
пункт
з
утилізації
,
тому
що
шкідливі
компоненти
,
що
містяться
в
приладі
,
можуть
створювати
загрозу
для
довкілля
.
Не
викидайте
порохотяг
разом
із
комунальними
відходами
!!!
Б
A

84
EN
Dear Clients!
Our vacuum cleaners have been manufactured for many years and they have a very good reputation.
Applying our best solutions from the previous models and new trends in cleaning equipment
development all over the world, we created a new vacuum cleaner for you, which shall help you to
solve the problems connected with keeping your house clean.
Apart from simple vacuuming, it can be used for picking up wet dirtiness as well as washing carpets,
fitted carpets or upholstery.
Using new filtration system the appliance can work like traditional vacuum cleaner, or like vacuum
cleaner with water filter. We created the possibility of choosing one of 5 dirtiness picking up systems,
which can be applied depending on user’s individual needs, including the possibility of paper bag
usage.
Please read these instructions carefully. Pay your special attention to important safety
instructions. Keep this User’s Guide for future reference.
This appliance is not intended for use by persons (including children) with reduced physical,
sensory or mental capabilities, or lack of experience and knowledge, unless they have been given
supervision or instruction concerning use of appliance by a person responsible for their safety.
Children should be supervised to ensure that do not play with the appliance.
IMPORTANT SAFETY INSTRUCTIONS
−
Please connect the vacuum cleaner to 230V mains supply, equipped with fuse 16A.
−
Do not use the appliance, when the casing or the cord is visibly damaged.
If the power cord is damaged, it shall be exchanged by special service desk staff, due to avoid
hazard.
The appliance should be repaired by trained staff only. Improper repair can result in serious hazard
for a user. In case of defects we recommend you to contact qualified service desk.
−
Do not run the vacuum cleaner or brushes over the cord; it can result in cord insulation damage.
−
Unplug before clearing and maintenance.
−
Do not use without the bag, filters or in case damage of the bag.
−
Do not use this vacuum cleaner to clean people or animals; be especially careful to keep the
nozzles away from ears and eyes.
−
Do not pick up: matches, cigarettes, hot ash. Avoid picking up sharp objects.
−
Do not pick up fine dust such as: flour, cement, gypsum, toners for printers and copy machines, etc.
−
Do not pick up corrosives, toxic agents, patrol, petroleum and other flammable or explosive liquids.
−
Prevent tumbling or flooding vacuum cleaner with water during operation.
−
Do not expose to weather conditions (rain, frost).
−
Do not operate without foam filter inside filtration unit.
−
Do not leave switched on and operating vacuum cleaner unattended.
The manufacturer does not accept any liability for any damages resulting from unintended use
or inappropriate handling.
The manufacturer reserves his rights for modifying the product any time in order to adjust it to
law regulations, norms, directives, or due to construction, trade aesthetic or other reasons,
without notifying it in advance.
TECHNICAL DATA
The vacuum cleaner type and its technical parameters are included at the name plate. Grid protection
16A. It does not cause RTV reception interferences.
It does not require grounding
.
ZELMER vacuum cleaners meet the requirements of effective standards.
The appliance meets the requirements of the following directives:
– Low Voltage Device (LVD) – 2006/95/EC,
– Electro- Magnetic Compatibility (EMC) – 2004/108/EC.
The product is marked with CE symbol on the name plate.
85
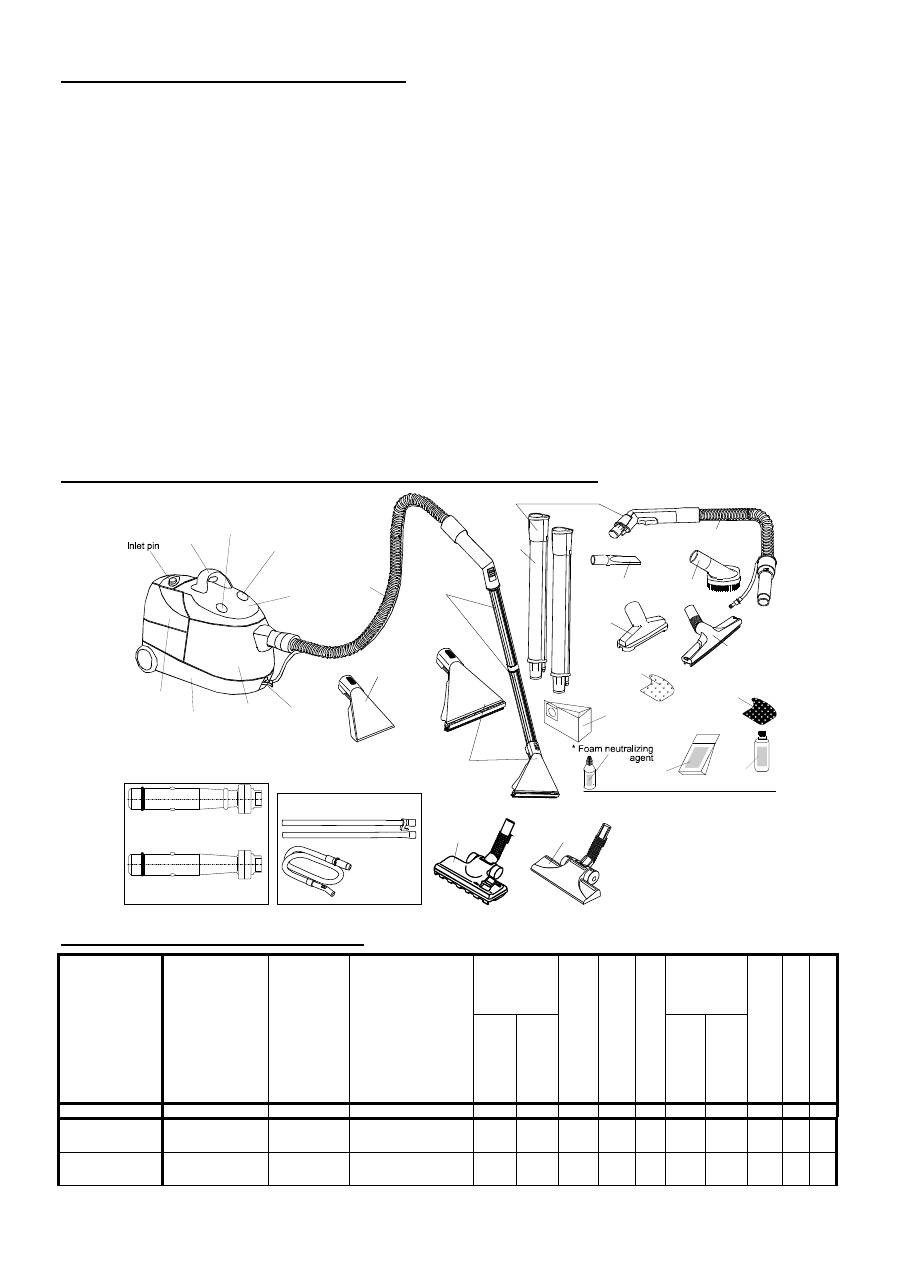
THE APPLIANCE CHARACTERISTICS
The 619 vacuum cleaner is intended for picking up dirtiness from the floor, carpets, ceramic
tiles, gaps in panelling, skirting, heaters, to vacuum furniture, curtains, drapes as well as
collecting liquids and wet clearing: flooring tiles, carpets, fitted carpets and upholstery.
The vacuum cleaner is equipped with fourfold filtration system.
The first filter is the paper bag or filtration pad located at the bottom of the filter housing. They are to
stop the biggest particles of dirtiness.
The second and the main filter is water filter. The filtering agent is clean water in amount of 1.5l, and
foam filter, which is to separate the air from the water. It means that during vacuuming you can pick up
additional amount of water. The vacuum cleaner is equipped with the system setting maximum water
level and protecting against water overflow.
The third filter is air-inlet filter, which is located at the top board of the complete filtration unit. It is to
stop dust particles and dirtiness not immersed in water before the air inlet to the unit.
The fourth filter is air-outlet filter, which is located directly at the air outlet.
The vacuum cleaner is perfect for operation with Zelmer turbo brush 212 type. The brush is necessary
accessory element for all the owners of cats, dogs or other pets, which hair is very difficult to remove
from the carpets or fitted carpets. Tuneable head of the brush brushes exactly the surface sucking the
hair into the bag.
VACUUM CLEANER CONSTRUCTION AND ACCESSORIES
VACUUM CLEANERS TYPES 619
For
washing
function
For dry
cleaning
R
ea
lia
tio
n
op
tio
n
an
d
ac
ce
ss
or
ie
s:
T
yp
e
B
ag
/ Q
ua
nti
ty
A
ir-
ou
tle
t fi
lte
r
No
zz
le
-b
ru
sh
S
uc
ki
ng
ho
se
S
uc
ki
ng
tu
be
s
B
ig
s
pr
ay
in
g n
oz
zl
e
S
m
al
l s
pr
ay
in
g
no
zz
le
S
we
ep
in
g n
oz
zl
e
S
uc
ki
ng
ho
se
S
uc
ki
ng
tu
be
s
S
m
al
l n
oz
zl
e
Cr
ev
ic
e n
oz
zl
e
S
m
al
l b
ru
sh
1
2
3
4
5
6
7
8
9
10
11
12
13
14
619.5**EW
Paper 2 pcs.
Microfiltr Switcheable (A)
+ + + +
―
―
―
+ + +
619.5**SV
Paper 2 pcs. HEPA 11
Universal (B)
+ + + + + + + + + +
Sweeping
nozzle
Sucking
hose
Sucking hose
Sucking hose
Upper
cover
Base
Back water
tank
Stub
Handle
Brush
Crevice nozzle
Paper
bag
"FIZELINA"
filtration pad
"GORETEX”
filtration pad
Small
nozzle
* Cleaning
powder
* Cleaning
liquid
Accessories for dry vacuuming
Big nozzle ending with rubber
ring
Small nozzle ending with rubber
ring
Tank
Pump
on/off button
Main on/off
button
For washing function
Big
spraying nozzle
Small spraying
nozzle
Nozzle-brush
Switcheable ( )
A
Nozzle-brush
Universal (B)
* The vacuum cleaner is equipped
by the manufacturer with one of
the a/m cleaning agents only.
Sucking
tubes
Sucking
tubes
Sucking tubes
The set of spare nozzles
86
DRY SURFACE VACUUMING
You can fit the nozzles for furniture, gaps and upholstery both at the sucking tube and hose.
Soft surface –
carpets and fitted carpets.
Hard surface –
wooden floor, laminates, ceramic tiles etc.
We recommend to clean such surfaces with nozzle brush.
Upholstery, mattress, etc.
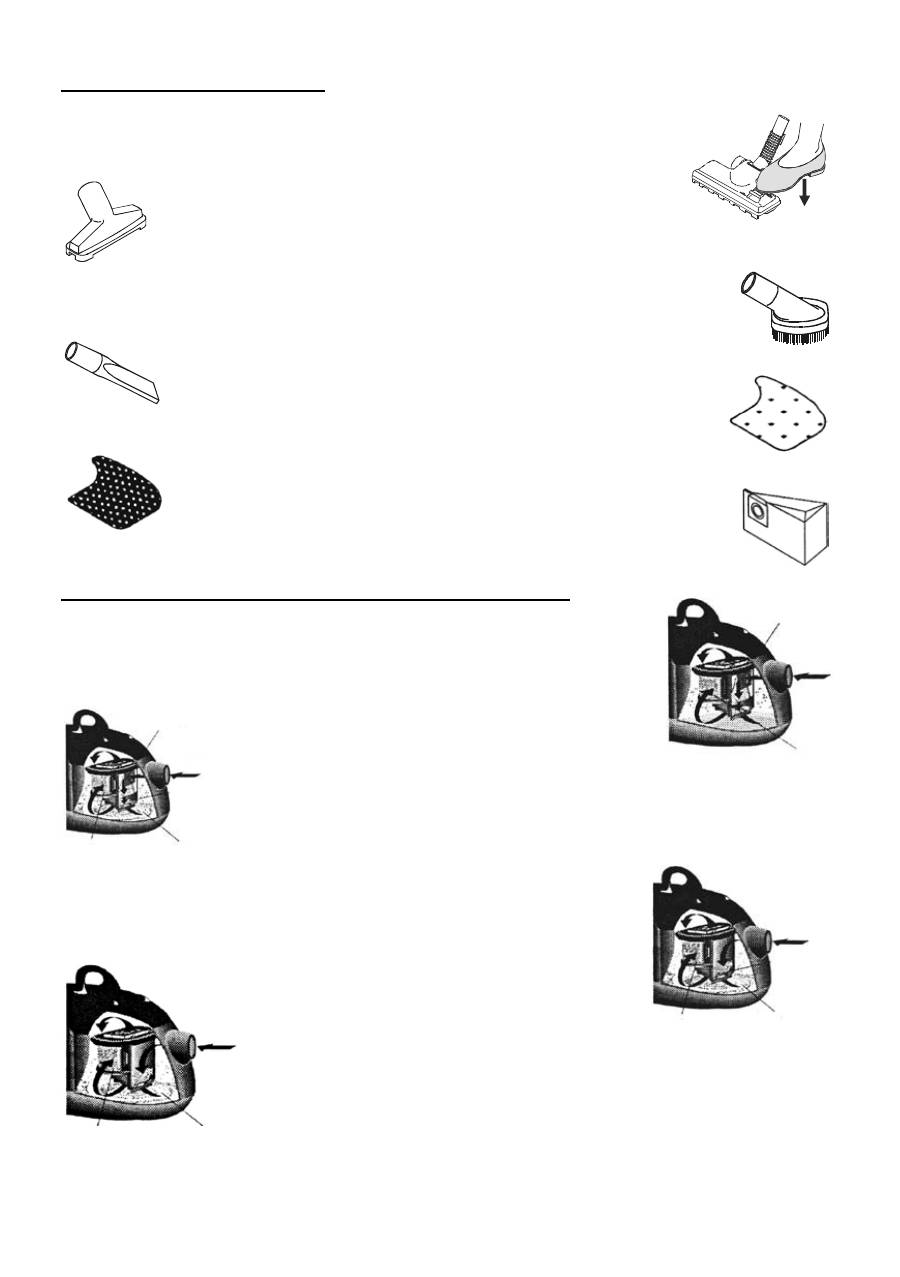
Nozzle
– is used for upholstery, mattress and curtains clearing. It
is equipped with a tape for picking up threads, which enables exact picking up the
threads, fine fibres, etc. We recommend reducing suction power during such activity.
Gentle fabrics and rough objects
Brush
- Small brush is used for vacuuming: libraries, picture frames and windows. We
recommend reducing suction power during such activity.
Vacuuming gaps, corners, cavities, etc.
Nozzle
–is used for vacuuming: gaps, corners, spaces and other
recesses with difficult access.
Filtration pad – „GORETEX”
(white colour) is applied for cleaning with paper bag.
Filtration pad – „FIZELINA”
(black colour) is applied for cleaning without paper bag.
Paper bag
– is the disposable dust compartment. Each vacuum
cleaner is equipped with 2 paper bags.
DIFFERENT METHODS OF DRY DIRTINESS CLEANING:
1. Traditional dry vacuuming without water, applying paper bag.
The applied elements are described in the fig. beside. The dirtiness is
accumulated inside the paper bag. There are no additional after- cleaning
maintenance activities predicted.
2. Vacuuming with both water and paper bag.
The applied elements are described in the fig.
beside. The dirtiness is accumulated inside the
paper bag.
„GORETEX” filtration pad (white colour) applied inside the filter chamber
prevents water infiltration to paper bag. You can use the bag for some
vacuuming. After operation remove the water from the tank and dry it.
3. Vacuuming with both water and ”FIZELINA” filtration pad (black
colour) without paper bag.
The applied elements are described in the fig. beside. The dirtiness is
accumulated inside the filter chamber– they are wet.
4. Vacuuming with water without paper bag and filtration pads inside the
filter chamber.
The applied elements are described in the fig. beside. The dirtiness is
accumulated inside the filter chamber (thicker particles) and in water.
PAPER BAG
GORETEX
FOAM FILTER WATER
PAPER BAG
FOAM FILTER
FIZELINA
FOAM FILTER WATER
FOAM FILTER WATER

86
DRY SURFACE VACUUMING
You can fit the nozzles for furniture, gaps and upholstery both at the sucking tube and hose.
Soft surface –
carpets and fitted carpets.
Hard surface –
wooden floor, laminates, ceramic tiles etc.
We recommend to clean such surfaces with nozzle brush.
Upholstery, mattress, etc.
Nozzle
– is used for upholstery, mattress and curtains clearing. It
is equipped with a tape for picking up threads, which enables exact picking up the
threads, fine fibres, etc. We recommend reducing suction power during such activity.
Gentle fabrics and rough objects
Brush
- Small brush is used for vacuuming: libraries, picture frames and windows. We
recommend reducing suction power during such activity.
Vacuuming gaps, corners, cavities, etc.
Nozzle
–is used for vacuuming: gaps, corners, spaces and other
recesses with difficult access.
Filtration pad – „GORETEX”
(white colour) is applied for cleaning with paper bag.
Filtration pad – „FIZELINA”
(black colour) is applied for cleaning without paper bag.
Paper bag
– is the disposable dust compartment. Each vacuum
cleaner is equipped with 2 paper bags.
DIFFERENT METHODS OF DRY DIRTINESS CLEANING:
1. Traditional dry vacuuming without water, applying paper bag.
The applied elements are described in the fig. beside. The dirtiness is
accumulated inside the paper bag. There are no additional after- cleaning
maintenance activities predicted.
2. Vacuuming with both water and paper bag.
The applied elements are described in the fig.
beside. The dirtiness is accumulated inside the
paper bag.
„GORETEX” filtration pad (white colour) applied inside the filter chamber
prevents water infiltration to paper bag. You can use the bag for some
vacuuming. After operation remove the water from the tank and dry it.
3. Vacuuming with both water and ”FIZELINA” filtration pad (black
colour) without paper bag.
The applied elements are described in the fig. beside. The dirtiness is
accumulated inside the filter chamber– they are wet.
4. Vacuuming with water without paper bag and filtration pads inside the
filter chamber.
The applied elements are described in the fig. beside. The dirtiness is
accumulated inside the filter chamber (thicker particles) and in water.
PAPER BAG
GORETEX
FOAM FILTER WATER
PAPER BAG
FOAM FILTER
FIZELINA
FOAM FILTER WATER
FOAM FILTER WATER
87
When applying the above mentioned filtration system you can use the vacuum cleaner the following way:
A
– FOR VACUUMING WITH PAPER BAG WITHOUT WATER.
−
Press the button of the hook and pull the top lid up.
−
Remove the front tank and take the filter out of the tank.
−
Release the hooks fastening the top lid with the filter housing,
pressing simultaneously both hooks with your thumbs; see the
figure beside (position1-1
)
.
−
Bring the filter handle to vertical position, remove the top lid from the hooks and open
the dust com.
There are the paper bag fastening gaps inside the compartment:
−
Bend the paper bag along the bending line according to the arrow direction.
−
Insert it vertically to the filter niche according to the arrow direction in the figure. The
bag inlet shall cover the filter inlet.
−
Break the bag cardboard inwards (along the cardboard cut line) and bring the filter
handle to vertical position.
−
Insert the protruding lid hooks into the housing rectangular holes, place the handle
on the lid and lock it.
−
Press the top board respectively near each of the hooks with both thumbs, or
press the board simultaneously with both thumbs near the hooks 1 and 2
(fig., beside) until you can hear characteristic clicking sound.
ATTENTION!!! Both upper hooks must be always locked!
B
– FOR VACUUMING WITH PAPER BAG WITH 1.5 L OF WATER AS ADDITIONAL FILTER.
After performing the same activities as under item „A”, additionally:
−
Release the hook of filter housing bottom (1). Insert filtration pad (2) –
„GORETEX” (white colour) and lock the hooks again.
−
Fill the front tank up with 1.5l of water. The water level should
remain within the range: MIN and MAX.
ATTENTION!!! Always use „GORETEX” filtration pad when
vacuuming with paper bag.
Do not leave the paper bag inside the filter cup
after vacuuming, if there is any water inside
the front tank.
C
– FOR VACUUMING WITHOUT PAPER BAG, DIRECTLY TO THE FILTER CUP USING
“FIZELINA” FILTRATION PAD, OR WITHOUT IT.
−
Check if there is a paper bag inside the filter cup, if so, please remove it.
−
Check if the top lid is properly locked with the housing (hooks 1 and 2 shall be locked).
In order to do it, please perform the activities described under item „A”.
−
Release the hook of the filter housing bottom, insert “FIZELINA” pad (black colour),
or don’t insert it.
Vacuuming with „FIZELINA” filtration pad causes that the dust and rubbish inside the filter cup
above the „FIZELINA” are damp.
ATTENTION!!! You can use the applied „FIZELINA” pad as disposable one (fast exchange), or
for repeated usage (cheapper, although it needs washing and flushing).
−
Pay attention to exact tensing the foam filter around the float (it is fastened with two
hooks).
−
Be careful that the sealing sticks thoroughly to the tan.
88
−
Insert the water filter into the tank and place the tank on the
base.
−
Close the top lid.
−
Insert the ending of the hose in the position where the tops marks on
the hose ending and tank cover each other and turn it right or left,
so that the marks change position in reference to each other.
−
Poł
ą
cz:
a
. sucking tubes,
b.
tube with hose,
c.
tube with
chosen nozzle or brush.
−
Insert the hose stub into the valve inside the vacuum
cleaner base.
−
Make sure that the stub fastening is exactly locked in the seating,
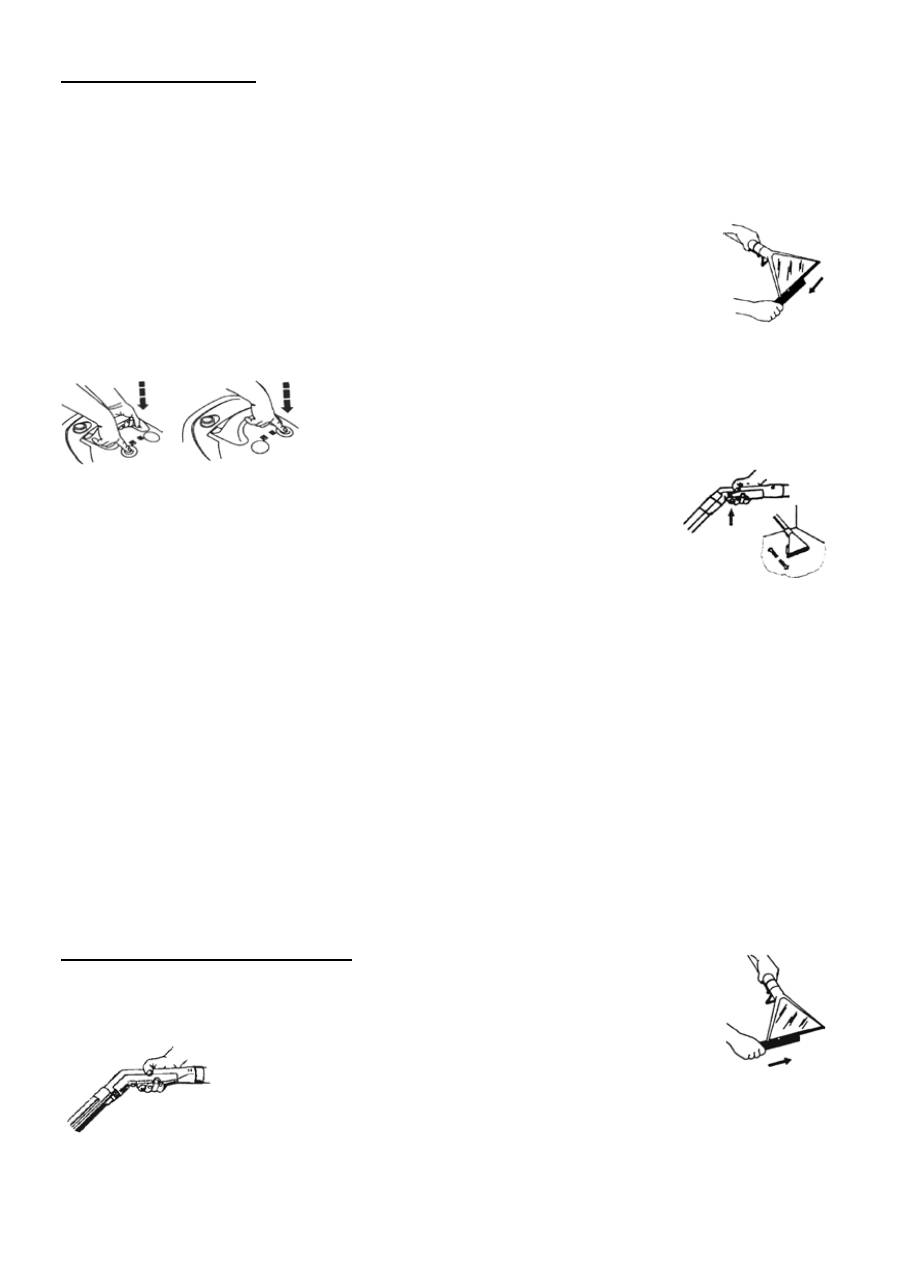
ATTENTION!!! In case of difficulties in a/m elements connection lubricate the sealing with i.e.
Vaseline grease, water, etc.
−
Take the connection cord plug and remove it from the vacuum cleaner.
ATTENTION!!! Be careful during pulling the cord out, the yellow mark on the
cord show the end of the cord.
Further trials (pulling) can lead to damage the cord.
−
Insert the plug to the mains supply receptacle and switch the vacuum cleaner on
pressing the on/off button.
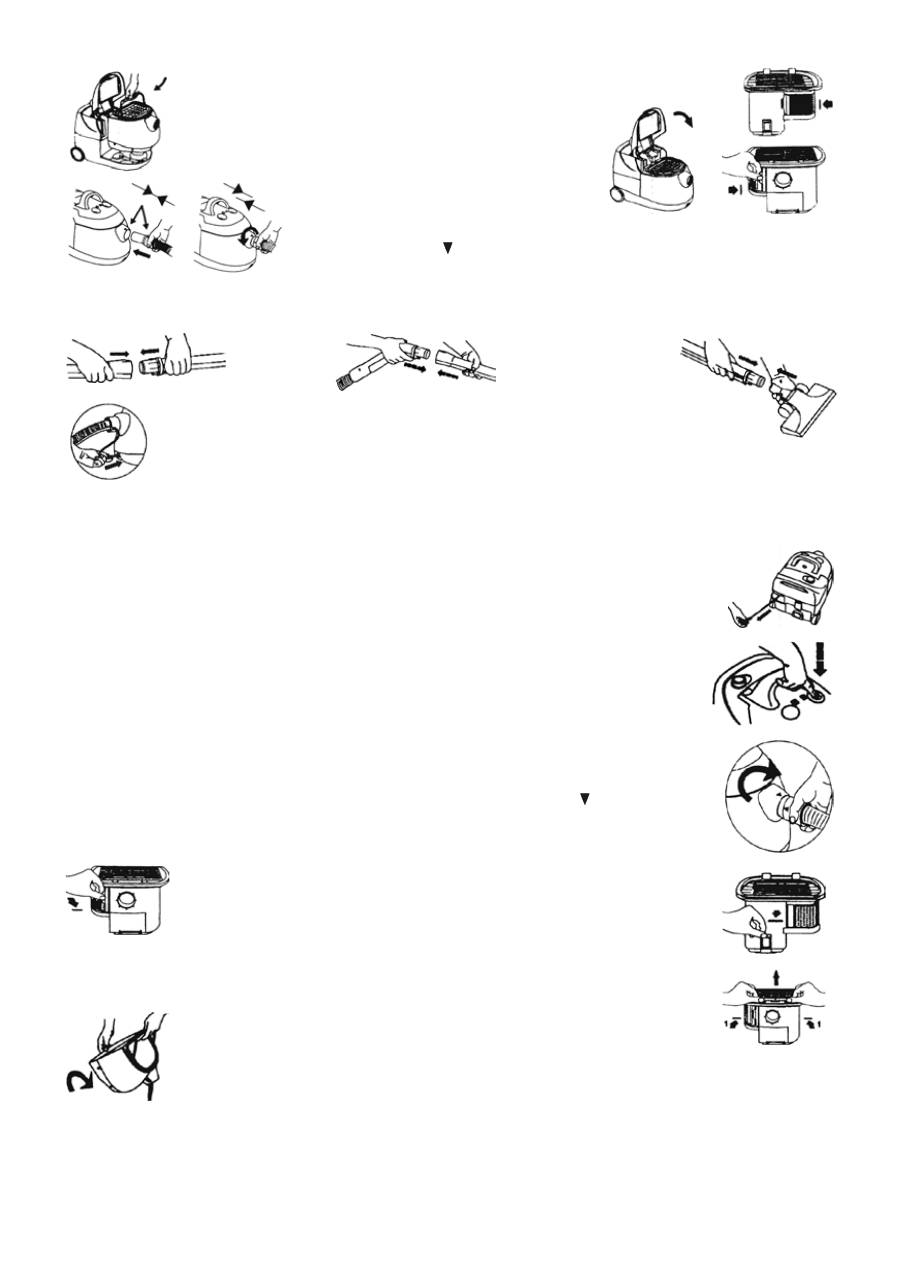
ATTENTION!!! The vacuum cleaner is equipped with a float, which shall
automatically block the suction, if the foam filter is very dirty.
It is indicated with increased engine rotation.
In such situation:
−
Switch off the vacuum cleaner pressing the on/off button and unplug it.
−
Turn the ending of the hose up to the position where the tops marks on the
hose ending and tank cover each other and remove the hose from the tank.
−
Open the top lid and remove the front tank.
−
Remove the water filter and take the foam filter out of it.
−
Clean the a/m filters thoroughly (see the “After operation”
section.
−
Release the hook of the filter housing bottom and remove the rubbish.
−
If the rubbish have been collected to the paper bag before, please release the
top cover hooks 1 following the above mentioned activities (Item”
A
”).
−
Pour dirty water out including the dirtiness form the tank and
rinse the tank.
−
Pour clean water, insert the water filter, place the tank on the base and close the
top lid.
−
Insert the plug to the mains supply receptacle, switch the vacuum cleaner on and
continue vacuuming.
ATTENTION!!! The float can also operate during sudden movements, sharp pulling, hitting, or
crossing the doorsteps
.
88
−
Insert the water filter into the tank and place the tank on the
base.
−
Close the top lid.
−
Insert the ending of the hose in the position where the tops marks on
the hose ending and tank cover each other and turn it right or left,
so that the marks change position in reference to each other.
−
Poł
ą
cz:
a
. sucking tubes,
b.
tube with hose,
c.
tube with
chosen nozzle or brush.
−
Insert the hose stub into the valve inside the vacuum
cleaner base.
−
Make sure that the stub fastening is exactly locked in the seating,
ATTENTION!!! In case of difficulties in a/m elements connection lubricate the sealing with i.e.
Vaseline grease, water, etc.
−
Take the connection cord plug and remove it from the vacuum cleaner.
ATTENTION!!! Be careful during pulling the cord out, the yellow mark on the
cord show the end of the cord.
Further trials (pulling) can lead to damage the cord.
−
Insert the plug to the mains supply receptacle and switch the vacuum cleaner on
pressing the on/off button.
ATTENTION!!! The vacuum cleaner is equipped with a float, which shall
automatically block the suction, if the foam filter is very dirty.
It is indicated with increased engine rotation.
In such situation:
−
Switch off the vacuum cleaner pressing the on/off button and unplug it.
−
Turn the ending of the hose up to the position where the tops marks on the
hose ending and tank cover each other and remove the hose from the tank.
−
Open the top lid and remove the front tank.
−
Remove the water filter and take the foam filter out of it.
−
Clean the a/m filters thoroughly (see the “After operation”
section.
−
Release the hook of the filter housing bottom and remove the rubbish.
−
If the rubbish have been collected to the paper bag before, please release the
top cover hooks 1 following the above mentioned activities (Item”
A
”).
−
Pour dirty water out including the dirtiness form the tank and
rinse the tank.
−
Pour clean water, insert the water filter, place the tank on the base and close the
top lid.
−
Insert the plug to the mains supply receptacle, switch the vacuum cleaner on and
continue vacuuming.
ATTENTION!!! The float can also operate during sudden movements, sharp pulling, hitting, or
crossing the doorsteps
.
89
In such case:
−
Switch the vacuum cleaner off for several seconds and then switch it on again and continue
vacuuming.
LIQUID SUCTION
If you want to use your vacuum cleaner for liquid suction, please prepare it like for dry surface
cleaning, apart from:
1. Front tank should be empty (without water).
2. Do not apply any filtration pads or paper bag.
3. Apply the spraying nozzles (big or small), described below.
ATTENTION!!! In any case do not start up the vacuum cleaner with full tank! Do not pick up big
amount of liquid in one cleaning (i.e. with hose immersed in water).
If „MAX” level is exceeded during liquid suction, the float shall automatically block the suction.
In such case:
−
Apply the same method as in case of suction blocking caused by dirty foam filter (increased engine
rotation).
WET CLEANING – accessories
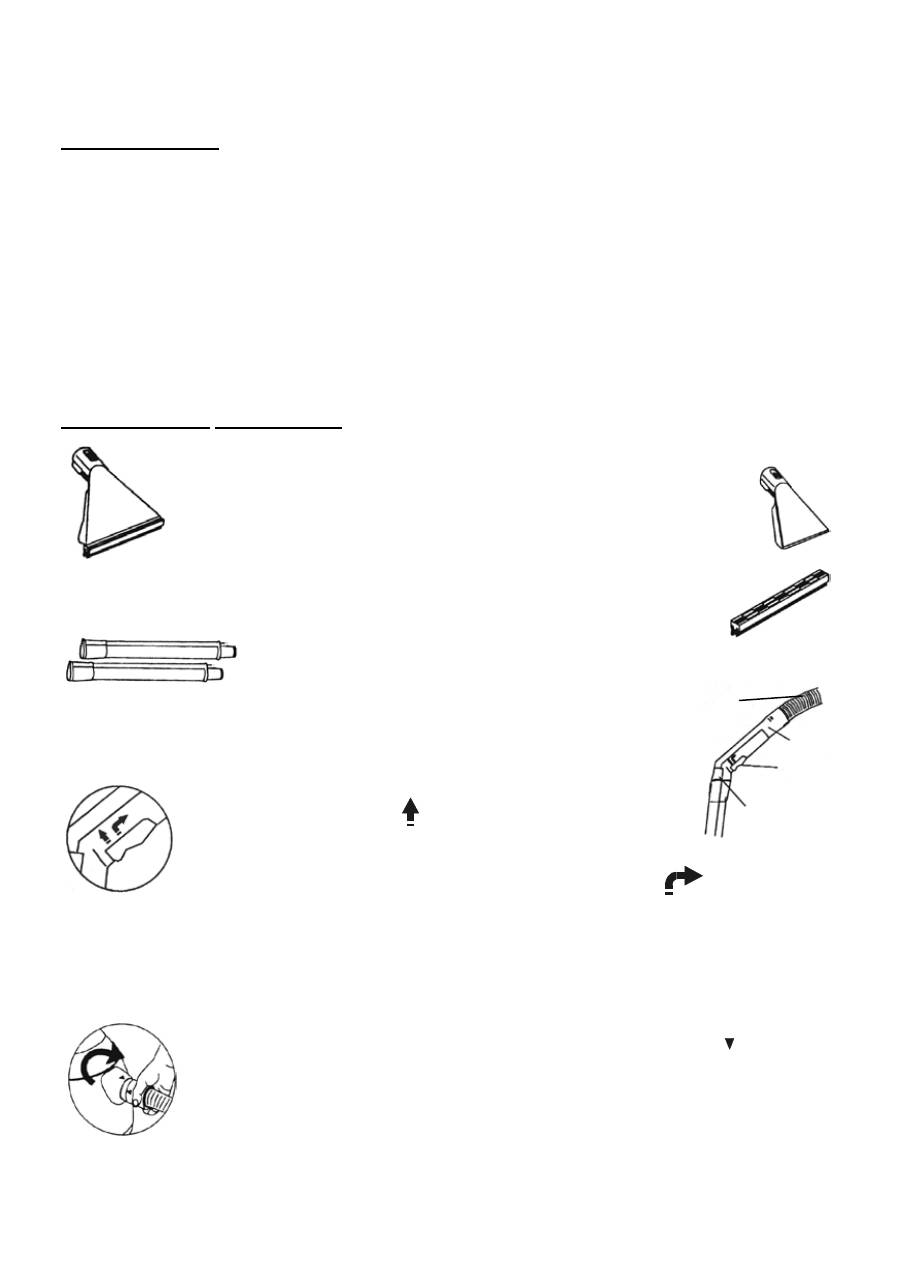
Big spraying nozzle – It is applied for water suction and wet cleaning.
Small spraying nozzle – It is applied for wet
cleaning of small upholstered surfaces, i.e. chairs,
armchairs, sofas, car upholstery, etc.
Brush strip – to be fitted on big spraying nozzle. It is applied for water suction from
hard surfaces, i.e. parquet, lino, ceramic tiles, etc. and wet cleaning.
Two sucking tubes set (for washing function) – they
connect the hose with proper nozzle. You can use both or
one tube depending on your needs.
Sucking hose (for washing function) – is the basic equipment of the vacuum
cleaner. The flexibility makes possible to manipulate with different parts of
accessories. The hose handle includes:
1. The two-functions button:
−
Water flow to nozzle releasing – press the button
according to the arrow .
−
Water flow to nozzle releasing with buttons stoppage –
press the button and move it back according to the arrow
.
2. The inlet with suction power adjusting. Do not open it during water suction or wet cleaning.
Preparations for wet cleaning
Vacuum the surface thoroughly before wet cleaning and then prepare the surface for wet cleaning,
the following way:
−
Switch the vacuum cleaner off and unplug it.
−
Turn the ending of the hose up to the position where the tops on the hose
ending and tank cover each other and remove the hose from the tank.
−
Open the top lid and remove the front tank.
−
Remove the water tank.
−
Remove the rubbish from the filter housing cup or remove the paper bag.
Buton
Sucking
hose
Handle
Power suction
regulator

0
90
−
Pour dirty water out including the dirtiness form the tank and rinse the tank.
−
Insert the water filter without paper bag and filtration pad.
−
Place the tank at the base and close the top lid.
−
Remove the nozzle or the brush, which was used earlier
and fit the nozzle for wet clearing on the sucking tube.
−
Remove the back tank:
−
open the top lid and bring it to vertical position 1.
−
move the tank up and then move it back 2.
−
Remove the inlet pin and fill the tank up with cleaning agents
(the powder solution or liquid), according to the label:
1. Powder, cleaning solution preparation: dissolve the content
of the bag in 2,5 – 3l of warm water- temp. up to 45ºC.
2. Cleaning liquid: pour the measured portion of the liquid into
the back tank. 1 pin of liquid for 3,5l water.
−
Depending on the applied clearing agent, fill the back tank up with prepared solution or warm water
with temp. up to 45ºC.
−
Insert the pin into the inlet in back tank.
ZELMER S.A. warranties good cleaning effect and proper vacuum cleaner operation, only using the
cleaning agents and their amount approved by ZELMER S.A., which is indicated at the label:
−
„DYWANOPUC” cleaning powder manufactured by OKTIMA,Poland,
−
„CARPEX” cleaning liquid manufactured by ASTRA POLLENA, Poland,
−
„FOUNTAINHEAD” cleaning liquid manufactured by Butcher’s, USA
−
Place the tank in previous place and push it in to fasten it exactly at the vacuum
cleaner housing.
−
Close the top lid.
ATTENTION !!! The vacuum cleaner is equipped by the manufacturer with one
of the a/m cleaning agents only.
CLEANING CARPETS
heck the colours resistance before wet cleaning.
Put a small amount of cleaning agent on white cloth (powder solution or liquid) and clean the carpet in
the least visible place. If the cloth will be coloured, it means that the carpet does not have permanent
colours and can not be cleaned this way.
To protect against foam generation, or when it is generated during cleaning, use the anti-
foaming agent recommended by ZELMER S.A., in amount and way explained at the label
:
−
“ANTYPIENIACZ III” provided by OKTIMA Poland,
−
„FOAM-FREE” provided by Butcher’s, US .
ATTENTION!!! The vacuum cleaner is equipped by the manufacturer with one
of the a/m cleaning agents only.
−
Remove the brush strip from the nozzle
−
Check the right direction of nozzle movement on the carpet, so that it has the least
friction.
−
Press the pump on/off button in and switch
the vacuum cleaner on.
ATTENTION!!! You can switch the pump on only, when there is water
inside the back tank. The lack of water is indicated with very noisy pump operation.
−
Press the adjusting button at the hose handle to adjust the water flow to the nozzle.
−
Move the nozzle along the carpet with forward and backward movements.

1
90
−
Pour dirty water out including the dirtiness form the tank and rinse the tank.
−
Insert the water filter without paper bag and filtration pad.
−
Place the tank at the base and close the top lid.
−
Remove the nozzle or the brush, which was used earlier
and fit the nozzle for wet clearing on the sucking tube.
−
Remove the back tank:
−
open the top lid and bring it to vertical position 1.
−
move the tank up and then move it back 2.
−
Remove the inlet pin and fill the tank up with cleaning agents
(the powder solution or liquid), according to the label:
1. Powder, cleaning solution preparation: dissolve the content
of the bag in 2,5 – 3l of warm water- temp. up to 45ºC.
2. Cleaning liquid: pour the measured portion of the liquid into
the back tank. 1 pin of liquid for 3,5l water.
−
Depending on the applied clearing agent, fill the back tank up with prepared solution or warm water
with temp. up to 45ºC.
−
Insert the pin into the inlet in back tank.
ZELMER S.A. warranties good cleaning effect and proper vacuum cleaner operation, only using the
cleaning agents and their amount approved by ZELMER S.A., which is indicated at the label:
−
„DYWANOPUC” cleaning powder manufactured by OKTIMA,Poland,
−
„CARPEX” cleaning liquid manufactured by ASTRA POLLENA, Poland,
−
„FOUNTAINHEAD” cleaning liquid manufactured by Butcher’s, USA
−
Place the tank in previous place and push it in to fasten it exactly at the vacuum
cleaner housing.
−
Close the top lid.
ATTENTION !!! The vacuum cleaner is equipped by the manufacturer with one
of the a/m cleaning agents only.
CLEANING CARPETS
heck the colours resistance before wet cleaning.
Put a small amount of cleaning agent on white cloth (powder solution or liquid) and clean the carpet in
the least visible place. If the cloth will be coloured, it means that the carpet does not have permanent
colours and can not be cleaned this way.
To protect against foam generation, or when it is generated during cleaning, use the anti-
foaming agent recommended by ZELMER S.A., in amount and way explained at the label
:
−
“ANTYPIENIACZ III” provided by OKTIMA Poland,
−
„FOAM-FREE” provided by Butcher’s, US .
ATTENTION!!! The vacuum cleaner is equipped by the manufacturer with one
of the a/m cleaning agents only.
−
Remove the brush strip from the nozzle
−
Check the right direction of nozzle movement on the carpet, so that it has the least
friction.
−
Press the pump on/off button in and switch
the vacuum cleaner on.
ATTENTION!!! You can switch the pump on only, when there is water
inside the back tank. The lack of water is indicated with very noisy pump operation.
−
Press the adjusting button at the hose handle to adjust the water flow to the nozzle.
−
Move the nozzle along the carpet with forward and backward movements.
91
ATTENTION!!! In case of finding out that the nozzle does not spray the water although the
pump is on, check if the back tank is properly assembled (push it strong in),
and assembling the stub in the valve at the base. In case of difficulties with
fitting lubricate the seating of back tank valve and the stub sealing.
−
Clean the carpet so, that you do not step on the cleaned surface during cleaNing or just after.
ATTENTION!!! The vacuum cleaner is equipped by the manufacturer with one of the a/m
cleaning agents only.
−
After cleaning the part of the carpet make a break and dry it with forward and backward movements
of the nozzle. Repeat the activities until the whole surface of the carpet is dried.
−
When spraying is finished switch the pump off and press for a moment the button adjusting the
water flow to the nozzle, to release the pressure.
In case of old or especially difficult stains, damp the place with cleaning agent recommended
by ZELMER S.A., up to the moment the foam appear. Then leave for a while and next suck it
out with the vacuum cleaner.
ATTENTION!!! Do not allow the carpet soaking. It can cause the permanent deformation
(rucking).
PLAIN FLOORS CLEANING
−
Fit the brush strip on the nozzle.
−
Press the pump on/off button in and switch the vacuum cleaner on (as in case of carpets).
−
Press the adjusting button at the hose handle to adjust the
water flow to the nozzle.
ATTENTION!!! In case the spraying nozzle is blocked disassemble the
nozzle from the tube and clean (blow) the duct, or replace
the nozzle with a new one.
The set of spare nozzles is attached to the accessories
Nozzle exchange
1. Remove the spraying element and the ring ø 5,6 x 1 from the
big (or small) spraying nozzle,
Press the sprayer with your thumb according to the mark on the nozzle housing.
2. Lubricate the new sprayer including the ring and insert it into the nozzle inlet up to the moment
the hooks are locked.
−
Move the nozzle along the cleaned surface with forward and back ward movements.
−
Stop the spraying after clearing the part of the floor and suck the solution in, making slow
movements of the nozzle in your direction, until all solution is collected from the floor.
−
Continua it until all the floor is cleaned and dried.
−
When spraying is finished switch the pump off and press for a moment the button adjusting the
water flow to the nozzle, to release the pressure.
If you preformed wet clearing (picking up wet dirtiness) before finishing operation in the final
stage, suck in abort 1–2l of clean water in order to flush the tubes and hose, and then suck in
the air for a while, in order to dry them.
AFTER OPERATION
−
Switch the vacuum cleaner off and unplug it from the mains supply outlet.
−
Rewind the cord pressing the rewind button. Hold the plug when rewinding, do not
allow the cord to get entangled and the plug to bump the casing.
−
Turn the ending of the hose up to the position where the tops
marks on the hose ending and tank cover each other and remove
the hose from the tank.
−
Remove the hose stub from the base.
−
Press the button and disassemble the tubes.Disassemble the
hose and nozzle similar way.

92
−
Remove the water filter from the tank.
−
Remove the foam filter from the water filter and rinse it under running water
from the inside of the foam.
ATTENTION!!! Do not wash the filtration foam in hand by wringing it or in
washing machines Avoid squashing, stretching or
deformation. Dry after washing in ambient temperature
straightened or hanged on the handle.
Never dry the foam on the heaters, radiators, ovens, etc.
−
Pour the dirty water out through the inlet for hose assembling.
−
Clean the tank and water filter thoroughly, change the water some times.
−
After washing clean thoroughly all the elements of accessories used during this
process (hose, tubes, accessories).
Leaving the a/m parts unclean or not exactly cleaned can cause the loss of
filtration abilities of the pads and foam and enhance bacteria and mites development.
−
Dry all the cleaned parts thoroughly.
ATTENTION!!! Never assemble the vacuum cleaner before drying cleaned parts.
−
Insert the water filter, place the tank on the base and close the top lid.
FILTERS REPLACEMENT
Air-inlet and air-outlet filters get dirty during operation. It is recommended to flush air-inlet filter to
provide proper operation. Very dirty or damaged air-inlet filter must be replaced with a new one.
Air inlet filter replacing
−
Open the vacuum cleaner lid and place it in vertical position.
−
Catch the upper edge of the filter grid (from the front) and pull it slightly in your
direction until it gets out of the hooks.
−
Turn the frame, remove the filter, rinse it under running water, press slightly, dry
and replace (or replace with a new one).
−
Place the new filter thoroughly, so that after closing the frame, its edges were
tightly pressing the filter edge.
−
Close the filter frame.
Air-outlet filter
The air-outlet filter should be exchanged after about 30 operational hours (6 months),
or earlier in case of strong dirtiness.
−
Press the cocker and open the outlet cover.
−
Exchange the filter insert:
Type 619.5*E – fig.
A;
Type 619.5*S – fig.
B
Electrostatic filter
Cassette with HEPA filter
−
Insert the filter thoroughly (fig.
A
), so
that after closing the frame, its edges
were tightly pressing the filter edge.
If any water occurs at air-outlet filter, it means that there is some foam inside the front tank,
which condenses at the air-outlet filter, after getting through the turbine. In order to avoid such
phenomenon it is required to add foam neutralizing agent recommended by ZELMER S.A., and
switch on for some minutes (without front tank) in order to dry the suction system.
Air-outlet filter should be always replaced with a brand- new, original one.
ECOLOGY
At the end the product’s useful life, please dispose of it at appropriate collection points
provided in your country.
619-195
B
A


