YUKON RANGER PRO 5x42: OPERATING INSTRUCTIONS
OPERATING INSTRUCTIONS: YUKON RANGER PRO 5x42
Table of contents
OPERATING INSTRUCTIONS
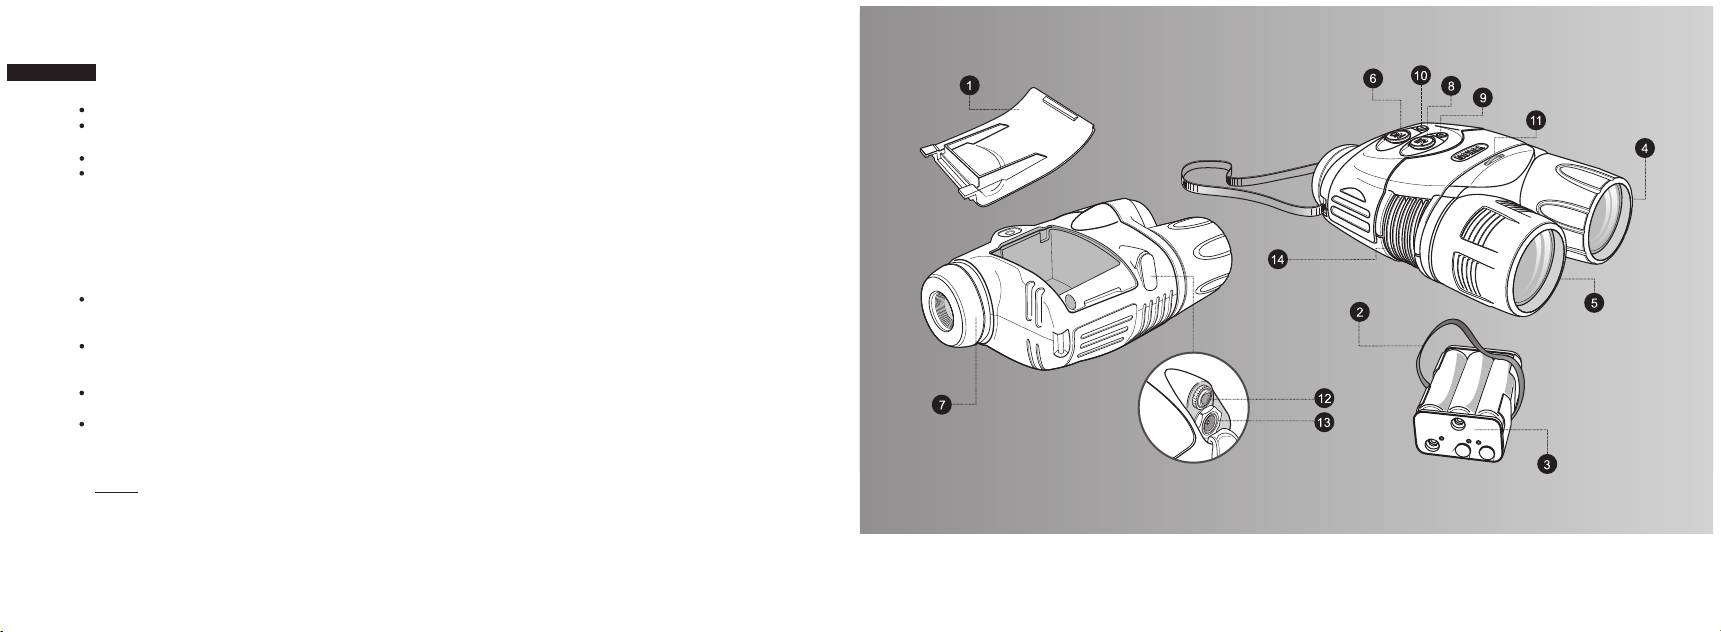
Remove the lens caps from the objective lens (4) and from the long-range IR-illuminator (5).
Press the button marked ON (6) to turn on the device. A stable green light indicates that the device is ready for use. A
« »
flashing green light indicates that the battery power level is low. A flashing red light indicates that the battery is empty.
Locate an object within 20 to 30 meters.
Rotate the eyepiece (7) until you see the frame of the display and black fine grid on it. Adjust the sensitivity of the
clearly
device (visually it is determined as image brightness) by turning the adjustment wheel (11).
Rotate the objective (4) until you see a sharp image of the object. When you turn the device on, the stealth short-range
IR-illuminator is turned on automatically. Press the «IR» button (8) to turn the main long-range IR-illuminator on.
Choose the operation modes of the IR-illuminator: press and hold the «+» (9) or «-» (10) buttons to increase or decrease
respectively the power of the IR-illuminator. The use of the IR-illuminator in the optimal mode prolongs operating time. If
the device is focused on an object closer than 15 metres, the emission spot of the main IR-illuminator (bright light circle)
will be shifted to the right side of the display.
When changing the viewing distance, try to see a sharp and high-quality image by rotating the objective (4) and the
sensitivity adjustment wheel (11) and by changing the operating modes of the IR-illuminator. Do not rotate the eyepiece
(7) the device is already individually adjusted.
Plug the output video cable into the RANGER PRO's video-output jack (12) to transmit the observed image to an
external LCD monitor. When the RANGER PRO 5x42 is coupled with video equipment, the observed image can be
recorded.
To connect the RANGER PRO 5x42 to a vehicle's 12V auxiliary power port, plug the car adapter into the RANGER
PRO’s power input jack (13) and connect the other end of the cable to the vehicle's auxiliary power port.
To connect the RANGER PRO to a household outlet, use a variable power switching adapter. 5x42
Be careful, observe the polarity shown on the inner side of the battery cover.
NOTE. When the batteries are in the container and the external power source is turned on, the device operates
on the external power source. If you unplug the external power source, you have to press the «ON» button to
make the device operate on the batteries.
3
44

— Снимите крышки с объектива (4) и линзы ИК- осветителя (5).
— Включите прибор кнопкой «ON» (6) - загорится индикатор зеленого цвета. При недостаточном заряде
элементов питания мигает индикатор зеленого цвета; при полном разряде батарей - индикатор красного цвета.
— Наведите прибор на объект, удаленный на расстоянии 20 - 30 м.
— Вращением окуляра (7) добейтесь четкого видения рамки дисплея и черной мелкой “сетки ” полосок на нем.
Отрегулируйте чувствительность прибора (визуально определяется как яркость изображения) вращением
поворотного регулятора (11).
— Вращением объектива (4) добейтесь появления четкого изображения объекта. При включении прибора
одновременно включается скрытый осветитель ближнего радиуса действия. Основной осветитель дальнего
действия (5) включается нажатием кнопки (8). Выбирайте режимы работы ИК-осветителя: нажимайте и
удерживайте кнопки «+» (9) или «-» (10) для увеличения или соответственно уменьшения мощности
работающего в данный момент ИК-осветителя. Использование ИК-осветителя в оптимальном режиме
позволяет повысить время непрерывной работы. Если прибор наведен на объект, расположенный ближе 15 м,
то наблюдаемое в окуляр пятно излучения основного осветителя (яркий светлый круг) будет смещено в правую
сторону дисплея.
— При изменении дистанции наблюдения добивайтесь четкого и качественного изображения с помощью
вращения объектива (4), регулятора чувствительности (11) и выбора режимов работы ИК-осветителя. Вращать
окуляр (7) не требуется - прибор Вами уже индивидуально настроен.
— Для передачи получаемого изображения на экран внешнего монитора или осуществления видеозаписи
подключите кабель для видеозаписи к видеовыходу (12).
— Для подключения питания от бортовой сети автомобиля, подключите кабель к разъему (13). При подключении
питания от стационарной сети пользуйтесь блоком внешнего питания.
Будьте внимательны, соблюдайте полярность, указанную на внутренней стороне крышки батарей
питания.
Примечание. При наличии батарей в контейнере и подключении внешнего питания прибор работает от
внешнего источника питания. Если отключить внешний источник питания, то для включения прибора
от элементов в контейнере батарей необходимо нажать кнопку «ON».
43
4
