Xoro HSD 8410 – page 5
Manual for Xoro HSD 8410
OPERATION FOR USB AND CARD READER
Operation for Card Reader and USB
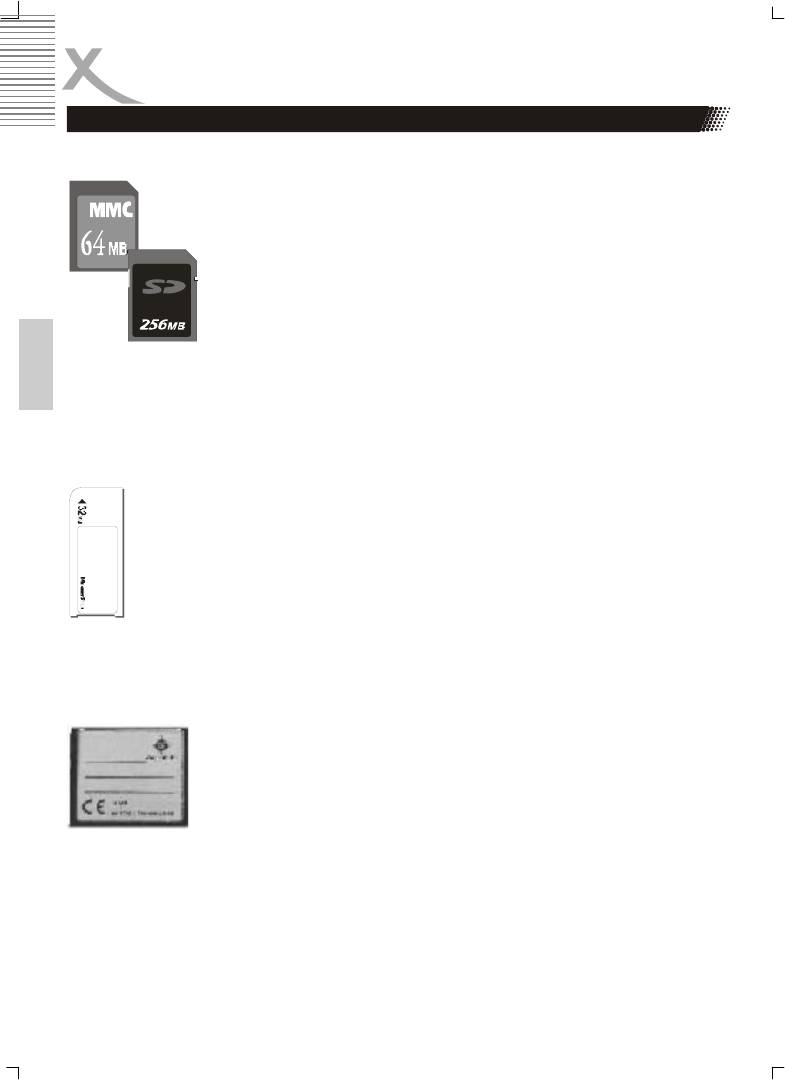
Inserting a MultiMedia Card or Secure Digital Card
Position the MultiMediaCard or Secure Digital card on its side with the
medias label on top and gold contacts on the bottom. The media
should be positioned so that the gold contacts are farthest from you
and inserted into the reader first. Please refer to below image for
proper media insertion.
Insert the card into the slot gold contacts first and the recessed notch
on the right. Gently push the card in all the way until the card is fixed in
place.
IMPORTANT:
Notice the notched corner of the MultiMediaCard or Secure Digital card and be careful not
English
to insert the MultiMediaCard or Secure Digital card in the wrong direction. To insert prop-
erly, be sure that the card is positioned so that the recessed notch is facing right and the
media‘s label is on the top. The media is to be inserted gold contacts first.
Inserting a Memory Stick Card
Position the Memory Stick on its side with the medias label on the top and the
gold contacts on the bottom. Position the media so that the gold contacts are
farthest from you. Please refer to below image for proper media insertion.
Insert the Memory Stick into the slot gold contacts first and the recessed notch on
the left. Gently push the Memory Stick in all the way until the card is fixed in
place.
IMPORTANT:
Notice the rounded corner of the Memory Stick card and be careful not to insert the Mem-
ory Stick in the wrong direction. To insert properly, be sure that the card is positioned so
that the rounded corner is facing left with the gold contacts downwards.
Inserting a CompactFlash Card
Position the CompactFlash card on ist side with the media manufac-
turer‘s label downwards (refer the picture) and the connectors facing
away from you. Insert the card into the reader with the CompactFlash
connectors first and label facing downwards.
Gently push the card in all the way until the card will insert no further.
Warning:
Be careful not to insert the CompactFlash card in the wrong direction—be sure the con-
nectors are facing inward and the card‘s label is on the top side.
30

OPERATION FOR CARD READER
Reading Card & Playing Control
After switching to card reader working status, Card Reader will read cards as per foolow-
ing sequence: CF I/II —> SD —> SM —> MMC —> MS. If there is a CF cards in the slot,
it won‘t be read the other cards (SD, SM, MMC, MS). If there are no cards, it will show NO
CARD.
For playing control, please refer to JPEG Photo CD /Mp3/MPEG-4 playing.
English
Removing Cards and USB device
The cards and thr USB device can only be removed when the card reader is at non-
working status and the cards indicator must be off, otherwise the reader or the cards may
be damaged, or data on the cards may be lost or corrupted.
To remove cards or USB devices, you should pull the card or USB device gently and hori-
zontally out of the slot by your hand directly.
Remark:
The supported range & capacity for the folders & files in the card
1. This card reader can support 2 levels of folders in the card.
2. The total folders number can be supported in the card is no more than 10. (Max 5
folders can be supported under directory)
3. Only support 100 files for each folder or support 100 files for each card with not
any folder in it.
4. A folder including different format files should not be supported.
5. Large JPEG files larger than 1 MB may not be displayed normally.
6. Do not insert different cards simultaneously.
31
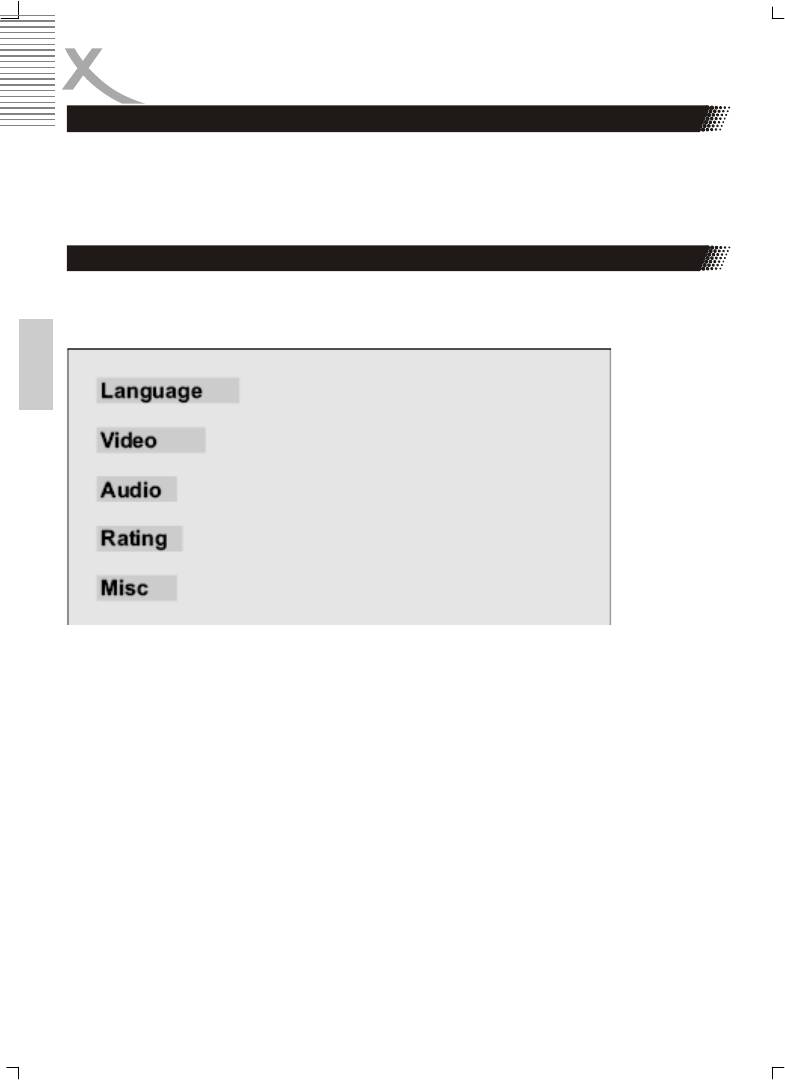
INITIAL SETTINGS
Once the initial settings have been completed, the player can always be operated under
the same conditions (especially with DVD discs). The settings will be retained in the mem-
ory even after turning off the power until the settings are changed. The initial language is
set to English/German, you may change the language to your preference.
Operation
Press STOP button first then press SETUP button to enter setup interface as followed
during the stop status. You can setup Language, Video, Audio, Rating and Mics.
English
Press Navigation button to navigate through menus. Choose desired option and press
OK button for confirmation. On the screen is appearing a submenu with all available op-
tions. To exit from the Setup mode, please press SETUP button once again.
32
INITIAL SETTINGS
Menu Languages
Highlight the OSD LANGUAGE option, and press the
Submenu Options
Arrow buttons to choose the OSD language you prefer.
Press OK to confirm, and it will display OSD in that
OSD
English
language; There are 6 optional OSD languages: Eng-
languages
German
lish, German, French, Spanish, Italian, Russian.
French
Spanish
Italian
Russian
English
Highlight the SUBTITLE LANG option, and press the
Submenu Options
Arrow buttons to choose the subtitle language you
prefer. Press OK to confirm. If the disc you are playing
Subtitle English
has that language available, it will displays subtitles in
German
that language; There are 8 optional audio languages:
French
English, German, French, Spanish, Russian, Auto, off.
Spanish
Italian
Russian
Auto
OFF
Highlight the MPEG 4 Subtitle option, and press the
Submenu Options
Arrow buttons to choose the subtitle language you
prefer. Press OK to confirm. If the disc you are play-
MPEG-4
Unicode (UTF-8)
ing has that language available, it will displays subti-
subtitle
Western European
tles in that language.
Turkish
For the languages Czech, Hungarian, Slovenian,
Central European
Polski, Slowacian and Serbian (with latin characters)
Cyrillic
please use the setting “Central European”.
Greek
For Russian language please use the setting
Hebrew
“Cyrillic”.
Arabic
For Swedish, German, French and English lan-
Baltic
guages please use the setting “Western European”.
Vietnam
Submenu Options
Highlight the Audio option, and press the Arrow buttons
to choose the audio language you prefer. Press OK to
Audio English
confirm. If the disc you are playing has that language
German
available, it will output audio in that language.
French
Spanish
Italian
Russian
33
INITIAL SETTINGS
Menu Languages
Highlight the DVD MENU option, and press the Arrow
Submenu Options
buttons to choose the menu language you prefer. Press
OK to confirm. If the disc you are playing has that lan-
DVD Menu English
guage available, it will displays menu in that language;
German
There are some optional menu languages: English,
French
German, French, Spanish, Italian, Russian.
Spanish
Italian
Russian
Highlight the MPEG-4 Subt. Shape option, and press
Submenu Options
the Arrow buttons to choose the MPEG-4 subtitle
shape colour. Press OK to confirm.
MPEG-4
White
English
subt. shape
Grey
Highlight the MPEG-4 Subt. Pos. Option, and press the
Submenu Options
Arrow button to choose the position of the MPEG-4
subtitle. Press OK to confirm.
MPEG-4
Buttom
subt. Pos.
Menu Video
Followed is the Video setup screen for your reference where you can set Aspect Ratio,
View Mode, TV System, Video-Out, Brightness, Sharpness, HD Resolution and HD JPEG
Mode.
Aspect Ratio
Submenu Options
4 : 3: Choosing this setting if your DVD player is connected to
a normal ratio TV. You can fill the movie to the entire screen of
your TV. This might mean that parts of the picture (the left and
Aspect ratio 4:3
right edges) won't be seen.
16:9
16 : 9: Choose this setting if your DVD player is connected to a
wide screen TV. If you choose this setting and you don't have a wide screen TV, the im-
ages on the screen may appear distorted due to vertical compression.
Notes:
1. The image display ratio is related to the recorded disc format. Some disc can not dis-
play images in the aspect ratio you choose.
2. If you play a disc recorded in 4:3 format on a wide screen TV, black bars will appear
on the left and right side of the screen.
3.
You must adjust the screen setting depending on the type of the television you have.
34
INITIAL SETTINGS
Menu Video
View mode
Submenu Options
These settings only take effect in case the resolution of MPEG4
video is less than PAL (720 x 576).
View mode Fill
Orginal
Player and TV are set to 4:3
Height Fit
Scaling of a file with the AR 1,33:1 and a resolution of 480x360
Width Fit
Original: Displays the native resolution of the video, including on
Auto Fit
all side borders.
Pan Scan
Pan Scan: Zoom to Fullscreen, crop on all sides, keep the
Aspect Ratio
English
All other settings are displaying in the same way like Pan Scan.
Scaling of a file with the AR 2,35:1 and a resolution of 640x272
Fill: Fullscreen / Crop on Right + Left side / keep the Aspect Ratio (AR)
Original: Displays the original resolution
Height Fit: Fullscreen / Crop strongly on Right + Left side / keep the AR
Width Fit: Fullscreen with black bar on Top + Bottom / Crop on Right + Left side / keep the
AR
Auto Fit: Same like Width Fit
Pan Scan: Same like Height Fit
Player and TV are set to 16:9
Scaling of a file with the AR 1,33:1 and a resolution of 480x360
Pan Scan: Fullscreen / Crop on all side / keep the AR
Auto Fit: 4:3 picture with black bar on Right + Left side / Crop on Top + Buttom side / keep
the AR
Width Fit: Same effect like Pan Scan
Height Fit: Same effect like Auto Fit
Original: 4:3 picture with a black bar on Left + Right side / complete resolution are shown /
keep the AR
Fill: Fullscreen / Crop on all side / AR is strongly distorted.
Scaling of a file with the AR 2,35:1 and a resolution of 640x272
Fill: Fullscreen / Crop on every side / AR is strongly distorted
Original: Diplays the original size
Height Fit: Fullscreen / Crop on Rifgt + Left side / keep the AR
Width Fit: Fullscreen with black bar on Top + Bottom side / smal crop on Right + Left side /
keep the AR
Auto Fit: Same effect like Width Fit
Pan & Scan: Same effect like Height Fit
35
INITIAL SETTINGS
Menu Video
TV SYSTEM
Submenu Options
According to the Color System of the TV, you can
choose the TV System.
TV Sytem NTSC
NTSC: Choose this settings if your DVD player is con-
PAL
nected to a NTSC TV.
Multi
PAL: Choose this settings if your DVD player is con-
nected to a PAL TV.
Multi: Choose this settings if your DVD player is con-
nected to a multi-system TV.
The default setting is NTSC.
English
Video Out
Submenu Options
Set normal video out on RGB. This is the SCART out-
put.
Video Out Component
Set normal video out via P-Scan. This is the YPbPr
RGB
output with progressive Scan in standard definition reso-
P-Scan
lution (576p).
VGA
Set normal video out on Component. This is the YPbPr
HD
interlaced (576i) output.
Set normal video out via VGA.
Set normal video out via HD. This settings activated the
high definition output for YPbPr and HDMI. Combined
with the setting HD Resolution=Auto the DVD-Player
set the optimal resolution to the native resolution of the
TV Set.
Brightness
Submenu Options
Use the right and Left Arrow button to move the scroll
and adjust the brightness
Brightness 1 to 16
Sharpness
Use the right and Left Arrow button to move the scroll
Sharpness 1 to 16
and adjust the sharpness.
HD Resolution
HD
Auto
You can select different settings for the resolution:
Resolution
480p/576p
Auto, 480p/576p, 720p and 1080i. By 720p and 1080i
720p
the DVD-Player will upscale to this resolution.
1080i
HD JPEG mode
HD JPEG
On
By activating this feature in HDMI or YPbPr with high
mode
Off
definition resolution the picture quality increases in
sharpness and details by displaying on the TV.
36
INITIAL SETTINGS
Menu Audio
Submenu Options
•
The Bass management option allows you to
set the analog audio output correspond with
the external speakers. When you set the op-
Bass
ON
tion On, than you can adjust reproduction of
Managment
OFF
the bass sound on each group of the speak-
ers.
• Large is for full frequency speakers
Front
Large
Speaker
Small
• Small is for medium high frequency speaker
which can not perform ultra low frequency.
Center
Larger
English
• None means, that the switch the channel off.
Speaker
Small
• Present: A subwoofer speaker is present and
None
switch on.
Surround
Lager
Speaker
Small
None
Subwoofer None
Present
Test Tones
Submenu Options
• OFF: Cancel the test function. It turn off auto-
Test Tone OFF
matically when playback of a content runs.
Left
Right
• Left: Test the left output
Center
Left Surr
• Right: Test the right output
Right Surr
• Center: Test the center output
Subwoofer
• Left Surr: Test the left surround output
• Right Surr: Test the right surround output
• Subwoofer: Test the subwoofer output
37
INITIAL SETTINGS
Menu Audio
Center delay
Submenu Options
Delay surround channel audio output in meters by
Center delay No Delay
different Steps: 0.3 m, 0.6 m, 1.0 m, 1.4 m and 1.7 m.
0.3 / 0.6 / 1.0 /
1.4 / 1.7 m
Surr delay (Surround delay)
Submenu Options
Delay surround channel audio output by different
Surr Delay No Delay
English
steps : 1.0 m, 2.0 m, 3.0 m, 4.0 m and 5.1 m.
1 / 2 / 3 / 4 /
5.1 m
Digital output
Submenu Options
• OFF: Disable digital audio
Digital
OFF
• PCM: Output PCM format digital audio
output
PCM
• ALL: Output all digital audio formats.
ALL
Night Mode
Submenu Options
The Night mode option is a night listening low dynamic
mode.
Night Mode OFF
• OFF: Turn off the night mode
ON
• ON: Turn on the night mode
Prologic
Submenu Options
• OFF: Turn off the prologic decode setting
• ON: Turn on the prologic decode setting
Pro Logic OFF
ON
38
INITIAL SETTINGS
Menu Audio
Rating
Submenu Options
In this option you can set the Parental Control and
adjust the Password.
Parental
G
Selecting a Rating option allows the user to set the
Control
PG-13
parental control feature on the player. If you choose
Adult
option Adult, any title will play on the unit (factory de-
fault). In other case, on the screen you will see a field
Set
Enter
to enter a password to access to DVD content.
Password
Password
The factory password is 8 8 8 8.
English
By the option Set Password you can change the factory
password. Enter the password, press OK button twice.
Than, enter a new password and press OK.
Misc
With this features all user settings could be reset to the
Submenu Options
default and standard settings, please choose Use de-
fault setting.
Misc Use default
By DVD Priority you can choose the priority of the DVD
setting
disc reproduction.
DVD Priority DVD Audio
DVD Video
39

DISC INFORMATION
Handling precautions
1. Do not touch the playback side of the disc.
2. Do not attach paper or tape to disc.
To clean disc
1. Fingerprints and dust on the disc may cause picture and sound deterioration.
Wipe the disc from the center outwards with a
soft cloth. Always keep the disc clean.
2. If you cannot wipe off the dust with a soft cloth,
wipe the disc lightly with slightly moistened soft
cloth and finish with a dry cloth.
3. Do not use any type of solvent such as thinner,
English
benzine, commercially available cleaners or anti-
static spray for vinyl Lps. It may damage the disc.
On storing disc
1. Do not store disc in a place to direct sunlight or near heat sources.
2. Do not store disc in places subject to moisture and dust such as a bathroom or
near a humidifier. Store disc vertically in a case. Stacking disc or placing objects
on their case may warp the disc.
Copyright notes
1. It is forbidden by law to copy, broadcast, show on cable, play in public, and rent
copyrighted material without permission.
2. DVD video disc are copy protected, and any recordings made from these disc will
be distorted.
About this manual
This user‘s manual explains the basic instruction of this DVD player. Some DVD video
disc are produced in a manner that follows specific or limited operation during playback.
As such, the DVD player may not respond to all operating commands.
Disc that can be played
Disc mark Contents Disc Size Maximum playback time
DVD Audio + Video 12 cm Approx. 2 hours (single sided single)
Approx. 4 hours (single sided double)
Approx. 4 hours (double sided single)
Approx. 4 hours (double sided double)
SVCD Audio + Video 12 cm Approximately 45 minutes
Video CD Audio + Video 12 cm Approximately 74 minutes
Aucio CD Audio 12 cm Approximately 74 minutes
40
TROUBLESHOOTING
Check the following guide for the possible cause of a problem before contacting service.
Technical Support of Xoro/MAS: Tel.: 040/77 11 09 17, Internet: www.xoro.de/support.htm
Sympton Cause Correction
No power The power plug is disconnected Connect the power plug into the wall
outlet
No picture
• The TV is not set into receive
• Select the appropriate video input
English
DVD signal output
on the TV so the picture from the
DVD player appears on the TV
• The video cable is not con-
screen
nected securely
• Connect the video cable into the
• The DVD video mode is not
jacks securely
matched with the TV
• Refer to connecting to a TV
No sound
• The audio cable is not con-
• Connect the audio cable into the
nected securely
jacks
• The power of the equipment
• Turn on the equipment connected
with the audio cable is turned
with the audio cables
off
• Set the audio settings correctly
• The setting of output sound type
is not correct
The playback picture
• The disc is dirty
• Eject the disc and clean it
has occasional
• It is in fast forward or fast re-
• Sometimes a small amount of pic-
verse playback
ture distortion may appear. This is
not malfunction.
Brightness is unstable
• The copy protection effect • Connect the DVD player to the TV
or noises are produced
directly
on playback pictures
The DVD player does
• No disc inserted
• Insert a disc
not start playback
• An unplayback disc in inserted
• Check the disc type and colour
system
• The disc is placed upside down
• Place the disc with the correctly
• The disc is not placed within the
guide
• Place the disc on the disc tray
correctly inside the guide
• A menu is on the screen
• Clean the disc
• The parental lock function is set
• Press the SETUP button to turn off
the menu screen. Cancel the paren-
tal lock function or change the
parental.
Buttons do not work Power supply fluctuations or other
Turn the power on or off with the
abnormalities such as static elec-
POWER button or disconnect the
tricity may interupt correct
power plug and insert it into the wall
outlet again.
The remote control
• The remote control is not
• Point the remote control at the
does not work properly
pointed at the remote sensor of
remote sensor of the DVD player.
the DVD player.
• Operate the remote control within
• The remote control is too far
about 7 m.
from the DVD player.
• Replaced the batteries with new
• The batteries in the remote
ones.
control are exhausted.
41

TROUBLESHOOTING
Symptons Cause Correction
Y Pb Pr (YUV)
• The video cable is not con-
• Connect the video cable into the
No picture or picture
nected securely
jacks securely
distortion
(progressive scan)
• The DVD video mode is not
• Set the video output as Progressive
matched
scan mode
• The TV is not set into receive
• Select the appropriate video input
DVD signal output
on the TV so the picture from the
DVD player
• The TV set may not be compatible
with this DVD-Player and switch to
NTSC output or use CVBS, S-
VIDEO or SCART to connect TV set
HDMI
• The video cable is not con-
• Connect the video cable into the
No picture
nected securely
jacks securely
English
• The DVD video mode is not
• Set the video output as HDMI (HD)
matched with the TV
mode
• The TV is not set into receive
• Select the appropriate video input
DVD signal output
on the TV so the picture from the
DVD player
• The TV set may not be compatible
with this DVD-Player and switch to
NTSC output or use CVBS, S-
VIDEO or SCART to connect TV set
Picture distorted dur-
• You had press the >> or <<
• The picture will be somewhat at
ing fast forward or fast
button for during fast forward or
times
reverse
fast backward
• This is normal advance or reverse
• Press > (Play) button for normal
speed
No 4:3 or 16:9 picture
• Wrong setting by TV TYPE • Choose the correct setup at TV
(distorted picture)
TYPE item that matches the TV set
Audio Soundtrack and/
• Cannot choose the correct
• If the audio soundtrack and/or
or Subtitle language
Soundtrack or Subtitle language
subtitle language does not exist on
are not setting
the disc, the language selected at
the initial settings will not seen/
heard.
• Alternative audio soundtracks (or an
alternative language is not selected
with disc which contain subtitle)
language cannot be more than one
language selected.
Can not change Angle
• This function depends on soft-
• If a disc has a number of angles
ware availability
recorded, these angles may be
recorded for specific scenes only
Forget password
• While the unit is in the Stop mode,
enter the setup mode and 8888 for
the password to unlock parental
setting
No Repeat, No A-B
• Some DVD disc have no ran-
• In program playing mode, no re-
function
dom function
peat, A-B functions are available.
42
SPECIFICATIONS
Power supply AC 180-240V 50-60Hz
Power consumption 15 W
Weight 2.5 kg
External dimensions 430 x 220 x 53 mm (W/H/D )
Signal system PAL / NTSC
Laser Semiconductor laser
English
Wavelength 650 nm and 780nm
Frequency range +3dB (20Hz - 20kHz)
Operation:
Temperature
0° - 40° Celsius
Humidity range
5—90 % (no condensation)
Status
Horizontal
Video:
Composit Video output
1.0 + 0,2Vp-p, 75 Ω
Horizontal resolution
≥ 500 lines
S / N ratio
≥ 60 dB
DAC
14bit / 108 MHz
Audio:
Audio output
1.8 + 0.2 /-0.8Vrms (1kHz 0dB)
Harmonic distortion
≤ 65dB (JIS-A 1kHz, typical)
Dynamic Range
≤ 80dB (JIS-A 1kHz, typical)
S / N ratio
≤ 90dB (JIS-A 1kHz, typical)
DAC
24bit / 192 kHz
Supplied Accessories
Quick Start Guide 1
Remote control 1
Batteries for the remote control 2
User manual 1
43

GLOSSARY
5.1
5.1-multichannel encoding means, that 5 audio channels with full frequency response are
present (left, center, right, surround left, surround right) plus a subwoofer channel
(represented by the „.1”) providing deep humming frequencies you are used to know from
®
®
modern cinemas. Both Dolby Digital
(including AC3) and DTS
support 5.1-coding and –
decoding.
Aspect ratio: 4:3 and 16:9
Full Frame refers to programs developed for TV display with an aspect ratio of 4:3. Wide-
screen refers to programs developed for screens with an aspect ratio of 16:9.
If a widescreen program is displayed on a 4:3 screen, the picture will have black borders
on top and bottom.
English
CD
A CD (Compact Disc) is a metal-coated plastic disc. It has a diameter of 12 cm and a
thickness of anout 1,2 mm. It was developed by Sony and Philips in 1985. The advan-
tages are digital storage of music enabling very natural sound reproduction. Beyond this,
the data is stored more compact, the handling is easy. The long lifetime of the media and
the fact that usage does not decrease quality made the CD the ideal storage media.
In the meantime, 12 different storage media have been developed from the first CD. The
mostly used are CD-DA (Compact Disc - Digital Audio) , CD-ROM (Compact Disc - Read
Only Memory), and the DVD (Digitale Versatile Disc).
One can store about 74 to 80 minutes of music on a CD (-DA). This is equal to 650 to 700
MB. Signal transmission is performed touchless with a laser beam. The CD is being read
from the middle to the outer side. The data or music is recorded in a spiral from the middle
to the outer side.
A CD has pits and lands, the distance is about 1,6 mm. The laser light created by a laser
diode passes different mirrors and prisms and then is focused by a lens to a laser beam.
This laser beam scans the data spiral of the CD. On the pits, the laser beam is reflected in
another direction and is detected by a photocell. The photocell transmits the signal to a
microprocessor which converts the digital data to an audio signal. The rest is done by the
sound system.
Component-Signal
please refer to YUV
Contrast
Means the range of luminance between the brightest and the darkest pixel which can be
displayed.
CVBS
Composite Video Interface. The video signal is transmitted via a single signal line. CVBS
should only be used, if your playback device does not offer other interfaces for connection
with you Xoro TV set, as CVBS due to technical reasons delivers worst quality of all avail-
able interfaces (please also refer to YUV, S-Video, SCART and RGB). The CVBS inter-
face can easily be identified from the yellow colour of the RCA jack.
44

GLOSSARY
®
Dolby Digital
5.1
®
Dolby Digital
5.1 is a system for transmission and storage of 5.1 channel sound on digi-
tal media as DVD, digital TV and satellite transmission. Different from the codecs Dolby
®
®
Surround
and Pro Logic
who do not work with channel separation to encode the sur-
®
round sound in a stereo recording, Dolby Digital
is a discrete system where the different
audio channels keep completely separated during encoding and decoding. Dolby Digital
5.1 is industry standard for coding of DVD movies with surround sound.
DSP
Digital Signal Processor. Microprocessor for digital processing of signals. Virtual Surround
English
for example is created with a DSP.
®
DTS
®
®
®
DTS
is a coding standard similar to Dolby Digital
. DTS Digital Surround
is a multichan-
®
nel surround system from Digital Theater Systems. Similar to Dolby Digital
it uses up to
5.1 channels. Different from Dolby, the data rate can be far above 1 Mbit/sec so the sound
®
is not compresses as strong as in Dolby Digital
resulting in a higher sound quality.
The frequency range is from 20Hz to 20kHz at 20Bit, but the subwoofer channels only
transmits frequencies below 80Hz. The coding system also is called CAC.
DVD
The DVD (Digital Versatile Disk) was introduced in 1995 and is a storage media with a
large capacity.
While a standard CD can store 650 MB of data, the DVD can store up to 9 GB. Especially
when it comes to video playback, a large storage capacity is important. Beyond its high
capacity, the consumer enjoys high quality video and audio. A DVD can store up to 8 dif-
ferent audiostreams, so in best case, the movie can be watched in 8 different languages
Photo-CD (JPEG CD)
A Photo-CD is a storage system for image storage on a CD-ROM in a platform independ-
ent multi resolution structure (support of different resolutions and file formats, e.g. JPEG,
BMP, etc). As a single camera film dies not fill a complete CD, more films can be added to
the CD at a later time. A CD-ROM drive must be multisession enabled to load images
from a Photo-CD.
GUI
Graphic User Interface. See OSD
HDCD
Pacific Microsonics has developed a digital audio technology using the full potential of a
CD. The HDCD process (High Definition Compatible Digital) is a patented coding and
decoding process transporting the complete details of a high resolution “master recording”
to a CD. There were several attempts to improve the sound quality of CD’s, but none
which could be compared to HDCD process.
45

GLOSSARY
Hosiden-connector
4-pin connector for S-Video connections.
HUE
HUE settings affect the colour balance of the picture.
Interlaced
The picture is created by writing two half pictures with a 1 line set-off on the screen. This
is standard on conventional 50 Hz TV sets.
®
Kodak Picture CD
®
The KODAK Picture CD
is the ideal media for allround photographers. All pictures are
English
stored at an excellent resolution of 1024 x 1536 pixel. On the KODAK Picture CD, the
images of your camera film strip are stored. It is not possible to add pictures at a later
point of time.
®
Note: There also are „Kodak Foto CDs
“ available. As they have a proprietary file format,
your DVD player cannot playback these media.
LPCM
LPCM stands for: Linear Pulse Code Modulation.
Digital, uncompressed audio recording. Standard on Audio-CDs.
MP3
MPEG 1 Layer 3 Codec, or short MP3, was developed in 1987 by Fraunhofer Institut für
Integrierte Schaltungen and was a revolution in audio compression. In 1992 it became
part of MPEG-1 video format. As MP3 offered high quality audio at incredible small file
size, it became an won standard. With this codec one can compress audio files to about 1
MB / minute.
MPEG-4
MPEG-4 is a standard used primarily to compress audio and video (AV) digital data. Intro-
duced in late 1998, it is the designation for a group of audio and video coding standards
and related technology agreed upon by the ISO/IEC Moving Picture Experts Group
(MPEG). The uses for the MPEG-4 standard are web (streaming media) and CD distribu-
tion, conversation (videophone), and broadcast television, all of which benefit from com-
pressing the AV stream. MPEG-4 absorbs many of the features of MPEG-1 and MPEG-2
and other related standards.
By MPEG-4 could be used a lot of different audio compression method. Most popular are
MP3 and AC3.
NTSC
Widespread TV standard, espacially in US and Asia. 525 (480 viewable) Lines and 60 Hz
refresh rate. Describes the way the video information (brightness, color, refresh rate etc.)
is transmitted. Within Europe, this video standard only appears on imported media (like
US DVDs).
46

GLOSSARY
OSD
The OSD (On Screen Display) is all the menus and options shown on the screen.
PAL
European TV standard. PAL stands for Phase Alternation Line; refresh rate: 50 Hz, Zeile-
nauflösung: 625 Lines, 576 visible lines. Describes the way the video information
(brightness, colour, refresh rate etc.) is transmitted.
PBC
English
PBC stands for playback control. This function can be used to show a menu on Video
CD’s (if contained on the VCD). One can move in this menu with the arrow keys and se-
lect the desired function with “enter”.
®
Pro Logic
®
Dolby Pro Logic
is a matrix decoder for decoding the four surround sound channels
®
contained in the stereo track of Dolby Surround
encoded programs (e.g. VHS movies or
TV shows). Dolby Surround is a matrix coding system mixing four channels (left, center,
right, surround) to a stereo track. A Pro Logic decoder separates these four channels
during playback. Without Pro Logic decoder, the program only has stereo sound
Progressive Scan
Progressive Scan writes a whole picture in one step, while the normal interlaced TV-
picture is composed of two half pictures. It delivers a significally enhanced picture, espe-
cially when used on vide beamers, PC monitors or LCD TV.
RGB
Red Green Blue. Describes the way of transmission and display of video signals. The
three in TV systems used colours red, green and blue are transmitted separately. When
used for connection between playback device and TV set, it delivers a quality similar to
YUV.
S/PDIF
S/PDIF (Sony/Philips Digital Interface) is a digital transmission standard for audio data.
S/PDIF can transmit audio files from one source to another without having to leave the
digital transmission which would result in worse quality.
S-Video
Describes the way video signals are transmitted. With S-Video, luminance and color infor-
mation are transmitted separately. S-Video interface can easily be identified by its 4-ports
in a round connector.
SECAM
French TV standard. It is also used outside France in some Easter European countries.
Refresh rate is the same as in PAL standard (50 Hz). The signal produces 625 TV lines.
47

GLOSSARY
Super Video CD (SVCD)
SVCD stands for Super Video CD. SVCD’s are very similar to VCD’s, one can store 35 –
60 minutes of high quality video with up to 2 Stereo audio tracks and 4 different subtitles.
All Xoro DVD players can play SVCD’s.
Video CD(VCD)
VCD stands for "Video Compact Disc". VCD’s are similar to normal CDs. They contain
movies with sound. A VCD can store 74 to 80 minutes of video with stereo sound. For the
storage of audio and video, MPEG-1 is used. All Xoro DVD players can play VCD’s.
YPbPr
please refer to YUV
English
YUV
Videosignal with separated transmission of color and brightness information. Similar to
RGB, the signal is transmitted via tree separate RCA cables. Also called Component Sig-
nal. YUV delivers best signal quality available with analogue signal transmission
48

NOTES
English
49


