Thomson ROC4507: instruction
Class: Household, kitchen appliances, electronics and equipment
Type:


Manual for Thomson ROC4507

ROC4507
User manual
Manuel d’utilisation
Bedienungsanleitung
Manuale di utilizzazione
Manual de utilización
Gebruiksaanwijzing
Руководство по применению
Cover_ROC4507.indd 1 14/05/07 11:46:12
ENGLISH...................................2
FRANÇ
AIS
................................8
D
E
UT
S
C
H
.............................
14
I
T
ALIAN
O
.............................
20
ES
P
A
ÑO
L
...............................
26
NEDERLANDS
..................... 32
PУCCКИЙ
........................... 38
Characteristics - Caractéristiques - Eigenschaften -
Caratteristiche - Características - Eigenschappen -
Технические характеристики
Weight = 103 grammes
P
oids = 103 grammes
Gewicht = 103 Gramm
P
eso = 103 grammi
P
вес = 103 грамм
eso = 103 gramos
Gewicht = 103 gram
Dimensions - Dimensions - Abmessungen - Dimensioni - Dimensiones -
Afmetingen - размеры
= 213 x 50 x 21 mm
Cover_ROC4507.indd 4 14/05/07 11:46:14
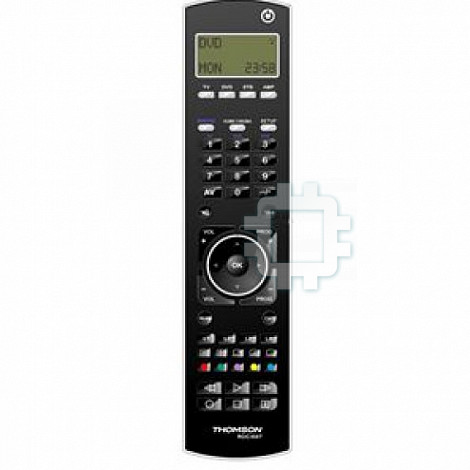
A B C
d
a
DVD
SET
e
Zzz
f
%
g
PM
h
b
MON 22:58
c
1
dvd
11
MON 23:58
TV DVD STB
AMP
2
MACRO HOME CINEMA
SETUP
10
3
TV DVD
STB
1
2 3
4
5 6
4
7
8 9
AV
0 --/-
16/9
VOL
PROG
+
+
9
OK
5
5
-
-
VOL
PROG
MENU
EXIT
L1 L2 L3 L4
6
7
8
ROC 4507
ROC4507
Cover_ROC4507.indd 3 14/05/07 11:46:14

Cover_ROC4507.indd 4 14/05/07 11:46:14
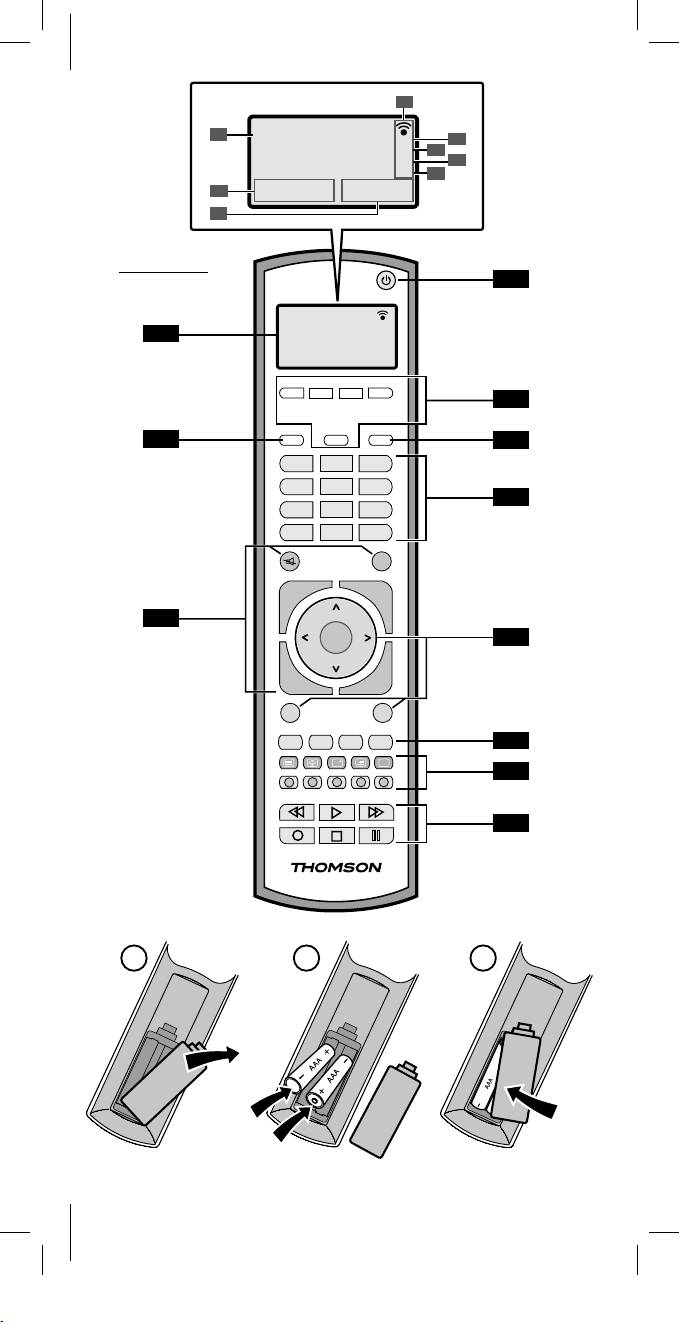
This universal remote control (4 in 1) is compatible with most television sets, DVD players, video cassette recorders,
ampliers and Home Cinema systems, as well as with most digital decoders such as satellite or cable receivers,
ADSL decoders, etc. These digital decoders are grouped together under the name STB (Set Top Box).
This remote control was factory-programmed in order to allow you to use it immediately with most devices with
Thomson group brand names. We suggest that you thus try it out before programming it using one of the methods
in this users manual. But rst of all, you must install 2 batteries (AAA - LR03) in it.
Keep this manual and its related documents so that you can refer to them for new programming operations
whenever you acquire new devices.
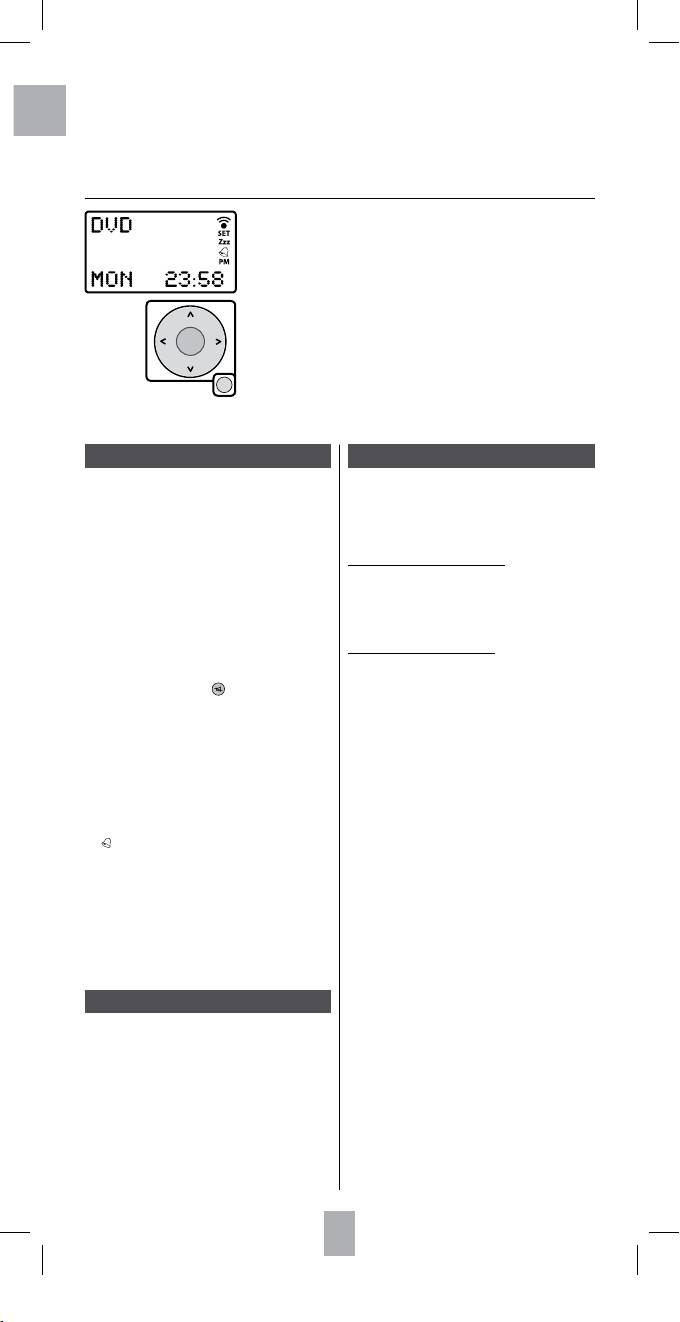
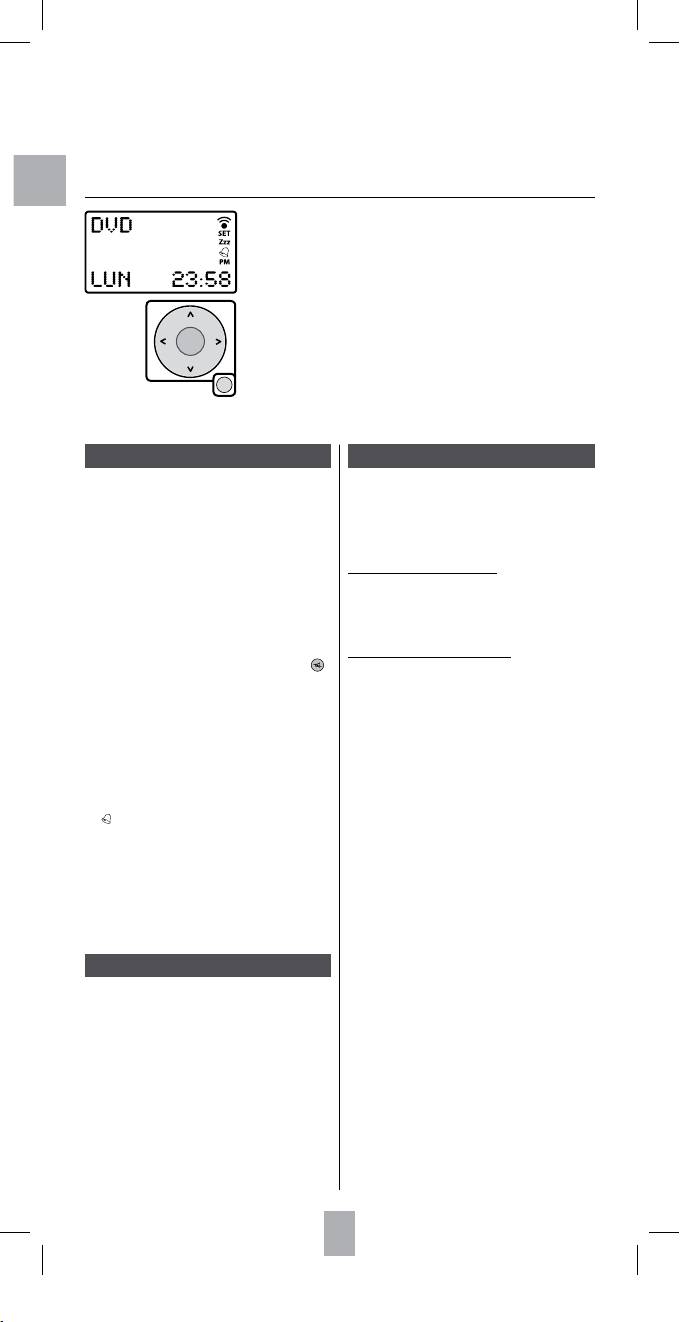
The LCD display always shows the active mode of the remote control (TV, DVD,
etc.) and the current time. These indications will be displayed as long as the
batteries are not worn down.
Navigation keys
The navigation keys serve to scan and then select the functions on the LCD
display.
The EXIT key serves to return to normal use of the remote control. In some cases,
this return to normal is automatic.
The keys and their functions
Programming the remote control
1 � - On/Standby, or Standby only, depending on the
The SETUP key is used for programming or to access
device.
the secondary functions such as, for example,
2 Mode keys – Select the device to be controlled (TV,
adjusting brightness or contrast on certain TV sets, etc.
DVD, etc.).
Programming is required if you wish to control devices of
3 SETUP – Programing the remote control.
other brands than Thomson.
4
Selec ting T V channels with one or two digits
(-/-),
Selec ting a plug/external feed (AV),
Access to the secondary functions
choosing a macro-command (1/T V, 2/DVD,
Briey press the SETUP key once. The date will show
3/STB).
on the screen. Then press the desired secondary
5 MENU, 5,6,4,3, OK, EXIT – Access to
function key. The remote control will exit this mode
the Navigation/Selection, Conrmation menus
30 seconds after a key is last pressed or if you press the
Exit from the menus.
EXIT key.
6 L1, L2, L3, L4 – Additional programmable keys
(learning function).
Programming the remote control
7 Activating and using Teletext (Videotext, Fastext,
Hold down the SETUP key until CODE SETUP appears
etc.).
on the display. If you see SET on the right side of
8 Playing a disc or cassette.
the display, this confirms that the remote control
9 Volume control, Mute ( ), Change TV channel/
is being programmed. Pressing SETUP repeatedly
station, Display in 16 : 9.
then allows you to scroll through the settings
10 Turns on the MACRO mode (sequence of automatic
options in the order given below. You may exit the
commands).
programming mode by pressing the EXIT key or by
11 LCD display
navigating up to the exit option and confirming by
a remote control mode (TV, DVD, etc.),
pressing OK.
b day, date, (press SETUP),
c hour, date or code of the device controlled, (press
SETUP or the mode key),
CODE SETUP - Allows you to access one of the
d shows transmission to the device,
4 programming modes using the OK key.
e SET is displayed when the remote control is in
You may thus choose to scroll through the list of codes,
programming mode.
enter a code, launch a code search or enter a code based
f Sleep timer is programmed
on the brand of the equipment to be controlled (the
g is displayed when a Timer is programmed
code booklet comes separately).
h Time format AM (morning) / PM (afternoon) when
the time is set in the 12Hr mode. Not shown when in
SYSTEM SETUP - Allows you to access settings for time,
the 24Hr mode.
date, volume, etc. using the OK key.
TIMER SETUP - Allows you to access the Timer settings
Note: The mode keys are pre-set for the devices indicated
using the OK key.
by their icons (
TV for a TV set, DVD for a DVD player, etc.).
Your remote control allows you to assign to each key a
LEARN SETUP - Allows you to access the learning function
dierent mode from the one indicated on it for all of the
of the keys using the OK key.
mode keys except the
TV key (e.g., DVD-HDD recorder to
the
STB key, etc).
MACRO SETUP - Consists of dening the sequences of
automatic commands. Each sequence is made up of
commands involving several keys (10 keys maximum).
Start set-up
HOME CINEMA SETUP - The Home Cinema mode is
considered to be a «virtual mode» that uses up to 5
The rst time you install the batteries, instructions will
groups of keys per mode. By means of this function,
appear in English (SET USING...KEY). Press OK to display
users can see all of the keys and devices they most often
LANGUAGE? ENGLISH then select one of the 7 languages
use regrouped under a single «Virtual mode». (See Home
using the 56 keys and press OK. CONFIRM xxxx
Cinema fucntion, Page 6).
(depending on the language selected) is displayed Press
OK > SUCCESS is briey displayed, then CODE SET UP.
EXIT SETUP - Allows you to exit the programming mode
When CODE SET UP is displayed, you will have a few
using the OK key.
seconds to set up the codes for the devices you would
like to control with your ROC 4507. Refer to stage 3 of
Note 1: After 15 seconds of inactivity, the remote control
the A, B, C, D programming methods to continue the
exits the programming mode.
programming procedure.
Note: TIMEOUT appears when you have exceeded the
Note 2: If the remote control is searching for a code or
allotted time for an operation.
awaiting information,
PLEASE WAIT is displayed.
OK
MENU
EXIT
EXIT
GB
Replacing the batteries: The settings for the time, day and date, and the macros are erased while the batteries are
replaced. Other settings entered will be preserved.
2
01_GB_ROC4507.indd 2 16/05/07 17:25:40

Method C - Programming by code search
Testing the remote control
before programming
Used to manually search for a code in any code library
GB
for a family of devices whose code or commercial brand
may not be included in the separate list or is led in
1. Turn on the device that you wish to control.
another fashion.
2. Press the key that corresponds to the type of device
to be controlled:
1. Turn on the equipment that you wish to control.
TV: TV set,
2. Hold down the SETUP key until CODE SETUP appears
DVD: DVD player/recorder,
on the display (for 7 seconds).
STB: satellite, cable, ADSL,
3. Press OK once to display SCROLL A LIST OF CODES.
AMP: amplier
4. Using the navigation keys (5,6), display SEARCH
3. Point the remote control at the device to be
FOR THE CODES then conrm using OK in order to
controlled and try to turn it o using the � key. If
display SELECT A MODE KEY.
the device does not go o, you should program the
5. Press once on the key of the device to be
remote control following one of the procedures A, B,
controlled (TV, DVD, etc.) to display SELECT
C or D described below.
DEVICE TV?
6. Conrm using OK to display TO SEARCH PRESS …P+
Identifying a code: Press and hold a mode key. The
or � (for the TV mode key, only TV can be selected).
code stored in memory for this mode is displayed (e.g.,
7. Point the remote control at the device to be
DVD…..0768).
controlled and try to turn it o using the � key.
8. If the device to be controlled goes o, press OK to
Note: Except for the TV key, every mode key (DVD, etc.)
store the code.
can be programmed to control a device other than the
9. If the device does not go o, press the � again
one indicated on the key. It is thus possible to assign,
several times until the device goes o. Between
for example, the
DVD mode to the STB key. You should
two presses on the key, leave time for the device to
enter the code that corresponds to the desired brand and
respond (1-2 seconds).
device following one of the procedures indicated in this
10. As soon as the device to be controlled goes o, press
manual.
OK to store the code.
11. The display briey indicates SUCCESS before exiting
the programming mode.
Note 1: Each time the (�) key is pressed, the remote control
sends a signal to the device. This signal corresponds to
Programming the remote control
a code in the code library stored in the remote control
Setting up the codes
memory. If you go past the required code, use the
PROG -
key to go back (or advance using
PROG +) inside the code
library.
Method A - Programming by scrolling
Note 2: the indication SEARCHING FOR: remains on display
during this mode.
Used to enter the codes using the list of codes shown
on the display.
1. Turn on the equipment that you wish to control.
Method D
2. Hold down the SETUP key until CODE SETUP appears
on the display (for 7 seconds).
Programming by search for Brand names
3. Press OK once to display SCROLL A LIST OF
CODES.
Used to manually search for a brand name (Thomson,
4. Press OK once to display SELECT A MODE KEY.
Philips, Sony, etc.) in the code library, which generally
5. Press once on the key of the device to be
contains 30 to 40 codes.
controlled (TV, DVD, etc.) to display SELECT
DEVICE TV?
1. Turn on the equipment that you wish to control.
6. Using the navigation keys (5,6), select the device
2. Hold down the SETUP key until CODE SETUP appears
(DVD, etc.) then conrm using OK. (for the TV mode
on the display (for 7 seconds).
key, only TV may be selected). The rst brand name
3. Press OK once to display SCROLL A LIST OF CODES.
and the rst code are displayed (e.g.: ADMIRAL,
4. Using the navigation keys (5,6), display USE
0000).
BRAND CODES then conrm using OK in order to
7. Select the brand using the navigation keys 56,
display SELECT A MODE KEY.
or by selecting the 1st letter of the brand of your
5. Press once on the key of the device to be
device using keys 2 - 9 (as on a mobile phone: 2=abc,
controlled (TV, DVD, etc.) to display SELECT
3=def, etc.) (e.g.: THOMSON : 8 4).
DEVICE TV?
8. Point the remote control at the device and try out
6. Conrm using OK in order to display ENTER THE
various keys, for example VOL +/-, PROG +/-, etc.
BRAND KEY 1-8 (for the TV mode key, only TV can be
9. If the device responds, store the code using OK.
selected).
10. If the device does not respond, change the code using
7. Refer to the separate list of codes by brand (this list
the 43 keys and try controlling the device again.
comes separately) and key in the number (1 to 8)
11. If you have tried all of the codes for your brand
that corresponds to the brand of the device to be
and the device still does not respond, try Method C
controlled. TO SEARCH PRESS P+ OR � is displayed
(programming by code search).
on the screen.
8. Point the remote control at the device to be
controlled and try to turn it o by pressing the � key
Method B - Programming by entering the code
once.
9. If the device to be controlled goes o, press OK to
Codes from the separate list (code tables).
store the code.
10. If the device does not go o, press the � again several
1. Turn on the equipment that you wish to control.
times until the device goes o. Between two presses
2. Hold down the SETUP key until CODE SETUP appears
on the key, leave time for the device to respond (1-2
on the display (for 7 seconds).
seconds).
3. Press OK once to display SCROLL A LIST OF CODES.
11. As soon as the device to be controlled turns o, press
4. Using the navigation keys (5,6), display ENTER
OK to store the code.
THE CODES then conrm using OK in order to display
12. The display briey indicates SUCCESS before exiting
SELECT A MODE KEY.
the programming mode.
5. Press once on the key of the device to be controlled
(TV, DVD, etc.). The key selected and the code
Note 1: Each time the (�) key is pressed, the remote control
stored in memory for this key are shown on the
sends a signal to the device. This signal corresponds to
display (e.g.: TV.....0166).
a code in the code library stored in the remote control
6. Enter one of the 4-digit codes oered on the list
memory. If you go past the required code, use the
PROG -
received separately.
key to go back (or advance using
PROG +) inside the code
7. The display briey indicates SUCCESS before exiting
library.
the programming mode.
Note 2: The indication SEARCHING FOR remains on display
during this mode.
3
01_GB_ROC4507.indd 3 16/05/07 17:25:41
GB
4
Programming the combo (combined) codes:
1. Using the SETUP keys (hold down for 7
for certain combos (TV/VCR, TV/DVD, DVD/VCR, etc.), you
seconds), and navigation keys 5,6,4,3,
will have to press two keys in dierent modes in order
OK, display CODE SETUP followed by SYSTEM
to control the two devices the make up the combo. For
SETUP (press OK) then VOL/MUTE CONTROL SETUP
example, if you have a TV/DVD Combo, you may have
(press OK) navigate up to VOL/ MUTE CONTROL
to set a code using the TV key for the TV set AND a
RESET.
separate code (using another mode key) to control the
2. Press OK once.
DVD player.
3. CONFIRM OK TO RESET is displayed.
4. Press
OK once to conrm cancellation.
5. The screen briey displays PLEASE WAIT then
Combo commands:
SUCCESS before exiting this setup.
certain combos (TV/VCR, TV/DVD, DVD/VCR,…) have
separate keys on the original remote control for
Setting the time
selecting the Combo device that you wish to control.
1. Using the SETUP keys (hold down for 7 seconds),
For example, if your Combo is a DVD/VCR, its original
and navigation keys 5,6,4,3, OK, display
remote control may have separate DVD and VCR keys
CODE SETUP then SYSTEM SETUP (press OK) and
for selecting the combo device you wish to control.
navigate up to TIME SETUP.
You may obtain the equivalent key functions on your
2. Press OK once.
remote control using the Mode and SETUP keys.
3. Set the format to 12 or 24 hours using 5,6, and
Supposing that your Combo has a DVD and a VCR,
conrm using OK.
and that its code is programmed in DVD mode, hold
4. Set the hour then the minutes using 5,6,
down the DVD Mode key for over 1 second in order to
(move from hours to minutes using OK) and conrm
send the DVD key command. In order to send the VCR
using OK.
key command, press and quickly release the SETUP
5. The display briey indicates SUCCESS before
key, then press and release the DVD Mode key. This
returning to CODE SETUP.
procedure may apply regardless of the type of Combo
(TV/VCR, TV/DVD, DVD/VCR, etc.), and is available in
Setting the date
all modes. This function is not guaranteed for all the
1. Using the SETUP keys (hold down for 7 seconds)
codes.
and navigation keys 5,6,4,3, OK, display CODE
SETUP followed by SYSTEM SETUP (press OK) then
navigate up to DATE SETUP
2. Press OK once.
3. Using keys 5,6, and OK, successively set the year,
System setup
month, date and day.
4. The display briey indicates SUCCESS before
Using the SETUP keys (hold down for 7 seconds), and
returning to CODE SETUP.
the navigation keys 5,6,4,3, OK go to the SYSTEM
SETUP screen in order to access the settings for volume,
Setting the backlight
time, date, backlighting and deleting options. Then
Used for setting the backlight delay following a key
navigate using keys 5,6,4,3, OK.
action.
1. Using the
SETUP keys (hold down for 7 seconds),
Volume control and Mute setup
and navigation keys 5,6,4,3, OK, display CODE
This remote control allows you to dene the mode that
SETUP then SYSTEM SETUP (press OK) and navigate
the Volume and Mute ( ) keys will control.
up to BACKLIGHT SETUP.
When it is shipped, this remote control is set so that
2. Press OK once.
the Volume and Mute keys control the current mode
3. Using keys
5,6 and OK, set the backlight time,
the remote control is in. If this mode does not have a
from 5 to 60 seconds, when BACKLIGHT TIME? is
volume control function, then the Volume and Mute keys
displayed.
automatically control the TV mode.
Note: the default time is 10 seconds. In order to deactivate
Volume control and mute setup in one mode
the backlight function, set the time to 00 and press
OK
Used to assign to one mode (TV or ...) the Volume and
once.
Mute keys ( ) without having to select that mode
during daily use.
4. The display briey indicates
SUCCESS before
1. Using the SETUP keys (hold down for 7 seconds),
returning to CODE SETUP.
and navigation keys 5,6,4,3, OK, display SET
CODES followed by SYSTEM SETUP (press OK) then
Setting the LCD display langauge
VOL/MUTE CONTROL SETUP. (press OK) then SET ALL
Used to select one of the 7 languages oered by your
VOL. TO 1 MODE (press OK) then SET ALL VOL. TO
remote control.
MODE?.
1. Using the
SETUP keys (hold down for 7 seconds),
2. Press once on the key of the device to be controlled
and navigation keys 5,6,4,3, OK, display CODE
(TV, DVD, etc.).
SETUP then SYSTEM SETUP (press OK) and navigate
3. The screen briey displays PLEASE WAIT then
up to LANGUAGE SETUP.
SUCCESS before exiting this setup.
2. Press OK once.
3. Using keys
5,6 and OK, select the language when
Note: If the mode selected does not itself display the
LANGUAGE? is displayed.
Volume/Mute commands,
VOLUME CONTROL ERROR is
4. The display briey indicates
SUCCESS before
shown on the screen and the remote control exits the setup
returning to CODE SETUP.
function and returns to normal operation.
Cancelling your settings
Volume control and mute setup in each mode
Used to recongure the remote control to the default
Used to assign the Volume and Mute keys
settings by erasing all the settings and storage of codes
( ), for each mode desired.
and keys.
1. Using the SETUP keys (hold down for 7 seconds),
1. Using the
SETUP keys (hold down for 7 seconds),
and navigation keys 5,6,4,3, OK, display CODE
and navigation keys 5,6,4,3, OK, display
SETUP followed by SYSTEM SETUP (press OK) then
CODE SETUP then SYSTEM SETUP (press OK) and
VOL/MUTE CONTROL SETUP (press OK) navigate up
navigate up to SYSTEM RESET.
to SET VOLUME FOR 1 MODE (press OK) then SET
2. Press OK once.
THE VOLUME FOR MODE?.
3. Press
OK once when CONFIRM OK TO RESET is
2. Press once on the key of the device to be controlled
displayed.
(TV, DVD, etc.).
4. The display briey indicates
PLEASE WAIT before
3. The screen briey displays PLEASE WAIT then
leaving this setting.
SUCCESS before exiting this setup.
Note: before using this setting, verify that the mode selected
has its own Volume/Mute functions either in the code or
by learning; otherwise, the Volume/Mute keys will have no
eect.
Resetting the Volume control and mute control
Used to cancel the settings of the preceding paragraphs
(return to the default factory-installed settings).
01_GB_ROC4507.indd 4 16/05/07 17:25:42

GB
5
Clearing a timer
Setting the Timer
1. Using the
SETUP keys (hold down for 7 seconds),
and navigation keys 5,6,4,3, OK display
CODE SETUP then OPTION SETUP then TIMER
Using the SETUP keys (hold down for 7 seconds), and
SETUP (press OK) then TV SLEEP SETUP then
navigation keys 5,6,4,3, OK, go to the TIMER SETUP
TIMER X SETUP (press OK) then TIMER X CLEAR.
display in order to access the stand-by settings for the
2. Press OK once to display TIMER X CLEAR.
TV set and 4 other timers that send sequences of at most
3. Press OK once to display CONFIRM OK TO CLEAR.
4 keys. Then navigate using keys 5,6,4,3, OK.
4. Press OK once.
Automatic sleep setup for the TV set
5. The display briey indicates
SUCCESS before
Used to program the sleep setup for a TV set using the TV
returning to CODE SETUP.
Sleep Timer mode (“Zzz”).
1. Turn on the device in TV Mode.
2. Using the
SETUP keys (hold down for 7 seconds),
and navigation keys 5,6,4,3, OK, display
Key learning
CODE SETUP then navigate up to TIMER SETUP
(press OK) then TV SLEEP SETUP (press OK) then
This function is used to copy the functions of keys
TV SLEEP SET.
on other remote controls to the keys on your ROC
3. Press OK once.
4507 in the mode and to the keys of your choice.
4. Using keys
5,6 and OK, select the number
Your ROC 4507 can store up to 150 keys (depending
of minutes (from 1 to 90 minutes) before the TV
on the format of the IR code to be learned). Only
enters sleep mode when TV SLEEP TIME? is
one original remote control may be stored per Mode
displayed.
(refer to the notes concerning learning). The remote
5. The display briey indicates
SUCCESS before
control may also be pre-programmed using one
returning to CODE SETUP.
of the codes in the library, and copied keys may
6. Press EXIT twice to exit this mode.
be «superimposed» on the key positions selected by
the user: The remote control can thus be customised
Note: The “Zzz” symbol is displayed when a TV Sleep Timer
by the user, who uses a pre-programmed code, then learn
is set.
the key functions from his original IR remote control.
7. Set the remote control down on a table or at surface
Careful: You may not copy onto the Setup, Home Cinema or
at the level of the TV set’s infrared receiver with its
Macro keys • All of the commands copied for one mode are
front end pointed toward the TV set.
erased if an identical or new 4-digit code is entered for this
mode (also applies to direct entry of a code, a code search
Note: to clear the programming, navigate up to TV SLEEP
or brand search) • The screen and key backlighting is o
SETUP then TV SLEEP CLEAR. Press OK once when CONFIRM
during learning.
OK TO CLEAR is displayed. The display briey indicates
SUCCESS before returning to CODE SETUP.
Advice before you begin:
• Place the remote controls face to face so that the
IR LED diodes of the two remote controls are precisely
Setting the timer
lined up. You may need to adjust the height of
Used to program up to 4 timers. You may assign up to 4
the remote controls so that the LED diodes are
keys to the Timer so that it will activate at the set time (for
properly aligned. Verify that the gap between the
example, to change the Mode SAT channel over to 123 at
two remote controls is about 25 mm [1 inch]. Do not
22:35). The rst key must always be a mode key. The
change the gap between the two remote controls
following keys may not include 5,6,4,3, OK EXIT,
during the learning of all the keys required for this
MACRO, SETUP, or any other mode key. Timers may only
mode.
be set to be activated within the following 24 hour
• Begin by copying 2 or 3 keys (to get used to it), then
period. Timers are automatically cleared after having
perform the “Clear All Learn Modes“ function (clear
been activated. The Timer
“ ”
symbol is displayed when
all learn modes) before learning the entire keyboard
a Timer is set.
of your original remote control.
1. Turn on the device in TV Mode.
2. Using the
SETUP keys, and navigation keys
5,6,4,3, OK display CODE SETUP then OPTION
How to copy (learn) keys
SETUP then TIMER SETUP (press OK) then TV SLEEP
1. Using the
SETUP keys (hold down for 7 seconds),
SETUP then TIMER X SETUP (X corresponds to one of
and navigation keys 5,6,4,3, OK, display CODE
the 4 timers).
SETUP then navigate up to LEARN SETUP (press OK)
3. Press
OK once to display TIMER X SET.
then LEARN ONE MODE (press OK) then SELECT A
MODE KEY.
2. Press OK once.
Note: Clear the timer if it already contains a program (see
3.
Press the desired mode key once (TV, DVD, etc.) to
below).
display SELECT A MODE KEY TO LEARN
.
4. Press once on the key of your ROC 4507 to which
4. Using keys
5,6, OK, select the desired start time
you wish to copy the code of the original remote
(hour and minutes), Press OK.
control.
5.
SELECT TIMER X MODE? is displayed. Using the
5. The indication
LEARNING: PLEASE WAIT appears.
mode keys, indicate the device to be controlled (TV,
6. While
LEARNING: PLEASE WAIT is displayed, hold
DVD).
down the key on the original remote control until
6. The indication SELECT TIMER X KEY? is displayed.
SUCCESS or KEY LEARN ERROR appears on the
Press once on the key that corresponds to the desired
display before releasing the key on the original
command (e.g. 1).
remote control (normally after 2-3 seconds).
7. The indication
SELECT KEY 2 is displayed. Press
7. The indication
OK – LEARN MORE or EXIT? is
once on the desired key (e.g. 3) or on OK if you do
displayed. To copy another key, press once on OK
only want to send one command, and go to Point 10,
then begin again starting with Step 5 or press EXIT
below.
once to exit this mode.
8. The indication
SELECT key 3 is displayed. Press once
8. The display briey indicates
PLEASE WAIT before
on the desired key (e.g. 8).
leaving this mode.
9. The display briey indicates
SUCCESS before
returning to CODE SETUP.
Erasing the functions learned in a mode
10. Press EXIT to exit this mode.
Erases all the keys copied in a given mode
11. Set the remote control down on a table or at
1. Using the
SETUP keys, (hold down for 7 seconds)
surface at the level of the TV set’s infrared receiver
and navigation keys 5,6,4,3, OK, display CODE
with its front end pointed toward the device to be
SETUP then navigate up to LEARN SETUP (press OK)
controlled.
then LEARN ONE MODE then CLEAR ONE LEARN
MODE.
Note: the symbol “ ” is displayed when a Timer is set.
2. Press OK once to display SELECT A MODE KEY.
3. Press the desired key (TV, DVD, etc.) once to display
CONFIRM OK TO CLEAR
4. Press
OK once.
5. The display briey indicates
PLEASE WAIT before
leaving this mode.
01_GB_ROC4507.indd 5 16/05/07 17:25:42

GB
6
Erasing functions learned for all modes
Note: The rst key in the Macro sequence must always be
Erases all the keys copied (overall erasing is recommended
a mode key.
for the rst learning)
1. Using the
SETUP keys (hold down for 7 seconds),
5. Press each of the keys in order that make up the
and navigation keys 5,6,4,3, OK, display
macro.
CODE SETUP then navigate up to LEARN SETUP
6. Store the macro by pressing the
MACRO key once.
(press OK) then navigate up to CLEAR ALL LEARN
7. The display briey indicates
PLEASE WAIT before
MODES.
leaving this mode.
2. Press OK once to display CONFIRM OK TO CLEAR.
3. Press OK once.
Note: the Macro is automatically stored the 10th time the
4. The display briey indicates
PLEASE WAIT before
key is pressed.
leaving this mode.
8. The display briey indicates
SUCCESS before leaving
Notes on learning: Do not try to perform learning
this mode.
directly under fluorescent lights or in weak lighting
conditions since this could cause interference with the IR
How to clear a macro
transmissions. Place the remote control at least 1 metre
1. Using the
SETUP keys (hold down for 7 seconds),
[3 feet] from any light source • Avoid copying the volume
and navigation keys 5,6,4,3, OK, display CODE
and mute keys on your original remote control, unless
SETUP then navigate up to MACRO SETUP (press OK)
you are sure that they activate the same target device;
then MACRO KEY CLEAR (press OK) then SELECT A
for example, certain original DVD remote controls may
MACRO KEY.
also include a TV volume/mute key: they may have two
2. Press once on key 1, 2 or 3 of the macro to be cleared
different types of codes • Avoid learning DVD keys on
to display CONFIRM OK TO CLEAR
your original remote control unless you are sure that they
3. Press OK once.
activate the same target device; for example, certain
4. The display briey indicates
SUCCESS before leaving
original TV remote controls may also include a DVD key:
this mode.
they may have two different types of codes • Copying
a key may take up to 3 seconds. Do not release the key
being copied unless the “
Success” or “Key Learn Error”
How to use a macro
screens are displayed.
In normal operation, to activate the Macro, press and
release the MACRO key, then (within 20 seconds) press
If copying the rst or second keys for a certain mode
and release key 1, 2 or 3 to display MACRO X while the
constantly cause errors, use the following procedure:
Macro sequence is being run and remote control returns
i. End the learning session by pressing the
EXIT key.
to normal function. While the Macro is being executed,
ii. Clear the commands learned for this mode.
the remote control must be pointed at the devices to be
iii. Verify that the IR LED’s are properly aligned between the
controlled.
two remote controls.
iv. Ajust the gap between the two remote controls so as to
Note: if there is no Macro stored for the number key selected,
reduce or increase the distance (from 15 mm to 50 mm
“Macro X Void“ is displayed.
[1/2 to 2»]).
v. Try learning the original remote control again for this
Notes on macros: The time elapsed between each automatic
mode.
command during the execution of a macro is 1/2 second.
If the problem continues for the same key, verify that the key
For certain commands, you may have to add pauses in a
on the original remote control was properly learned; does
macro sequence (for example, to allow the TV set to warm
it send the signals? Does it activate the target device? Try
up). These pauses may be adjusted by using the
PAUSE key,
copying this key using a dierent mode. If the learning is
followed by a number of seconds from 1 to 9. The rst key
correct, the type of code may be dierent from the others
stored in a Macro sequence must be a Mode key (
TV, etc.).
and cannot be copied in the same mode.
The
SETUP, HOME CINEMA and MACRO keys may not be
included in a Macro. Press
SETUP in order to exit Macro
Setup.
Macro commands
This function permits storing sequences of commands
Home Cinema Function
using the MACRO key. You can program and store up
to 3 sequences of successive keystrokes for several
The Home Cinema function uses up to 5 devices with
keys of your choice. By pressing the respective Macro
one mode key: the HOME CINEMA key. The 5 devices
digital key, this sequence of successive keystrokes
correspond to the ve mode keys (TV, DVD, AMP...) that
(IR commands) is sent. Any sequence of successive
will be associated with predened keys. The keys are:
keystrokes performed frequently may be reduced to
a. The 2 program keys
PROG + / -.
only two commands (MACRO key plus one of the 1, 2 or
b. The 3 volume
VOL + / - keys and the mute ( ) key.
3 keys). For example, by pressing MACRO and then only
c. The 6 run keys Play, Pause, Stop, Fast Forward, Fast
one key, you can turn on your TV set, display your favorite
Rewind and Record 7,4,8,=,<,;.
channel, turn on your VCR and start a recording, etc.
d. Directional keys: up, down, right and left
5,6,4,3
You can store a sequence of 10 commands for each 1, 2
and the MENU, EXIT, OK keys.
or 3 key.
e. For the remaining keys: "base" mode
HOME CINEMA
(any one of the other modes).
How to set up a macro
Tip: Set up your macro on a sheet of paper by
Example: In Home Cinema mode, you can set up the
writing down the series of 10 keystrokes (maximum)
PROG+/ keys to control the satellite receiver, the VOL +/
that it is composed of. As an example, if you want to
and ( ) keys to control the amplier, the Run keys (PLAY,
turn on your TV set to Channel 3 and then turn on a
PAUSE, etc.) to control the DVD player, the MENU, EXIT, etc.
satellite receiver to Channel 5, you should write down:
keys to control the DVD player, and the other keys to control
MACRO, 1 (for storage for this key), TV (�), 3, SAT (�),
the TV set.
5, MACRO.
How to program the Home Cinema function
1. Using the
SETUP keys (hold down for 7 seconds),
1. Using the
SETUP keys (hold down for 7 seconds),
and navigation keys 5,6,4,3, OK, display CODE
and navigation keys 5,6,4,3, OK, display CODE
SETUP then navigate to HOME CINEMA SETUP (press
SETUP then navigate up to MACRO SETUP (press
OK) then HOME CINEMA SET (press OK) then PROG/
OK) then MACRO KEY SET (press OK) then SELECT A
CHAN KEY GROUP MODE?.
MACRO KEY.
2. Choose a mode key (TV, DVD, etc.) for the PROG + /
2. Press once on the 1, 2 or 3 key to which you wish to
- keys.
assign the macro.
>
VOLUME & MUTE KEYS MODE? appears.
3.
The indication SELECT MACRO X MODE? appears.
3. Choose a mode key (
TV, SAT, AMP, etc.) for the VOL +
4. Press once on the desired mode key (TV, DVD, etc.)
/ - keys.
to select the device that will receive the command
>
RUN KEYS MODE? appears.
SELECT MACRO X KEY? is displayed.
4. Choose a mode key (
TV, DVD, etc.) for the
7,4,8,=,<,;run keys.
>
xxx MENU, OK, EXIT MODE? appears
01_GB_ROC4507.indd 6 16/05/07 17:25:43
GB
7
5. Choose a mode key (TV, DVD, etc.) for the navigation
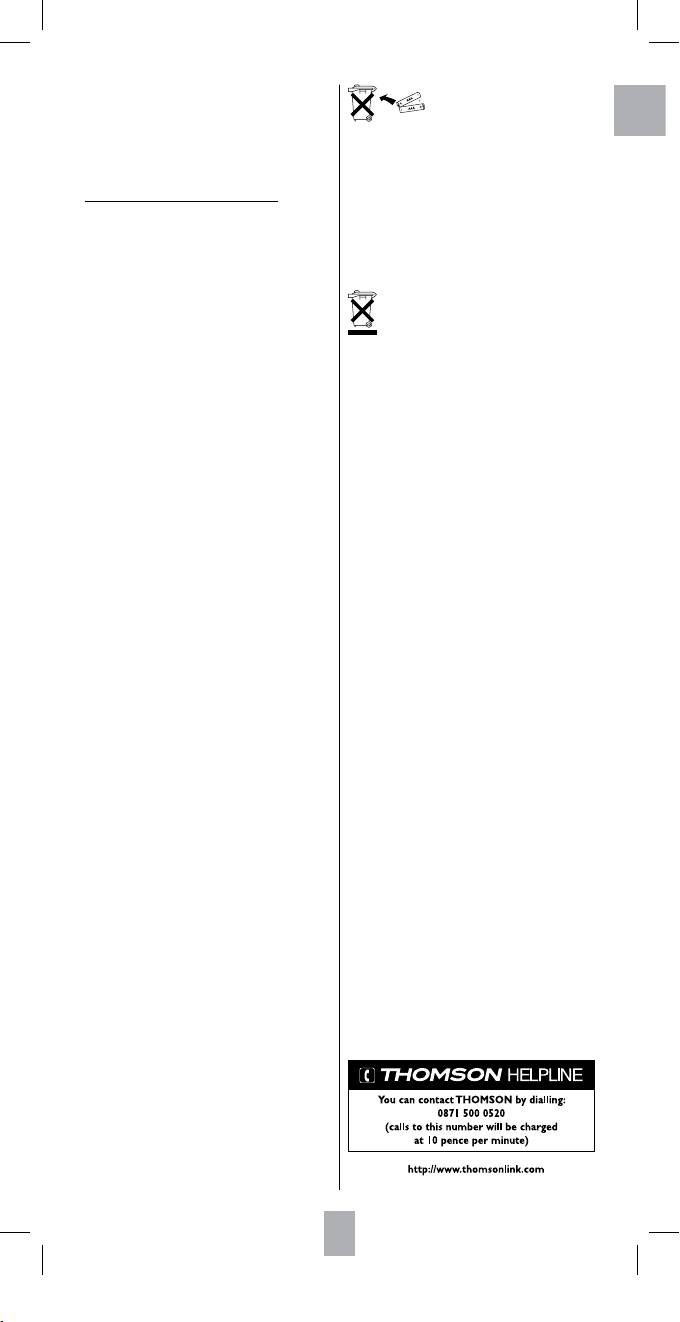
Respect the environment and the law!
keys MENU, EXIT, OK.
Do not mix different types of batteries
>
ALL OTHER KEYS MODE? appears.
or new and old batteries. Do not use
6. Choose a mode key (
TV, DVD, etc.) for the other
rechargeable batteries. In order to avoid any risk of explosion,
remote control keys to be used for Home Cinema
mode.
observe polarities indicated inside the battery compartment.
The display briey indicates
PLEASE WAIT then
Replace only with the type of batteries specified above. Do not
SUCCESS before returning to CODE SETUP.
throw them into fire, do not recharge them. If you are not using
the remote control for a long period of time, remove the batteries.
How to delete the Home Cinema function
Please respect the environment and prevailing regulations. Before
1. Using the
SETUP keys (hold down for 7 seconds),
you dispose of batteries or accumulators, ask your dealer whether
and navigation keys 5,6,4,3, OK, display CODE
SETUP then navigate to HOME CINEMA SETUP (press
they are subject to special recycling and if they will accept them
OK) then HOME CINEMA RESET.
for disposal.
2. Press OK once to display CONFIRM OK TO RESET.
3. Press OK once.
4. The display briey indicates PLEASE WAIT then
SUCCESS before returning to CODE SETUP.
This symbol means that your inoperative electronic
Notes on the Home Cinema function: the mode keys SETUP
appliance must be collected separately and not mixed
and
MACRO are used to exit the HOME CINEMA mode.
with the household waste • The European Union has
Learning and Macros do not work in the
HOME CINEMA
implemented a specic collection and recycling system for which
mode.
producers are responsible • This appliance has been designed and
manufactured with high quality materials and components that
can be recycled and reused • Electrical and electronic appliances
are liable to contain parts that are necessary in order for the
system to work properly but which can become a health and
environmental hazard if they are not handled or disposed of in the
proper way • Consequently, please do not throw out your
inoperative appliance with the household waste • If you are the
owner of the appliance, you must deposit it at the appropriate
local collection point or leave it with the vendor when buying a
new appliance • If you are a professional user, please follow your
supplier’s instructions • If the appliance is rented to you or left in
your care, please contact your service provider • Help us protect the
environment in which we live !
ROC4507 / EN_fr/ Parleclair - rst / 05-2007
01_GB_ROC4507.indd 7 16/05/07 17:25:45
Cette télécommande universelle (4 en 1) est compatible avec la plupart des téléviseurs, lecteurs DVD,
magnétoscopes, les amplicateurs et les Home Cinéma ainsi que la plupart des boîtiers numériques tels que les
récepteurs satellite ou câble, les décodeurs ADSL, ... Ces boîtiers numériques sont regroupés sous l'appellation STB
(Set Top Box).
La télécommande a été programmée en usine pour vous permettre de l’utiliser immédiatement avec la plupart des
appareils des marques du groupe Thomson. Nous vous conseillons donc de l’essayer avant de la programmer en
suivant une des méthodes de cette notice. Mais avant tout, vous devez installer 2 piles (AAA – LR03).
Conservez cette notice et ses documents associés an de pouvoir vous y reporter pour de nouvelles programmations
lors de l’acquisition de nouveaux appareils.
L’acheur LCD ache en permanence le mode actif de la télécommande (TV,
DVD, …) et indique l’heure. Ces indications restent présentes tant que les piles
ne sont pas usées.
Les touches de navigation
Les touches de navigation permettent de parcourir puis de choisir des fonctions
dans l’acheur LCD.
La touche EXIT permet un retour à l’utilisation quotidienne de la télécommande.
Dans certains cas, le retour est automatique.
Les touches de la télécommande
Programmation de la télécommande
1 � - Marche / Veille ou Veille uniquement selon les
La touche SETUP est utilisée pour la programmation
appareils.
ou pour accéder aux fonctions secondaires tel que
2 Touches de mode – Sélection de l’appareil à
par exemple le réglage de luminosité ou contraste sur
commander (TV, DVD, …) .
certains téléviseur, etc. La programmation est nécessaire
3 SETUP – Programmation de la télécommande.
si vous souhaitez commander des appareils d’autres
4 Sélection de chaînes à un ou deux chires (-/--),
marques que Thomson.
Sélection d’une prise / source externe (AV), choix
d’une macro-commande (1/TV, 2/DVD, 3/STB).
Accès aux fonctions secondaires
5 MENU, 5,6,4,3, OK , EXIT – Accès à des menus,
Appuyez brièvement une ou plusieurs fois sur la touche
Navigation / Sélection, Validation, Sortie des menus.
SETUP, la date s'ache sur l'écran puis appuyez sur la
6 L1, L2, L3, L4 – Touches programmables
touche de fonction secondaire désirée. La télécommande
additionnelles (fonction apprentissage).
quitte ce mode 30 s après le dernier appui sur une touche
7 Activation et utilisation du Télétexte (Videotext,
ou si vous appuyez sur la touche EXIT.
Fastext, …).
8 Exploitation d’un disque ou d’une cassette.
Programmation de la télécommande
9 Réglage du Volume, coupure du son ( ),
Maintenez appuyée la touche SETUP jusqu'à ce
Changement de chaîne/station, Achage en 16 : 9.
que REGLAGE DES CODES apparaisse sur l’acheur.
10 Activation du mode MACRO (séquence de
L’indication SET à droite de l’acheur conrme que la
commandes automatiques).
télécommande est en cours de programmation. Des
11 Acheur LCD
pressions successives sur la touche SETUP permettent
a mode de la télécommande (TV, DVD, …),
ensuite de faire déler les options de réglage dans l'ordre
b jour, date, (appuis sur SETUP),
déni ci-dessous. Vous pouvez quitter la programmation
c heure, date ou code de l’appareil commandé, (appuis
en appuyant sur la touche EXIT ou en navigant jusqu'à
sur SETUP ou sur la touche de mode),
l'option SORTIR et en validant par OK.
d symbole de transmission vers l’appareil,
e SET s'ache lorsque la télécommande est en mode
REGLAGE DES CODES – Permet d’accéder à un des
pogrammation.
4 modes de programmation avec la touche OK.
f Minuterie de mise en veille programmée
Vous pouvez ainsi choisir de faire déler la liste des
g s'ache lorsqu'un Timer (minuterie) est
codes, de saisir un code, de lancer une recherche de code
programmé
ou de d’entrer un code selon la marque de l’appareil à
h Format de l’heure AM (matin) / PM (après-midi)
commander (Bibliothèque des codes livrée séparément).
lorsque l'heure est programmée en mode 12H. Ne
REGLAGE OPTIONS – Permet d’accéder aux réglages
s'ache pas en mode 24H.
d’heure, de date, de volume… avec la touche OK.
Note : Les touches de modes sont prévues pour les appareils
indiqués sur la sérigraphie (
TV pour un téléviseur, DVD
REGLAGE TIMER – Permet d’accéder aux réglages des
pour un lecteur DVD, …). Votre télécommande permet
minuteries avec la touche OK.
cependant d’aecter un autre mode que celui qui est prévu
APPRENTISSAGE – Permet d’accéder à la fonction
pour toutes les touches de modes excepté pour la touche
TV
d’apprentissage des touches (parfois appelée learning)
(ex : enregistreur DVD-HDD pour la touche
STB, etc).
avec la touche OK.
Mise en service
DEFINIR LES MACRO – Consiste à dénir des séquences
de commandes automatiques. Chaque séquence
est constituée des commandes de plusieurs touches
Lors de la première installation des piles des indications
(10 touches maxi).
en anglais apparaissent (SET USING ….KEY). Appuyez sur
OK pour acher LANGUAGE? ENGLISH puis choisissez
FONCTION HOME CINEMA – Le mode Home Cinema est
une des 7 langues proposées à l'aide des touches 5,6
considéré comme un “mode virtuel“ utilisant jusqu’à 5
et appuyez sur OK (choisissez FRENCH pour le français).
groupes de touches par mode. Grâce à cette fonction,
> CONFIRM xxxxx (selon la langue) s'ache. Appuyez
l’utilisateur voit toutes les touches et appareils les plus
sur OK > OPERATION REUSSIE s'ache brièvement puis
souvent utilisés regroupés sous un seul “Mode virtuel“.
REGLAGE DES CODES apparaît.
(voir fonction Home Cinema Page 13).
Lorsque REGLAGE DES CODES est aché, vous disposez
SORTIR – Permet de quitter le mode programmation
de quelques secondes pour continuer les réglages en
avec la touche OK.
entrant les codes correspondants aux appareils que
vous souhaitez commander avec votre ROC 4507.
Note 1 : Après 15 secondes sans action, la télécommande
Reportez-vous aux étapes 3 d’une des 4 méthodes de
quitte le mode programmation.
programmation A, B, C, D an de poursuivre la procédure
de programmation.
Note 2 : Si la télécommande recherche un code ou attend
Note : L'indication HORS DELAI apparaît lorsque le temps
une information,
PATIENTEZ SVP est aché.
prévu pour réaliser une opération est dépassé.
OK
MENU
EXIT
EXIT
F
Remplacement des piles : Les réglages de l’heure, du jour, de la date et des macros sont eacés pendant le
remplacement des piles. Les autres réglages eectués sont conservés.
8
02_FR_ROC4507.indd 8 16/05/07 17:11:40

6. Saisissez un des codes à 4 chires proposés par la
Essai de la télécommande
liste livrée séparément.
avant programmantion
7. L’acheur indique un instant OPERATION REUSSIE
avant de quitter le mode de programmation.
1. Mettez en marche l’appareil que vous souhaitez
commander.
Méthode C – Programmation par recherche de code
2. Appuyez sur la touche correspondant au type
d’appareil à commander :
Permet la recherche manuelle d’un code dans toute la
F
bibliothèque de codes, pour une famille d’appareils
TV : téléviseur,
dont le code ou la marque commerciale peut ne pas
DVD : lecteur / enregistreur DVD,
gurer dans la liste séparée ou être classée autrement.
STB : satellite, câble, ADSL,
AMP : amplicateur
1. Mettez en marche l’appareil que vous souhaitez
3. Dirigez la télécommande vers l’appareil à commander
commander.
et essayez de l’éteindre avec la touche �. Si l’appareil
2. Appuyez sur la touche SETUP jusqu'à ce que
ne s’éteint pas, vous devrez programmer la
REGLAGE DES CODES apparaisse sur l’acheur
télécommande en suivant une des méthodes A, B, C
(7 secondes).
ou D décrites ci-après.
3. Appuyez une fois sur OK pour acher FAIRE DEFILER
CODE.
Identication d’un code : Maintenez appuyée une touche
4. Avec les touches de navigation (5,6) achez
de mode. Le code mémorisé pour ce mode apparaît (ex :
RECHERCHE DE CODES puis valider avec OK pour
DVD…..0768).
acher ATTRIBUER LA TOUCHE DE MODE.
5. Appuyez une fois sur la touche de l’appareil à
Note : Excepté la touche TV, chaque touche de mode
commander (TV, DVD, …) pour acher CHOIX
(DVD, ...) est programmable pour commander un appareil
APPAREIL ?
autre que celui indiqué sur la touche. Il est donc possible
6. Conrmez avec OK pour acher LANCER LA
d'attribuer, par exemple, le mode
DVD à la touche STB.
RECHERCHE PAR …P+ ou � (pour la touche de mode
Vous devrez entrer le code correspondant à la marque et
TV, seul TV peut être sélectionné).
à l'appareil désiré en suivant une des méthodes indiquées
7. Dirigez le télécommande vers l’appareil et essayez de
dans ce manuel.
l’éteindre en appuyant une fois sur la touche �.
8. Si l’appareil à commander s’éteint, appuyez sur OK
pour mémoriser le code.
9. Si l’appareil ne s’éteint pas, appuyez de nouveau sur
la touche � plusieurs fois jusqu’à ce que l’appareil
Programmation de la télécommande
s’éteigne. Entre deux appuis, laissez le temps à
l’appareil de réagir (1 à 2 secondes).
Réglage des codes
10. Dès que l’appareil à commander s’éteint, appuyez sur
OK pour mémoriser le code.
11. L’acheur indique un instant OPERATION REUSSIE
Méthode A – Programmation par délement
avant de quitter le mode de programmation.
Pour entrer des codes à l’aide de la liste de codes qui
apparaît à l’écran.
Note 1 : A chaque appui sur la touche (�), la télécommande
envoit un signal vers l’appareil. Ce signal correspond à un
1. Mettez en marche l’appareil que vous souhaitez
code de la bibliothèque des codes en mémoire dans la
commander.
télécommande. Si vous dépassez le code requis, utilisez les
2. Appuyez sur la touche SETUP jusqu'à ce que
touches
PROG - pour reculer (ou avancer avec PROG +) dans
REGLAGE DES CODES apparaisse sur l’acheur
la bibliothèque de codes.
(7 secondes).
3. Appuyez une fois sur OK pour acher FAIRE DEFILER
Note 2 : l’indication RECHERCHE POUR reste achée
CODE.
pendant ce mode.
4. Appuyez une fois sur OK pour acher ATTRIBUER LA
TOUCHE DE MODE
5. Appuyez une fois sur la touche de l’appareil à
Méthode D
commander (TV, DVD, …) pour acher CHOIX
Programmation par recherche de Marques
APPAREIL ?
6. Avec les touches de navigation (5,6), choisissez
Permet la recherche manuelle d’une marque
l’appareil (DVD, …) puis conrmez avec OK. (pour la
commerciale (Thomson, Philips, Sony, …) dans la
touche de mode TV, seul TV peut être sélectionné).
bibliothèque de codes qui comprend généralement de
La première marque et le premier code apparaissent
30 à 40 codes.
(ex :
ADMIRAL, 0000).
1. Mettez en marche l’appareil que vous souhaitez
7. Choisissez la marque avec les touches de navigation
commander.
56, ou en choisissant la 1ère lettre de la marque
2. Appuyez sur la touche SETUP jusqu'à ce que
de votre appareil à l'aide des touches 2 à 9
REGLAGE DES CODES apparaisse sur l’acheur
(comme un téléphone portable : 2=abc, 3=def, ...).
(7 secondes).
(ex :
THOMSON : 8 4)
3. Appuyez une fois sur OK pour acher FAIRE DEFILER
8. Dirigez la télécommande vers l’appareil et essayez
CODE.
diérentes touches par exemple VOL +/-, PROG +/-,
4. Avec les touches de navigation (5,6), achez
etc.
CODE PAR MARQUE puis valider avec OK pour
9. Si l’appareil réagit mémorisez le code avec OK.
acher ATTRIBUER LA TOUCHE DE MODE
10. Si l’appareil ne réagit pas changez le code avec les
5. Appuyez une fois sur la touche de l’appareil à
touche 43 et essayez de le commander de nouveau.
commander (TV, DVD, …) pour acher CHOIX
11. Si vous avez essayé tous les codes de votre marque et
APPAREIL ?
que votre appareil ne réagit toujours pas, essayer la
6. Conrmez avec OK pour acher CODE DE LA
Méthode C (Programmation par recherche de code).
MARQUE 1-8 (pour la touche de mode TV, seul TV
peut être sélectionné).
Méthode B – Programmation par saisie du code
7. Reportez-vous à la liste des codes par marques (livrée
séparément), et tapez le chire (1 à 8) correspondant
Saisie des codes choisi dans la liste séparée
à la marque de l’appareil à commander. LANCER LA
(bibliothèque des codes).
RECHERCHE PAR � apparaît sur l'écran.
1. Mettez en marche l’appareil que vous souhaitez
8. Dirigez la télécommande vers l’appareil et essayez de
commander.
l’éteindre en appuyant une fois sur la touche �.
2. Appuyez sur la touche SETUP jusqu'à ce que
9. Si l’appareil à commander s’éteint, appuyez sur OK
REGLAGE DES CODES apparaisse sur l’acheur
pour mémoriser le code.
(7 secondes).
10. Si l’appareil ne s’éteint pas, appuyez de nouveau sur
3. Appuyez une fois sur OK pour acher FAIRE DEFILER
la touche � plusieurs fois jusqu’à ce que l’appareil
CODE.
s’éteigne. Entre deux appuis, laissez le temps à
4. Avec les touches de navigation (5,6), achez
l’appareil de réagir (1 à 2 secondes).
SAISIR LE CODE VOIR DOC puis validez avec OK pour
11. Dès que l’appareil à commander s’éteint, appuyez sur
acher ATTRIBUER LA TOUCHE DE MODE.
OK pour mémoriser le code.
5. Appuyez une fois sur la touche de l’appareil à
12. L’acheur indique un instant OPERATION REUSSIE
commander (TV, DVD, …). La touche choisie ainsi
avant de quitter le mode de programmation.
que le code mémorisé sous cette touche apparaissent
dans l’acheur (ex :
TV…..0166).
9
02_FR_ROC4507.indd 9 16/05/07 17:11:41

F
10
Note 1 : A chaque appui sur la touche (�), la télécommande
1. A l’aide des touches SETUP (appui de 7 secondes), et
envoit un signal vers l’appareil. Ce signal correspond à un
des touches de navigation 5,6,4,3, OK, achez
code de la bibliothèque des codes en mémoire dans la
successivement REGLAGE DES CODES puis REGLAGE
télécommande. Si vous dépassez le code requis, utilisez les
OPTIONS (appuyez sur OK) puis REGLAGE VOL. MUTE
touches
PROG - pour reculer (ou avancer avec PROG +) dans
(appuyez sur OK) naviguez jusqu'à GERER VOL. PAR
la bibliothèque de codes.
MODE (appuyez sur OK) puis CHOIX D’APPAREIL.
2. Appuyez une fois sur la touche de mode souhaitée
Note 2 : l’indication RECHERCHE POUR reste achée
(TV, DVD, …).
pendant ce mode.
3. L’acheur indique un instant PATIENTEZ SVP puis
OPERATION REUSSIE avant de quitter ce réglage.
Programmation de codes de combos (combinés) :
pour certains combos (TV/VCR, TV/DVD, DVD/VCR, etc),
Note : avant d'utiliser ce réglage, vériez que le mode choisi
vous serez amené à actionner deux touches de mode
a ses propres fonctions de volume / coupure du son, dans le
diérentes pour commander les deux appareils que
code ou par apprentissage ; sinon, les touches de volume /
réunit le combo. Par exemple, si vous avez un Combo TV/
coupure du son n’auront aucun eet.
DVD, vous pourrez être amené à régler un code avec la
touche TV pour le téléviseur et un code séparé (avec une
Annulation du réglage du volume et coupure du son
autre touche de mode) pour commander le lecteur DVD.
Permet l’annulation des réglages des paragraphes
précédents (retour au paramétrage présent lors de la
Commande des Combos :
livraison).
certains combos (TV/VCR, TV/DVD, DVD/VCR,…)
1. A l’aide des touches SETUP (appui de 7 secondes), et
présentent des touches séparées sur la télécommande
des touches de navigation 5,6,4,3, OK, achez
d’origine an de choisir l'appareil du Combo que vous
successivement REGLAGE DES CODES puis REGLAGE
souhaitez commander. Par exemple, si votre Combo est
OPTIONS (appuyez sur OK) puis REGLAGE VOL.
un DVD/VCR, sa télécommande d’origine peut présenter
MUTE (appuyez sur OK) puis naviguez jusqu'à VOL.
des touches DVD et VCR séparées pour choisir l'appareil
MUTE CONTROLE RESET.
du combo que vous souhaitez commander. Vous
2. Appuyez une fois sur OK.
pouvez trouver les fonctions des touches équivalentes
3. CONFIRMEZ PAR OK ? s'ache.
sur votre télécommande en utilisant les touches Mode
4. Appuyez une fois sur
OK pour conrmez
et SETUP. En supposant que votre Combo réunisse un
l’annulation.
DVD/VCR, et que son code soit programmé en mode
5. L’acheur indique un instant PATIENTEZ SVP puis
DVD, maintenez appuyée la touche Mode DVD pendant
OPERATION REUSSIE avant de quitter ce réglage.
plus d'une seconde an d'envoyer la commande touche
DVD. Pour envoyer la commande touche VCR, appuyez
Réglage de l’heure
et relâchez rapidement la touche SETUP, puis appuyez
1. A l’aide des touches SETUP (appui de 7 secondes), et
et relâchez la touche Mode DVD. Cette procédure peut
des touches de navigation 5,6,4,3, OK, achez
s’appliquer indiéremment à tous les Combos (TV/VCR,
successivement REGLAGE DES CODES puis REGLAGE
TV/DVD, DVD/VCR,…), et est disponible dans tous les
OPTIONS (appuyez sur OK) et naviguez jusqu'à
modes. Cette fonction n’est pas prise en charge par tous
REGLER HEURE.
les codes.
2. Appuyez une fois sur OK.
3. Réglez le format 12 ou 24 heures avec 5,6,
conrmez avec OK.
4. Réglez successivement l’heure puis les minutes avec
5,6, (passez des heures aux minutes avec OK)
conrmez avec OK.
5. L’acheur indique un instant OPERATION REUSSIE
Réglage des options
avant de revenir à REGLAGE DES CODES.
A l’aide des touches SETUP (appui de 7 secondes), et
Réglage de la date
des touches de navigation 5,6,4,3, OK allez dans
1. A l’aide des touches SETUP (appui de 7 secondes), et
l’écran REGLAGE OPTIONS an d’accéder aux réglages
des touches de navigation 5,6,4,3, OK, achez
de volume, de l’heure, de la date, de l’éclairage et la
successivement REGLAGE DES CODES puis REGLAGE
suppression des options. Naviguez ensuite avec les
OPTIONS (appuyez sur OK) et naviguez jusqu'à
touches 5,6,4,3, OK.
REGLAGE DE LA DATE.
2. Appuyez une fois sur OK
Réglage du volume et coupure du son
3. Avec les touches 5,6, et OK, réglez successivement
Cette télécommande vous permet de dénir le mode
l’année, le mois, la date, le jour.
que les touches Volume et Coupure du Son ( ) vont
4. L’acheur indique un instant OPERATION REUSSIE
contrôler.
avant de revenir à REGLAGE DES CODES.
Au moment de sa livraison, cette télécommande est réglée
de manière à ce que les touches Volume et Coupure du
Réglage de l’éclairage
Son contrôlent le mode dans lequel la télécommande se
Pour régler la durée de l’éclairage après une action sur
trouve. Si ce mode ne possède pas de fonction contrôle
une touche.
du son, alors les touches Volume et Coupure du Son
1. A l’aide des touches
SETUP (appui de 7 secondes), et
contrôlent automatiquement le mode TV.
des touches de navigation 5,6,4,3, OK, achez
successivement REGLAGE DES CODES puis REGLAGE
Réglage du volume et coupure du son dans un mode
OPTIONS (appuyez sur OK) et naviguez jusqu'à
Permet d’aecter à un seul mode (TV, ou ...) les touches
REGLAGE ECLAIRAGE.
Volume, coupure du son ( ) sans avoir besoin de
2. Appuyez une fois sur OK
sélectionner ce mode lors de l’utilisation quotidienne.
3. Avec les touches 5,6 et OK, réglez la durée de
1. A l’aide des touches SETUP (appui de 7 secondes), et
l’éclairage, de 5 à 60 secondes, quand ECLAIRAGE
des touches de navigation 5,6,4,3, OK, achez
ACTIF est aché.
successivement REGLAGE DES CODES puis REGLAGE
OPTIONS (appuyez sur OK) puis REGLAGE VOL.
Note : la durée est préréglée à 10 secondes. Pour désactiver
MUTE (appuyez sur OK) puis GESTION UNIQUE VOL
la fonction éclairage, mettez la durée à 00 et appuyez une
(appuyez sur OK) puis CHOIX D’APPAREIL.
fois sur
OK.
2. Appuyez une fois sur la touche de mode souhaitée
(TV, DVD, …).
4. L’acheur indique un instant
OPERATION REUSSIE
3. L’acheur indique un instant PATIENTEZ SVP puis
avant de revenir à REGLAGE DES CODES.
OPERATION REUSSIE avant de quitter ce réglage.
Réglage de la langue de l’acheur LCD
Note : Si le mode choisi ne présente pas lui-même de
Pour choisir une des 7 langues proposées par votre
commandes de volume / coupure du son,
ERREUR CONTROL
télécommande.
VOL. apparaît à l’écran ; la télécommande quitte la fonction
1. A l’aide des touches
SETUP (appui de 7 secondes), et
de réglage et revient au fonctionnement normal.
des touches de navigation 5,6,4,3, OK, achez
successivement REGLAGE DES CODES puis REGLAGE
Réglage du volume et coupure du son dans chaque
OPTIONS (appuyez sur OK) et naviguez jusqu'à
mode
DEFINIR LA LANGUE.
Permet d’aecter les touches Volume, coupure du son
2. Appuyez une fois sur OK.
( ), pour chaque mode souhaité.
3. Avec les touches 5,6 et OK, choisissez la langue
quand LANGUE ? est aché.
02_FR_ROC4507.indd 10 16/05/07 17:11:42
F
11
4. L’acheur indique un instant OPERATION REUSSIE
6. L’indication CHOIX DE LA TOUCHE 1 apparaît.
avant de revenir à REGLAGE DES CODES.
Appuyez une fois sur la touche correspondant à la
commande souhaitée (ex 1).
Annulation de vos réglages
7. L'indication
CHOIX DE LA TOUCHE 2 apparaît.
Pour recongurer la télécommande aux réglages usine
Appuyez une fois sur la touche souhaitée (ex : 3)
en eaçant tous les réglages et mémorisation de codes
ou sur OK si vous ne voulez transmettre qu'une
et de touches.
commande et allez au point 10 ci-dessous.
1. A l’aide des touches
SETUP (appui de 7 secondes), et
8. L'indication
CHOIX DE LA TOUCHE 3 apparaît.
des touches de navigation 5,6,4,3, OK, achez
Appuyez sur la touche souhaitée (ex : 8).
successivement REGLAGE DES CODES puis REGLAGE
9. L’acheur indique un instant
OPERATION REUSSIE
OPTIONS (appuyez sur OK) et naviguez jusqu'à
avant de revenir à REGLAGE DES CODES.
SUPPRIMER OPTIONS.
10. Appuyez une fois sur EXIT pour quitter ce mode.
2. Appuyez une fois sur OK
11. Posez la télécommande sur une table ou une surface
3. Appuyez une fois sur OK lorsque SUPPRIMER PAR
plane à hauteur du capteur infrarouge de l'appareil à
OK ? est aché.
commander, l’avant de la télécommande dirigé vers
4. L’acheur indique un instant
PATIENTEZ SVP avant
l'appareil à commander.
de quitter ce réglage.
Note : Le symbole “ ” s’ache quand un Timer est réglé.
Annulation d’une minuterie (timer)
Réglage du Timer (minuterie)
1. A l’aide des touches
SETUP (appui de 7 secondes), et
des touches de navigation 5,6,4,3, OK achez
successivement REGLAGE DES CODES puis RÉGLAGE
A l’aide des touches SETUP (appui de 7 secondes), et
OPTIONS puis REGLAGE TIMER (appuyez sur OK)
des touches de navigation 5,6,4,3, OK, allez dans
puis REGLAGE VEILLE TV puis TIMER X REGLAGE
l’acheur REGLAGE TIMER an d’accéder aux réglages
(appuyez sur OK) puis ANNULER TIMER X.
de mise en veille du téléviseur et de 4 autres minuteries
2. Appuyez une fois sur OK pour acher ANNULER
pour l’envoi de séquences de 4 touches maximum.
TIMER X.
Naviguez ensuite avec les touches 5,6,4,3, OK.
3. Appuyez une fois sur OK pour acher SUPPRIMER
PAR OK ?
Mise en veille automatique du téléviseur
4. Appuyez une fois sur OK.
Pour programmer une mise en veille d’un téléviseur
5. L’acheur indique un instant
OPERATION REUSSIE
grâce au mode Timer veille TV (Zzz).
avant de revenir à REGLAGE DES CODES.
1. Mettez en marche l’appareil en Mode TV.
2. A l’aide des touches
SETUP (appui de 7 secondes), et
des touches de navigation 5,6,4,3, OK, achez
Apprentissage de touches
successivement REGLAGE DES CODES puis naviguez
jusqu'à REGLAGE TIMER (appuyez sur OK) puis
REGLAGE VEILLE TV (appuyez sur OK) puis VEILLE TV
Cette fonction permet de copier les fonctions des touches
REGLAGE.
d’autres télécommandes sous des touches de votre ROC
3. Appuyez une fois sur OK.
4507 dans le mode et sous les touches de votre choix.
4. Avec les touches 5,6 et OK, choisissez la durée en
Votre ROC 4507 peut mémoriser jusqu’à 150 touches (en
minute (de 1 à 90 minutes) avant la mise en veille du
fonction du format du code IR à apprendre). Une seule
téléviseur lorsque HEURE DE VEILLE ? est aché.
télécommande d’origine doit être mémorisée dans un
5. L’acheur indique un instant
OPERATION REUSSIE
Mode (reportez-vous aux conseils sur l’apprentissage).
avant de revenir à REGLAGE DES CODES.
La télécommande peut aussi être pré-programmée avec
6. Appuyez deux fois sur EXIT pour quitter ce mode.
un des codes de la bibliothèque, et des touches copiées
peuvent se « superposer » aux positions de touches
Note : le symbole “Zzz” s’ache quand un Timer Veille TV
choisies par l’utilisateur : La télécommande peut ainsi
est réglé.
être personnalisée par l’utilisateur qui utilise un code
pré-programmé, puis apprend les fonctions des touches
7. Posez la télécommande sur une table ou une surface
à partir de sa télécommande IR d’origine.
plane à hauteur du capteur infrarouge du téléviseur,
l’avant de la télécommande dirigé vers le téléviseur.
Attention : Vous ne pouvez pas copier sous les touches
Setup, Home Cinema ou Macro • Toutes les commandes
Note : pour annuler la programmation, naviguez jusqu’à
copiées pour un mode sont eacées si un code à 4 chires
REGLAGE VEILLE TV puis ANNULER VEILLE TV. Appuyez
identique ou nouveau est entré pour ce mode (aussi bien
une fois sur
OK lorsque SUPPRIMER PAR OK ? est aché.
pour l’entrée directe d’une code, la recherche de code ou de
marque) • L’ éclairage de l'acheur et des touches est éteint
durant l’apprentissage.
Réglage de la minuterie (timer)
Pour programmer jusqu’à 4 minuteries. Vous pouvez
Conseils avant de commencer :
attribuer jusqu’à 4 touches au Timer pour qu’il s’active au
• Placez les télécommandes face à face de façon que
moment déni (par exemple pour faire passer la chaîne
les diodes LED IR des deux télécommandes soient
Mode SAT sur 123 à 22:35). La première touche doit
précisément alignées. Eventuellement ajustez la
toujours être une touche de mode. Les touches suivantes
hauteur des télécommandes pour que les diodes
ne peuvent pas inclure 5,6,4,3, OK EXIT, MACRO,
LED soient bien alignées. Vériez que l’écartement
SETUP, ou toute autre touche de mode. Les Timers
entre les deux télécommandes soit d’environ
peuvent uniquement être réglés pour être activés dans la
25 mm. Ne modiez pas l’écartement entre les deux
période de 24 heures suivante. Les Timers sont
télécommandes lors de l’apprentissage de toutes les
automatiquement annulés après avoir été activés. Le
touches nécessaires pour ce mode.
symbole
“ ”
de Timer s’ache quand un Timer est
• Commencez par copier 2 ou 3 touches (pour vous
réglé.
habituer), puis eectuez la fonction “Otez Tous
1. Mettez en marche l’appareil en Mode TV.
Modes Appris“ (ôter toutes les commandes apprises)
2. A l’aide des touches
SETUP, et des touches de
avant d’apprendre la totalité du clavier de votre
navigation 5,6,4,3, OK achez successivement
télécommande d’origine.
REGLAGE DES CODES puis RÉGLAGE OPTIONS puis
REGLAGE TIMER (appuyez sur OK) puis REGLAGE
Comment copier (apprendre) des touches ?
VEILLE TV puis TIMER X REGLAGE (X correspond à
1. A l’aide des touches
SETUP (appui de 7 secondes),
l’une des 4 minuteries).
et des touches de navigation 5,6,4,3, OK,
3. Appuyez une fois sur
OK pour acher REGLAGE
achez REGLAGE DES CODES puis naviguez jusqu'à
TIMER X.
APPRENTISSAGE (appuyez sur OK) puis APPRENDRE
Appuyez une sur OK pour acher ENTRER HEURE.
UN MODE (appuyez sur OK) puis QUEL MODE
APPRENDRE ?
Note : Annuler la minuterie si elle contient déjà une
2. Appuyez une fois sur OK.
programmation (voir plus loin).
3.
Appuyez une fois sur la touche de mode souhaitée
(TV, DVD, …) pour acher TOUCHE DE STOCKAGE
.
4. Avec les touches
5,6, OK, choisissez l’heure de
4. Appuyez une fois sur la touche de votre ROC 4507
déclenchement souhaitée (heure puis minutes),
sous laquelle vous souhaitez copier le code de la
Appuyez sur OK.
télécommande d’origine.
5.
CHOIX APPAREIL s'ache. A l'aide des touches de
5. L’indication
PATIENTEZ SVP apparaît.
mode indiquez l’appareil à commander (TV, DVD).
02_FR_ROC4507.indd 11 16/05/07 17:11:42

F
12
6. Pendant que PATIENTEZ SVP est aché, maintenez
appuyée la touche de la télécommande d’origine
Macros commandes
jusqu'à ce que OPERATION REUSSIE ou ECHEC
apparaisse sur l’acheur avant de relâcher la touche
Cette fonction permet de mettre en mémoire des
de la télécommande d’origine (généralement après 2
séquences de commandes grâce à la touche MACRO.
à 3 secondes).
Vous pouvez programmer et mémoriser jusqu’à 3
7. L’indication
OK – ENCORE ou SORTIR s'ache. Pour
séquences d’appuis successifs sur plusieurs touches de
copier une autre touche, appuyez une fois sur OK
votre choix. En appuyant sur la touche numérique de
puis recommencez à partir de l’étape 5 ou appuyez
Macro respective, cette séquence d’appuis successifs
une fois sur EXIT pour quitter ce mode.
sur les touches (commandes IR) est envoyée. N’importe
8. L’acheur indique un instant
PATIENTEZ SVP avant
quelle séquence d’appuis successifs sur des touches
de quitter ce mode.
réalisée régulièrement peut être réduite en seulement
deux commandes (touche MACRO puis une des touches
Eacement des fonctions apprises sous un mode
1, 2 ou 3). Par exemple, en appuyant sur MACRO puis
Eace toutes les touches copiées sous un mode donné
sur une seule touche, vous pouvez allumer votre
1. A l’aide des touches
SETUP (appui de 7 secondes), et
téléviseur, acher votre chaîne préférée, allumer votre
des touches de navigation 5,6,4,3, OK, achez
magnétoscope, et déclencher un enregistrement,…
successivement REGLAGE DES CODES puis naviguez
Vous pouvez mémoriser une séquence de 10 commandes
jusqu'à APPRENTISSAGE (appuyez sur OK) puis
sous chaque touche 1, 2 ou 3.
APPRENDRE UN MODE puis OTER UN MODE APPRIS.
2. Appuyez une fois sur OK pour acher CHOISIR LA
Comment préparer une macro ?
TOUCHE MODE.
Conseil : Préparez votre macro sur une feuille de papier
3. Appuyez une fois sur la touche de mode souhaitée
en écrivant la succession des 10 touches maximum qui
(TV, DVD, …) pour acher SUPPRIMER PAR OK ?
la compose. A titre d’exemple si vous souhaitez allumer
4. Appuyez une fois sur
OK.
votre téléviseur sur la chaîne 3 puis allumer un récepteur
5. L’acheur indique un instant PATIENTEZ SVP avant
satellite sur la chaîne 5 vous devrez écrire : MACRO, 1
de quitter ce mode.
(pour une mémorisation sous cette touche), TV (�), 3,
STB (�), 5, MACRO.
Eacement des fonctions apprises pour tous les
modes
1. A l’aide des touches
SETUP (appui de 7 secondes), et
Eace toutes les touches copiées (eacement général
des touches de navigation 5,6,4,3, OK, achez
recommandé lors du premier apprentissage)
successivement REGLAGE DES CODES naviguer
1. A l’aide des touches
SETUP (appui de 7 secondes), et
jusqu'à DEFINIR LES MACRO (appuyez sur OK) puis
des touches de navigation 5,6,4,3, OK, achez
ECRIRE UNE MACRO (appuyez sur OK) puis AFFECTER
successivement REGLAGE DES CODES puis naviguez
N° MACRO.
jusqu'à APPRENTISSAGE (appuyez sur OK) naviguez
2. Appuyez une fois sur la touche
1, 2 ou 3 sous laquelle
jusqu'à OTER TOUS MODES APPRIS.
vous mémoriserez la macro.
2. Appuyez une fois sur OK pour acher SUPPRIMER
3.
L’indication AFFECTER MODE À LA MACRO X apparaît.
PAR OK ?
4. Appuyez une fois sur la touche de mode souhaitée
3. Appuyez une fois sur OK.
(TV, DVD, …) pour sélectionner l'appareil sur lequel
4. L’acheur indique un instant PATIENTEZ SVP avant
la commande sera eectuée ENTRER COMMANDE
de quitter ce mode.
s'ache.
Notes à propos de l’apprentissage : Ne tentez pas
Note : La première touche de la séquence Macro doit
l’apprentissage directement sous des tubes uorescents
toujours être une touche de mode.
ou une lampe à faible consommation, qui pourraient
provoquer des interférences avec les transmissions IR.
5. Appuyez successivement sur les touches composant
Disposez la télécommande au moins à un mètre de toute
la macro.
source lumineuse • Evitez de copier les touches de volume
6. Mémorisez la macro en appuyant une fois sur la
et de coupure du son sur votre télécommande d’origine,
touche MACRO.
hormis si vous êtes certain qu’elles actionnent le même
7. L’acheur indique un instant PATIENTEZ SVP avant
appareil cible ; par exemple, certaines télécommandes DVD
de quitter ce mode.
d’origine peuvent aussi inclure une touche TV de volume
/ coupure du son : elles peuvent présenter deux types de
Note : la Macro est automatiquement mémorisée au 10 ème
code diérents • Evitez d’apprendre les touches DVD sur
appui sur la touche.
votre télécommande d’origine, hormis si vous êtes certain
qu’elles actionnent le même appareil cible ; par exemple,
8. L’acheur indique un instant
OPERATION REUSSIE
certaines télécommandes TV d’origine peuvent aussi
avant de quitter ce mode.
inclure une touche DVD : elles peuvent présenter deux types
de code diérents • La copie d’une touche peut prendre
Comment eacer une macro ?
jusqu’à 3 secondes. Ne relâchez pas la touche en cours de
1. A l’aide des touches
SETUP (appui de 7 secondes), et
copie, hormis si les écrans “
Opération Réussie” ou “Echec”
des touches de navigation 5,6,4,3, OK, achez
s’achent.
successivement REGLAGE DES CODES naviguez
jusqu'à DEFINIR LES MACRO (appuyez sur OK) puis
Si la copie des première ou deuxième touches pour un
SUPPRIMER UNE MACRO (appuyez sur OK) puis N°
certain mode provoque des erreurs continues, suivez la
MACRO A OTER.
procédure suivante :
2. Appuyez une fois sur la touche 1, 2 ou 3 de la macro
i. Terminez la session d’apprentissage en appuyant sur la
à supprimer pour acher SUPPRIMER PAR OK ?
touche
EXIT.
3. Appuyez une fois sur OK.
ii Otez les commandes apprises pour ce mode.
4. L’acheur indique un instant OPERATION REUSSIE
iii. Vériez que les LED IR sont alignées correctement entre
avant de quitter ce mode.
les deux télécommandes.
iv. Ajustez l’écartement entre les deux télécommandes de
Comment utiliser une macro ?
façon à diminuer ou augmenter la distance (de 15 mm
Lors du fonctionnement normal, pour activer la Macro,
à 50 mm).
appuyez et relâchez la touche MACRO puis (dans les
v. Tentez de nouveau l’apprentissage de la télécommande
20 secondes), appuyez et relâchez la touche 1, 2 ou
d’origine pour ce mode.
3 pour acher MACRO X tandis que la séquence de
Macro est eectuée, et la télécommande revient au
Si le problème persiste avec la même touche, vériez que
fonctionnement normal. Pendant l'exécution de la Macro,
la touche de la télécommande d’origine a bien été apprise ;
la télécommande doit être dirigée vers les appareils à
transmet-elle les signaux ? Actionne-t-elle l’appareil cible ?
commander.
Tentez de copier cette touche avec un mode diérent. Si
l’apprentissage est correct, le type de code est peut-être
Note : si aucune Macro n’est mémorisée sous la touche
diérent des autres et ne peut pas être copié sous le même
numérique choisie, “
Macro X Invalide“ s’ache brièvement,
mode.
et la télécommande revient au fonctionnement normal.
Notes à propos des macro : Le temps entre chaque
commande automatique lors de l’utilisation d’une macro
est de 0,5 seconde.
Pour certaines commandes, vous devrez peut-être ajouter
des temps d’attente dans une séquence de macro (par
exemple pour permettre le préchauage du téléviseur).
02_FR_ROC4507.indd 12 16/05/07 17:11:43
F
13
Ces pauses peuvent être ajoutées en utilisant la touche
Respectez l’environnement et la loi !
PAUSE, suivie du nombre de secondes de 1 à 9 secondes.
Ne mélangez pas différents types de piles ou
La première touche mémorisée dans une séquence Macro
des piles neuves et usagées. N'utilisez pas de
doit être une touche de mode (
TV,…). Les touches SETUP,
piles rechargeables. Afin d'éviter tout risque d'explosion, respectez
HOME CINEMA et MACRO ne peuvent pas être incluses
dans une Macro. Appuyez sur
SETUP pour quitter Dénir
les polarités indiquées au fond du compartiment à piles. Utilisez
Les Macro.
uniquement des piles du type spécifié. Ne les jetez pas au feu, ne
les rechargez pas. Si vous n'utilisez pas la télécommande pendant
une période prolongée, retirez les piles. Avant de jeter des piles (ou
des accumulateurs), informez-vous auprès de votre distributeur
Fonction Home Cinéma
pour savoir si elles (ou ils) font l’objet d’un recyclage spécial, et s’il
peut se charger de les récupérer.
La fonction Home Cinema permet de commander
5 appareils à partir d’une seule touche de mode : la
Ce symbole signie que votre appareil électronique hors
touche HOME CINEMA. Les 5 appareils correspondent
d’usage doit être collecté
séparément et non jeté avec les
à 5 touches de modes (TV, DVD, AMP …) auxquelles
déchets ménagers • Dans ce but, l'Union
Européenne a
seront associées des touches de fonctions prédénies.
Les réglages décrits ci-après permettent de choisir les
institué un système de collecte et de recyclage spécique dont
les
appareils qui seront associés aux touches de fonctions
producteurs ont la responsabilité • Cet appareil a été conçu et
prédénies dont voici la liste :
fabriqué avec des matériaux et des composants de haute qualité
a. Les 2 touches de programme
PROG +/-.
pouvant être recyclés
et réutilisés • Les appareils électriques et
b. Les 3 touches de volume VOL +/- et coupure du son
électroniques sont susceptibles de
contenir des éléments qui, bien
.
qu’indispensables au bon fonctionnement du
système, peuvent
c. Les 6 touches de délement pour la lecture,
l’enregistrement, l’arrêt sur image, l’avance rapide en
s’avérer dangereux pour la santé et l’environnement s’ils sont
avant ou en arrière, l’arrêt (stop) 7,4,8,=,<,;.
manipulés ou éliminés de manière incorrecte • Par conséquent,
d. Les touches de navigation haut, bas, droite et gauche
veuillez ne pas
jeter votre appareil usagé avec les ordures
5,6,4,3 et les touches MENU, EXIT, OK.
ménagères • Si vous êtes propriétaire
de l’appareil, vous devez le
e. Pour les touches restantes : mode de “base”
HOME
déposer au point de collecte local approprié ou le
remettre à votre
CINEMA (l’un quelconque des autres modes).
vendeur contre l’achat d’un produit neuf • Si vous êtes un
Exemple: En mode Home Cinema vous pouvez régler les
touche PROG+/ pour commander le récepteur satellite,
utilisateur professionnel, référez vous aux instructions de votre
les touches
VOLUME +/ et ( ) pour commander
fournisseur •
Si l'appareil vous est loué ou remis en dépôt,
l'amplicateur, les touches de délement (
PLAY, PAUSE,
contactez votre fournisseur de
service • Aidez-nous à préserver
…) pour commander le lecteur DVD, les touches
MENU,
l’environnement dans lequel nous vivons !
EXIT,… pour commander le lecteur DVD et les autres
touche pour commander la TV.
Comment programmer la fonction Home Cinéma ?
1. A l’aide des touches
SETUP (appui de 7 secondes)
puis des touches de navigation 5,6,4,3, OK,
achez REGLAGE DES CODES puis naviguez jusqu'à
FONCTION HOME CINEMA (appuyez sur OK) puis
REGLAGE HOME CINEMA (appuyez sur OK) puis
MODE TOUCHE PROG ?
2. Choisissez une touche de mode (TV, DVD, …) pour
les touches PROG +/-.
> L’indication
MODE TOUCHES VOL apparaît.
3. Choisissez une touche de mode (
TV, SAT, AMP, …)
pour les touches VOL +/- et ( )
> L’indication
MODE TOUCHES DE DEFILEMENT
apparaît.
4. Choisissez une touche de mode (
TV, DVD, …) pour
les touches de délement 7,4,8,=,<,;.
> L’indication MODE xxx OK MENU EXIT apparaît.
5. Choisissez une touche de mode (
TV, DVD, …) pour
les touches de navigation, MENU, EXIT, OK
> L’indication AUTRE TOUCHE DE MODE ? apparaît.
6. Choisissez une touche de mode (
TV, DVD, …) pour
les autres touches de la télécommandes qui seront
utilisées en mode Home Cinéma.
L’acheur indique un instant
PATIENTEZ SVP puis
OPERATION REUSSIE avant de revenir à REGLAGE
DES CODES.
Comment supprimer la fonction Home Cinéma ?
1. A l’aide des touches
SETUP (appui de 7 secondes)
et des touches de navigation 5,6,4,3, OK,
achez REGLAGE DES CODES puis naviguez jusqu'à
FONCTION HOME CINEMA (appuyez sur OK) puis
HOME CINEMA RESET.
2. Appuyez une fois sur OK pour acher CONFIRMER
PAR OK ?
3. Appuyez une fois sur OK.
4. L’acheur indique un instant PATIENTEZ SVP puis
OPERATION REUSSIE avant de revenir à REGLAGE
DES CODES.
Notes à propos de la fonction Home Cinéma : les touches
de modes
SETUP et MACRO permettent de quitter le
mode
HOME CINEMA. L’apprentissage ou les Macro ne
fonctionnent pas dans le mode
HOME CINEMA.
ROC4507 / FR_rst/fr/ Parleclair - rst / 05-2007
02_FR_ROC4507.indd 13 16/05/07 17:11:45
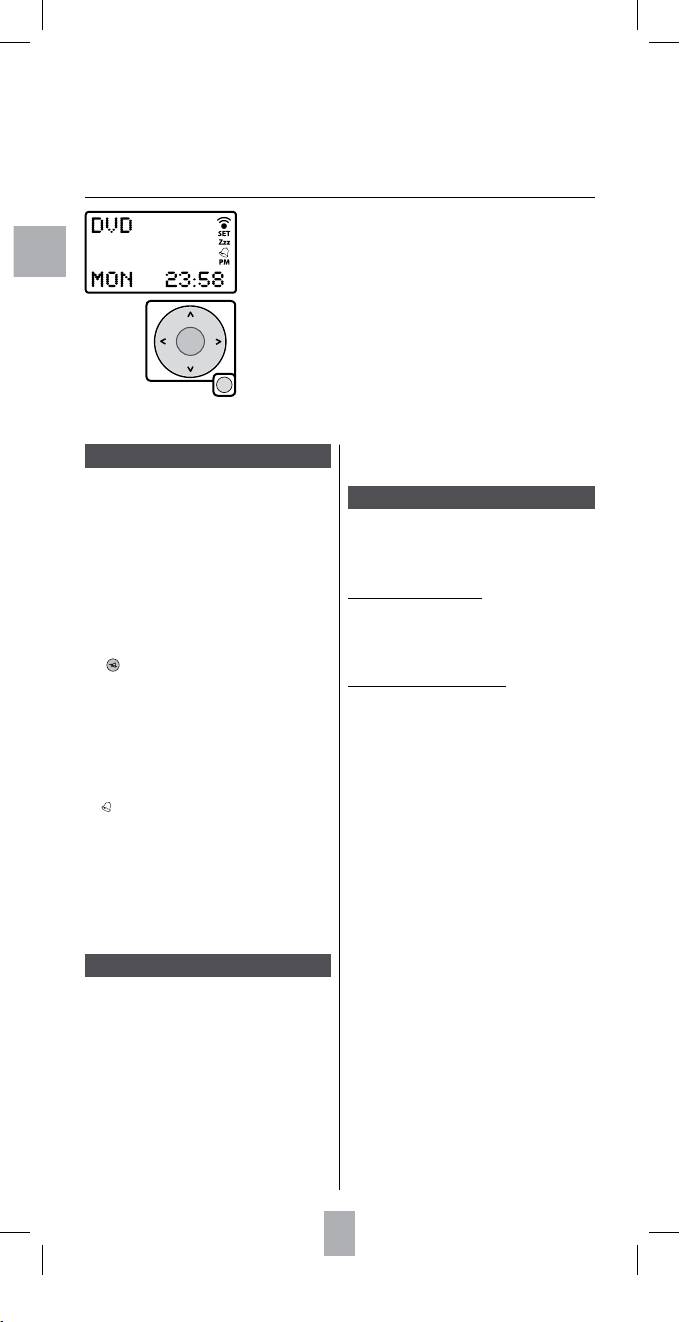
Diese Universalfernbedienung (4 in 1) ist mit den meisten Fernsehgeräten, DVD-Playern, Videorecordern,
Verstärkern und Home Cinema-Systemen sowie mit den meisten digitalen Geräten wie Satelliten- und Kabelempfängern
oder ADSL-Decodern kompatibel. Diese digitalen Geräte werden unter der Bezeichnung STB (Set Top Box) zusammen
gefasst.
Die Fernbedienung wurde im Werk so programmiert, so dass sie sofort mit den meisten Geräten der Marken der
Thomson-Gruppe verwendet werden kann. Wir empfehlen Ihnen daher, sie auszuprobieren, bevor Sie versuchen, sie mit
einer der in dieser Bedienungsanleitung aufgeführten Methoden zu programmieren. Zunächst jedoch müssen Sie zwei
Batterien (AAA – LR03) einlegen.
Bewahren Sie diese Bedienungsanleitung sowie die zugehörigen Dokumente auf, damit Sie sie für die Programmierung
neuer Geräte einsehen können.
Die LCD-Anzeige zeigt ständig den aktiven Modus der Fernbedienung
(TV, DVD …) sowie die Uhrzeit an. Diese Angaben werden immer angezeigt,
solange die Batterien nicht leer sind.
Die Navigationstasten
Mit den Navigationstasten können Sie die Optionen durchsuchen und die
Funktionen dann in der LCD-Anzeige auswählen.
Mit der Taste EXIT kehren Sie zur normalen Verwendung der Fernbedienung
zurück. Manchmal geschieht dies automatisch.
Hinweis: Die Angabe HORS DELAI wird angezeigt, wenn
Die Tasten der Fernbedienung
die vorgesehene Zeit zur Durchführung eines Vorgangs
überschritten ist.
1 � - Ein / Standby oder lediglich Standby (ist abhängig
vom Gerät).
Programmieren der Fernbedienung
2 Mode-Tasten – Auswahl des Geräts, das Sie bedienen
wollen (TV, DVD, …) .
Die Taste SETUP wird zum Programmieren oder zum Zugri
3 SETUP – Programmierung der Fernbedienung.
auf Nebenfunktionen verwendet (beispielsweise Einstellung
4 Auswahl von Sendern mit einer oder zwei Ziern
der Helligkeit oder des Kontrasts bei manchen Fernsehgeräten
(-/--), Auswahl Anschluss / externe Quelle (AV),
etc.). Das Programmieren ist notwendig, wenn Sie Geräte
Auswahl eines Makrobefehls (1/TV, 2/DVD, 3/STB).
anderer Marken als Thomson bedienen möchten.
5 MENU, 5,6,4,3, OK , EXIT – Zugang zu Menüs,
Navigation / Auswahl, Bestätigung, Menüs verlassen.
Zugang zu Nebenfunktionen
6 L1, L2, L3, L4 – Programmierbare Zusatztasten
Drücken Sie kurz einmal oder mehrmals auf die
(Lernfunktion).
Taste SETUP, wird das Datum auf dem Bildschirm
7 Teletext (Videotext, Fastext …) aktivieren und verwenden.
angezeigt. Drücken Sie dann die Taste der gewünschten
8 Verwenden einer CD oder einer Cassette.
Nebenfunktion. Die Fernbedienung beendet diesen
9 Einstellung von Lautstärke, Abschalten des Tons
Modus 30 Sek. nach dem letzten Tastendruck oder bei
( ), Senderwechsel, Anzeige 16 : 9.
Druck auf die Taste EXIT.
10 Aktivierung des Modus MACRO (Reihe automatischer
Programmieren der Fernbedienung
Befehle).
Halten Sie die Taste SETUP so lange gedrückt, bis
11 LCD-Anzeige
CODE EINSTELLEN angezeigt wird. Der Hinweis
a Modus der Fernbedienung (TV, DVD, …),
SET rechts in der Anzeige bestätigt, dass die
b Tag, Datum (SETUP betätigen),
Fernbedienung gerade programmiert wird. Drücken
c Uhrzeit, Datum oder Code des bedienten Geräts
Sie dann mehrmals hintereinander die Taste SETUP,
(SETUP oder die Mode-Taste betätigen),
um die Einstellungsoptionen in der unten aufgeführten
d Übertragungsymbol zum Gerät,
Reihenfolge durchlaufen zu lassen. Sie können das
e SET wird angezeigt, wenn für die Fernbedienung der
Programmiieren abbrechen, indem Sie die Taste EXIT
Programmiermodus eingestellt ist.
drücken oder bis zur Option VERLASSEN navigieren und
f Timer für programmiertes Umschalten auf Standby
durch OK bestätigen.
g wird angezeigt, wenn ein Timer (Zeitschalter)
programmiert ist
CODE EINSTELLEN – Ermöglicht den Zugang zu einem der
h Format der Uhrzeit AM (Vormittag) / PM (Nachmittag),
4 Programmiermodi mit der Taste OK.
wenn die Uhrzeit im Modus 12 Stunden programmiert
So können Sie die Liste der Codes durchlaufen lassen,
ist. Wird im 24-Stunden-Modus nicht angezeigt.
einen Code eingeben, eine Code-Suche starten oder
Hinweis: Die Mode-Tasten dienen der Verwendung mit den
einen Code entsprechend der Marke des zu bedienenden
Geräten, die auf dem Siebdruck (
TV für ein Fernsehegrät,
Geräts eingeben (Code-Bibliothek separat geliefert).
DVD für einen DVD-Player…) angegeben sind. Doch mit
SYSTEM EINSTELLEN – Ermöglicht den Zugang zur Einstellung
Ihrer Fernbedienung können Sie auch einen anderen Modus
von Uhrzeit, Datum, Lautstärke… mit der Taste OK.
zuordnen als den, der für alle Mode--Tasten vorgesehen
ist. Dies gilt nicht für die Taste
TV (z. B. DVD-HDD
TIMER EINSTELLEN – Ermöglicht den Zugang zur
Aufnahmegerät für die Taste
STB etc).
Einstellung des Timers über die Taste OK.
LERNMODUS EINSTELLEN – Ermöglicht den Zugang zur
Inbetriebnahme
Funktion «Lernmodus der Tasten einstellen» (manchmal
auch Learning genannt), über die Taste OK.
Legt man zum ersten Mal Batterien in das Gerät ein, werden
MAKROS DEFINIEREN – Reihen automatischer Befehle
Hinweise in englischer Sprache angezeigt (EINSTELLEN MIT….
denieren. Jede Reihe enthält die Befehle mehrerer
TASTE). Drücken Sie auf OK, erfolgt die Anzeige SPRACHE?
Tasten (maximal 10 Tasten).
ENGLISH. Wählen Sie nun eine der 7 angebotenen Sprachen
mit den Tasten 5,6 und drücken Sie auf OK (wählen Sie
HOME CINEMA FUNKTION – Der Modus Home Cinema
DEUTSCH für eine Anzeige in deutscher Sprache).
ist ein «virtueller Modus», der bis zu 5 Tastengruppen
> BESTAET. DEUTSCH (je nach ausgewählter Sprache)
pro Modus verwendet. Durch diese Funktion sieht der
wird angezeigt. Drücken Sie auf OK, wird kurz
Bediener alle häug benutzten Tasten und Geräte,
> OPERATION GEGLÜCKT angezeigt, gefolgt von CODE
zusammengefasst zu einem einzigen “virtuellen Modus».
EINSTELEN.
(siehe Home Cinema Funktion, Seite 19).
Wird CODE EINSTELLEN angezeigt, haben Sie einige
VERLASSEN – Ermöglicht das Verlassen des
Sekunden Zeit, um die Einstellungen zu beenden, indem
Programmiermodus mit der Taste OK.
Sie die entsprechenden Codes für die Geräte eingeben,
Hinweis 1: Betätigen Sie 15 Sekunden lang keine Taste,
die Sie mit Ihrer Fernbedienung ROC 4507 bedienen
verlässt die Fernbedienung den Programmiermodus.
möchten. Sehen Sie in den Schritten 3 einer der 4
Programmierungsmethoden A, B, C, D nach, wie Sie den
Hinweis 2: Sucht die Fernbedienung einen Code oder wartet
Programmierungsvorgang fortsetzen.
auf eine Information, wird
BITTE WARTEN angezeigt.
OK
MENU
EXIT
EXIT
D
Austauschen der Batterien: Die Einstellungen Uhrzeit, Wochentag, Datum und Makros werden beim Austauschen der
Batterien gelöscht. Die anderen Einstellungen werden beibehalten.
14
03_DE_ROC4507.indd 14 18/05/07 9:40:15

6. Geben Sie einen der 4-stelligen Codes aus der separat
Test der Fernbedienung
gelieferten Liste ein.
vor dem Programmieren
7. Im Anzeigefeld wird kurz OPERATION GEGLUECKT
angezeigt und der Programmiermodus dann
beendet.
1. Schalten Sie das Gerät ein, das Sie bedienen
möchten.
2. Betätigen Sie die Taste, die dem Typ des zu
Methode C – Programmieren durch Code-Suche
bedienenden Geräts entspricht:
TV: Fernsehgerät
Ermöglicht die manuelle Suche eines Codes in der
gesamten Code-Bibliothek, für eine Gerätegruppe,
DVD: DVD Player / Recorder
deren Code oder Handelsmarke nicht in der searat
STB: Satellit, Kabel, ADSL
gelieferten Liste aufgeführt oder anders sortiert sind.
AMP : Verstärker
3. Richten Sie die Fernbedienung auf das Gerät, das
1. Schalten Sie das Gerät ein, das Sie bedienen
Sie bedienen möchten und versuchen Sie, es mit
möchten.
D
der Taste � auszuschalten. Schaltet sich das Gerät
2. Halten Sie die Taste SETUP so lange gedrückt, bis
nicht aus, müssen Sie die Fernbedienung mit einer
CODE EINSTELLEN angezeigt wird (7 Sekunden).
der Methoden A, B, C oder D programmieren, die
3. Drücken Sie einmal die Taste OK, um SUCHE IN 1
nachstehend beschrieben sind.
CODE-LISTE anzuzeigen.
4. Wählen Sie mt den Navigationstasten (5,6) die
Bestimmung eines Codes: Halten Sie eine Mode-Taste
Anzeige CODE-SUCHE und bestätigen Sie dann mit
gedrückt. Der für dieses Gerät gespeicherte Code wird
OK, um WAHL 1 MODE-TASTE anzuzeigen.
angezeigt (z. B. DVD…..0768).
5. Drücken Sie einmal auf die Taste des Geräts, das
Sie bedienen möchten (TV, DVD, …), um WAHL 1
Hinweis: Mit Ausnahme der Taste TV kann jede Mode-Taste
GERAETS? anzuzeigen.
(DVD, ... so programmiert werden, dass sie ein anderes
6. Bestätigen Sie mit OK, um SUCHE STARTEN
Gerät als das auf der Taste angegebene bedient. So können
MIT …P+ oder � (für die Mode-Taste TV kann nur TV
Sie zum Beispiel den
DVD-Modus der Taste STB zuordnen.
ausgewählt werden).
Sie müssen dazu den Code der jeweiligen Marke und das
7. Richten Sie die Fernbedienung auf das Gerät, das
entsprechende Gerät mit einer der Methoden eingeben, die
Sie bedienen möchten und versuchen Sie, es durch
in diesem Handbuch beschrieben sind.
einmaligen Druck auf die Taste � auszuschalten.
8. Schaltet sich das zu bedienende Gerät aus, drücken
Sie auf OK, um den Code zu speichern.
9. Schaltet sich das Gerät nicht aus, drücken Sie die
Taste � mehrmals, bis das Gerät sich ausschaltet.
Programmieren der Fernbedienung
Lassen Sie dem Gerät nach dem Drücken der Taste
ausreichend Zeit, zu reagieren (1 bis 2 Sekunden).
Code einstellen
10. Sobald sich das zu bedienende Gerät ausschaltet,
drücken Sie auf OK, um den Code zu speichern.
Methode A – Programmieren über Code-Liste
11. Im Anzeigefeld wird kurz OPERATION GEGLUECKT
angezeigt und der Programmiermodus dann
Code-Eingabe über die angezeigte Code-Liste.
beendet.
1. Schalten Sie das Gerät ein, das Sie bedienen
möchten.
Hinweis 1: Bei jedem Druck auf die Taste (�) sendet
2. Halten Sie die Taste SETUP so lange gedrückt, bis
die Fernbedienung ein Signal zum Gerät. Dieses Signal
CODE EINSTELLEN angezeigt wird (7 Sekunden).
entspricht einem Code der Code-Bibliothek im Speicher
3. Drücken Sie einmal die Taste OK, um SUCHE IN 1
der Fernbedienung. Sind Sie weiter gegangen als zum
CODE-LISTE anzuzeigen.
erforderlichen Code, können Sie mit den Tasten
PROG - in der
4. Drücken Sie einmal die Taste OK, um WAHL 1 MODE-
Code-Bibliothek zurückgehen (oder vorgehen mit
PROG +).
TASTE anzuzeigen.
Hinweis 2 : Die Anzeige SUCHE NACH bleibt in diesem
5. Drücken Sie einmal auf die Taste des Geräts, das
Modus angezeigt.
Sie bedienen möchten (TV, DVD, …), um WAHL 1
GERAETS? anzuzeigen.
Methode D
6. Wählen Sie mit den Navigationstasten (5,6), das
gewünschte Gerät (DVD, …) und bestätigen Sie
Programmieren durch Markensuche
dann mit OK. (für die Mode-Taste TV kann nur TV
ausgewählt werden). Die erste Marke und der erste
Ermöglicht die manuelle Suche einer Handelsmarke
Code werden angezeigt (z. B. ADMIRAL, 0000).
(Thomson, Philips, Sony …) in der Code-Bibliothek, die
7. Wählen Sie die Marke mit den Navigationstasten
in der Regel 30 bis 40 Codes enthält.
56, oder wählen Sie den ersten Buchstaben
1. Schalten Sie das Gerät ein, das Sie bedienen
der Marke Ihres Geräts mit den Tasten 2 bis 9
möchten.
(wie bei einem Mobiltelefon: 2=abc, 3=def ...).
2. Halten Sie die Taste SETUP so lange gedrückt, bis
(z. B.
THOMSON: 8 4)
CODE EINSTELLEN angezeigt wird (7 Sekunden).
8. Richten Sie die Fernbedienung zum Gerät und testen
3. Drücken Sie einmal die Taste OK, um SUCHE IN 1
Sie verschiedene Tasten wie beispielsweise VOL +/-,
CODE-LISTE anzuzeigen.
PROG +/- etc.
4. Wählen Sie mit den Navigationstasten (5,6) die
9. Reagiert das Gerät, speichern Sie den Code mit OK.
Anzeige CODE NACH MARKE und bestätigen Sie mit
10. Reagiert das Gerät nicht, ändern Sie den Code mit den
OK, um WAHL 1 MODE-TASTE anzuzeigen.
Tasten 43 und versuchen Sie erneut, ob Sie das Gerät
5. Drücken Sie einmal auf die Taste des Geräts, das
bedienen können.
Sie bedienen möchten (TV, DVD, ...), um WAHL 1
11. Haben Sie alle Codes der Gerätemarke ausprobiert
GERAETS? anzuzeigen.
und reagiert das Gerät immer noch nicht, versuchen
6. Bestätigen Sie mit OK, um MARKENCODE 1-8
Sie es bitte mit Methode C (Programmieren durch
anzuzeigen (für die Mode-Taste TV kann nur TV
Code-Suche).
ausgewählt werden).
7. Sehen Sie in der (separat gelieferten) Liste mit den
Codes nach Marken nach und geben Sie die Zahl (1
Methode B – Programmieren durch Code-Eingabe
bis 8) ein, die der Marke des zu bedienenden Geräts
entspricht. SUCHE STARTEN MIT � wird angezeigt.
Eingabe von Codes aus der separaten Liste (Code-
Bibliothek).
8. Richten Sie die Fernbedienung auf das Gerät, das
Sie bedienen möchten und versuchen Sie, es durch
1. Schalten Sie das Gerät ein, das Sie bedienen
einmaligen Druck auf die Taste � auszuschalten.
möchten.
9. Schaltet sich das zu bedienende Gerät aus, drücken
2. Halten Sie die Taste SETUP so lange gedrückt, bis
Sie auf OK, um den Code zu speichern.
CODE EINSTELLEN angezeigt wird (7 Sekunden).
10. Schaltet sich das Gerät nicht aus, drücken Sie die
3. Drücken Sie einmal die Taste OK, um SUCHE IN 1
Taste � mehrmals, bis das Gerät sich ausschaltet.
CODE-LISTE anzuzeigen.
Lassen Sie dem Gerät nach jedem Drücken der Taste
4. Wählen Sie mit den Navigationstasten (5,6) die
ausreichend Zeit, zu reagieren (1 bis 2 Sekunden).
Anzeige CODE-EINGABE und bestätigen Sie mit OK,
11. Sobald sich das zu bedienende Gerät ausschaltet,
um WAHL 1 MODE-TASTE anzuzeigen.
drücken Sie auf OK, um den Code zu speichern.
5. Drücken Sie einmal auf die Taste des Geräts, das Sie
12. Im Anzeigefeld wird kurz OPERATION GEGLUECKT
bedienen möchten (TV, DVD, …). Die so gewählte
angezeigt und der Programmiermodus dann beendet.
Taste sowie der für diese Taste gespeicherte Code
werden angezeigt (z. B. TV…..0166).
15
03_DE_ROC4507.indd 15 18/05/07 9:40:16
D
16
Hinweis 1: Bei jedem Druck auf die Taste (�) sendet
Lautstärke einstellen und Ton abschalten in jedem
die Fernbedienung ein Signal zum Gerät. Dieses Signal
Modus
entspricht einem Code der Code-Bibliothek im Speicher
Für eine Zuordnung der Tasten Volume, Stummschaltung
der Fernbedienung. Sind Sie weiter gegangen als zum
( ) für jeden gewünschten Modus.
erforderlichen Code, können Sie mit den Tasten
PROG - in der
1. Wählen Sie mit den Tasten SETUP (7 Sekunden
Code-Bibliothek zurückgehen (oder vorgehen mit
PROG +).
lang gedrückt halten) und den Navigationstasten
5,6,4,3, OK nacheinander CODE EINSTELLEN
Hinweis 2: Die Anzeige SUCHE NACH bleibt in diesem
und SYSTEM EINSTELLEN (drücken Sie auf OK) und
Modus angezeigt.
dann auf VOL/ MUTE (bestätigen Sie mit OK). Gehen
Sie dann bis zu VOL./STUMM ALLE (bestätigen Sie
Code-Programmierung bei Gerätekombinationen:
mit OK) und wählen Sie dann WAHL 1 GERAETS.
Bei manchen Gerätekombinationen (TV/VCR, TV/
2. Drücken Sie einmal auf die Taste des Geräts, das Sie
DVD, DVD/VCR etc) müssen Sie zwei verschiedene
bedienen möchten (TV, DVD, …).
Mode-Tasten betätigen, um die beiden Geräte dieser
3. Auf dem Anzeigefeld wird einen Moment lang
Kombination zu bedienen. So müssen Sie beispielsweise
BITTE WARTEN und dann OPERATION GEGLUECKT
bei der Gerätekombination TV/DVD einen Code mit der
angezeigt, bevor diese Einstellung beendet wird.
Taste TV für das Fernsehgerät und einen getrennten
Code (mit einer anderen Mode-Taste) zur Bedienung des
Hinweis: Überprüfen Sie vor Verwendung dieser Einstellung,
DVD-Players einstellen.
dass der gewählte Modus über seine eigenen Funktionen
für Lautstärke und Stummschaltung verfügt, im Code oder
Bedienen von Gerätekombinationen:
durch den Lernmodus. Ansonsten zeigt die Betätigung der
Bestimmte Gerätekombinationen (TV/VCR, TV/DVD,
Tasten für Lautstärke und Stummschaltung keine Wirkung.
DVD/VCR,…) verfügen über getrennte Tasten auf der
Original-Fernbedienung, anhand derer Sie das Gerät
Reset von Lautstärkeseinstellung und Stummschaltung
auswählen können, das Sie bedienen möchten. Handelt
Ermöglicht ein Rückgängigmachen der Einstellungen der
es sich bei Ihrer Gerätekombination beispielsweise um
letzten Abschnitte (bis zu den Liefereinstellungen).
ein DVD/VCR-Gerät, kann die Original-Fernbedienung
1. Wählen Sie mit den Tasten SETUP (7 Sekunden
für DVD und VCR getrennte Tasten haben, um das Gerät
lang gedrückt halten) und den Navigationstasten
der Gerätekombination zu wählen, das Sie gerade
5,6,4,3, OK nacheinander CODE EINSTELLENund
bedienen möchten. Sie nden die Funktionen der
SYSTEM EINSTELLEN (bestätigen Sie mit OK) und
entsprechenden Tasten auf Ihrer Fernbedienung durch
dann VOL./ STIMM EINSTELLEN (bestätigen Sie mit
Betätigen der Tasten Mode und SETUP. Im Falle eines
OK) und gehen Sie weiter bis RESET VOL./ STUMM.
kombinierten Geräts aus DVD und VCR, dessen Code
2. Drücken Sie einmal auf OK.
im DVD-Modus programmiert ist, halten Sie die Taste
3. DURCH OK BESTÄTIGEN? wird angezeigt.
Mode DVD über eine Sekunde lang gedrückt, um den
4. Drücken Sie einmal auf
OK, um den Reset zu
Tastenbefehl DVD zu senden. Um den Tastenbefehl VCR
bestätigen.
zu senden, drücken Sie kurz die Taste SETUP und lassen
5. Auf dem Anzeigefeld wird einen Moment lang
Sie sie sofort wieder los. Drücken Sie dann ebenso kurz
BITTE WARTEN und dann OPERATION GEGLUECKT
die Taste Mode DVD. Diese Vorgehensweise kann für alle
angezeigt, bevor diese Einstellung beendet wird.
Gerätekombinationen (TV/VCR, TV/DVD, DVD/VCR,…)
und für alle Modi verwendet werden. Diese Funktion
Uhrzeit einstellen
wird nicht durch alle Codes unterstützt.
1. Wählen Sie mit den Tasten SETUP (7 Sekunden lang
gedrückt halten) und mit den Navigationstasten
5,6,4,3, OK, um nacheinander CODE
EINSTELLEN, SYSTEM EINSTELLEN (mit OK
bestätigen) anzuzeigen und gehen Sie weiter bis
UHRZEIT EINSTELLEN.
System einstellen
2. Drücken Sie einmal auf OK.
3. Stellen Sie das Format 12 oder 24 Stunden mit 5,6,
Gehen Sie mit den Tasten SETUP (7 Sekunden lang
ein und bestätigen Sie mit OK.
gedrückt halten) und den Navigationstasten 5,6,4,3,
4. Stellen Sie mit 5,6, nacheinander die Stunden
OK zur Anzeige SYSTEM EINSTELLEN, um zur Einstellung
und die Minuten (Übergang von Stunden zu Minuten
von Lautstärke, Uhrzeit, Datum, Beleuchtung bzw. zu
mit OK) und bestätigen Sie mit OK.
Optionen löschen zu gelangen. Navigieren Sie dann mit
5. Im Anzeigefeld wird kurz OPERATION GEGLUECKT
den Tasten 5,6,4,3, OK.
angezeigt, bevor das Gerät zurückkehrt zu CODE
EINSTELLEN.
Lautstärke einstellen und Ton abschalten
Mit dieser Fernbedienung können Sie den Modus
Datum einstellen
denieren, den die Tasten für Lautstärke und
1. Wählen Sie mit den Tasten SETUP (7 Sekunden
Stummschaltung ( ) steuern.
lang gedrückt halten) und der Navigationstasten
Bei der Lieferung ist die Fernbedienung so eingestellt,
5,6,4,3, OK nacheinander CODE EINSTELLEN
dass die Tasten für Lautstärke und Stummschaltung
und SYSTEM EINSTELLEN (bestätigen Sie mit OK)
den Modus steuern, in dem sich die Fernbedienung
und gehen Sie weiter bis DATUM EINSTELLEN.
bendet. Ist für diesen Modus keine Funktion zur
2. Drücken Sie einmal auf OK
Lautstärkensteuerung vorhanden, steuern die
3. Stellen Sie mit den Tasten 5,6, et OK nacheinander
Tasten Lautstärkeneinstellung und Stummschaltung
Jahr, Monat, Datum und Tag ein.
automatisch den TV-Modus.
4. Im Anzeigefeld wird kurz OPERATION GEGLUECKT
angezeigt, bevor das Gerät zurückkehrt zu CODE
Lautstärke einstellen und Ton abschalten in einem
EINSTELLEN.
Modus
Ermöglicht die Zuordnung der Tasten für
Beleuchtung einstellen
Lautstärkeneinstellung und Stummschaltung ( ) zu
Zur Einstellung der Beleuchtungsdauer nach einem
einem einzigen Modus (TV oder ...), ohne dass Sie diesen
Tastendruck.
Modus in der täglichen Anwendung auswählen müssen.
1. Wählen Sie mit den Tasten
SETUP (7 Sekunden
1. Wählen Sie mit den Tasten SETUP (7 Sekunden
lang gedrückt halten) und den Navigationstasten
lang gedrückt halten) und den Navigationstasten
5,6,4,3, OK nacheinander CODE EINSTELLEN
5,6,4,3, OK nacheinander CODE EINSTELLEN
und SYSTEM EINSTELLEN (bestätigen Sie mit OK)
und SYSTEM EINSTELLEN (drücken Sie auf OK) und
und gehen Sie dann weiter bis BELEUCHTUNG
dann auf VOL/ STUMM EINSTELLEN (drücken Sie auf
EINSTELLEN.
OK). Wählen Sie dann VOL/STUMM ALLE (drücken Sie
2. Drücken Sie einmal auf OK
auf OK) und WAHL 1 GERAETS.
3. Stellen Sie mit den Tasten 5,6 und OK die
2. Drücken Sie einmal auf die Taste des Geräts, das Sie
Beleuchtungsdauer ein (5 - 60 Sekunden), wenn
bedienen möchten (TV, DVD, …).
BELEUCHTUNG AKTIV angezeigt wird.
3. Auf dem Anzeigefeld wird einen Moment lang
BITTE WARTEN und dann OPERATION GEGLUECKT
Hinweis: Die Beleuchtungsdauer ist auf 10 Sekunden
angezeigt, bevor diese Einstellung beendet wird.
voreingestellt. Um die Beleuchtungsfunktion zu
deaktivieren, stellen Sie die Dauer auf 00 und drücken Sie
Hinweis: Verfügt der gewählte Modus nicht selbst über eine
einmal auf
OK.
Steuerung der Lautstärken / Stummschaltung, wird
FEHLER
VOL. KONT. angezeigt. Die Fernbedienung verlässt die
4. Einen kurzen Moment wird
OPERATION GEGLÜCKT
Einstellung und kehrt zur Normalfunktion zurück.
angezeigt, dann wieder CODE EINSTELLEN.
03_DE_ROC4507.indd 16 18/05/07 9:40:17

D
17
Einstellung der Sprache der LCD-Anzeige
1. Schalten Sie das Gerät im TV-Modus ein.
Zur Auswahl einer der 7 Sprachen, die Ihre Fernbedienung
2. Wählen Sie mit den Tasten
SETUP und den
anbietet.
Navigationstasten 5,6,4,3, OK nacheinander
1. Wählen Sie mit den Tasten
SETUP (7
die Anzeigen CODE EINSTELLEN und SYSTEM
Sekunden lang gedrückt halten) und den
EINSTELLEN sowie TIMER EINSTELLEN (bestätigen
Navigationstasten5,6,4,3, OK, wird
Sie mit OK), TV AUF STANDBY STELLEN und TIMER X
nacheinander CODE EINSTELLEN und SYSTEM
EINSTELLEN (X entspricht einem der 4 Timer).
EINSTELLEN (bestätigen Sie mit OK) und gehen Sie
3. Drücken Sie einmal auf
OK, um TIMER X EINSTELLEN
weiter bis SPRACHE EINSTELLEN.
anzuzeigen.
2. Drücken Sie einmal auf OK.
Drückken Sie einmal auf OK, um UHRZEIT EINGEBEN?
3. Wählen Sie mit den Tasten 5,6 und OK die Sprache,
anzuzeigen.
wenn SPRACHE? angezeigt wird.
4. Einen kurzen Moment wird
OPERATION GEGLÜCKT
Hinweis: Timer annulieren, wenn er bereits programmiert
angezeigt, dann wieder CODE EINSTELLEN.
wurde (siehe unten).
Rückgängigmachen Ihrer Einstellungen
4. Wählen Sie mit den Tasten
5,6, OK die Uhrzeit,
Löschen aller Einstellungen sowie der Code- und
zu der der Timer aktiviert werden soll (Stunden und
Tastenspeicher. Wiederherstellen der Werkseinstellungen
Minuten) und drücken Sie dann auf OK.
der Fernbedienung.
5.
WAHL 1 GERAETS wird angezeigt. Geben Sie mit den
1. Wählen Sie mit den Tasten
SETUP (7 Sekunden
Mode-Tasten das zu bedienende Gerät an (TV, DVD).
lang gedrückt halten) und den Navigationstasten
6. Die Option AUSWAHL DER TASTE 1 wird angezeigt.
5,6,4,3, OK nacheinander CODE EINSTELLEN
Drücken Sie einmal auf die Taste, die dem
und SYSTEM EINSTELLEN (bestätigen Sie mit OK)
gewünschten Befehl entspricht (Bsp. 1).
und gehen Sie weiter bis OPTIONEN LOESCHEN.
7. Die Option
AUSWAHL DER TASTE 2 wird angezeigt.
2. Drücken Sie einmal auf OK.
Drücken Sie einmal auf die gewünschte Taste (Bsp. 3)
3. Drücken Sie einmal auf OK, wenn DURCH OK
oder auf OK, wenn Sie nur einen Befehl senden möchten
LÖSCHEN? angezeigt wird.
und gehen Sie dann zu Punkt 10 über (siehe unten).
4. Einen Moment lang wird
BITTE WARTEN angezeigt,
8. Die Option
AUSWAHL DER TASTE 3 wird angezeigt.
bevor Sie diese Einstellung verlassen.
Drücken Sie auf die gewünschte Taste (Bsp. 8).
9. Einen kurzen Moment wird
OPERATION GEGLÜCKT
angezeigt, dann wieder CODE EINSTELLEN.
Einstellung des Timers
10. Drücken Sie einmal auf EXIT, um diesen Modus zu
verlassen.
11. Legen Sie die Fernbedienung auf einen Tisch oder
Gehen Sie mit den Tasten SETUP (7 Sekunden lang
eine ebene Oberäche (auf gleicher Höhe mit dem
gedrückt halten) und den Navigationstasten 5,6,4,3,
Infrarotsensor des Fernsehgeräts) und richten Sie die
OK zur Anzeige TIMER EINSTELLEN, um in den Standby-
Vorderseite der Fernbedienung zu dem Gerät, das Sie
Einstellungen des Fernsehgeräts und 4 anderer
bedienen möchten.
Zeitschalter Befehlsreihen von maximal 4 Tasten zu
übertragen. Gehen Sie dann mit den Tasten 5,6,4,3,
Hinweis: Das Symbol « « wird angezeigt, wenn ein Timer
OK weiter.
eingestellt ist.
Automatisches Umstellen des Fernsehgeräts auf
Annulieren eines Timers
Standby
1. Wählen Sie mit den Tasten
SETUP (7 Sekunden
Ermöglicht das programmierte Umschalten eines
lang gedrückt halten) und den Navigationstasten
Fernsehgeräts auf Standby durch den Modus Standby-
5,6,4,3, OK nacheinander CODE EINSTELLEN,
Timer TV (Zzz).
SYSTEM EINSTELLEN und TIMER EINSTELLEN
(bestätigen Sie mit OK). Wählen Sie dann TV AUF
1. Schalten Sie das Gerät im TV-Modus ein.
STANDBY STELLEN, TIMER X EINSTELLEN (bestätigen
2. Wählen Sie mit den Tasten
SETUP (7 Sekunden
mit OK) und TIMER X ANNULIEREN.
lang gedrückt halten) und den Navigationstasten
2. Drücken Sie einmal auf OK, um TIMER X ANNULIEREN
5,6,4,3, OK EINSTELLEN DER CODES und gehen
anzuzeigen.
Sie dann weiter bis TIMER EINSTELLEN (bestätigen
3. Drücken Sie einmal auf OK, um DURCH OK LÖSCHEN?
Sie mit OK), TV AUF STANDBY STELLEN (wiederum
anzuzeigen.
bestätigen mit OK) und TV AUF STANDBY STELLEN.
4. Drücken Sie einmal auf OK.
3. Drücken Sie einmal auf OK.
5. Einen kurzen Moment wird
OPERATION GEGLÜCKT
4. Wählen Sie mit den Tasten 5,6 und OK die Dauer
angezeigt, dann wieder CODE EINSTELLEN.
in Minuten (1 bis 90 Minuten), bevor das Gerät
auf Standby gestellt wird, wenn STANDBY ZEIT?
angezeigt wird.
5. Einen kurzen Moment wird
OPERATION GEGLÜCKT
Tasten-Lernmodus
angezeigt, dann wieder CODE EINSTELLEN.
6. Drücken Sie zweimal auf EXIT, um diesen Modus zu
verlassen.
Mit dieser Funktion können Sie Funktionen von Tasten
anderer Fernbedienungen auf die Tasten Ihrer ROC
Hinweis: Das Symbol “Zzz” wird angezeigt, wenn ein TV-
4507 kopieren - im Modus und auf die Tasten Ihrer
Standby-Timer eingestellt ist.
Wahl. Ihre ROC 4507 kann bis zu 150 Tasten speichern
(abhängig vom Format des zu lernenden Infrarot-
7. Legen Sie die Fernbedienung auf einen Tisch oder
Codes). Eine einzige Originalfernbedienung muss in
eine ebene Oberäche (auf gleicher Höhe mit dem
einem Modus gespeichert werden (siehe Empfehlungen
Infrarotsensor des Fernsehgeräts) und richten Sie die
zum Lernmodus). Die Fernbedienung kann weiterhin
Vorderseite der Fernbedienung zum Fernsehgerät.
mit einem der Codes der Bibliothek vorprogrammiert
werden und kopierte Tasten können «über» den vom
Hinweis: Um die Programmierung rückgängig zu machen,
Anwender gewählten Tasten liegen: Die Fernbedienung
gehen Sie weiter bis
TV AUF STANDBY STELLEN und TV
kann so vom Benutzer angepasst werden, der einen
STANDBY ANNULIEREN. Drücken Sie einmal auf OK,
vorprogrammierte Code verwendet und anschliessend
wenn
DURCH OK LÖSCHEN? angezeigt wird. Einen kurzen
einen Lernvorgang der Tastenfunktionen ausgehend von
Moment wird
OPERATION GEGLÜCKT angezeigt, dann
seiner Infrarot-Originalfernbedienung durchführt.
wieder
CODE EINSTELLEN.
Achtung: Auf die Tasten Setup, Home Cinema oder
Einstellung des Timers
Macro können keine Funktionen kopiert werden • Alle für
Programmieren von bis zu 4 Timern. Siie können
einen Modus kopierten Befehle funktionieren, wenn ein
dem Timer bis zu 4 Tasten zuordnen, damit er am
identischer oder neuer 4-stelliger Code für diesen Modus
angegebenen Zeitpunkt aktiviert wird (beispielsweise
eingegeben wird (sowohl für die Direkteingabe eines Codes
damit der Sender SAT auf 123 um 22:35 läuft). Die erste
als auch für die Code- oder Markensuche) • Die Beleuchtung
Taste muss immer eine Mode-Taste sein. Die folgenden
von Anzeige und Tasten ist während des Lernvorgangs nicht
Tasten dürfen nicht die Tasten 5,6,4,3, OK EXIT,
aktiviert.
MACRO, SETUP oder andere Mode-Tasten enthalten.
Die Timer können nur so eingestellt werden, dass sie
im Zeitraum der nächsten 24 Stunden aktiviert werden.
Die Timer werden nach ihrer Aktivierung automatisch
annuliert. Das Symbol
“ ”
Timer wird angezeigt, wenn
ein Timer eingestellt ist.
03_DE_ROC4507.indd 17 18/05/07 9:40:18


