Saturn ST-HT7269: Steps for castor installation: Wall-mount Instructions III. Installation and application of the electric heater
Steps for castor installation: Wall-mount Instructions III. Installation and application of the electric heater: Saturn ST-HT7269
Table of contents
- I. Product features II. Safety Instructions
- Steps for castor installation: Wall-mount Instructions III. Installation and application of the electric heater
- V. Technical Data: Set
the plug. Do not yank the
Please note the safe distance
into the slot to click on, as shown below.
bearing current ≥ 10A. Do not power
power cable.
mentioned below.
the heater on until the requirements are
Demolition of the electric
met.
heater with authorization is
strictly prohibited. Please look
for professional service
personnel if the heater is
damaged.
The product is limited to home
use.
Installation of the heater
directly under wall outlet is
strictly forbidden.
During normal use, do not let
1. Turn the temperature control knob
bare skin touch the surface of
Fix the wall bracket lock piece onto the
clockwise to the end, press the level-I
the appliance, so as not to be
bracket with screws, slide the lock piece
burnt
power switch to switch on the low-level
into the locking slot on the back of the
Avoid the use of the heater if
heating, or the level-II switch for the
machine, and then tighten up the screw,
high-level heating. If both levels are
children, animals or the
as shown in the picture below.
switched on, the machine will be
disabled and those who lack
working on the maximum power.
self control are present while
nobody else is taking care of
them.
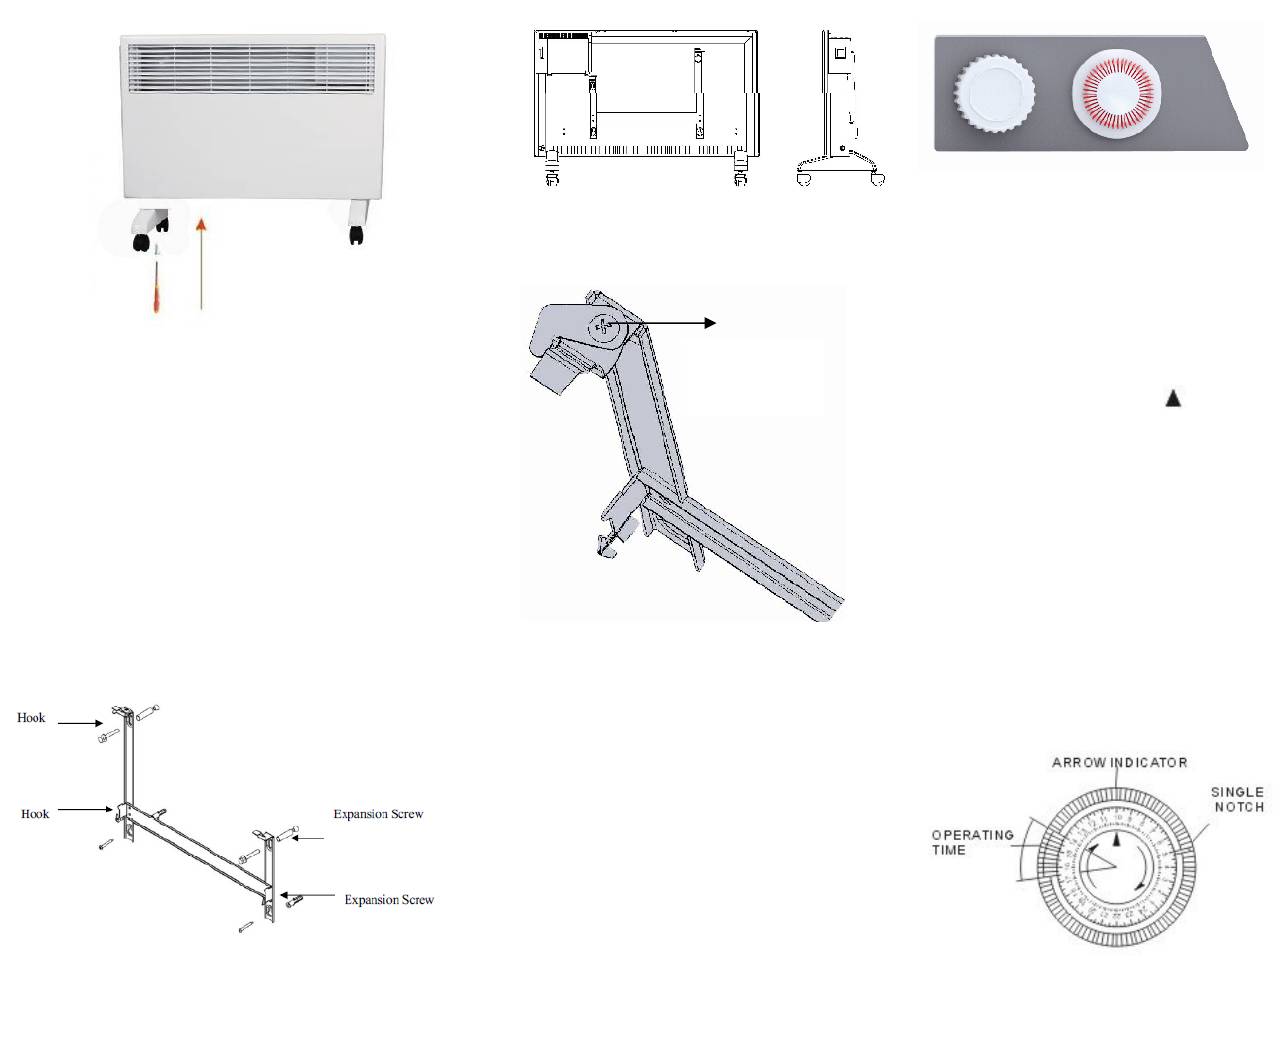
2. Models with a 24 hour time-clock. To
program heating, proceed as follows:
The appliance should not be
Steps for castor installation:
a) Look at the time on your clock or
available to the following
1. Put the product upside down on a
Wall Bracket
watch if it is 10.00, turn the numbered
people (including children):
those with physical, sensory or
soft cotton cloth or carpet.
Lock Piece
timer disk clockwise until the number 10
mental impairments, or those
2. Mount the stand in the corresponding
on the disk coincides with the
on the
who lack experience and
location of the lower part of the product
timer. Set the periods of time when you
knowledge unless they get
as shown above, and then fix the
want the appliance to work by pushing
custody or instructions on the
randomly supplied screw at the bottom
the teeth inwards. Each tooth
use of the product from the
of the product with a screwdriver and
corresponds to a period of 15 minutes.
person who is responsible for
tighten the screw.
This will leave visible sectors which
their safety.
correspond to the periods of operation.
Children should be supervised
When set, the radiator will operate
and ensured that they will not
Wall-mount Instructions
automatically each day during the times
play with this appliance.
programmed (important the radiator
Only specific personnel from
Take out the wall brackets and
must always be plugged into the
the technical service center
expansion screws out from the box, and
socket.)
may replace the power cord of
fix the screws onto the wall according to
b) To change the programming, move
the product in case it is
the distances between holes of the wall
the teeth back into the initial position
damaged to ensure safety.
brackets, as depicted in the picture
and set the new periods of functioning
Do not share the socket with
below.
Note: Prior to the drilling, make sure
there is no cable or other pipelines on
c) If you want to make the appliance
other electrical appliances to
the wall to avoid damage. Remember
operate without programming , push all
avoid current overload, or fire
that the screws on the wall shall be
the teeth into the centre. In this case,
risks may be caused by
to turn the mains to avoid continued
fixed and firm to ensure the safety
excessive load
installation of the electric heater on the
operation of the timer.
CAUTION: covering of the
wall. Please note the safe distance
cooling device is prohibited
mentioned below.
to avoid overheating, or
During installation, the heater must be
dangerous accidents may be
maintained sufficiently safe distance
caused.
from combustible materials and gas and
away from water.
III. Installation and application
During wall-hanging installation, keep
of the electric heater
the installation height from the ground
Check whether the parts are
greater than 15 cm. Hanging-type
complete and the product is
heater shall be no less than 50 cm away
intact when open the
from the ceiling.
Expansion Screw
package.
If you want to use the
electric heater in a mobile
I . Operation notice
way, please install the rollers
Make sure the heater shell, line and
provided in the package.
power plug are intact.
Make sure the heater is
Aim the 4 holes in the back of the
Check the rated voltage in the model
correctly fixed with the screws
machine to the 4 hooks on the wall
label of the heater is in line with that of
3. Models with mechanical 24 hour
provided. Please make sure the
bracket and push it on, and then slide
the outlet. Power outlet requirements
timer (programming of delayed start.)
base is level, stable and clean.
are: voltage 220V, frequency 50Hz,
4
5


