Olympus LS-11 – page 4
Manual for Olympus LS-11
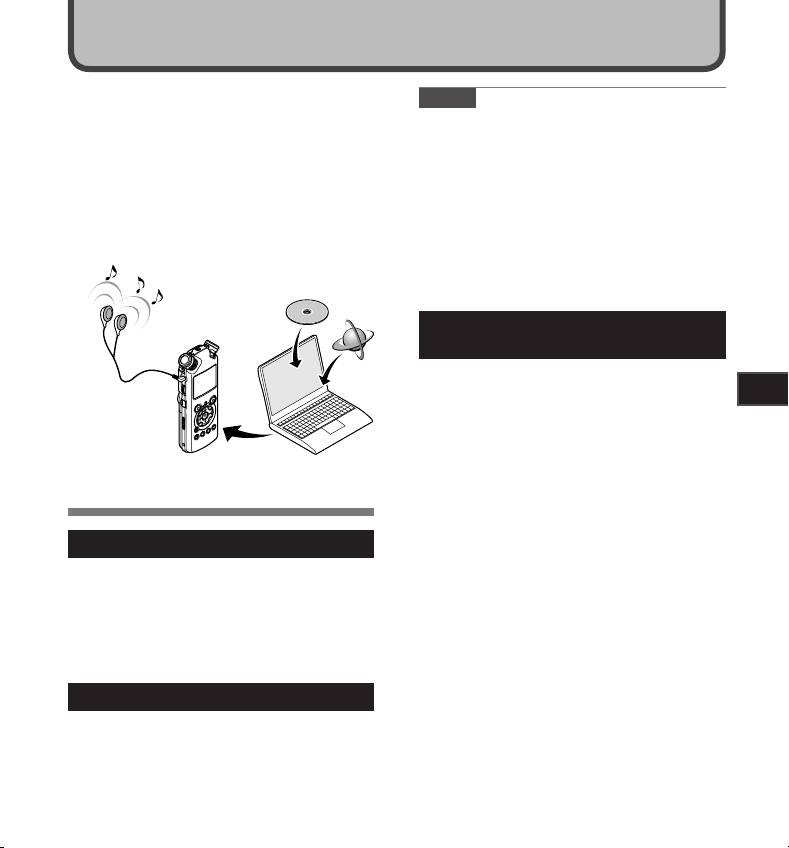
Using the Recorder on Your PC
By being connected to a PC, the recorder enables
Notes
you to do the following:
• This is an operational environment for saving
• You can transfer files recorded with this
the files recorded by this recorder to your PC
recorder to a computer, play them back, and
with USB connection.
manage them by using Windows Media Player
• To check the operational environment of
or iTunes (☞ P.65, P.72).
[Steinberg CUBASE LE4] software, see a sup-
• In addition to its uses as an IC recorder and a
plied separate sheet.
music player, this recorder can also be used
• Even if operational environment is satisfied, we
as external memory for a computer by storing
do not support such as 64-bits OS, the multi-
data from a computer and reading it back out
boot environment and self-modified PC’s.
(☞ P.64, P.76).
• Even if operational environment is satisfied, we
do not support such as upgraded OS, the multi-
boot environment and self-modified PC’s.
Precautions on using the recorder
connected to a PC
• When you are downloading a file from the
recorder or uploading a file to the recorder, do
5
not remove the USB cable even if the screen is
Using the Recorder on Your PC
indicating you can. Data is still being transferred
while the [PEAK] indicator light is blinking. When
removing the USB cable, be sure to follow
the description in ☞ P.63. If the USB cable is
removed before the drive is stopped, data may
not be successfully transferred.
Operating Environment
• On a PC, do not format the drive of the recorder.
Initialization is not successfully achieved on
a PC. For initialization, follow the instruc-
Windows
tions in the [Format] screen of the recorder
(☞ P.51).
Operating System:
• Folder (directory) names appeared by file
Microsof t Windows XP/ Vista (Standard
management tools such as Explorer attached
Installation)
to Microsoft Windows is different from the folder
Compatible PC’s:
names that can be set with the recorder.
Windows PC’s equipped with more than one
• If folders or files stored on the recorder are
free USB port
moved or renamed by using a file management
tool such as Explorer, the order of files may be
changed or files may become unrecognizable
Macintosh
•
Data can be written or uploaded to the recorder even
though the attribute of the recorder drive is shown
Operating System:
as Read-only by the operating system of the PC.
Mac OS X 10.4.11 ~ 10.5 (Standard Installation)
• As the noise may cause adverse effects on
Compatible PC’s:
electronics devices nearby the recorder, unplug
Apple Macintosh series equipped with more
the earphone when you connect the recorder to
than one free USB port
a PC.
61
Operating Environment
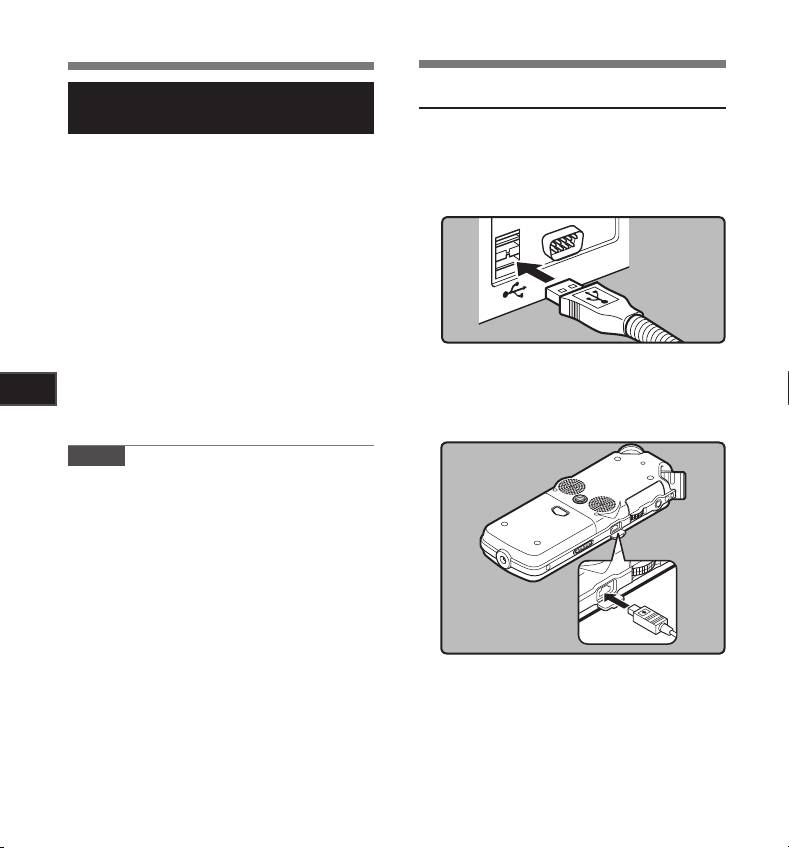
Connecting to Your PC
Copyright and Copyright Protection
Connecting to Your PC
Feature (DRM)
Boot the PC.
1
By the Copyright Act, any voice/music files and
music CDs downloaded from the Internet without
the copyright holder’s permission may not be
Connect the USB connecting cable to
2
reproduced, distributed, publicized/re-publicized
the USB port of the PC.
on the Internet, or converted into WMA or MP3
files for the purpose of commercial business
or sale.
A WMA file may be provided with DRM (Digital
Right Management) for copyright protection.
DRM limits the file to copy or distribute music
files that are converted (ripped) from a music CD
or downloaded from music distribution services.
To transfer a WMA file with DRM to the recorder,
you need to use appropriate methods such as
Windows Media Player. Copying the music files
Confirm that the recorder has stopped
with DRM purchased from online music distribu-
3
and connect a USB connection cable
5
tion service to a portable device such as this
to the connection port on the side of
Using the Recorder on Your PC
recorder may be restricted.
recorder.
Note
• This recorder is compatible with Microsoft
Corporation DRM9, but not with DRM10.
Windows:
When you open [My Computer], it will be recog-
nized by the drive name [LS_11] (Built-in flash
memory) and [Removable Disk] (SD card).
Macintosh:
When you connect the recorder to a Mac OS, it
will be recognized by the drive name [LS_11] on
the desktop. When an SD card is inserted it will
be recognized by the drive name [Untitled].
62
Connecting to Your PC
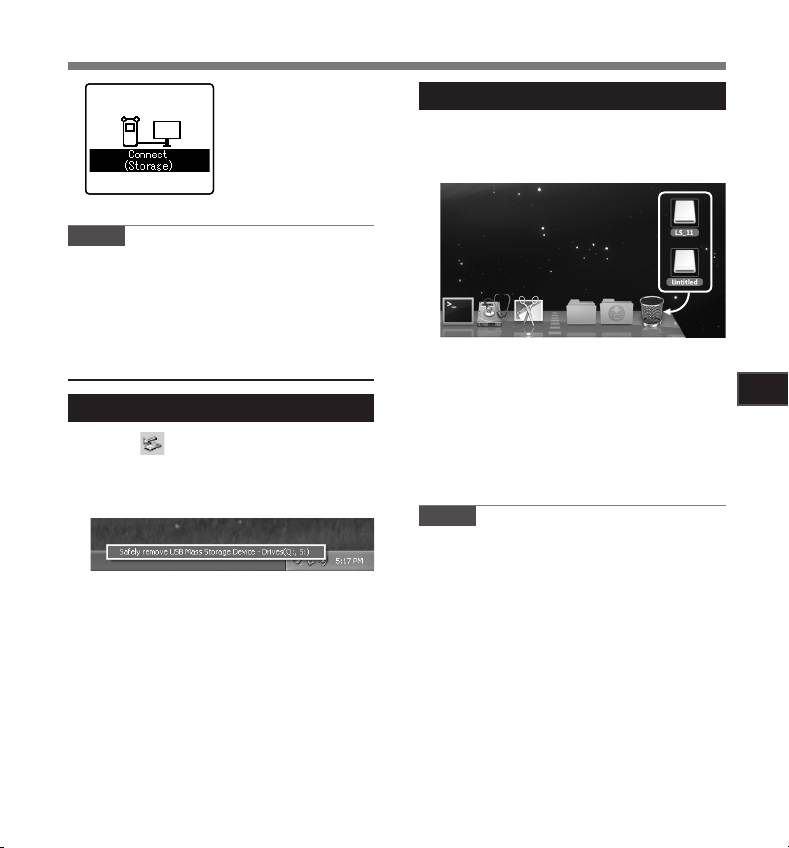
[Connect (Storage)]
Macintosh
is appeared on
recorder if the USB
Move the drive icon for this recorder that
cable is connected
1
is appear on the desktop to the garbage
bin by Drag & Drop it.
Note
• Be sure to use the attached dedicated cable
for the USB connection cable. If any other
company’s cable is used, it cause problems.
Also, please do not connect this dedicated
cable to any other company’s product.
• When you connect the recorder to a Mac
OS, it will be recognized by the drive name
Disconnecting from Your PC
[LS_11] on the desktop. When an SD card
is inserted it will be recognized by the drive
5
Windows
name [Untitled].
Using the Recorder on Your PC
Click [ ] on the task bar located at
Disconnect the USB cable.
1
2
the lower-right corner of the screen.
Click [
Safely remove USB Mass Storage
Device
].
Notes
• NEVER disconnect the USB while the [PEAK]
indicator light is flashing. If you do, the data will
be destroyed.
• When the recorder is connected to a PC, the
• The drive letter will differ depending on the
power will be supplied from the USB cable.
PC being used.
• Refer to the user’s manual for your PC regard-
ing the USB port on your PC.
When the safe to remove hardware
• Be sure that you connect the USB cable either
2
window appears, click [
OK
].
directly to the USB port on your PC.
• Be sure to push the cable connector all the way
in. Otherwise, the recorder may not operate
Disconnect the USB connection
3
properly.
cable.
• When connecting the recorder through an USB
hub the operation may become unstable. In
such cases, refrain from using a USB hub.
63
Transfer the Voice Files to Your PC
The 5 voice folders of this recorder are appeared
as [DSS_FLDA], [DSS_FLDB], [DSS_FLDC],
[DSS_FLDD] and [DSS_FLDE], and the recorded
voice files are saved in these folders.
Windows
Connecting the recorder to your PC
1
(☞ P.62).
Open the Explorer window.
2
Open the [
LS_11
] folder.
3
• When you open [My Computer], it will
be recognized by the drive name [LS_11]
(Built-in flash memory) and [Removable
Disk] (SD card) (The drive letter will differ
depending on the PC being used).
5
Copy the data.
Using the Recorder on Your PC
4
Disconnecting the recorder to your PC
5
(☞ P.63).
Macintosh
Connecting the recorder to your PC
1
(☞ P.62).
• When you connect the recorder to a Mac
OS, it will be recognized by the drive name
[LS_11] on the desktop. When an SD card
is inserted it will be recognized by the drive
name [Untitled].
Notes
Double-click on [
LS_11
] icon on the
• While transmitting data, [Busy] is appeared,
2
and the [PEAK] indicator light flashes. NEVER
desktop.
disconnect the USB while the [PEAK] indicator
light is flashing. If you do, the data will be
Copy the data.
destroyed.
3
• In the Windows operational environment 24 bit
Disconnecting the recorder to your PC
WAV format files cannot be played back.
4
(☞ P.63).
• When a sound board of your PC does not
support to 24 bit, the recorder cannot play the
software supporting to 24 bit correctly.
• In the Mac OS operational environment, WMA
format files cannot be played back.
64
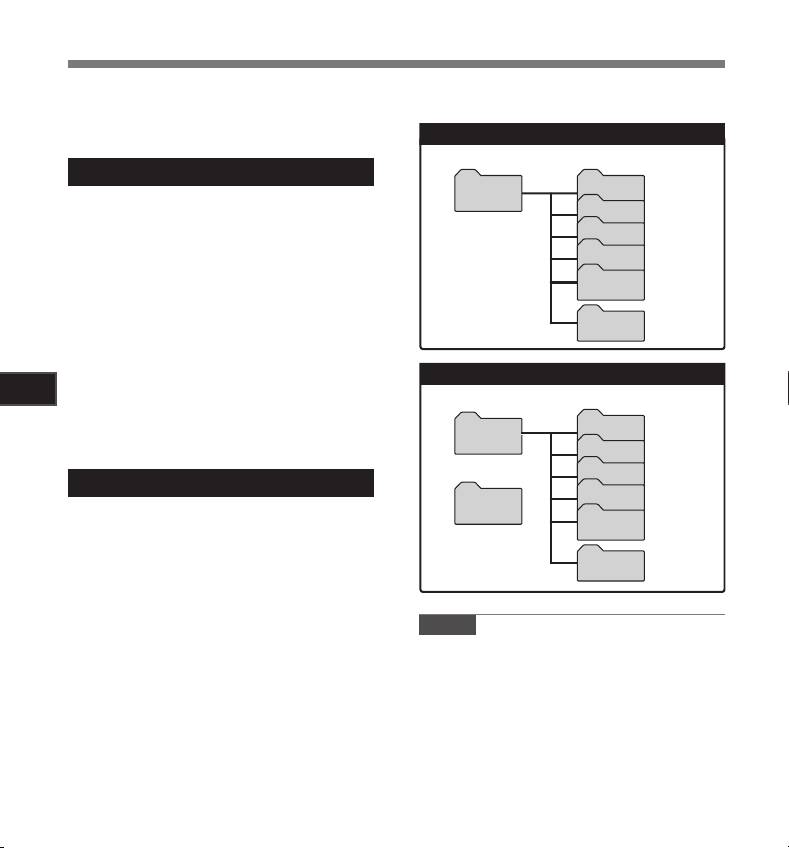
Built-in flash memory
Drive name Folder name
DSS_FLDA
LS_11
Folder A
DSS_FLDB
Folder B
DSS_FLDC
Folder C
DSS_FLDD
Folder D
DSS_FLDE
Folder E
Music
SD card
Drive name
Folder name
DSS_FLDA
Removable
Folder A
Disk
DSS_FLDB
Folder B
Windows
DSS_FLDC
Folder C
DSS_FLDD
Folder D
Untitled
DSS_FLDE
Folder E
Macintosh
Music
4 Drive name and folder name when a
personal computer is connected:
5
Using the Recorder on Your PC
65
1 2
5
3
4
7
6 8 0
9
@
!5 7 9
6 8 04
32
1
1 2
5
3
4
7
6 8 0
9
@
!5 7 9
6 8 04
32
1
Using Windows Media Player
By using Windows Media Player, music files from music CDs or language study CDs can be imported
to your PC (☞P.66) and music files that you have bought from any music distribution sites can be easily
transferred to the recorder to play (☞P.67).The files recorded on the recorder can be transferred to your
PC and can be copied to CD (☞P.70). It supports WAV, MP3, and WMA format music files.
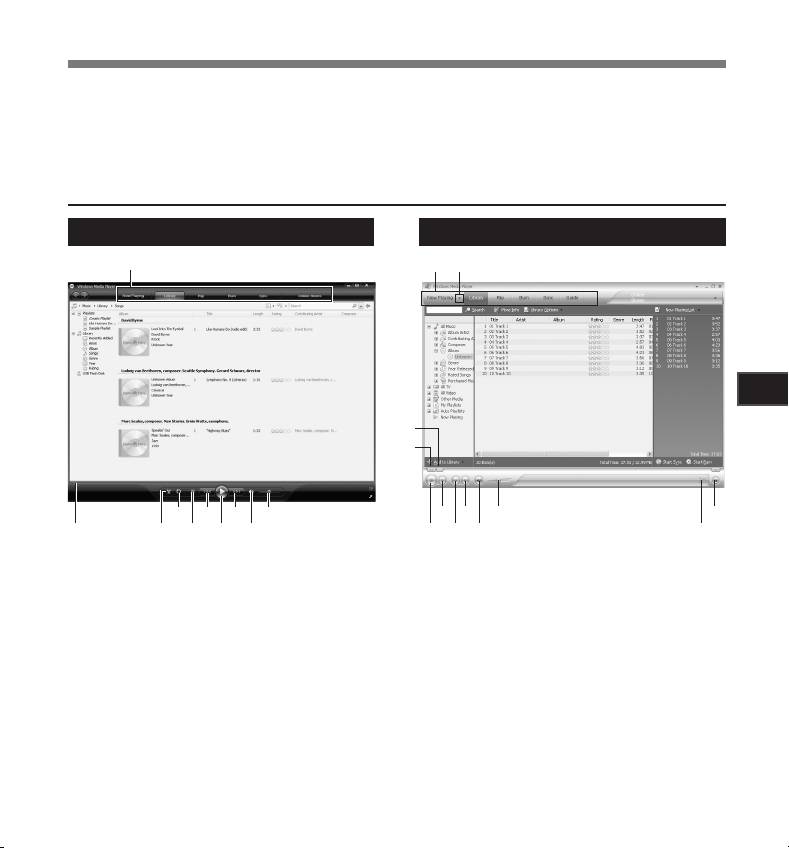
Window Names
Windows Media Player 11
Windows Media Player 10
1 Features taskbar
1 Features taskbar
2 Seek slider
2 Quick Access Panel button
3 Shuffle button
3 Seek slider
4 Repeat button
4 Rewind button
5 Stop button
5 Play button
6 Previous button
6 Stop button
7 Play button
7 Previous button
8 Next button
8 Next button
9 Mute button
9 Mute button
0 Volume slider
0 Volume slide
! Shuffle/ Repeat button
@ Fast Forward button
Using Windows Media Player
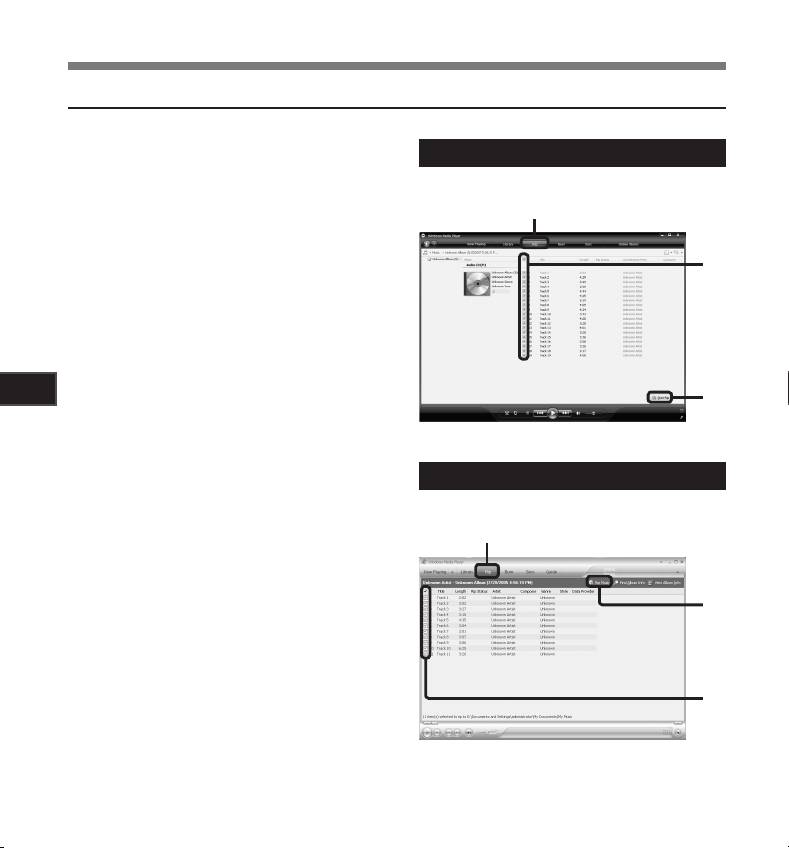
Copying Music from CD
Insert CD into the CD-ROM drive, and
Windows Media Player 11
1
start Windows Media Player.
From the Features taskbar, click [
Rip
]
2
2
menu.
• After clicking [Rip] menu, click [View Album
Info] for Windows Media Player 10 as
necessary.
• If Internet connectivity is available, CD
3
information is searched.
Put a check mark on the music file that
3
you want to copy.
Click [
Start Rip
].
4
5
• For Windows Media Player 10 Click [Rip
Music].
Using the Recorder on Your PC
4
• Files copied to a PC are stored in WMA
format. Music files copied are categorized
by artist, album, genre, etc. and added to
the play list.
Windows Media Player 10
2
4
3
66
Using Windows Media Player
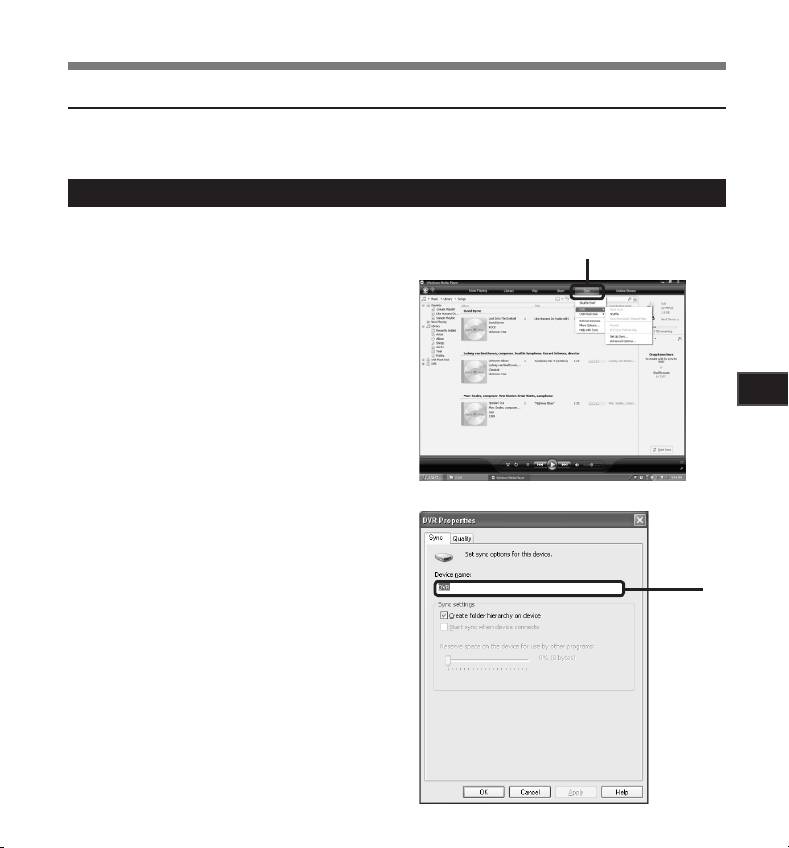
Transferring Music File to the Recorder
You can transfer the music files saved in your PC to this recorder. For how to copy the music files from
the CD to your PC, see “Copying Music from CD” (☞ P.66).
Windows Media Player 11
Connect the recorder to a PC, and
1
start Windows Media Player.
2, 3
From the Features taskbar, click
2
[
Sync
].
Click [
Sync
] menu again to select [
DVR
]
3
{ [
Advanced Options
] { [
Set Up Sync
],
and set as follows.
• Click on the [Create folder hierarchy on
device] to check. *1 *2
5
• The folder with artist name or album name
Using the Recorder on Your PC
is automatically created. This will make
you find the file you want to listen to more
easily.
*1 If [Create folder hierarchy on device] is
checked by default, click to uncheck the
box once, and click it again to check.
*2 After the synchronous transfer to the
recorder, a file named “WMPInfo.xml” is
created. If you delete this file, the *1 may
need to be set again.
3
67
Using Windows Media Player
Select the desired category from
4
[
Library
] on the left, and select music
files or albums to transfer to the
recorder, and Drag & Drop them in
[
Sync List
] on the right.
4
Click [
Start Sync
].
5
• The file is transferred to the recorder.
5
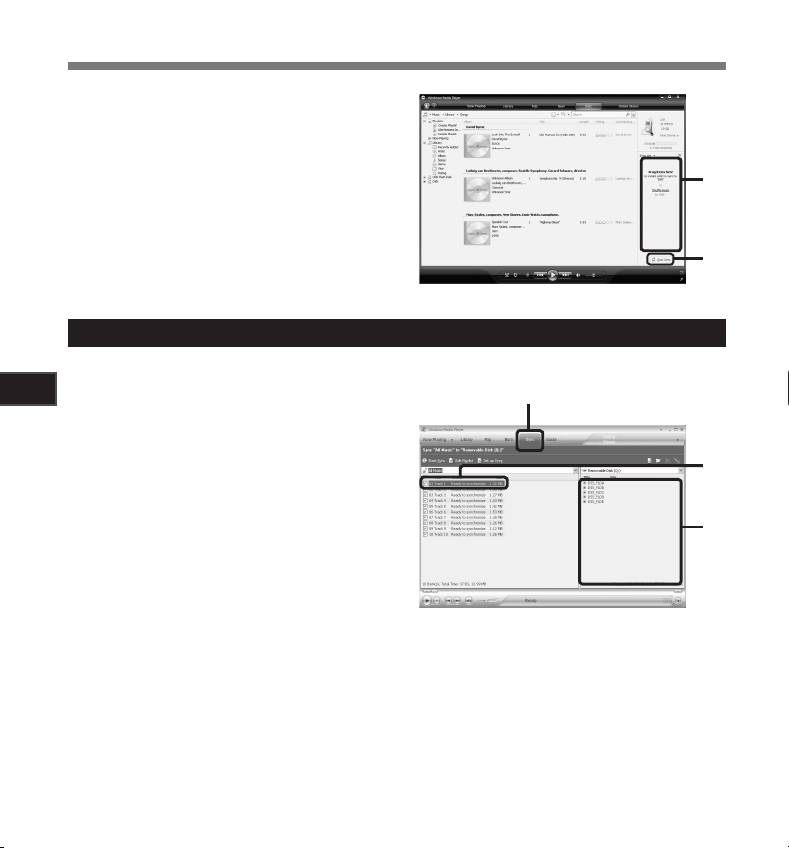
Windows Media Player 10
Connect the recorder to a PC, and
5
2
1
start Windows Media Player.
Using the Recorder on Your PC
From the Features taskbar, click
2
[
Sync
].
3
From the pull down menu on the left
3
side window, select the play list to be
transferred to the recorder, and put
the check marks on the music file that
4
you want to transfer.
• The order of music pieces can be changed
by Drag & Drop of the music file in the play
list displayed.
From the pull down menu on the right side window, select the drive correspond-
4
ing to the recorder.
• The recorder is recognized as a Removable Disk.
68
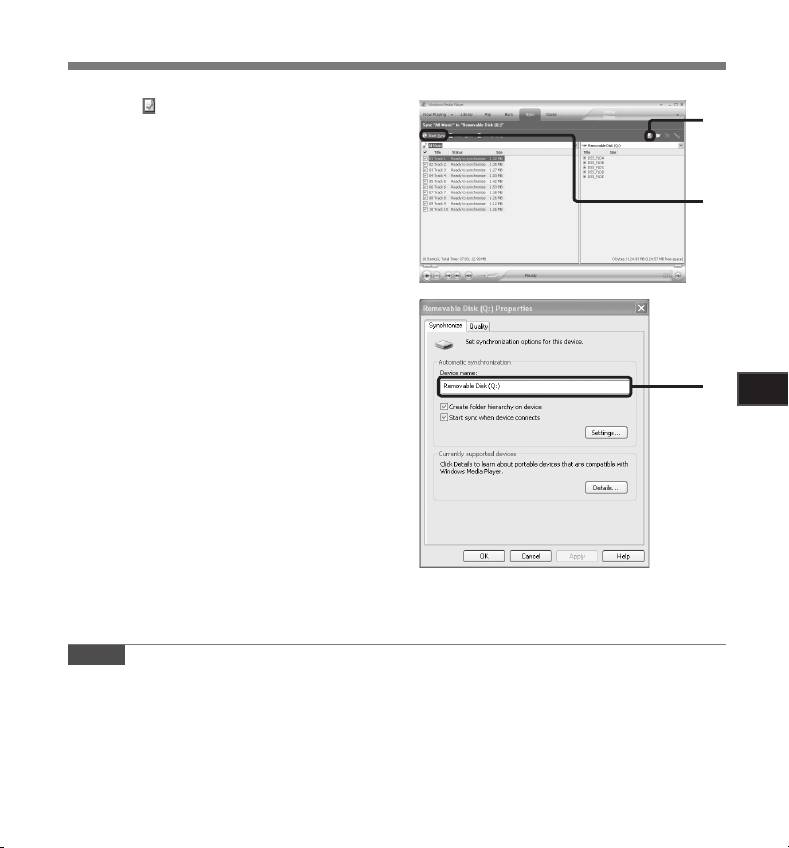
Using Windows Media Player
Click [ ] on the upper right corner,
5
and set the synchronization options.
• Click on the [Create folder hierarchy on
5
device] to check. * 1 *2
• The folder with artist name or album name
is automatically created. This will make
you find the file you want to listen to more
easily.
6
*1 If [Create folder hierarchy on device] is
checked by default, click to uncheck the
box once, and click it again to check.
*2 After the synchronous transfer to the
recorder, a file named “WMPInfo.xml” is
created. If you delete this file, the *1 may
need to be set again.
Click [
Start Sync
].
6
• The file is transferred to the recorder. The
music file transferred to the recorder is
6
5
displayed in Item on Device.
Using the Recorder on Your PC
Notes
• Copying the music files with DRM purchased online music distribution service to a portable device such
as this recorder may be restricted.
• To transfer the files by using Windows Media Player 9, check the Olympus website.
• If the music files are transferred to the recorder until it reaches to the maximum memory, the message
[Cannot make the system file. Connect to PC and delete unnecessary file] may appear on this recorder’s
display. In such a case, erase the files to make free space (hundreds of KB to dozens of MB depending
on the music file sizes) for the management file (The more capacity for the management file will be
necessary as the number of the music files increases).
69
Using Windows Media Player
Copying Voice File to the CD
You can transfer the voice files in the recorder to your PC and copy them to CD. For how to copy the voice
files from the recorder to your PC, see “Transfer the Voice Files to Your PC” (☞ P.64).
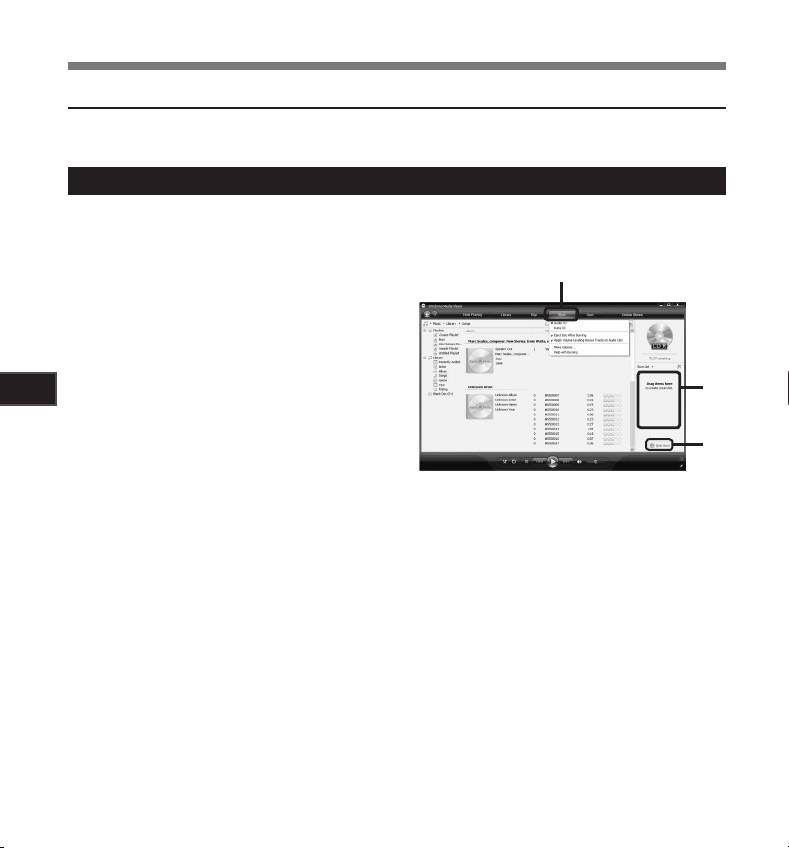
Windows Media Player 11
Insert the blank CD-R/RW into
1
the CD-R/RW drive, and start
Windows Media Player.
2, 4
From the Features taskbar, click
2
the [
Burn
] menu.
Select the desired category from
5
3
[
Library
] on the left, and select
3
Using the Recorder on Your PC
voice files or albums to copy to
the CD-R/RW, and Drag & Drop
them in [
Burn List
] on the right.
5
Click [
Burn
] menu again, and select [
Audio CD
] or [
Data CD
].
4
When [
Audio CD
] is selected:
• A file is converted and copied in CD in order to play it by the audio equipment which can play
CD-R/RW.
When [
Data CD
] is selected:
• Copying files with the format to be recorded.
Click [
Start Burn
].
5
70
Using Windows Media Player
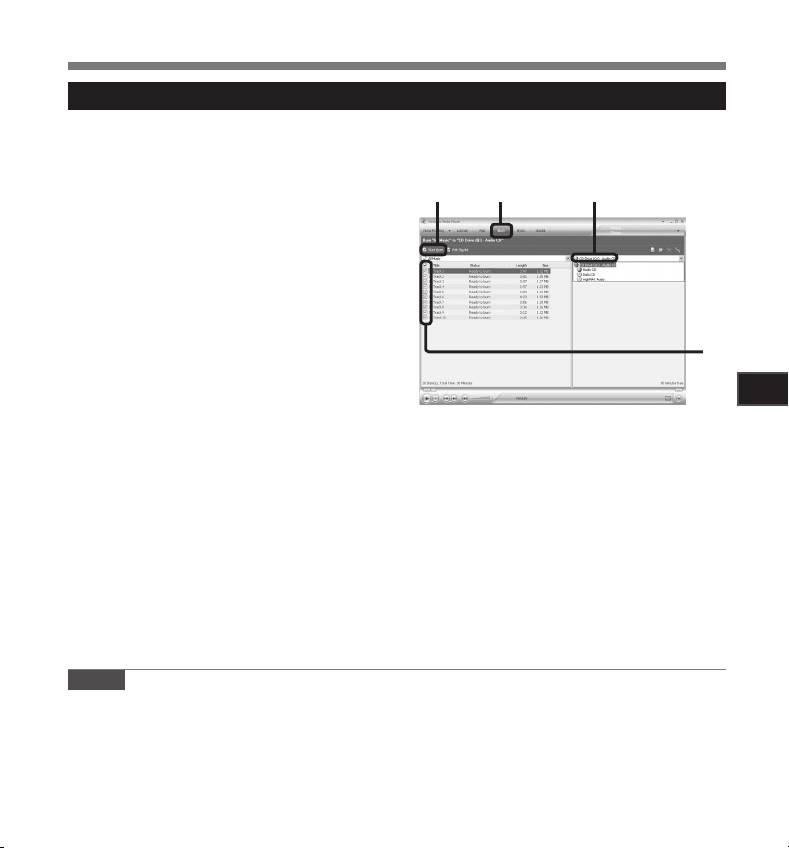
Windows Media Player 10
Insert the blank CD-R/RW into
1
the CD-R/RW drive, and start
Windows Media Player.
5 4
2
From the Features taskbar, click
2
[
Burn
] menu.
• Click [Burn] as needed after clicking [Edit
Playlist] menu.
• You can change the order of tracks by
Drag & Drop files.
Put a check mark on the voice
3
3
files that you want to copy.
5
Using the Recorder on Your PC
Select format of CD before clicking [
Start Burn
].
4
When [
Audio CD
] is selected:
• A file is converted and copied in CD in order to play it by the audio equipment which can play
CD-R/RW.
When [
Data CD
] is selected:
• Copying files with the format to be recorded.
Click [
Start Burn
].
5
Notes
• Copying the music files with DRM purchased online music distribution service to a portable device such
as this recorder may be restricted.
• Refer to the online help of Windows Media Player for details.
71
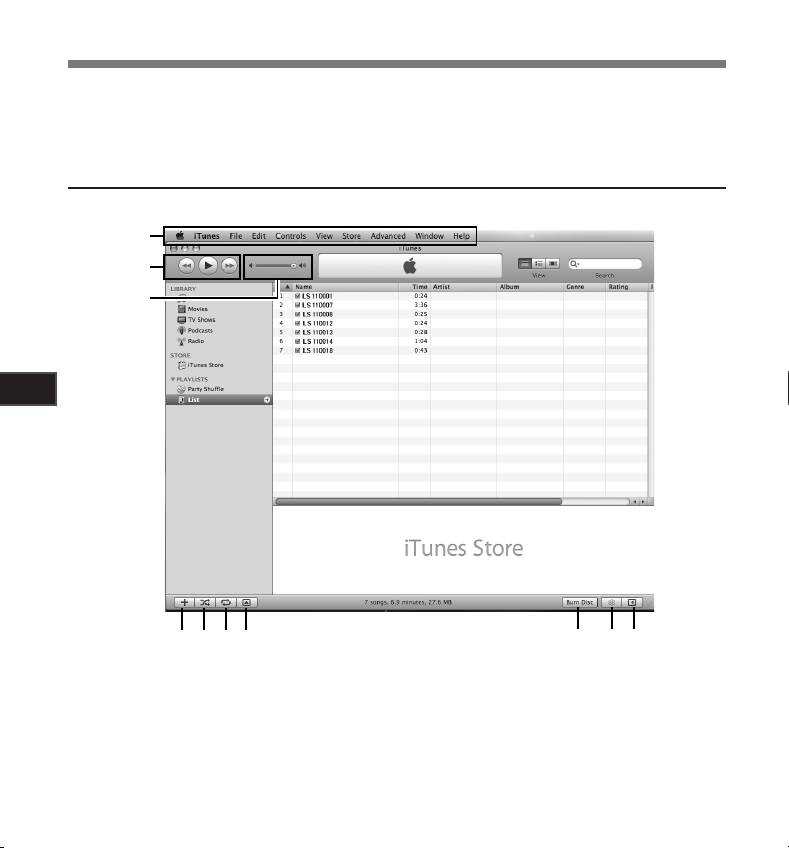
Using iTunes
Window Names
5
Using the Recorder on Your PC
1 Features taskbar
6 Repeat button
2 Rewind button/ Playback, Pause button/
7 Display change button
Fast Forward button
8 Disc create button
3 Volume slide
9 Genius button
4 Playlist addition button
0Genius side button
5 Shuffle button
72
1
2
3
4 5 67
8 9
0
By using iTunes, music files from music CDs or language study CDs can be imported to your PC (☞P.73) and
music files that you have bought from any music distribution sites can be easily transferred to the recorder to
play (☞P.74).The files recorded on the recorder can be transferred to your PC and can be copied to CD (☞P.75).
Using iTunes
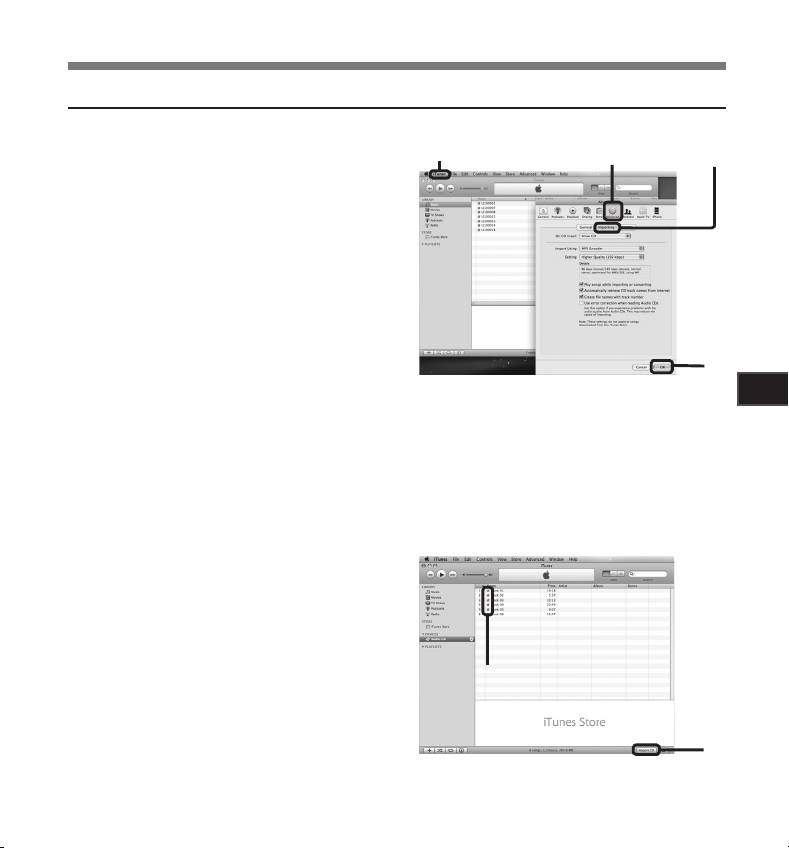
Copying Music from CD
Insert the CD into the CD-ROM
1
drive, and start iTunes.
1
3 4
Click [
iTunes
] { [
Preferences
].
2
Click [
Advanced
] tag.
3
Click [
Importing
] to set the file
4
format and bit rate for copying
music files to your PC, and click
4
[
OK
].
5
• This recorder is compatible with music files in the MP3 and WAV formats (☞ P.33).
Using the Recorder on Your PC
[Import Using]:
Set the file format for copying music file from a CD. Please select [MP3] or [WAV].
[Setting]:
Set the bit rate for copying music file from
a CD. You can select a bit rate between
[128], [160] and [192].
Put a check mark on the music
5
files that you want to copy.
Click [
Import CD
].
6
5
6
73
Using iTunes
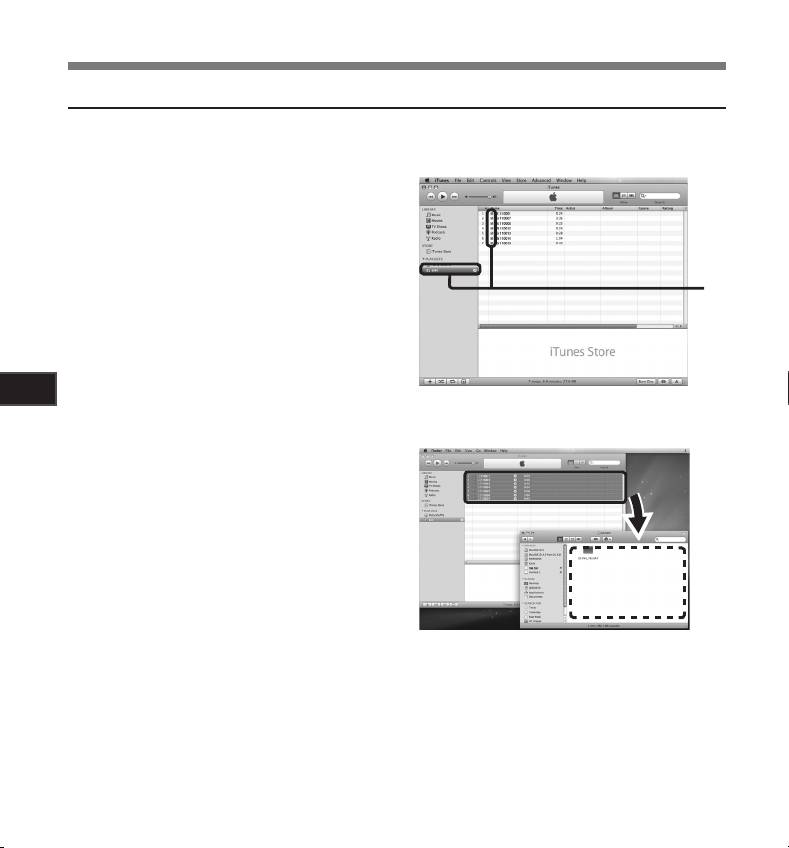
Transferring Music File to the Recorder
You can transfer the music files saved in your PC to this recorder. For how to copy the music files from
the CD to your PC, see “Copying Music from CD” (☞ P.73).
Connect the recorder to a PC, and
1
start iTunes.
Select the play list to be transferred
2
to the recorder, and put the check
marks on the music files that you
2
want to transfer.
• The order of music pieces can be changed
by Drag & Drop of the music file in the play
list displayed.
5
Using the Recorder on Your PC
Double-click the corresponding
3
drive with the recorder, and
open [
Music
] folder.
• When you connect the recorder to a Mac
OS, it will be recognized by the drive
name [LS_11] on the desktop. When an
SD card is inserted it will be recognized
by the drive name [Untitled].
• Copy to [Music] folder of the recorder
when transferring the music file.
Drag & Drop
• You can create up to 2 hierarchies in the
files here
[Music] folder. And up to 128 folders can
be made including [Music] folder.
• Up to 200 files can be stored in each
folder.
Select the desired files, and Drag & Drop them to [
Music
] folder.
4
74
Using iTunes
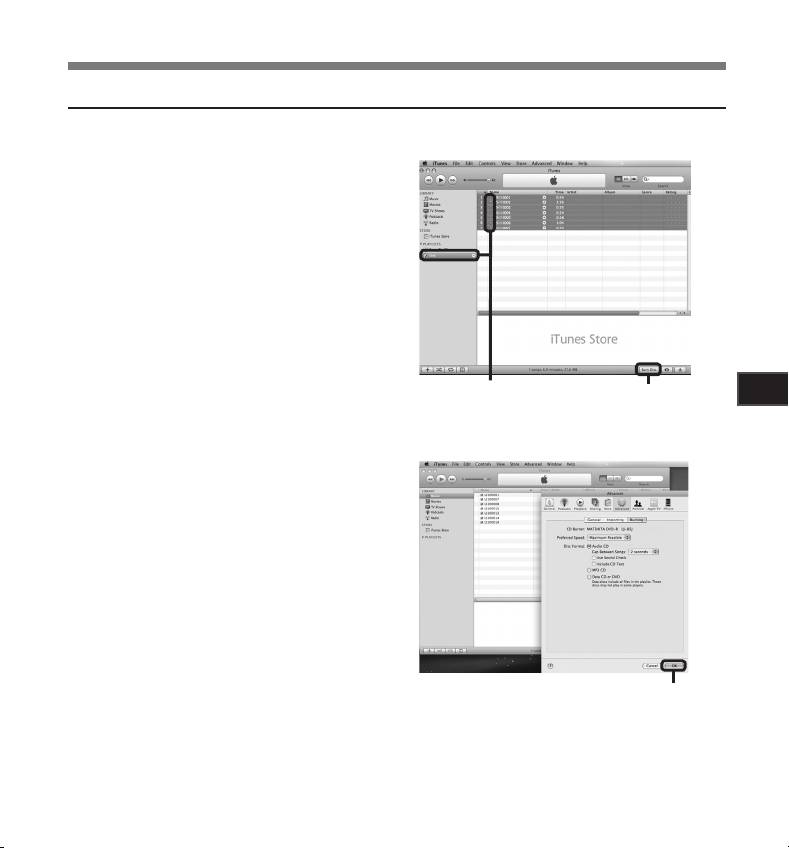
Copying Voice File to the CD
You can transfer the voice files in the recorder to your PC and copy them to CD. For how to copy the voice
files from the recorder to your PC, see “Transfer the Voice Files to Your PC” (☞ P.64).
Insert the CD-R/RW into the CD-
1
R/RW drive, and start iTunes.
Select the desired playlist, and
2
put a check mark on the voice
files to copy to the CD-R/RW.
Click [
Burn Disc
].
3
5
Using the Recorder on Your PC
2 3
To set the CD format for copying
4
voice files to CD-R/RW, and click
[
OK
].
When [Audio CD] is selected:
• A file is converted and copied in music CD
in order to play it by the audio equipment
which can play CD-R/RW.
When [MP3 CD] is selected:
• Copying in MP3 format.
When [Data CD] is selected:
• Copying files with the format to be
recorded.
4
75

Using as External Memory of the PC
In addition to its uses as an IC recorder and a
Note
music player, this recorder can also be used as
• While transmitting data, [Busy] is displayed,
external memory for a computer by storing data
and the [PEAK] indicator light flashes. NEVER
from a computer and reading it back out.
disconnect the USB while the [PEAK] indicator
With the recorder connected to your PC, you can
light is flashing. If you do, the data will be
download data from the memory to your PC and
destroyed.
upload data stored on your PC to the memory.
Windows
Connecting the recorder to your PC
1
(☞ P.62).
Open the Explorer window.
2
Open the [
LS_11
] folder.
3
• When you open [My Computer], it will
be recognized by the drive name [LS_11]
(Built-in flash memory) and [Removable
5
Disk] (SD card) (The drive letter will differ
Using the Recorder on Your PC
depending on the PC being used).
Copy the data.
4
Disconnect the USB connection cable
5
(☞ P.63).
Macintosh
Connecting the recorder to your PC
1
(☞ P.62).
• When you connect the recorder to a Mac
OS, it will be recognized by the drive name
[
LS_11
] on the desktop. When an SD card
is inserted it will be recognized by the drive
name [Untitled].
Double-click on [
LS_11
] icon on the
2
desktop.
Copy the data.
3
Disconnect the USB connection cable
4
(☞ P.63).
76
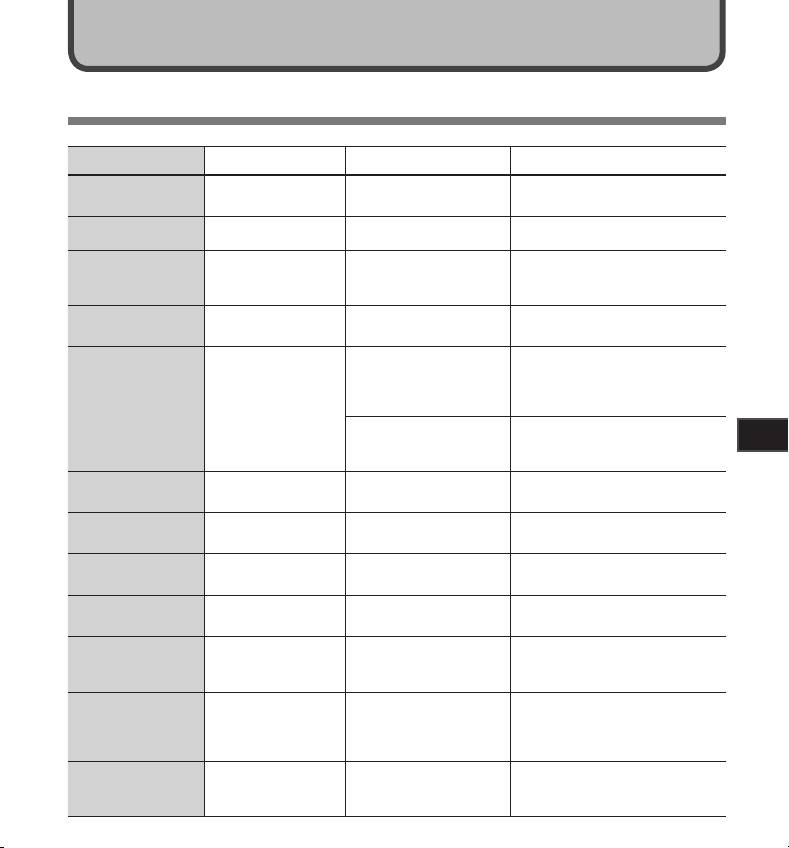
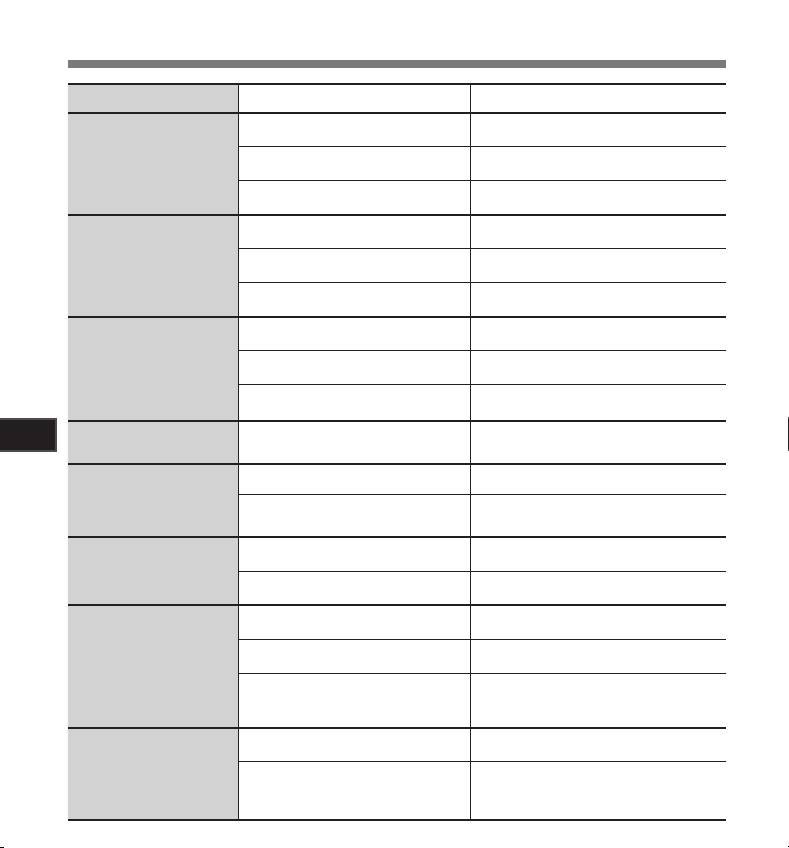
Other Information
Alarm Message List
Message Meaning Explanation Action
Battery power is getting
Battery Low Low battery power.
Replace with new batteries (☞ P.11).
low.
File Protected Erase-locked. Tried to delete a locked file.
Unlock the file (☞ P.41, P.47).
Recording has been
Select a folder from [
A
] through to
Can't record in this
Not an audio-recording
attempted with a [Music]
[
E
] and try recording again (☞ P.19
folder
folder.
folder.
to P.21, P.23).
The folder is full of files
Folder Full Folder full.
Erase unnecessary files (☞ P.38).
(maximum of 200 files).
This is a malfunction, so go to the
store where you purchased the
Error in the memory.
recorder or an Olympus service
station for repair (☞ P.80).
Memory Error Error in the memory.
Remove the SD card then put it
SD card is not recognized
6
again
correctly.
(☞ P.17 to P.18).
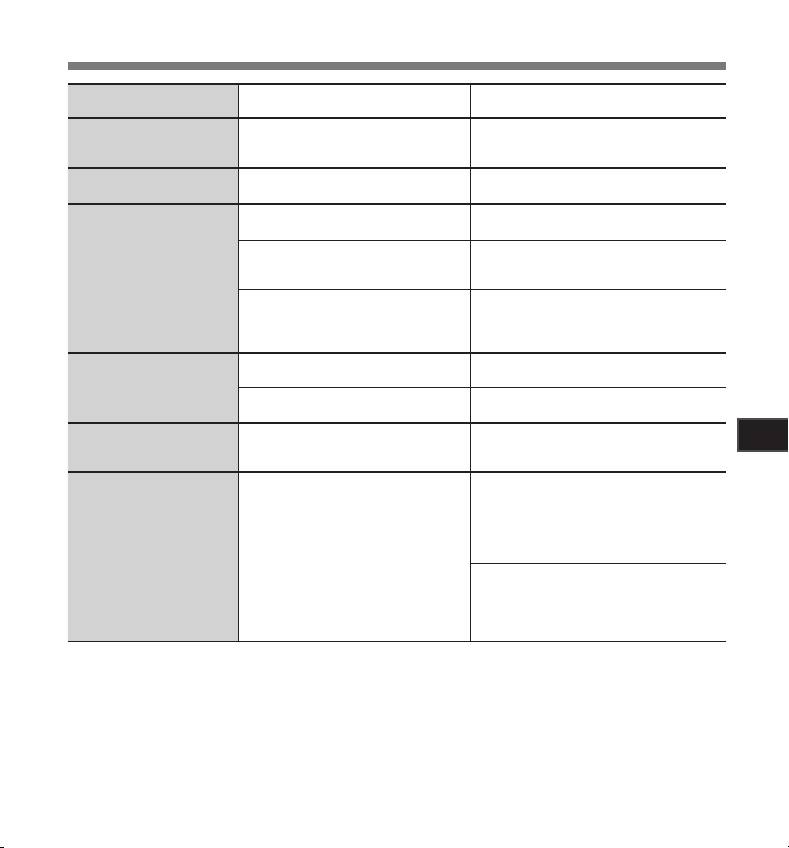
Other Information
The music files copied
Licence Mismatch Illegally copied file.
Erase the file (☞ P.38).
illegally.
Zero remaining
Memory Full
No remaining memory.
Erase unnecessary files (☞ P.38).
memory.
No files were found in the
Select another folder (☞ P.19 to
No File No file.
folder.
P.21).
The SD Card is set to write
Undo the SD Card’s write protection
SD Card Locked Card Locked.
protection.
setting and then try again (☞ P.18).
There was an error while
Format Error Formatting error.
formatting the recorder’s
Reformat the memory (☞ P.51).
memory.
Can’t make the
The file for management
system file. Connect
The management file
cannot be created due to
Connect the recorder to a computer
to PC and delete
cannot be created.
a shortage of capacity for
and delete any unnecessary files.
unnecessary file
remaining memory.
The data is not
Data writing to memory
Data Write Error
written correctly in the
cannot be done in time and
Format the memory (☞ P.51).
memory.
the recorded sound skips.
77
Troubleshooting
Symptom Probable cause Action
Verify that the batteries’ polarities = and
The batteries are not loaded properly.
- are correct (☞ P.11).
Not hing ap p ear s on t h e
Battery power is getting low.
Replace with new batteries (☞ P.11).
display
The power is off.
Turn the power on (☞ P.13).
Battery power is getting low.
Replace with new batteries (☞ P.11).
Won’t start
The power is off.
Turn the power on (☞ P.13).
The recorder is in HOLD mode.
Release the recorder from HOLD (☞ P.13).
Low remaining memory.
Erase unnecessary files (☞ P.38).
The maximum number of files has
Change to the another folder
Unable to record
been reached.
(☞ P.19 to P.21, P.23).
Undo the SD Card’s write protection setting
The SD Card is set to write protection.
and then try again (☞ P.18).
Detach all external microphones and
No sound picked up by the
An external microphone or external
6
external devices connected to the LINE IN
built-in microphone
device is connected.
jack and the MIC jack (☞ P.30, P.31).
Other Information
An external device is connected to the
Detach the connecting cord from the
LINE IN jack.
recorder.
Unable to record through an
external microphone
An external microphone supported by
Set [Plug-inPower] to [On] when an
plug-in power is connected but [Plug-in
external microphone supported by plug-in
Power] is set to [Off].
power is connected
(☞ P.41, P.44).
Unplug the earphones to use the internal
The earphone is connected.
speaker.
No playback tone heard
The volume level is set to [0].
Adjust the volume level (☞ P.32).
The recording level has not been ad-
Adjust the recording level and then try
justed.
recording once more (☞ P.26).
Set the microphone sensitivity to [HIGH]
The microphone sensitivity is too low.
mode and try again (☞ P.27).
Recording level too low
If you cannot record clearly even after
This could potentially be because the
adjusting the recording level, then adjust the
recording level and output level for the
output level for the connected devices
connected external devices are too low.
(☞ P.23).
The recording level has not been ad-
Adjust the recording level and then try
justed.
recording once more (☞ P.23).
Recording level too high
If you cannot record clearly even after
This could potentially be because the
adjusting the recording level, then adjust the
recording level and output level for con-
output level for the connected devices
nected external devices are too high.
(☞ P.23).
78
Troubleshooting
Symptom Probable cause Action
When recording while an external monaural
Voice files are not recorded
The connected external microphone is
microphone is connected, sound will only be
in stereo
monaural.
recorded by the L-channel.
Cannot find the recorded
Switch to the correct recording media or
Wrong recording media or folder.
Voice File
folder (☞ P.19 to P.20, P.23, P.41, P.46).
The recorder was shaken during record-
--------
ing.
The recorder was placed near a cell
phone or fluorescent lamp while recording
Move the recorder.
Noise heard during playback
or during playback.
When a microphone not supported by the
The settings of the connected external
plug-in power function is connected, turn
microphone do not correspond to those
the [Plug-inPower] setting to [Off] (☞ P.41,
of the recorder.
P.44).
The file is locked.
Unlock the file (☞ P.41, P.47).
Unable to erase
Cancel the read-only setting of the file on
The file is read-only.
the PC.
Unable to hear any sound
Turn the [Rec Monitor] setting to [On]
6
from the earphone through
The [Rec Monitor] is set to [Off].
(☞ P.41, P.44).
Other Information
the recording monitor
When the built-in speaker amps and the
like are connected there is a risk that audio
feedback will occur while recording. It is
recommended that you use earphones for the
recording monitor, or turn the [Rec Monitor] to
Noise is audible through the
[Off] while recording (☞ P.41, P.44).
Acoustic feedback is occurring.
recording monitor
Conduct adjustments like separating the
earphones from the microphone farther, do
not point the microphone at the earphones,
lower the volume on the recording monitor,
and so on.
79

Technical Assistance and Support
The following are contact information for technical support for Olympus recorders and software only.
s Technical Hotline Number in the U.S. and Canada
1-888-553-4448
s User Support E-mail address in the U.S. and Canada
distec@olympus.com
s Technical Hotline Number in Europe
Toll free number: 00800 67 10 83 00
available for Austria, Belgium, Denmark, Finland,
France, Germany, Italy, Luxemburg, Netherlands,
Norway, Portugal, Spain, Sweden, Switzerland,
United Kingdom
Charged numbers for the Rest of Europe
+ 49 180 567 1083
+ 49 40 23773 4899
s User Support E-mail address in Europe
dss.support@olympus-europa.com
6
Other Information
80


