Olympus LS-11 – page 3
Manual for Olympus LS-11

Menu Setting
Menu Setting Method
Items in menus are categorized by tabs, so select
a tab first and move to a desired item to quickly set
Press the `/
OK
or 9 button to move
it. You can set each menu item as follows.
3
the cursor to the item to set.
2 3 button
9 0 button
`/
OK
button
MENU
button
Press the 2 or 3 button to move to
4
the item you want to set.
4
Menu Setting
While the recorder is during stop
1
mode, press the
MENU
button.
The menu will appear on
the display
Press the `/
OK
or 9 button.
5
• Menu items can be set during a recording
or playback (☞ P.50).
Press the 2 or 3 button to move to the
2
tab that contains the item you want to
set.
• Moves to the setting of the selected item
• You can change the menu display by
moving the settings tab cursor.
41
Menu Setting Method
Press the 2 or 3 button to change the
Notes
6
setting.
• The recorder will stop if you leave it idle for 3
minutes during a menu setup operation, when
a selected item is not applied.
• When entering menu settings during recording
or playback, the menu settings will be cancelled
if 8 seconds elapse with no buttons being
pressed.
Press the `/
OK
button to complete the
7
setting.
4
Menu Setting
• You will be informed that the settings have been
established via the screen.
• Pressing the 0 button without pressing the
`/OK button will cancel the settings and return
you to the previous screen.
Press the
MENU
button to close the
8
menu screen.
• When in the menu screen during recording
or playback, pressing the 0 or MENU but-
ton will allow you to return to the playback
screen without interrupting recording or
playback.
42

Menu Setting Method
4 Rec Menu
The recorder can record in the linear PCM format. High resolution recording at a high
Rec Mode
sampling rate and high bit rate equivalent or superior to that of a music CD is possible.
Moreover, it also supports the MP3 and WMA formats.
1. Select the recording format.
Setting:
[PCM]:
This is an uncompressed audio format which is used for music CDs and the like.
[MP3]: MPEG is the international standard established by a working group of the
ISO (International Organization for Standardization).
[WMA]: This is an audio compression encoding method that was developed by
the Microsoft Corporation in the US.
2. Select the recording rate.
Setting:
[PCM]: [96kHz/24bit] to [44.1kHz/mono]
[MP3]: [320kbps] to [mono]
[WMA]: [160kbps] to [mono]
• When the recording format is set to the MP3 or WMA formats, the sampling rate will
be encoded and processed at 44.1 kHz.
• When a high recording rate setting is used the file capacity will increase. Make sure
that the amount of memory remaining is sufficient before recording (☞ P.46).
4
• If the directional microphone function is used, you cannot change [If the directional microphone function is used, you cannot change [PCM] setting in [Rec Mode]
Menu Setting
other than [44.1kHz/16 bit]. You use the all modes in [MP3] or [WMA] of [Rec Mode].
• When [mono] of [MP3] is selected, the recording rate will be set to 64kbps.
• When [When [mono] of [WMA] is selected, the recording rate will be set to 32kbps.
Rec Level
You can configure whether to adjust the recording level automatically or to adjust it manually.
1. Select the Recording level setting.
Setting:
[Manual]:
Recording is performed by manually adjusting the recording level.
When
[Rec Level] is set to [Manual] you can configure the limiter function.
[Auto]: Recording is performed by automatically adjusting the recording level. This is
useful for when you will be recording right away.
2. Select the Limiter setting.
This recorder is equipped with a limiter function that corrects the recording level
down to an appropriate range in cases where a loud noise is suddenly picked up.
This prevents distortion caused by an excessive recording level.
Setting:
[Limiter On]: Enables the limiter function, thus preventing distortion when recording.
[Limiter Off]: Disables this function.
•
When [Rec Level] is set to [Auto] the recording level will be adjusted automatically. Set [Rec Level]
to [Manual] when using the recording level adjustment function and the limiter function.
The directional microphone function utilizes DiMAGIC’s (DiMAGIC Co., Ltd.) DiMAGIC
Zoom Mic
Virtual Microphone (DVM) technology. DVM is an audio pickup system which allows you
to record by focusing on sound from any direction. From expansive stereo recording
to high directivity recording, DVM represents the latest in directional control methods
that allow you to switch to a single exclusive microphone.
Setting:
[Off]: Disables this function. Disables this function.Disables this function.
[Wide]: Recording by an expansive stereo sound. Recording by an expansive stereo sound.
[Standard]:
Recording by the natural stereo sound which has no medium getting away.
[Narrow]: Recording by a directivity stereo sound. Recording by a directivity stereo sound.Recording by a directivity stereo sound.
[Zoom]: Recording with monaural, however you can record high directivity sound. Recording with monaural, however you can record high directivity sound.Recording with monaural, however you can record high directivity sound.
• The directional microphone function has been designed so that this capability will be
elicited only with the built-in stereo microphone. Please note that the recorder will become
unable to record normally when using other commercially available microphones.
• You can use directional microphone only when [PCM] setting in [Rec Mode] is set to
[44.1kHz/16 bit].
43

Menu Setting Method
4 Rec Menu (Continued)
Select whether or not to output audio while recording from the earphone jack.
Rec Monitor
Setting:
[On]: Enables the recording monitor function. Sound will be output from the
EAR jack.
[Off]: Disables this function. Sound will not be output from the EAR jack.
• When the external speaker is connected while recording, there is a risk that audio
feedback will occur. It is recommended that you use earphones for the recording
monitor, or turn [Rec Monitor] to [Off] while recording (☞ P.27).
• When [Rec Monitor] is set to [Off] no sound will come out of the earphones while you are
recording (☞ P.27).
External microphones which are supported by plug in power can also be used. Whether
Plug-inPower
or not to supply power to external microphones can be configured.
4
Setting:
Menu Setting
[On]: When the plug-in power function is activated, power will be supplied to
the connected external microphone. Select this when external microphones
supported by plug-in power are connected (☞ P.30).
[Off]: Disables this function. Select this when external microphones not supported
by plug-in power are connected.
• Turn the plug-in power function to [Off] when an external microphone not supported
by plug-in power is connected, as there is the risk that noise may be generated while
recording.
•
Phantom power cannot be supplied, even when the plug in power function is set to [On].
Voice sync recording starts when a voice louder than the voice sync level (detection
V-Sync. Rec
level) is detected. When the voice becomes quiet, recording is automatically stopped.
When voice sync recording is on and the voice is below the voice sync level (detection
level) for longer than the specified detection time, the recorder stops.
Setting:
[On]: [1 second] [2 seconds] [3 seconds] [4 seconds] [5 seconds] [10 seconds]:
Sets the detection time. If the input (recording level) is equal to or below
the specified level for longer than the specified detection time, the recorder
stops.
[Off]: Disables this function.
44

Menu Setting Method
4 Play Menu
There are six play modes. You can select whether to play by file or folder, or all files
Play Mode
stored in the recorder.
Setting:
[File]: Stop after playing back the current file.
[File Repeat]: Play the current file repeatedly.
[Folder]: Play files continuously in the current folder until the last file and stop.
[Folder Repeat]: Play all files in the current folder continuously.
[All]: Play all files in the selected memory continuously and stop.
[All Repeat]: Play all files in the selected memory continuously and repeatedly.
• In [File] mode, when the recorder comes to the end of the last file in the folder, [End] flashes
for two seconds on the display and the recorder stops at the start of the last file.
• In [Folder] mode, when the recorder comes to the end of the last file in the folder, [End]
flashes for two seconds on the display and the recorder stops at the start of the first file
in the folder.
• In [All] mode, after playing the last file in the folder, the recorder will start playing from the
first file in the next folder. When it comes to the end of the last file in the recorder, [End]
flashes for two seconds on the display and the recorder stops at the start of the first file
4
in the recorder.
Menu Setting
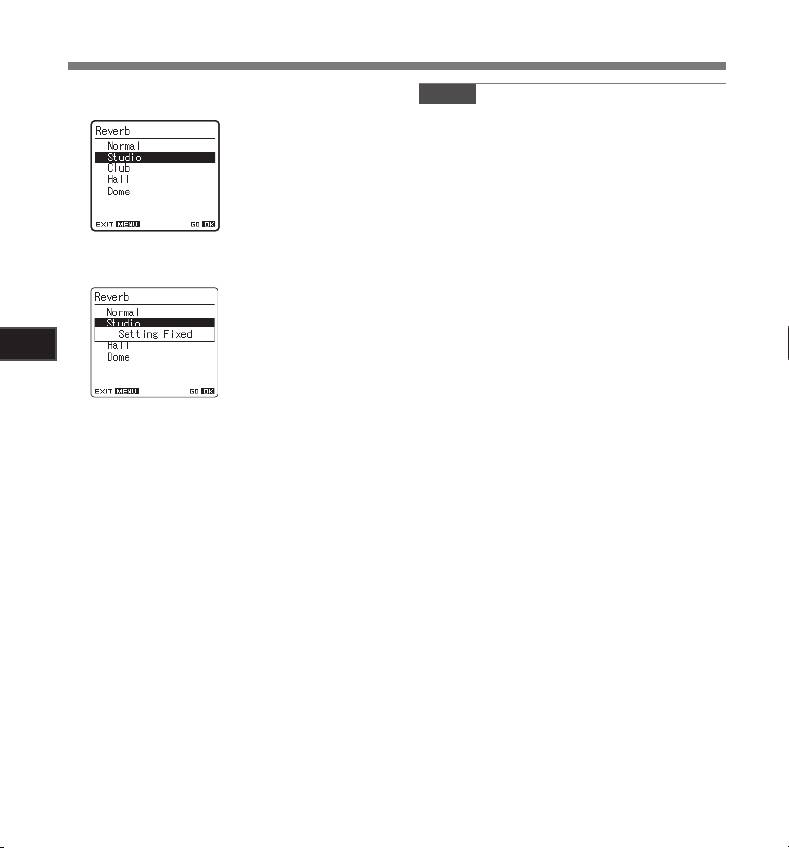
You can enjoy the reverberant sound of various space sizes such as from
Reverb
the recording studio to the dome.
Setting:
[Normal]: Disables the reverb function. Select this when playing back original
sounds as they are.
[Studio] [Club] [Hall] [Dome]: Select the preferred acoustical environment.
• When playing back WAV format files using these playback results, the sampling rate
and bit rate will be converted downward from 96 kHz to 48 kHz and 24 bit to 16 bit,
respectively.
• This function is only available during playback. This recorder cannot perform
recording by using the playback results.
• When you adjust the various sound quality settings related to playback on the
recorder, the audio output signal sent out from the EAR jack will change as well.
This recorder is equipped with “EUPHONY MOBILE”, the latest in surround sound systems
EUPHONY
which combines bandwidth correction, expansion technology, and virtual acoustical
source processing technology. In addition to its natural, expansive feel, the recorder is
equipped with the exceptional feature wherein listeners are less prone to developing
an compressed or closed-in feel, or to growing tired over extended listening. On top of
this, listeners are less prone to developing an oppressed or closed-in feel, or to growing
tired over extended listening. Level adjustments of the [EUPHONY] setting can be set
to four stages according to preference.
Setting:
[Normal]: Disables this function. Select this when playing back original sounds
as they are.
[Natural]: This mode achieves natural bandwidth correction and acousticalThis mode achieves natural bandwidth correction and acoustical
field expansion.
[Wide]: This mode has an even more expansive feel. This mode has an even more expansive feel.
[Power]: This mode focuses more on lower sound registers. This mode focuses more on lower sound registers.
• When playing back WAV format files using these playback results, the sampling rate and
bit rate will be converted downward from 96 kHz to 48 kHz, 88.2kHz to 44.1kHz and 24 bit
to 16 bit, respectively.
• This function is only available during playback. This recorder cannot perform
recording by using the playback results.
• When you adjust the various sound quality settings related to playback on the
recorder, the audio output signal sent out from the EAR jack will change as well.
45
Menu Setting Method
4 LCD/Sound Menu
The display will remain lit for about 10 (Initial setting) seconds when a button on the
Backlight
recorder is pressed.
Setting:
[5 seconds] [10 seconds] [30 seconds] [60 seconds] [Always on]:
Set the length of time that the backlight will remain lit.
[Off]: Disables this function. The backlight will not light up.
Display contrast can be adjusted in 12 levels.
Contrast
Setting:
You can adjust the LCD display contrast level from [01] to [12].
You can set it so the LED indicator light does not turn on.
LED
Setting:
[On]: LED light will be set.
[Off]: Disables this function. LED light will be cancelled.
You can select the display language for this recorder.
4
Language
Setting
Menu Setting
[English] [Français] [Deutsch] [Italiano] [Español] [Русский]
• The selectable language differs depending on the region.
4 Memory Menu
When an SD Card is inserted you can select to record to either the built-in flash memory
MemorySelect
or to the SD Card (☞ P.14).
Setting:
[Built-in Memory]: Built-in flash memory.
[SD Card]: SD Card.
• When attempting to perform operations such as rewriting the contents of an SD Card
in cases where the card has been write protected, [SD Card Locked] will appear. The
playback operation can be performed, but the write protection must first be turned
off when overwriting the contents on the card (☞ P.18).
The recordable capacity remaining and overall capacity of the recording media can
Memory Info.
seen from the menu screen.
• When no SD Card is inserted only information for the built-in flash memory will
seen.
• The domain area which uses the administrative files which the recorder uses is
included in the remaining capacity for the recording media. For SD cards in particular,
in addition to this administrative domain the administrative domain area for the SD
card is added in as well. Owing to this, the remaining capacity will be displayed as
less than the card’s specified capacity, yet this is not abnormal.
Format
(☞ P.51)
46
Menu Setting Method
4 Others
Locking a file keeps important data from being accidentally erased. Locked files are
Lock
not erased when you select to erase all files from a folder (☞ P.38).
Setting:
[On]: Locks the file and prevents it from being erased.
[Off]: Disables this function. Unlocks the file and allows it to be erased.
• Select the files to be locked in advance before operating the menu.
• When attempting to perform operations such as rewriting the contents of an SD Card
in cases where the card has been write protected, [SD Card Locked] will appear. The
playback operation can be performed, but the write protection must first be turned
off when overwriting the contents on the card (☞ P.18).
Replace
(☞ P.54)
File Move
(☞ P.56)
4
Menu Setting
File Divide
(☞ P.59)
Forgetting to turn the power off can be prevented. If the recorder remains in stop
AutoPowerOff
mode for over 10 minutes (Initial setting) while the power is turned on, the power will
be turned off.
Setting:
[5 minutes] [10 minutes] [30 minutes] [60 minutes]: Set the length of time before
the power will be turned off.
[Off]: Disables this function.
• If any button is pressed, the elapsed time count before the power turns off will start
over again.
There are two USB settings when connecting the recorder to a computer using the sup-
USB Settings
plied USB cable. [Storage Class] is used when using the recorder as an external storage
device. [Audio Class] is used when using the recorder as a USB microphone.
Setting:
[Storage Class]: The recorder is recognized as an external storage
device by the computer.
[Audio Class]: Use this setting when connecting the recorder to a
computer as a USB microphone.
Time & Date
(☞ P.15)
47

Menu Setting Method
4 Others (Continued)
When functions are registered in the Fn button, each time the Fn button is pressed, you
Fn Setting
can set or change the menu of registered function.
Setting:
[Off]: No functions will be allocated to the button.
[Index] (☞ P.35) [Rec Mode] (☞ P.43)
[Rec Level]: (☞ P.43) [Zoom Mic] (☞ P.43)
[Play Mode] (☞ P.45) [Reverb] (☞ P.45)
[EUPHONY] (☞ P.45) [MemorySelect] (☞ P.46)
[Property] (☞ P.49) [Light] (☞ P.46)
To call up a registered function:
When the Fn button is pressed, menu setting display of registered function
will appear:
[Rec Mode]: [PCM] [MP3] [WMA]: The recording rate can be configured
for each file format.
[Rec Level]: [Manual] [Auto]: You can configure whether to adjust the
4
recording level automatically or to adjust it manually. When
Menu Setting
the [Rec Level] is set to [Manual] you can configure the limiter
function.
[Zoom Mic]: [Off] [Wide] [Standard] [Narrow] [Zoom]
[Play Mode]: [File] [File Repeat] [Folder] [Folder Repeat] [All]
[All Repeat]
[Reverb]: [Normal] [Studio] [Club] [Hall] [Dome]
[EUPHONY]: [Normal] [Natural] [Wide] [Power]
[MemorySelect]: [Built-in Memory] [SD card]
[Property]: File and folder information can be confirmed from the menu
screen.
Each time the Fn button is pressed, the setting of registered function is changed:
[Light]: [On] [Off]: Select backlight on or off by pressing the Fn
button.
If the Fn button is pressed during recording or playback, the registered function
is performed:
[Index]: With each press of the Fn button, an index mark or temp
mark is added.
• When the registered function is [Rec Mode], [MemorySelect], or [Property], these
will not function if the Fn button is pressed during recording or playback. While the
recorder is during stop mode, press the Fn button.
48

Menu Setting Method
4 Others (Continued)
This returns the functions back to their initial settings (factory default).
Menu Reset
Setting:
[Start]: Returns the settings to their initial values.
[Cancel]: Takes you back to the [Others].
• After resetting the settings, the time settings and file numbers will be preserved from
before the reset and will not return to their initial settings.
Menu settings after setting reset (initial settings):
4 Rec Menu
4 LCD/Sound Menuu
[Rec Mode]
[Backlight] [10 seconds]
Recording format [
PCM]
[Contrast] [06]
Recording rate [
44.1kHz/16bit]
[LED] [On]
[Rec Level]
4 Memory Menuu
Recording level [
Manual]
[MemorySelect] [Built-in Memory]
Limiter function [
Limiter On]
4
4 Others
[Zoom Mic] [Off]
Menu Setting
[AutoPowerOff] [10 minutes]
[Rec Monitor] [On]
[USB Settings] [Storage]
[Plug-inPower] [On]
[Fn Setting] [Off]
[V-Sync. Rec] [Off]
4 Play Menuu
[Play Mode] [File]
[Reverb] [Normal]
[EUPHONY] [Normal]
You can check the recorder’s information on the menu screen. [Model Name], [Version]
System Info.
and [Serial Number] appears on the display.
File and folder information can be confirmed from the menu screen.
Property
When the file is selected: [Name] [Date] [Size] [Length] and [File Format] will
appear on the display.
When the folder is selected: [Name] and [Date] will appear on the display.
• Select the files for which you would like to confirm information in advance before
operating the menu.
49
4
Menu Setting
50
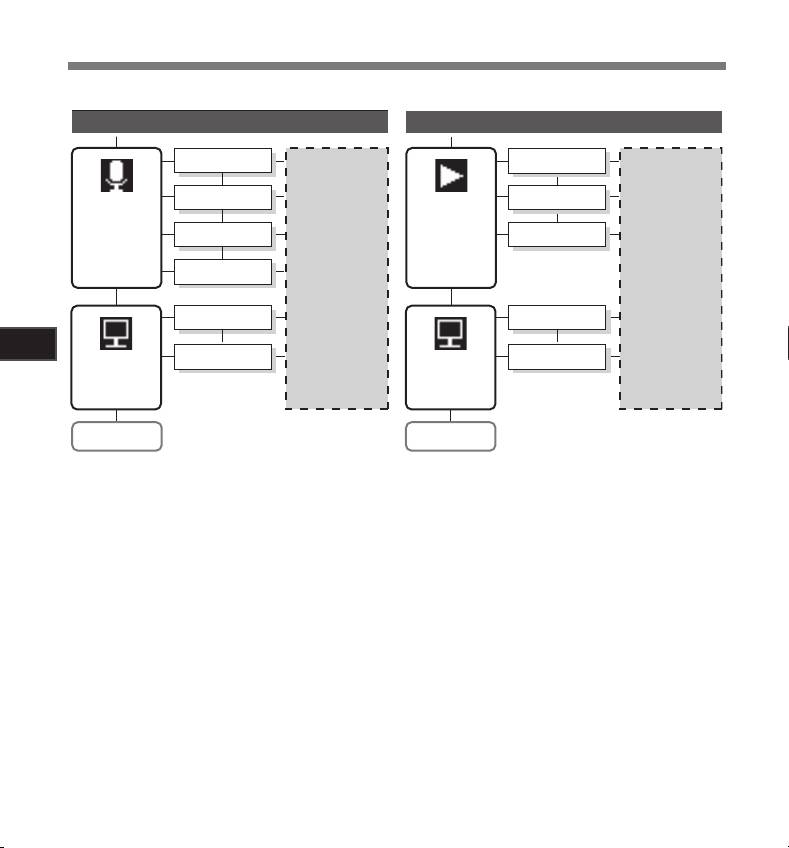
hSetting menu during recording hSetting menu during playback
SettingTab Function SettingTab Function
Rec Level
Play Mode
Zoom Mic
Reverb
Rec
Play
Menu
Rec Monitor
Menu
EUPHONY
To menu item
To menu item
Plug-inPower
options
options
Backlight
Backlight
LED
LED
LCD/
LCD/
Sound
Sound
Menu
Menu
Rec Menu Play Menu
Menu Setting Method
Menu Setting Method
Press the `/
OK
or 9 button to move
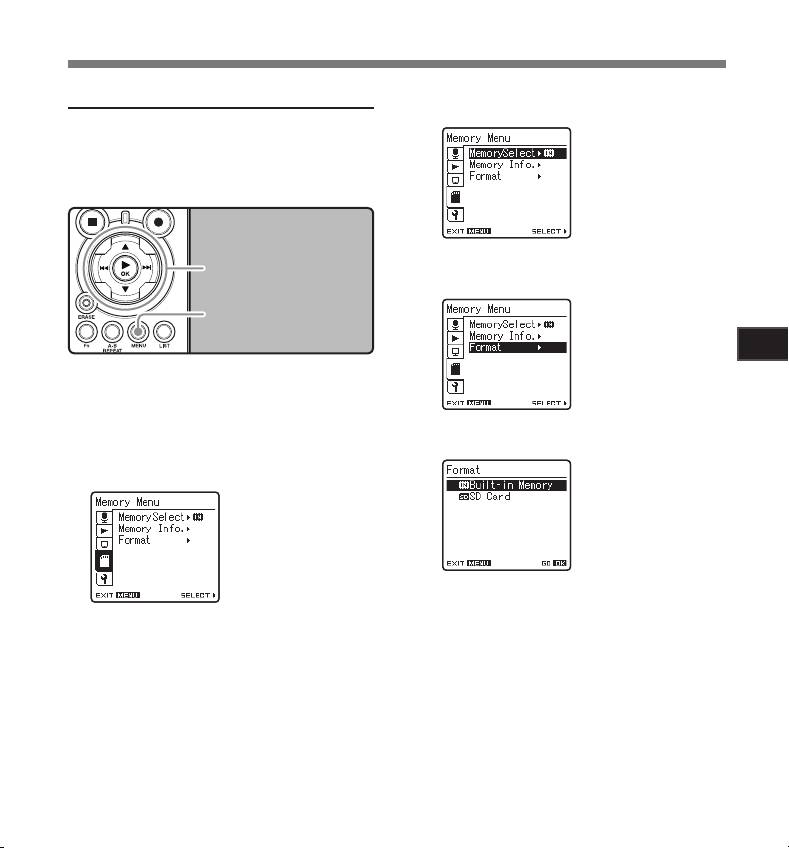
Formatting the Recorder [Format]
3
the cursor to the item to set.
If you format the recorder, all files will be removed
[Memory Menu] will
and all function settings will return to defaults
appear on the display
except date and time settings. Transfer any
important files to a computer before formatting
the recorder.
2 3 button
Press the 2 or 3 button to select
9 0 button
4
[
Format
].
`/
OK
button
MENU
button
4
Menu Setting
While the recorder is during stop
1
mode, press the
MENU
button.
• The menu will appear on the display (☞
P.41).
Press the `/
OK
or 9 button.
5
Press the 2 or 3 button to select
[Format] will appear
2
[
Memory Menu
] tab.
on the display
Press the 2 or 3 button to select the
6
recording media to format.
• You can change the menu display by
• When formatting an SD Card, cancel the
moving the settings tab cursor.
write protection function before inserting
the card into the recorder (☞ P.18).
51
Menu Setting Method
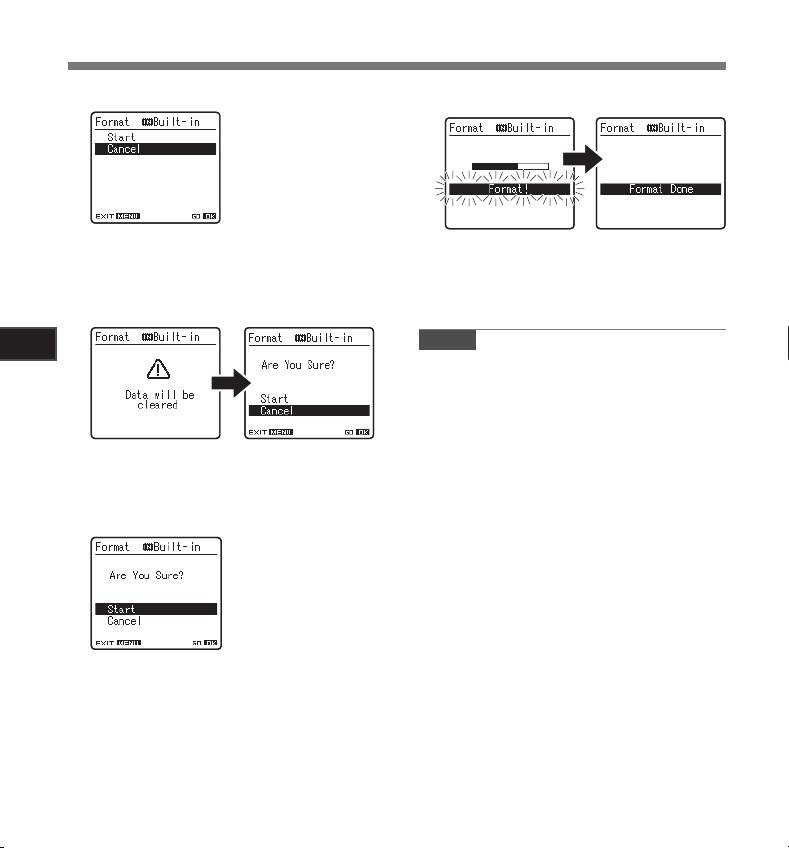
Press the `/
OK
button.
Press the `/
OK
button.
7
11
[Cancel] will appear on
the display
Press the 2 button to select [
Start
].
• Formatting begins and [Format !] flashes
8
on the display.
• [Format Done] appears when formatting
ends.
Press the `/
OK
button.
9
Notes
4
• When an SD Card is inserted in the recorder,
Menu Setting
be sure to confirm the recording media as either
[Built-in Memory] or [SD Card] so that there is
no mistake (☞ P.41, P.46).
• When attempting to perform operations such as
rewriting the contents of an SD Card in cases
• After the [Data will be cleared] message is
where the card has been write protected, [SD
on for two seconds, [Cancel] will turn on.
Card Locked] will appear. The playback opera-
tion can be performed, but the write protection
Press the 2 button again to select
must first be turned off when overwriting the
10
[
Start
].
contents on the card (☞ P.18).
• Never perform operations such as the following
while processing, as they may damage the
data. In addition, replace the batteries with two
new ones in order to ensure that the batteries
will not run out while processing.
1 Turning off the power while processing.
2 Removing the batteries while processing.
3 Remove the SD Card during processing
when [SD Card] is being used as the record-
ing media.
Performing any of these operations may dam-
age the data.
• Never format the recorder from a PC.
• Once the recorder is formatted, the music files
with DRM may not be transferred to the recorder
again.
52

Menu Setting Method
• When the recorder is formatted, all the saved
data, including locked files and read-only files,
are erased.
• After formatting, recorded audio file names may
start from [0001].
• When returning the settings for the functions
to their initial settings, use [Menu Reset]
(☞ P.41, P.49).
• Formatting on the recorder will be Quick
Format. If you format the SD card, information
of file management is refreshed and the data
inside the SD card is not deleted completely.
When handing over and disposing the SD card,
be careful about the data leakage from the
SD card. We recommend the SD card to be
destroyed when you dispose the SD card.
4
Menu Setting
53
Menu Setting Method
Press the `/
OK
or 9 button to move
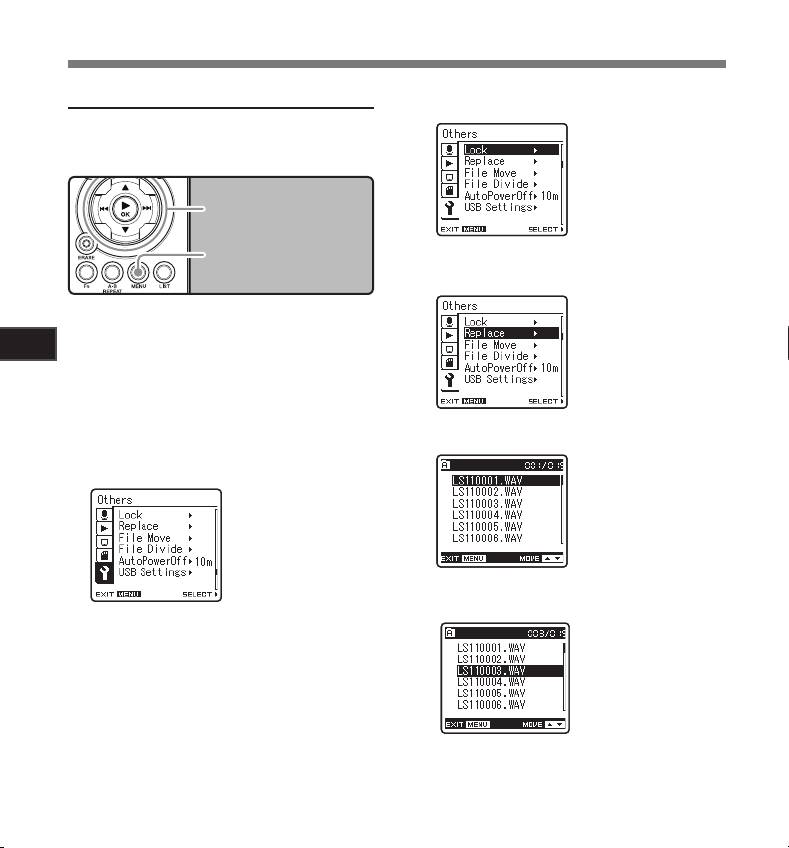
Rearranging files [Replace]
4
the cursor to the item to set.
You can move a file in a folder to change the order
[Others] will appear on
of playback. First select the folder (file) for which
the display.
you want to change the playback order.
2 3 button
9 0 button
`/
OK
button
MENU
button
Press the 2 or 3 button to select
5
[
Replace
].
Select the folder for which you would
1
like to rearrange the song order (☞
4
P.17 to P.21).
Menu Setting
While the recorder is during stop
2
mode, press the
MENU
button.
• The menu will appear on the display (☞
P.41).
Press the `/
OK
or 9 button.
6
Press the 2 or 3 button to select
3
[
Others
] tab.
Press the 2 or 3 button to select the
7
file you want to move.
• You can change the menu display by mov-
ing the settings tab cursor.
54
Menu Setting Method
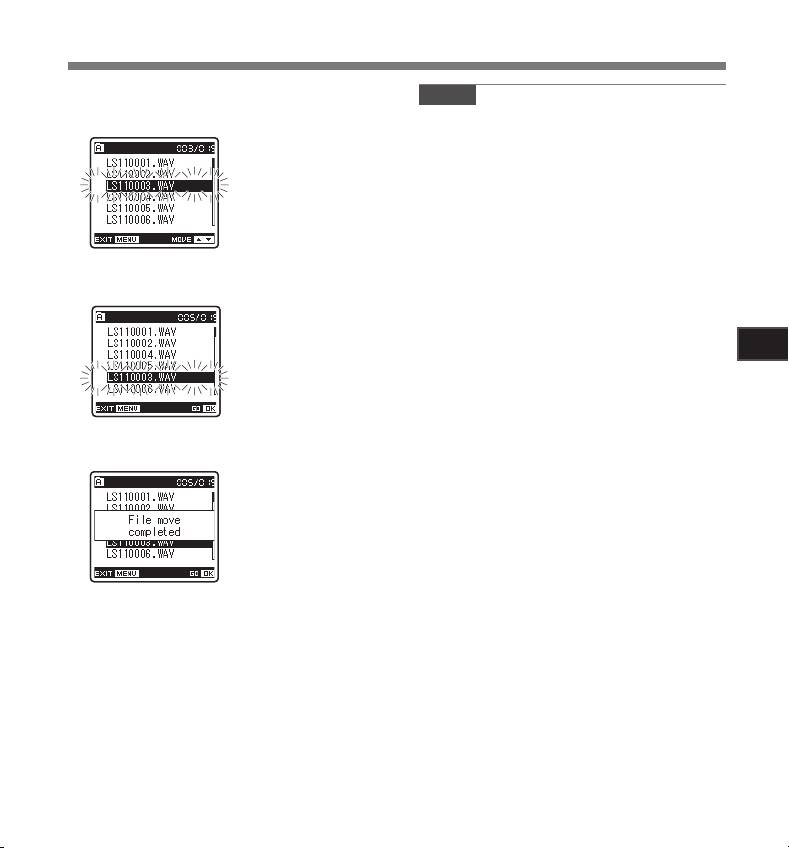
Press the `/
OK
or 9 button.
Note
8
• The cursor will flash to confirm that the file
• When attempting to perform operations such as
can be moved.
rewriting the contents of an SD Card in cases
where the card has been write protected, [SD
Card Locked] will appear. The playback opera-
tion can be performed, but the write protection
must first be turned off when overwriting the
contents on the card (☞ P.18).
Press the 2 or 3 button to select the
9
location to move it to.
4
Menu Setting
Press the `/
OK
button to complete the
10
setting.
• If there are more files to move, repeat Steps
7 through 10.
• Pressing the 0 button without pressing
the `/OK button will cancel the settings and
return you to the previous screen.
Press the
MENU
button to close the
11
menu screen.
55
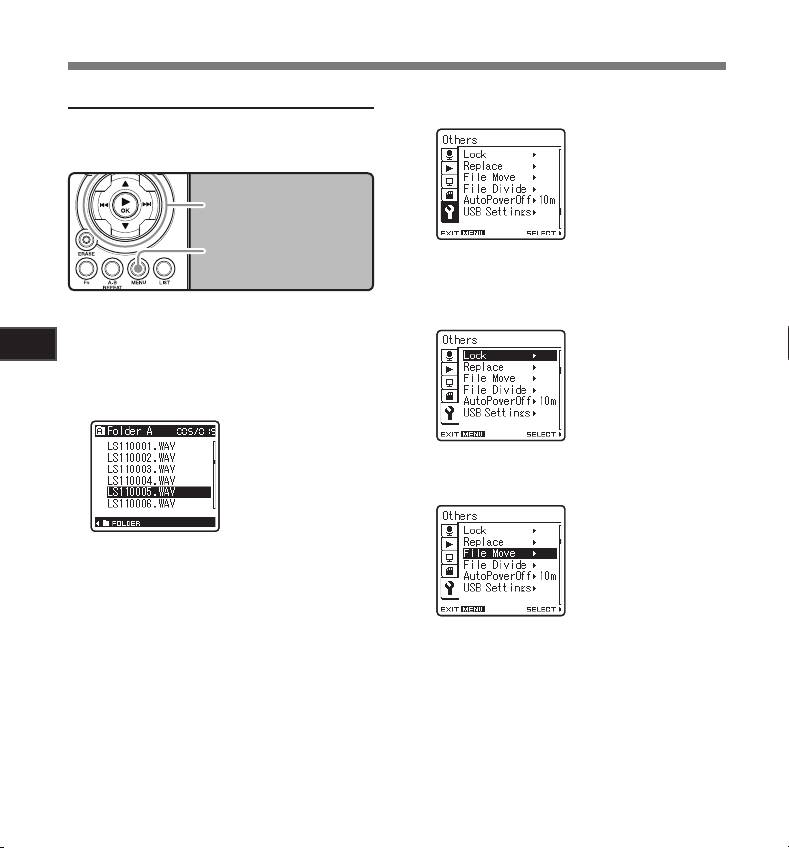
Menu Setting Method]
Press the 2 or 3 button to select
Moving Files [File Move]
4
[
Others
] tab.
Files saved in the built-in memory or the SD card
can be moved or copied within the memory. Files
can also be moved or copied between memory.
2 3 button
9 0 button
`/
OK
button
MENU
button
• You can change the menu display by mov-
ing the settings tab cursor.
Press the `/
OK
or 9 button to move
Select the folder where the file you
5
the cursor to the item to set.
1
want to move or copy is saved.
4
[Others] will appear on
Menu Setting
In the File list display, press the 2 or
the display
2
3 button to select the file you want to
move or copy.
Press the 2 or 3 button to select
6
[
File Move
].
• In the File display, press theIn the File display, press the 9 or 0
button to select a file.
While the recorder is during stop
3
mode, press the
MENU
button.
• The menu will appear on the display (☞
P.41).
56
Menu Setting Method
Press the `/
OK
or 9 button.
Press the 2 or 3 button to select the
7
10
folder you want to move or copy the
[File Move] will appear
file to.
on the display
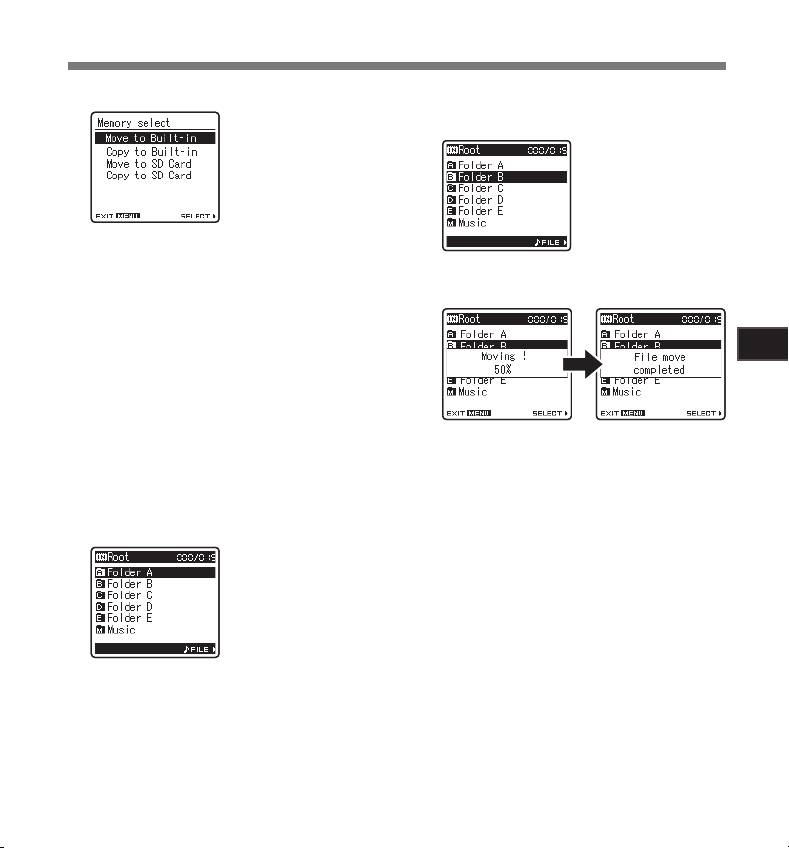
Press the 2 or 3 button to choose the
8
position to move or copy the file to.
Press the `/
OK
button to complete the
[Move to Built-in]:
11
setting.
Move a file in the built-in memory or SD card to
another folder within the built-in memory.
[Copy to Built-in]:
Copy a file in the built-in memory or SD
4
card to another folder within the built-in
Menu Setting
memory.
[Move to SD Card]:
Move a file in the built-in memory or SD card
to another folder in the SD card.
• [Moving!] or [Copying!] will appear on the
[Copy to SD Card]:
display and moving or copying will start.
Copy a file in the built-in memory or SD card
During the process, the progress status
to another folder in the SD card.
will be shown in percentage. The process
is completed when [File move completed]
or [File copy completed] is displayed.
Press the `/
OK
or 9 button.
9
A Move or Copy folder
Press the
MENU
button to close the
selection screen is
12
menu screen.
displayed.
57

Menu Setting Method
Notes
• The recorder cannot copy when the memory
capacity is not sufficient.
• The recorder cannot move or copy when the
number of file exceeds 199.
• Do not remove the batteries during moving or
copying. This may damage the datas.
• A file cannot be moved or copied to the same
folder.
• If there is a file with the same name in the
move/copy destination folder, [Cannot move.
Same name file exists] or [Cannot copy. Same
name file exists] is displayed. The file will not
be overwritten.
• When the operation is cancelled during moving
or copying, the move or copy is cancelled.
• Files which are locked will remain so even after
4
they are moved or copied.
Menu Setting
• If you attempt to rewrite the contents in the SD
card when the SD card is write protected, [SD
Card Locked] will appear. The playback opera-
tion can be performed, but the write protection
must first be turned off when overwriting the
contents on the card (☞ P.18).
• DRM files cannot be moved or copied.
• Files cannot be moved or copied directly under
the [Root] folder.
58
2 3 button
9 0 button
`/
OK
button
MENU
button
4
Menu Setting
59
a
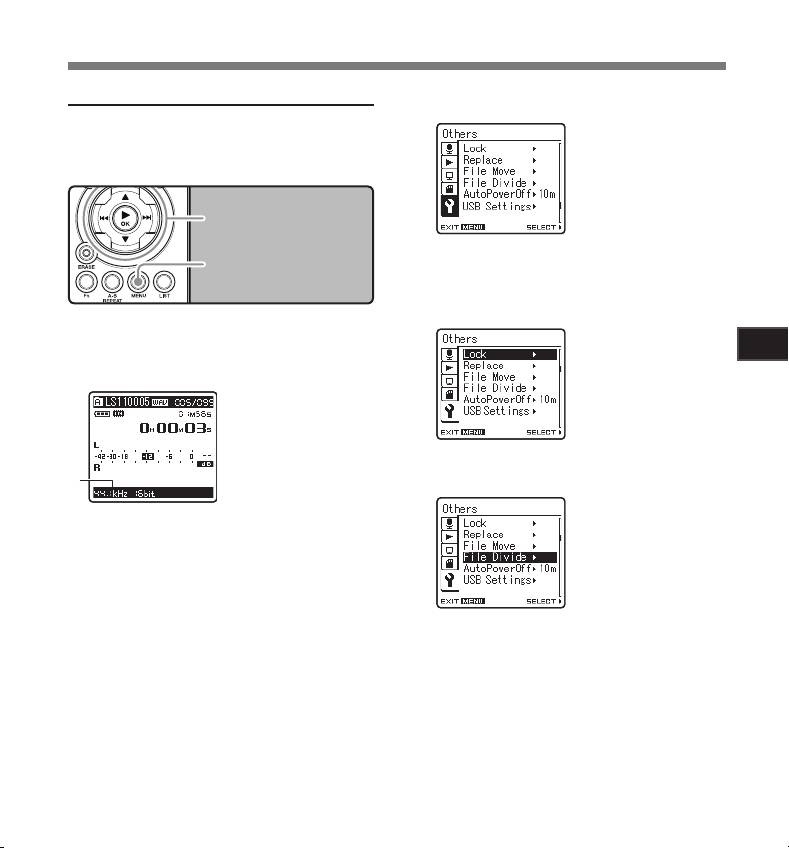
Menu Setting Method
Press the 2 or 3 button to select
Splitting Files [File Divide]
3
[
Others
] tab.
PCM files recorded in this recorder can be split.
Files with large capacities and long recording
times can be split so that they are easier to
manage and edit.
• You can change the menu display by mov-
ing the settings tab cursor.
Press the `/
OK
or 9 button to move
4
the cursor to the item to set.
Select the PCM file you want to split,
[Others] will appear on
1
the display
play or fast-forward the file and stop
at where you want to split the file.
Press the 2 or 3 button to select [
File
5
Divide
].
• Files with the recording mode of [Files with the recording mode of [96kHz],
[88.2kHz], [48kHz] or [44.1kHz] are files recorded
in the PCM format.
a Recording mode
While the recorder is during stop
2
mode, press the
MENU
button.
• The menu will appear on the display (☞
P.41).
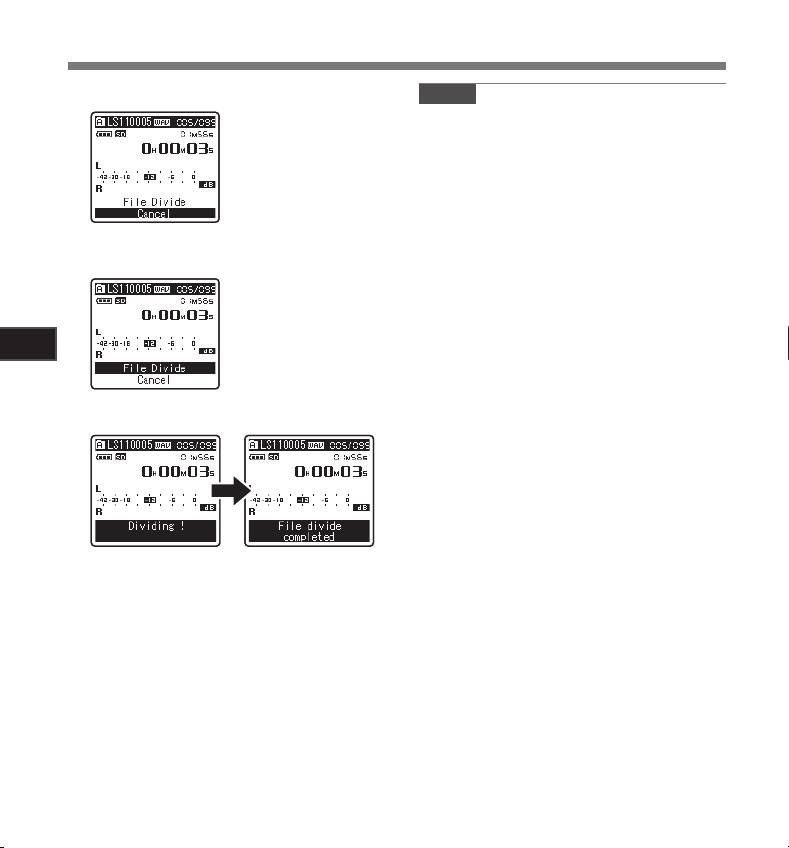
Menu Setting Method
Press the `/
OK
or 9 button.
Notes
6
[File Divide] will
• The file split cannot be done when the file list
appear on the display.
is displayed.
• The recorder cannot split files when the number
of files in the folder exceeds 199.
• Locked files (☞ P.41, P.47) cannot be split.
• After a file has been split, the original file will
be renamed [File name_1.WAV] and the new
file will be named [File name_2.WAV].
• After a file has been split, the resulting files
Press the 2 or 3 button to select [
File
retain the same creation date and modification
7
Divide
].
date as the original file.
• If a file has an extremely short recording time,
it may not be split even if it is a PCM file.
• Do not remove the batteries during splitting file.
This may damage the data.
4
Menu Setting
Press the `/
OK
or 9 button.
8
• [Dividing!] will be displayed and file splitting
will start. Splitting is completed when [File
divide completed] is displayed.
Press the
MENU
button to close the
9
menu screen.
60


