Olympus LS-11 – page 2
Manual for Olympus LS-11
1
Getting Started
21
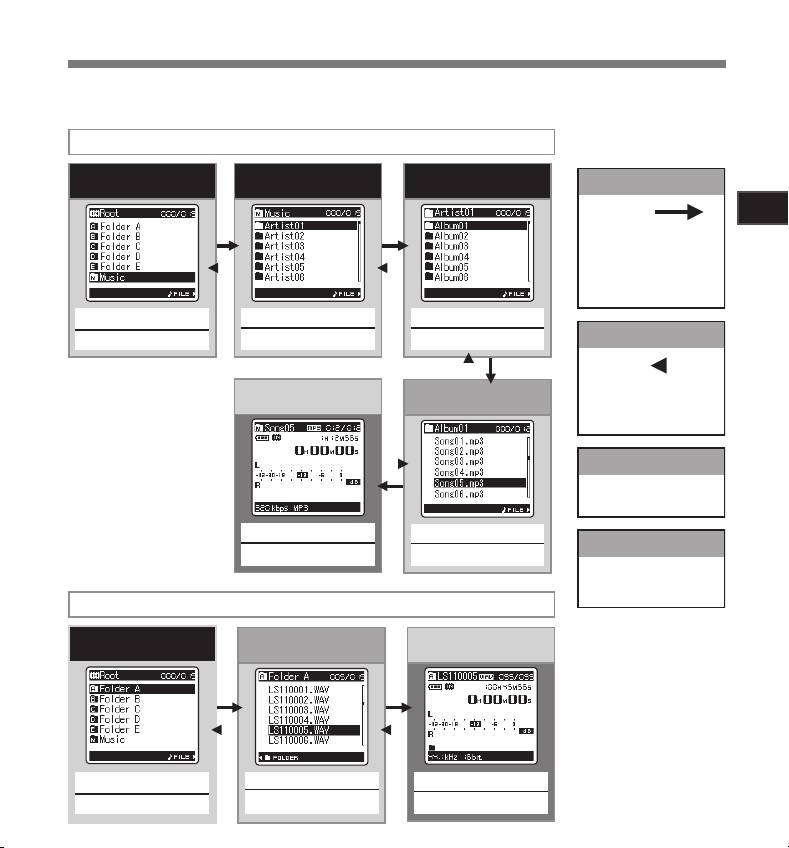
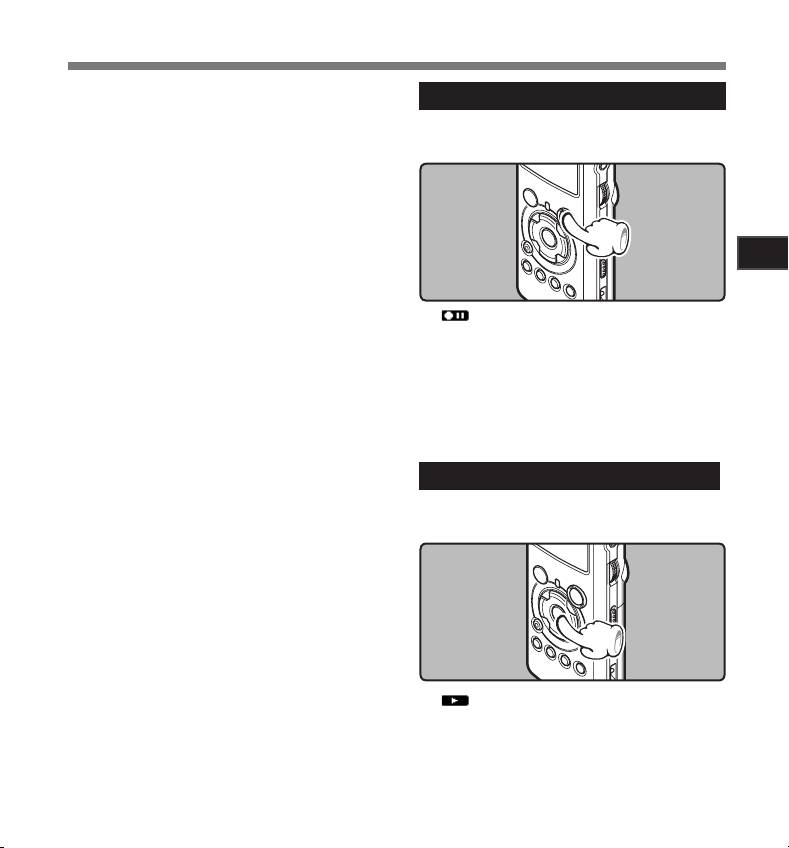
Operation of the folders for music playback
4
Moving through the
levels
Folder list display
Folder list display
Folder list display
`/
OK
button
(First layer)
(Second layer)
Proceed
Each time you press this it
opens the folder or file selected
in the list display and proceeds
down one level. The list display
screen can be operated by the
9 button
2 or 3 button
2 or 3 button
2 or 3 button
Select the artist folder
Select the album folder
LIST
button
Select the folder
Return
Each time you press this it
File display
File list display
returns up one level. The list
display can be operated by the
0 button
List display
The folders and files recorded
in this recorder are displayed
`/
OK
button
2 or 3 button
File display
Begin playback
Select the file
Information of the selected file
is displayed. Enters in
playback standby mode
Operation of the folders for voice recordings
Folder list display
File list display
File display
2 or 3 button
2 or 3 button
`/
OK
button
Select the folder
Select the file
Begin playback
Selecting the Folders and Files
Change folders while the operation is stopped. For information on the layered structure of the folders, see
the section entitled “Notes on the Folders” (☞ P.19, P.20).
2
About Recording
22
MIC SENSE HIGH
MIC SENSE
LOW
About Recording
Before Recording
Getting Ready
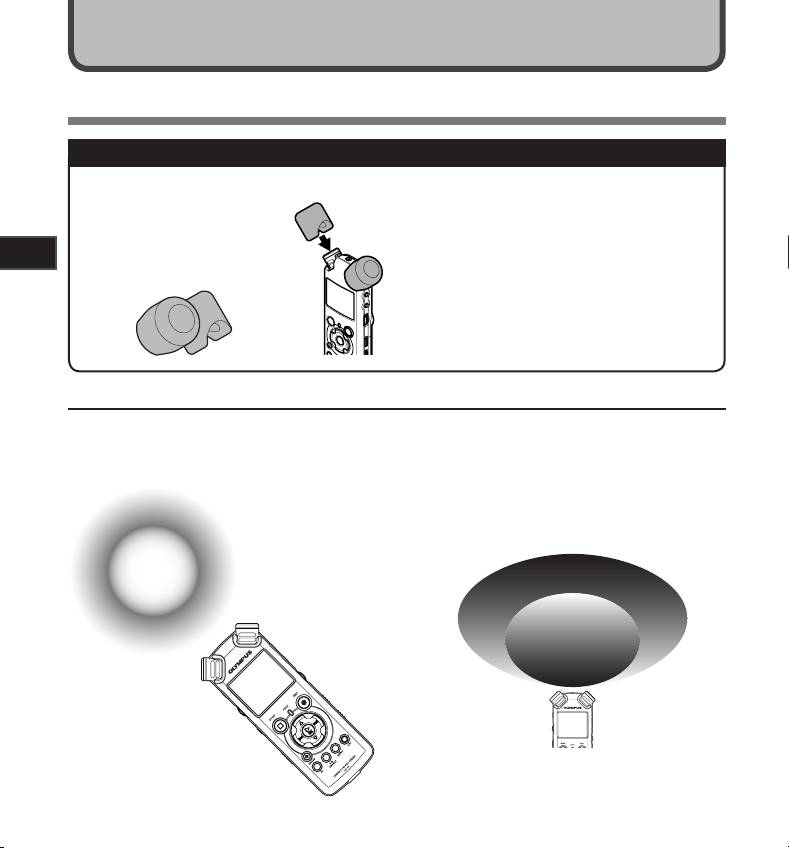
Afx the windscreen:
Select the media for recording:
Start recording after attach the
The built-in flash memory as well as an SD
windscreen (included within) to
Card can be used (☞ P.17, P.41, P.46).
the microphone. The noise may
occur even if a windscreen is at-
Select the recording format:
tached when forcing wind blows
against a microphone.
Recording can be performed through the
linear PCM format, as well as the WAV, MP3
and WMA formats (☞ P.41, P.43).
Turn the Microphone Toward the Original Sound Source
Turn the built-in stereo microphone in the direction that you would like to record. Placing the built-in stereo
microphone over the display is the proper position for performing stereo recording. If it is below the display
when recording then proper stereo recording cannot be performed because the position of the original
sound will be recorded in reverse phase.
About the built-in stereo microphone:
The direction of capturing sound by the microphone
can be changed with the MIC SENSE HIGH/LOW switch
(☞ P.27).
Original
sound
source
L R
When recording with the
Key map
built-in microphone:
On mounting:
Turn the microphone in the direction
of the source to be recorded.
Accurate adjustments of the microphone’s angle and
the like can be made when the device is affixed to a
commercially available tripod used for cameras.
2
About Recording
23
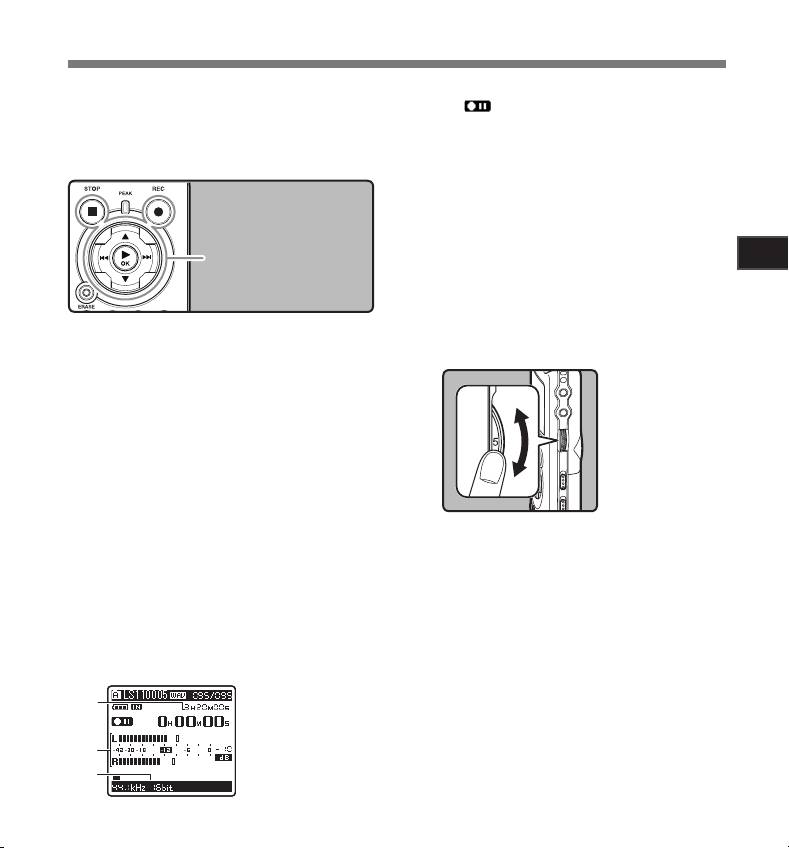
a
b
c
Recording
Before starting recording, select a folder between
• The recording indicator light will flash and
[A] to [E]. These five folders can be selectively
[ ] will appear on the display.
used to distinguish the kind of recording; for ex-
• The voice sync level can be set when voice
ample, Folder [A] might be used to store private
sync recording is on.
• [Rec Mode] cannot be changed in the
information, while Folder [B] might be dedicated
recording standby mode or while recording.
to holding business information.
Configure this while the recorder is stopped
(☞ P.41, P.43).
• The various functions related to recording
can be configured to suit the recording
conditions (☞ P.41, P.43, P.44).
REC
s button
• The level indicator position of the level
STOP
4 button
meter will change in accordance with the
`/
OK
button
switching of the various settings related
to recording. Confirm the recording level
through the level meter after switching the
settings.
Select the recording folder (☞ P.19 to
Use the
REC LEVEL
dial to adjust the
1
P.21).
3
recording level.
How to change folders:
This can be adjusted
1 Pressing the LIST button at the file display
in a range from [0]
while stopped will return you back one layer
to [10]. The larger
above.
the number on the
Pressing the LIST button repeatedly will
dial is the higher the
bring you to the folder list display.
recording level will
2 Pressing button 2 or 3 at the folder list
be, and the indicator
display will select the folders for voice
position of the level
recordings.
meter will grow
• Newly recorded audio will be saved as the
larger as well
last file in the selected folder.
• This recorder is designed to be able to
Press the
REC
s button and prepare to
record cleanly and evenly, even in record-
2
record.
ing conditions such as when the volume
• Turn the microphone in the direction of the
of the source sound changes significantly.
source to be recorded.
However, even higher sound quality record-
a Remaining recording time
ings can be achieved by adjusting the
b Level meter (change according to the
recording level manually.
recording level and recording function
• If too big sound is input, the noise may
settings)
occur even if [Rec Level] is set to [Auto]
c Recording mode
or [Limiter On]. Also, in certain cases the
[PEAK] indicator light, which notifies large
input, may not light. To ensure successful
recordings, we recommend that you test the
record function and volume before use.
• When [Rec Level] is set to [Auto] the record-
ing level will be adjusted automatically.
Set [Rec Level] to [Manual] when using the
recording level adjustment function and the
limiter function (☞ P.41, P.43).
2
About Recording
24
e
d
Recording
Actually producing the sound you
Press the
STOP
4 button to stop re-
would like to record:
5
cording.
• When a loud sound is produced the level
• [ ] will go out on the display.
meter will swing all the way over to the right
while recording and the [PEAK] indicator
e File length
light will turn on. When this happens the
sound will be recorded in a distorted man-
ner since the recording level is too high.
When the level meter is
maxed out (the recorded
sounds will be distorted)
Notes
• When a loud noise is produced, adjust
the recording level so that the level meter
• The recording will continue even if the volume
remains in the vicinity of [–6].
of a single file exceeds 2 GB in the linear PCM
format recording (☞ P.43).
Example of conditions
1 The file is saved every 2 GB in separate
where the recording level
files. It will be treated as multiple files when
has been lowered and the
excess input has been
playing back.
adjusted
2 When the recording exceeds 2 GB, the
number of files in the folder may exceed
200 files. The 201st file and later will not
be recognized by the recorder, so check by
Press the
REC
s button again will
connecting the recorder to a PC.
4
• When an SD Card is inserted in the recorder,
begin recording.
be sure to confirm the recording media as either
• [ ] will appear on the display.
[Built-in Memory] or [SD Card] so that there is
d Elapsed recording time
no mistake (☞ P.41, P.46).
• When attempting to perform operations such as
rewriting the contents of an SD Card in cases
where the card has been write protected, [SD
Card Locked] will appear. The playback opera-
tion can be performed, but the write protection
must first be turned off when overwriting the
contents on the card (☞ P.18).
• If you select a folder other than [
A
] through [
E
]
and press the REC s button, an [Can't record
in this folder] message will flash. Select a
folder from [
A
] through [
E
] and start recording
again.
Recording
• When remaining recording time is less than
Pause
60 seconds, the [PEAK] indicator light starts
flashing in amber. When the recording time
While the recorder is during recording
is decreasing to 30 or 10 seconds, the light
mode, press the
REC
s button.
flashes faster.
• [Folder Full] will appear when the folder
capacity is full. Delete any unnecessary files
before recording any further (☞ P.38).
• [Memory Full] will appear when the memory
is full. Change the recordable media or de-
lete any unnecessary files before recording
2
any further (☞ P.38, P.41, P.46).
About Recording
• When the recording button of the exclusive
remote control RS30W (optional) is pressed
once, recording will start immediately.
• [ ] will appear on the display.
• Depending on the sound recording mode
• The recorder will time out after 60 minutes
and the status of record media, the data
when left in "Rec Pause".
transfer to the media cannot be done in time
Resume Recording:
during recording and the skipped sound may
be recorded. In this case, [Data Write Error]
Press the
REC
s button again.
will appear during recording or when the
• Recording will resume at the point of
recording is finished. After transferring the
interruption.
data to the PC, format the record media.
• We recommend the media to be formatted
before recording.
To quickly check on the recorded contents
While the recorder is during recording
mode, press the `/
OK
button.
• [ ] will appear on the display.
• Stop recording and the file that was just
recorded will be played back.
25
Recording
Recommended settings by recording condition
The recorder is set up so that it can perform high quality recording equivalent to that of a music CD right away.
The various functions relating to recording can be configured in detail to suit the recording conditions.
Recording condition
Outdoor
environment
Conferences
Recording
Band
Conferences
Performance
sounds like
with large
settings
Indoor musical
performance
with a few
in a vast hall,
wild birds
crowds in
performance
in a practice
people
etc.
singing,
vast meeting
2
studio
indoors
railroad
venues
About Recording
noises, etc.
Recording level*
When the [Rec Level] is set to [Manual] you can adjust the recording level.
(☞ P.23)
Adjust while looking at the level meter
Microphone
sensitivity
[LOW] [HIGH]
(☞ P.27)
Low Cut Filter
[OFF] [ON]
(☞ P.27)
[Rec Mode]
The recording level can be adjusted to suit the volume of the original sound
(☞ P.41, P.43)
[Rec Level]
You can configure whether to adjust the recording level automatically or to adjust it manually.
(☞ P.41, P.43)
When [Rec Level] is set to [Manual] you can configure the limiter function
[Zoom Mic]
The directivity of the built-in stereo microphone can be set according to the source to be recorded
(☞ P.41, P.43)
[Rec Monitor]
Select whether or not to output the recording monitor sound from the EAR jack
(☞ P.41, P.44)
[Plug-inPower]
Select whether or not to use the plug-in power function according to the external microphone
(☞ P.41, P.44)
connected to the MIC jack
*
When [Rec Level] is set to [Auto] the recording level will be adjusted automatically. When this happens,
the recording level adjustment function and limiter function will not work (☞ P.23, P.41, P.43).
26
Recording
Listening While Audio is Recorded
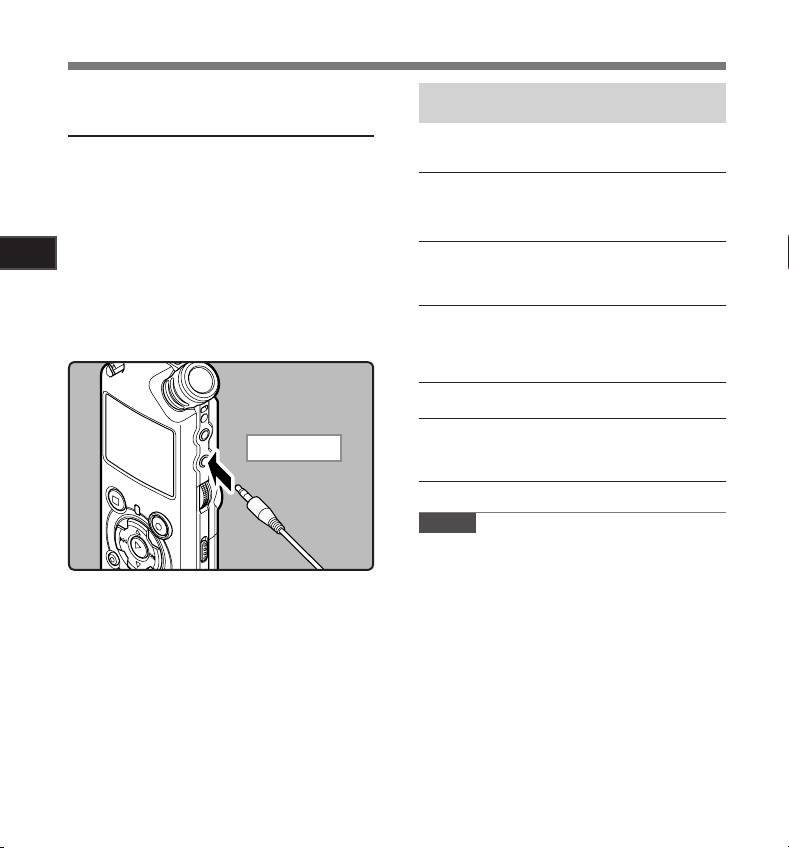
Set the Low Cut Filter
If you start recording after inserting the earphone
The recorder has a Low Cut Filter function to
into the EAR jack on the recorder, you can hear
minimize low-frequency sounds and record
the sound being recorded. The recording monitor
voices more clearly. This function can reduce
volume can be adjusted by using the VOLUME
noise from air conditioners, projectors and other
dial.
similar noises.
Slide the
LOW CUT ON/OFF
switch and select
Connect the earphone to the
EAR
jack on
[
ON
] or [
OFF
].
the recorder.
2
About Recording
To EAR jack
[ON]:
• After recording has started, you can hear
Enables the Low Cut Filter function.
the sound being recorded through the
[OFF]:
earphone. If the earphone is connected,
Disables this function.
no sound will come from the speaker.
Notes
Microphone Sensitivity
• Recording level cannot be controlled using the
Microphone sensitivity is adjustable to meet
volume button.
recording needs.
• When using the earphones, do NOT set the
volume too high. Listening at very high volume
Slide the
MIC SENSE HIGH/LOW
switch and
may lead to hearing loss.
select [
HIGH
] or [
LOW
].
• Do not place earphones near a microphone as
this may cause feedback.
• When the external speaker is connected while
recording, there is a risk that audio feedback
will occur. It is recommended that you use
earphones for the recording monitor, or turn
[Rec Monitor] to [Off] while recording (☞ P.41,
P.44).
• When [Rec Monitor] is set to [Off] no sound
will come out of the earphones while you are
recording (☞ P.41, P.44).
27

Recording
[HIGH]:
Adjusting the voice sync level for
This is a highly sensitive mode which can
record surrounding noises.
recording
[LOW]:
Voice sync recording allows you to start
This is the standard level of microphone
recording when voice louder than the
sensitivity. Select this mode for cases
voice sync level (detection level) is de-
where the volume of the source sound is
high, such as a band performance.
tected, and automatically stop recording
when the voice becomes quiet. When
voice sync recording is on (☞P.44) and the
Note
voice is below the voice sync level (detec-
2
• When you would like to clearly record a
tion level) for longer than the specified
About Recording
speaker’s voice, set the recorder to [LOW] and
detection time, the recorder stops.
hold its built-in stereo microphone close to the
speaker’s mouth (5-10 cm) before recording.
REC
s button
STOP
4 button
9 0 button
Select the recording folder (☞ P.19 to
1
P.21).
How to change folders:
1 Pressing the LIST button at the file display
while stopped will return you back one layer
above.
Pressing the LIST button repeatedly will
bring you to the folder list display.
2 Pressing button 2 or 3 at the folder list
display will select the folders for voice
recordings.
• Newly recorded audio will be saved as the
last file in the selected folder.
28
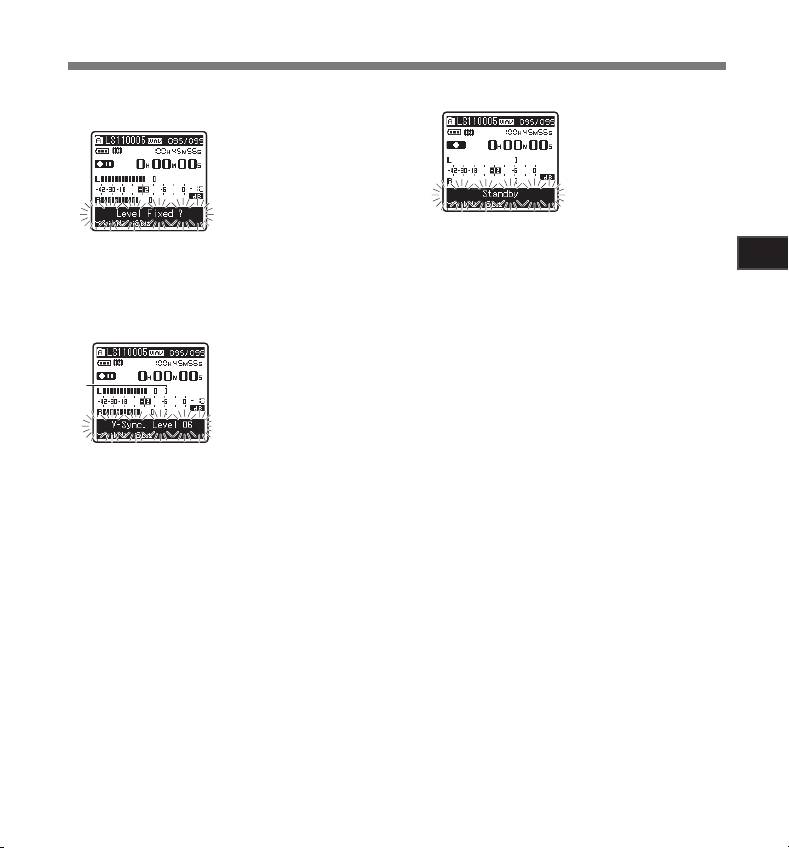
[Level Fixed?] will flash
on the display.
2
About Recording
Appears the voice sync
level in 23 steps ([01] to
[38]) on the display.
29
a
Recording
Press the
REC
s button and prepare to
Press the
REC
s button again.
2
4
record.
• Recording enters standby. [Standby]
flashes on the display and the recording
• To use voice sync recording, set [V-Sync.
indicator light flashes.
Rec] on and set the detection time (☞
If input meets or exceeds the voice sync
P.44).
level, recording starts automatically. At this
time, the recording indicator light glows.
Press the 9 or 0 button to adjust
3
the voice sync level.
Recording stops automatically.
5
• If the volume is equal to or less than voice
sync level for longer than the specified time,
recording stops automatically. At this time,
the recording indicator light turns off.
• To manually stop recording, press STOP 4
button.
• The higher the value, the more sensitive
the recorders gets to sounds. At the highest
value, even the faintest sound will activate
recording.
a Voice sync level (moves to the right/left
according to the set level)
Recording
Recording from External
Applicable External Microphones
(optional) (☞ P.81)
Microphone or Other Devices
Stereo microphone: ME51S
The external microphone and other devices can
The built-in large-diameter microphone enables
be connected and the sound can be recorded.
sensitive stereo recording.
Connect as follows by the device to be used.
2 channel microphone (omni-directional): ME30W
• Do not plug and unplug devices into the
These are highly sensitive omni- directional
recorder’s jack while it is recording.
microphones supported by plug-in power which are
well-suited to recording musical performances.
Recording with External Microphone:
Highly sensitive noise-cancellation monaural micro-
2
phone
(unidirectional): ME52W
About Recording
Connect an external microphone to the
This microphone is used to record sound at a
MIC
jack of the recorder.
distance while minimizing surrounding noise.
• When recording while an external monaural
Compact Gun Microphone (unidirectional): ME31
microphone is connected, sound will only be
The directional microphones is useful for recordings
recorded by the L-channel.
such as outdoor recording of wild birds singing. The
metal-cut body provides a sturdiness to the high
rigidity.
Tie clip microphone (omni-directional): ME15
Small concealing microphone with a tie-clip.
Telephone pickup: TP7
Earphone type microphone can be plugged into your
To MIC jack
ear while phoning. The voice or conversation over
the phone can be clearly recorded.
Notes
• The built-in microphone will become inoperable
when an external microphone is plugged into
the recorder’s MIC jack.
• Microphones supported by plug-in power can
also be used. When the plug-in power function
is set to [On] power will be supplied by the
device to the microphone (☞ P.41, P.44).
• Turn the plug-in power function to [Off] when
an external microphone not supported by
plug-in power is connected, as there is the risk
that noise may be generated while recording
(☞ P.41, P.44).
• Do not connect the connecting cord to the
LINE IN jack when recording from external
microphone with this recorder.
30
Recording
Recording the Sound of Other Devices with
Recording the Sound of This Recorder with
This Recorder:
Other Devices:
The sound can be recorded when connecting to
The sound of this recorder can be recorded to
the audio output terminal (earphone jack) of the
other devices when connected to the audio input
other device, and the LINE IN jack of the recorder
terminal (line jack) of other devices and the EAR
with the connecting cord KA334 (included within)
jack of this recorder, with the connecting cord
for dubbing.
KA334 (included within) for dubbing.
To audio input
2
To audio output
terminal of other
terminal of
About Recording
devices
other devices
To LINE IN
jack
To EAR
jack
Notes
• If you are unable to produce a clear recording
with this recorder even after adjusting the
recording level (☞ P.23), this could potentially
Notes
be because the output level for the connected
devices is too high or too low. When external
• When you adjust the various sound quality
devices are connected, perform a test record-
settings related to playback on the recorder,
ing and then adjust the output level for the
the audio output signal sent out from the EAR
external devices.
jack will change as well (☞ P.41, P.45).
• Do not connect the connecting cord to the MIC
• In case of recording on other devices without
jack when recording sound from other device
a line input, the input may be too large to con-
with this recorder.
trol when the audio is input to the microphone
jack. In this case, use the connecting cord
KA333 (optional) with attenuation resistance
(☞ P.81).
31
3
About Playback
32
a
b
c
d
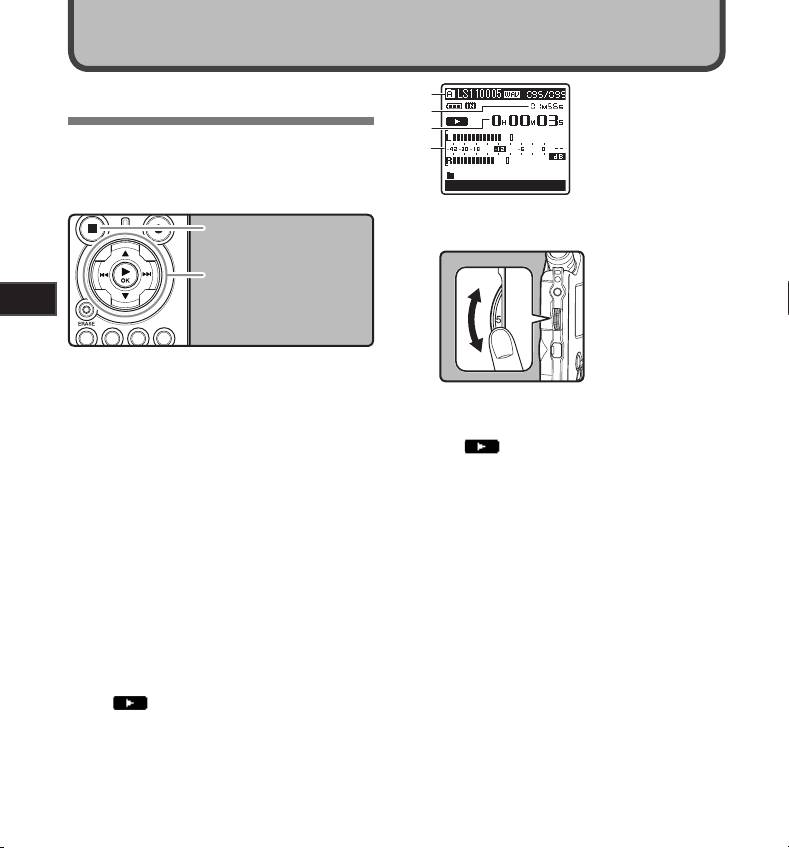
About Playback
Playback
The recorder can playback WAV, MP3 and WMA
format files. To playback a file recorded with
other machines, you need to transfer (copy) it
from a computer.
Use the
VOLUME
dial to adjust to a
STOP
4 button
4
comfortable listening volume.
The volume can be
2 3 button
adjusted within a range
9 0 button
from [0] to [10]. The
`/
OK
button
larger the number on
the dial is the higher the
volume will be
Select the folder which contains the
1
files to be played back (☞ P.19 to
P.21).
Press the
STOP
4 or `/
OK
button at any
How to change folders:
5
point you want to stop the playback.
1 Pressing the LIST button at the file display
• [ ] will go out on the display.
while stopped will return you back one layer
• This will stop the file being played back
above.
midway. When the resume function is
Pressing the LIST button repeatedly will
activated the stopped location will be
bring you to the folder list display.
registered, even if the power is turned
2 Pressing button 2 or 3 at the folder list
off. The next time the power is turned
display will select the folders for voice
on, playback may be resumed from the
recordings and press the 9 button.
registered stopped location.
• When the batteries are removed from the
In the File list display, press the 2 or 3
recorder the resume function’s stopped
2
button to select the file that you want
position will be erased.
to playback.
• In the File display, press the 9 or 0
button to select a file.
Press the `/
OK
button to start play-
3
back.
• [ ] will appear on the display.
a Folder name/ File name/ File format/
Current file number/ Total number of
recorded files in the folder
b File length
c Elapsed playback time
d Level meter

Playback
Settings relating to playback
About music file
In cases where the recorder is unable to playback
Segment
This allows you to repeat-
music files that have been transferred to it, check
repeat
edly playback part of a file
to make sure that the sampling rate and bit rate
(☞ P.36)
during playback.
are in the range where playback is possible.
[File] [File Repeat] [Folder]
Combinations of sampling rates and bit rates for
[Play Mode]
[Folder Repeat] [All]
music files which the recorder can playback are
(☞ P.41, 45)
[All Repeat]
given below.
[Reverb]
[Normal] [Studio] [Club]
File
(☞ P.41, 45)
[Hall] [Dome]
Sampling frequency Bit rate
format
[EUPHONY]
[Normal] [Natural] [Wide]
WAV
44.1 kHz, 48 kHz,
(☞ P.41, 45)
[Power]
16 bit or 24 bit
format
88.2 kHz, 96 kHz
3
This changes the order
MPEG1 Layer3:
About Playback
of the files in the selected
32 kHz, 44.1 kHz,
[Replace]
folder. It is useful for playing
MP3
48 kHz
From 8 kbps
(☞ P.54)
back files in a preferred or-
format
MPEG2 Layer3:
up to 320 kbps
der while in normal playback
16 kHz, 22.05 kHz,
mode etc.
24 kHz
Selected files can be moved
[File Move]
16 kHz
,
22 kHz
,
or copied within or between
WMA
From 16 kbps
(☞ P.56)
32 kHz
,
44.1 kHz
,
memory storages.
format
up to 256 kbps
48 kHz
[File Divide]
PCM files recorded by this
(☞ P.59)
recorder can be divided.
• Variable bitrate MP3 files (in which conversion
bitrates can vary) may not play properly.
• For WAV files, this recorder can only play back
those in the linear PCM format. WAV files other
than these cannot be played back.
• This recorder is compatible with Microsoft
Corporation DRM9, but not with DRM10.
• It is possible to playback the WMA files which
are created by the Olympus Digital Voice
Recorder.
33
Playback
• [ ] will appear on the display.
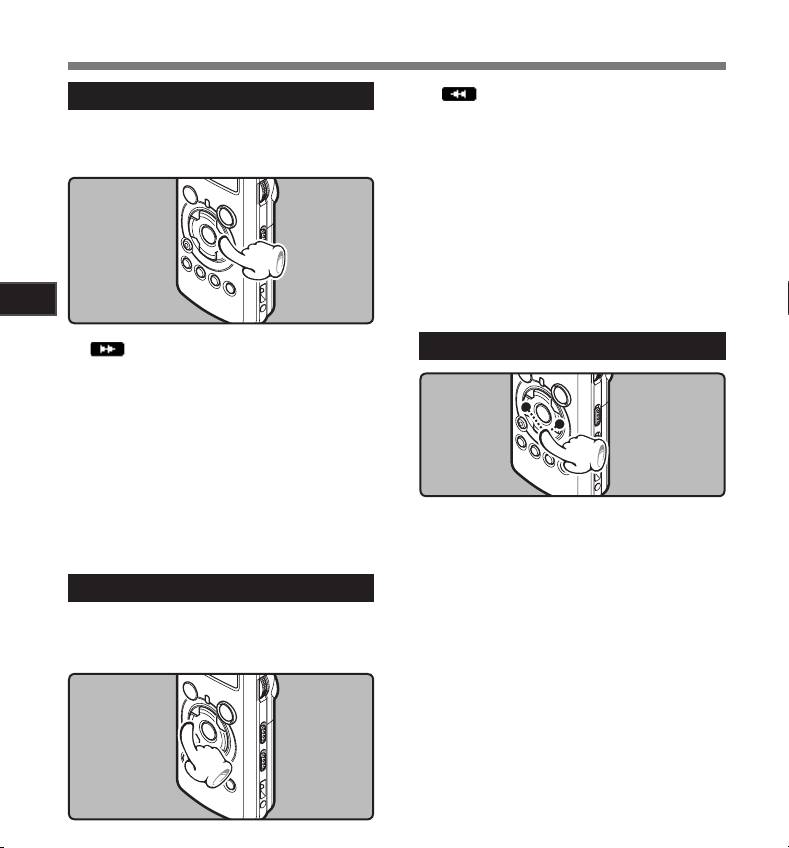
Forwarding
• If you release the 0 button, it will stop. Press
While the recorder is during stop mode
the `/OK button to start playback from where
it was stopped.
in the file display, press and hold the
While the recorder is during playback
9 button.
mode, press and hold the 0 button.
• When you release the 0 button the recorder
will resume normal playback.
• If there is an index mark or temp mark in the middle
of the file, the recorder will stop at that location (☞
P. 35).
• The recorder stops when it reaches the
beginning of the file. Continue pressing the 0
button to proceed with the review from the end
3
of the previous file.
About Playback
• [ ] will appear on the display.
Locating the Beginning of the File
• If you release the 9 button, it will stop. Press
the `/OK button to start playback from where it
was stopped.
While the recorder is during playback
mode, press and hold the 9 button.
• When you release the 9 button the recorder
will resume normal playback.
• If there is an index mark or temp mark in the middle
of the file, the recorder will stop at that location (☞
P. 35).
• The recorder stops when it reaches the end of the
While the recorder is during stop mode or
file. Continue pressing the 9 button to proceed
playback mode, press the 9 button.
with the cue from the beginning of the next file.
• The recorder skips to the beginning of the next
file.
Rewinding
While the recorder is during playback
mode, press the 0 button.
While the recorder is during stop mode
• The recorder skips to the beginning of the
in the file display, press and hold the
current file.
0 button.
While the recorder is during stop mode,
press the 0 button.
• The recorder skips to the beginning of the
previous file. If the recorder stop the midway
of the file, return to the beginning of the file.
While the recorder is during playback
mode, press the 0 button twice.
• The recorder skips to the beginning of the
previous file.
34

Playback
Playback Through Earphone
Setting an index mark or a temp
An earphone can be connected to the EAR jack of
mark
the recorder for listening.
If index marks and temp marks are placed, you can
• When the earphone is used, the recorder
quickly find a location you want to listen to in fast
speaker will be switched-off.
forward and fast rewind and when cuing a file.
Index and temp marks can be added only during
PCM recording with this recorder or to PCM files
recorded using this recorder. Index marks cannot
be added to WMA files, MP3 files or files made
by recorders other than Olympus IC recorders.
However, temp marks can be added to temporarily
To EAR
mark locations to which you wish to listen.
jack
3
To add index marks, the index function must be
registered to the
Fn
button (☞ P.48).
About Playback
Notes
• When you skip to the beginning of the file during
playback, the recorder will stop at the position
9 0 button
of the index mark and temp mark. The index
`/
OK
button
mark and temp mark will be skipped when you
perform the operation in stop mode (☞ P. 35).
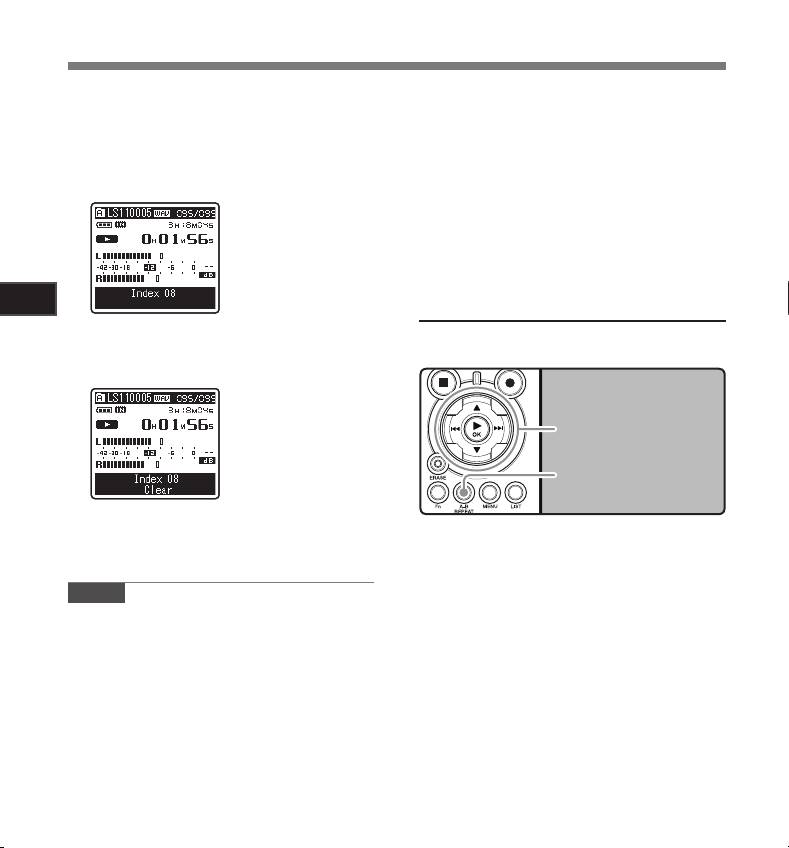
Fn
button
• To avoid irritation to the ear, insert the earphone
after turning down the volume level.
ERASE
button
• When you listen with the earphone during
playback, do not raise the volume too much. It
may cause hearing impairment and decrease in
Press the
Fn
button during file re-
hearing ability.
1
cording, recording pause, playing, or
playback pause.
• A number appears on the display and an
index mark or temp mark will be placed.
• Even after an index or temp mark is placed,
recording or playback will continue so you
can place index or temp marks in other
locations in a similar manner.
35
Playback
• Temp marks are temporary markings, so if you
Clearing an index mark or a temp mark:
move to another file, switch to the list screen,
or connect the recorder to a computer, they will
Locate the index or temp mark you
be automatically erased.
1
want to clear.
• Up to 16 index and temp marks can be set in
Press the 9 or 0 button to select
a file. If you try to place more than 16 index
2
or temp marks, the [Index Full] message will
the index or temp mark to erase.
appear for index marks, and [Temp Mark Full]
for temp marks.
• Index or temp marks cannot be set or erased
in a locked file (☞ P.47).
How to begin segment repeat
3
playback
About Playback
While the index or temp number ap-
This function enables repeated playback of part
3
of the file being played.
pears for approximately 2 seconds on
the display, Press the
ERASE
button.
2 3 button
9 0 button
`/
OK
button
A-B REPEAT button
• The index or temp mark is erased.
• Index or temp numbers after the erased index
or temp number will automatically move up.
Select a file that has a segment you
1
would like to play back repeatedly (☞
P.19 to P.21).
Notes
• Index marks can be added during PCM record-
In the File list display, press the 2 or
ing with this recorder or to PCM files recorded
2
3 button to select the file.
using this recorder.
• In the File display, press the 9 or 0
button to select a file.
Press the `/
OK
button to start play-
3
back.
36
Playback
Press the
A-B REPEAT
button at the
Cancel the segment repeat playback function
4
point you want to start segment repeat
playback.
Pressing any of the following buttons will
release the segment repeat playback.
[ ] will flash on the
display
• Fast forwarding and rewinding (☞ P.29) can
be conducted when [ ] is flashing in the
same manner as during normal playback,
3
and you can quickly proceed as far as the end
About Playback
position (☞ P.34).
• When it reaches to the end of the file while
[ ] is flashing, the point will become the end
a Press the
STOP
4 button
position, and repeat playback will start.
Pressing the STOP 4 button will release seg-
ment repeat playback, and stop playback.
Press the
A-B REPEAT
button again at
5
b Press the `/
OK
button
the position where you want to end
segment repeat playback.
Pressing the `/OK button will release segment
repeat playback, and stop playback.
c Press the 9 button
Pressing the 9 button will release segment
repeat playback, and cue to the beginning of
the next file.
d Press the 0 button
Pressing the 0 button will release segment
repeat playback, and reverse to the beginning
• The recorder repeatedly plays back the
segment until the segment repeat playback
of the current file.
is cancelled.
e Press the
A-B REPEAT
button
Pressing the A-B REPEAT button will release
segment repeat playback, and playback
continues without repeating.
37
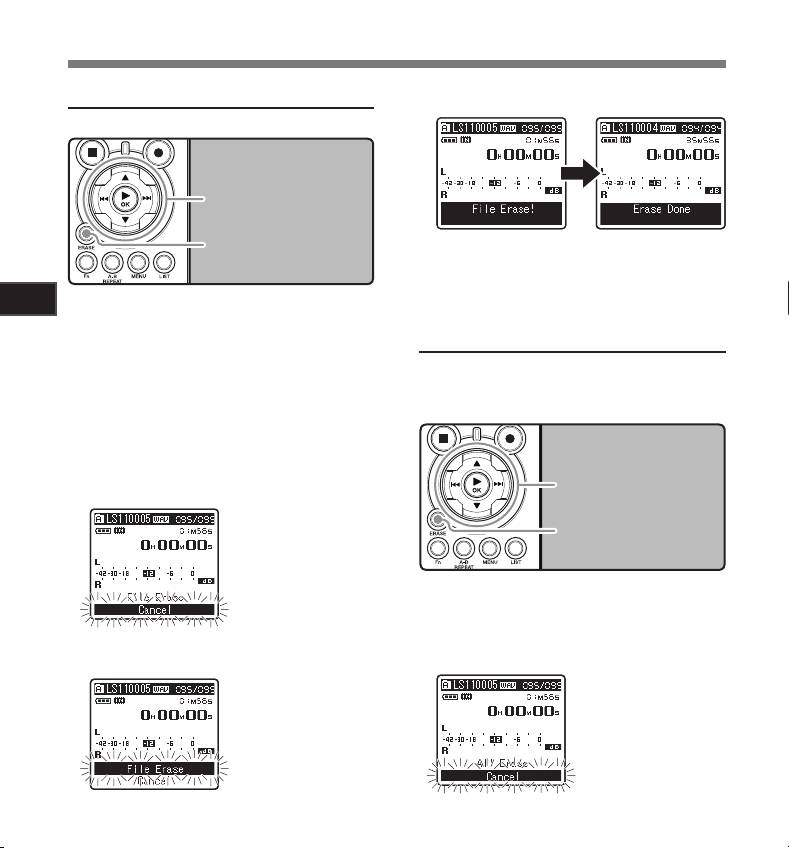
Erasing
Press the `/
OK
button.
Erasing One File at a Time
5
A selected file can be erased from a folder.
2 3 button
9 0 button
`/
OK
button
ERASE
button
• The display changes to [File Erase!] and
erasing will start.
• [Erase Done] is displayed when the file is
erased. File numbers will be reassigned
3
Select the folder which contains the
automatically.
1
About Playback
files you want to erase (☞ P.19 to
P.21).
Erase All Files from a Folder
In the File list display, press the 2 or
All files in a folder can be erased simultaneously.
2
3 button to select the file you want to
The locked files (☞ P.41, P.47) and the files set to
erase.
read-only on the PC will not be erased.
• In the File display, press theIn the File display, press the 9 or 0
button to select a file.
While the recorder is during stop
2 button
3
mode, press the
ERASE
button.
`/
OK
button
[Cancel] will flash on the
display
ERASE
button
Select the folder that you want to
1
erase (☞ P.19 to P.21).
While the recorder is during stop mode,
Press the 2 button to select [
File
2
4
press the
ERASE
button twice.
Erase
].
[Cancel] will flash on the
display
38
Erasing
Press the 2 button to select [
All
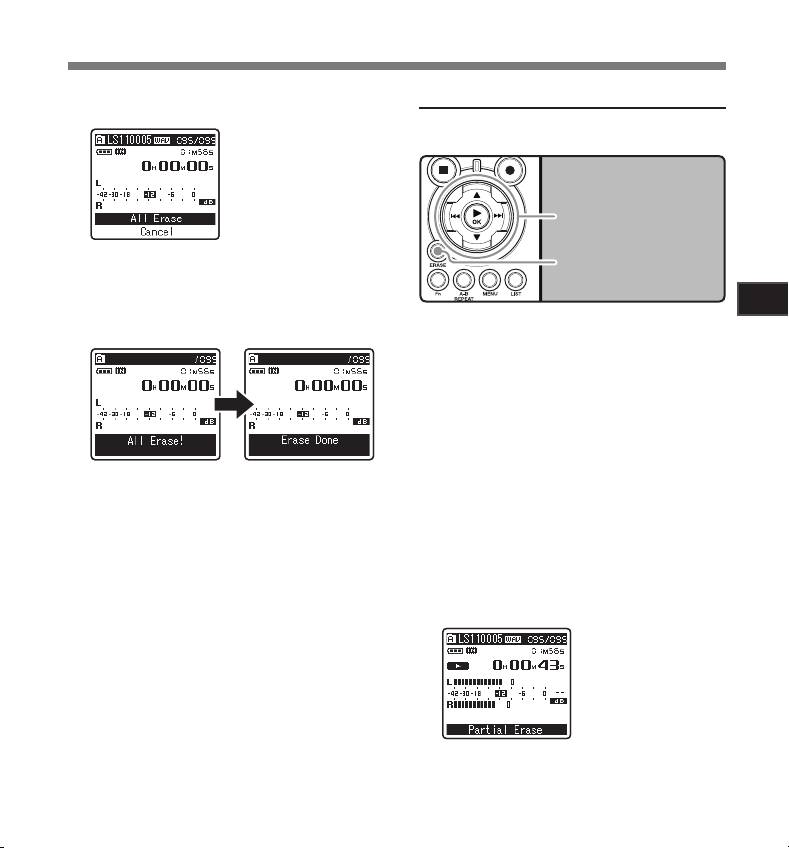
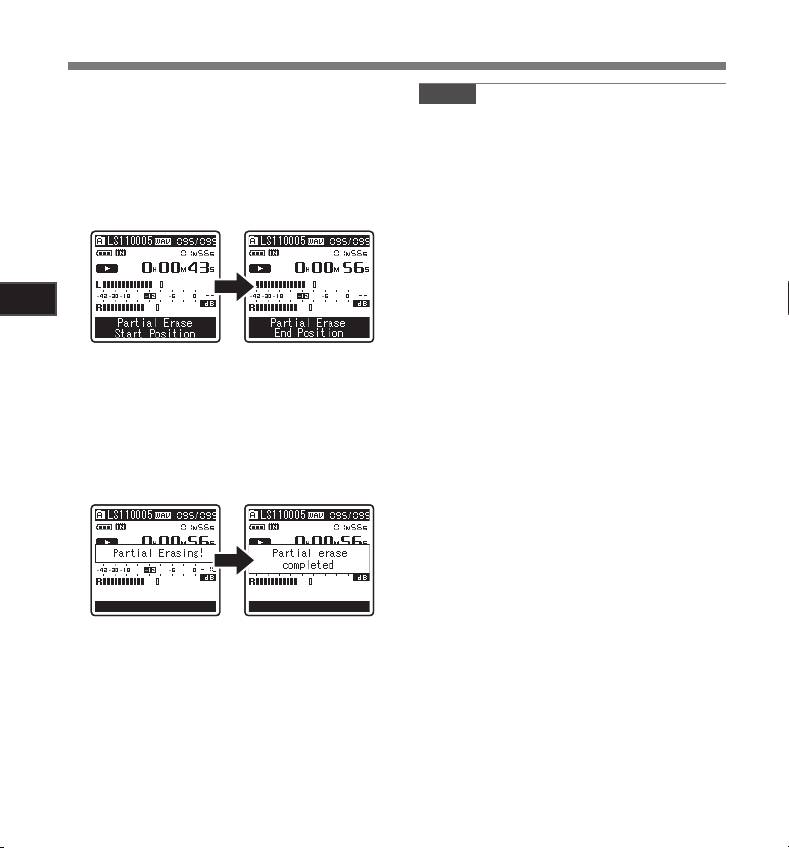
Partially erase a file
3
Erase
].
Only a PCM file recorded in the recorder can be
partially erased.
2 button
`/
OK
button
ERASE
button
Press the `/
OK
button.
4
• The display changes to [All Erase!] and
3
erasing will start. [Erase Done] is displayed
About Playback
when the files are erased.
Select the folder which contains the
1
files you want to partial erase (☞ P.19
to P.21).
In the File list display, press the 2 or
2
3 button to select the file you want to
partial erase.
• In the File display, press the 9 or 0
button to select a file.
Play the file you want to partial erase.
3
• Forward a file to the position that shall be
erased. If the file is long, use the 9 button
to move to the position you want to delete.
At the starting position of the partial
4
erase, press the
ERASE
button.
[Partial Erase] will flash
on the display.
39
Erasing
Press the
ERASE
button again.
Notes
5
• [Partial Erase Start Position] and [Partial
• Partial erase is not applicable to files recorded
Erase End Position] on the display flash
in the WMA or MP3 formats.
alternately. When the lights are flashing,
• The File Created Date will not change even if
playback continues and you can rewind or
the file is partially erased.
fast-forward as usual and fast-forward to
• An erased file cannot be restored. When an
the end of erase. If the file reaches the end
SD Card is inserted in the recorder, be sure to
during the flashing of the lights, that will be
confirm the recording media as either [Built-
the position where erase ends.
in Memory] or [SD Card] so that there is no
mistake (☞ P.41, P.46).
• When attempting to perform operations such as
rewriting the contents of an SD Card in cases
where the card has been write protected, [SD
Card Locked] will appear. The playback opera-
3
tion can be performed, but the write protection
About Playback
must first be turned off when overwriting the
contents on the card (☞ P.18).
• The locked files and files set as read-only
cannot be erased (☞ P.41, P.47).
At the position you want to end partial
6
• If an action is not selected within 8 seconds,
erase, press the
ERASE
button again.
the recorder will return to stop status.
• The display will switch to [Partial Erasing !]
• Never perform operations such as the following
and start the partial erase. The deletion is
while processing, as they may damage the
completed when [Partial erase completed]
data. In addition, replace the batteries with two
is displayed.
new ones in order to ensure that the batteries
• Playback will stop at the end location of the
will not run out while processing.
partial erase.
1 Turning off the power while processing.
2 Removing the batteries while processing.
3 Remove the SD Card during processing
when [SD Card] is being used as the record-
ing media.
Performing any of these operations may dam-
age the data.
• You cannot delete folders through the re-
corder.
40


