Jura Capresso 571: instruction
Class: Small Kitchen Appliances
Type: Water Heater
Manual for Jura Capresso 571
de
en
fr
it
nl
es
Tassenwärmer / Cup warmer
Bedienungsanleitung Tassenwärmer
pt
Cup Warmer Instructions for Use
Mode d’emploi du chauffe-tasses
Istruzioni per l’uso scaldatazze
Gebruiksaanwijzing kopjeswarmer
sv
Modo de empleo para calentador de tazas
Manual de instruções do dispositivo de aquecimento de chávenas
Bruksanvisning koppvärmare
ru
Руководство по эксплуатации подогревателя чашек
JURA Type 571

JURA Tassenwärmer / Cup Warmer
IMPORTANT SAFEGUARDS
Follow the basic safety precautions
Z
Always attach plug to appliance first, then
When using electrical appliances, basic safety
plug cord into the wall outlet. To discon-
precautions should always be followed, to reduce
nect, turn any control to »off«, then remove
the risk of fire, electric shock, and/or injury to per-
plug from wall outlet.
sons, including the following:
Z
Do not use appliance for other than intent-
Z
Read all instructions.
ed use.
Z
To protect against fire, electric shock and
Z
For household use only.
injury to persons, do not immerse cord,
plugs, or body of machine in water or other
Special cord set instructions
liquid.
a. A short power supply cord is provided to
Z
Do not touch hot surfaces. Use handles or
reduce the risk resulting from becoming
knobs.
entangled in or tripping over a long cord.
Z
Close supervision is necessary when any
b. Longer extension cords are available and
appliance is used by or near children.
may be used if care is exercised in their
Z
Unplug from outlet when not in use and
use.
before cleaning. Allow to cool before
c. If an extension cord is used,
putting on or taking off parts.
1. the marked electrical rating of the exten-
Z
Do not operate any appliance with a dam-
sion cord should be at least as great as
aged cord or plug or after the appliance
the electrical rating of the appliance, and
malfunctions, or has been damaged in any
2. if the appliance is of the grounded type,
manner. Return appliance to the nearest
the extension cord should be a ground-
authorized service facility for examination,
ing type 3-wire cord, and
repair or adjustment.
3. the longer cord shall be arranged so that
Z
The use of accessory attachement not rec-
it will not drape over the counter top or
ommended by the appliance manufactur-
tabletop where it can be pulled on by
er may result in fire, electric shock, or injury
children of tripped over.
to persons.
Z
Do not use outdoors.
Warning
Z
Do not let the cord hang over the edge of
To reduce the risk of fire or electric shock, do not
a table or counter, or touch hot surfaces.
remove any service covers. No user serviceable
Z
Do not place on or near a hot gas or electric
parts inside. Repair should be done by authorized
burner, or in a heated oven.
personnel only.
SAVE THESE INSTRUCTIONS
2

JURA Tassenwärmer / Cup Warmer
Caution
This appliance is for household use only. Any
servicing other than cleaning and user mainte-
nance should be performed by an authorized
service representative:
Z
Do not immerse base in water or try to dis-
assemble.
Z
To reduce the risk of fire or electric shock,
do not remove the base. No user servicea-
ble parts inside. Repair should be done by
authorized service personnel only.
Z
Keep the cord away from hot parts of the
appliance during operation.
Z
Never clean with scouring powders or hard
implements.
NEVER DO (or you will void your
warranty protection):
Z
Never do anything with the appliance
which is not described in the User‘s
Manual. In case of doubt, call your dealer.
3

JURA Tassenwärmer / Cup Warmer
4
de
JURA-Tassenwärmer
Ihr JURA-Tassenwärmer
Symbolbeschreibung ............................................................................................................................................ 5
Bedienelemente .....................................................................................................................................................6
Wichtige Hinweise
7
Bestimmungsgemäße Verwendung .................................................................................................................. 7
Zu Ihrer Sicherheit ................................................................................................................................................. 7
1 Vorbereiten
8
Lieferumfang ..........................................................................................................................................................8
Aufstellen und anschließen .................................................................................................................................. 8
2 Tassen erwärmen (Manuelles Einschalten)
8
3 Automatisches Ein- und Ausschalten
8
Uhrzeit einstellen ...................................................................................................................................................8
Automatisches Einschalten ..................................................................................................................................9
Automatisches Ausschalten .................................................................................................................................9
Automatisches Ein- und Ausschalten deaktivieren .........................................................................................9
4 Displayanzeigen 1
0
5 Pflege 1
0
6 Umweltgerechte Entsorgung 1
0
7 Technische Daten 1
0
Symbolbeschreibung
Warnhinweise:
VORSICHT
Beachten Sie stets die Informationen,
die mit VORSICHT oder WARNUNG mit
Warnpiktogramm gekennzeichnet sind.
Das Signalwort WARNUNG weist Sie auf
mögliche, schwere Verletzungen hin,
das Signalwort VORSICHT auf mögliche,
leichte Verletzungen.
Verwendete Symbole:
E
Hinweise und Tipps, damit Ihnen der
Umgang mit Ihrem Tassenwärmer noch
leichter fällt.
T
Handlungsaufforderung. Hier werden
Sie zu einer Aktion aufgefordert.
5
JURA-Tassenwärmer
Bedienelemente
1
2
3
6
4
7
5
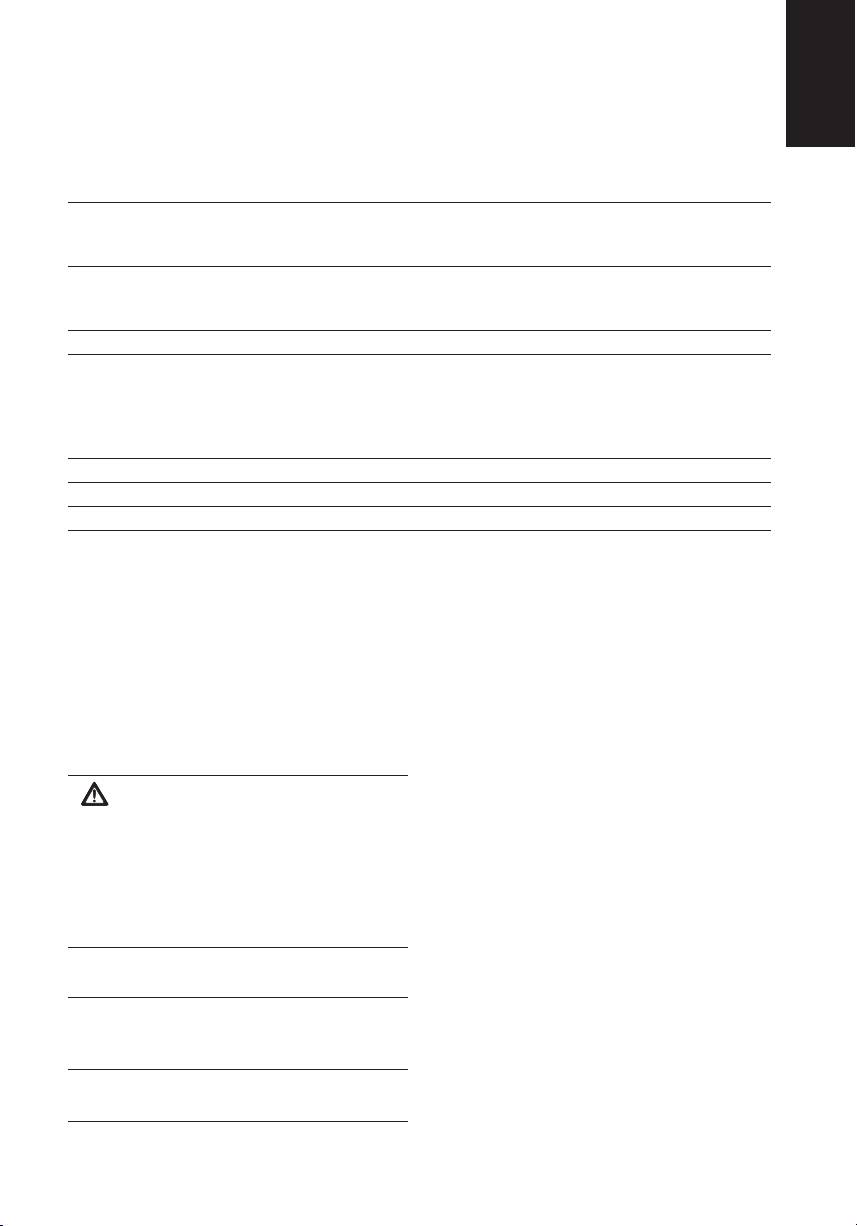
1 JURA-Tassenwärmer
6 Pfeiltaste
2 Tassenschublade
7 Uhrtaste
3 Abdeckung
4 Display
5 Taste Ein/Aus Q mit Betriebsanzeige
6

de
JURA-Tassenwärmer
Wichtige Hinweise
beschrieben sind. Das Gerät enthält Strom
führende Teile.
Bestimmungsgemäße Verwendung
Das Gerät ist für den privaten Hausgebrauch
Ein beschädigtes Gerät ist nicht sicher und kann
konzipiert und konstruiert. Das Gerät dient
Verletzungen und Brand verursachen. So vermei-
ausschließlich dazu, Tassen in den ausziehbaren
den Sie Schäden und damit mögliche Verletzungs-
Tassenschubladen abzustellen und zu erwärmen.
und Brandgefahren:
Jede andere Verwendung gilt als nicht bestim-
Z
Lassen Sie das Netzkabel niemals lose
mungsgemäß. Die JURA Elektroapparate AG
herabhängen. Das Netzkabel kann zur
übernimmt keine Haftung für Folgen aus nicht
Stolperfalle werden oder beschädigt werden.
bestimmungsgemäßer Verwendung.
Z
Schützen Sie das Gerät vor Witterungseinflüs-
sen wie Regen, Frost und direkter Sonnenein-
Lesen und beachten Sie diese Bedienungsanleitung
strahlung.
vollständig vor Gebrauch des Geräts. Halten Sie die
Z
Verwenden Sie das Gerät nicht zum Aufbewah-
Bedienungsanleitung beim Gerät verfügbar und
ren und Erwärmen von Getränken oder
geben Sie sie bei Bedarf an nachfolgende
anderen Lebensmitteln.
Anwender weiter.
Z
Augezogene Tassenschubladen nicht schwer
belasten.
Zu Ihrer Sicherheit
Z
Stellen Sie keine feuchten oder nassen Tassen
Lesen und beachten Sie die folgenden wichtigen
in die Tassenschubladen.
Sicherheitshinweise sorgfältig.
Z
Tauchen Sie das Gerät, das Netzkabel und die
So vermeiden Sie Lebensgefahr durch Stromschlag:
Anschlüsse nicht in Wasser.
Z
Benutzen Sie nur das von JURA mitgelieferte
Z
Stellen Sie das Gerät und seine Einzelteile nicht
original Netzkabel.
in die Spülmaschine.
Z
Nehmen Sie nie ein Gerät mit Beschädigungen
Z
Schalten Sie das Gerät vor Reinigungsarbeiten
oder schadhaftem Netzkabel in Betrieb.
aus und ziehen Sie den Netzstecker. Wischen
Z
Nehmen Sie das Gerät nie mit nassen Händen
Sie das Gerät stets feucht, aber niemals nass ab
in Betrieb.
und schützen Sie es vor dauerhaftem Spritzwas-
Z
Achten Sie vor der Inbetriebnahme darauf,
ser. Die inneren Seitenwände nicht reinigen.
dass das Netzkabel trocken ist.
Z
Das Gerät nur an Netzspannung gemäß
Z
Schließen Sie das Gerät nur mit dem im
Typenschild anschließen. Das Typenschild ist
Lieferumfang enthaltenen Netzkabel an das
auf der Unterseite des Geräts angebracht.
Wechselstromnetz an.
Weitere technische Daten finden Sie im
Z
Bei Hinweisen auf Beschädigungen, beispiels-
Kapitel 7 »Technische Daten«).
weise Schmorgeruch, trennen Sie das Gerät
Z
Schalten Sie das Gerät bei längerer Abwesen-
unverzüglich vom Netz und wenden Sie sich
heit aus und ziehen Sie den Netzstecker.
an den JURA-Service.
Z
Betreiben Sie das Gerät nur unter Aufsicht.
Z
Achten Sie darauf, dass sich das Gerät und das
Netzkabel nicht in der Nähe von heißen
Personen, einschließlich Kinder, die aufgrund ihrer
Oberflächen oder offenen Flammen befinden.
Z
physischen, sensorischen oder geistigen
Z
Achten Sie darauf, dass das Netzkabel nicht
Fähigkeiten oder
eingeklemmt wird oder an scharfen Kanten
Z
Unerfahrenheit oder Unkenntnis
scheuert.
nicht in der Lage sind, das Gerät sicher zu
Z
Öffnen und reparieren Sie das Gerät niemals
bedienen, dürfen das Gerät nicht ohne Aufsicht
selbst. Nehmen Sie keine Veränderungen am
oder Anweisung durch eine verantwortliche Person
Gerät vor, die nicht in der Bedienungsanleitung
nutzen.
7
JURA-Tassenwärmer
1 Vorbereiten
2 Tassen erwärmen
(Manuelles Einschalten)
Lieferumfang
Im Lieferumfang sind enthalten:
Z
JURA-Tassenwärmer
J
Verbrennungsgefahr. Die Abstellflächen
Z
Bedienungsanleitung
der Tassenschubladen können während
Z
Netzkabel
des Betriebs heiß werden.
T
Berühren Sie nicht die Abstellflächen der Tas-
senschubladen.
Aufstellen und anschließen
Beachten Sie beim Aufstellen Ihres Tassenwärmers
T
Öffnen Sie eine Tassenschublade.
folgende Punkte:
T
Stellen Sie die Tassen in die Tassenschublade
Z
Stellen Sie das Gerät auf eine waagrechte
und schließen Sie diese.
Fläche.
Q T Schalten Sie das Gerät mit der Taste Ein/Aus
Z
Wählen Sie den Standort des Geräts so, dass
ein.
es vor Überhitzung geschützt ist.
Die Betriebsanzeige leuchtet und das Gerät
beginnt, die Tassen zu erwärmen. Im Display
unter der Abdeckung wird ON angezeigt.
J
WARNUNG
Lebensgefahr durch Stromschlag bei Betrieb mit
E
Wenn Sie das Gerät ausschalten möchten,
schadhaftem Netzkabel.
drücken Sie die Taste Ein/Aus Q. Die
T
Nehmen Sie nie ein Gerät mit schadhaftem
Betriebsanzeige leuchtet nicht mehr, im
Netzkabel in Betrieb.
Display wird OFF angezeigt.
T
Stellen Sie das Gerät vorsichtig auf den Kopf.
T
Verbinden Sie das Netzkabel mit dem Gerät.
3 Automatisches Ein- und Ausschalten
E
Wird das Gerät vom Netz getrennt, werden
alle Einstellungen zurückgesetzt.
Uhrzeit einstellen
Für die Funktion »Automatisches Ein- und
Ausschalten« müssen Sie zunächst die Uhrzeit
einstellen:
T
Öffnen Sie die Abdeckung.
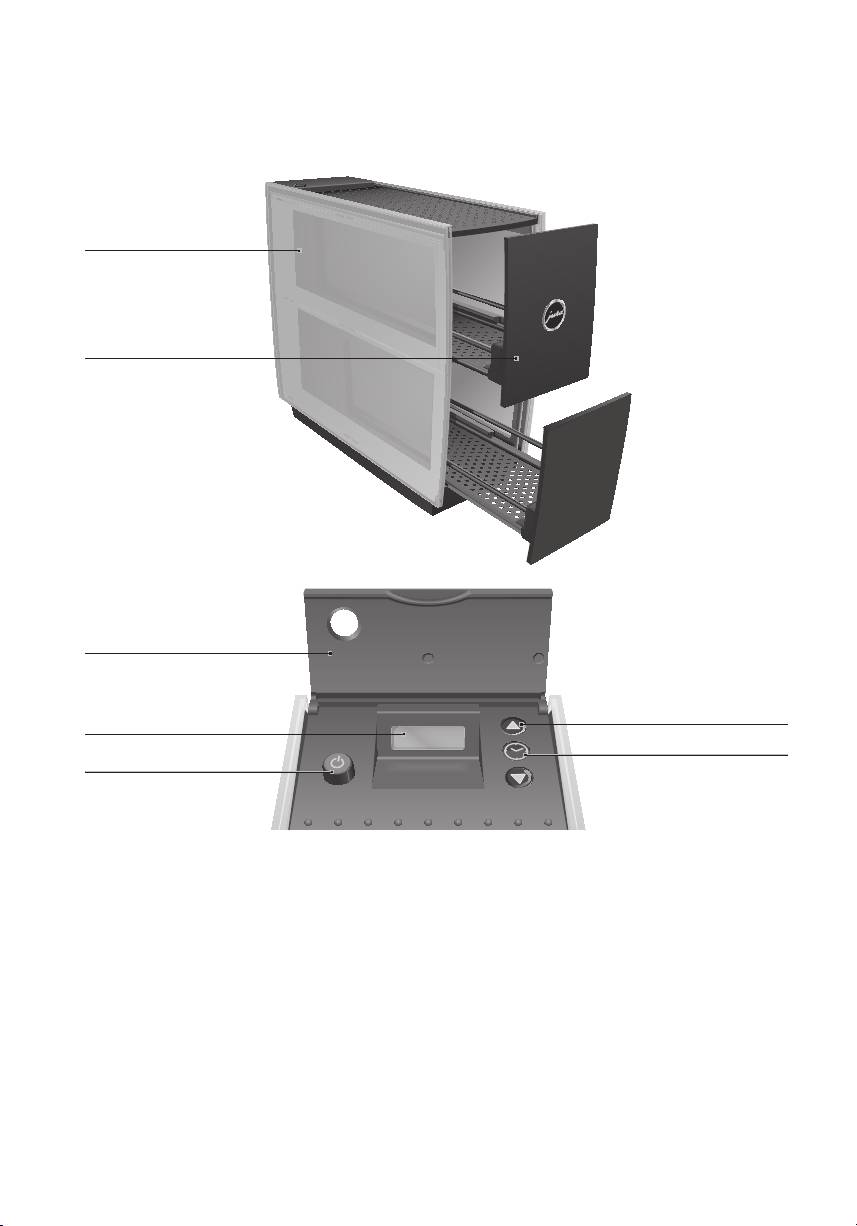
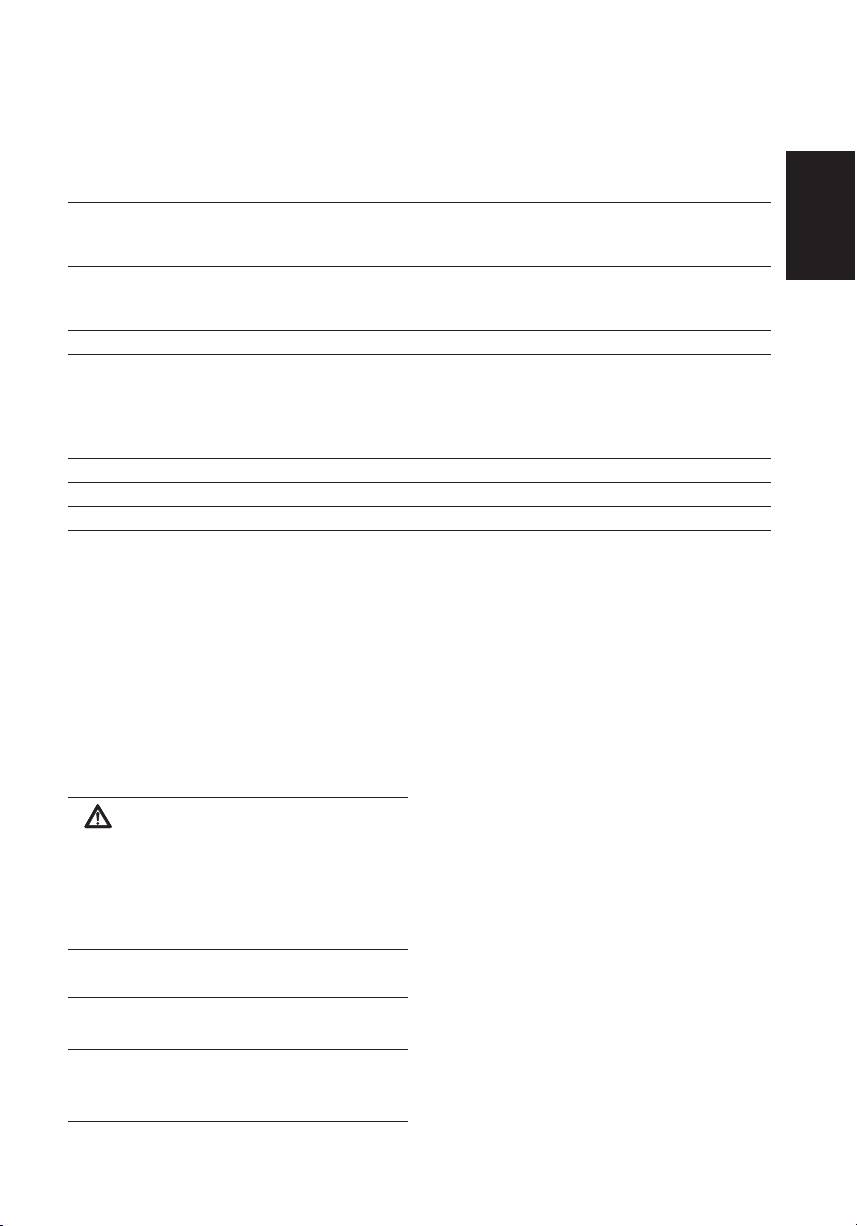
E
An der Unterseite des Tassenwärmers
T
Drücken Sie die Uhrtaste.
können Sie das Netzkabel je nach benötigter
Im Display erscheint AM 12:00.
Länge verstauen.
T
Drücken Sie eine der Pfeiltasten, um das
Uhrzeitformat zu wechseln (AM/PM oder
T
Stellen Sie das Gerät wieder auf die
24h).
Standfüße.
T
Drücken Sie die Uhrtaste, um das Uhrzeitfor-
T
Stecken Sie den Netzstecker in eine
mat zu bestätigen.
Netzsteckdose.
00:00 (Beispiel), die Stunden blinken.
Im Display unter der Abdeckung wird OFF
T
Drücken Sie die Pfeiltasten, um die Stunden
angezeigt.
einzustellen.
8

de
JURA-Tassenwärmer
T
Drücken Sie die Uhrtaste, um die Einstellung
Automatisches Ausschalten
der Stunden zu bestätigen.
T
Öffnen Sie die Abdeckung.
10:00 (Beispiel), die Minuten blinken.
T
Drücken Sie die Uhrtaste.
T
Drücken Sie die Pfeiltasten, um die Minuten
Im Display wird die von Ihnen eingestellte
einzustellen.
Uhrzeit angezeigt.
10:30 (Beispiel)
T
Drücken Sie zwei Mal eine der Pfeiltasten.
T
Drücken Sie die Uhrtaste, um die Einstellung
AUTO OFF --:-- (Beispiel)
der Minuten zu bestätigen.
T
Drücken Sie die Uhrtaste.
Im Display erscheint ON oder OFF, je
AUTO OFF --:-- (Beispiel), die Stunden
nachdem, ob das Gerät ein- oder ausge-
blinken.
schaltet ist.
T
Drücken Sie die Pfeiltasten, um die Stunden
einzustellen.
E
Sie können die Einstellung der Uhrzeit
AUTO OFF 18:00 (Beispiel)
jederzeit ändern. Drücken Sie hierzu die
T
Drücken Sie die Uhrtaste, um die Einstellung
Uhrtaste zwei Mal und nehmen Sie die
der Stunden zu bestätigen.
Änderung vor.
AUTO OFF 18:00 (Beispiel), die Minuten
blinken.
T
Drücken Sie die Pfeiltasten, um die Minuten
Automatisches Einschalten
einzustellen.
T
Öffnen Sie die Abdeckung.
AUTO OFF 18:30 (Beispiel)
T
Drücken Sie die Uhrtaste.
T
Drücken Sie die Uhrtaste, um die Einstellung
Im Display wird die von Ihnen eingestellte
der Minuten zu bestätigen.
Uhrzeit angezeigt.
Im Display erscheint AUTO (ON oder OFF, je
T
Drücken Sie eine der Pfeiltasten.
nachdem, ob das Gerät ein- oder ausge-
ON --:--
schaltet ist).
T
Drücken Sie die Uhrtaste.
--:-- , die Stunden blinken.
Automatisches Ein- und Ausschalten deakti-
T
Drücken Sie die Pfeiltasten, um die Stunden
vieren
einzustellen.
Um das automatische Ein- oder Ausschalten zu
AUTO ON 07:00 (Beispiel)
deaktivieren, müssen Sie die jeweilige Uhrzeit auf
T
Drücken Sie die Uhrtaste, um die Einstellung
»--:--« stellen.
der Stunden zu bestätigen.
AUTO ON 07:00 (Beispiel), die Minuten
Beispiel: So deaktivieren Sie das automatische
blinken.
Ausschalten.
T
Drücken Sie die Pfeiltasten, um die Minuten
T
Öffnen Sie die Abdeckung.
einzustellen.
T
Drücken Sie die Uhrtaste.
AUTO ON 07:30 (Beispiel)
T
Drücken Sie zwei Mal eine der Pfeiltasten.
T
Drücken Sie die Uhrtaste, um die Einstellung
AUTO OFF 18:30 (Beispiel)
der Minuten zu bestätigen.
T
Drücken Sie die Uhrtaste.
Im Display erscheint AUTO (ON oder OFF, je
AUTO OFF 18:30 (Beispiel), die Stunden
nachdem, ob das Gerät ein- oder ausge-
blinken.
schaltet ist).
T
Stellen Sie Stunden auf »00«.
T
Drücken Sie die Uhrtaste.
AUTO OFF 00:30 (Beispiel), die Minuten
blinken.
9

JURA-Tassenwärmer
T
Drücken Sie die Pfeiltasten, bis »--:--«
7 Technische Daten
angezeigt wird.
T
Drücken Sie die Uhrtaste, um die Einstellung
Spannung 120 V, 60 Hz
zu bestätigen.
(nur USA/Kanada)
Das automatische Ausschalten ist deakti-
120–240 V, 50–60 Hz
(Europa, übrige Länder)
viert.
Sicherheitsprüfung UL 1026
IEC/EN 60335-1
4 Displayanzeigen
IEC/EN 60335-2-12
Leistung 40 W (nur USA/Kanada)
Z
ON: Gerät ist manuell eingeschaltet
60 W (max. 110 W) (Europa,
Z
OFF: Gerät ist manuell ausgeschaltet
Australien, Neuseeland,
Z
AUTO ON: Gerät ist automatisch eingeschaltet
übrige Länder)
Z
AUTO OFF: Gerät ist automatisch ausgeschaltet
Gewicht ca. 3,8 kg
Kabellänge ca. 1,1 m
5 Pflege
Maße (B x H x T) 12,2 x 30,6 x 34,9 cm
E
Verwenden Sie zur Pflege keine scharfen,
scheuernden Reinigungsmittel oder harten
Richtlinien
Gegenstände. Dies kann das Gerät beschädi-
Das Gerät entspricht den folgenden Richtlinien:
gen.
Z
2006/95/EG – Niederspannungsrichtlinie
Z
2004/108/EG – Elektromagnetische Verträglich
-
T
Ziehen Sie vor jedem Reinigen des Geräts
keit
den Netzstecker aus der Netzsteckdose.
Z
2005/32/EG – Energierichtlinie
T
Reinigen Sie das Gerät außen mit einem
weichen, feuchten Tuch (z.B. Mikrofaser).
Technische Änderungen
Technische Änderungen vorbehalten.
E
Mikrofasertücher von JURA sind im
Fachhandel erhältlich.
Feedback
Ihre Meinung ist uns wichtig!
Nutzen Sie den Kontakt-Link unter www.jura.com.
6 Umweltgerechte Entsorgung
Copyright
Altgeräte bitte umweltgerecht entsorgen.
Die Bedienungsanleitung enthält Informationen,
die durch Copyright geschützt sind. Fotokopieren
oder Übersetzen in eine andere Sprache ist ohne
H
vorherige schriftliche Zustimmung durch die
JURA Elektroapparate AG nicht zulässig.
Altgeräte enthalten wertvolle recyclingfähige
Materialien, die einer Verwertung zugeführt
JURA Elektroapparate AG
werden sollten. Entsorgen Sie Altgeräte deshalb
Kaffeeweltstraße 10
über geeignete Sammelsysteme.
CH-4626 Niederbuchsiten
www.jura.com
10
de
JURA Cup Warmer
Your JURA cup warmer
Symbol description ...............................................................................................................................................11
en
Control elements ..................................................................................................................................................12
Important information 1
3
Proper use ..............................................................................................................................................................13
For your safety ......................................................................................................................................................13
1 Preparation 1
4
Supplied as standard............................................................................................................................................14
Set-up and connection ........................................................................................................................................14
2 Warming cups (manual switch-on) 1
4
3 Automatic switch-on / switch-off 1
4
Setting the time ....................................................................................................................................................14
Automatic switch-on ............................................................................................................................................15
Automatic switch-off ............................................................................................................................................15
Deactivating automatic switch-on / switch-off ...............................................................................................15
4 Displays 1
5
5 Maintenance 1
6
6 Environmentally neutral disposal 1
6
7 Technical data 1
6
Symbol description
Warning:
CAUTION
Always take note of any information
marked with the CAUTION or WARNING
symbol. The signal word WARNING
points out potential risk of serious
injury, and the signal word CAUTION
potential risk of slight injury.
Symbols used:
E
Information and tips to make use of
your cup warmer even easier.
T
Prompt to take action. This symbol
means that you are being prompted to
perform some action.
11

JURA Cup Warmer
Control elements
1
2
3
6
4
7
5
1 JURA Cup Warmer
6 Arrow button
2 Cup drawer
7 Clock button
3 Cover
4 Display
5 On/off button Q with operation
indicator lamp
12

de
JURA Cup Warmer
Important information
A defective machine is not safe and could cause
injury or fire. To avoid damage and any associated
en
Proper use
risk of injury or fire:
The machine was designed and built for domestic
Z
Never allow the mains cable to loosely hang
use. The machine should only be used to heat cups
down. The mains cable can be tripped over or
placed in the pull-out cup drawers. Use for any
damaged.
other purpose will be deemed improper. JURA
Z
Protect the machine from environmental
Elektroapparate AG cannot accept any responsibil-
influences such as rain, frost and direct
ity for the consequences of improper use.
sunlight.
Before using the machine always read these
Z
Do not use the machine to store or heat up
instructions for use thoroughly and completely
drinks or other foods.
and comply with the instructions they contain.
Z
Do not place heavy loads on the extended cup
Keep these instructions for use close to the
drawers.
machine and pass them on to the next user if
Z
Do not place damp or wet cups in the cup
applicable.
drawers.
Z
Do not put the machine, mains cable or
For your safety
connectors in water.
Please read and note carefully the following
Z
Do not put the machine or any individual
important safety information.
parts in the dishwasher.
To avoid the life-threatening danger of electric
Z
Turn the machine off and disconnect the
shock:
mains plug before starting any cleaning
Z
Only use the original mains cable supplied by
operation. Always wipe the machine with a
JURA.
damp cloth rather than a wet one, and protect
Z
Never use a machine which has been damaged
it from prolonged water splash. Do not clean
or with a defective mains cable.
the inner side panels.
Z
Never use the machine when you have wet
Z
Only connect the machine to the mains
hands.
voltage in accordance with the information on
Z
Make sure the mains cable is dry before first-
the rating plate. The rating plate is located on
time use.
the underside of the machine. Further
Z
Only connect the machine to the AC mains
technical data is given in Chapter 7, ‘Technical
power with the mains cable supplied with the
data’.
machine.
Z
Turn the machine off and disconnect the
Z
In the event of signs of damage, for example if
mains plug if you will be away for any length
there is a smell of burning, unplug the
of time.
machine immediately from the mains supply
Z
Do not leave the machine unattended when it
and contact JURA service.
is in operation.
Z
Make sure that the machine and the mains
cable are not located close to hot surfaces or
The machine is only allowed to be used by people
naked flames.
who can use it safely. People, including children,
Z
Be careful to ensure that the mains cable does
who do not have the
not get caught and does not rub against sharp
Z
physical, sensory or mental capabilities or
edges.
Z
experience or knowledge
Z
Never open and repair the machine yourself.
to use the machine safely must be supervised by a
Do not modify the machine in any way that is
responsible person when using it, or be instructed
not described in the instructions for use. The
in how to use it correctly.
machine contains live parts.
13
JURA Cup Warmer
1 Preparation
2 Warming cups (manual switch-on)
Supplied as standard
J
Risk of burns. The storage surfaces in the
The following items are supplied as standard:
cup drawers can get hot during operation.
Z
JURA Cup Warmer
T
Do not touch the storage surfaces in the cup
Z
Instructions for use
drawers.
Z
Mains cable
T
Open a cup drawer.
T
Place the cups in the cup drawer and close it.
Set-up and connection
Q T Switch the machine on with the on/off
When setting up your cup warmer, observe the
button.
following:
The operation indicator lamp lights up and
Z
Set the machine down on a horizontal surface.
the machine starts to warm the cups. ON is
Z
Choose a spot for the machine which is
displayed below the cover.
protected against overheating.
E
When you want to switch off the machine,
press the on/off button Q. The operation
J
WARNING
indicator lamp goes out and OFF is
If the machine is operated with a defective mains
displayed.
cable, there is a danger of electric shock.
T
Never use a machine which has a defective
mains cable.
3 Automatic switch-on / switch-off
T
Carefully turn the machine upside down and
E
If the machine is disconnected from the
set it down.
mains, all settings are reset.
T
Connect the mains cable to the machine.
Setting the time
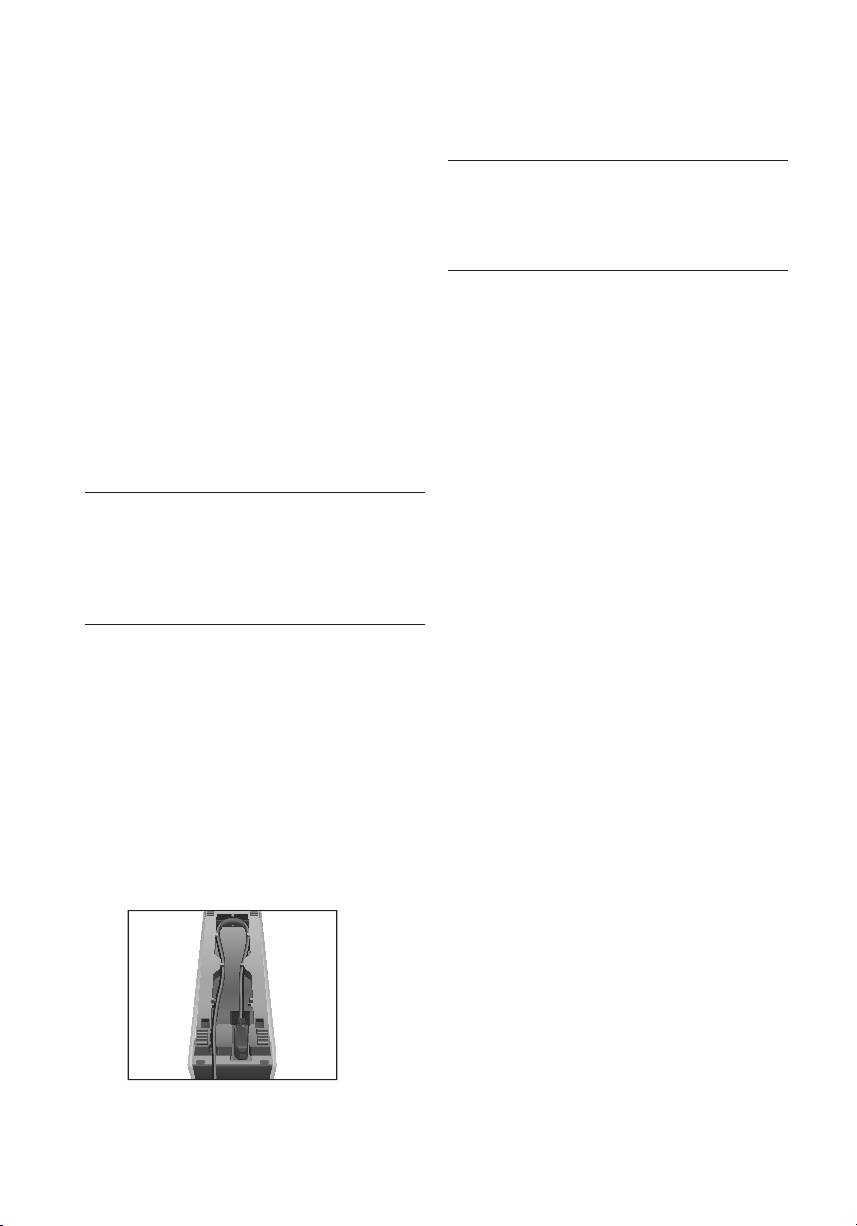
E
Spare cable can be stored on the underside
For the ‘automatic switch-on / switch-off’ function,
of the cup warmer depending on the length
you must first set the time:
of cable required.
T
Open the cover.
T
Press the Clock button.
T
Set the machine down the right way up
AM 12:00 appears on the display.
again.
T
Press one of the arrow buttons to change
T
Insert the mains plug into a power socket.
the time format (AM/PM or 24h).
OFF is displayed below the cover.
T
Press the Clock button to confirm the time
format.
00:00 (example), the hours flash.
T
Use the arrow buttons to set the hours.
T
Press the Clock button to confirm the hours
setting.
10:00 (example), the minutes flash.
T
Use the arrow buttons to set the minutes.
10:30 (example)
T
Press the Clock button to confirm the
minutes setting.
14

de
JURA Cup Warmer
ON or OFF appears in the display depending
T
Use the arrow buttons to set the minutes.
on whether the machine is switched on or
AUTO OFF 18:30 (example)
en
off.
T
Press the Clock button to confirm the
minutes setting.
E
You can change the time setting at any time.
AUTO ON or AUTO OFF appears in the
To do this, press the Clock button twice and
display (depending on whether the machine
make the necessary changes.
is switched on or off).
Deactivating automatic switch-on / switch-off
Automatic switch-on
To deactivate automatic switch-on or switch-off,
T
Open the cover.
you must set the relevant time to ‘--:--’.
T
Press the Clock button.
The time set by the user is displayed.
Example: Here is how to deactivate automatic
T
Press one of the arrow buttons.
switch-off.
ON --:--
T
Open the cover.
T
Press the Clock button.
T
Press the Clock button.
--:-- , the hours flash.
T
Press one of the arrow buttons twice.
T
Use the arrow buttons to set the hours.
AUTO OFF 18:30 (example)
AUTO ON 07:00 (example)
T
Press the Clock button.
T
Press the Clock button to confirm the hours
AUTO OFF 18:30 (example), the hours flash.
setting.
T
Set the hours to ‘00’.
AUTO ON 07:00 (example), the minutes
T
Press the Clock button.
flash.
AUTO OFF 00:30 (example), the minutes
T
Use the arrow buttons to set the minutes.
flash.
AUTO ON 07:30 (example)
T
Press the arrow buttons until ‘--:--’ is
T
Press the Clock button to confirm the
displayed.
minutes setting.
T
Press the Clock button to confirm the
AUTO ON or AUTO OFF appears in the
setting.
display (depending on whether the machine
Automatic switch-off is deactivated.
is switched on or off).
4 Displays
Automatic switch-off
T
Open the cover.
Z
ON: Machine is switched on manually
T
Press the Clock button.
Z
OFF: Machine is switched off manually
The time set by the user is displayed.
Z
AUTO ON: Machine is switched on automati-
T
Press one of the arrow buttons twice.
cally
AUTO OFF --:-- (example)
Z
AUTO OFF: Machine is switched off automati-
T
Press the Clock button.
cally
AUTO OFF --:-- (example), the hours flash.
T
Use the arrow buttons to set the hours.
AUTO OFF 18:00 (example)
T
Press the Clock button to confirm the hours
setting.
AUTO OFF 18:00 (example), the minutes
flash.
15

JURA Cup Warmer
5 Maintenance
Cable length Approx. 1.1 m
E
Do not use any sharp, corrosive or abrasive
Dimensions
12.2 x 30.6 x 34.9 cm
(W x H x D)
cleaning agents or hard objects for
maintenance. This may damage the
machine.
Directives
T
Before cleaning the machine disconnect the
The machine complies with the following
mains plug from the power socket.
directives:
T
Clean the outside of the machine with a
Z
2006/95/EC – Low Voltage Directive
soft, damp cloth (e.g. a microfibre cloth).
Z
2004/108/EC – Electromagnetic Compatibility
Z
2005/32/EC – Ecodesign
E
JURA microfibre cloths are available from
stockists.
Technical changes
We reserve the right to make technical changes.
6 Environmentally neutral disposal
Feedback
Your opinion is important to us!
Please dispose of old machines in an environmen-
Use the contact link at www.jura.com.
tally neutral way.
Copyright
The instructions for use contain information which
H
is protected by copyright. It is not permitted to
photocopy or translate these instructions for use
Old machines contain valuable materials capable
into another language without the express written
of being recycled which should be salvaged for
consent of JURA Elektroapparate AG.
recycling. Please therefore dispose of old machines
via suitable collection systems.
JURA Elektroapparate AG
Kaffeeweltstrasse 10
CH-4626 Niederbuchsiten
7 Technical data
www.jura.com
Voltage 120 V, 60 Hz
(USA/Canada only)
120–240 V, 50–60 Hz
(Europe, other countries)
Safety test UL 1026
IEC/EN 60335-1
IEC/EN 60335-2-12
Power 40 W (USA/Canada only)
60 W (max. 110 W) (Europe,
Australia, New Zealand,
other countries)
Weight Approx. 3.8 kg
16

de
Chauffe-tasses JURA
Votre chauffe-tasses JURA
Description des symboles ...................................................................................................................................17
Eléments de commande .....................................................................................................................................18
Informations importantes 1
9
Utilisation conforme ............................................................................................................................................19
Pour votre sécurité ...............................................................................................................................................19
1 Préparation 2
0
Matériel fourni ......................................................................................................................................................20
fr
Installation et branchement ..............................................................................................................................20
2 Chauffage des tasses (allumage manuel) 2
0
3 Allumage et extinction automatiques 2
0
Réglage de l’heure ...............................................................................................................................................20
Allumage automatique ........................................................................................................................................21
Extinction automatique .......................................................................................................................................21
Désactivation de l’allumage et de l’extinction automatiques ......................................................................21
4 Affichages 2
2
5 Entretien 2
2
6 Elimination écologique 2
2
7 Caractéristiques techniques 2
2
Description des symboles
Mises en garde :
ATTENTION
Tenez toujours compte des informa-
tions signalées par ATTENTION ou
AVERTISSEMENT avec un pictogramme
de danger. Le mot AVERTISSEMENT
signale un risque de blessure grave ; le
mot ATTENTION signale un risque de
blessure légère.
Symboles utilisés :
E
Informations et conseils destinés à
vous faciliter encore l’utilisation du
chauffe-tasses.
T
Demande d’action. Ce symbole vous
invite à accomplir une action.
17

Chauffe-tasses JURA
Eléments de commande
1
2
3
6
4
7
5
1 Chauffe-tasses JURA
6 Touche fléchée
2 Tiroir à tasses
7 Touche de réglage de l’heure
3 Couvercle
4 Visuel
5 Touche Marche/Arrêt Q avec témoin
de fonctionnement
18

de
Chauffe-tasses JURA
Informations importantes
mode d’emploi. L’appareil comporte des
pièces sous tension.
Utilisation conforme
Cet appareil a été conçu et construit pour un usage
Un appareil endommagé n’est pas sûr et peut être
domestique privé. Il sert exclusivement à ranger
à l’origine de blessures ou d’un incendie. Pour
des tasses dans les tiroirs à tasses coulissants et à
éviter les dommages et donc les risques de
faire chauffer des tasses. Toute autre utilisation est
blessure et d’incendie :
considérée comme non conforme. La société
Z
Ne laissez jamais le câble secteur pendre de
fr
JURA Elektroapparate AG décline toute responsabi-
manière lâche. Le câble secteur peut provo-
lité relative aux conséquences d’une utilisation non
quer une chute ou être endommagé.
conforme.
Z
Protégez l’appareil des intempéries telles que
Lisez entièrement ce mode d’emploi avant
la pluie, le gel et le rayonnement solaire direct.
d’utiliser l’appareil et respectez-le impérativement.
Z
N’utilisez pas l’appareil pour stocker et faire
Conservez ce mode d’emploi à proximité de
chauffer des boissons ou d’autres denrées
l’appareil et remettez-le aux utilisateurs suivants, le
alimentaires.
cas échéant.
Z
Ne chargez pas trop lourdement les tiroirs à
tasses lorsqu’ils sont tirés.
Pour votre sécurité
Z
Ne placez pas de tasses humides ou mouillées
Lisez et observez soigneusement les importantes
dans les tiroirs à tasses.
consignes de sécurité suivantes.
Z
Ne plongez pas l’appareil, le câble secteur et
Pour éviter tout risque d’électrocution :
les raccordements dans l’eau.
Z
Utilisez exclusivement le câble secteur
Z
Ne mettez pas l’appareil et ses composants au
d'origine fourni par JURA.
lave-vaisselle.
Z
Ne mettez jamais en service un appareil
Z
Avant tous travaux de nettoyage, mettez
endommagé ou dont le câble secteur est
l’appareil hors tension et débranchez la fiche
défectueux.
secteur. Essuyez l’appareil avec un chiffon
Z
Ne mettez jamais l’appareil en service avec les
humide, mais jamais mouillé, et protégez-le
mains mouillées.
des projections d’eau permanentes. Ne
Z
Avant la mise en service, vérifiez que le câble
nettoyez pas l’intérieur des parois latérales.
secteur est sec.
Z
Raccordez l’appareil uniquement sur une
Z
Pour brancher l’appareil au réseau alternatif,
tension secteur conforme aux indications de la
utilisez exclusivement le câble secteur fourni.
plaque signalétique. La plaque signalétique se
Z
Si vous remarquez des signes de détérioration,
trouve au-dessous de l’appareil. Vous
par exemple une odeur de brûlé, débranchez
trouverez d’autres caractéristiques techniques
immédiatement l’appareil du secteur et
au chapitre 7 « Caractéristiques techniques ».
contactez le service après-vente JURA.
Z
En cas d’absence prolongée, éteignez l’appareil
Z
Assurez-vous que l’appareil et le câble secteur
et débranchez la fiche secteur.
ne se trouvent pas à proximité de surfaces
Z
Utilisez toujours l’appareil sous surveillance.
chaudes ou de flammes nues.
Z
Assurez-vous que le câble secteur n’est pas
Les personnes, y compris les enfants,
coincé ou qu’il ne frotte pas contre des arêtes
Z
qui, en raison de leurs capacités physiques,
vives.
sensorielles ou mentales
Z
N’ouvrez et ne réparez jamais l’appareil vous-
Z
ou de leur inexpérience ou méconnaissance,
même. N’apportez à l’appareil aucune
ne seraient pas à même d’utiliser l’appareil en
modification qui ne soit pas décrite dans le
toute sécurité, ne sont autorisées à utiliser ce
19
Chauffe-tasses JURA
dernier que sous la surveillance ou en suivant les
2 Chauffage des tasses (allumage
consignes d’une personne responsable.
manuel)
J
Risque de brûlure. Les surfaces de
1 Préparation
rangement des tiroirs à tasses peuvent
devenir chaudes en cours de fonctionne-
Matériel fourni
ment.
Le matériel fourni comprend :
T
Ne touchez pas les surfaces de rangement
Z
Chauffe-tasses JURA
des tiroirs à tasses.
Z
Mode d’emploi
Z
Câble secteur
T
Ouvrez l’un des tiroirs à tasses.
T
Placez les tasses dans le tiroir à tasses et
Installation et branchement
refermez ce dernier.
Respectez les points suivants lors de l’installation
Q T Allumez l’appareil à l’aide de la touche
de votre chauffe-tasses :
Marche/Arrêt.
Z
Placez l’appareil sur une surface horizontale.
Le témoin de fonctionnement s’allume et
Z
Sélectionnez un emplacement à l’abri de toute
l’appareil commence à faire chauffer les
source de chaleur excessive.
tasses. ON s’affiche sur le visuel placé sous le
couvercle.
J
AVERTISSEMENT
E
Si vous souhaitez éteindre l’appareil,
Risque d’électrocution en cas de fonctionnement
appuyez sur la touche Marche/Arrêt Q. Le
avec un câble secteur défectueux.
témoin de fonctionnement s’éteint, OFF
T
Ne mettez jamais en service un appareil
s’affiche sur le visuel.
dont le câble secteur est défectueux.
T
Placez délicatement l’appareil la tête en bas.
3 Allumage et extinction automatiques
T
Reliez le câble secteur à l’appareil.
E
Lorsque la machine est débranchée, tous les
réglages sont réinitialisés.
Réglage de l’heure
Pour la fonction « Allumage et extinction automati-
ques », vous devez d’abord régler l’heure :
T
Ouvrez le couvercle.
T
Appuyez sur la touche de réglage de l’heure.
AM 12:00 apparaît sur le visuel.
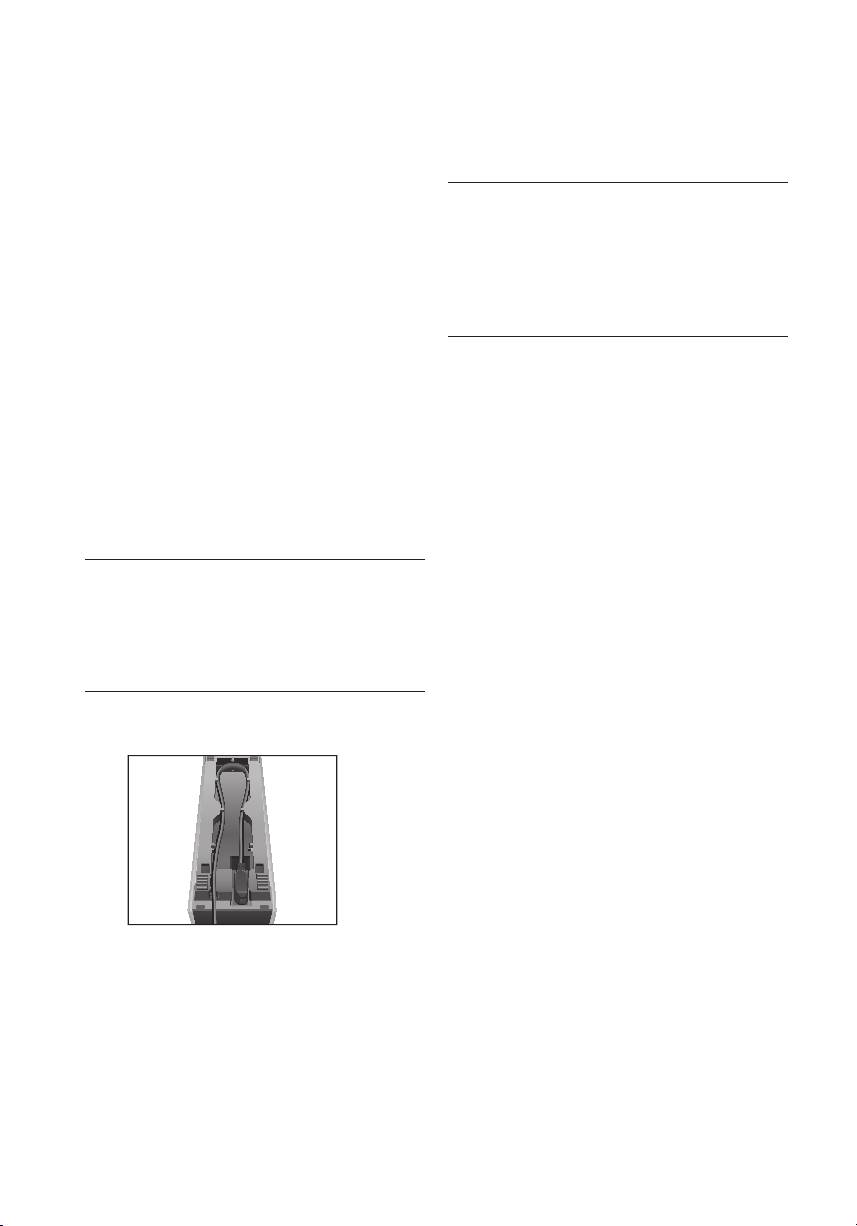
E
Vous pouvez ranger le câble sous le chauffe-
T
Appuyez sur l’une des touches fléchées pour
tasses selon la longueur nécessaire.
modifier le format de l’heure (AM/PM ou
24h).
T
Remettez l’appareil sur ses pieds.
T
Appuyez sur la touche de réglage de l’heure
T
Branchez la fiche secteur dans une prise de
pour confirmer le format de l’heure.
courant.
00:00 (par exemple), les heures clignotent.
OFF s’affiche sur le visuel placé sous le
T
Appuyez sur les touches fléchées pour régler
couvercle.
les heures.
20
