Hoover XARION-XARION PRO TXP 1510 019: instruction
Class: Household, kitchen appliances, electronics and equipment
Type: Vacuum Cleaner
Manual for Hoover XARION-XARION PRO TXP 1510 019
®
®
PRINTED IN P.R.C.
48003366
INSTRUCTION MANUAL
1
U*
V*
W*
X*
E
J
L
F
C
T*
A
I
N*
N*
P*
O*
T*
M*
S
Q
D
B
H
G
P*
R
O*
M*
K
ENGLISH
GB
FRANÇAIS
FR
DEUTSCH
DE
ITALIANO
IT
NEDERLANDS
NL
PORTUGUÉS
PT
ESPAÑOL
ES
DANSK
DK
NORSK
NO
SVENSKA
SE
SUOMI
FI
E
ΛΛ
HNIKA
GR
PY
ССКИЙ
RU
POLSKI
PL
ČESKY
CZ
SLOVENČINA
SI
(
*Certain models only)

2
3
4
5
6
7
8
10
*
*
12
*
14
13
15
16
17
18
19
20
21
22
23
24
25
11
MID
9*
(* Depending on model)
1
IMPORTANT SAFETY REMINDERS
This cleaner should only be used for domestic cleaning, as described in this user guide.
Please ensure that this guide is fully understood before operating the appliance. Use only
attachments recommended or supplied by Hoover.
WARNING:
Electricity can be extremely dangerous. This appliance is double insulated
and must not be earthed. This plug is fitted with a 13 amp fuse (UK only).
IMPORTANT:
The wires in the mains power lead are coloured in accordance with the
following code:
Blue – Neutral Brown – Live
STATIC ELECTRICITY:
Some carpets can cause a small build up of static electricity.
Any static discharge is not hazardous to health.
AFTER USE:
Switch the cleaner off and remove the plug from the electricity supply.
Always switch off and remove the plug before cleaning the appliance or attempting any
maintenance task.
SAFETY WITH CHILDREN, ELDERLY OR THE INFIRM:
Do not let children play with
the appliance or its controls. Please supervise the use of the appliance by older children,
the elderly or the infirm.”
HOOVER SERVICE:
To ensure the continued safe and efficient operation of this appli
-
ance we recommend that any servicing or repairs are only carried out by an authorised
Hoover service engineer.
IT IS IMPORTANT THAT YOU DO NOT:
• Position the cleaner above you when cleaning the stairs.
• Use your cleaner out of doors or on any wet surface or for wet pick up.
•
Pick up hard or sharp objects, matches, hot ashes, cigarette ends or other
similar items.
• Spray with or pick up flammable liquids, cleaning fluids, aerosols or their vapours
as this may cause risk of fire / explosion.
• Run over the supply cord when using your cleaner or remove the plug by pulling
on the supply cord.
• Stand on or wrap the power cord around arms or legs when using the cleaner.
•
Use the appliance to clean people or animals.
•
Continue to use your cleaner if it appears to be faulty. If the supply cord is damaged
stop using the cleaner IMMEDIATELY. To avoid a safety hazard, an authorised
Hoover service engineer must replace the supply cord.
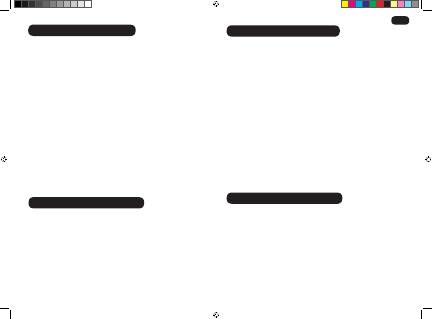
GETTING TO KNOW YOUR CLEANER
A. Cleaner main body
B. Carry handle
C. Dust Container
D. Dust Container handle and latch
E. On/Off Button
F.
Cord Rewind Button
G. Filter Door
H. Filter Door latch
I.
Pre-Motor Filter Pack
J.
Exhaust Filter Door
K.
Exhaust Filter
L.
Parking Slot
M. Handle*
N. Suction Control*
O. Telescopic Tube*
P. Telescopic Tube Adjuster*
Q. Carpet & Floor Nozzle
R. Surface Selector
S. Hose
T.
Accessories*
U. Pet Hair Remover Mini Turbo Nozzle*
V. Allergen Remover Mini Turbo Nozzle*
W.
Turbo Nozzle*
X.
Parquet Nozzle*
ASSEMBLING YOUR CLEANER
Remove all components from the packaging.
1.
Connect the hose to the cleaner main body, ensuring it clips and locks into position.
To release: simply press the two buttons on the hose end and pull.
[2]
2. Connect the tube upper end to the hose handle and store the accessories on the
handle.
[3]
3. Connect the tube lower end to the carpet and floor nozzle.
[4]
GB
(*Certain Models Only)
4800xxxx Xarion Pro Standard handle ML ef.indd 1
25/01/2011 10:36:27
2
USING YOUR CLEANER
1. Extract power cord and plug it into the power supply. Do not pull the cord beyond
the red marker.
[5]
2. Adjust the telescopic tube to the desired height by holding the handle and moving
the telescopic tube adjuster up or down.
[6]
3.
Select carpet care control height by pressing the pedal in the nozzle.
[7]
Hard Floor – Brushes are lowered to protect the floor.
Carpet – Brushes are raised for the deepest clean.
4.
Switch the cleaner on by pressing the On/Off Button on the cleaner main body.
[8]
5. Adjust the suction by sliding the suction control to the desired level.
[9]
6. Switch off at the end of use by pressing the On/Off Button. Unplug and press the
cord rewind button to wind the power cord back into the cleaner.
[10]
7. To store your cleaner adjust telescopic tube to the lowest height setting and park the
nozzle in the park position on the cleaner main body.
[11]
ACCESSORIES
All accessories can be fitted to the end of the handle or the end of the telescopic tube.
3 in 1 tool*
– Combines several functions in one, with maximum flexibility by the rotating
body. Reach into awkward areas by rotating the body. The 3 in 1 tool can be stored neatly
underneath the hose handle.
[1] (Depending on model)
Crevice Tool*
– For corners and hard to reach areas.
[12]
Furniture Nozzle*
– For soft furniture and fabrics
.[13]
Dusting Brush* –
For bookshelves, frames, keyboards and other delicate areas. To
extend the brushes push the button on the body of the tool.
[14]
Parquet Nozzle* –
For parquet floors and other delicate floors.
[1X]
Turbo Nozzle* –
Use the turbo nozzle for deep cleaning on carpets.
[1W]
Pet Hair Remover Mini Turbo Nozzle* -
Use the mini turbo nozzle on stairs or for deep
cleaning on textile surfaces and other hard to clean areas. Particularly suitable for pet
hairs removal. [1U]
Allergen Remover Mini Turbo Nozzle* –
Use the mini turbo nozzle on stairs or for deep
cleaning on textile surfaces and other hard to clean areas, particularly suitable for aller-
gen removal.
[1V]
IMPORTANT:
Do not
use the turbo and mini turbo nozzles on rugs with long fringes,
animal hides and carpet pile deeper than 15mm. Do not keep the nozzle stationary while
brush is rotating.
CLEANER MAINTENANCE
Emptying the Dust Container
When the dust reaches the max level indicator in the container empty the dust container.
IMPORTANT:
To maintain optimum performance do not allow the dust to sit higher than
the max level.
1.
Release the container carry handle by lifting the centre latch to detach the dust
container from the main cleaner and pull upward to remove.
[15]
2.
Hold the dust container over a bin with one hand and with the other pull the dust
container catch to open the door and empty.
[16]
3. Close the dust container door and refit to the cleaner main body. To lock in place
push the container carry handle down until the latch connects with the main body
of the cleaner. Once correctly retained the carry handle will sits flush with the top
of the cleaner.
Cleaning the washable filters
The cleaner is fitted with a filter pack. To maintain optimum cleaning performance regu
-
larly remove the the filters and tap against the side of the bin to release dust.The filters
should be washed every 3 months or when the filter has excessive dust level.
IMPORTANT: All bagless cleaners require regular filter cleaning. Failure to clean
your filters may result in air blockage, overheating and product failure. This may
invalidate your guarantee.
IMPORTANT:
Regularly check and maintain the filters.
IMPORTANT:
Always ensure the filter pack is fully dry before use.
To access the Pre- Motor filter:
NOTE:
Ensure the carry handle is at its down position before opening the filter door.
1. Unlock the filter door by pulling the filter latch upwards. Open the filter door. [17]
2.
Remove the blue filter pack by pressing down on the retainer catch to release. The
filter pack will pop up. Slide the filter pack out. [18]
3. Unlatch the filter pack frame.
4.
Remove the micro filter from the pack frame and wash the micro filter by handusing
warm water. Do not use hot water or detergents. Remove excess water from the
filter and leave to dry fully before reusing. [21]
5.
Reassemble to filter pack once fully dry and refit to the cleaner. Press on the top of
the filter to ensure it clips back into place.
GB
(*Certain Models Only)
4800xxxx Xarion Pro Standard handle ML ef.indd 2
25/01/2011 10:36:28
Table of contents
- IMPORTANT SAFETY REMINDERS
- USING YOUR CLEANER
- USER CHECKLIST
- GB
- REMARQUES IMPORTANTES CONCERNANT LA SÉCURITÉ
- UTILISATION DE L'ASPIRATEUR
- TE DES VÉRIFICATIONS À EFFECTUER
- FR
- WICHTIGE SICHERHEITSHINWEISE
- GEBRAUCH DES STAUBSAUGERS
- PRÜFLISTE ZUR FEHLERSUCHEWICHTIGE INFORMATIONEN DE PRÜFLISTE ZUR FEHLERSUCHE
- DE
- AVVERTENZE IMPORTANTI PER LA SICUREZZA
- UTILIZZO DELL'APPARECCHIO
- CHECKLIST UTENTE
- IT
- BELANGRIJKE VEILIGHEIDSTIPS
- DE STOFZUIGER GEBRUIKEN
- CHECKLIST GEBRUIKER
- NL
- IMPORTANTE AVISOS DE SEGURANÇA
- UTILIZAÇÃO DO ASPIRADOR
- LISTA DE VERIFICAÇÃO DO UTILIZADOR
- PT
- CONSEJOS IMPORTANTES DE SEGURIDAD
- UTILIZACIÓN DEL ASPIRADOR
- LISTA DE COMPROBACIONES QUE DEBE REALIZAR EL USUARIO
- ES
- VIGTIGE SIKKERHEDSOPLYSNINGER
- BRUG AF STØVSUGEREN
- DK BRUGERENS CHECKLISTE
- DK
- VIKTIG SIKKERHETSADVARSLER
- BRUKE STØVSUGEREN
- SJEKKLISTE FOR BRUKER
- NO
- VIKTIGA SÄKERHETSANVISNINGAR
- ANVÄNDA DAMMSUGAREN
- KONTROLLISTA
- SE
- TÄRKEITÄ HUOMAUTUKSIA TURVALLISUUDESTA
- IMURIN KÄYTTÖ
- VIANMÄÄRITYSLISTA
- FL
- ΣΗΜΑΝΤΙΚΕΣ YΠΕΝΘΥΜΙΣΕΙΣ ΑΣΦΑΛΕΙΑΣ
- ΠΩΣ ΝΑ ΧΡΗΣΙΜΟΠΟΙΗΣΕΤΕ ΤΗ ΣΚΟΥΠΑ
- ΚΑΤΑΛΟΓΟΣ ΕΛΕΓΧΟΥ ΧΡΗΣΤΗ
- GR
- ВАЖНЫЕ ЗАМЕЧАНИЯ ПО ТЕХНИКЕ БЕЗОПАСНОСТИ:
- ЭКСПЛУАТАЦИЯ ПЫЛЕСОСА
- АНКЕТА ПОЛЬЗОВАТЕЛЯ
- RU
- WSKAZÓWKI DOTYCZĄCE BEZPIECZEŃSTWA
- KORZYSTANIE Z ODKURZACZA
- LISTA KONTROLNA UŻYTKOWNIKA
- PL
- DŮLEŽITÁ BEZPEČNOSTNÍ UPOZORNĚNÍ
- JAK POUŽÍVAT VYSAVAČ
- KONTROLNÍ SEZNAM UŽIVATELE
- CZ
- POMEMBNA VARNOSTNA OPOZORILA
- UPORABA SESALNIKA
- KONTROLNI SEZNAM ZA UPORABNIKA
- SI
