EXFO Photonic Solutions Div. EPM-ELS-50: 3 Getting Started
3 Getting Started: EXFO Photonic Solutions Div. EPM-ELS-50
3 Getting Started
Turning the Unit On and Off
When you turn off the EPM-50, it saves the current wavelength, unit and reference
power.
IMPORTANT
If you remove the batteries, the unit will turn off without saving the
above values.
If batteries are low, the unit will save the above values and turn off.
Note: Offset nulling values are always returned to factory settings.
To turn on the unit:
Press . You may use the unit immediately under normal conditions.
To turn off the unit:
From normal operating mode, hold down a few seconds.
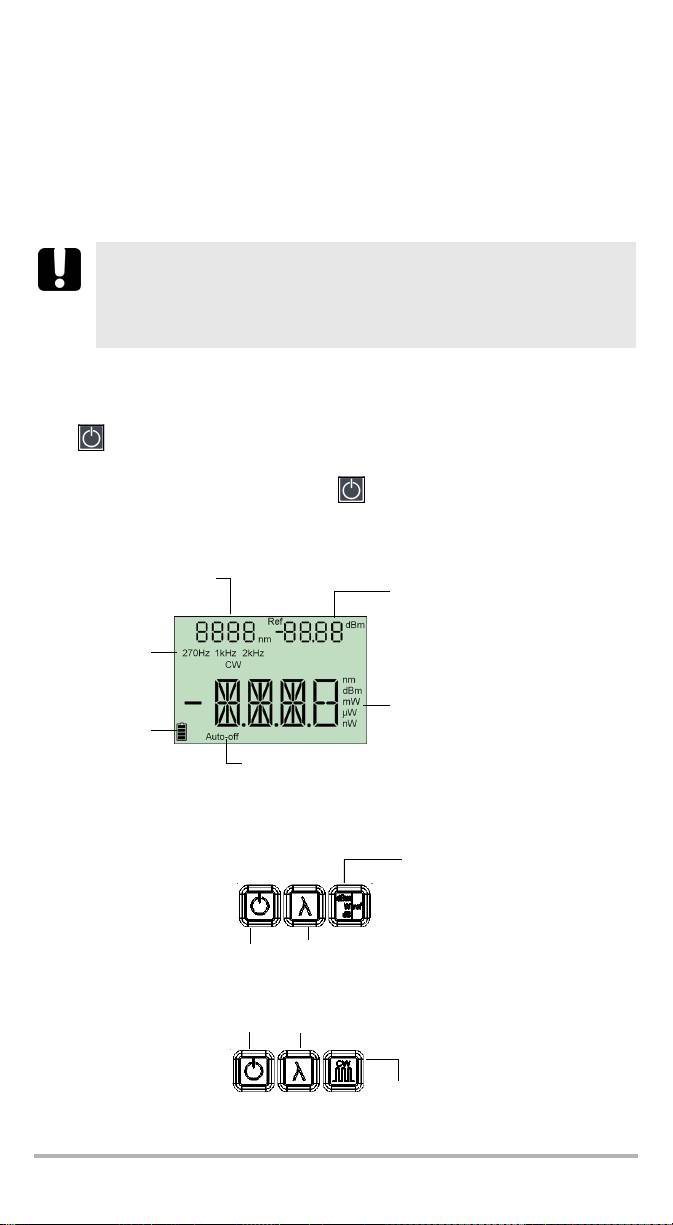
Display
Power meter wavelength
Reference power (EPM-50)
(EPM-50)
Source
modulation
(ELS-50)
Detected
modulation
(EPM-50)
Measured power/loss (EPM-50)
Active source wavelength (ELS-50)
Batteries level
Auto-off activated
Keypad
PRESS: Switches between
units
EPM-50
HOLD: Sets input power as
reference power
PRESS: Changes
HOLD: Turns unit on/off
wavelengths
PRESS: Controls
auto-off
PRESS: Activates next source
PRESS: Exits special
modes
HOLD: Deactivates current source
ELS-50
PRESS: Switches between
modulation values
EPM-50/ELS-50 5

Getting Started 6
Activating Automatic Shutdown (Auto-Off)
When auto-off is activated, the unit will turn off after
10 minutes of idle time.
Auto-off is activated by default when you turn on the
unit.
To deactivate/reactivate auto-off:
When unit is on, press .
Note: Auto-off is automatically disabled when you perform an offset nulling.
Changing Connector Adapters
The connector adapters are optional accessories available on the EPM-50 Power
Meter and ELS-50 Light Source. Depending on the type of connector on the fiber you
need to test, you might have to change them.
To change connector adapters:
1. Hold the unit so the connector port is facing you.
2. Turn the connector adapter counterclockwise to unscrew it.
3. Screw in the adapter you want to use.

Cleaning and Connecting Optical Fibers
IMPORTANT
To ensure maximum power and to avoid erroneous readings:
³ Always clean fiber ends as explained below before inserting
them into the port. EXFO is not responsible for damage or errors
caused by bad fiber cleaning or handling.
³ Ensure that your patchcord has appropriate connectors. Joining
mismatched connectors will damage the ferrules.
To connect the fiber-optic cable to the port:
1. Inspect the fiber using a fiber inspection microscope. If the fiber is clean,
proceed to connecting it to the port. If the fiber is dirty, clean it as explained
below.
2. Clean the fiber ends as follows:
2a. Gently wipe the fiber end with a lint-free swab dipped in isopropyl alcohol.
2b. Use compressed air to dry completely.
2c. Visually inspect the fiber end to ensure its cleanliness.
3. Carefully align the connector and port to prevent the fiber end from touching the
outside of the port or rubbing against other surfaces.
If your connector features a key, ensure that it is fully fitted into the port’s
corresponding notch.
4. Push the connector in so that the fiber-optic cable is firmly in place, thus
ensuring adequate contact.
If your connector features a screwsleeve, tighten the connector enough to firmly
maintain the fiber in place. Do not overtighten, as this will damage the fiber and
the port.
Note: If your fiber-optic cable is not properly aligned and/or connected, you
will notice heavy loss and reflection.
EPM-50/ELS-50 7
Table of contents
- 1 Introducing the EPM-50/ELS-50
- 2 Safety Information
- 3 Getting Started
- 4 Measuring Power or Loss (EPM-50)
- 5 Using a Light Source (ELS-50)
- 6 Maintenance
- 7 Troubleshooting
- 8 Warranty
- A Technical Specifications
- 1 Présentation du EPM-50/ELS-50
- 2 Informations relatives à la sécurité
- 3 Initiation
- 4 Mesure de la puissance ou de la perte (EPM-50)
- 5 Utilisation d’une Source lumineuse (ELS-50)
- 6 Entretien
- 7 Dépannage
- 8 Garantie
- A Caractéristiques techniques
- 1 EPM-50/ELS-50 简介
- 2 安全信息
- 3 入门
- 4 测量功率或损耗 (EPM-50)
- 5 使用光源 (ELS-50)
- 6 维护
- 7 故障排除
- 8 保修
- A 技术规格
- 1 Presentación del EPM-50/ELS-50
- 2 Información de seguridad
- 3 Primeros pasos
- 4 Medición de potencia o pérdida (EPM-50)
- 5 Uso de una fuente de luz (ELS-50)
- 6 Mantenimiento
- 7 Resolución de problemas
- 8 Garantía
- A Especificaciones técnicas
- 1 Apresentação do EPM-50/ELS-50
- 2Informações de segurança
- 3 Iniciar
- 4 Medição da potência ou perda (EPM-50)
- 5 Utilizar fonte de luz (ELS-50)
- 6 Manutenção
- 7 Resolução de avarias
- 8 Garantia
- A Especificações técnicas
- 1 Общие сведения о EPM-50/ELS-50
- 2 Информация о безопасности
- 3 Начало работы
- 4 Измерение мощности или потерь (EPM-50)
- 5 Использование источника света (ELS-50)
- 6 Обслуживание
- 7 Поиск и устранение неисправностей
- 8 Гарантия
- A Технические характеристики
