Bosch WFB 1602 – page 4
Manual for Bosch WFB 1602

Detergents and fabric-care additives
L
Fig.®,®
Frequent use of insufficient detergent will'even
You can use any standard powder or liquid de
tually become noticeable as follows:
tergent which is suitable for automatic washing
- washing appears grey or not properly clean
machines.
“ grey-brown stains (grease marks) form on
! Do not use non-automatic detergents as
the washing
these produce too much foam.
- scale builds up on the heating elements.
! Do not use solvent-based cleaning agents
Too much detergent results in:
in fully automatic washing machines. Explo
- unnecessarily high environmental pollution,
sion hazard.
- due to the generation of too much foam, the
! Do not use any detergent boosters con
washing.is hardly agitated which leads to
taining solvents or dirt and stain-removings
poor washing results.
sprays near the machine, as these could
The amount of detergent indicated on its
damage the machine.
packaging refers to a full machine load.
! Always store'detergents and other fabric-
For smaller loads or less soiling, reduce the
care products out of children's reach.
amount of detergent.
Amount of detergent
Notes
The best washing results will only be achieved
Fabric softeners and conditioners
if you add the correct amount of detergent. Ob
Put these into the ® compartment. Do not fill
serve the instructions for use shown on the de
beyond the MAX mark, otherwise they will be
tergent packaging.
flushed into the machine together with the de
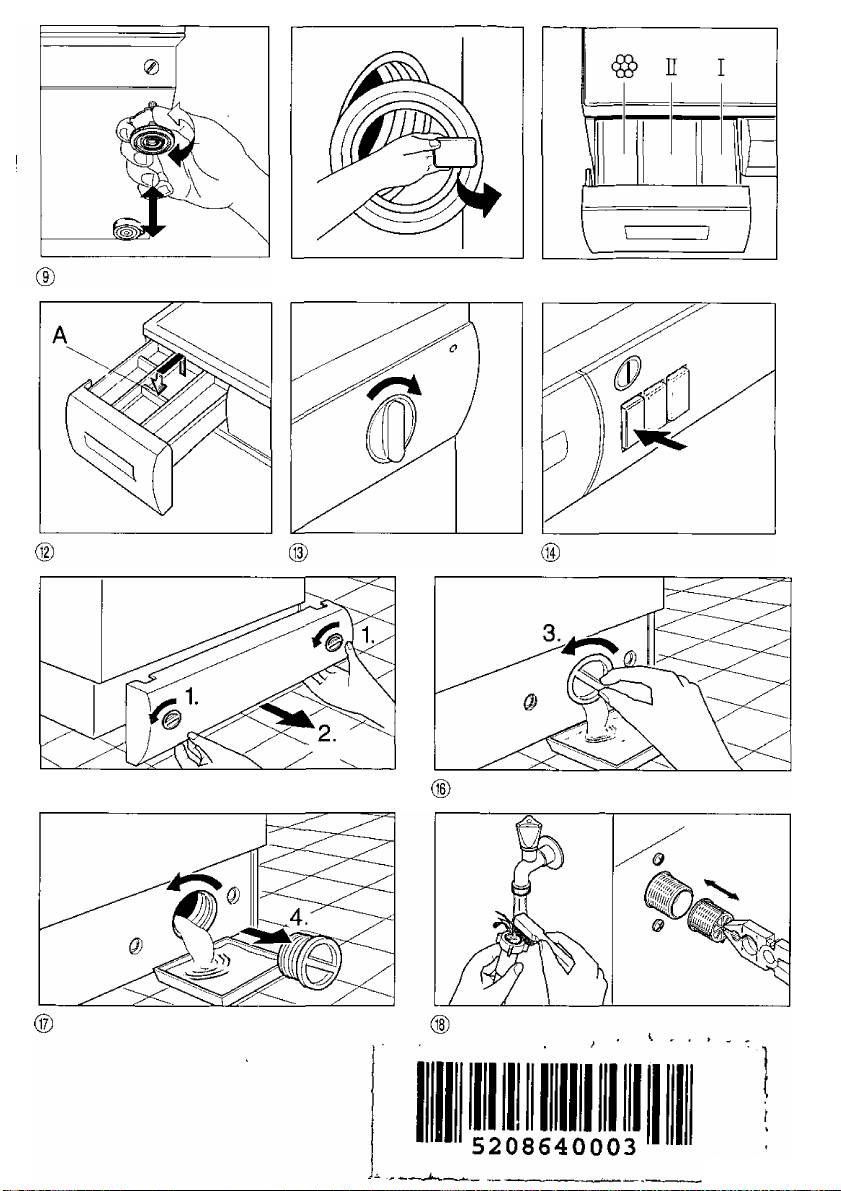
When using liquid detergents, first slide the
tergent at the start of the programme. Dilute
green insert out of the back section of the de
thick conditioner with a little water (taking care
tergent drawer and slide it in at the front
to dissolve all lumps) before pouring it into the
(Fig. ®). Then add the liquid detergent.
® compartment.
The scale on the insert will help you to add the
Bleaching agents and stain removers
correct amount of detergent. Do not fill the de
In addition, certain powdered bleaching agents
tergent dispenser beyond the MAX mark.
and stain removers may be used on stained
You can also use any measuring aids provided
fabrics.
with the detergents, such as dosage balls or
First put the detergent and then the bleaching
bags.
powder or stain remover into compartment II.
The amount of detergent depends on:
— water hardness
— degree of soiling
— size of the load
— amount of detergent to be added according
to its manufacturer.
63

GB
[Preparing laundry for washing
Sorting the laundry
Practical tips
о Sort the laundry according to the symbols
O Remove any loose items or metal objects,
on the fabric care labels.
such as safety pins, paper clips, etc. from
! Knitted garments or garments with a wool
the laundry.
content can only be washed in the machine
O Brush sand out of pockets and cuffs.
if they are marked "machine-washable".
O Close zips and button up cushion covers,
Risk of shrinking.
duvet covers, etc.
O Remove curtain runners, or secure them in a
Only items marked with the following care sym
net bag.
bols are suitable for washing in the machine:
O Particularly delicate items, such as tights or
cottons
lace curtains, or smaller items, such as tiny
socks or handkerchiefs, should only be
coloureds Убо7 УЗоУ
washed in a net bag or pillow case.
easy-care
O Some items are best turned inside out.
These include knitwear, trousers, T-shirts
ХШ Ш ХШ Ш Ш
and sweatshirts.
O Make sure that wire-cup bras are machine-
machine-washable wool
washable.
Ш Ш Ш Ш
! Wash wire-cup bras in a pillow case which
can be securely closed with a zip or buttons.
If the wire works itself out of the cup it may
Laundry marked with the following care sym
fall through the holes of the drum and cause
bols must not be washed in the machine:
extensive damage.
hand wash
Stain removal
do not wash w
If possible, stains should be removed immedia
tely while they are still fresh, or at least pre
treated. Try soap and water first of all. Dab the
Sort the laundry.by colour.
material rather than rub it.
Wash white and coloured items separately
Stubborn, dried-in stains may require several
otherwise white washing will turn grey.
washes before they disappear completely.
Do not wash new coloured items together
with other laundry. Risk of discoloration!
Do not exceed the machine’s maximum
capacity when sorting the laundry. Do not
overload the washer/dryer. Overloading
leads to inferior results.
Maximum washing loads;
Cottons / coloureds 4.5 kg
Easy-care, woollens 1.5 kg
64

GB
"n
First wash cycle
Washing
Carry out the first wash cycle without laundry
Open the door
to remove any water left over from the factory
<> Pull the handle on the door towards you
tests.
(Fig.®).
1. Check that the transit bolts have been re
moved from the back of the machine (see
Put washing into the machine
installation instructions).
! Any items which have been pre-treated with
2. Turn the tap ON.
solvent-based cleaners, such as stain remo
3. Pull the detergent drawer out as far as it will
vers and petrol-based agents must be aired
go.
before they are put into the machine.
4. Pour half a measuring cup into compart
Explosion hazard!
ment II. Do not use a special detergent for
! Before loading the machine, ensure that
délicates or woollens as these will create
there are no foreign objects nor trapped
too much foam.
pets in the drum.
5. Turn the programme selector clockwise and
O Place the washing into the drum so that'it is
set it to Cottons / coloureds, normal (B).
folded out and loose, with a mixture of large
6. Set the temperature selector 90 '^C.
and small items.
7. Press the "ON/OFF" button.
Close the door
The programme is started.
! When you close the door, make sure that
8. When the programme has ended, press the
nothing is caught between the door and the
"ON/OFF" button to switch the machine off.
rubber seal.
O Close the door by pressing it shut until it
snaps into place with an audible click.
Add detergent
Turn ON the tap
65

GB
Washing End of wash programme /
Switching the machine OFF
Selecting the wash programme
All programmes end automatically after the
1, Turn the programme selector clockwise until
spin cycle.
it reaches the required programme (Fig. (§)),
If the ’’Rinse hold" button has been pressed,
2, Set the temperature selector to the required
the programme will stop at the final rinse cycle
temperature,
and the washing will be left in the final rinse
3, Press the buttons for any additional func
water.
tions that are required.
You then have two options:
• remove the washing while it is dripping-wet
Starting the programme
• spin the washing
1, Make sure that the door is closed,
If you want to take the laundry out dripping-
A safety switch prevents the machine from
wet:
operating when the door is open,
1, Switch OFF the machine,
2, Press the ’’ON/OFF” button (Fig, ®), The
2, Set the programme selector to Pumping
red ON indicator light illuminates and the
(P).
programme starts.
3, Switch the machine ON again.
Programme sequence
The rinse water is pumped out without spin
The position of the programme selector Indi
ning.
cates which stage in the wash programme the
If you want to spin the laundry;
machine is currently at.
O Press the "Rinse hold" button again to re
turn it to its normal position.
Altering the programme
The water is then pumped out and the laun
Switch off the machine (press the "ON/OFF”
dry is spun.
button). Turn the programme selector clock
wise to the new programme. Switch the ma
Switching the machine OFF
chine on again.
1. Press the ’’ON/OFF" button.
The machine is switched off and the power
indicator light goes out,
2. After approx, 2 minutes you will be able to
open the door and remove the washing.
! Remove any foreign objects (paper clips,
coins, etc.) inside the drum or trapped in the
rubber seal, otherwise there is a danger or
rust occurring.
Leave the door open slightly so that the ma
chine can dry out properly.
3. Reset any buttons that were pressed by
pressing them again.
4. Turn the tap OFF!
66

GB
Cleaning / Maintenance / Frost Protection
L
Before you begin any maintenance work,
Cleaning the pump
unplug the machine from the mains or
Fig.(D,(D,(g)
switch it off at the fuse-box. Turn the tap
The pump must be cleaned:
off.
• if the pump has been blocked by some for
eign object, such as a button or paper clip,
Cleaning your machine
and water cannot be pumped out.
! Do not use solvents, as these can damage
• after washing very fluffy items.
machine components, produce noxious va
Before cleaning the pump, water must be
pours and they also constitute an explosion
drained from the machine. If the pump has
hazard.
been blocked, up to 20 litres of water can run
! Do not spray the machine with a jet of water.
out - so keep a bucket handy.
Housing and fascia panel should only be clea
Cleaning procedure:
ned with detergent solution or with a standard,
1. Remove the base panel from the front of
solvent-free, non-scouring cleaning agent.
the machine,
Cleaning the detergent drawer
! Scalding hazard. Allow hot water to cool
1. Pull the detergent drawer all the way out of
down.
the machine (tug slightly to overcome the
2. Carefully unscrew the pump cover - do not
spring catch).
remove it completely - and let the water
2. Clean all parts under running water.
drain out into a shallow container (let the
remainder drip onto a floor cloth),
3. Replace the detergent drawer in the ma
chine.
3. Remove the pump cover.
4. Remove any foreign objects and fibrous
Descaling the machine
deposits. Clean the inside of the pump. En
If you use the right amount of detergent, it will
sure that the vanes on the pump move
not normally be necessary to descale the ma
freely.
chine.
5. Screw the pump cover back on.
! Descaling agents contain acids which can
corrode machine components and cause
6. Replace and close the base panel.
discoloration of laundry.
7. Pour approx. 2 litres of water into the deter
However, if you do want to descale your
gent drawer and start the Pumping pro
washing machine, follow the manufacturer's
gramme (P). This prevents detergent from
directions.
passing unused straight out into the drains
the next time that the washing machine is
Cleaning the drum
used.
Any rust caused by metal objects left in the
machine must be removed using a chlorine-
free cleaning agent (check the description of
contents on the pack). Do not use steel wool!
Water inlet hose
To avoid water damage, arrange for the hose to
be checked by a specialist every 5 years.
67

GB
Cleaning / Maintenance / Frost protection
Cleaning the filters in the water inlet
Frost protection
Fig.®
If the machine is located in a room which is
The filters in the water inlet must be cleaned if
exposed to freezing temperatures, any residual
no or insufficient water flows into the machine
water in both the pump and the water inlet
when the tap is turned ON.
hose must be drained immediately every time
The filters are located in the hose connection at
the machine is used.
the tap end and at the back of the machine.
Draining the pump:
Cleaning procedure:
See "Cleaning the pump" on page 67.
1. Turn off the tap.
Draining the water Inlet hose:
1. Turn the tap OFF.
2. Set the programme selector to Cottons /
coloureds, normal (B) and the tempera
2. Unscrew the hose from the tap and hold
ture selector to 0. Press the "ON/OFF" but
the end of the hose over a container.
ton.
3. Switch ON any of the wash programmes for
After approx. 40 seconds, switch off the
approximately 40 seconds. Water left inside
machine by pressing the "ON/OFF” button
the inlet hose will be drained out.
again.
4. Screw the hose back onto the tap.
This removes the pressure inside the inlet
hose.
3. Unscrew the hose from the tap and rinse
the filter under running water.
4. Screw the hose back onto the tap.
5. Unscrew the hose at the back of the ma
chine.
6. Use a pair of flat-nosed pliers to remove the
filter. Clean the filterand replace it inside
the hose connection,
7. Reconnect the hose.
8. Turn on the tap and make sure that no wa
ter leaks at either end of the hose.
9. Turn off the tap.
68

GB
I Correcting minor problems yourself
! Only qualified technicians are permitted to repair electrical appliances. Repairs by unauthorised
persons can lead to considerable damage.
Problems
Possible causes / remedies
The power indicator iight
-The plug is not correctly, or only loosely, inserted into the
does not come on
socket.
- A fuse has blown in the domestic wiring.
- Power failure.
Power faiiure
If there is a power failure or the machine malfunctions, there is a
special procedure for emptying the machine of water (see
"Cleaning the pump”, page 67), so that the laundry can be re
moved.
Washing sequence does not
"ON/OFF" button not pressed.
start
Door not properly closed.
No water to be seen during
This is not a malfunction! The water inside the machine is below
washing
the level at which it becomes visible.
Poor washing resuits
Degree of soiling was greater than usual.
Change type and amount of detergent.
Select maximum permissible temperature for fabric type.
Select a more powerful wash programme.
Foam comes out of the
Too much detergent was used. Switch off the machine for ap
detergent drawer
proximately 5-10 minutes. To reduce the amount'of foam, put a
tables poon of fabric softener mixed with 1/2 litre water into the
detergent drawer. For the next wash, adjust the amount of deter
gent accordingly.
Foam stiii visibie after iast
Certain detergents tend to produce more suds but this does not
rinse
affect the rinsing result.
Motor noise
This is not a malfunction! It is normal for noises to be heard while
the motor is running in.
Pump noise
This is not a malfunction! It is norma) for noises to be heard from
the pump during the start-up phase or the final stage of draining
the drum.
j Vibrations when washing
- Transit bolts were not removed. Follow the directions in the
and spinning
installation instructions (page 71).
- The machine’s feet were not secured in place when the ma
chine was installed. Realign the machine using a spirit level,
.securing the machine's feet according to the installation in
structions.
Machine does not spin or
Pump blocked
does not pump out the water
69
GB
[Customer service
__
J [technical specifications
о Before calling Customer Service, see if you
Width .
59.5 cm
can correct the problem yourself. (To do
Height,
85.0 cm
this, refer to "Correcting minor problems
Depth
56.0 cm
yourself”).
Weight
approx. 70 kg
If a service engineer is called out and no
Capacity
fault is found with the machine, a call-out.
Mains voltage
see rating plate
charge will be made, even if the machine is
Connected load
stilt under warranty.
Fuse rating
Water pressure
1 - 10 bar
! If you can't correct a problem yourself,
switch off the washing machine, remove the
plug from the socket, shut off the water sup
ply and call Customer Service.
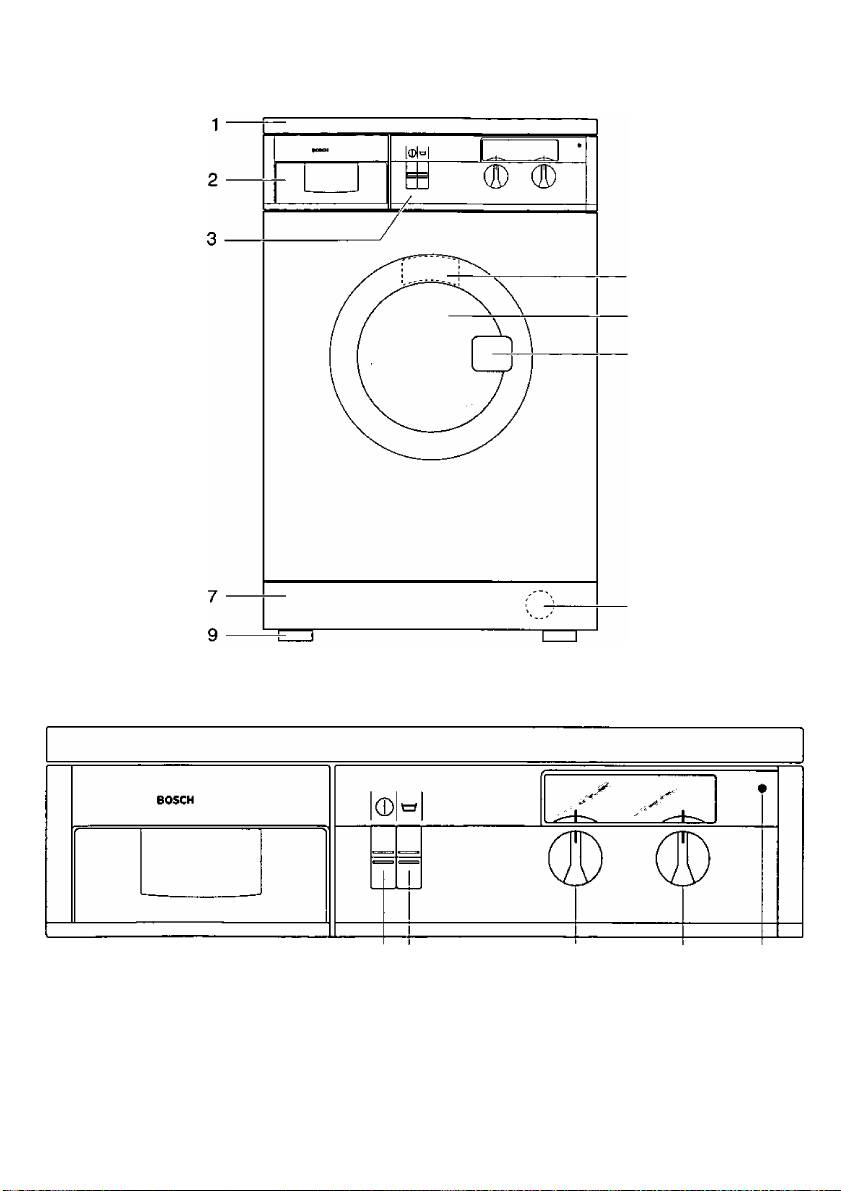
Customer Service will ask you for the ma
chine’s product number (E-Nr.) and serial num
ber (FD). These numbers are shown on the ra
ting plate which can be found on the frame of
the open door and also on the identification
plate, enclosed by a thick line, on the front of
the machine behind the base plate.
Make a note of your machine’s numbers here:
r
E-Nr. FD
Product n
umber Serial nu mber
Please help to avoid unnecessary travel by our
Customer Service engineers by providing the
correct product and serial numbers. You will
also save the additional costs which would
otherwise occur.
70

GB
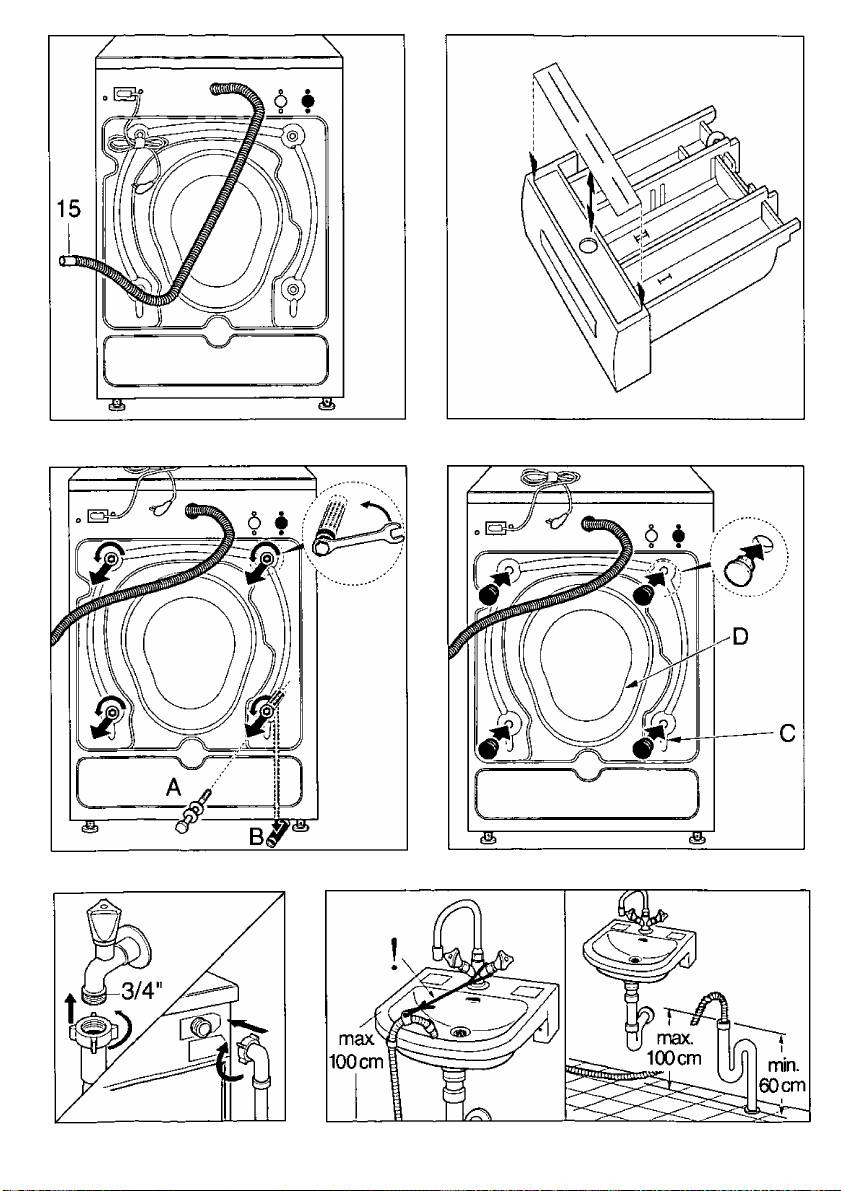
I Removing the transit bolts
■ Installing the machine
_______
^
Fig,®.®
! When installing and connecting the ma
! Before the machine is used for the first time,
chine, special attention must be paid to the
it is very important that the transit bolts are
safety advice and warnings which have
removed from the back of the machine,
been identified with an exclamation mark
! Only use the spanner supplied with the ma
You should comply with all regulations
chine if a ring spanner is unavailable.
issued by your local water and power autho
! Caution. If the spanner slips, there is danger
rities.
of injury.
! Take care when lifting the machine! Risk of
1. Undo and remove the 4 securing bolts (A).
injury.
2. Remove the four spacers (B) that will have
! Do not lift the machine by any of the pro
dropped down inside the machine. Tilt the
truding parts.
machine to the rear so that they fall out.
! If in doubt, arrange for the machine to be
3. Insert the cover caps (C) which you will find
connected by a qualified specialist.
in the bag containing the documentation,
Before leaving the factory, every machine is
! Keep the transit bolts in case you need to
thoroughly tested under operating conditions.
move the machine again (moving house).
Any moisture or residual water which you may
Do not transport the machine without first
find in the machine or drain hose is left over
inserting the transit bolts. To do this, un
from these tests.
screw the back panel D and proceed in re
Installation location
verse order (1 and 2 above).
To ensure'that the machine remains stable
while it is spinning, the installation location
must be flat and solid.
Do not site the machine on soft floor coverings
such as vinyls, carpeting or foam-backed carpets.
! In the case of timber beam floors, place
the machine on a water-resistant wooden
board that is at least 30 mm thick and is
screwed to the floor. If possible, the ma
chine should be sited in the corner of a
room.
Secure the machine by attaching retaining
straps to the feet (this applies particularly if
a dryer is going to be placed on top of the
washing machine).
! If the machine is installed on a plinth, the
machine’s feet must be secured with retain
ing straps to prevent it sliding while it is
spinning.
Retaining straps are available as a set from
your authorised dealer.
71

GB
Aligning the machine
Fig. (D
Fig. ®
! The machine must be perfectly level with all
For the water connection, a standard cold-wa
four feet standing on the floor. It must not
ter line with a minimum water pressure of 1 bar
wobble.
is required (with tap full ON, at least 8 litres of
O Use a spirit level to align the machine on all
water must flow out in one minute).
If the water pressure exceeds 10 bar, a pres
sides.
If necessary, correct the height of the ma
sure reducing valve must be added.
chine’s feet.
! Do not connect the machine to the mixer tap
1. Undo the lock nuts
on a pressuretess hot-water heater. If in
doubt, arrange for the machine to be con
2. Adjust the height of the feet.
nected by a specialist.
3. Tighten the lock nuts again firmly to ensure
! Caution! The hose connections are subject
that the feet remain at the same height.
to the full water pressure; check for leaks
with the tap turned fully ON.
! The filters at the free end of the inlet hose
and at the back of the machine should only
be removed for cleaning purposes.
! To avoid water damage, the tap must be
turned OFF when the machine is not in use.
Í The plastic nuts on the hose connections
should only be tightened by hand.
72
ф
10 11 12
13 14
CD