Pioneer KRP-S02: инструкция
Раздел: Бытовая, кухонная техника, электроника и оборудование
Тип: Домашний кинотеатр
Инструкция к Домашнему кинотеатру Pioneer KRP-S02


日本語
2
このたびは、パイオニアの製品をお買い求めいただきましてま
ことにありがとうございます。
お使いになる前に取扱説明書をよくお読みになり、安全に正し
くご使用ください。また、お読みになったあとも、この取扱説
明書は大切に保管してください。
「据え付け」について
お客様がご自身で本機の取り付けを困難だと思われる場
合は、販売店にご相談ください。
なお、据え付け、取り付けの不備、誤使用、改造、天災
などによる事故損傷については、弊社は一切責任を負
いません。
警告 注意
人がけがをしたり財産に損害を受
ける恐れがある内容を示します。
人が死亡または重傷を負う恐れ
がある内容を示します。
警告・注意
(気をつけること)
禁止
(やってはいけないこと)
指示・強制
(しなければならないこと)
警告
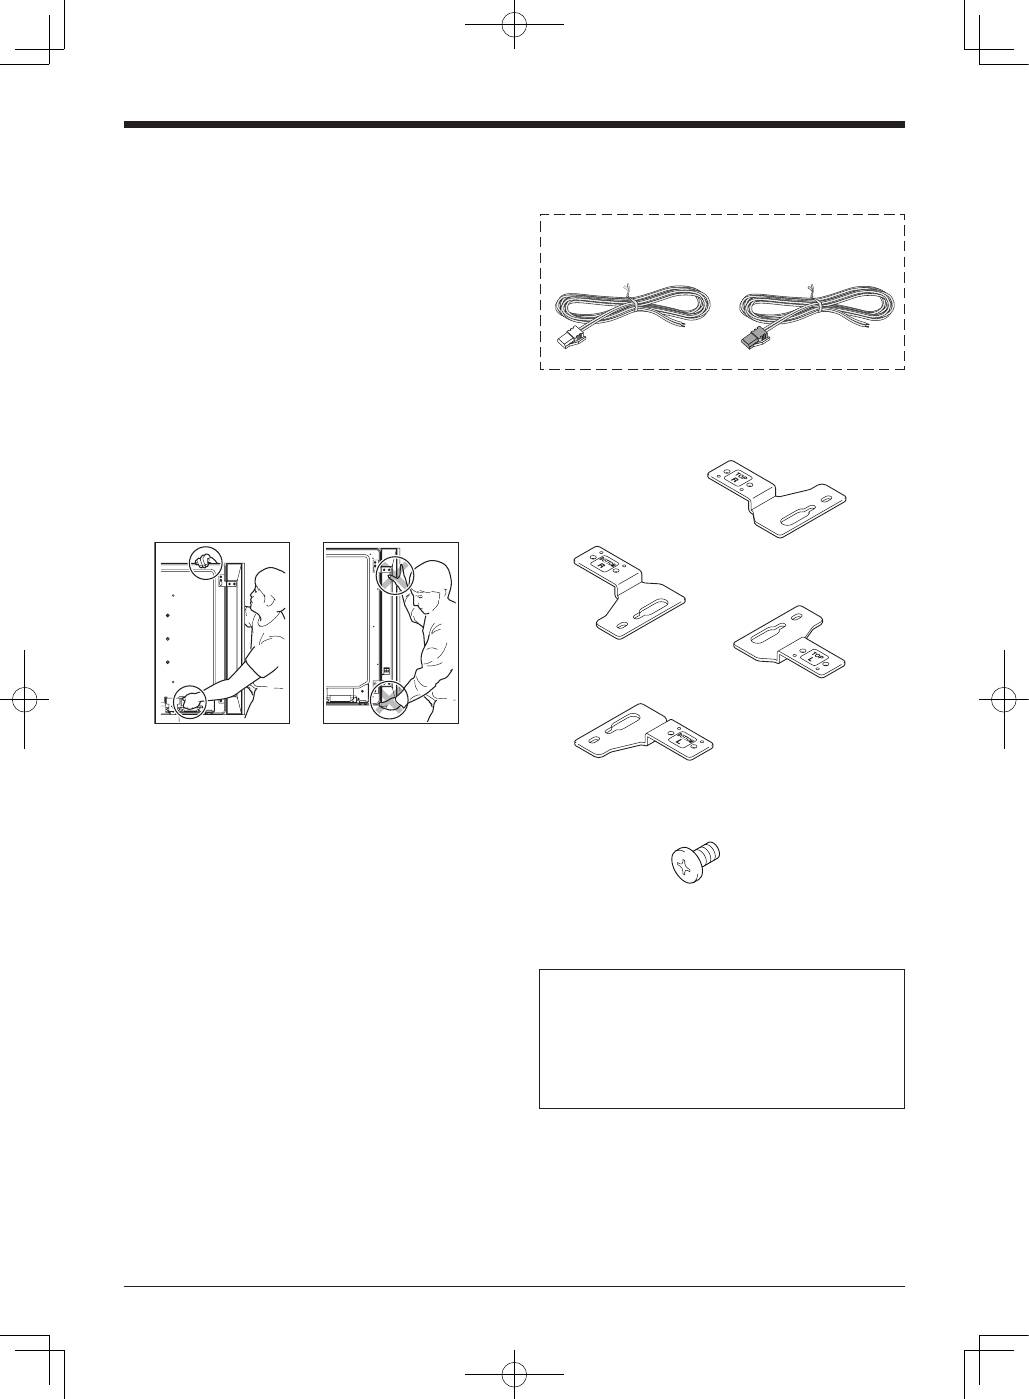
スピーカーを持ってフラットパネルディスプレイを移
動しないでください。ディスプレイが落下してけがの
原因となります。ディスプレイを動かすときは、ディ
スプレイ本体の取っ手を持って持ち上げてください。
安全確保のため、ネジ類は確実に締めつけてください。
スピーカーが落下してけがの原因となります。
注意
長時間、音が歪んだ状態で使わないでください。スピー
カーが発熱し、火災の原因となることがあります。
本機に乗ったり、ぶら下がったりしないでください。
特にお子様はご注意ください。倒れたり、壊れたりし
てけがの原因になることがあります。
スピーカーに水を入れたり、濡らさないでください。
火災・感電の原因となります。また、屋外では使用し
ないでください。火災・感電の原因となります。
接続コードの上に重いものをのせたり、コードがディ
スプレイの下敷きにならないようにしてください。コー
ドに傷がついて火災・感電の原因となります。
スピーカーの開口部などから内部に金属類や燃えやす
いものなど異物を差し込んだり、落とし込んだりしな
いでください。火災・感電の原因となります。特に小
さなお子様のいるご家庭や場所ではご注意ください。
スピーカーを指定のディスプレイ以外に接続して使用
しないでください。故障・火災の原因になることがあ
ります。
この製品は、天井に吊り下げたり壁に掛けたりしない
でください。落ちてけがの原因となることがあります。
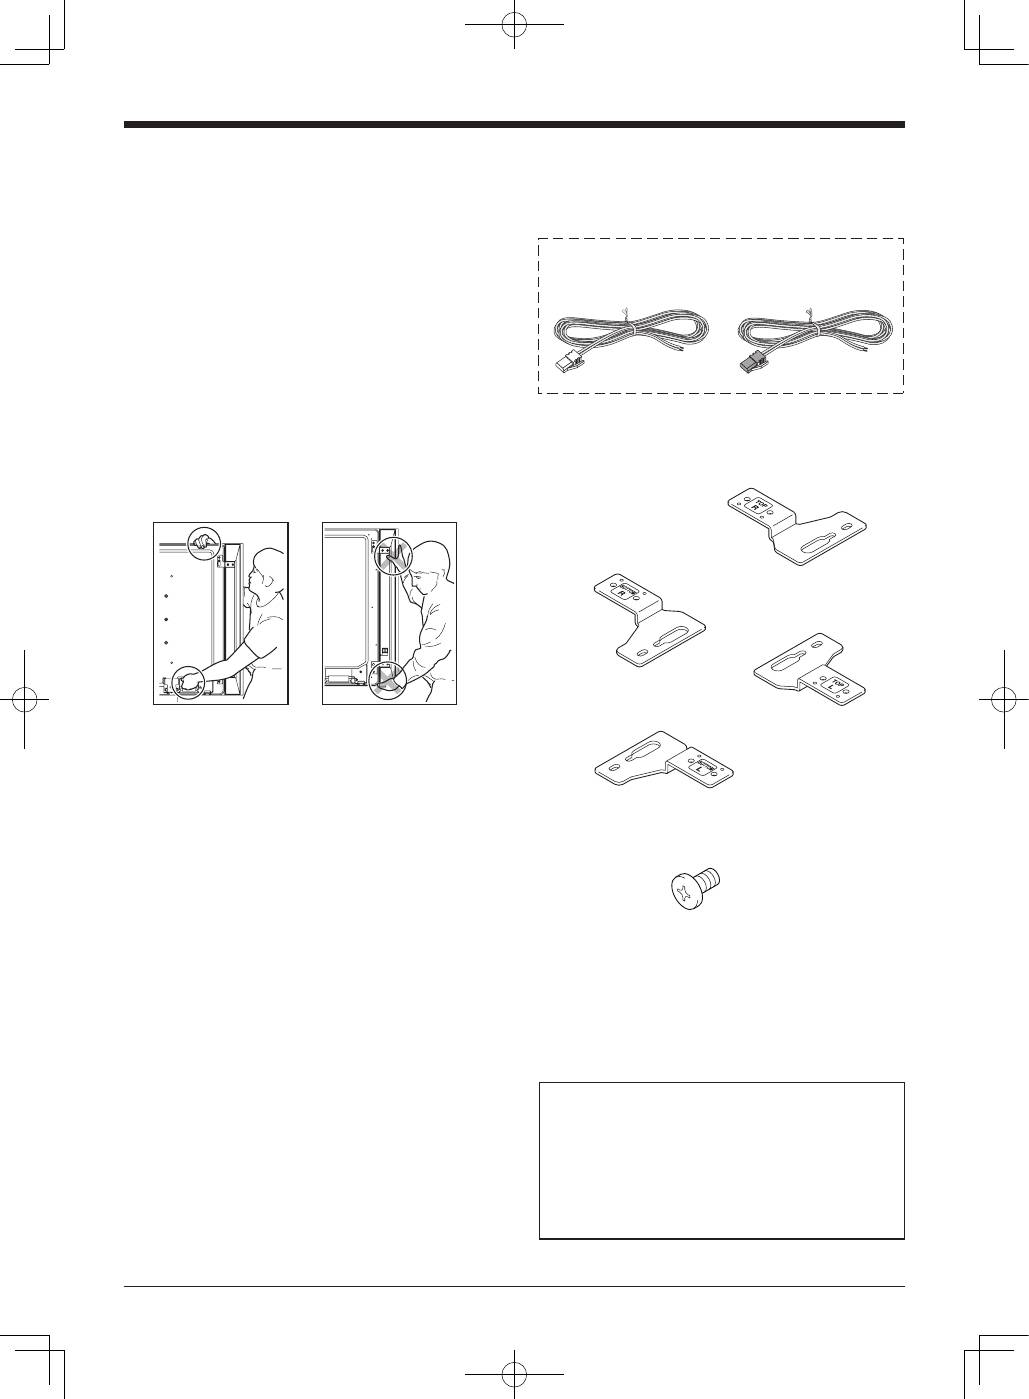
付属品の確認
• スピーカーケーブル (L)×1 • スピーカーケーブル (R)×1
ディスプレイ側に付属
• スピーカー取付金具 × 各 1
右上用
左上用
右下用
左下用
• 取付ネジ
(M5 × 10 mm : 黒 ) × 16
• 取扱説明書(本書) × 1
取扱上の注意
安全上の絵表示について
取扱説明書および製品に記されている注意事項には、損害のレ
ベルや内容を示す絵表示が付けられていることがあります。そ
れら絵表示の意味は以下のとおりです。
3
日本語
日本語
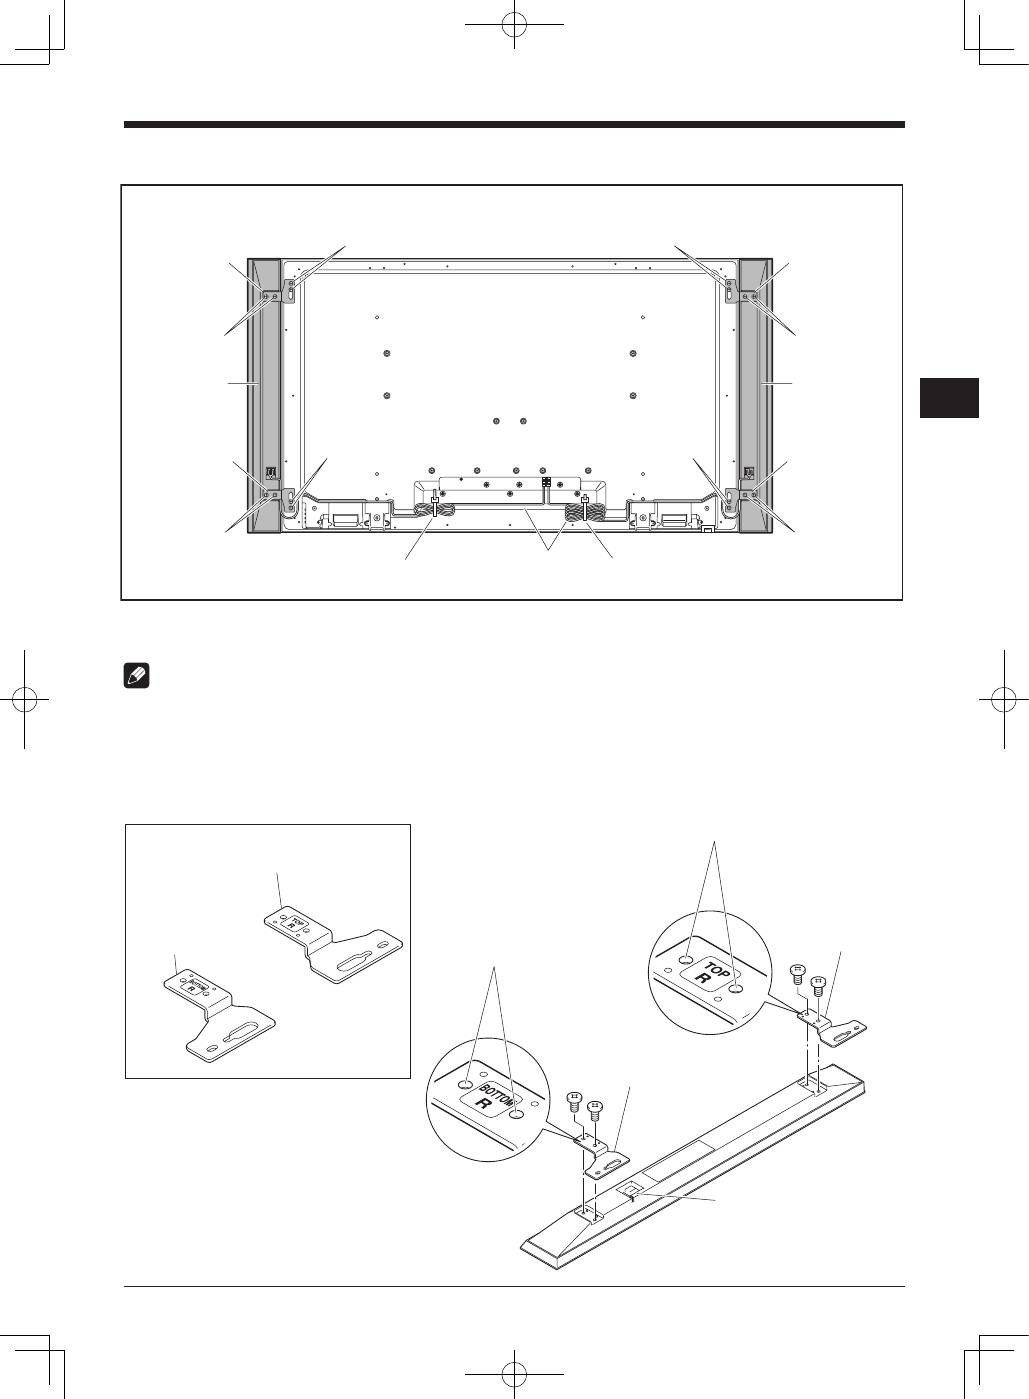
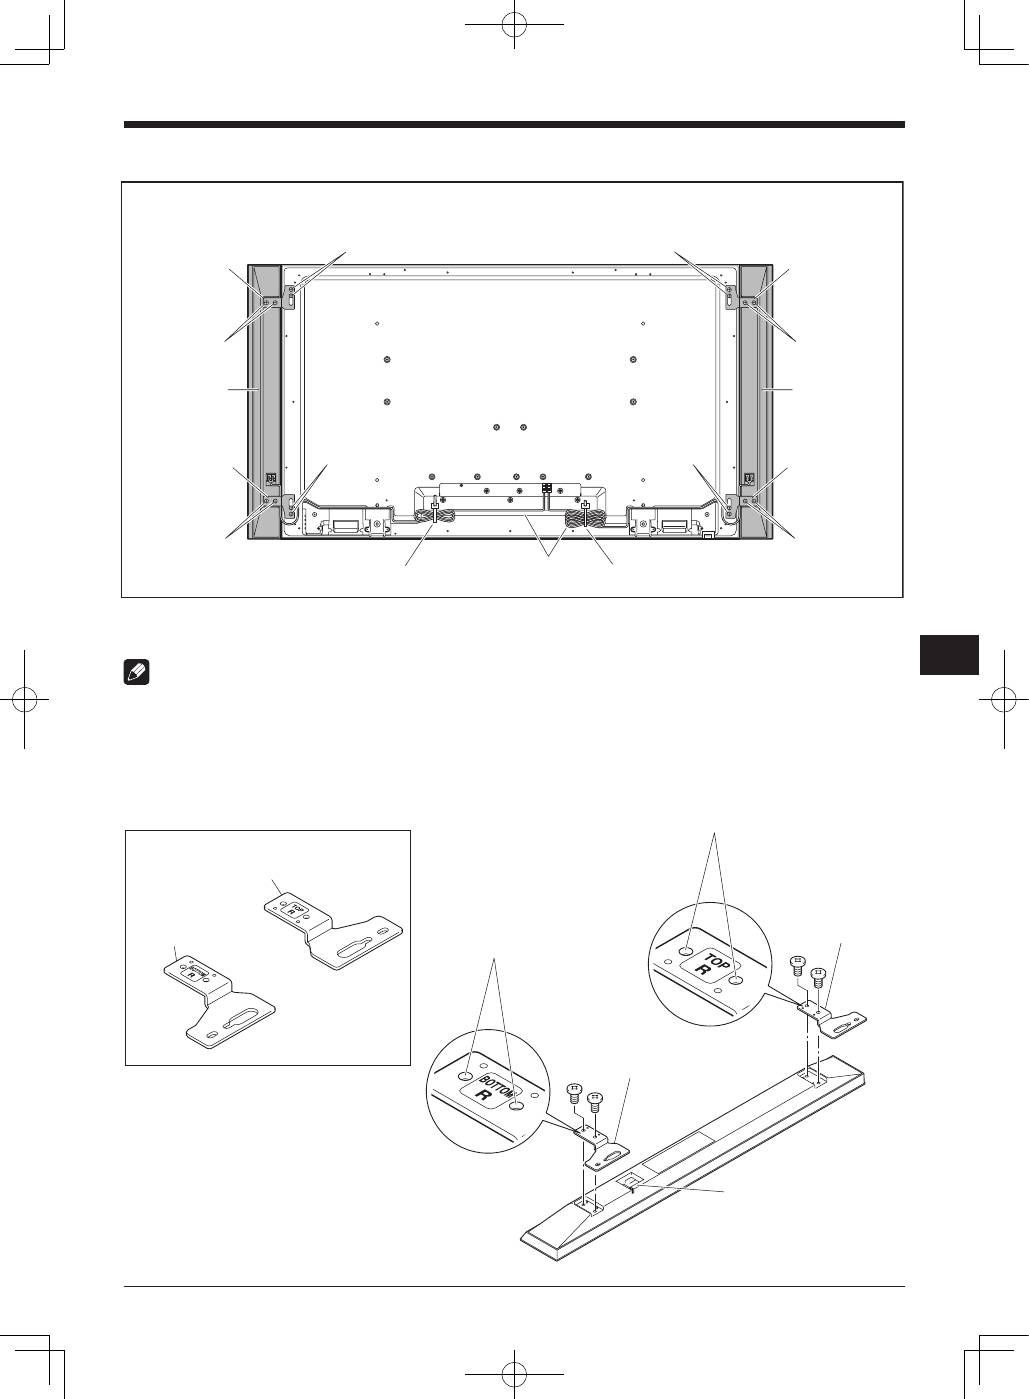
フラットパネルディスプレイに取り付ける
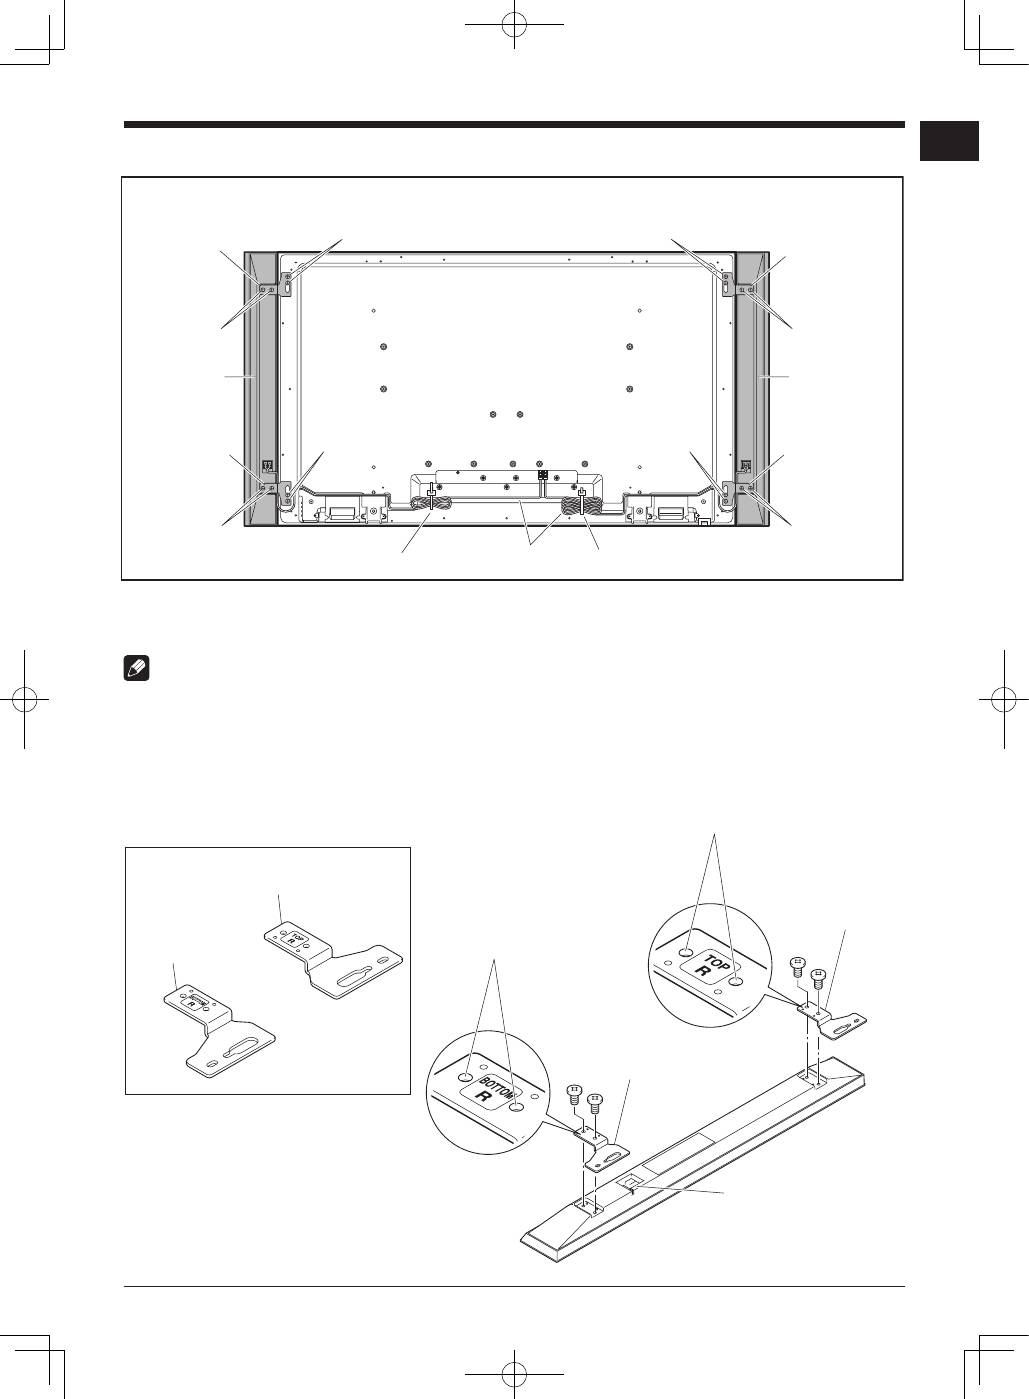
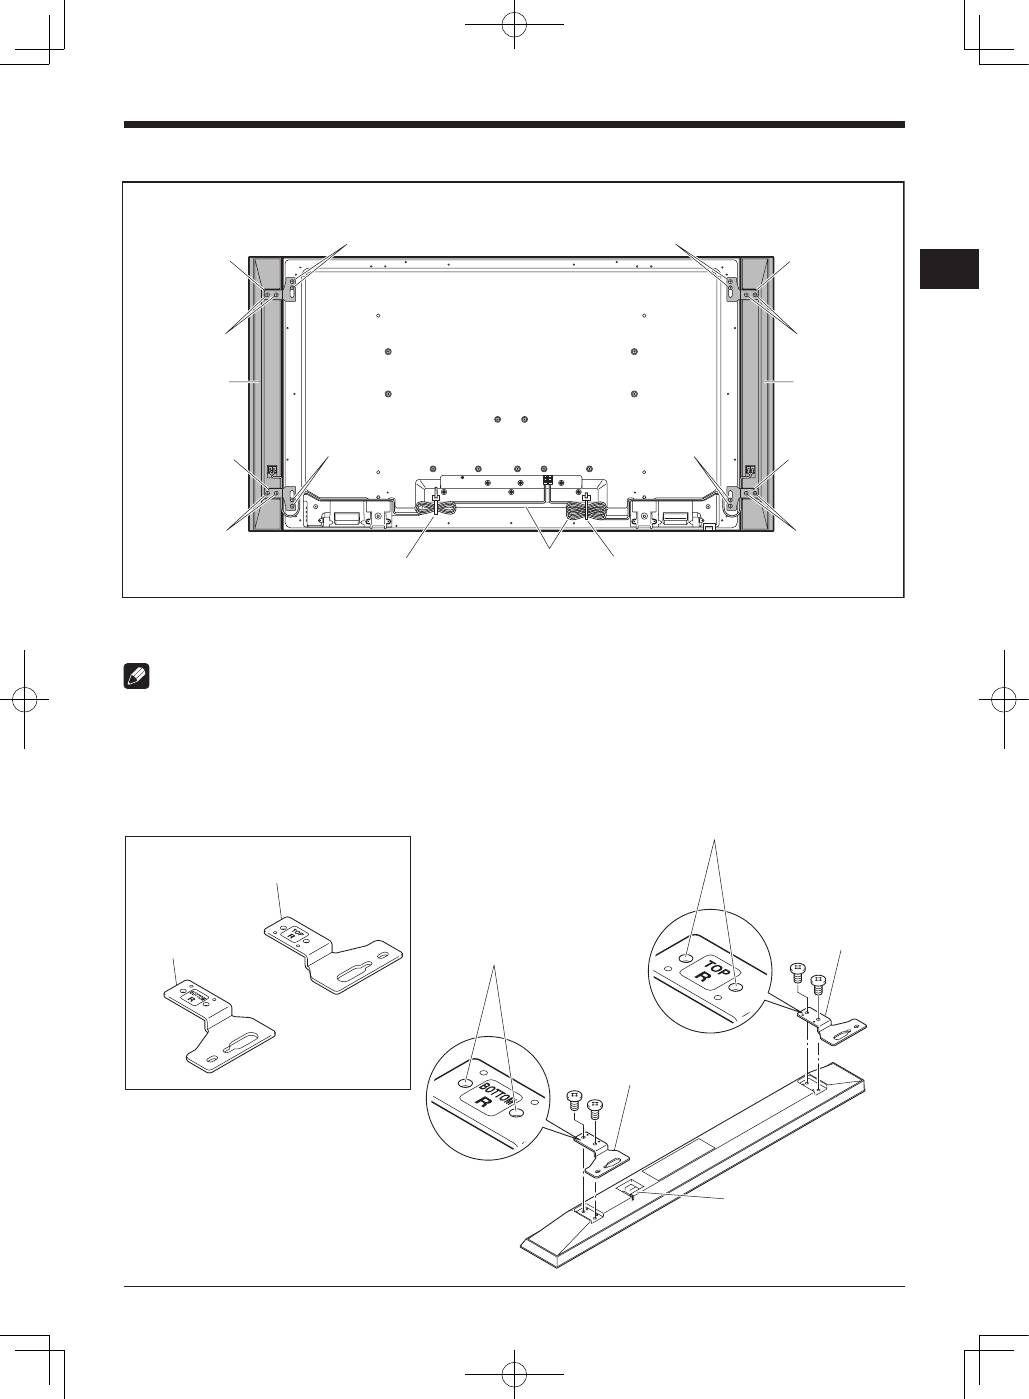
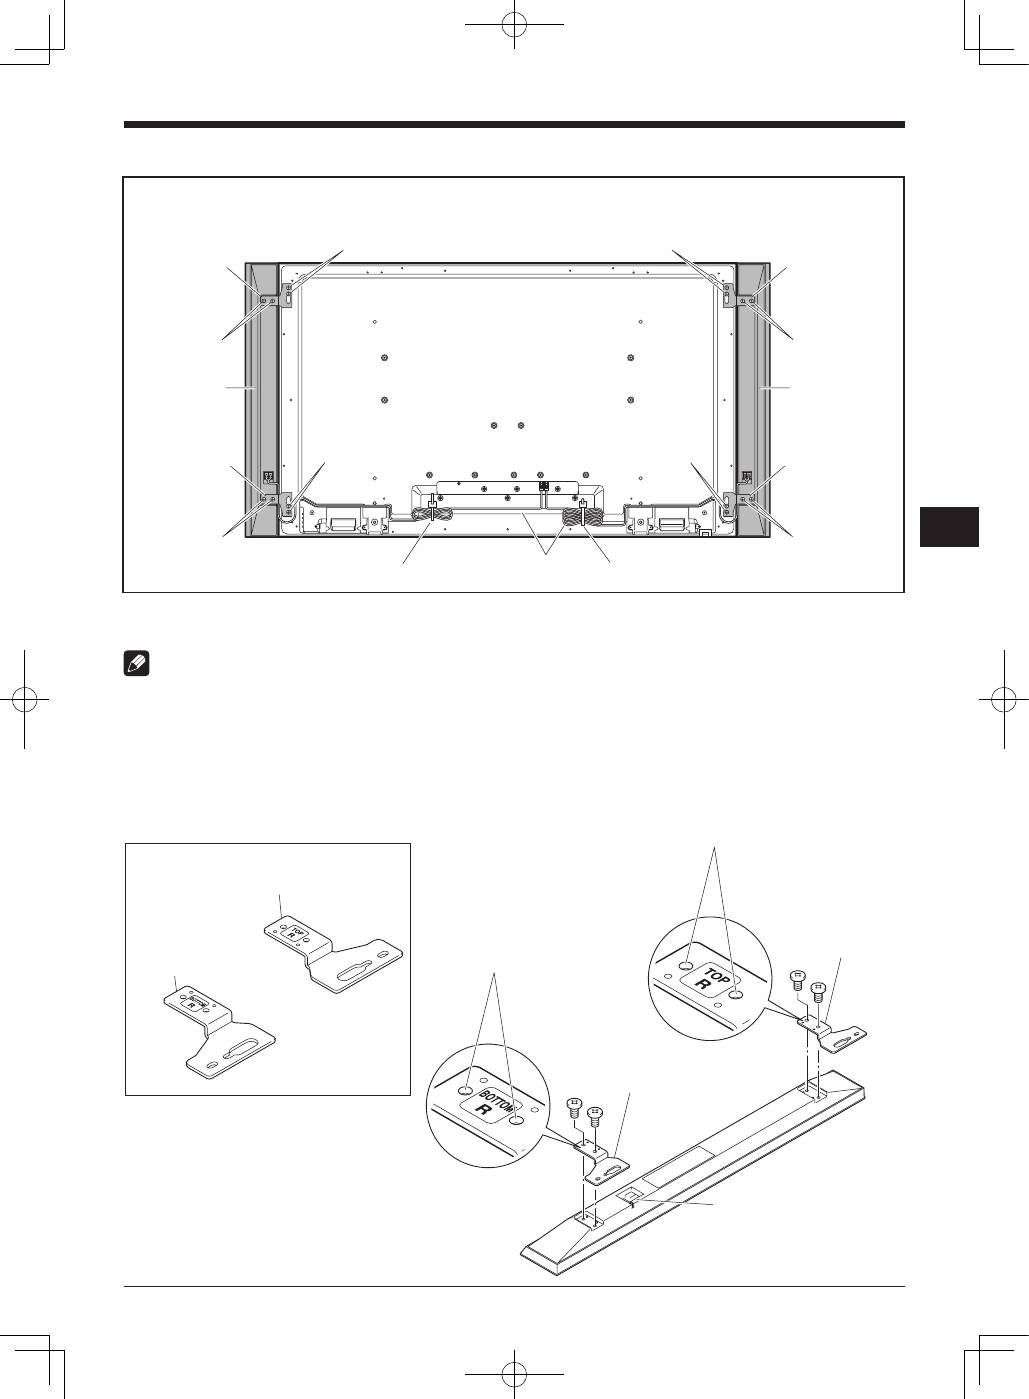
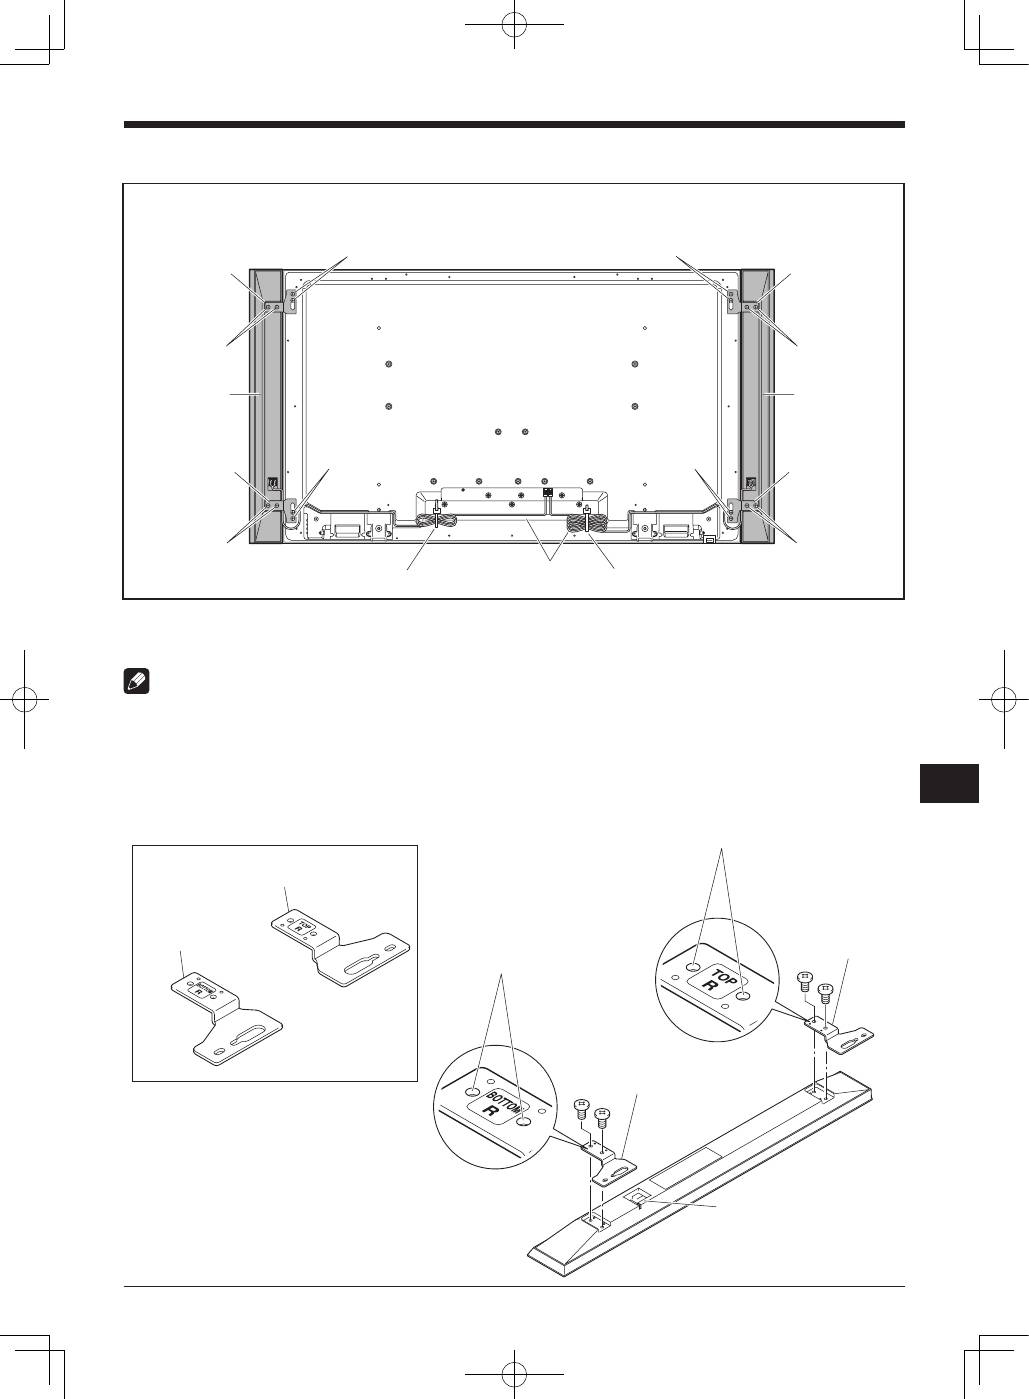
スピーカー取り付け完成図
スピーカー
スピーカー
スピーカー取付金具
(右上用)
スピーカー取付金具
(右下用)
スピーカー取付金具
(左下用)
* : ディスプレイ側に付属
取付ネジ
(M5 × 10 mm)
取付ネジ
(M5 × 10 mm)
スピーカー
取付ネジ
(M5 × 10 mm)
取付ネジ
(M5 × 10 mm)
取付ネジ
(M5 × 10 mm)
取付ネジ
(M5 × 10 mm)
取付ネジ
(M5 × 10 mm)
スピーカー取付金具
(左上用)
取付ネジ
(M5 × 10 mm)
ケーブルクランプ*
ケーブルクランプ*
スピーカーケーブル*
テーブルトップスタンドを使うときは
ご注意
スピーカーを取り付ける前に、ディスプレイへ KRP-TS01 シリーズのテーブルトップスタンド(または他のスタンド)を
取り付けてください。
1. スピーカーにスピーカー取付金具を取り付ける
スピーカー取付金具は、右スピーカー / 左スピーカー別に、それぞれ上下用があります。スピーカー背面の上部と下部に、
それぞれスピーカー取付金具を付属のネジで取り付けます。(本機前面から見て、右側を例にして説明します。左側も同
じ手順で取り付けます。)
スピーカー端子が手前(下側)
にくるように置きます。
(右スピーカーの例)
ネジ穴
ネジ穴
スピーカー取付金具
(右上用)
スピーカー取付金具
(右下用)
スピーカー取付金具
(右上用)
スピーカー取付金具
(右下用)
日本語
4
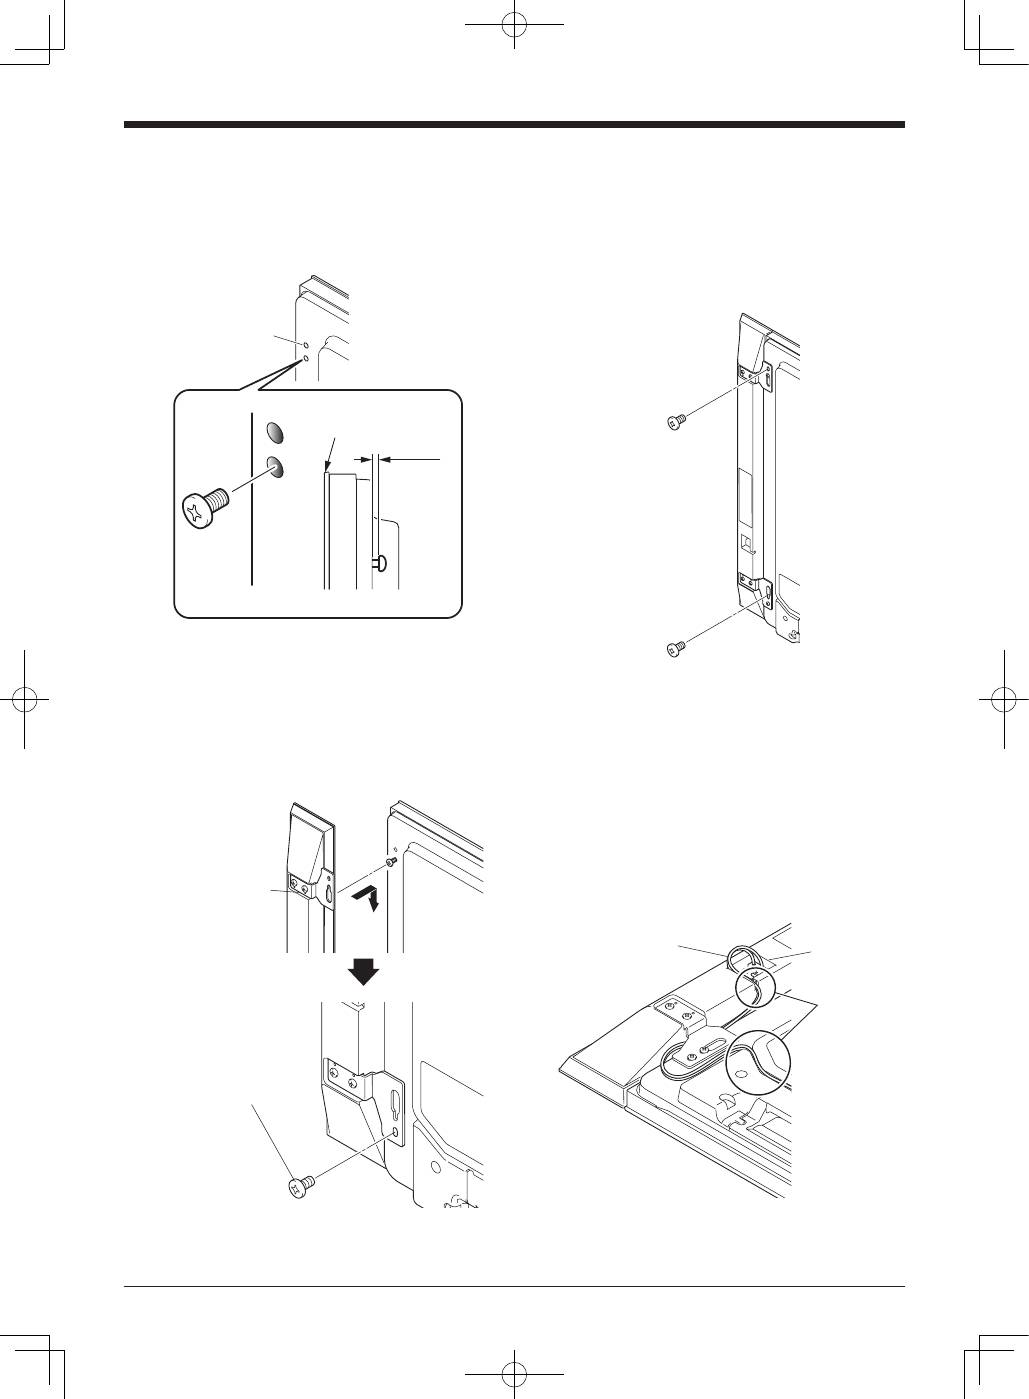
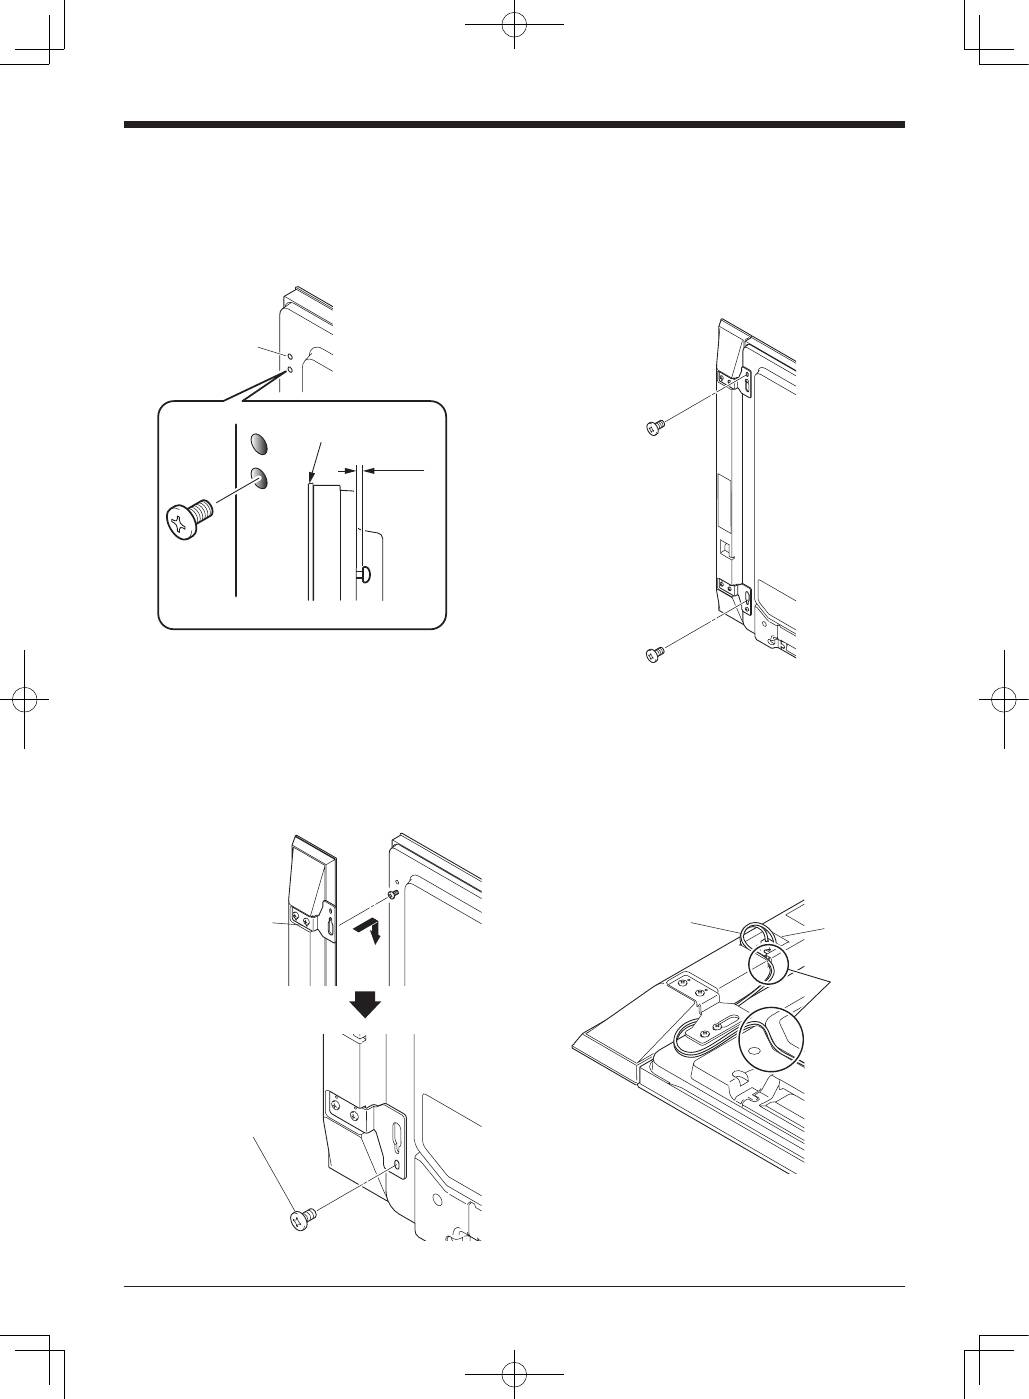
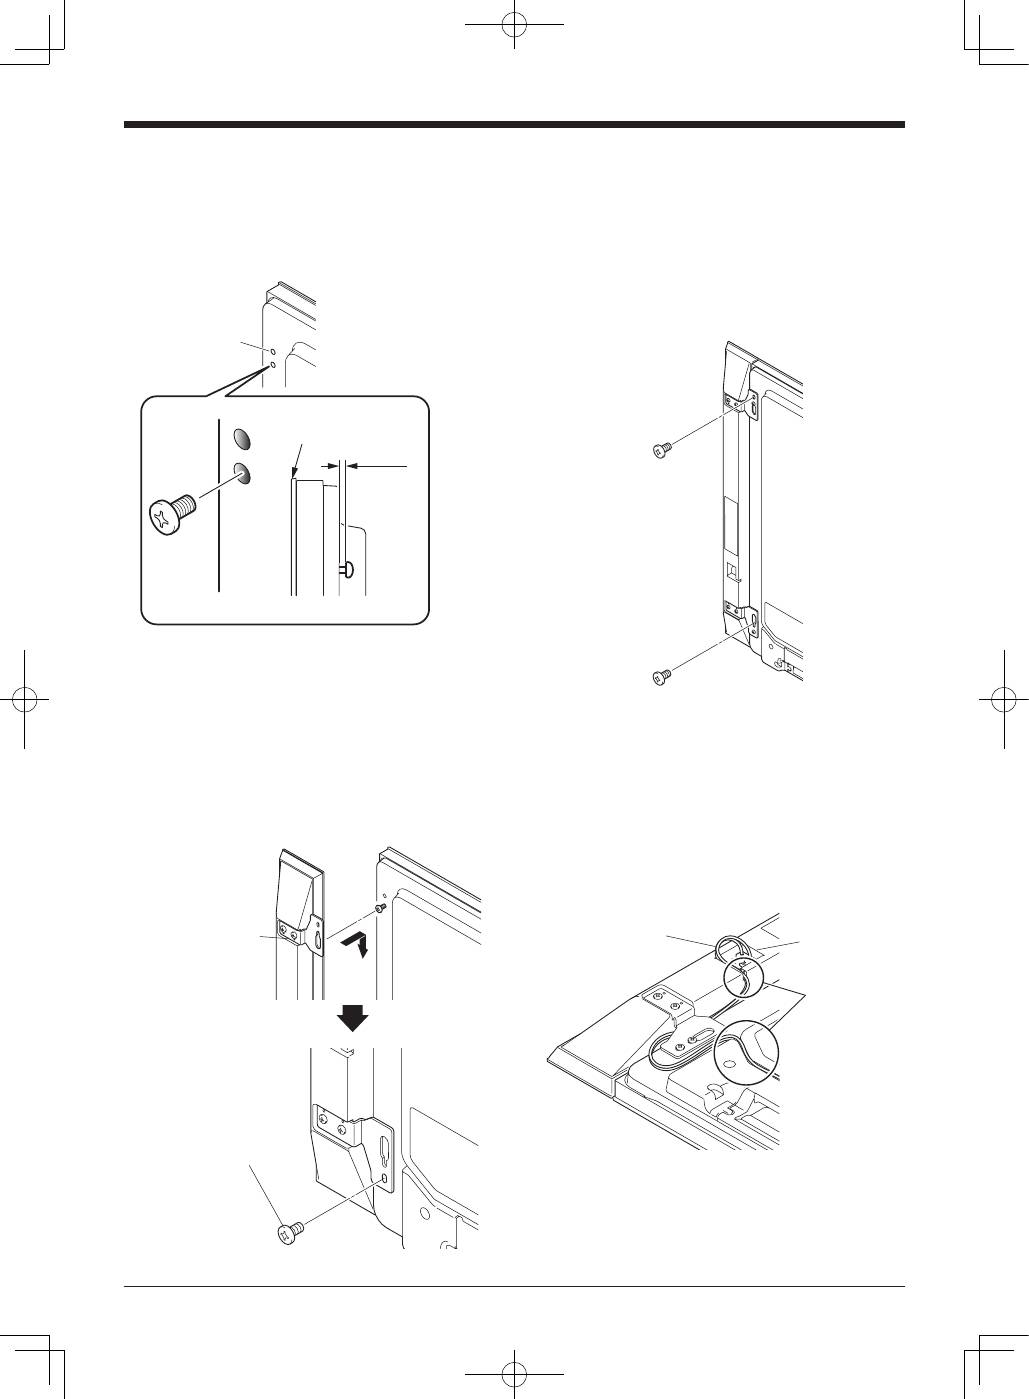
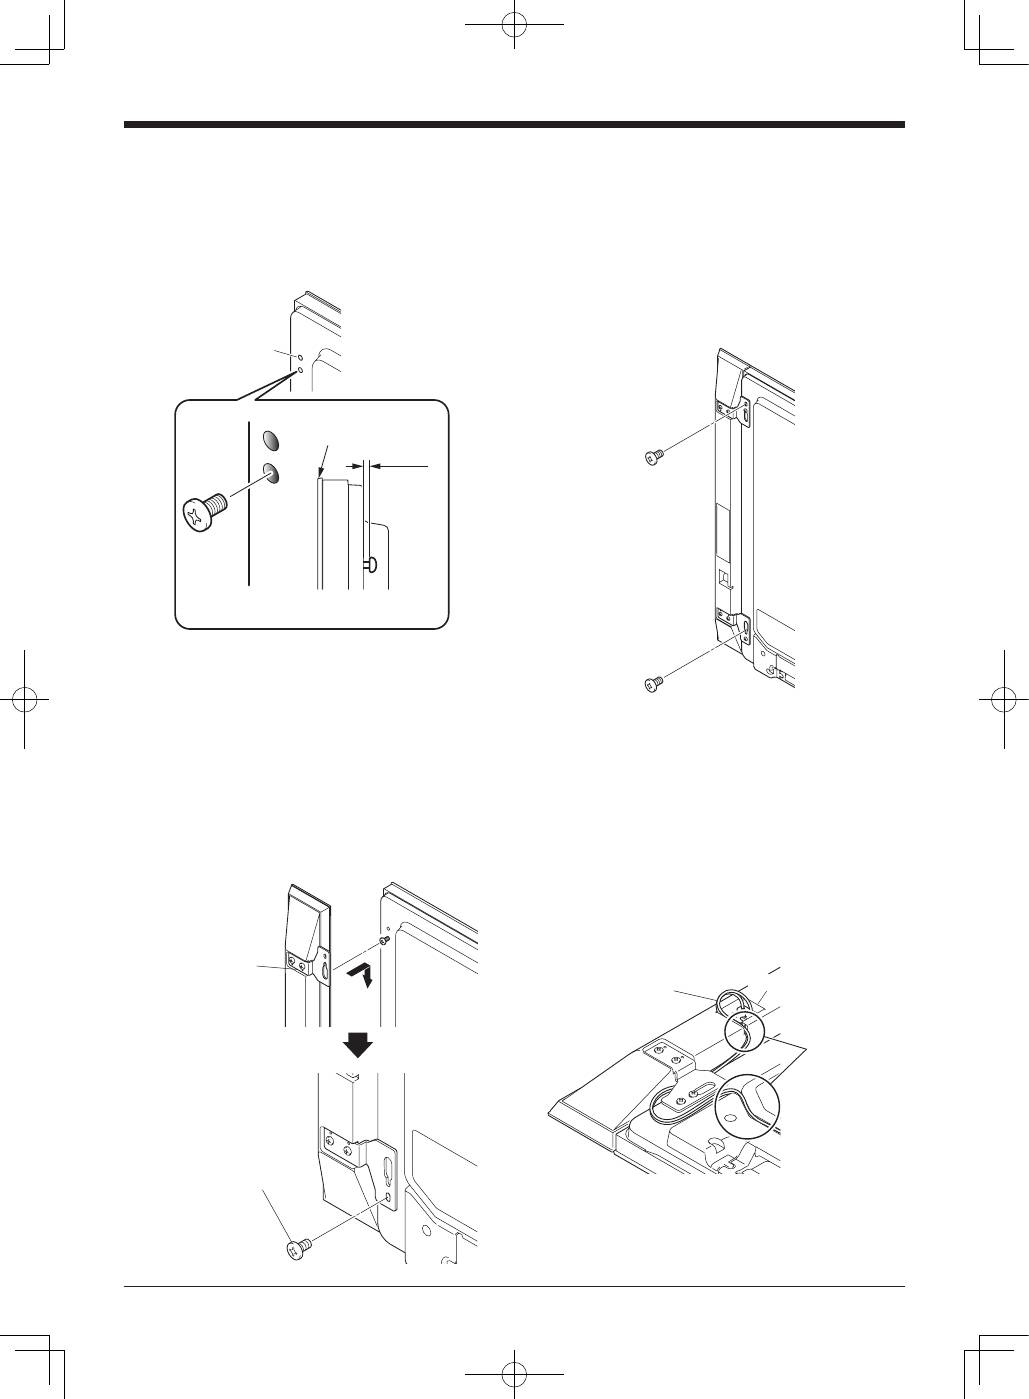
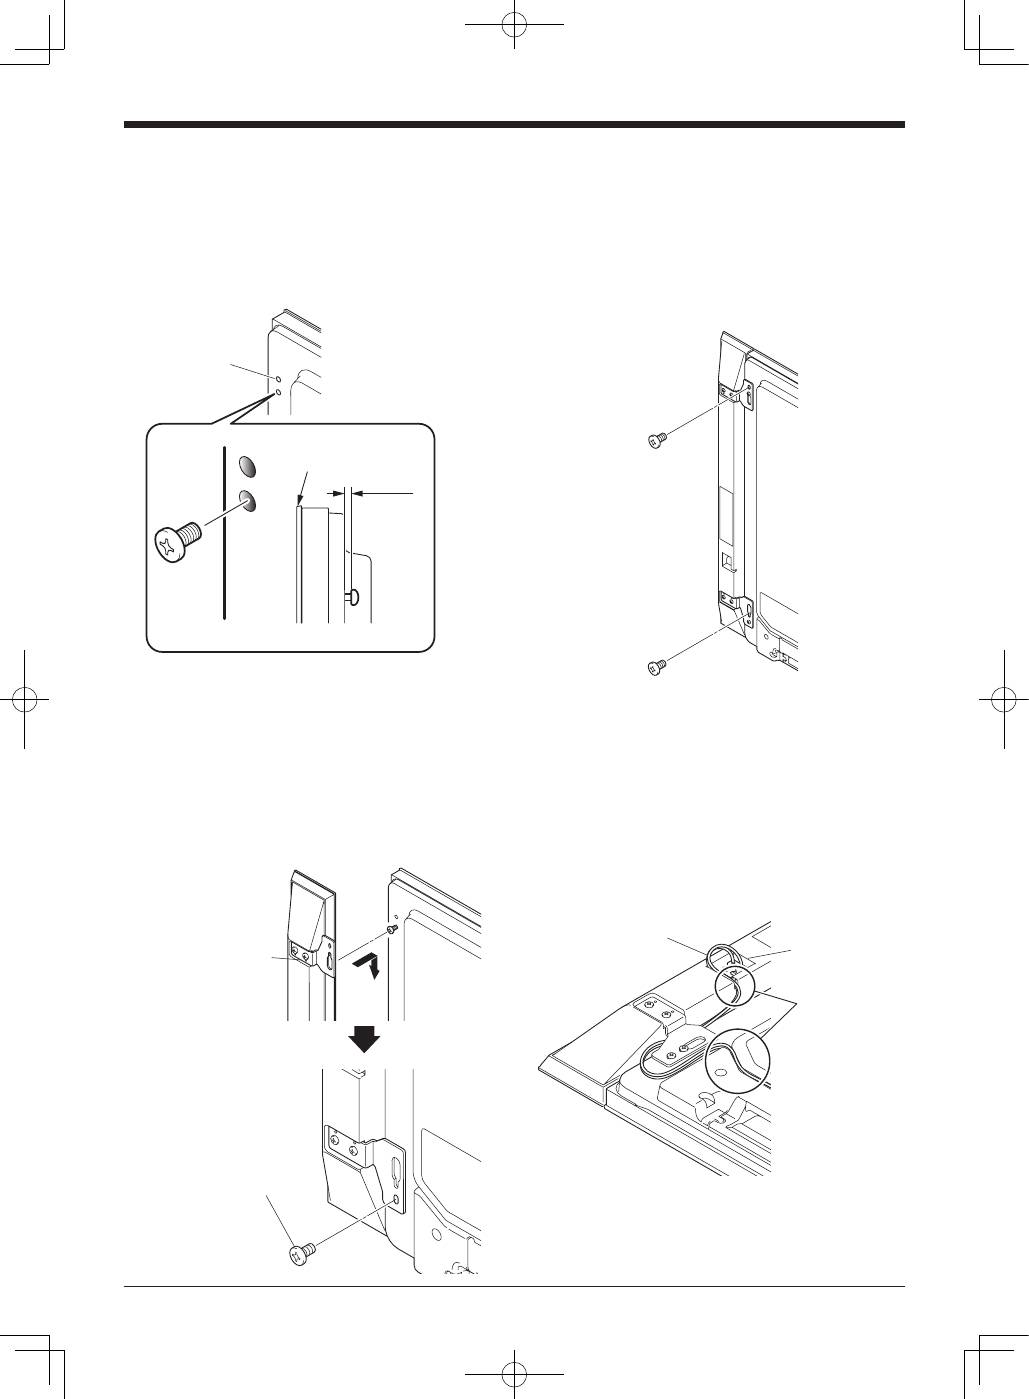
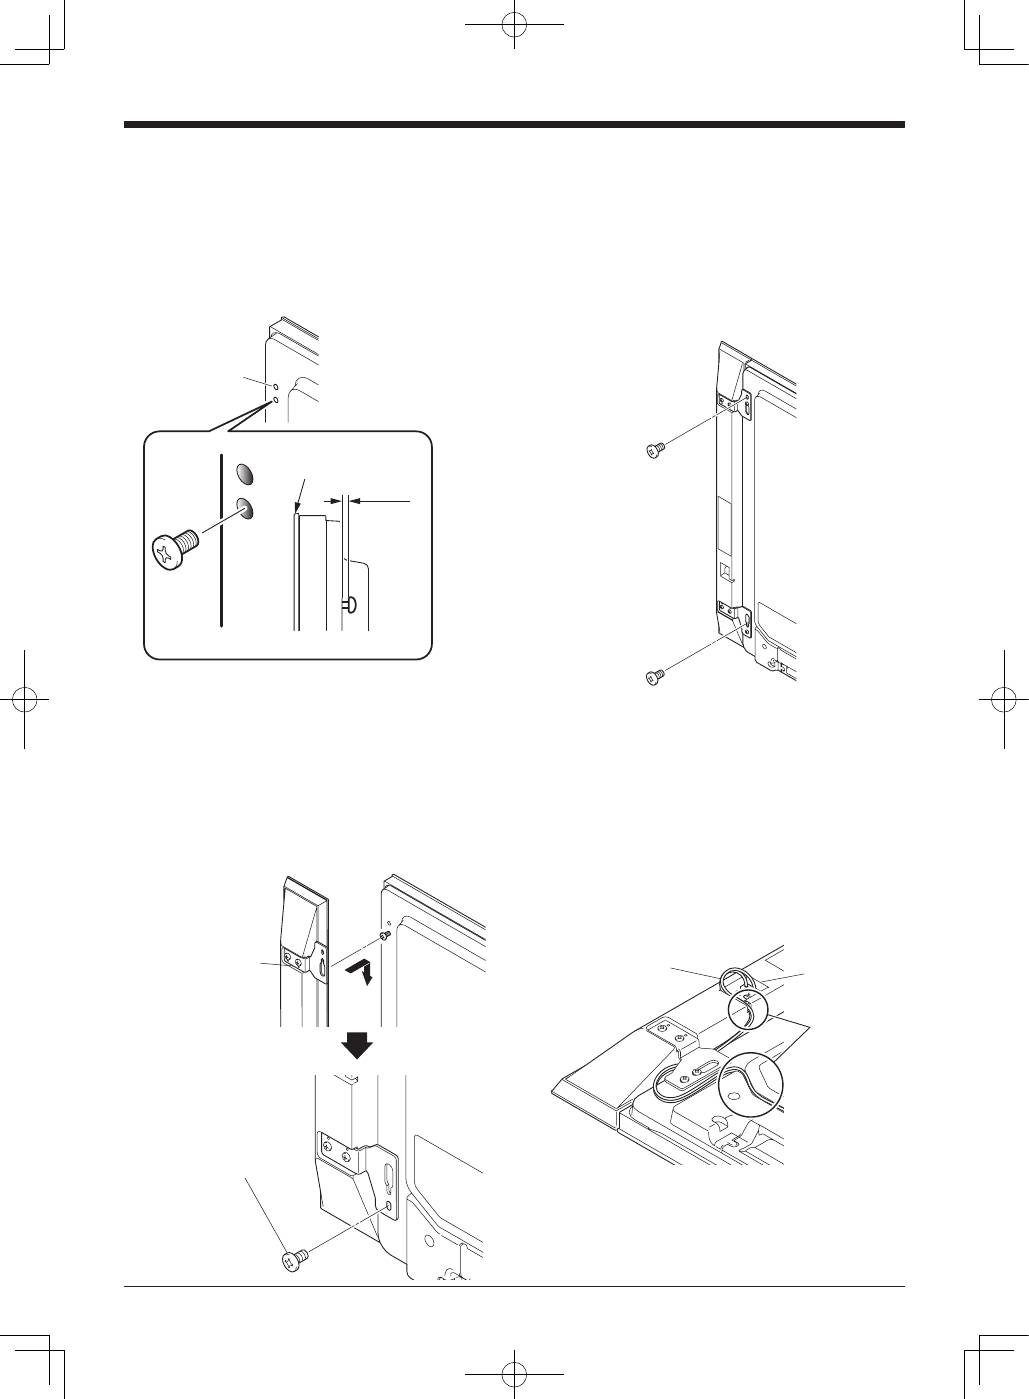
2. ディスプレイ背面上部のスピーカー取り付
け穴(2 つあるうちの下側)に、付属のネ
ジを取り付ける
まだ、ネジを完全に留めないでください。5 mm 程度
を残して軽く取り付けておきます。
5 mm
5 mmほどの隙間を残す。
スピーカー取り付け穴
ディスプレイ
背面上部
ディスプレイ上部
3. 取り付けた上部のネジを、スピーカー取付
金具(上部)の細長い穴(広い部分)に通
して引っ掛け、下のネジを仮留めする
スピーカー取付金具(上部)の細長い穴の広い部分に
ネジを通してから、スピーカーを下に下げます。
下部のスピーカー取付金具を
ディスプレイに仮留めします。
(1カ所下側)
細長い穴の広い部分に
ネジを通してから、
スピーカーを下に下げ
ます。
4. スピーカーの位置を調整する
スピーカーとディスプレイのすき間が均一になるよう
に調整し、スピーカーとディスプレイの高さを合わせ
ます。そのあと、仮留めした 2 本のネジを締めて固定
します。
5. 残りの 2 本(上下各 1 本)のネジを締める
手順 2、3 で仮留めしたネジも締めます。
6. ディスプレイとスピーカーの間にスピー
カーケーブルを下から通す
スピーカーケーブルはスピーカー取付金具の下をくぐ
らせます。
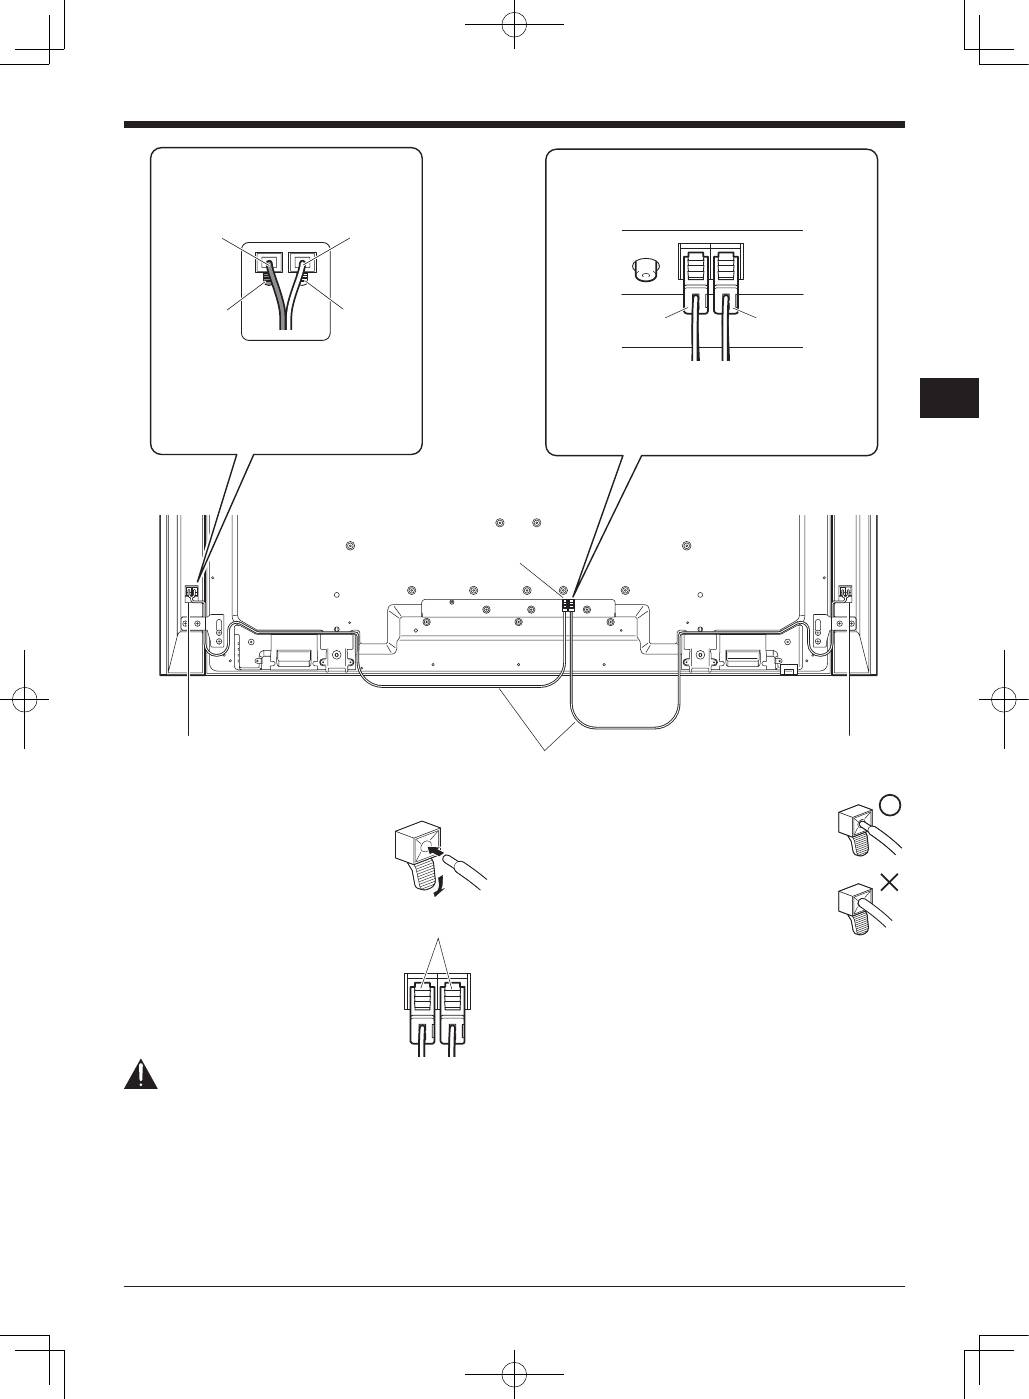
7. スピーカーケーブルを、極性を合わせてス
ピーカーにつなぐ
8. スピーカーケーブルを、スピーカーケーブ
ル固定用の溝に入れる
溝に入れる
スピーカーケーブル
スピーカー端子
9. スピーカーケーブルのもう一端をディスプ
レイにつなぐ
5
日本語
日本語
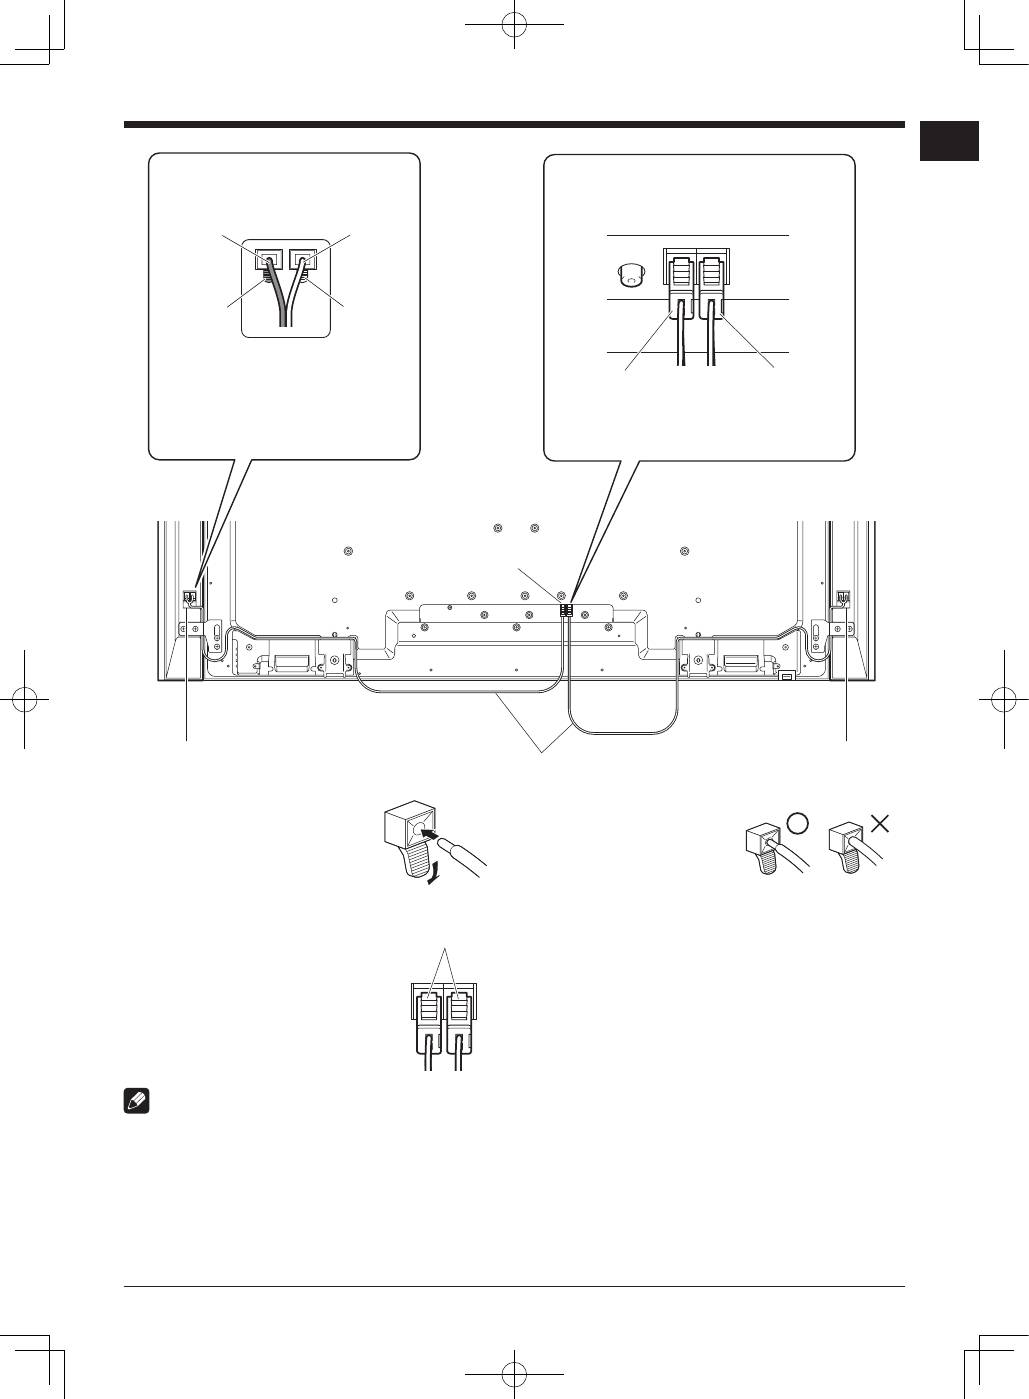
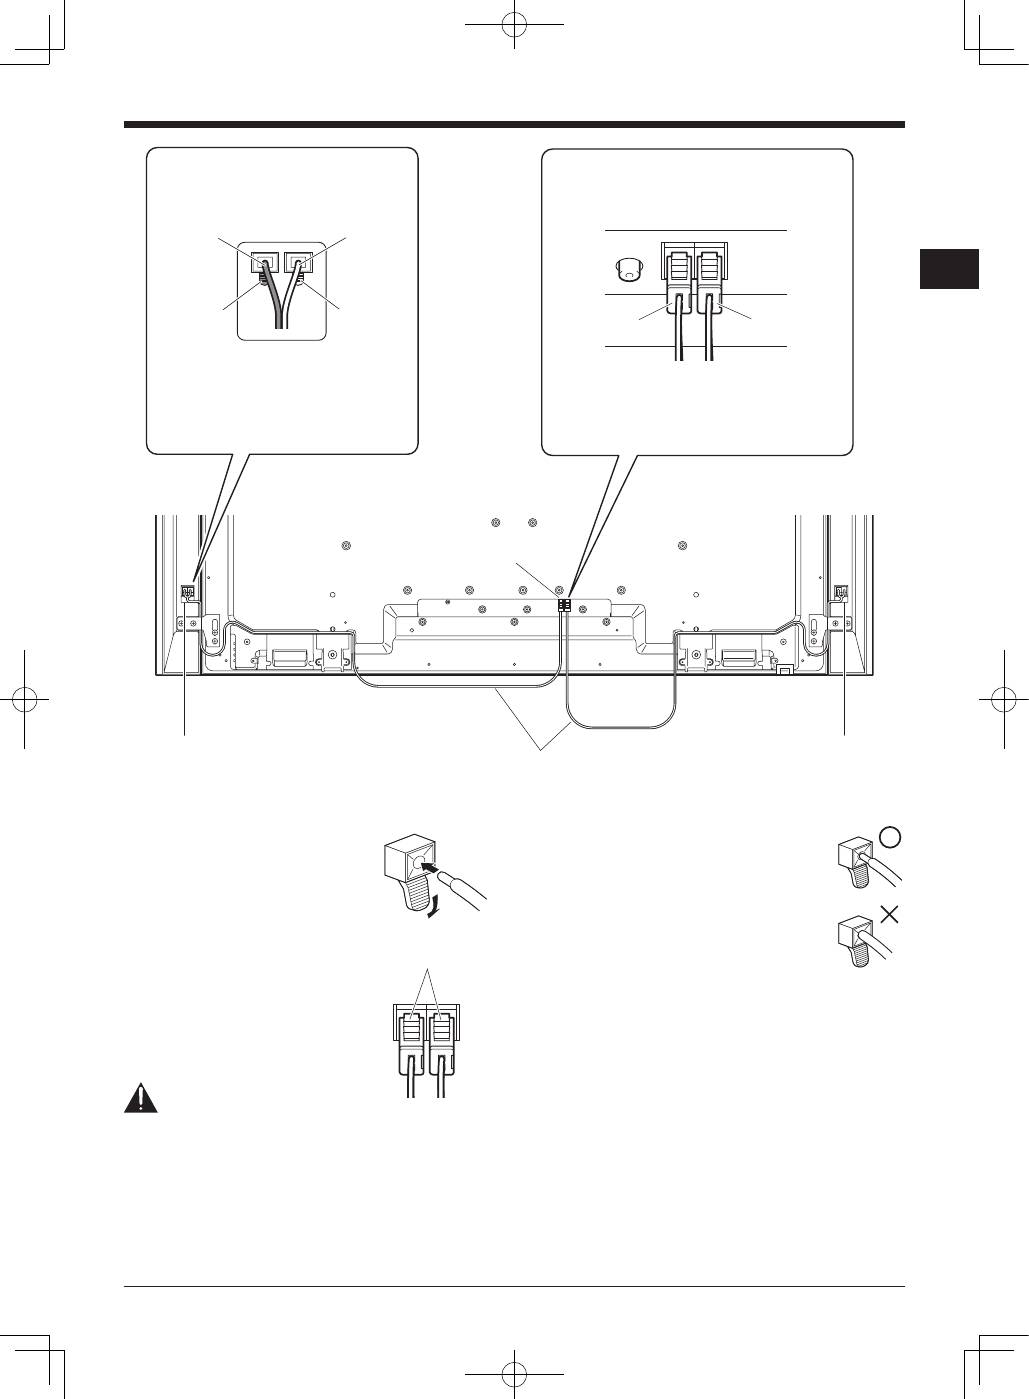
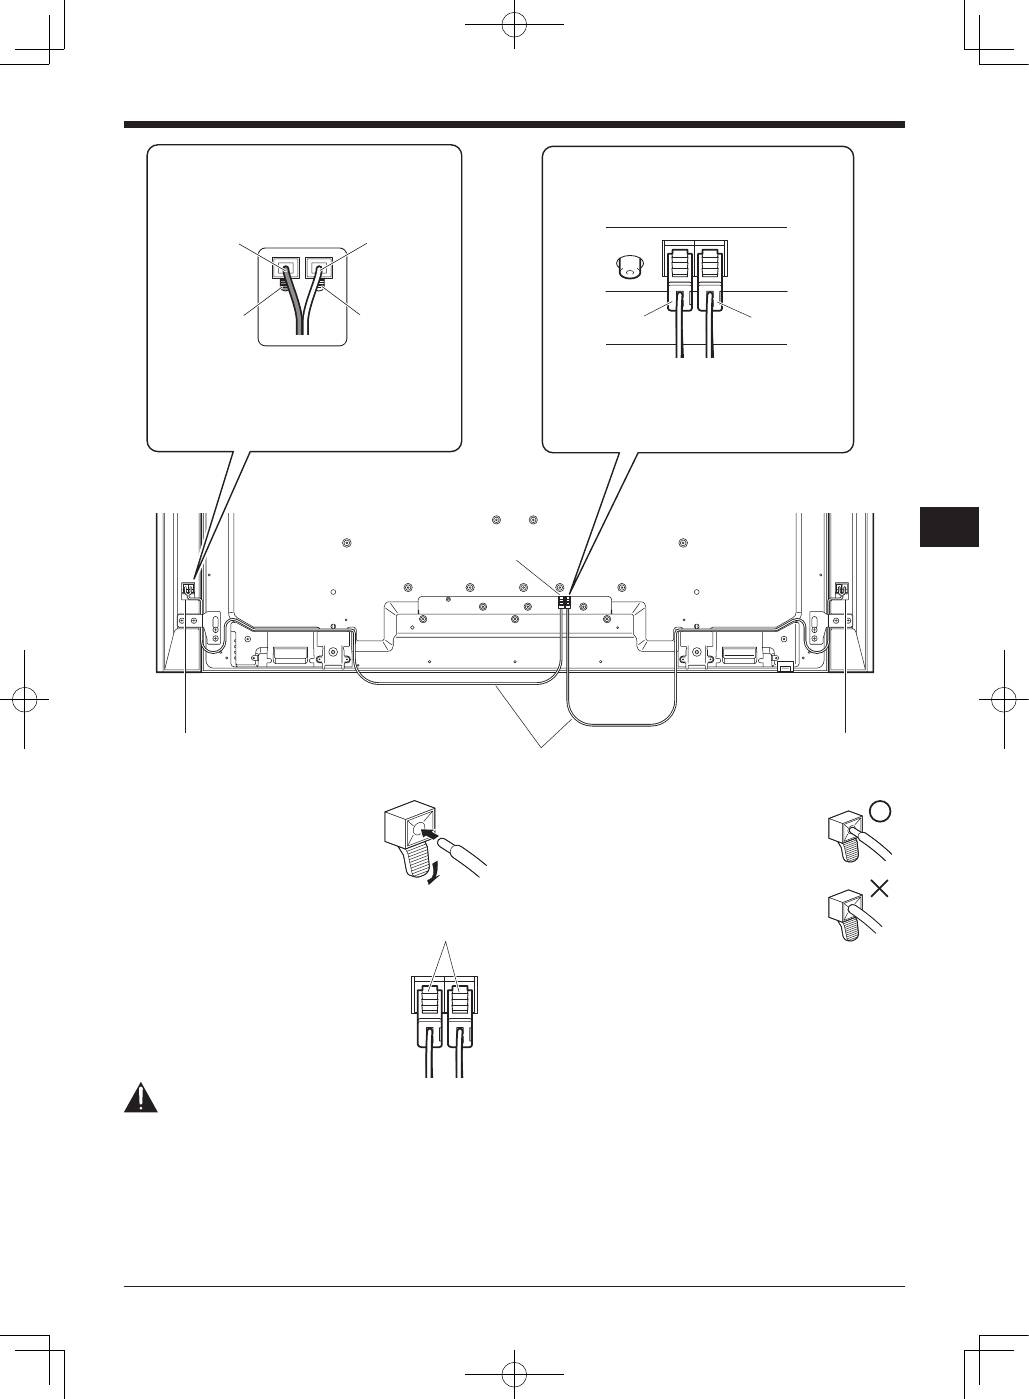
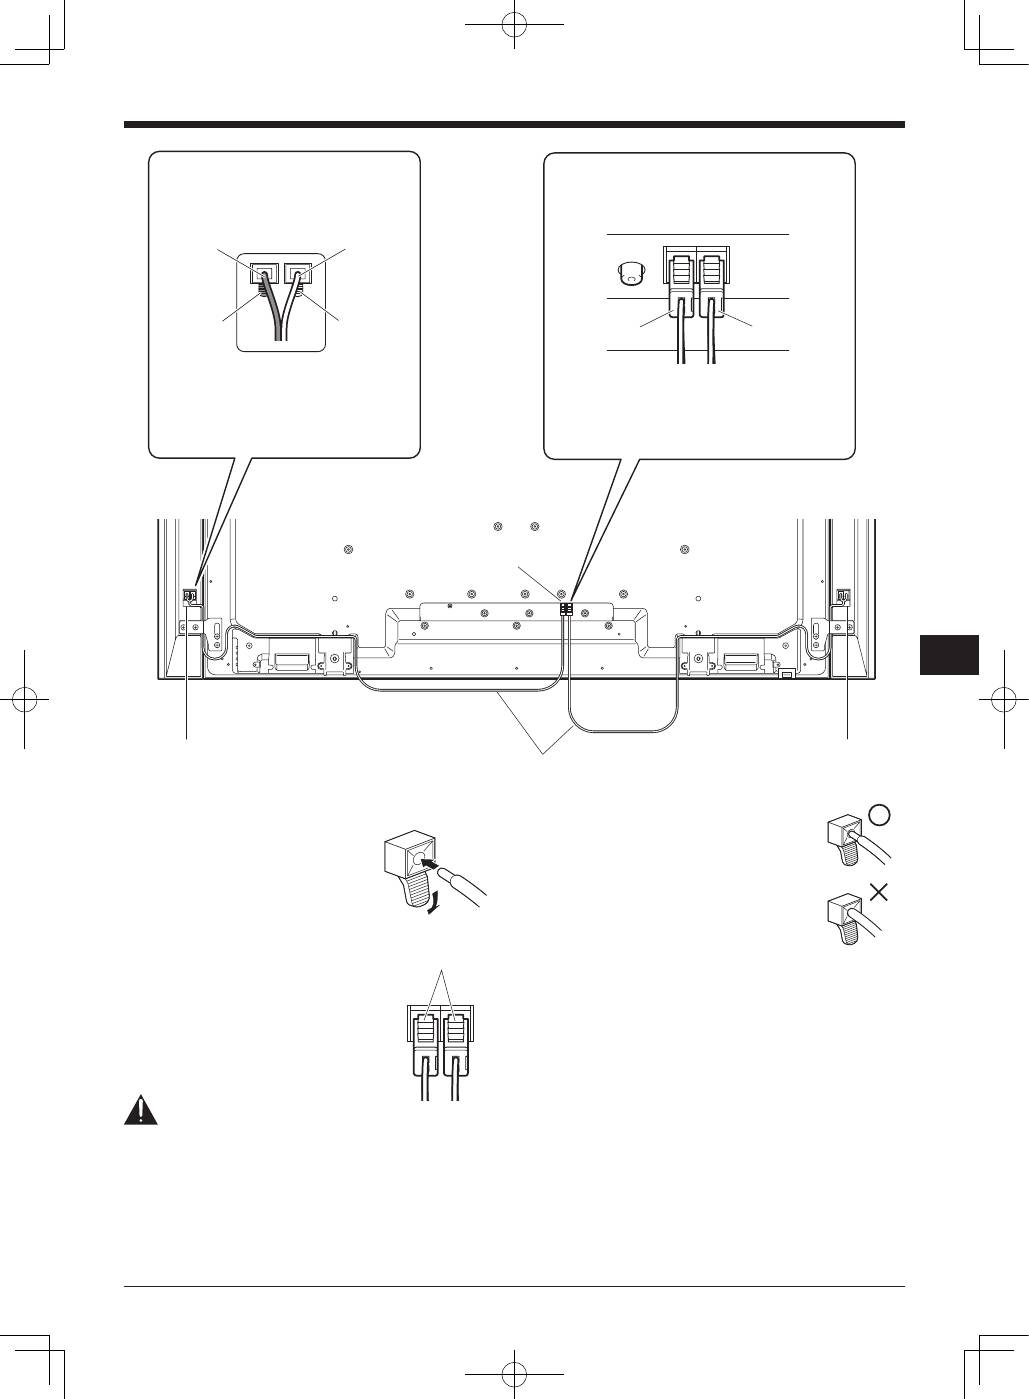
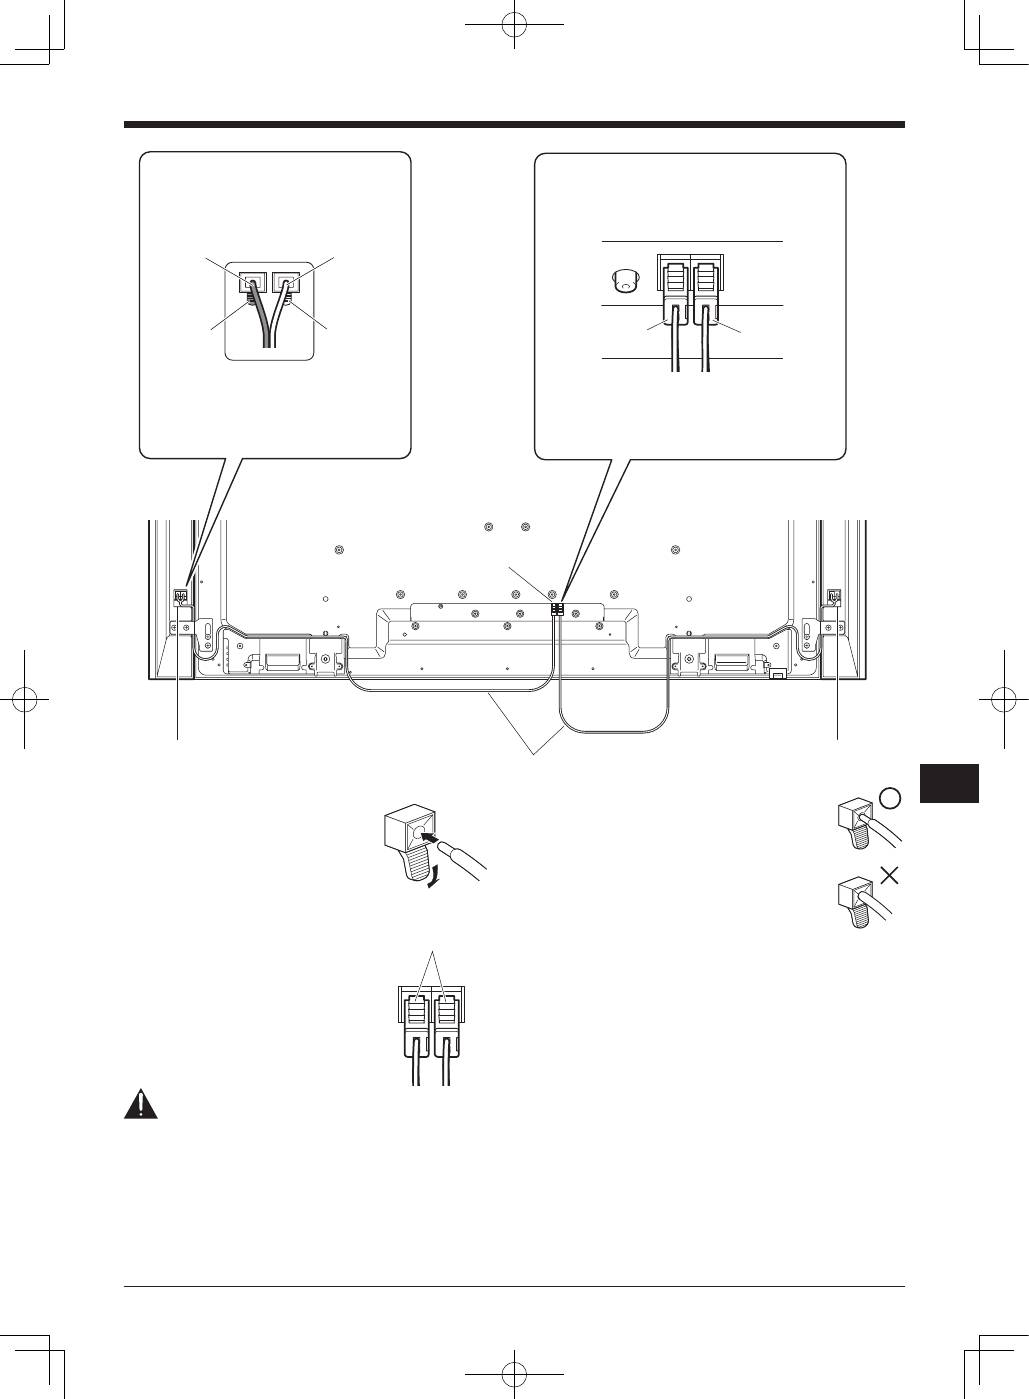
スピーカーケーブルのつなぎ方
(スピーカー側)
レバーを押してケーブルの先端を差し
込みます。レバーを放すとスピーカー
ケーブルが固定されます。
スピーカーケーブルのつなぎ方
(ディスプレイ側)
スピーカーケーブルのコネクタを、スピー
カー端子に差し込みます。コネクタが外
れないように、きちんと差し込んでくだ
さい。スピーカーケーブルを外す時は、
必ずレバーを押しながら外してください。
ご注意
• ディスプレイとスピーカーとを接続する前に、ディスプ
レイの電源プラグを抜いてください。
本機の電源を入れたままスピーカーケーブルの接続をす
ると、スピーカーケーブルの銅線が接続されている他機
器などに触れたときに、ディスプレイに過大な負荷が加
わって動作が停止したり、故障することがあります。接
続が終わってから、電源プラグをコンセントに差し込ん
でください。
• スピーカーケーブル(スピーカー側)を端子の奥まで差
し込むと、被覆(ビニール
部分)を挟み込んで音が出
なくなる場合があります。
銅線が外側から少し見え
るように差し込んでください。
• スピーカー端子にコードを接続したあとは、コードを軽
く引いて、コードの先端が端子に確実に接続されている
ことを確かめてください。接続が不完全だと、音がとぎ
れたり、雑音が出る原因となります。
• コードの芯線がはみ出して、
と
の線がショートす
ると、ディスプレイに過大な負荷が加わって動作が停止
したり、故障することがあります。
• 極性(+-)を間違えないようにしてください。片方(右
または左)のスピーカーの極性を間違えて接続した場合、
低音が不足したり、音の定位感がなくなって、正しいス
テレオ効果が得られなくなります。
• スピーカー端子には、スピーカー以外の機器を接続しな
いでください。
• スピーカーケーブルを強く引っ張らないでください。
接続が不完全になって音がとぎれたり、コネクタが破損
することがあります。
コネクタが赤のケーブルをR(右)に、コネクタ
が白のケーブルをL(左)に接続してください。
赤:R
白:L
スピーカーケーブルをつなぐ
(ディスプレイ側)
ケーブル(灰色のライン)はスピーカー
端子(赤)に、
ケーブル(黒)はスピーカー
端子(黒)に接続してください。
スピーカーケーブルをつなぐ
(スピーカー側)
黒
赤
スピーカー端子
スピーカー端子
スピーカーケーブル
スピーカー端子
黒
灰色のライン
レバー
日本語
6
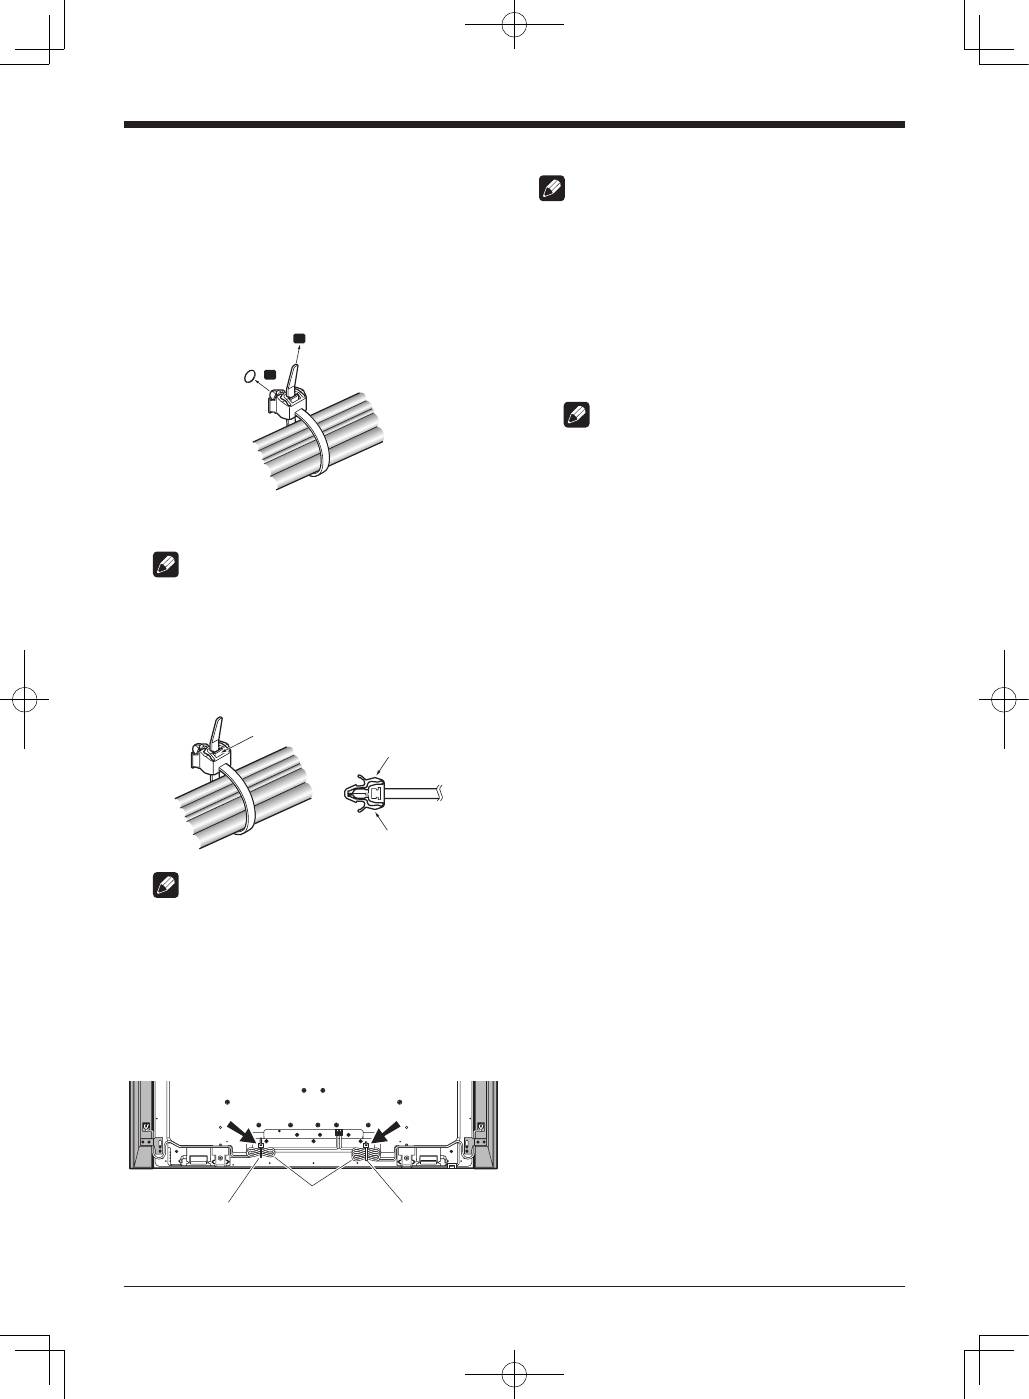
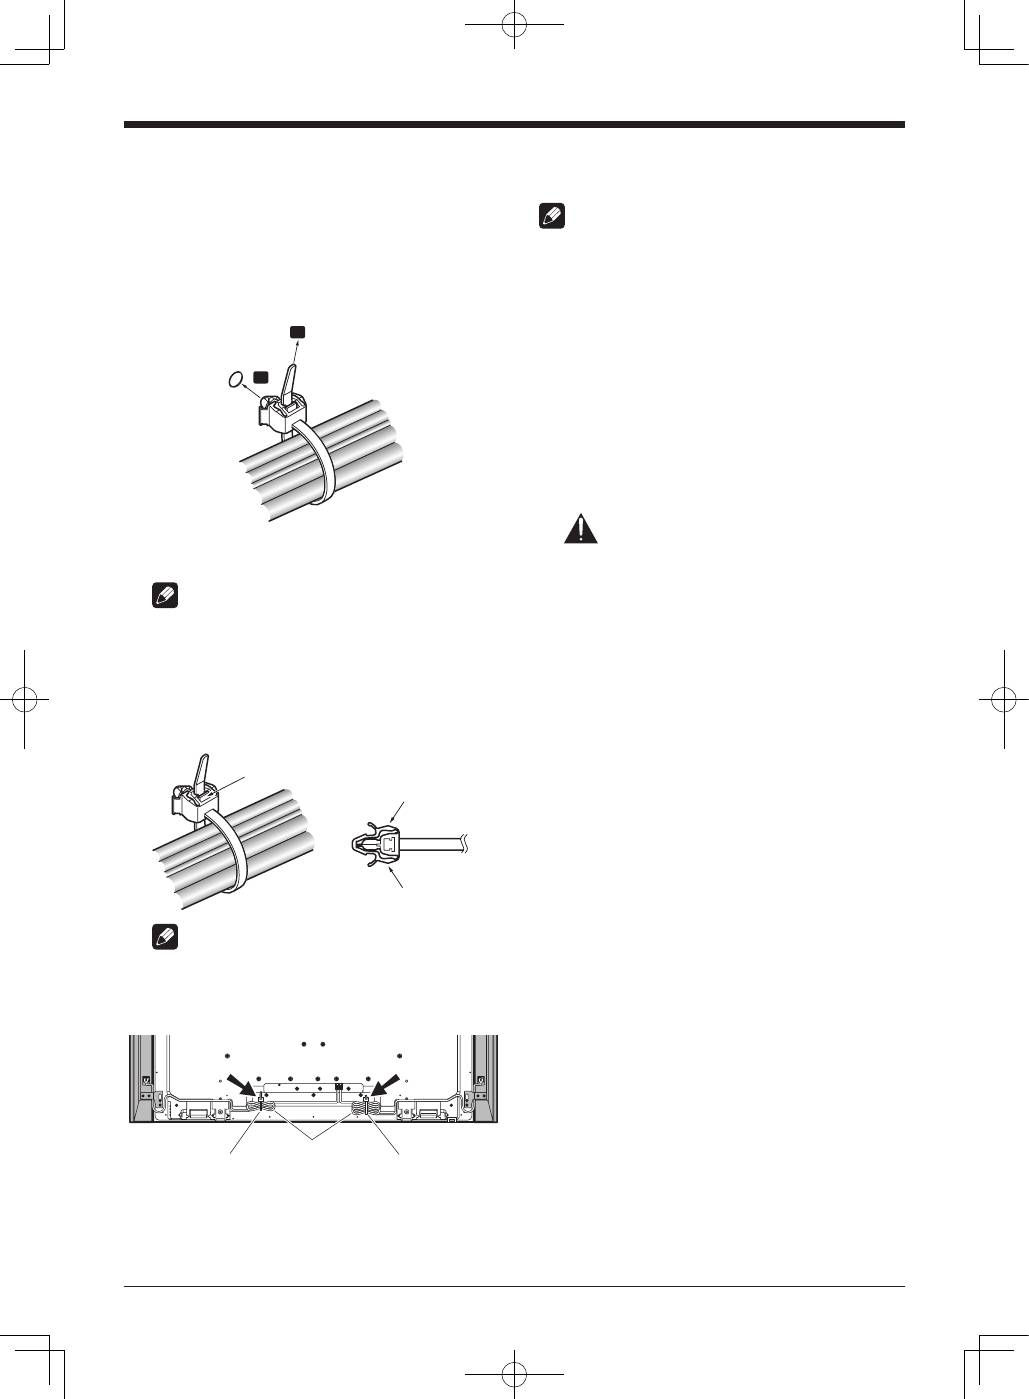
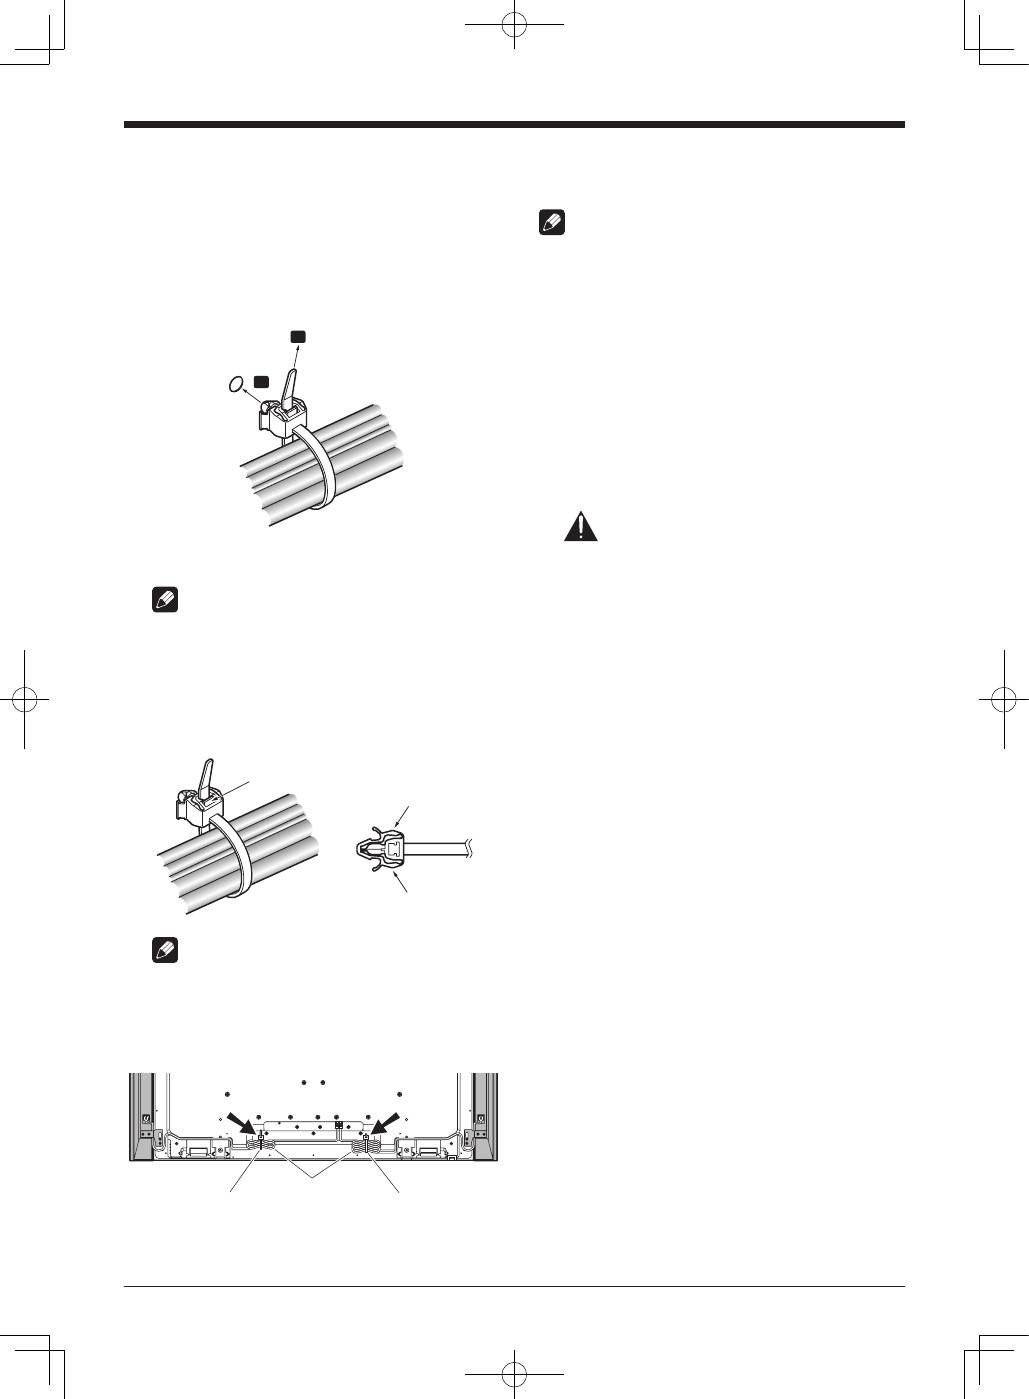
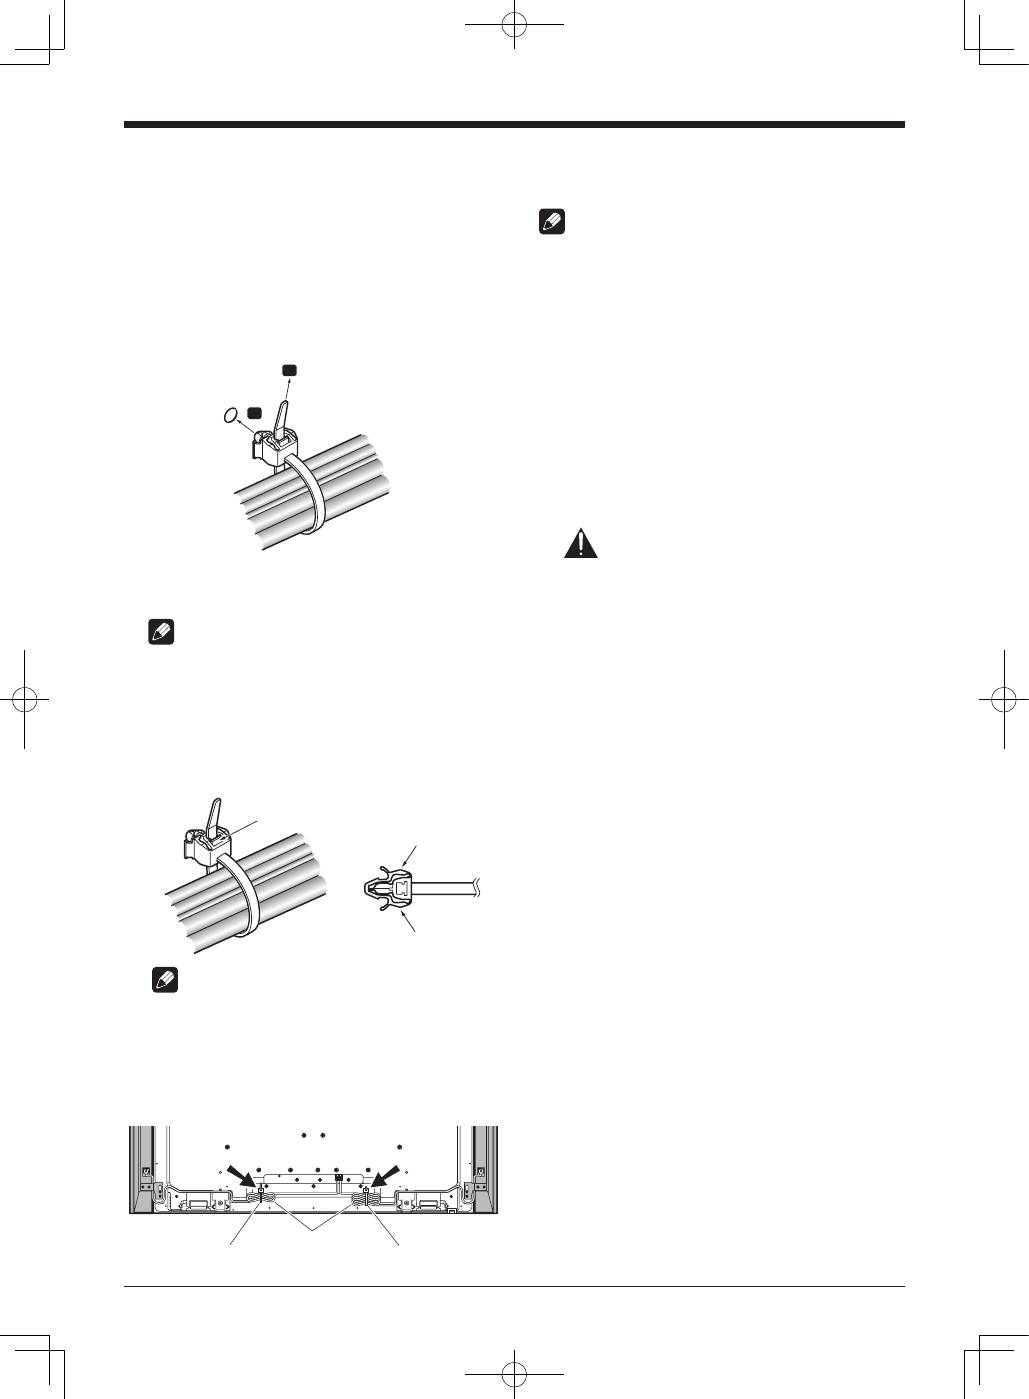
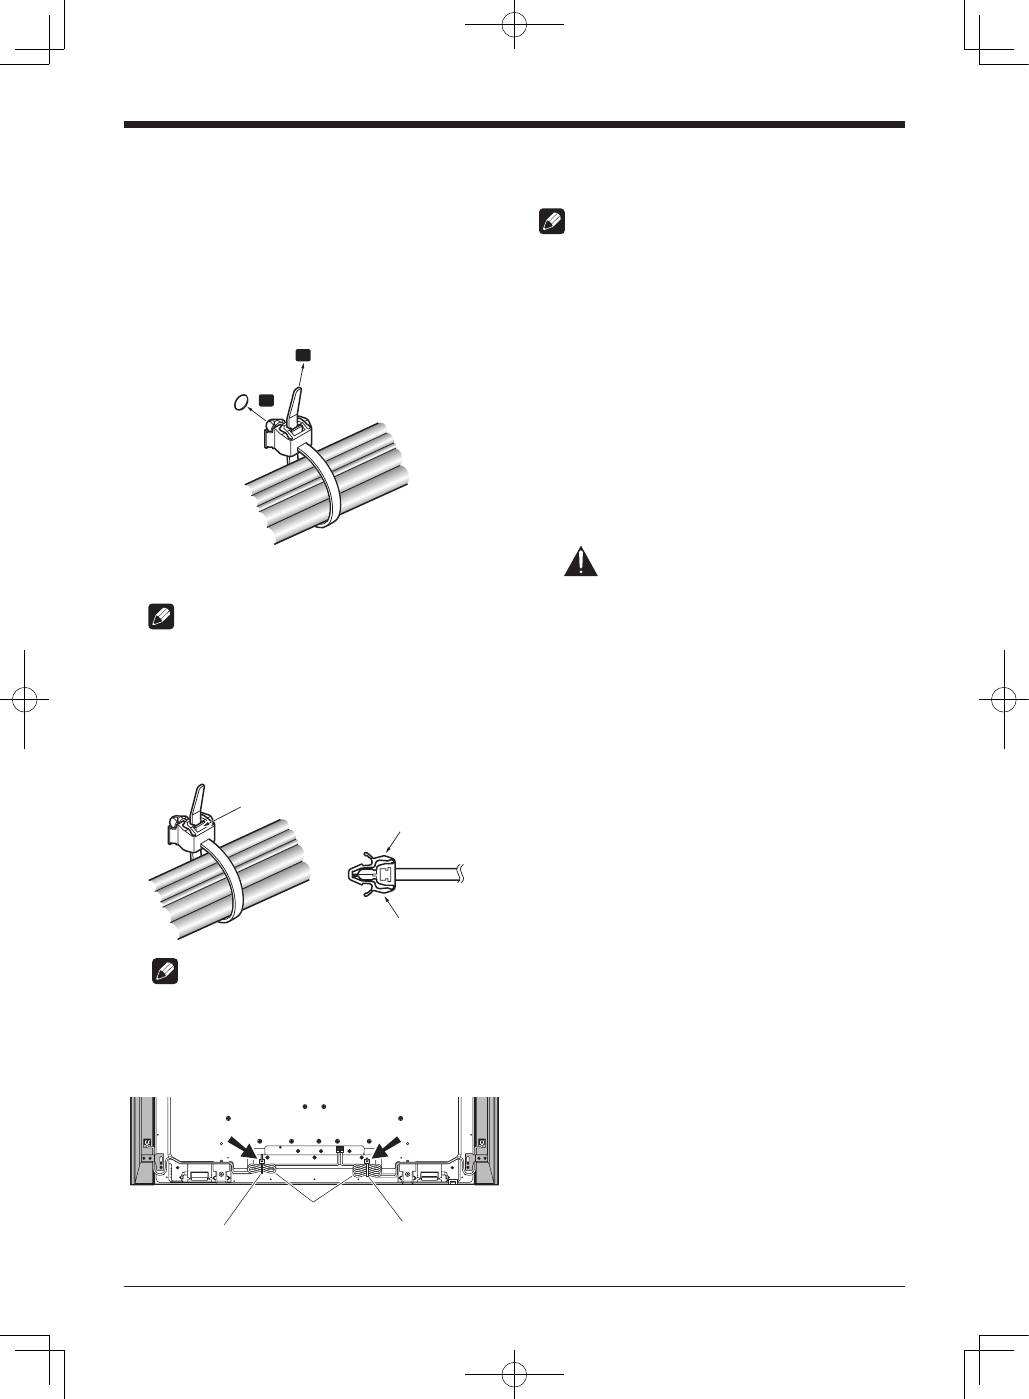
10. ケーブルを束ねる
ケーブルを束ねるときは、必要に応じてディスプレイ
側に付属のケーブルクランプを使います。
1) ケーブルクランプのバンドをホルダーに通します。
2) ケーブルを束ねたあと、ケーブルクランプホルダー
のレバーを持ち、フックをテレビ背面の所定のク
ランプ穴に差し込みます。
3) 最後にクランプバンドを引き上げてロックします。
1
2
4 ) ケーブルクランプがディスプレイ背面にしっかり
固定されているか確認してください。
ご注意
各ケーブルに負荷がかからないように束ねてくださ
い。各ケーブルを引っ張らないでください。
クランプバンドを取り外すときは、ラッチを引きなが
ら緩めて取り外します。ケーブルクランプを取り外す
ときは、レバーを押しながらクランプ穴から引き抜き
ます。
ラッチ
レバー
レバー
ご注意
• ケーブルを束ねるときは、指を挟んだり、ケーブル
が圧迫されることがないように注意してください。
• ケーブルクランプは、長期間使用すると劣化します。
古くなったクランプは取り外しの際に損傷しやす
く、再使用ができなくなることがあります。
• ケーブルクランプは必要に応じてお使いください。
• ケーブルが絡まないように注意してください。
ディスプレイ背面
スピーカーケーブル
ケーブルクランプ
ケーブルクランプ
壁掛けユニットをお使いのときは
ご注意
最初にディスプレイを柔らかいシートなどの上に寝かせて
から、スピーカーを取り付けてください。
1. ディスプレイにスピーカーを取り付ける
3 ~ 6 ページを参照して取り付けます。
2. 壁掛けユニットの壁側金具に、スピーカー
を取り付けたテレビを取り付ける
詳しくは、壁掛けユニットに付属の取扱説明書をご覧
ください。
ご注意
壁掛けユニットにディスプレイを取り付けるときは、
スピーカー部を持たずに取っ手とディスプレイ上部を
持ってください。
スピーカー部を持つとスピーカーが外れて落下する場
合があります。
7
日本語
日本語
©2008 パイオニア株式会社 禁無断転載
仕様
形式 ........................................................................ 位相反転式
スピーカー構成(2 ウェイ方式):
ウーファー ................. 4.8 cm × 13 cm 長円コーン型
トゥイーター ...................................2.5 cm セミドーム型
公称インピーダンス ......................................................... 6
Ω
再生周波数帯域 .............................. 55 Hz to 30 000 Hz
出力音圧レベル(1 m, 1 W) ...................................80 dB
許容入力:
最大入力 ..................................................................... 18 W
定格入力 ....................................................................... 6 W
クロスオーバー周波数 .................................................3 kHz
外形寸法
....105(幅)mm
×
876(高さ)mm
×
64(奥行)mm
質量
スピーカー 1 本 .....................................................1.75 kg
スピーカー 2 本(取付金具、取付ネジを含む) .... 4.1 kg
付属品
..............................................................スピーカー取付金具
左上用
×
1
左下用
×
1
右上用
×
1
右下用
×
1
.........................................取付ネジ (M5
×
10 mm)
×
16
........................................................取扱説明書(本書)
×
1
上記の仕様および外観は、改良のため予告なく変更するこ
とがあります。
キャビネットのお手入れのしかた
キャビネットの表面は清潔な柔らかい布(綿、ネルなど)
で軽くから拭きしてください。
ご注意
• ホコリのついた布や硬い布で拭いたり、強くこすったり
すると、表面にキズがつくことがあります。
• キャビネットにはプラスチックが多く使われているので
ベンジン、シンナーなどで拭いたりしないでください。
変質したり、塗料がはがれることがあります。
• 殺虫剤など、揮発性のものをかけないでください。また、
ゴムやビニール製品などを長時間接触させたままにしな
いでください。
プラスチックの中に含まれる可塑剤の作用により変質し
たり、塗料がはげるなどの原因となります。
• キャビネットの表面を濡れた布で拭くと、水滴などが本
機の表面を伝って、内部に侵入し故障の原因になること
があります。

English
8
Thank you for buying this Pioneer product.
Please read through these operating instructions before
using your speaker system so you will know how to make
the most of its performance. After you have finished reading
the instructions, put them away in a safe place for future
reference.
CAUTION
About compatibility
This product is designed exclusively for use with the flat
panel display. For more information on compatibility, please
consult with your nearest Pioneer authorized dealer or
service center.
About installation and setting
• Do not move the flat panel display by holding these
speakers or speaker brackets. This could result in injury
or damage to the brackets. When moving the flat panel
display, hold by the top and handles.
• When installing the speaker, do not use any screws other
than those supplied, otherwise the speaker may come off
from the main unit and fall over.
• When installing the speaker, tighten the screws firmly.
• Please handle the speaker with sufficient care, as the
grille net and the cabinet can become damaged or broken
when they are subjected to strong external impacts.
• Placing a CRT computer screen or CRT monitor near to
the speaker may result in interference or color distortion.
If this happens, distance the monitor from the speaker.
• Do not attach these speakers to the wall or ceiling. They
may fall off and cause injury.
About the input
• In order to prevent damage to the speaker system
resulting from input overload, please observe the
following precautions:
• Do not connect these speakers to anything other than
the specified flat panel display. Doing so may result in
damage or fire.
• Be sure to turn the connected devices off and remove
the power cord from the wall outlet beforehand when
changing the connection or installation method.
• When using a tone control function to greatly emphasize
treble sounds, do not use excessive amplifier volume.
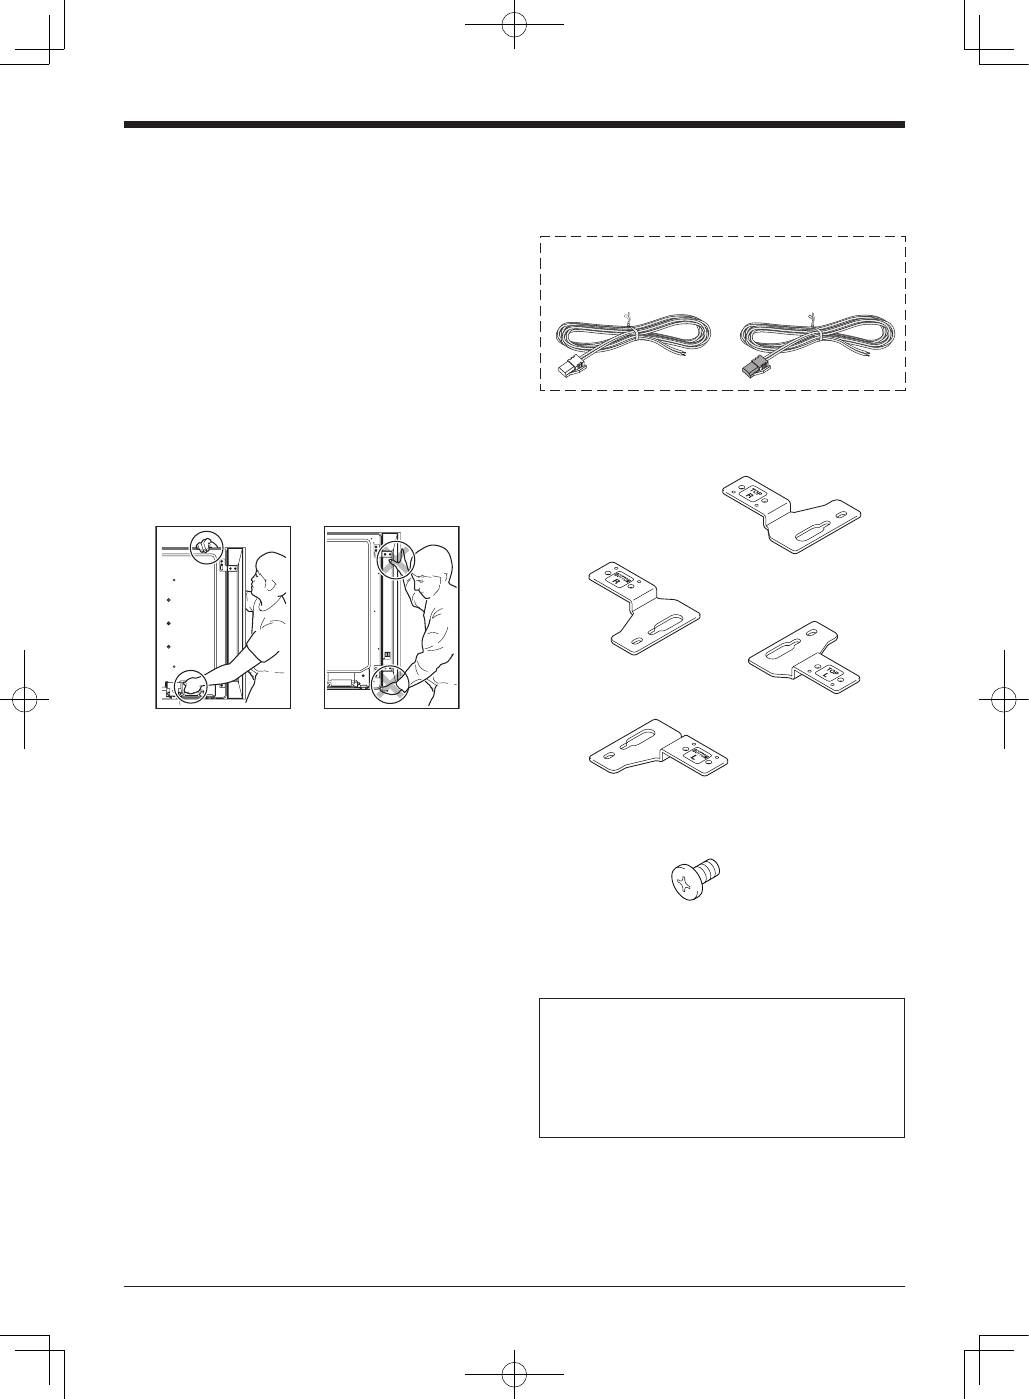
CHECKING THE ACCESSORIES
• Speaker Cable (L) x
1
• Speaker Cable (R) x
1
Accessories of the flat panel display
• Speaker Brackets × 4
for TOP-Right
for TOP-Left
for BOTTOM-Right
for BOTTOM-Left
• Speaker Mounting Screws
(M5 × 10 mm : Black) × 16
• Operating Instructions (this document) × 1
Installation
• Consult your dealer if you encounter any difficulties
with this installation.
• Pioneer is not liable for any damage resulting from
improper installation, improper use, modification, or
natural disasters.
9
English
English
INSTALLATION ON THE FLAT PANEL DISPLAY
Flat panel display with the speaker installed
Speaker
Speaker
Speaker mounting
screw (M5 × 10 mm)
Speaker mounting
screw (M5 × 10 mm)
Speaker bracket
(for TOP-Left)
Speaker bracket
(for TOP-Right)
Speaker bracket
(for BOTTOM-Right)
Speaker bracket
(for BOTTOM-Left)
Speaker mounting
screw (M5 × 10 mm)
Speaker mounting
screw (M5 × 10 mm)
Speaker mounting
screw (M5 × 10 mm)
Speaker mounting
screw (M5 × 10 mm)
Cable clamp*
Cable clamp*
Speaker cable*
Speaker mounting
screw (M5 × 10 mm)
Speaker mounting
screw (M5 × 10 mm)
*: Accessories of the flat panel display
When using the table top stand:
NOTE:
Before attaching the speaker, please attach the KRP-TS01 series table top stand (or another flat panel display stand) to the flat panel
display.
1. Attaching the Speaker Brackets to the Speakers.
There are top and bottom speaker brackets for both the left and the right speakers. Attach the appropriate brackets to the top
and the bottom on the back of the speakers using the supplied screws.
(It shows the attachment of the bracket on the right side. It is attached on the left side by the same procedure.)
Screw holes
Speaker bracket
(For BOTTOM-Right)
Speaker bracket
(For BOTTOM-Right)
Speaker bracket
(For TOP-Right)
Place the speaker so its
terminals (bottom) are
facing you.
Speaker bracket
(For TOP-Right)
Screw holes
English
10
2. Screw an supplied screw into the
speaker mounting hole (lower of the
two) at the top, rear of the flat panel
display.
Do not tighten it all the way yet. Leave it loose, with
about 5 mm left to tighten.
5 mm
Speaker
Mounting
Hole
Top, rear of flat
panel display
Top of flat panel display
Leave a space of about 5 mm
3. Hang the speaker bracket on the
screw you installed at the top by
passing the wide part over it and
lowering into the slot; screw in the
lower screw temporarily.
After passing the wide part of the hole of the speaker
bracket (top) over the screw, lower the speaker onto it.
Tighten with the provided
screw the bottom
speaker bracket to the
flat panel display
temporarily (one place
bottom).
After passing the
wide part of the
hole over the screw,
lower the speaker.
4. Adjust the position of the speaker
and then tighten the upper and lower
screws firmly.
5. Tighten the two screws, at the top
and bottom for each speaker (total of
four screws), thus fixing the speakers
to the flat panel display.
6. Pass the supplied speaker cable
between the speaker and the flat
panel display (below the speaker
bracket) from below.
7. Connect the speaker cables to the
speaker (see next page).
8. Insert the cable in the groove on the
speaker.
Speaker Cable
Speaker
Terminal
Insertion
in groove
9. Connect the other end of the speaker
cables to the rear of flat panel display
(see next page).
11
English
English
How to connect the speaker cables
(speaker)
Press the lever and insert the end of
the cable. When you release the lever,
it clamps onto the speaker cable. Press
and hold the lever when removing the
cable.
How to connect the speaker cables
(flat panel display)
Insert the speaker cable connector
securely into the panel’s speaker
terminal. To remove the speaker cable,
hold and push the lever then remove it.
Caution
• Before connecting the speakers to the flat panel display,
unplug the panel from the power outlet. Connecting the
speaker cable with the power cord plugged in can cause
malfunction or damage to the panel if the cable’s bare
wire touches other equipment. Plug in the power cord
after connecting the speakers.
Connect the speaker cables
(flat panel display)
Connect the cable with a red connector to R
(right) terminal and the cable with a white
connector to L (left) terminal of the flat panel
display.
Connect the gray-lined cable to the
terminals and the black cable to the
terminals.
Connect the speaker cables
(speaker)
Black
Gray lined
Black
Red
Speaker terminal
Speaker terminal
Speaker cable
Speaker terminal
White: L
Red: R
Lever
• If you insert the speaker cable too far so
that the insulation is touching the speaker
terminal, you may not get any sound. Please
insert it so that the copper wire is still
showing.
• Check if the ends of the speaker cables
are securely connected to the terminals by
slightly tugging on the cables after making
connections. Loose connections may result
in sound dropouts or noise.
• If there is a short in the
and
cables caused by an
exposed lead wire, excessive load may be applied to the
flat panel display, resulting in interrupted operation or
malfunction.
• Incorrect connections of the speaker cable to the left or
right flat panel display terminals with respect to polarity
may result in insufficient stereo sound effects, delivering
poor bass sounds or unstable sound image.
• Do not connect any devices to the speaker terminals
other than the speakers specified.
• Excessive force exerted on the speaker cable may cause
connection failures, sound dropouts and/or connector
damage.
English
12
10. Bundling the cables.
Follow the steps below to attach the cable clamp, an
accessory of the flat panel display.
1 ) Thread the clamp band through the holder and
bundle the cable(s) in the cable clamp.
2 ) Push and hold the levers then insert the hook into
an appropriate hole on the rear of the flat panel
display.
3 ) Pull up the clamp band to lock.
1
2
4 ) Confirm that the cable clamp is seated firmly in the
panel.
NOTE:
Avoid pinching or creating pressure points when routing
or bundling cables.
To remove the clamp band, pull and hold the latch to
release.
To remove the cable clamp, push and hold the levers
then pull it out from the hole.
Latch
Lever
Lever
NOTE:
The longer a clamp is in place, the better chance of
deterioration. An older clamp is more easily damaged
while being removed and may not be reusable.
Rear of flat panel display
Speaker cable
Cable clamp
Cable clamp
When using the hung on wall unit:
NOTE:
First lay the flat panel display on top of a soft sheet etc., then
attach the speakers.
1. Attach the speakers to the flat panel
display (See procedures 1 to 10 on
pages 9 to 12).
Connect the other cables and power cord to the flat
panel display.
2. Place the flat panel display on the
mounting fittings of the hung on
wall unit.
For details, refer to the operating instructions supplied
with the hung on wall unit.
Caution
Do not move the flat panel display by holding these
speakers or speaker brackets. This could result in injury
or damage to the brackets. When moving the flat panel
display, hold by the top and handles.
CABINET MAINTENANCE
• Use a polishing cloth or dry cloth to wipe off dust and dirt.
• When the cabinet is very dirty, wipe with a soft cloth
moistened with water-diluted cleanser; then wipe again
with a dry cloth. Do not use furniture wax or cleaners.
They may damage the surface of the cabinet.
• Never use thinner, benzine, insecticide sprays and other
chemicals on or near the cabinets, since these will
corrode the surfaces.
• When a chemical cloth is used, read the cautions for the
chemical cloth carefully.
13
English
English
Published by Pioneer Corporation.
Copyright © 2008 Pioneer Corporation.
All rights reserved.
If you want to dispose this product, do not mix it with general household waste. There is a separate collection system for used
electronic products in accordance with legislation that requires proper treatment, recovery and recycling.
Private households in the member states of the EU, in Switzerland and Norway may return their used electronic products free of charge to
designated collection facilities or to a retailer (if you purchase a similar new one).
For countries not mentioned above, please contact your local authorities for the correct method of disposal.
By doing so you will ensure that your disposed product undergoes the necessary treatment, recovery and recycling and thus prevent potential
negative effects on the environment and human health.
K058_A_En
SPECIFICATIONS
Cabinet
............................................................
Bass-reflex type
Used speaker (two-way system):
Woofer (for low tones)
...............
4.8 cm × 13 cm cone type
Tweeter (for high tones)
....................
2.5 cm semidome type
Impedance ...........................................................................
6
Ω
Frequency Range
........................................
55 Hz to 30 000 Hz
Sensitivity (1 m, 1 W)
.......................................................
80 dB
Permissible input :
Max. input
......................................................................
18 W
Rated input
.....................................................................
6 W
Crossover frequency
........................................................
3 kHz
External Dimensions
...............................
105 (W) mm
×
876 (H) mm
×
64 (D) mm
Weight :
Speaker (one piece)
....................................................
1.75 kg
Speakers (pair) with brackets and screws
.................
4.1 kg
Accessory parts (for two speakers)
....................................................................
Speaker Brackets
TOP-Left
×
1
BOTTOM-Left
×
1
TOP-Right
×
1
BOTTOM-Right
×
1
....................
Speaker Mounting Screws (M5
×
10 mm)
×
16
.........................
Operating Instructions (this document)
×
1
NOTE:
Specifications and design subject to possible modification
without notice, due to improvements.
Français
14
Merci pour votre achat de cet appareil Pioneer.
Veuillez lire attentivement la totalite de ce mode d’emploi
avant d’utiliser vos enceintes acoustiques de façon à
pouvoir en tirer le meilleur profit. Après lecture complète du
livret d’instructions de fonctionnement, le ranger dans un
endroit sûr afin de pouvoir vous y reporter facilement en cas
de besoin lors de l’utilisation des l’enceintes acoustiques.
ATTENTION
À propos de la compatibilité
Ce produit a été conçu exclusivement pour une utilisation
avec le moniteur à écran plat. Pour de plus amples
informations sur la compatibilité, veuillez vous adresser au
distributeur ou au centre de service Pioneer agréé le plus
proche.
À propos de l’installation et des réglages
• Ne déplacez pas le moniteur à écran plat en le tenant par
les enceintes ou les supports d’enceinte. Vous risqueriez
de vous blesser ou d’endommager les supports. Pour
déplacer le moniteur à écran plat, tenez-le par le haut et
par les poignées.
• À l’installation des enceintes, utilisez uniquement les vis
fournies, car d’autres pourraient se détacher de l’unité
principale et entraîner la chute des enceintes.
• A l’installation des enceintes, serrez les vis à fond.
• Manipuler les enceintes avec suffisamment de soin, car
autrement, l’enjoliveur frontal et le coffret risqueraient
d’être endommagés ou hors d’usage en les soumettant à
des chocs externes exagérés.
• La présence d’un écran d’ordinateur ou d’un moniteur à
tube cathodique près des enceintes peut provoquer des
interférences et une distorsion des couleurs. Si c’est le
cas, éloignez l’écran par rapport aux enceintes.
• Ne fixez pas ces enceintes au mur ou au plafond. Elles
risqueraient de tomber et de blesser quelqu’un.
À propos de l’entrée des signaux
• Afin d’éviter d’endommager les enceintes acoustiques,
suite à une surcharge à l’entrée, veuillez observer les
précautions suivantes:
• Ne raccordez ces enceintes à aucun appareil hormis le
moniteur à écran plat spécifié. Faute de quoi, des dégâts,
voire un incendie pourraient en résulter.
• Prenez soin de mettre hors tension les appareils
raccordés et de débrancher le cordon d’alimentation
au niveau de la prise secteur avant de changer les
connexions ou la méthode d’installation.
• Si vous utilisez une fonction de contrôle des tonalités
pour accentuer fortement les aigus, n’élevez pas
excessivement le volume sonore.
VÉRIFICATION DES ACCESSOIRES
•
Câ
ble
d’encein
te (G) x
1
•
Câ
ble
d’encein
te (D) x
1
Accessoire
s du moniteur à
écra
n plat
• Supports de l’enceinte × 4
Angle supérieur droit
(TOP R)
Angle inférieur droit
(BOTTOM R)
Angle supérieur gauche
(TOP L)
Angle inférieur gauche
(BOTTOM L)
• Vis de montage de l’enceinte
(M5 × 10 mm : Noir) × 16
• Mode d’emploi (ce document) × 1
Installation
• En cas de difficultés, veuillez consulter votre revendeur.
• Pioneer ne saurait être tenu responsable d’aucun
dommage résultant d’une installation ou d’une
utilisation incorrecte de ce produit, de sa modification
ou encore de catastrophes naturelles.
15
Français
Français
INSTALLATION SUR LE MONITEUR À ÉCRAN PLAT
Moniteur à écran plat avec l'enceinte installée
Serre-câbles*
Serre-câbles*
Câble d’enceinte*
* : Accessoires du moniteur à écran plat
Enceinte
Enceinte
Vis de montage
de l’enceinte
(M5 x 10 mm)
Vis de montage
de l’enceinte
(M5 x 10 mm)
Vis de montage
de l’enceinte
(M5 x 10 mm)
Vis de montage
de l’enceinte
(M5 x 10 mm)
Support de l’enceinte
(angle supérieur gauche)
Support de l’enceinte
(angle supérieur droit)
Support de l’enceinte
(angle inférieur droit)
Support de l’enceinte
(angle inférieur gauche)
Vis de montage
de l’enceinte (M5 x 10 mm)
Vis de montage
de l’enceinte (M5 x 10 mm)
Vis de montage
de l’enceinte (M5 x 10 mm)
Vis de montage
de l’enceinte (M5 x 10 mm)
Si vous utilisez un pied de table :
REMARQUE :
Avant d’installer l’enceinte, installez le support de table série KRP-TS01 (ou tout autre pied de moniteur à écran plat) sous le moniteur
à écran plat.
1. Fixer les supports d’enceinte sur les enceintes.
Il y a des supports d’enceinte supérieurs et inférieurs pour les enceintes de droite et de gauche. Posez les bons supports en
haut et en bas au dos des enceintes à l’aide des vis fournies.
(L’illustration montre la pose des supports de droite. Pour les supports de gauche, procédez de la même façon.)
Support de l’enceinte
(angle inférieur droit)
Placez l’enceinte de façon à
avoir ses bornes (dessous)
en face de vous.
Trous de vis
Trous de vis
Support de l’enceinte
(angle supérieur droit)
Support de l’enceinte
(angle inférieur droit)
Support de l’enceinte
(angle supérieur droit)
Français
16
2. Vissez une vis fournie dans le trou
de montage de l’enceinte (le plus bas
des deux) situé en haut au dos du
moniteur à écran plat.
Ne la serrez pas complètement tout de suite. Laissez du
jeu, arrêtez-vous à environ 5 mm de la fin.
5 mm
Trou de
montage de
l’enceinte
Laissez un espace d’environ 5 mm
Partie supérieure du dos
du moniteur à écran plat
Haut du moniteur
à écran plat
3. Suspendez le support de l’enceinte
sur la vis que vous avez installée en
haut en passant la partie large par-
dessus la vis puis baissez le support
dans la fente et vissez la vis du bas
provisoirement.
Une fois que vous avez passé la partie large du trou du
support de l’enceinte (haut) par-dessus la vis, baissez
l’enceinte.
Vissez provisoirement à
l'aide de la vis fournie le
bas du support
d'enceinte sur le
moniteur à écran plat
(un endroit en bas).
Une fois que vous
avez passé la partie
large du trou du
support sur la vis,
baissez l’enceinte.
4. Ajustez la position de l’enceinte puis
serrez complètement les vis du haut
et du bas.
5. Serrez les deux vis - en haut et en
bas - de chaque support d’enceinte
(quatre vis au total). Les enceintes
sont maintenant installées sur le
moniteur à écran plat.
6. Glissez le câble d’enceinte fourni
entre l’enceinte et le moniteur à
écran plat (sous le support d’enceinte)
en passant par le dessous.
7. Branchez les câbles d’enceinte sur les
enceintes (voir page suivante).
8. Insérez le câble dans la rainure située
sur l’enceinte.
Câble d’enceinte
Borne
d’enceinte
Insertion dans
la rainure
9. Branchez l’autre extrémité des câbles
d’enceinte à l’arrière du moniteur à
écran plat (voir page suivante).
17
Français
Français
Comment brancher les câbles d’enceinte (côté enceinte)
Appuyez sur le levier et insérez
l’extrémité du câble. Lorsque vous
relâchez le levier, il serre le câble
d’enceinte. Maintenez le levier enfoncé
pour retirer le câble.
Comment brancher les câbles d’enceinte
(côté moniteur à écran plat)
Insérez fermement le connecteur du câble
d’enceinte dans la prise d’enceinte du
moniteur. Pour retirez le câble d’enceinte,
maintenez le levier enfoncé puis retirez le
câble.
Attention
• Avant de raccorder l’enceinte au moniteur à écran plat,
débranchez-le de la prise secteur. Si vous raccordez le
câble d’enceinte alors que le cordon d’alimentation est
branché, le moniteur risque de mal fonctionner ou d’être
endommagé dans le cas où les fils dénudés du câble
entreraient en contact avec un autre appareil. Branchez le
cordon d’alimentation au moniteur après avoir raccordé
les enceintes.
Branchement des câbles d’enceinte
(côté moniteur à écran plat)
Connectez le câble avec un connecteur rouge à
la prise R (droite) et le câble avec un connecteur
blanc à la prise L (gauche) du moniteur à écran
plat.
Connectez le câble rayé gris aux prises
et le câble noir aux prises
.
Branchement des câbles
d’enceinte (côté enceinte)
Noir
Rayé gris
Noir
Rouge
Borne d’enceinte
Borne d’enceinte
Câble d’enceinte
Borne d’enceinte
Blanc : L
Rouge : R
Levier
• Si vous insérez le câble d’enceinte trop loin
et que l’isolant touche la prise d’enceinte,
vous risquez de n’entendre aucun son.
Insérez le câble de manière que le cuivre
soit visible.
• Vérifiez si les extrémités des câbles
d’enceinte sont solidement connectées aux
prises en tirant légèrement sur les câbles,
une fois les connexions terminées. Une
connexion lâche peut être la cause de coupures de son
ou de bruits.
• S’il y a un court-circuit dans les câbles
et
causé par
un fil à nu, une charge excessive peut être appliquée au
moniteur à écran plat et il peut s’arrêter de fonctionner
ou cela peut entraîner un mauvais fonctionnement.
• Une connexion incorrecte des câbles d’enceinte aux
prises droite et gauche du moniteur à écran plat qui
ne respecte pas les polarités peut être la cause d’effets
sonores stéréo insuffisants, de sons graves médiocres et
d’une image sonore instable.
• Ne connectez aucun appareil aux prises d’enceinte en
dehors des enceintes spécifiées.
• Appliquer une force excessive sur le câble d’enceinte
peut être à l’origine de l’échec de la connexion, d’un
affaiblissement du son et/ou endommager le connecteur.
Français
18
10. Relier les câbles.
Fixez le collier de câble, qui est un accessoire du
moniteur à écran plat, en suivant les étapes ci-dessous.
1 ) Passez la languette du collier dans le support et
placez le ou les câbles dans le serre-câbles.
2 ) Poussez les leviers et maintenez-les en place
pendant que vous insérez le crochet dans le trou
correspondant à l’arrière du moniteur à écran plat.
3 ) Tirez la languette du collier pour bloquer les câbles.
1
2
4 ) Vérifiez que le serre-câbles est bien installé contre
le panneau.
REMARQUE :
Evitez de pincer ou de créer des points de pression sur les
câbles lorsque vous les posez ou que vous les reliez.
Pour retirez la languette du collier, tirez le taquet pour
dégager le tout.
Pour retirez le serre-câbles, poussez les leviers puis
retirez-les du trou.
Taquet
Levier
Levier
REMARQUE :
Plus un collier reste longtemps en place, plus il risque de
se détériorer. Les vieux colliers ont tendance à s’abîmer
plus facilement lors de la dépose et vous risquez de ne
pas pouvoir les réutiliser.
Câble d’enceinte
Serre-câbles
Serre-câbles
Arrière du moniteur à écran plat
En cas d’utilisation de l’unité d’installation murale :
REMARQUE :
Avant de commencer, couchez le moniteur à écran plat sur un
drap doux etc., puis installez les enceintes.
1. Installez les enceintes sur le moniteur
à écran plat (Voir les procédures 1 à
10, pages 15 à 18).
Branchez les autres câbles et le cordon d’alimentation
sur le moniteur à écran plat.
2. Placez le moniteur à écran plat sur les
fixations de l’unité de pose murale.
Pour de plus amples informations, reportez-vous aux
instructions d’utilisation fournies avec l’unité
d’installation murale.
Attention
Ne déplacez pas le moniteur à écran plat en le tenant par
les enceintes ou les supports d’enceinte. Vous risqueriez
de vous blesser ou d’endommager les supports. Pour
déplacer le moniteur à écran plat, tenez-le par le haut et
par les poignées.
19
Français
Français
SPECIFICATIONS
Coffret
.............................................................. Type bass-reflex
Haut-parleurs utilisés (système à double voie) :
Haut-parleur de graves
......
Type à cône de 4,8 cm × 13 cm
Haut-parleur d’aigus
...............
Type à semi-dôme de 2,5 cm
Impédance
..........................................................................
6
Ω
Plage de fréquences
....................................
55 Hz à 30 000 Hz
Sensibilité (1 m, 1 W)
......................................................
80 dB
Entrée admissible :
Entrée max.
...................................................................
18 W
Entrée nominale
.............................................................
6 W
Fréquence de recouvrement
...........................................
3 kHz
Encombrement
..............................
105 (L) mm × 876 (H) mm × 64 (P) mm
Poids :
Enceinte (une pièce)
...................................................
1,75 kg
Enceintes (paire) avec supports et vis
.......................
4,1 kg
Pièces accessoires (Pour deux enceintes)
............................................................
Supports de l’enceinte
Angle supérieur gauche (TOP L)
×
1
Angle inférieur gauche (BOTTOM L)
×
1
Angle supérieur droit (TOP R)
×
1
Angle inférieur droit (BOTTOM R)
×
1
................
Vis de montage de l’enceinte (M5
×
10 mm)
×
16
.........................................
Mode d’emploi (ce document)
×
1
REMARQUE:
Les spécifications et la finition sont susceptibles d’être
modifiées sans préavis en vue de l’amélioration.
ENTRETIEN DU COFFRET
• Utiliser un chiffon à polir ou un chiffon sec pour essuyer
la poussière et éliminer les salissures.
• Si le coffret est très sale, le frotter avec un chiffon doux
imbibé de liquide à nettoyer dilué d’eau. Ensuite, essuyer
à nouveau avec un chiffon sec. Ne pas utiliser de cire
à meuble ou de produits de nettoyage corrosifs. Ils
risqueraient d’endommager la surface du coffret.
• Ne jamais utiliser non plus de diluant, de benzine,
d’insecticides en vaporisateur et autres produits
chimiques sur le coffret ou à proximité, car ils risquent de
corroder les surfaces.
• Si l’on utilise un chiffon chimique, lire et observer
attentivement les précautions à prendre pour son usage
adéquat.
Publication de Pioneer Corporation.
© 2008 Pioneer Corporation.
Tous droits de reproduction et de traduction réservés.

Deutsch
20
Wir danken Ihnen dafür, dass Sie sich für ein Produkt von
Pioneer entschieden haben.
Bitte lesen Sie vor der Verwendung Ihrer Lautsprecheranlage
diese Anleitung aufmerksam durch, um die Vorzüge des
Systems optimal ausnützen zu können. Nachdem Sie die
Bedienungsanleitung durchgelesen haben, bewahren Sie
sie sorgfältig auf, um sich im Bedarfsfall jederzeit darauf
beziehen zu können.
VORSICHT
Hinweis zur Kompatibilität
Dieses Produkt ist ausschließliche für den Gebrauch mit
dem Flachbildschirm bestimmt. Weitere Informationen
zur Kompatibilität bringen Sie bitte bei Ihrem autorisierten
Pioneer-Händler oder einer Pioneer-Kundendienststelle in
Erfahrung.
Hinweise zur Installation und Einstellung
• Bewegen Sie den Flachbildschirm nicht fort, indem Sie
ihn an den Lautsprechern oder an den Lautsprecher-
Halterungen festhalten. Das kann zu Verletzungen oder
zu Schäden an den Montageelementen führen. Halten Sie
den Flachbildschirm beim Fortbewegen oben und an den
Handgriffen fest.
PRüFEN DES ZUBEHöRS
• Lautsprecherkabel (L) x
1
• Lautsprecherkabel (R) x
1
Zubehör für den Flachbildschirm
• Lautsprecher-Halterungen × 4
Für oben rechts
(TOP R)
Für oben links
(TOP L)
Für unten rechts
(BOTTOM R)
Für unten links
(BOTTOM L)
• Lautsprecher-Montageschrauben
(M5 × 10 mm : schwarz) × 16
• Bedienungsanleitung (dieses Dokument) × 1
• Verwenden Sie zur Installation ausschließlich die
Schrauben im Lieferumfang. Anderenfalls kann sich
der Lautsprecher vom Flachbildfernseher lösen und
herunterfallen.
• Achten Sie bei der Installation des Lautsprechers darauf,
die Schrauben fest anzuziehen.
• Die Lautsprecher sind vorsichtig zu behandeln, da Ziergitter
und Gehäuse durch starke Stöße und Erschütterungen
verkratzt oder beschädigt werden können.
• Wenn ein CRT-Computer-Monitor oder ein CRT-Monitor
in der Nähe des Lautsprechers aufgestellt wird, kann
dies Bildrauschen oder Farbstörungen verursachen. In
einem solchen Fall muss für einen größeren Abstand des
Monitors vom Lautsprecher gesorgt werden.
• Bringen Sie die Lautsprecher nicht an der Wand oder
an der Decke an, denn sie könnten herabfallen und
Verletzungen verursachen.
Hinweise zum Eingang
• Um eine Beschädigung des Lautsprechersystems durch
ein zu starkes Eingangssignal zu vermeiden, müssen die
folgenden Hinweise unbedingt beachtet werden:
• Schließen Sie die Lautsprecher an nichts anderes
als den angegebenen Flachbildschirm an. Wird der
Lautsprecher in Verbindung mit irgendeinem anderen
Gerät verwendet, besteht die Gefahr von Beschädigung
und Brandausbruch.
• Achten Sie unbedingt darauf, alle angeschlossenen
Geräte auszuschalten und den Netzstecker von der
Netzsteckdose zu trennen, bevor die Anschlüsse geändert
werden oder die Installation verändert wird.
• Bei Verwendung der Klangfarbenregelungs-Funktion
eines Verstärkers zu einer starken Anhebung der Höhen
darf die Lautstärke am Verstärker nicht auf einen
übermäßig hohen Pegel eingestellt werden.
Installation
• Wenn es bei dieser Installation zu Problemen kommen
sollte, wenden Sie sich bitte an Ihren Händler.
• Pioneer haftet für keinerlei Schäden, die sich auf
falsche Installation, unsachgemäßen Gebrauch,
Modifikationen oder Naturkatastrophen zurückführen
lassen.
21
Deutsch
Deutsch
INSTALLATION AM FLACHBILDSCHIRM
Kabelhalterung*
Kabelhalterung*
Lautsprecherkabel*
*: Zubehör für den Flachbildschirm
Lautsprecher-
Montageschraube
(M5 x 10 mm)
Lautsprecher-
Montageschraube
(M5 x 10 mm)
Lautsprecher-
Montageschraube
(M5 x 10 mm)
Lautsprecher-
Montageschraube
(M5 x 10 mm)
Lautsprecher-
Halterung
(für oben links)
Lautsprecher-
Halterung
(für oben rechts)
Lautsprecher-
Halterung
(für unten rechts)
Lautsprecher-
Halterung
(für unten links)
Lautsprecher-Montageschraube
(M5 x 10 mm)
Lautsprecher-Montageschraube
(M5 x 10 mm)
Lautsprecher-
Montageschraube
(M5 x 10 mm)
Lautsprecher-
Montageschraube
(M5 x 10 mm)
Lautsprecher
Lautsprecher
Flachbildschirm mit dem integrierten Lautsprecher
Bei Verwendung des Tischständers:
HINWEIS:
Bitte bringen Sie vor der Montage des Lautsprechers den Tischständer der Serie KRP-TS01 (oder einen anderen Flachbildschirm-
Ständer) am Flachbildschirm an.
1. Anbringen der Lautsprecher-Halterungen an den Lautsprechern.
Es gibt obere und untere Lautsprecher-Halterungen für den rechten und den linken Lautsprecher. Befestigen Sie die
jeweils vorgesehenen Halterungen unter Verwendung der mitgelieferten Schrauben oben und unten an der Rückseite der
Lautsprecher.
(Die Abbildung zeigt die Befestigung der Halterung an der rechten Seite. Auf die gleiche Weise erfolgt die Befestigung auf
der linken Seite.)
Positionieren Sie den
Lautsprecher so, dass seine
Kabelanschlüsse (unten)
auf Sie gerichtet sind.
Lautsprecher-Halterung
(für unten rechts)
Lautsprecher-Halterung
(für unten rechts)
Lautsprecher-
Halterung
(für oben rechts)
Schraublöcher
Schraublöcher
Lautsprecher-Halterung
(für oben rechts)
Deutsch
22
2. Schrauben Sie eine mitgelieferte
Schraube in das Montage-
Schraubloch (das untere der zwei
Schraublöcher) oben an der Rückseite
des Flachbildschirms ein.
Ziehen Sie die Schraube noch nicht fest, sondern lassen
Sie noch etwa 5 mm Zwischenraum.
4. Richten Sie die Position des
Lautsprechers aus und ziehen Sie
dann die obere und die untere
Schraube fest.
5. Ziehen Sie die zwei Schrauben, oben
und unten an jedem Lautsprecher
(insgesamt vier Schrauben) fest und
fixieren Sie die Lautsprecher auf diese
Weise am Flachbildschirm.
6. Führen Sie das mitgelieferte
Lautsprecherkabel zwischen dem
Lautsprecher und dem Flachbildschirm
(unter der Lautsprecher-Halterung)
von unten durch.
7. Schließen Sie die Lautsprecherkabel
an den jeweiligen Lautsprecher an
(siehe nächste Seite).
8. Führen Sie das jeweilige Kabel in
die am betreffenden Lautsprecher
befindliche Nut ein.
Lautsprecher-Kabel
Einführung
in die Nut
Lautsprecheranschluss
9. Schließen Sie das andere Ende der
Lautsprecherkabel an die Rückseite
des Flachbildschirms an (siehe nächste
Seite).
3. Hängen Sie die Lautsprecher-
Halterung an die Schraube. die Sie
oben installiert haben, indem Sie den
weiten Bereich der Öffnung hindurch-
stecken und das Element dann in
den Schlitz absenken. Schrauben Sie
anschließend die untere Schraube
provisorisch ein.
Senken Sie nach dem Hindurchstecken des
weiten Bereichs der Öffnung des Lautsprecher-
Befestigungselements (oben) durch die Schraube den
Lautsprecher auf diese ab.
5 mm
Lautsprecher-
Montageschraubloch
Oben, Rückseite des
Flachbildschirms
Obere Teil des
Flachbildschirms
Lassen Sie einen Zwischenraum
von etwa 5 mm
Befestigen Sie mit der
vorgesehenen Schraube
die untere Lautsprecher-
Halterung provisorisch
am Flachbildschirm (eine
Position unten).
Senken Sie den
Lautsprecher auf
die Schraube ab,
nachdem Sie den
weiten Teil der
Öffnung der
Halterung Über die
Schraube
hinweggeführt
haben.
23
Deutsch
Deutsch
Anschließen der Lautsprecherkabel
(Lautsprecher)
Drücken Sie den Hebel, und führen
Sie das Kabelende ein. Wenn Sie
den Hebel freigeben, klemmt er das
Lautsprecherkabel fest. Drücken und
halten Sie den Hebel, um das Kabel zu
entfernen.
Anschließen der Lautsprecherkabel
(Flachbildschirm)
Führen Sie den Lautsprecherkabelstecker
richtig in die Lautsprecherbuchse des
Bildschirms ein. Um das
Lautsprecherkabel abzutrennen, sollten Sie
den Hebel anfassen und drücken und das
Kabel dann herausziehen.
VORSICHT
• Bevor Sie die Lautsprecher an den Flachbildschirm
anschließen, ziehen Sie den Netzstecker des Bildschirms
ab. Falls Sie das Lautsprecherkabel anschließen, während
das Netzkabel des Bildschirms in die Steckdose gesteckt
ist, kann eine Funktionsstörung auftreten oder der
Bildschirm beschädigt werden, wenn der blanke Draht
des Kabels andere Geräte berührt. Stecken Sie den
Netzstecker nach dem Anschließen der Lautsprecher
erneut in die Steckdose.
• Wenn Sie das Lautsprecherkabel zu weit
einführen, so dass der Isoliermantel die
Lautsprecheranschlüsse berührt, erfolgt
ggf. kein Tonausgang. Bitte führen Sie das
Kabel so ein, dass der Kupferdraht noch
sichtbar ist.
• Vergewissern Sie sich, dass die
Lautsprecherkabel richtig angeschlossen
sind, indem Sie leicht daran ziehen,
nachdem Sie die Anschlüsse
abgeschlossen haben. Lose Anschlüssekönnen zu
Tonaussetzern oder Rauschen führen.
• Falls ein Kurzschluss in den Kabeln
und
auftritt, der
durch einen blanken Zuleitungsdraht hervorgerufen wird,
kann eine zu große Last auf den Flachbildschirm angelegt
werden, so dass der Betrieb unterbrochen wird oder eine
Funktionsstörung auftritt.
• Der verkehrte Anschluss des Lautsprecherkabels an die
linke und rechte Buchse des Flachbildschirms kann zu
ungenügend Stereoton-Wiedergabe, schwachen Bässen
oder einem unstabilen Klangbild führen.
• Schließen Sie keine anderen Geräte als die angegebenen
Lautsprecher an die Lautsprecheranschlüsse an.
• Falls eine zu große Kraft auf die Lautsprecherkabel
ausgeübt wird, kann es zu Anschlussfehlern,
Tonaussetzern und/oder einer Beschädigung der
Anschlussstecker kommen.
Anschließen der Lautsprecherkabel
(Flachbildschirm)
Schließen Sie das Kabel mit einem roten
Stecker an die rechte Buchse R (recht) und das
Kabel mit einem weißen Stecker an die linke
Klemme L (links) am Flachbildschirm an.
Schließen Sie zu diesem Zweck das grau
gestrichelte Kabel an die
Klemmen und das
schwarze Kabel an die
Klemmen an.
Anschließen der Lautsprecherkabel
(Lautsprecher)
Schwarz
Grau
gestrichelt
Schwarz
Rot
Lautsprecheranschluss
Lautsprecheranschluss
Lautsprecherkabel
Lautsprecheranschluss
Weiß: L (links)
Rot: R (rechts)
Hebel
Deutsch
24
10. Bündelung der Kabel.
Verfahren Sie wie nachfolgend beschrieben, um die
Kabelhalterung am Zubehör des Flachbildschirms
anzubringen.
1) Ziehen Sie das Halterungsband durch die Halterung
und fixieren/bündeln Sie das/die Kabel in der
Kabelhalterung.
2) Drücken Sie den Hebel, halten Sie ihn gedrückt
und führen Sie dann den Haken in eine geeignete
Öffnung an der Rückseite des Flachbildschirms ein.
3) Ziehen Sie das Halterungsband fest.
1
2
4 ) Überzeugen Sie sich, dass die Kabelhalterung fest
im Bedienfeld sitzt.
HINWEIS:
Vermeiden Sie es, wenn Sie Kabel verlegen oder bündeln,
diese zusammenzudrücken oder Druckpunkte zu schaffen.
Ziehen Sie zur Entfernung des Halterungsbandes die
Arretierung, um sie zu lösen.
Drücken Sie zur Entfernung der Kabelhalterung die
Hebel, halten Sie sie gedrückt und ziehen Sie das Band
aus dem Loch.
Arretierung
Hebel
Hebel
HINWEIS:
Je länger eine Halterung angebracht ist, um so
wahrscheinlicher ist es, dass ihre Eigenschaften
schlechter werden. Eine ältere Halterung wird leichter
beschädigt, wenn sie entfernt wird, und kann dann
möglicherweise nicht wiederverwendet werden.
Rückseite des Flachbildschirms
Lautsprecherkabel
Kabelhalterung
Kabelhalterung
Bei Verwendung der Wandmontage-Einheit:
HINWEIS:
Legen Sie zuerst den Flachbildschirm auf eine weiche
Unterlage und montieren Sie dann die Lautsprecher.
1. Montieren Sie die Lautsprecher an
den Flachbildschirm (siehe Schritte 1
bis 10 auf den Seiten 21 bis 24).
Schließen Sie die anderen Kabel und das Netzkabel an
den Flachbildschirm an.
2. Platzieren Sie den Flachbildschirm
an den Montageelementen der
Wandbefestigungseinheit.
Zu Einzelheiten siehe die mit der Wandmontage-Einheit
mitgelieferte Bedienungsanleitung.
VORSICHT
Bewegen Sie den Flachbildschirm nicht fort, indem Sie
ihn an den Lautsprechern oder an den Lautsprecher-
Halterungen festhalten. Das kann zu Verletzungen oder
zu Schäden an den Montageelementen führen. Halten Sie
den Flachbildschirm beim Fortbewegen oben und an den
Handgriffen fest.
25
Deutsch
Deutsch
TECHNISCHE DATEN
Gehäuse
..............................................................
Bassreflextyp
Verwendete Lautsprecher (Zweiweg-System):
Woofer (für tiefe Frequenzen)
.....................................
4,8 cm × 13-cm-Konuslautsprecher
Hochtöner (für hohe Frequenzen)
.................................................................
2,5 cm Semikalotte
Impedanz ..............................................................................
6
Ω
Frequenzgang ...........................................
55 Hz bis 30 000 Hz
Empfindlichkeit (1 m, 1 W)
.............................................
80 dB
Zulässige Eingangswerte:
Maximaler Eingangswert
.............................................
18 W
Nenn-Eingangswert
.......................................................
6 W
Übergangsfrequenz
.........................................................
3 kHz
Äußere Abmessungen
..............................
105 (B) mm × 876 (H) mm × 64 (T) mm
Gewicht:
Lautsprecher (ein einzelner)
......................................
1,75 kg
Lautsprecher (ein Paar) mit Halterungen und
Schrauben
...................................................................
4,1 kg
Zubehörteile (für zwei Lautsprecher)
.....................................................
Lautsprecher-Halterungen
oben links (TOP L)
×
1
unten links (BOTTOM L)
×
1
oben rechts (TOP R)
×
1
unten rechts (BOTTOM R)
×
1
........
Lautsprecher-Montageschrauben (M5
×
10 mm)
×
16
......................
Bedienungsanleitung (dieses Dokument)
×
1
HINWEIS:
Die technischen Daten und das Design können aus Gründen
der Weiterentwicklung jederzeit ohne vorherige Ankündigung
geändert werden.
PFLEGE DES GEHÄUSES
• Zum Abwischen von Staub und Verschmutzung kann ein
Poliertuch oder ein trockener Lappen verwendet werden.
• Wenn das Gehäuse stark verschmutzt ist, kann es mit
einem weichen, mit verdünntem Haushaltsreiniger
angefeuchteten Lappen gesäubert und dann mit einem
trockenen Lappen abgewischt werden. Keine Möbelpolitur
oder Reinigungsmittel verwenden, da diese Mittel die
Oberfläche des Gehäuses beschädigen können.
• Niemals Verdünner, Benzol, Insektensprays oder andere
Chemikalien am oder in der Nähe des Gehäuses
verwenden, da hierdurch die Oberfläche beschädigt wird.
• Vor der Verwendung eines chemischen Reinigungstuchs
unbedingt die Vorsichtshinweise sorgfältig durchlesen.
Veröffentlicht von Pioneer Corporation.
Urheberrechtlich geschützt © 2008 Pioneer Corporation.
Alle Rechte vorbehalten.
Italiano
26
Grazie per avere acquistato questo prodotto Pioneer.
Leggere attentamente queste istruzioni per l’uso prima di
utilizzare il sistema di altoparlanti per avvalersi al massimo
delle sue prestazioni. Conservare poi il manuale in un luogo
sicuro per ogni eventuale futura necessità.
ATTENZIONE
Problemi di compatibilità
Questo prodotto è concepito esclusivamente per l’uso con
un display flat-panel. Per maggiori informazioni sulla loro
compatibilità al proprio schermo si raccomanda di rivolgersi
al più vicino rivenditore o centro di riparazioni Pioneer
autorizzato.
Installazione ed impostazione
• Non spostate il display flat-panel sollevandolo dagli
altoparlanti o dai relativi supporti: potreste ferirvi o
danneggiare questi ultimi. Quando dovete spostare
il display flat-panel, sollevatelo dall’alto afferrando le
maniglie.
• Per installare l’altoparlante, non usare alcuna vite che
non sia fra quelle in dotazione, o esso potrebbe staccarsi
e cadere.
• Per fissare bene l’altoparlante, stringere sempre bene le
viti.
• Si prega di maneggiare con cura gli altoparlanti; la griglia
di schermo e la cassa esterna possono danneggiarsi o
rompersi se sottoposte a colpi esterni molto forti.
• Se vicino all’altoparlante si trova un monitor televisivo
con tubo a raggi catodici, questo schermo può subite
interferenze e mostrare aberrazioni cromatiche. Se questo
accade, allontanare il monitor dall’altoparlante.
• Non attaccate gli altoparlanti alla parete o al soffitto.
Potrebbero cadere e provocare danni.
L’ingresso di segnale
• Per evitare danni al sistema di altoparlanti dovuti a
un sovraccarico d’ingresso, osservare le seguenti
precauzioni:
• Collegate questi altoparlanti esclusivamente al display
flat-panel specificato. In caso contrario, potreste
provocare danni o incendi.
• Prima di cambiare i collegamenti o il metodo di
installazione, non dimenticare di spegnere tutti i
dispositivi collegati e rimuoverne il cavo di collegamento.
• Se si usa una funzione di controllo dei toni per enfatizzare
molto gli acuti, non usare volume molto alti.
CONTROLLO DEGLI ACCESSORI
• Cavo altoparlante (S) x
1
• Cavo altoparlante (D) x
1
Accessori del display flat-panel
• Supporti dell’altoparlante × 4
Per parte superiore destra
(TOP R)
Per parte inferiore destra
(BOTTOM R)
Per parte superiore sinistra
(TOP L)
Per parte inferiore sinistra
(BOTTOM L)
• Viti di montaggio per l’altoparlante
(M5 x 10 mm: nero) × 16
• Istruzioni per l’uso (questo documento) × 1
Installazione
• In caso di difficoltà con questa installazione rivolgetevi
al vostro rivenditore.
• Pioneer non accetta alcuna responsabilità per gli
eventuali danni causati da un’installazione non
corretta, da un uso non corretto, da modifiche
apportate o da distrastri naturali.
27
Italiano
Italiano
INSTALLAZIONE DEL DISPLAY FLAT-PANEL
Display flat-panel con l'altoparlante installato
Vite di montaggio
per l’altoparlante
(M5 x 10 mm)
Vite di montaggio
per l’altoparlante
(M5 x 10 mm)
Supporto
dell’altoparlante
(per parte superiore
sinistra)
Supporto
dell’altoparlante
(per parte superiore
destra)
Supporto
dell’altoparlante
(per parte inferiore
destra)
Supporto
dell’altoparlante
(per parte inferiore
sinistra)
Vite di montaggio
per l’altoparlante
(M5 x 10 mm)
Vite di montaggio
per l’altoparlante
(M5 x 10 mm)
Vite di montaggio
per l’altoparlante
(M5 x 10 mm)
Vite di montaggio
per l’altoparlante
(M5 x 10 mm)
Morsetto del cavo*
Morsetto del cavo*
Cavo dell’altoparlante*
*: Accessori del display flat-panel
Altoparlante
Altoparlante
Vite di montaggio
per l’altoparlante (M5 x 10 mm)
Vite di montaggio
per l’altoparlante (M5 x 10 mm)
Per l’uso del supporto di tavolo:
NOTA:
Prima di attaccare l’altoparlante, attaccate il supporto di tavolo della serie KRP-TS01 (o un altro supporto per il display flat-panel) al
display flat panel.
1. Fissaggio dei supporti agli altoparlanti.
Vi sono supporti superiori e inferiori per gli altoparlanti destro e sinistro. Fissate i supporti appropriati alla parte superiore e
inferiore del retro degli altoparlanti, usando le viti in dotazione.
(Mostra il fissaggio corretto del supporto sul lato destro. Viene fissato sul lato sinistro seguendo la stesso procedimento.)
Posizionate gli altoparlanti
con i terminali (inferiori)
rivolti verso di voi.
Supporto
dell’altoparlante
(per parte inferiore destra)
Supporto dell’altoparlante
(per parte inferiore destra)
Supporto
dell’altoparlante
(per parte
superiore destra)
Fori per le viti
Fori per le viti
Supporto dell’altoparlante
(per parte superiore destra)
Italiano
28
2. Stringete una delle viti in
dotazione nel foro di montaggio
dell’altoparlante (il più basso dei due)
nella parte superiore del retro del
display flat-panel.
Non stringete fino in fondo. Lasciate le viti allentate, con
ancora 5 mm circa da stringere.
5 mm
Foro per il montaggio
dell’altoparlante
Parte superiore del retro
del display flat-panel
Parte superiore del
display flat-panel
Lasciate uno spazio di 5 mm circa
3. Attaccate il supporto dell’altoparlante
alla vite che avete avvitato passando
la parte larga sopra di esso e
abbassandolo verso la scanalatura;
avvitatelo temporaneamente alla vite
più bassa.
Dopo aver passato la parte larga del foro del supporto
dell’altoparlante (superiore) sopra la vite, abbassate
l’altoparlante su di essa.
Dopo aver passato la
parte larga del foro
sulla vite, abbassate
l’altoparlante.
Fissate con la vite in
dotazione il supporto
dell'altoparlante inferiore
al display flat-panel
temporaneamente
(un punto nella parte
inferiore).
4. Regolate la posizione
dell’altoparlante, quindi stringete
bene la vite superiore e inferiore.
5. Stringete le due viti, nella parte
superiore e inferiore per ogni
altoparlante (quattro viti in totale), e
fissate così gli altoparlanti al dispaly
flat-panel.
6. Fate passare il cavo dell’altoparlante
in dotazione tra l’altoparlante e il
display flat-panel (sotto il supporto
dell’altoparlante) dal basso.
7. Collegate i cavi dell’altoparlante
all’altoparlante (vedi pagina
successiva).
8. Inserite il cavo nella scanalatura
dell’altoparlante.
Inserimento
nella scanalatura
Terminale
dell’altoparlante
Cavo dell’altoparlante
9. Collegate l’altra estremità dei cavi
dell’altoparlante al retro del display
flat-panel (vedi pagina seguente).
29
Italiano
Italiano
Come collegare i cavi degli altoparlanti
(altoparlante)
Premete la levetta e inserite l’estremità
del cavo. Quando rilasciate la levetta, si
serra sul cavo dell’altoparlante. Premete
e tenete premuta la levetta durante la
rimozione del cavo.
Come collegare i cavi degli altoparlanti
(display flat-panel)
Inserite saldamente il connettore del
cavo dell’altoparlante nel terminale
dell’altoparlante dello schermo. Per
rimuovere il cavo dell’altoparlante, tenete
premuta e spingete la levetta
e quindi estraetela.
Attenzione
• Prima di collegare gli altoparlanti al display flatpanel,
scollegate lo schermo dalla presa di alimentazione.
Collegando il cavo dell’altoparlante con il cavo
dell’alimentazione inserito si possono causare
malfunzionamenti o danni allo schermo se il filo nudo
del cavo tocca altri apparecchi. Inserite il cavo di
alimentazione dopo aver collegato gli altoparlanti.
Collegate i cavi degli
altoparlanti (display flat-panel)
Collegate il cavo con un connettore rosso al
terminale R (destro) e il cavo con un
connettore bianco al terminale L (sinistro) del
display flat-panel.
Collegare il cavo con la linea grigia ai
terminali
e il cavo nero ai terminali
.
Collegate i cavi degli
altoparlanti (altoparlante)
Nero
Linea
grigia
Nero
Rosso
Terminale dell’altoparlante
Terminale dell’altoparlante
Cavo dell’altoparlante
Terminale dell’altoparlante
Bianco: L
Rosso: R
Levetta
• Se inserite il cavo dell’altoparlante troppo
in profondità in modo che l’isolamento
tocchi il terminale dell’altoparlante,
potreste non avere alcun suono. Inseritelo
in modo che il filo in rame sia ancora
visibile.
• Verificate che le estremità dei cavi degli
altoparlanti siano collegate saldamente ai
terminali tirando delicatamente i cavi dopo
aver effettuato i collegamenti. I collegamenti allentati
potrebbero provocare interruzioni di suono o rumore.
• Se è presente un cortocircuito nei cavi
e
causato
da un filo esposto, è possibile che un carico eccessivo
sia applicato al display flat-panel, risultante in un
funzionamento interrotto o in un malfunzionamento.
• I collegamenti errati del cavo dell’altoparlante ai terminali
del display flat-panel sinistro o destro rispettivamente
alla polarità possono causare effetti audio stereofonici
insufficienti o immagini o suoni instabili.
• Non collegate ai terminali degli altoparlanti diversi da
quelli specificati.
• Esercitando una forza eccessiva sul cavo dell’altoparlante
si potrebbero provocare problemi di collegamento, perdita
di suono e/o danni al connettore.
Italiano
30
10. Legare i cavi.
Seguite i passaggi qui sotto per attaccare il morsetto del
cavo, un accessorio del display flat-panel.
1) Infilate la banda del morsetto nella staffa di
supporto e legate il/i cavo(i) nel morsetto.
2) Spingete e tenete ferme le leve, quindi inserite il
gancio nell’apposito foro sul retro del display flat-
panel.
3) Tirate verso l’alto la banda del morsetto per
chiuderlo.
1
2
4 ) Assicuratevi che il morsetto del cavo sia ben saldato
al pannello.
NOTA:
Evitate di comprimere o esercitare pressione sui cavi
quando li posizionate o legate.
Per rimuovere la banda del morsetto, tirate e tenete
fermo il dispositivo di chiusura perché si sblocchi.
Per rimuovere il morsetto del cavo, spingete e tenete
ferme le leve, quindi estraetelo dal foro.
Dispositivo
di chiusura
Leva
Leva
NOTA:
Se un morsetto è stato installato da molto tempo, vi
saranno maggiori probabilità che si deteriori. Un morsetto
vecchio è più facilmente danneggiabile mentre viene tolto
e non può essere riutilizzato.
Retro del display flat-panel
Cavo dell’altoparlante
Morsetto del cavo
Morsetto del cavo
Per l’uso dell’unità da parete:
NOTA:
Innanzitutto, appoggiate il display flat-panel sulla parte
superiore di un panno morbido, ecc, quindi attaccate i
supporti dell’altoparlante.
1. Attaccate gli altoparlanti al display
flat-panel (Vedi procedure 1 a 10 alle
pagine 27 a 30).
Collegate gli altri cavi e il filo di alimentazione al display-
flat panel.
2. Appoggiate il display flat-panel sui
supporti di montaggio dell’unità da
parete.
Per maggiori dettagli, consultate le istruzioni per l’uso
in dotazione con l’unità da parete.
Attenzione
Non spostate il display flat-panel sollevandolo dagli
altoparlanti o dai relativi supporti: potreste ferirvi o
danneggiare questi ultimi. Quando dovete spostare
il display flat-panel, sollevatelo dall’alto afferrando le
maniglie.
31
Italiano
Italiano
DATI TECNICI
Cassa esterna
.................................................
Tipo Bass-reflex
Altoparlanti utilizzati (sistema a due vie) :
Altoparlante per toni bassi ............
A cono, 4,8 cm × 13 cm
Altoparlante per toni alti ..................
A semi-cupola, 2,5 cm
Impedenza ............................................................................
6
Ω
Gamma di frequenze
...................................
55 Hz a 30 000 Hz
Sensibilità (1 m, 1 W)
......................................................
80 dB
Ingresso tollerabile :
Ingresso massimo .........................................................
18 W
Ingresso nominale .........................................................
6 W
Frequenza di transizione .................................................
3 kHz
Dimensioni esterne
...............................
105 (L) mm × 876 (A) mm × 64 (P) mm
Peso :
Altoparlante (pezzo unico)
.........................................
1,75 kg
Altoparlanti (coppia) con supporti e viti
.....................
4,1 kg
Parti accessorie
(per due altoparlanti)
.......................................................
Supporti dell’altoparlante
Parte superiore sinistra (TOP L)
×
1
Parte inferiore sinistra (BOTTOM L)
×
1
Parte superiore destra (TOP R)
×
1
Parte inferiore destra (BOTTOM R)
×
1
......
Viti di montaggio per l’altoparlante (M5
×
10 mm)
×
16
........................
Istruzioni per l’uso (questo documento)
×
1
NOTA:
I dati tecnici e il design sono soggetti a variazioni senza
preavviso, a seguito di ulteriori miglioramenti del prodotto.
MANUTENZIONE DELLA CASSA ESTERNA
• Per togliere sporco e polvere utilizzare un panno per
lucidare o un normale panno asciutto.
• Se la cassa esterna è molto sporca, pulirla con un panno
morbido bagnato con acqua e detergente, quindi passare
di nuovo un panno asciutto. Non utilizzare cera per mobili
o detersivi. Potrebbero danneggiare la superficie della
cassa esterna.
• Non usare mai diluenti, benzina, insetticidi spray e altri
prodotti chimici sulla cassa esterna o nelle vicinanze.
Questi prodotti sono corrosivi.
• In caso di uso di panni chimici, leggere attentamente le
avvertenze per il loro uso.
Pubblicato da Pioneer Corporation.
Copyright © 2008 Pioneer Corporation.
Tutti i diritti riservati.
Nederlands
32
Dank u voor de aanschaf van dit Pioneer product.
Lees alvorens het luidsprekersysteem in gebruik te nemen
eerst deze gebruiksaanwijzing door zodat u volledig op
de hoogte bent van de bediening en werking. Bewaar de
gebruiksaanwijzing op een veilige plaats voor het geval u
later nog het een en ander wilt nalezen.
LET OP
Over de compatibiliteit
Dit product is uitsluitend ontworpen voor gebruik met
een Flat Panel Display. Voor meer informatie omtrent
compatibiliteit met andere producten dient u uw
dichtstbijzijnde erkende Pioneer dealer of service-centrum
te raadplegen.
Over de installatie en de instellingen
• Als u de Flat Panel Display wilt verplaatsen mag deze
niet bij de luidspreker of luidsprekerbeugels vastgepakt
worden. Dit kan resulteren in letsel of beschadiging van
de beugels. Houd de Flat Panel Display aan de bovenzijde
en de hendels vast wanneer u hem verplaatst.
• Voor de montage van de luidspreker mogen alleen de
bijgeleverde schroeven worden gebruikt, want anders kan
de luidspreker van het hoofdapparaat losraken en vallen.
• Draai de schroeven stevig vast bij de montage van de
luidspreker.
• Wees uitermate voorzichtig met de luidsprekers.
Het rooster en de behuizing zouden kunnen worden
beschadigd wanneer het luidsprekersysteem aan
schokken of stoten onderhevig wordt gesteld.
• Wanneer u een computerscherm of monitor met een
beeldbuis in de buurt van de luidspreker plaatst, kan dit
resulteren in beeldstoringen of kleurvervorming. Als dit
het geval is, moet u het scherm op een grotere afstand
van de luidspreker zetten.
• De luidsprekers mogen niet aan de wand of het plafond
worden bevestigd. Als ze eraf vallen kan dit resulteren in
letsel.
Over de ingang
• Voorkom beschadiging van het luidsprekersysteem
door overbelasting en let derhalve op de volgende punten:
• De luidsprekers mogen uitsluitend op deze Flat Panel
Display worden geïnstalleerd. Dit kan leiden tot brand of
andere schade.
• Schakel de aangesloten apparatuur uit en trek het
netsnoer uit het stopcontact voordat u begint met het
wijzigen van de aansluitingen of de installatie.
• Bij gebruik van een toonregelfunctie voor het versterken
van de hoge tonen mag u het volume op de versterker niet
te hoog instellen.
CONTROLEREN VAN DE ONDERDELEN
• Luidsprekersnoeren
(L) x
1
• Luidsprekersnoeren
(R) x
1
Toebehoren bij de Flat Panel Display
• Luidsprekerbeugels × 4
Voor rechtsboven
(TOP R)
Voor linksboven
(TOP L)
Voor rechtsonder
(BOTTOM R)
Voor linksonder
(BOTTOM L)
• Montageschroeven luidspreker
(M5 × 10 mm : Zwart) × 16
• Handleiding (dit document) × 1
Installatie
• Raadpleeg uw dealer als u problemen ondervindt
tijdens de installatie.
• Pioneer aanvaardt geen aansprakelijkheid als gevolg
van onjuiste installatie, onjuist gebruik, wijziging of
natuurrampen.
33
Nederlands
Nederlands
INSTALLATIE OP DE FLAT PANEL DISPLAY
Flat Panel Display met geïnstalleerde Luidspreker
Luidspreker
Luidsprekerbeugel
(voor rechtsboven)
Luidsprekerbeugel
(voor rechtsonder)
Kabelklem*
Kabelklem*
Luidsprekersnoer*
*: Toebehoren bij de Flat Panel Display
Luidspreker
Montageschroef
luidspreker
(M5 x 10 mm)
Montageschroef
luidspreker
(M5 x 10 mm)
Luidsprekerbeugel
(voor linksboven)
Luidsprekerbeugel
(voor linksonder)
Montageschroef
luidspreker
(M5 x 10 mm)
Montageschroef
luidspreker
(M5 x 10 mm)
Montageschroef
luidspreker (M5 x 10 mm)
Montageschroef
luidspreker (M5 x 10 mm)
Montageschroef
luidspreker (M5 x 10 mm)
Montageschroef
luidspreker (M5 x 10 mm)
Indien de tafelbladstaander wordt gebruikt:
N.B.:
Voordat de luidspreker wordt bevestigd, dient de KRP-TS01-serie tafelbladstaander (of andere staander voor de Flat Panel Display) aan
de Flat Panel Display te worden bevestigd.
1. Bevestiging van de Luidsprekerbeugels aan de Luidsprekers.
Er zijn boven- en onderluidsprekerbeugels voor de linker- en rechterluidsprekers. Bevestig de juiste beugels aan de boven- en
onderzijde aan de achterzijde van de luidsprekers d.m.v. de meegeleverde schroeven.
(De bevestiging van de beugel wordt aan de rechterzijde getoond. De bevestiging aan de linkerzijde vindt op dezelfde wijze
plaats.)
Luidsprekerbeugel
(voor rechtsonder)
Luidsprekerbeugel
(voor rechtsboven)
Plaats de luidspreker zodat
de eindklemmen ervan
(onderzijde) naar u toe
gericht zijn.
Luidsprekerbeugel
(voor rechtsonder)
Schroefgaten
Schroefgaten
Luidsprekerbeugel
(voor rechtsboven)
Nederlands
34
2. Draai een meegeleverde schroef in
het montagegat van de luidspreker
(de laagste van de twee) aan de
bovenachterzijde van de Flat Panel
Display.
Draai hem nog niet helemaal aan. Laat het nog half
aangedraaid zodat er nog ongeveer 5 mm moet worden
aangedraaid.
5 mm
Montagegat
luidspreker
Bovenzijde, achterzijde
Flat Panel Display
Bovenzijde
Flat Panel Display
Laat ongeveer 5 mm ruimte
3. Hang de luidsprekerbeugel aan de
schroef die u aan de bovenzijde heeft
geïnstalleerd door het brede gedeelte
erover heen te schuiven en het in
de gleuf te laten zakken; draai de
laagste schroef tijdelijk aan.
Nadat het brede gedeelte van het gat van de
luidsprekerbeugel (bovenste gedeelte) over de schroef is
geschoven, laat u de luidspreker erin zakken.
Draai de onderste
luidsprekerbeugel met de
meegeleverde schroef
tijdelijk aan op de Flat
Panel Display (op een
plaats onder).
Nadat het brede
gedeelte van het
gat over de schroef
is geschoven, laat u
de luidspreker erin
zakken.
4. Stel de positie van de luidspreker bij
en draai vervolgens de bovenste en
onderste schroeven stevig aan.
5. Draai de twee schroeven boven en
beneden aan voor elke luidspreker
(totaal vier schroeven), zodat de
luidsprekers op de Flat Panel Display
worden vastgezet.
6. Leid het meegeleverde
luidsprekersnoer tussen de
luidspreker en de Flat Panel Display
(onder de luidsprekerbeugel) van
onderop.
7. Sluit de luidsprekersnoeren aan op de
luidspreker (zie volgende bladzijde).
8. Voeg het snoer in de sponning op de
luidspreker.
Luidsprekersnoer
Eindklem
luidspreker
Het invoegen
in de sponning
9. Sluit het andere uiteinde van de
luidsprekersnoeren aan op de
Flat Panel Display (zie volgende
bladzijde).
35
Nederlands
Nederlands
Aansluiten van de luidsprekerkabels
(luidspreker)
Druk de hefboom in en steek het
gestripte uiteinde van de draad in de
aansluiting. Wanneer u de hefboom
weer los laat, wordt de luidsprekerdraad
vastgeklemd. Houd de hefboom
ingedrukt en verwijder de draad.
Aansluiten van de luidsprekerkabels
(Flat Panel Display)
Steek de stekker van de luidsprekerkabel
goed in de luidsprekeraansluiting op
het Flat Panel Display. Om de kabel te
verwijderen, dient u de hendel ingedrukt
te houden zodat u de stekker los kunt
maken.
Let op
• Voor u de luidsprekers gaat aansluiten op het Flat
Panel Display, moet u de stekker van het toestel uit het
stopcontact halen. Aansluiten van de luidsprekerkabels
met de stekker in het stopcontact, kan leiden tot storingen
of schade aan het toestel als de draden in de kabel in
aanraking komen met andere apparatuur. Doe de stekker
weer in het stopcontact wanneer u klaar bent met het
aansluiten van de luidsprekers.
Aansluiten van de
luidsprekerkabels
(op het Flat Panel Display)
Verbind de kabel met de rode stekker met de R
aansluiting (rechts) en de kabel met de witte
stekker met de L aansluiting (links) op het Flat
Panel Display.
Verbind de kabel met de grijze streep
met de
aansluitingen en de zwarte
kabel met de
aansluitingen.
Aansluiten van de
luidsprekerkabels
(op de luidspreker)
Zwart
Met grijze
streep
Zwart
Rood
Eindklem luidspreker
Eindklem luidspreker
Luidsprekersnoer
Eindklem luidspreker
Wit: L
Rood: R
Hefboom
• Als u de luidsprekerdraad zo ver in de
aansluiting steekt dat de isolatie de
luidsprekeraansluiting raakt, is het mogelijk
dat er geen geluid wordt weergegeven. Steek
de draad slechts zo ver in de aansluiting dat
er nog net een stukje koperdraad te zien is.
• Controleer of de luidsprekerkabels goed vast
zitten in de aansluitingen door voorzichtig aan
de kabels te trekken nadat u de aansluitingen
gemaakt heeft. Losse aansluitingen kunnen leiden tot
onderbreking van de geluidsweergave of tot storende ruis.
• Als er kortsluiting is in de
en
kabels door een
blootliggende draad, kan dit leiden tot overbelasting van
het Flat Panel Display, waardoor het toestel niet meer
correct zal functioneren of storingen zal vertonen.
• Incorrecte verbindingen met de linker en rechter
luidsprekeraansluitingen van het Flat Panel Display
betreffende de polariteit kan leiden tot onvoldoende
stereoeffecten, zwakke weergave van de lage tonen of tot
een instabiel geluidsbeeld.
• Verbind geen andere apparatuur met de
luidsprekeraansluitingen dan de gespecificeerde
luidsprekers.
• Als er teveel kracht wordt uitgeoefend op de
luidsprekerkabel, kan de verbinding verbroken worden,
het geluid tijdelijk wegvallen en/of de aansluiting
beschadigd raken.
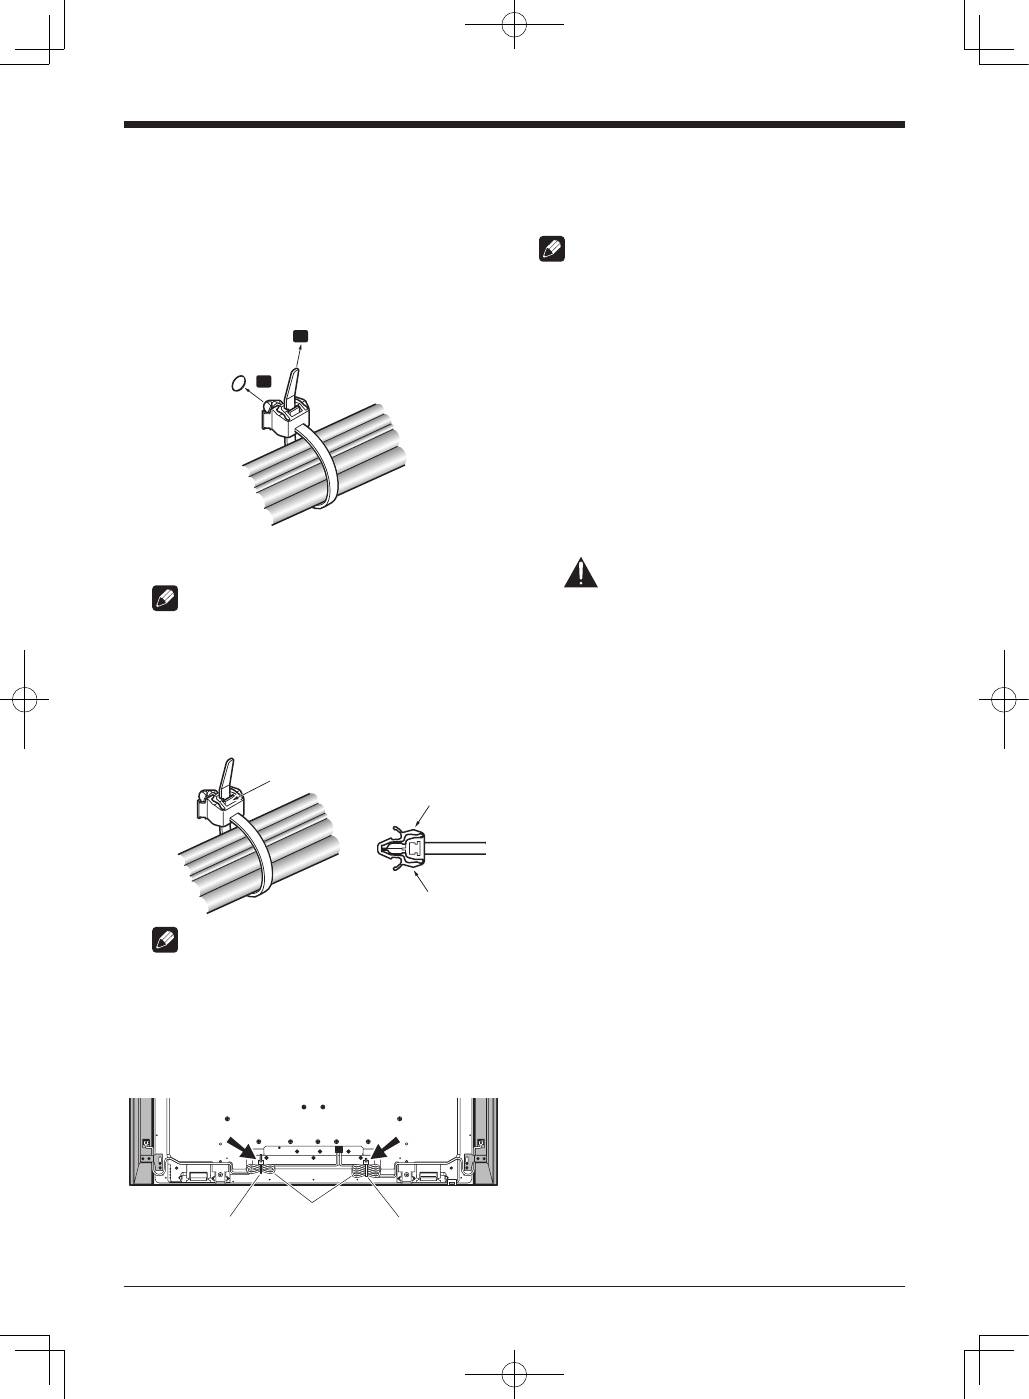
Nederlands
36
10. Het samenvoegen van de snoeren.
Volg onderstaande stappen om de kabelklem, een
toebehoren van de Flat Panel Display, aan te brengen.
1) Steek het klembandje door de houder en voeg het
snoer/de snoeren samen in de kabelklem.
2) Houd de hendeltjes ingedrukt en leid het haakje
door het juiste gat aan de achterzijde van de Flat
Panel Display.
3) Trek aan het klembandje om het vast te zetten.
1
2
4) Zorg ervoor dat de kabelklem stevig in het paneel
vastzit.
N.B.:
Zorg dat er geen beknelling of drukpunten ontstaan
wanneer de snoeren worden geleid of samengevoegd.
Houd de vergrendeling ingedrukt zodat deze openspringt
om het klembandje te verwijderen.
Druk de hendeltjes in en trek het bandje uit de opening
om het te verwijderen.
Vergrendeling
Hendeltje
Hendeltje
N.B.:
Hoe langer een klem op zijn plaats blijft zitten, hoe
groter de kans op slijtage. Een oudere klem raakt sneller
beschadigd wanneer deze wordt verwijderd zodat hij niet
opnieuw gebruikt kan worden.
Achterzijde van de Flat Panel Display.
Luidsprekersnoer
Kabelklem
Kabelklem
Indien de eenheid voor wandbevestiging wordt gebruikt:
N.B.:
Leg eerst de Flat Panel Display op een zachte doek of iets
dergelijks en bevestig daarna de luidsprekers.
1. Bevestig de luidsprekers aan de Flat
Panel Display (zie procedures 1 tot 10
op bladzijde 33 tot 36).
Sluit de overige snoeren en het netsnoer aan op de Flat
Panel Display.
2. Plaats de Flat Panel Display op de
montage-onderdelen van de eenheid
voor wandbevestiging.
Zie voor meer informatie de bij de eenheid voor
wandbevestiging meegeleverde bedieningshandleiding.
Let op
Als u de Flat Panel Display wilt verplaatsen mag deze
niet bij de luidspreker of luidsprekerbeugels vastgepakt
worden. Dit kan resulteren in letsel of beschadiging van
de beugels. Houd de Flat Panel Display aan de bovenzijde
en de hendels vast wanneer u hem verplaatst.
37
Nederlands
Nederlands
TECHNISCHE GEGEVENS
Behuizing
........................................................... Type basreflex
Luidsprekers (tweewegsysteem):
Woofer (voor lage tonen)
........................................
4,8 cm × 13 cm hoornvormig type
Tweeter (voor hoge tonen)
..........
2,5 cm halfbolvormig type
Impedantie ...........................................................................
6
Ω
Frequentiebereik ......................................
55 Hz t/m 30 000 Hz
Gevoeligheid (1 m, 1 W)
..................................................
80 dB
Toelaatbare invoer:
Maximaal ingangsvermogen
.......................................
18 W
Nominaal ingangsvermogen
........................................
6 W
Crossover-frequentie
.......................................................
3 kHz
Externe afmetingen
.............................
105 (B) mm × 876 (H) mm × 64 (D) mm
Gewicht:
Luidspreker (een stuk)
................................................
1,75 kg
Luidsprekers (beide) met beugels en schroeven
.......
4,1 kg
Bijgeleverde onderdelen (voor twee luidsprekers)
................................................................
Luidsprekerbeugels
Linksboven (TOP L) × 1
Linksonder (BOTTOM L) × 1
Rechtsboven (TOP R) × 1
Rechtsonder (BOTTOM R) × 1
..........
Montageschroeven luidspreker (M5 × 10 mm) × 16
............................................
Handleiding (dit document) × 1
OPMERKING:
Technische gegevens en ontwerp zijn ter productverbetering
zonder voorafgaande kennisgeving wijzigbaar.
ONDERHOUD VAN DE BEHUIZING
• Veeg stof en vuil met een poetsdoek of droge, schone
doek van de behuizing.
• Bevochtig een zachte doek in een oplossing van water
en een neutraal reinigingsmiddel en wring de doek goed
uit voor het verwijderen van hardnekkige vlekken. Veeg
na met een droge doek. Gebruik geen meubelwas of
andere reinigingsmiddelen daar deze de behuizing aan
kunnen tasten.
• Gebruik beslist geen thinner, benzine, insectensprays en
andere chemische middelen op of in de buurt van de
behuizing daar dit soort middelen de behuizing aantast.
• Bij gebruik van een chemische doek moet u alvorens
gebruik de aanwijzingen goed lezen en controleren of
deze doek voor dit systeem geschikt is.
Uitgegeven door Pioneer Corporation.
Copyright © 2008 Pioneer Corporation.
Alle rechten voorbehouden.

Español
38
Muchas gracias por comprar este producto Pioneer.
Lea atentamente estas instrucciones de funcionamiento
antes de usar su sistema de altavoces, de modo que sepa
cómo obtener el máximo rendimiento. Después de haber
finalizado la lectura del manual de instrucciones, guárdelo
en un lugar seguro para futuras consultas.
PRECAUCIÓN
Acerca de la compatibilidad
Este producto ha sido diseñado exclusivamente para
ser utilizado con el monitor de pantalla plana. Para
más información sobre la compatibilidad, consulte su
distribuidor Pioneer autorizado o un centro de servicio.
Acerca de la instalación y el ajuste
• No desplace el monitor de pantalla plana sujetándolo por
los altavoces o los soportes para los altavoces, ya que
usted podría lastimarse o los soportes podrían resultar
dañados. Cuando desplace el monitor de pantalla plana,
sujételo por la parte superior y por las asas.
• Cuando instale el altavoz, no emplee tornillos que no sean
los suministrados, dado que el altavoz podría separarse
de la unidad principal y caerse.
• Cuando instale el altavoz, apriete bien los tornillos.
• Manipule los altavoces con mucho cuidado, ya que la red
de rejilla y la caja del altavoz pueden dañarse o romperse
si se encuentran sujetos a fuertes impactos externos.
• Si pone una pantalla TRC o un monitor TRC cerca del
altavoz, pueden producirse interferencias o distorsión del
color. En tal caso, aleje el monitor del altavoz.
• No instale los altavoces en la pared ni en el techo, ya que
podrían caerse y herir a alguien.
Acerca de la entrada
• Para evitar daños al sistema de altavoces como
consecuencia de una sobrecarga de entrada, tenga en
cuenta las precauciones siguientes:
• Estos altavoces deberán conectarse única y
exclusivamente al monitor de pantalla plana especificado.
De lo contrario, podrían producirse daños o un incendio.
• Asegúrese de desconectar los dispositivos conectados y
de desenchufar el cable de alimentación de la toma de
corriente antes de cambiar las conexiones o de efectuar
la instalación.
• Cuando emplee una función de control del tono
para acentuar mucho los sonidos agudos, no suba
excesivamente el volumen del amplificador.
COMPROBACIÓN DE LOS ACCESORIOS
• Cables de altavoz (I) x
1
• Cables de altavoz (D) x
1
Accesorios del monitor de pantalla plana
• Soportes para el altavoz × 4
Para parte superior
derecha (TOP R)
Para parte superior
izquierda (TOP L)
Para parte inferior
derecha (BOTTOM R)
Para parte inferior
izquierda (BOTTOM L)
• Pernos de fijación del altavoz
(M5 x 10 mm: negro) × 16
• Manual de instrucciones (este documento) × 1
Instalación
• Si experimentara alguna dificultad con la instalación,
consulte a su distribuidor.
• Pioneer no se responsabiliza de ningún daño que
pudiera derivarse de una instalación incorrecta, un
uso inadecuado, la realización de modificaciones o
catástrofes naturales.
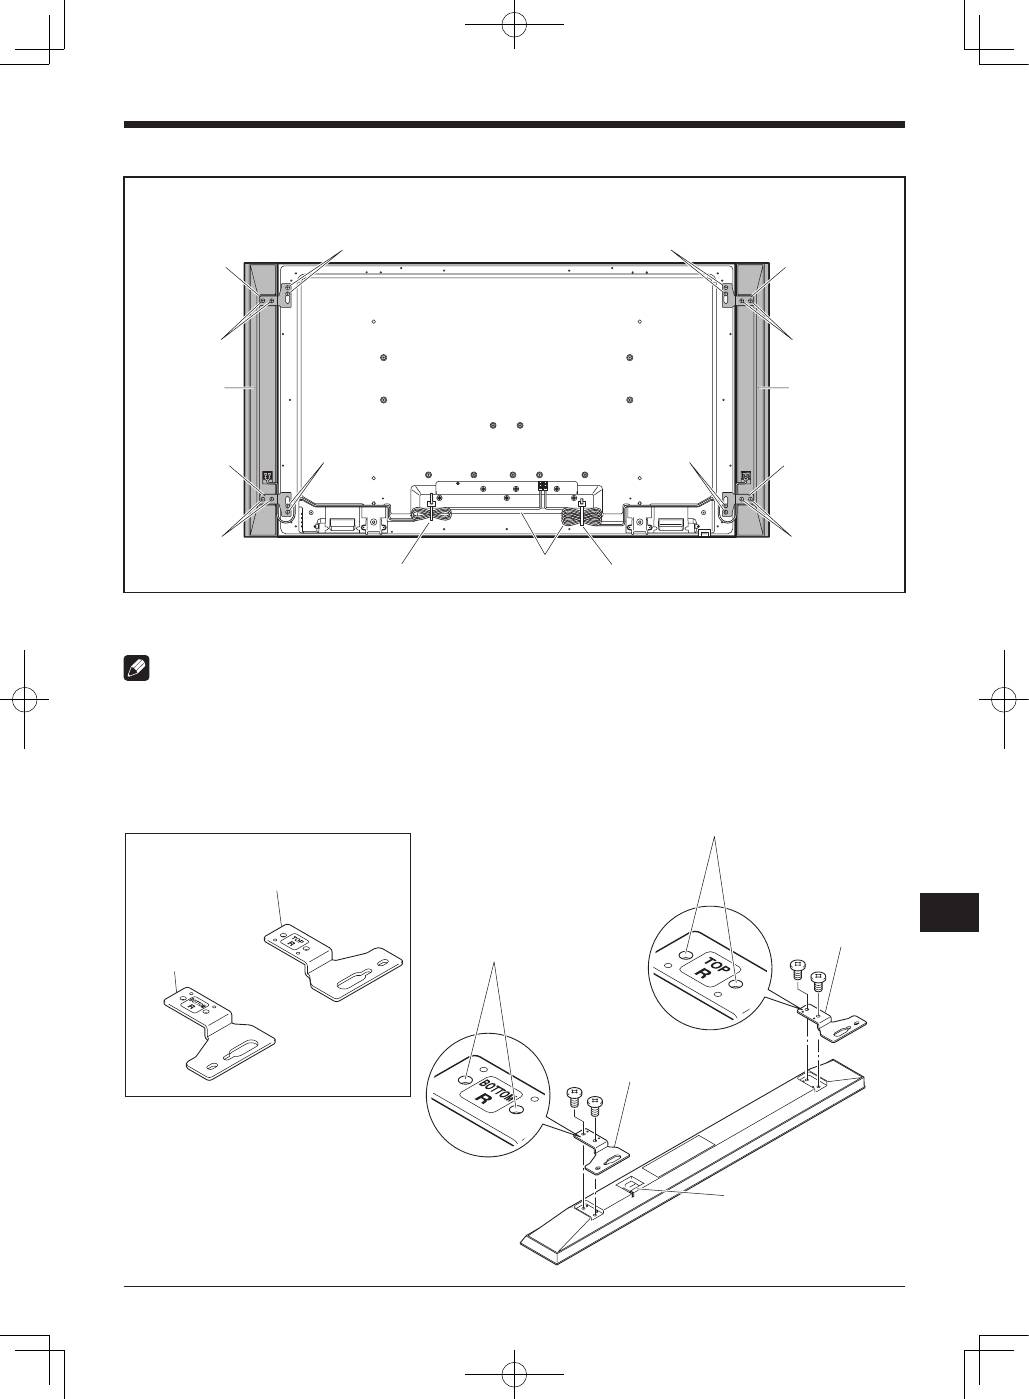
39
Español
Español
INSTALACIÓN EN EL MONITOR DE PANTALLA PLANA
Altavoz
Altavoz
Abrazadera para cables*
Abrazadera para cables*
Cable de altavoz*
*: Accesorios del monitor de pantalla plana
Perno de fijación
del altavoz
(M5 x 10 mm)
Perno de fijación
del altavoz
(M5 x 10 mm)
Soporte para el altavoz
(para parte superio
izquierda)
Soporte para el altavoz
(para parte superior
derecha)
Soporte para el altavoz
(para parte inferior
derecha)
Soporte para el altavoz
(para parte inferior
izquierda)
Perno de fijación
del altavoz
(M5 x 10 mm)
Perno de fijación
del altavoz
(M5 x 10 mm)
Perno de fijación
del altavoz (M5 x 10 mm)
Perno de fijación
del altavoz (M5 x 10 mm)
Perno de fijación
del altavoz
(M5 x 10 mm)
Perno de fijación
del altavoz
(M5 x 10 mm)
Monitor de pantalla plana con el altavoz instalado
Si se utiliza el soporte de mesa:
NOTA:
Antes de instalar el altavoz, acople al monitor de pantalla plana el soporte de mesa de la serie KRP-TS01 (u otro soporte para
monitores de pantalla plana).
1. Cómo montar los soportes para los altavoces en los altavoces.
Hay soportes superiores e inferiores para el altavoz de la derecha y para el de la izquierda. Utilice los pernos suministrados
para montar los soportes adecuados en la parte superior e inferior de la cara posterior de los altavoces.
(Seguidamente se indica cómo montar el soporte del lado derecho; para montar el del lado izquierdo, siga el mismo
procedimiento.)
Soporte para el altavoz
(para parte inferior derecha)
Soporte para el
altavoz (para parte
superior derecha
)
Coloque el altavoz de
modo que sus terminales
(parte inferior) estén
mirando hacia usted.
Soporte para el
altavoz (para parte
inferior derecha)
Agujeros roscados
Agujeros roscados
Soporte para el altavoz
(para parte superior derecha
)

Español
40
2. Atornille uno de los pernos
suministrados en el agujero de
montaje del altavoz (el más bajo de
los dos) situado en la parte superior
de la cara posterior del monitor de
pantalla plana.
No lo apriete al máximo todavía. Déjelo algo flojo, de
modo que queden unos 5 mm para atornillar.
5 mm
Agujero para
el montaje
del altavoz
Dejar un espacio de unos 5 mm
Parte superior del
monitor de pantalla plana
Parte superior de la
cara posterior del
monitor de pantalla
plana.
3. Cuelgue el soporte para el altavoz
en el perno que ha atornillado en la
parte superior. Para ello, deslice la
parte más ancha por encima de él y
después baje el altavoz y encájelo en
la ranura; atornille provisionalmente
el perno inferior.
Después de haber pasado por encima del perno la parte
más ancha del agujero del soporte para el altavoz (parte
superior), baje el altavoz, de modo que descanse sobre
él.
Utilice el perno
suministrado para fijar
provisionalmente en el
monitor de pantalla
plana el soporte para la
parte inferior del
altavoz (agujero en la
parte inferior).
Después de haber
pasado por encima
del perno la parte
más ancha del
agujero, baje el
altavoz.
4. Ajuste la posición del altavoz y a
continuación asegure firmemente los
pernos superior e inferior.
5. Apriete los dos pernos, en la parte
superior e inferior de cada altavoz
(un total de cuatro pernos). De este
modo fijará los altavoces al monitor
de pantalla plana.
6. Pase el cable de altavoz suministrado
entre el altavoz y el monitor de
pantalla plana (por debajo del
soporte para el altavoz) desde abajo.
7. Conecte los cables de altavoz al
altavoz (consulte la página siguiente).
8. Introduzca el cable por la ranura del
altavoz.
Cable de altavoz
Terminal
de altavoz
Introducir por
la ranura
9. Conecte el otro extremo de los cables
de altavoz a la parte posterior del
monitor de pantalla plana (consulte
la página siguiente).
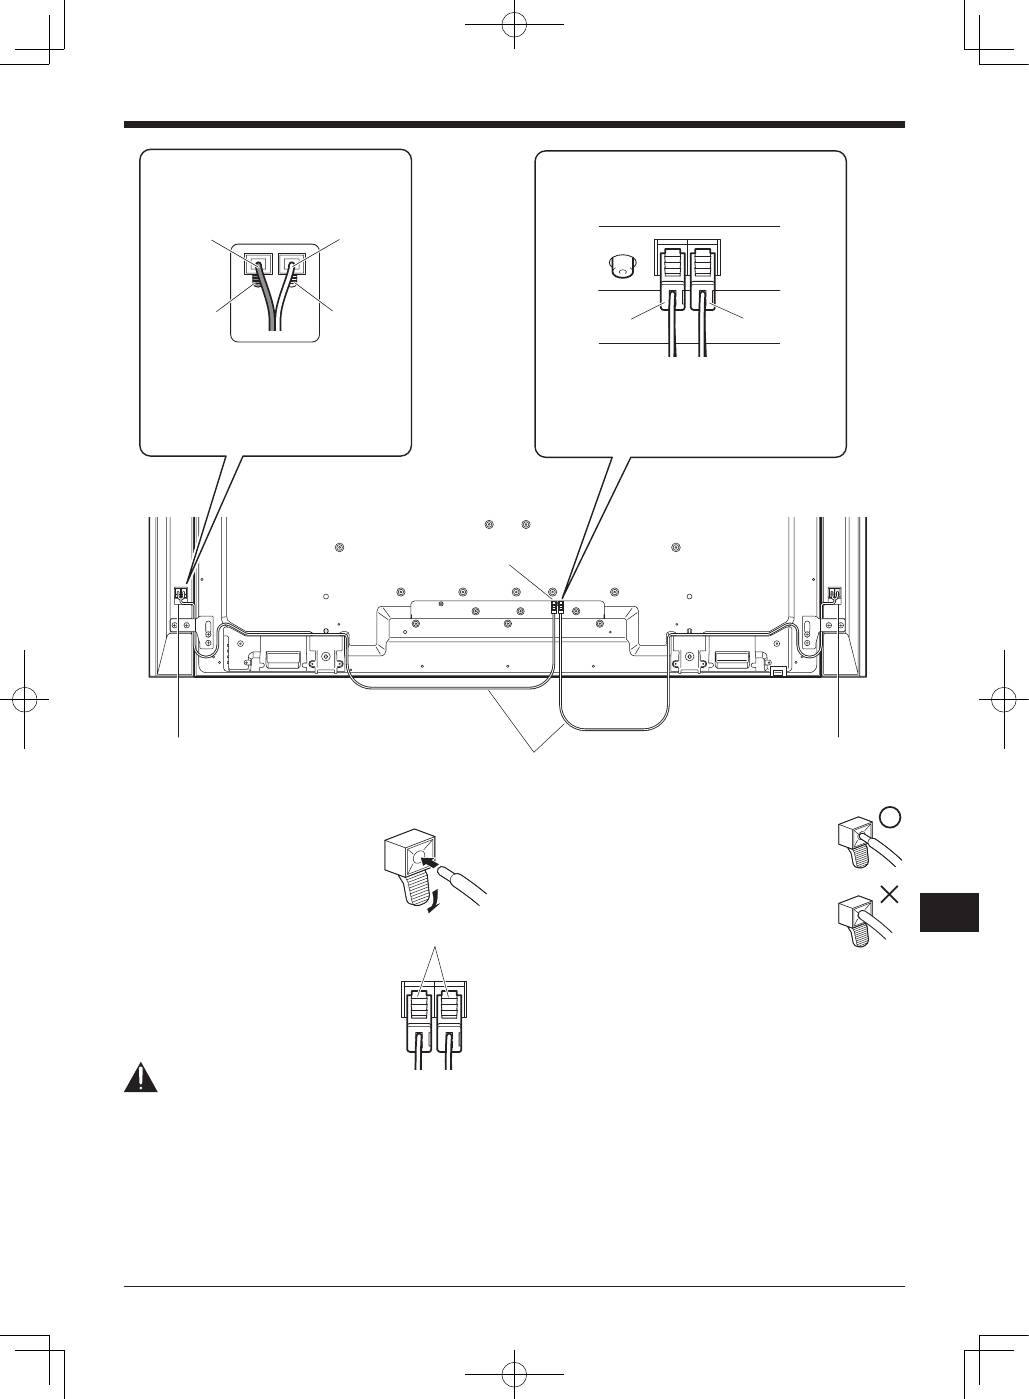
41
Español
Español
Cómo realizar la conexión de los cables del altavoz
(altavoz)
Presione la palanca e inserte el extremo
del cable. Al soltar la palanca, la misma
sujeta el cable de altavoz. Presione la
palanca al extraer el cable.
Cómo realizar la conexión de los cables
del altavoz (monitor de pantalla plana)
Inserte el conector del cable del altavoz
correctamente en el terminal del altavoz
de la pantalla. Para extraer el cable del
altavoz, pulse la palanca y extráigalo.
Precaución
• Antes de conectar los altavoces al monitor de pantalla
plana, desenchufe la pantalla de la toma de corriente.
Conectar el cable de altavoz con el cable de alimentación
enchufado puede causar un fallo de funcionamiento o
dañar la pantalla si un hilo desnudo del cable toca otro
equipo. Enchufe el cable de alimentación después de
conectar los altavoces.
Conecte los cables del altavoz
(monitor de pantalla plana)
Conecte el cable con conector rojo al terminal
R (derecha) y el cable con conector blanco al
terminal L (izquierda) del monitor de pantalla
plana.
Conecte el cable con línea gris a los
terminales
, y el cable negro a los
terminales
.
Conecte los cables del
altavoz (altavoz)
Negro
Línea gris
Negro
Rojo
Terminal de altavoz
Terminal de altavoz
Cable de altavoz
Terminal de altavoz
Blanco: L
Rojo: R
Palanca
• Si inserta el cable de altavoz demasiado,
tanto que el aislamiento toca el terminal
de altavoz, puede que no obtenga ningún
sonido. Insértelo de forma que pueda verse
el núcleo de cobre.
• Compruebe que los extremos de los
cables del altavoz estén conectados
firmemente a los terminales, tirando de los
cables ligeramente después de hacer las
conexiones. Conexiones flojas pueden interrumpir el
sonido o producir ruido.
• Si hay un cortocircuito en los cables
y
causado
por un hilo expuesto, puede que se aplique una carga
excesiva al monitor de pantalla plana, resultando en la
interrupción de la operación o fallo de funcionamiento.
• Conexiones incorrectas de los cables de altavoz a los
lados derecho o izquierdo de los terminales del monitor
de pantalla plana con respecto a la polaridad puede
resultar en efectos de sonido estéreo insuficientes,
produciendo sonidos de bajos de calidad inferior o una
imagen sonora inestable.
• No conecte ningún dispositivo a los terminales de altavoz
que no sea uno de los altavoces especificados.
• Aplicar excesiva fuerza al cable del altavoz podría
provocar fallos de conexión, interrupciones de sonido y/o
daños al conector.
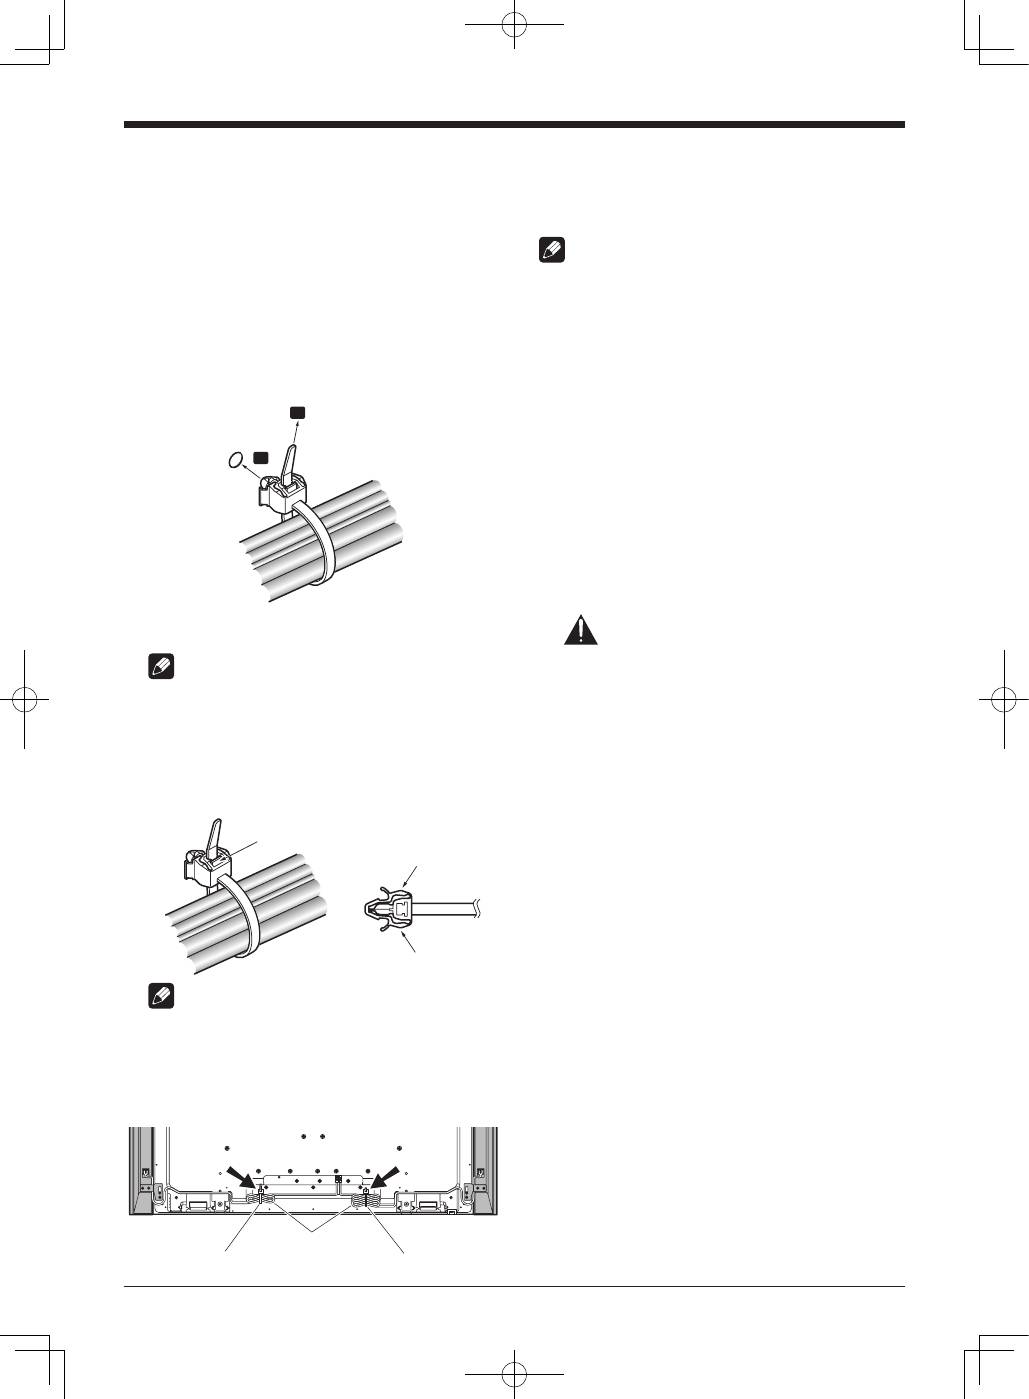
Español
42
10. Cómo reunir y enrollar los cables
sobre sí mismos.
Siga los pasos que se indican a continuación para
colocar la abrazadera para cables (un accesorio del
monitor de pantalla plana).
1) Deslice un extremo de la abrazadera por el soporte
de la misma y reúna los cables de modo que éstos
queden sujetos por la abrazadera.
2) Presione las palancas de la abrazadera y, sin
soltarlas, introduzca el gancho en el orificio que
encontrará en la parte posterior del monitor de
pantalla plana.
3) Tire del extremo de la abrazadera para cerrarla.
1
2
4) Confirme que la abrazadera para cables queda
firmemente sujeta en el panel.
NOTA:
Al distribuir o reunir los cables, evite pellizcarlos o crear
puntos de presión.
Para extraer la banda de la abrazadera para cables, tire
de la lengüeta de liberación.
Para extraer la abrazadera para cables, mantenga
presionadas las palancas y extráigala del orificio.
Lengüeta
Palanca
Palanca
NOTA:
Cuanto más tiempo haga que se haya instalado una
abrazadera, más probabilidades habrá de que la misma se
deteriore. Una abrazadera antigua se dañará con mayor
facilidad al extraerla y es posible que no se pueda utilizar
de nuevo.
Parte posterior del monitor de pantalla plana
Cable de altavoz
Abrazadera para cables
Abrazadera para cables
Si el televisor se instala en la unidad para colgar de la pared:
NOTA:
Primero disponga de forma horizontal el monitor de pantalla
plana sobre una sábana suave, etc. Después, coloque los
altavoces.
1. Coloque los altavoces en el monitor
de pantalla plana (consulte los
procedimientos 1 a 10 en las páginas
39 a 42).
Conecte los otros cables y el cable de alimentación al
monitor de pantalla plana.
2. Coloque el monitor de pantalla plana
en los accesorios de montaje de la
unidad para colgar de la pared.
Para detalles al respecto, consulte el manual de
instrucciones facilitado con la unidad para colgar de la
pared.
Precaución
No desplace el monitor de pantalla plana sujetándolo por
los altavoces o los soportes para los altavoces, ya que
usted podría lastimarse o los soportes podrían resultar
dañados. Cuando desplace el monitor de pantalla plana,
sujételo por la parte superior y por las asas.

43
Español
Español
ESPECIFICACIONES
Caja del altavoz
........................................Tipo reflejo de bajos
Altavoces usados (sistema de dos vías):
Woofer (para los sonidos graves)
..................................................
Tipo cónico 4,8 cm × 13 cm
Tweeter (para los sonidos agudos)
....................................................
Tipo semicúpula de 2,5 cm
Impedancia ..........................................................................
6
Ω
Gama de frecuencias
..................................
55 Hz a 30 000 Hz
Sensibilidad (1 m, 1 W)
...................................................
80 dB
Entrada permisible:
Entrada máxima
............................................................
18 W
Entrada nominal
............................................................
6 W
Frecuencia de cruce ........................................................
3 kHz
Dimensiones exteriores
..........................
105 (An) mm × 876 (Al) mm × 64 (Pr) mm
Peso:
Altavoz (una sola unidad)
...........................................
1,75 kg
Altavoces (dos) con soportes y pernos
......................
4,1 kg
Accesorios (para dos altavoces)
.........................................................
Soportes para el altavoz
Parte superior izquierda (TOP L) × 1
Parte inferior izquierda (BOTTOM L) × 1
Parte superior derecha (TOP R) × 1
Parte inferior derecha (BOTTOM R) × 1
.............
Pernos de fijación del altavoz (M5 × 10 mm) × 16
.................
Manual de instrucciones (este documento) × 1
NOTA:
Las especificaciones y el diseño están sujetos a posibles
cambios sin previo aviso a efectos de mejorar el producto.
MANTENIMIENTO DE LA CAJA DEL ALTAVOZ
• Para quitar la suciedad y el polvo utilice un paño
abrillantador o un paño seco.
• Si la caja del altavoz está muy sucia, límpiela con un paño
humedecido con algún producto limpiador diluido con
agua. Después, seque la superficie con un paño seco. No
utilice ceras ni productos limpiadores para muebles, ya
que dañarían la superficie de la caja del altavoz.
• Nunca utilice diluyentes, bencinas, rociadores de
insecticidas ni otros productos químicos sobre la caja del
altavoz o cerca de ella, ya que podrían correr la superficie.
• Si utiliza un paño químico, lea cuidadosamente las
instrucciones que acompañen al mismo.
Publicado por Pioneer Corporation.
Copyright © 2008 Pioneer Corporation.
Todos los derechos reservados.
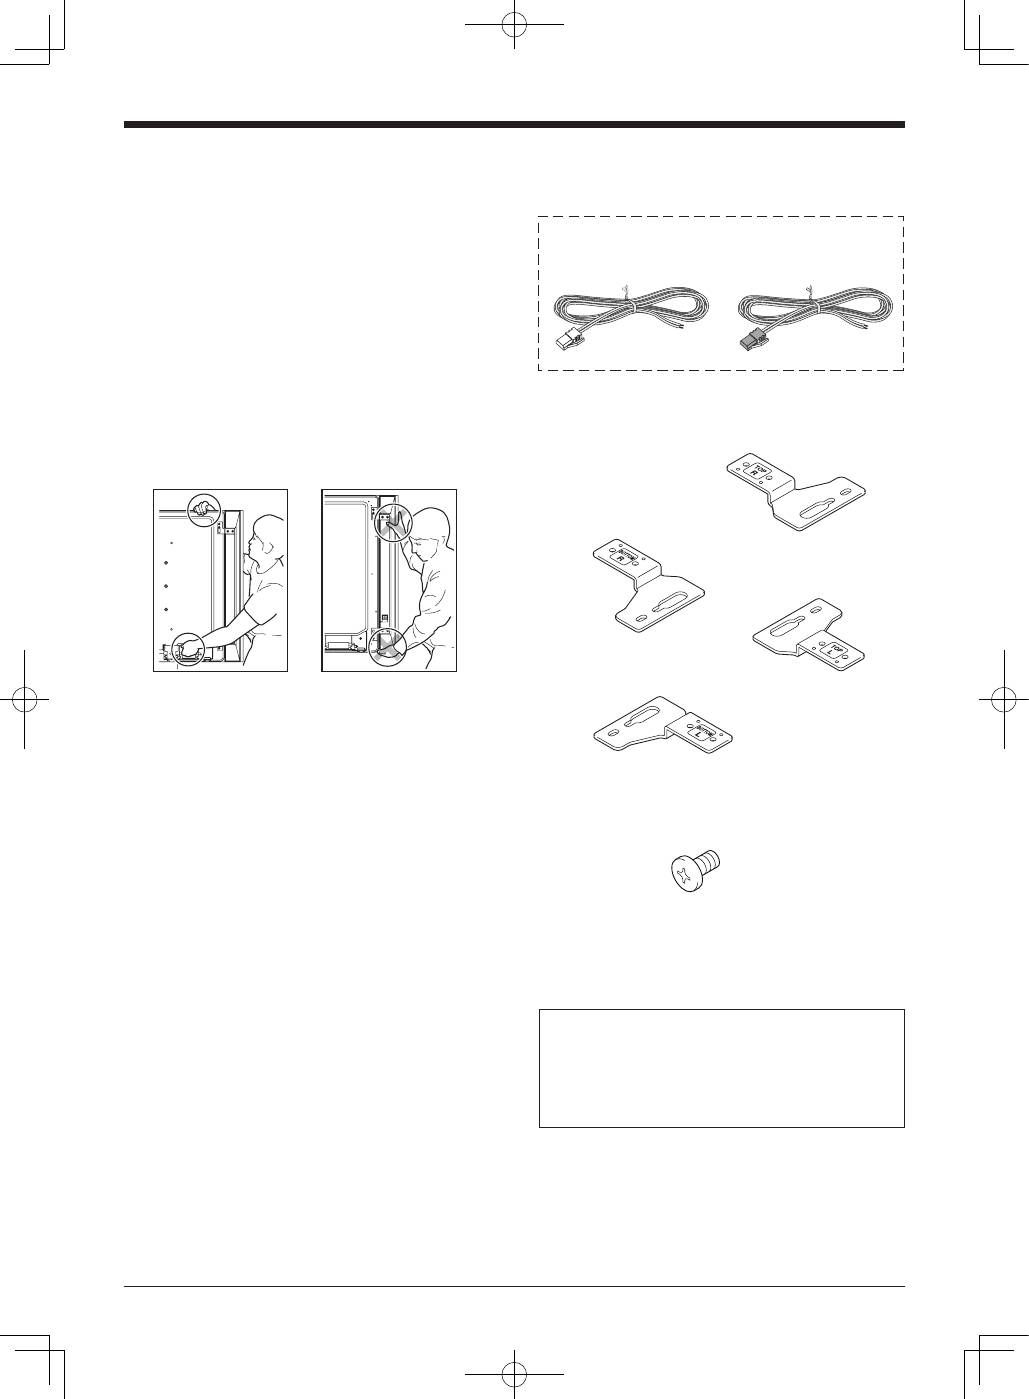
中文
44
感謝惠購先鋒產品。
在使用該揚聲器系統之前,請通讀操作手冊,以獲知
如何使本揚聲器系統發揮最佳性能。閱讀完畢後,請
將其妥善保管以備日後參考。
注意
關於兼容性
本產品專為平面顯示器而設計。有關相容性的詳情,
請就近諮詢先鋒授權經銷商或服務中心。
關於安裝與固定
• 請勿以握住揚聲器或揚聲器固定裝置來移動平面顯
示器,
否則可能會導致人身傷害或固定裝置損壞。
若要移動平面顯示器,請以握住平面顯示器頂部及
其把手的方式搬動。
• 安裝揚聲器時,請勿使用附送螺絲以外的螺絲,否
則揚聲器可能會從本機脫開,甚至於掉落。
• 安裝揚聲器時,請將螺絲擰緊。
• 當揚聲器受到外部的影響時,請充分注意揚聲器的
處理,以免損壞護網和音箱。
• 在揚聲器附近放置
CRT
電腦屏幕或
CRT
監視器可
能會導致干擾或色彩失真。如果出現這種情況,請
使監視器遠離揚聲器。
• 不得將揚聲器固定到牆壁或天花板上。否則可能掉
落並造成傷害。
關於輸入端子
• 為防止因輸入過載而導致揚聲器系統損壞,請務必
遵循以下注意事項:
•
不得將揚聲器連接至除指定平面顯示器之外的任何
物體上。
否則可能導致損壞或火災。
• 改變連接或安裝方法時,務必先將連接設備的電源
關掉,並將電線插頭從牆壁上的插座中拔出。
• 使用音調控制功能來增強高音時,請勿將放大器音
量開得太大。
檢查配件
•
ඵᖑᏣഀ௦ጤȞѿȟ
x
1
•
ඵᖑᏣഀ௦ጤȞѢȟ
x
1
҂८ᡘұᏣޠߤӈ
• 揚聲器固定裝置
× 4
ѿαР!
(TOP L)
ѿίР!
(BOTTOM L)
ѢαР!
(TOP R)
ѢίР!
(BOTTOM R)
• 揚聲器固定螺絲
(
M5 x 10 mm
:黑色 )
× 16
• 操作手冊 ( 本分文件 )
× 1
安裝
• 如果安裝遇到困難,請與經銷商聯絡。
• 對於因安裝不當、使用不當、更改或自然災害
引起的損害,先鋒概不負責。
