Fractal Design Define XL R2 Titanium Grey: Construction / design
Construction / design: Fractal Design Define XL R2 Titanium Grey

Cleaning the lters
Dene XL R2 is equipped with two particle lters at air intakes to prevent dust from entering
the case. To ensure optimal cooling, lters should be cleaned on a regular basis.
• To clean the PSU lter, simply slide the lter toward the rear of the case and remove
it; clean any dust gathered on it.
• To clean the front lter, open the front door panel and push the symbols on the hatch
to open the fan door. To completely remove fan lter, pull down the lever on the top of
the lter. Once removed, the lter can then be cleaned directly by hand or with water if
fans have been removed.
Construction / design
Power/HDD LED activity
Dene XL R2 features an LED on the front panel that, when lit, indicates the computer is
receiving power. By changing its connection on the motherboard, the LED can be used to
indicate HDD activity. In either case, connecting the LED to the motherboard is optional;
computer functionality is not dependent on its connection.
4
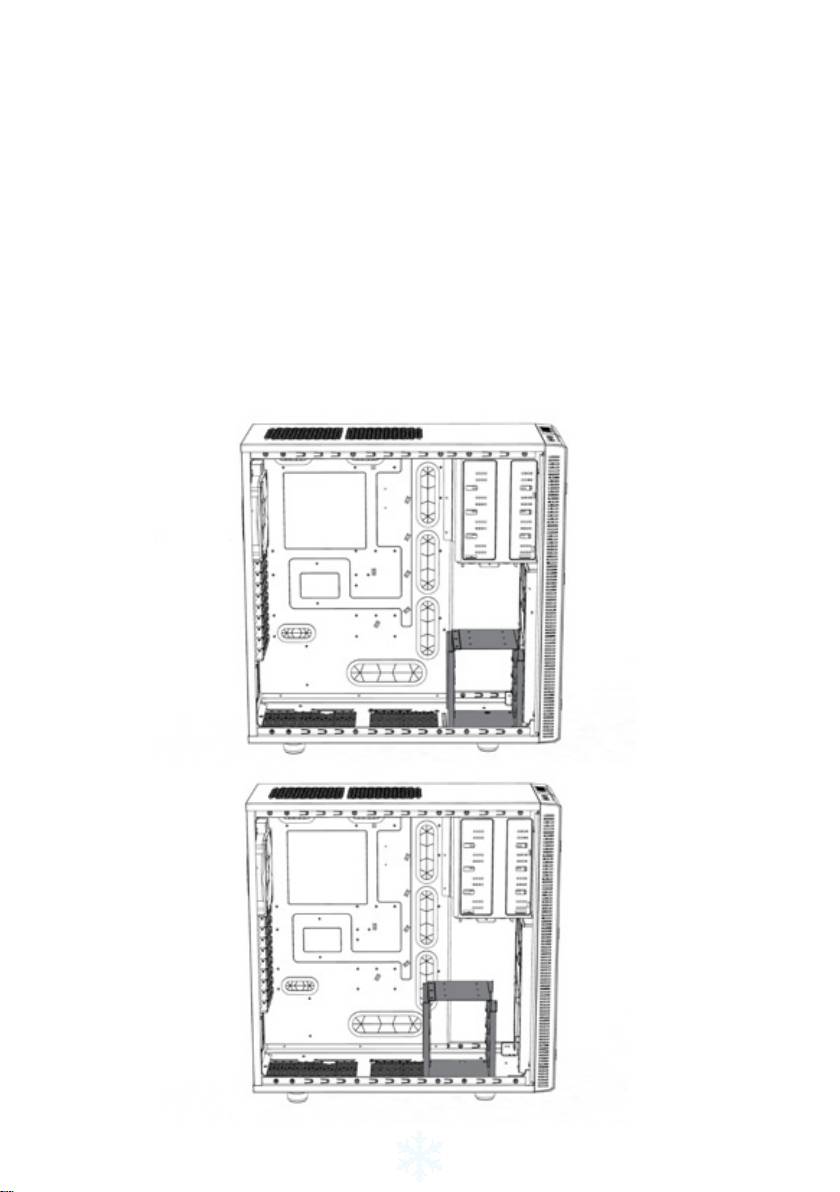
Adaptable hard drive cages
Dene XL R2 features two HDD cages - the upper cage may be removed and/or rotated,
and the lower cage may be repositioned.
In its original position, the upper HDD cage has been strategically placed to optimize a clean
build with excellent HDD cooling and cable management. By removing the upper HDD cage,
Dene XL R2 supports graphics cards up to 400mm in length. When the upper HDD cage is
rotated, it acts as a guide for the front fan and directs airow to the graphics card. To remove
or rotate the upper HDD cage, the two thumbscrews securing it must be removed. Following
rotation or removal of the HDD cage, re-insert in desired position and secure the thumb-
screws in new position or remove completely.
The lower HDD cage can be repositioned to provide more space in the front of the case.
This extra space is useful for front-mounted water-cooling radiators. The cage is secured
with seven screws: four under the case, two in front of the case and one on the motherboard
plate. Once the screws are removed, the lower HDD cage can be moved further back in the
chassis to one of two different positions, depending on how much space is required. The
cage is re-secured by screwing the four screws into the base of the case.
5
Оглавление
- About Fractal Design – our concept
- Table of Contents:
- Introduction
- Construction / design
- Limited warranty and limitations of liability
- Einleitung
- Praktischer Einsatz
- Konstruktion/Design
- Eingeschränkte Garantie und Garantieeinschränkun- gen
- Introducción
- Construcción / Diseño
- Garantía limitada y limitación de responsabilidad
- Introduzione
- Struttura/design
- Garanzia limitata e limitazione delle responsabilità
- はじめに
- 限定保証と責任制限
- 개요
- 제한된 보증 및 신뢰성
- Wprowadzenie
- Ograniczona gwarancja i ograniczenia odpowiedzialności
- Введение
- Ограниченная гарантия и ограничения ответственности
- Introduction
- Construction / Design
- Garantie limitée et limites de responsabilité
- Inledning
- Begränsad garanti och ansvarsbegränsningar
- www.fractal-design.com
